
VCP 8931 - Vacuum Cleaner GRUNDIG - Free user manual and instructions
Find the device manual for free VCP 8931 GRUNDIG in PDF.


| Product Type | 2-in-1 Cordless Stick Vacuum Cleaner |
| Brand | Grundig |
| Model | VCP 8931 |
| Nominal Input Power | 450 W |
| Power Supply (Adapter) | 100-240 V~, 50-60 Hz, 0.8 A max. Input; 36 V, 0.6 A Output |
| Battery | Removable, Model ZB1858, Li-ion |
| Charging Time | 4-5 hours |
| Operating Time (Max Speed) | 7 minutes |
| Operating Time (Medium Speed) | 22 minutes |
| Operating Time (Min Speed) | 45 minutes |
| Dust Container Capacity | Not specified (estimated 0.5 L) |
| Filtration System | EPA E10 filter, metal filter, inlet foam, outlet foam |
| Cleaning Tools Included | Electric turbo brush, mini turbo brush, crevice tool, dust brush, elbow, hard floor roll |
| Weight | Approx. 2.5 kg |
| Dimensions (Height) | Approx. 110 cm |
| Cordless | Yes |
| Foldable Wand | Yes |
| Wall-Mountable Charging Dock | Yes |
| Safety Features | Automatic shut-off when placed on charging dock; overheat protection |
| Washable Filters | Metal filter and inlet foam (cold water); EPA E10 filter not washable |
Frequently Asked Questions - VCP 8931 GRUNDIG
User questions about VCP 8931 GRUNDIG
0 question about this device. Answer the ones you know or ask your own.
Ask a new question about this device
Download the instructions for your Vacuum Cleaner in PDF format for free! Find your manual VCP 8931 - GRUNDIG and take your electronic device back in hand. On this page are published all the documents necessary for the use of your device. VCP 8931 by GRUNDIG.
USER MANUAL VCP 8931 GRUNDIG
2 In 1 Cordless Stick Vacuum Cleaner
User Manual

natural_image
Two abstract geometric patterns: a woven bamboo design and a square with circular motifs (no text or symbols)VCP 8931
Dongguan Yinli Electronics Co., Ltd
Modell-ID: YLS0241A-E360060
natural_image
Technical illustration of a mechanical device with arrows indicating assembly or motion (no text or symbols)natural_image
Diagram showing a vacuum cleaner with arrows indicating motion, no text or symbols presentnatural_image
Illustration of a vacuum cleaner with a vertical arm and base mount, showing no text or symbols.
natural_image
Technical line drawing of a vacuum cleaner with attached circuit symbols (no text or labels)natural_image
Technical line drawing of a robotic arm with a mounted device, showing internal components and a circular inset view (no text or symbols)natural_image
Diagram of a mechanical device with an arrow pointing to a small component (no text or symbols present)natural_image
Diagram of a hairdryer with a tool inserted, showing the process from an arrow to a small component (no text or symbols present)natural_image
Diagram showing a hand tool interacting with a vacuum cleaner (no text or symbols present)natural_image
Technical illustration of a mechanical device with three parts and directional arrows indicating assembly or operation (no text or symbols present)natural_image
Technical line drawing of a mechanical assembly with wheels and a rolled component (no text or symbols)Hartbodenwalze (16):
natural_image
Illustration of a hand cleaning a mechanical device with a cloth (no text or symbols)natural_image
Line drawing of a manual blender with a spool of food being poured into a container (no text or symbols)natural_image
Technical illustration of mechanical components with numbered callouts (1 and 2), no visible text or symbolsnatural_image
Mechanical component diagram showing a rotating shaft and housing with directional arrows indicating motion (no text or symbols)natural_image
Diagram showing a pile of cylindrical containers with an upward arrow, alongside a container with liquid and leaves (no text or symbols)natural_image
Diagram showing two mechanical components with a downward arrow indicating transformation (no text or symbols)natural_image
Mechanical component diagram showing a rotating assembly with directional arrows (no text or symbols)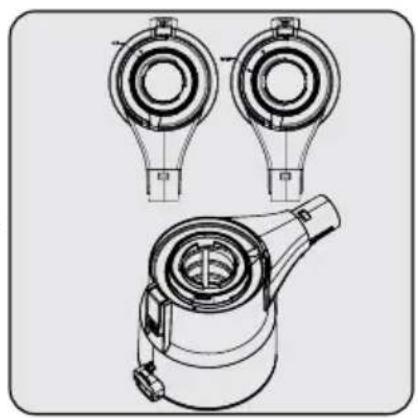
natural_image
Technical line drawing of a mechanical component with three views (top, front, side), no text or symbols present.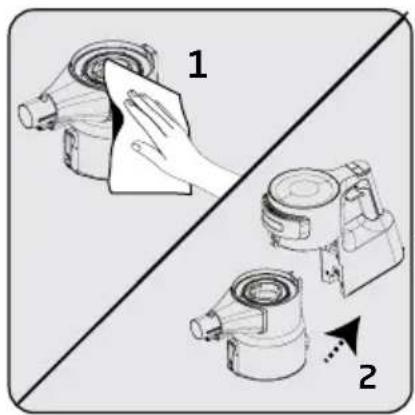
natural_image
Mechanical component diagram showing a rotating assembly with directional arrows (no text or symbols)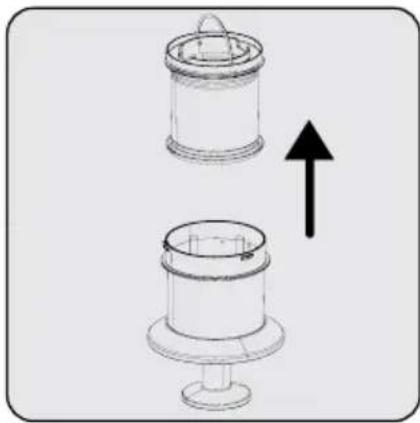
natural_image
Diagram of two cylindrical mechanical components with an upward arrow indicating motion (no text or symbols)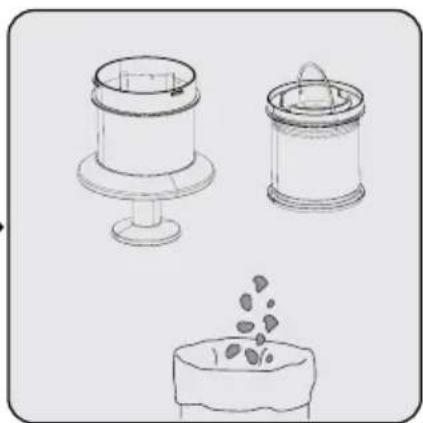
natural_image
Three simple line drawings of containers: a tiered container, a lid with a handle, and a tray with seeds (no text or symbols)natural_image
Diagram showing two mechanical components with a downward arrow indicating motion (no text or symbols)natural_image
Mechanical component diagram showing a rotating fan or pump mechanism with directional arrows (no text or symbols)natural_image
Diagram of two cylindrical mechanical components with an upward arrow indicating motion (no text or symbols)natural_image
Three line drawings of containers: a cylindrical container, a lid with handle, and a bowl with granular material (no text or symbols)natural_image
Diagram showing two mechanical components with a downward arrow indicating motion (no text or symbols)natural_image
Illustration of two hand gestures operating a device, showing mechanical components and motion arrows (no text or symbols)natural_image
Illustration of three abstract 3D shapes with a small container pouring liquid into them (no text or symbols)natural_image
Three 3D mechanical component cutouts with an arrow indicating direction (no text or symbols)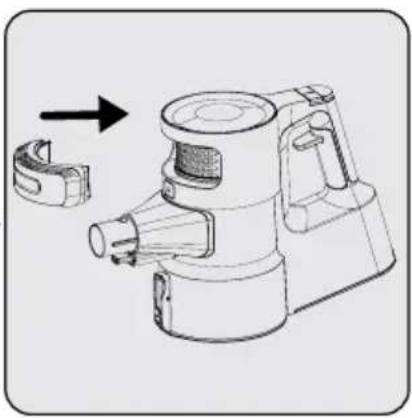
natural_image
Technical line drawing of a mechanical device with an arrow indicating assembly or transformation (no text or symbols present)natural_image
Technical line drawing of a mechanical device with a magnified circular detail showing internal components (no text or symbols)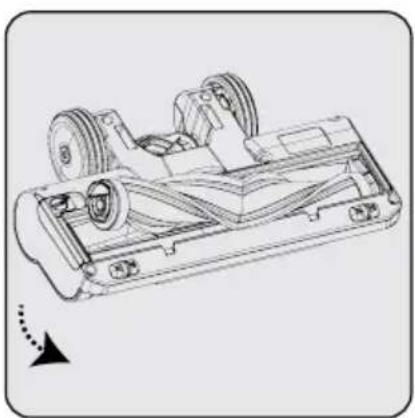
natural_image
Technical line drawing of a vehicle chassis frame with wheels and suspension components (no text or symbols)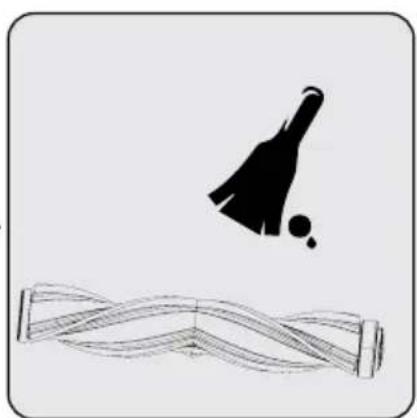
natural_image
Illustration of a broom with a broom and ball above it, no text or symbols presentnatural_image
Technical line drawing of a vehicle chassis with wheels and suspension components (no text or symbols)Please read this guide first!
Dear Customer,
Thank you for choosing an Grundig product. We would like you to achieve the optimal efficiency from this high quality product which has been manufactured with state of the art technology. Please make sure you read and understand this guide and supplementary documentation fully before use and keep it as a reference. Include this guide with the unit if you hand it over to someone else. Observe all warnings and information herein and follow the instructions.
Symbols and their meanings
These symbols are used throughout this guide:

Important information and recommendations regarding the use of the appliance.

WARNING: Warnings on personal injury or property damage.

Electric shock protection rating

This product has been produced in environmentally-friendly, state-of-the-art facilities.
1 Important safety and environmental instructions
This section contains safety instructions to prevent hazards that can result in injury or property damage.
Any warranty is void if these instructions are not followed.
1.1 General safety
- This appliance complies with international safety standards.
- This device can be used by children over 8 years of age, people with physical, sensory or mental challenges or people with lack of experience or knowledge; as long as control is ensured or information is provided regarding the hazards. Children must not play with the appliance. Cleaning and user maintenance shall not be carried out by unattended children.
- Do not use the appliance if the power cord or the appliance is damaged. Contact authorized service.
- Your mains power supply shall be in align with the specified information on the type tag.
- Do not use the appliance with an extension cord.
- To prevent damage to the power cord, prevent it from being pinched, crimped or rubbed against sharp edges.
- Do not touch the plug of the appliance with damp or wet hands while the appliance is plugged in.
- Do not pull on the cord while unplugging the appliance.
- Do not vacuum flammable materials and ensure that the cigarette ashes are cooled down before vacuuming them.
- Do not vacuum water and other fluids.
- Protect the appliance against precipitation, humidity and heat sources.
- Do not use the appliance in or near explosive or flammable environments and substances.
- Unplug the appliance before cleaning and maintenance.
- Do not immerse the appliance or its power cord in water for cleaning.
1 Important safety and environmental instructions
- Do not disassemble the appliance.
- Use only original parts or parts recommended by the manufacturer.
- To prevent blockage of the filter or damage to the motor, do not vacuum cement, plaster or fragments of compressed paper.
- Use the appliance with the adapter delivered with the appliance only.
- Do not use the appliance without filters, it may get damaged.
- If you keep the packaging materials, keep them out of the reach of children.
-
This appliance is not intended to be used by persons, including children, with physical, sensory and mental disabilities or those who have not adequate experience and knowledge regarding its use, unless they are under the supervision of a person responsible for their safety or they are informed about the operation of the appliance.
-
The children shall be supervised to prevent them from playing with the appliance.
- Unplug the adaptor and remove the battery pack before any cleaning or maintenance procedure.
- To avoid any risk of hazard, a damaged adaptor shall be replaced by the manufacturer, the authorized representative of the manufacturer or a similarly qualified technician.
- Keep your fingers, hair and loose clothes away from moving parts or clearances while vacuuming.
- Batteries shall be removed from the appliance before discarding the appliance.
- Disconnect the appliance from power supply before removing the battery.
- Please discard used batteries in accordance with local laws and regulations.
- The batteries included in this appliance may only be replaced with qualified persons.
1 Important safety and environmental instructions
- WARNING: Use the YLS0241A-E360060 removable supply unit delivered with the appliance to charge to the battery.
- Please install/remove batteries as per the instructions specified in the user guide.
- Rechargeable batteries shall be removed from the appliance before recharging operation;
- Do not use batteries of different types or old and new batteries together.
- Batteries shall be installed with the correct polar layout.
- Remove the depleted batteries from the appliance and dispose of these batteries in a safe way.
- If you do not intend to use the appliance for a long while, the batteries shall be removed.
- Do not short circuit the supply terminals.
- Use with ZB1858 batteries only.
- This appliance shall not be operated by children and people with limited physical, sensory and cognitive skills or people with lack of experience and knowledge unless they are under supervision or they are provided with the relevant instructions.
- The children shall be supervised to prevent them from playing with the appliance.
1.2 Compliance with the WEEE Regulations and Waste Disposal
This product does not contain the dangerous and prohibited materials indicated in the "Regulation on The Control of Waste Electrical and Electronic Equipment" published by Ministry of Environment and Urbanisation of Republic of Turkey. Complies WEEE Regulations. This product was manufactured from recyclable and reusable high quality parts and materials. Therefore, do not dispose of this product with other domestic wastes at the end of its life cycle. Take it to a collection point for electrical and electronic equipment. You can ask your local administration about these collection points. You can help protect the environment and natural resources by delivering the used products for recycling.
1 Important safety and environmental instructions
1.3 Packaging information

The product's packaging is made of recyclable materials, in accordance with the National Legislation.
Do not dispose the packaging waste with the household waste or other wastes, dispose it to the packaging collection areas specified by local authorities.
1.4 Waste batteries
Ensure that the waste batteries are disposed of in accordance with local laws and regulations. The symbol on the battery and packaging indicates that the battery delivered with the product should not be considered as
household waste. This symbol may be used in combination with a chemical symbol in some regions. If the batteries contain more than 0.0005 % mercury and more than 0.004 % of lead, the Hg chemical is added for mercury and the Pb chemical symbol is added for lead under the symbol. By ensuring that the batteries are disposed correctly, you shall contribute to the prevention of potential damage to the environment and human health due to improper disposal of the batteries.
2 Overview
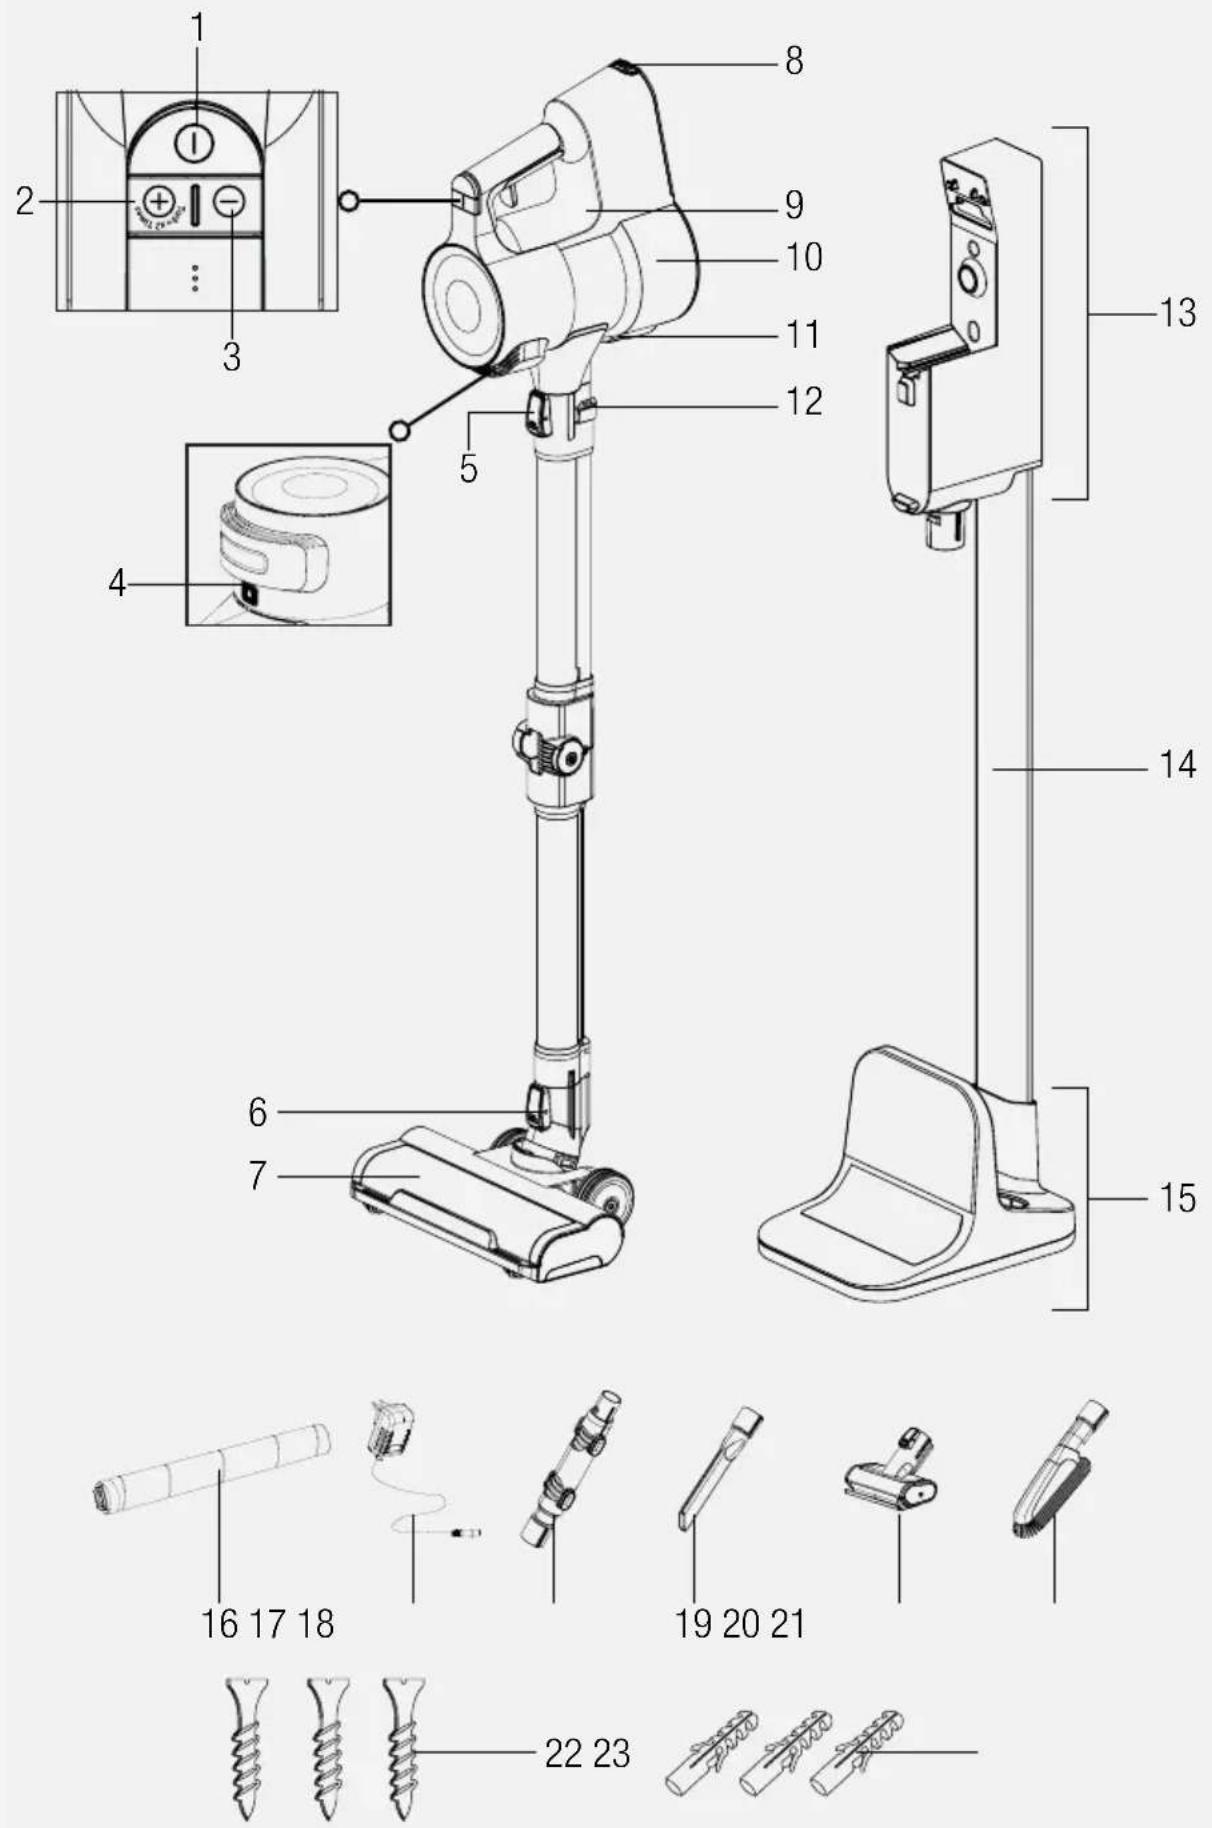
2.1 Controls and components
- On-Off switch
- Mode button +
- Mode button -
- EPA E10 filtre cover release button
- Wand release button
- Brush release button
- Electric turbo brush
- Battery pack release button
- Body of the appliance
- Dust container
- Dust reservoir lid opening button
- Foldable wand button
- Charging dock
- Charging dock tube
- Charging dock support
- Hard floor roll
- Charge adaptor
- Elbow
- Crevice tool
- Mini turbo brush
- Dust brush
- Screw
- Dowel
2.2 Technical data
Nominal input power: 450 W:
Input:
100 - 240 V\~ 50-60 Hz 0.8 A (max.)
Output: 36 V = 0.6 A
Charging period: 4-5 hours
Operation period under maximum power: 7 mins
Operation period under medium power: 22 mins
Operation period under minimum power: 45 mins
The rights to make technical and design changes are reserved.
External Power Supply Parameter
Manufacturer:
Dongguan Yinli Electronics Co., Ltd
Model ID: YLS0241A-E360060
Input Voltage: 100-240V\~
Input Frequency: 50-60Hz
Input Current: 0.8A
Output Voltage: 36.0V
Output Current: 0.6A
Output Power: 21.6 W
Average active efficiency: 87.19%
Efficiency at low load (10%): 79.58%
Power consumption under no load: 0.09 W
The values provided with the appliance or its accompanying documents are laboratory readings in accordance with the respective standards. These values may differ depending on the use and ambient conditions.
3 Installation
3.1 Intended use
This appliance is intended for household use and it is not suitable for industrial use.
3.2 Installation of the mobile charging dock
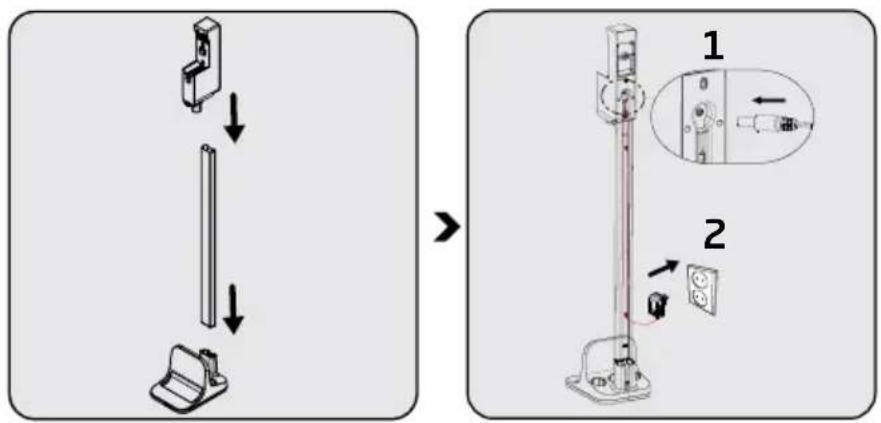
Install charging dock tube (15) to the charging dock support (14), then install the charging dock (13) to the charging dock tube (14).
Install the thin end of the charger to the seat on the charging dock (13). Plug the charging adaptor (17) to the outlet.
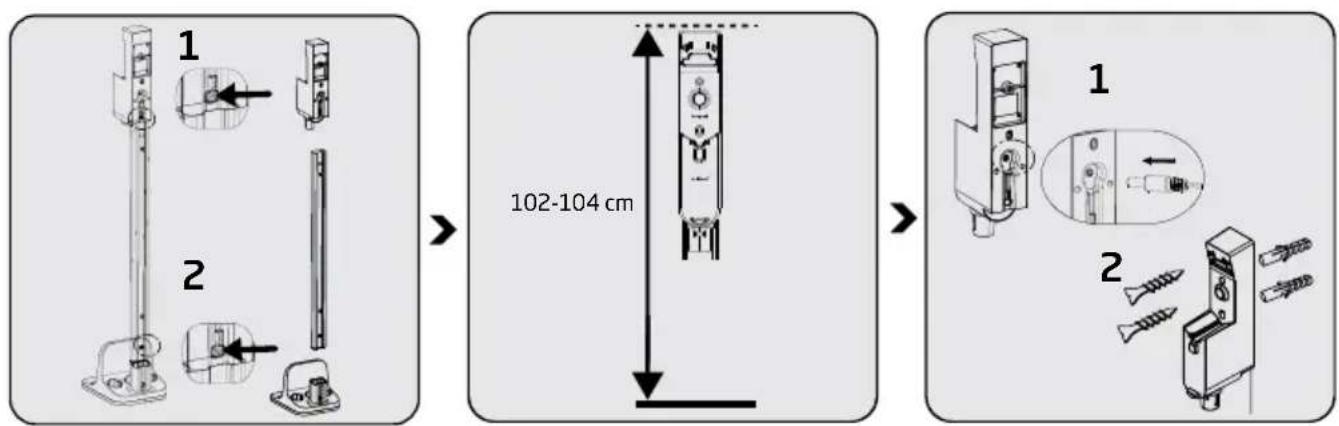
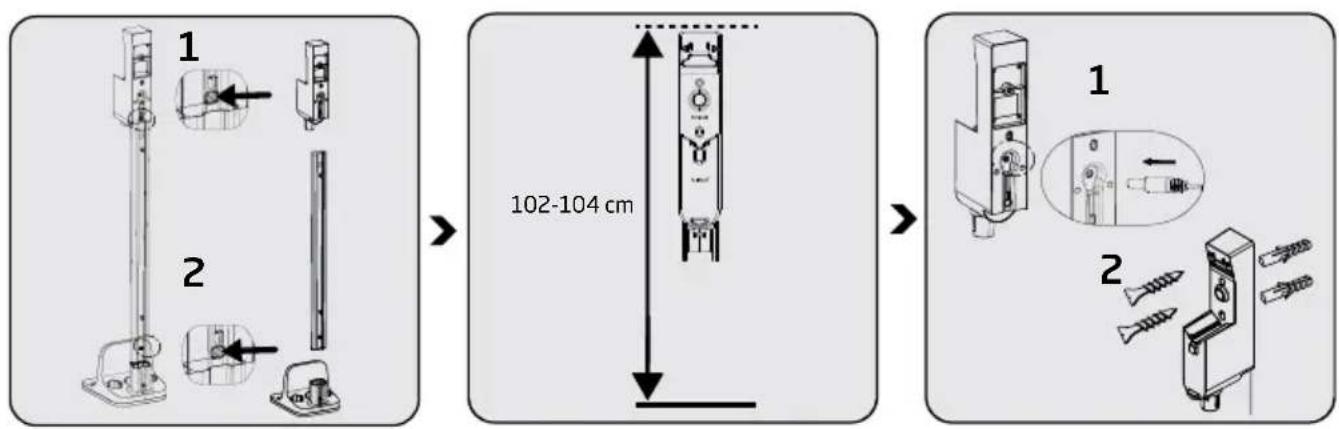
If you want to install the charging dock (13) to the wall, detach the charging unit from the tube (14) and support (15) using two separate buttons.
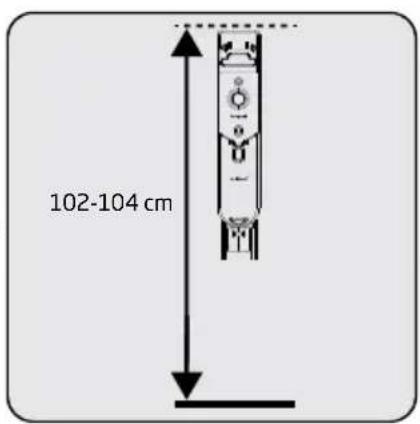
Position the charging dock (13) at a height of 102-104 cm from the ground.
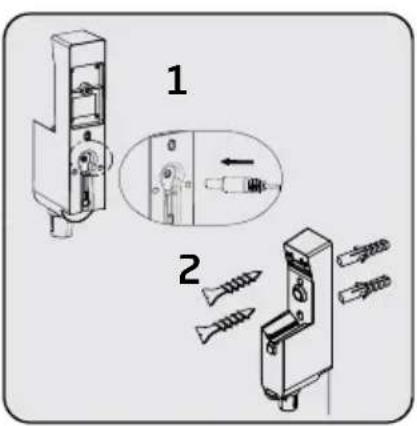
Install the end of the charging adaptor (17) to the seat on the back of the charging dock (13).
Secure the charging dock (13) to the wall using two screws and two dowels.
3 Installation
3.3 Installation of the body and the brush
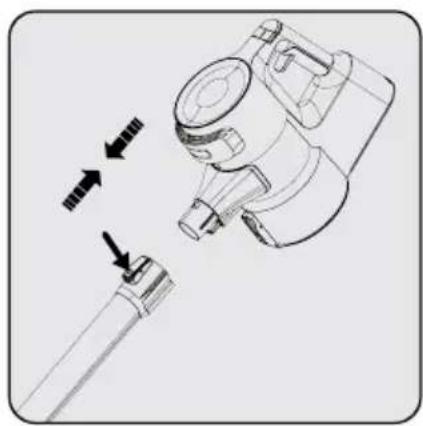
natural_image
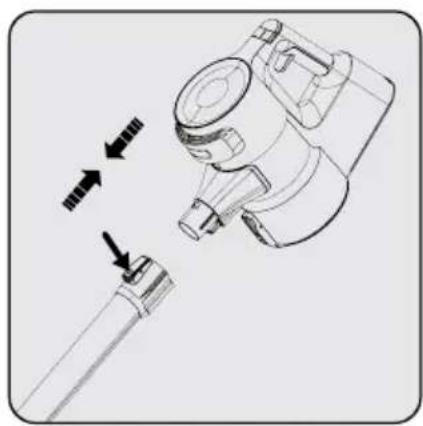
Technical illustration of a mechanical device with arrows indicating assembly or movement (no text or symbols)Install the wand to the end of the body (9).
Remove it by pressing the release button.
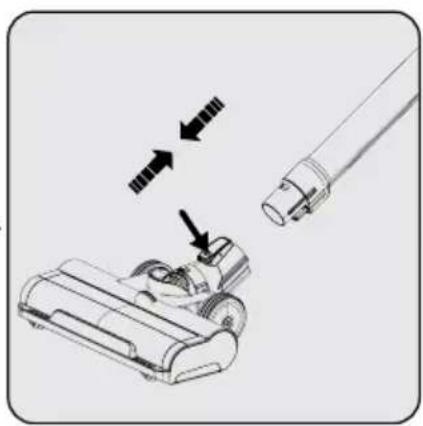
natural_image
Diagram showing a vacuum cleaner with two arrows indicating motion, next to a tool (no text or symbols present)Press the electric turbo brush release button (6) on the electric turbo brush (7) and push it in the direction of arrow towards the wand.
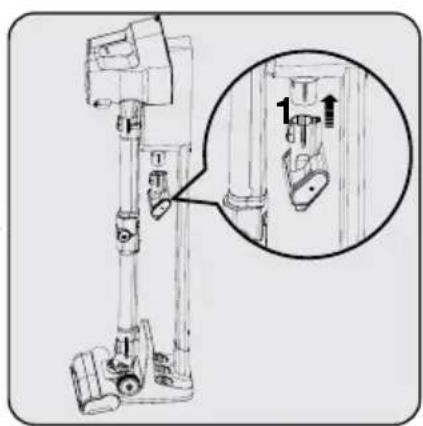
natural_image
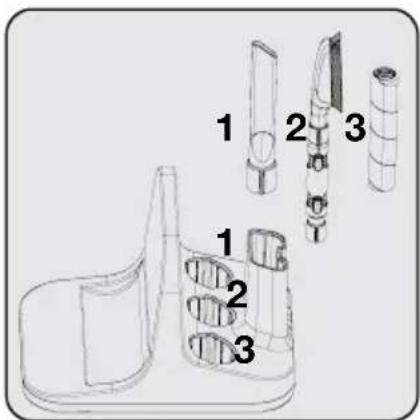
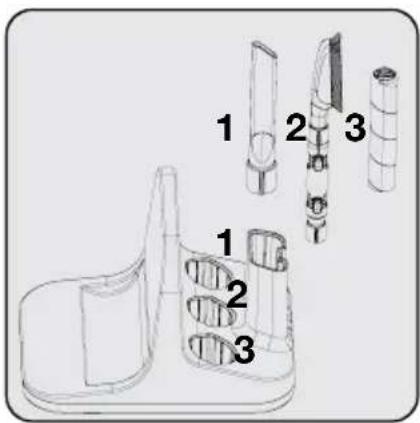
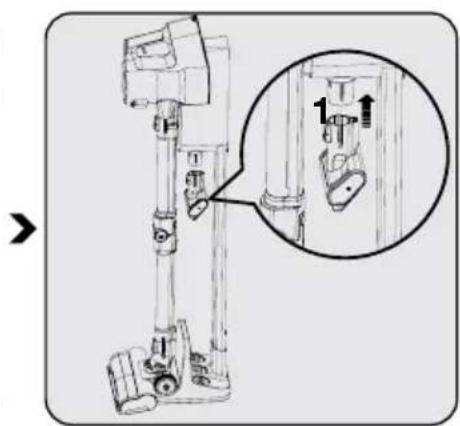
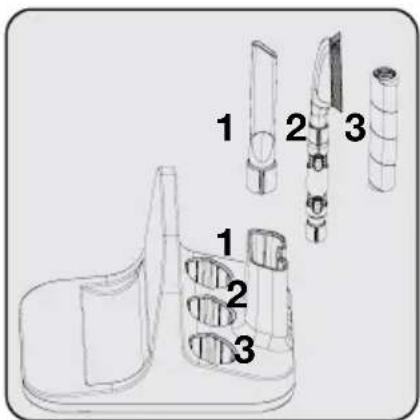
Technical diagram of a mechanical device with an inset close-up showing internal components (no text or symbols)Install the mini turbo brush (20) to the charging dock (13).
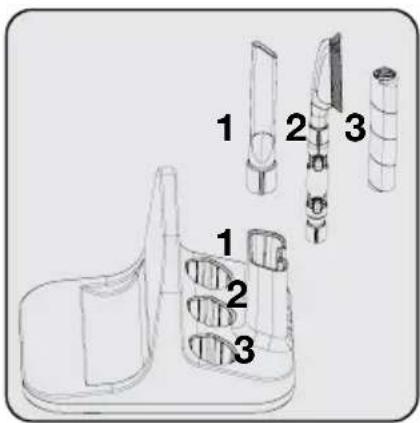
Place other accessories to the charging dock support (15).
4 Operation
4.1 Charging the appliance
natural_image
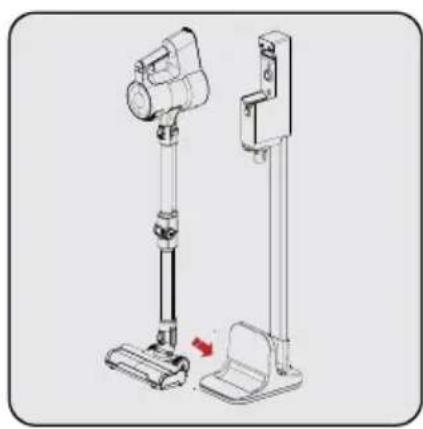
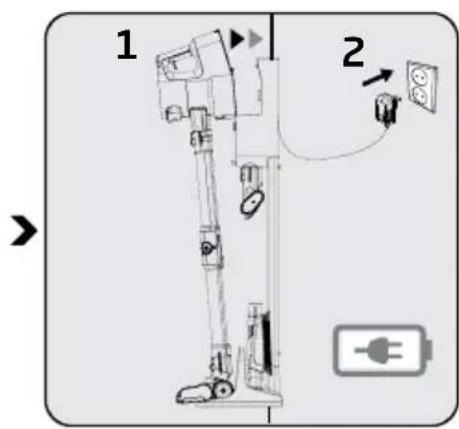
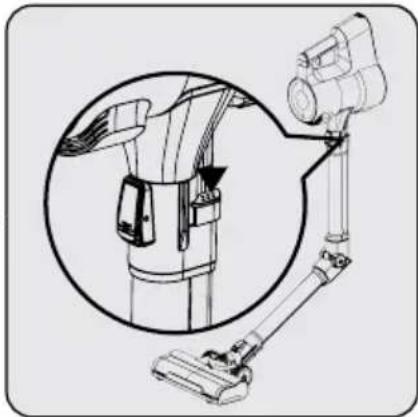
Illustration of a vacuum cleaner with a mounted device and a side-mounted stand, showing no text or symbols.Secure the wheels of the electric turbo brush (7) to the clearance on charging dock support (15).
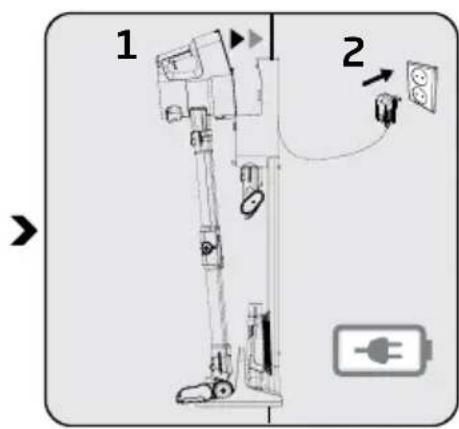
Install the body (8) to the charging dock (13).
Plug the charging adaptor (17) to the outlet.
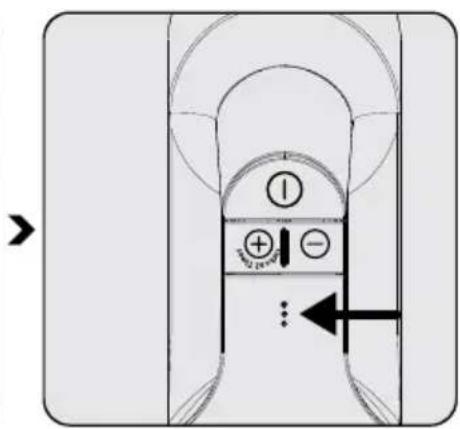
Flashing of the charge indicator LEDs in white colour indicates that the appliance is being charged.
- When all levels of the charge indicator LEDs are illuminated, this indicates that the charging of the appliance is completed.

It takes up to 5 hours to charge the appliance completely. The appliance shall not be operated while charging.
4.2 Start Up

It may be connected for charging before the complete discharging of the battery. The appliance may be kept continuously as charging on the charging dock until the next operation.
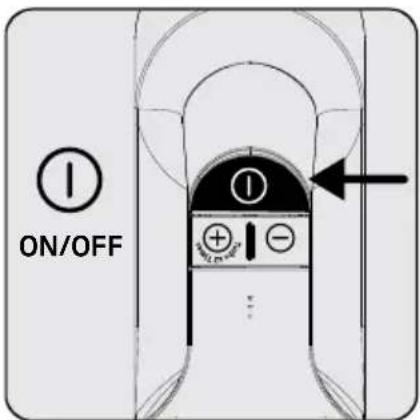
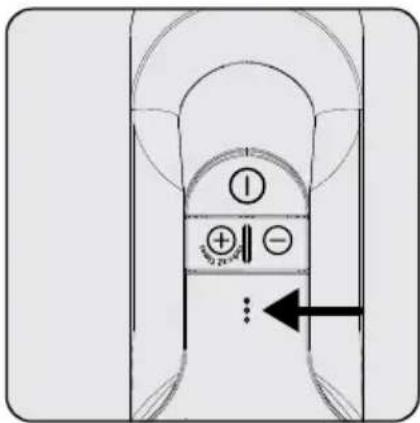
Press the on/off button (1) to operate the appliance. The appliance starts operating with the minimum speed when the on/off button is pressed.
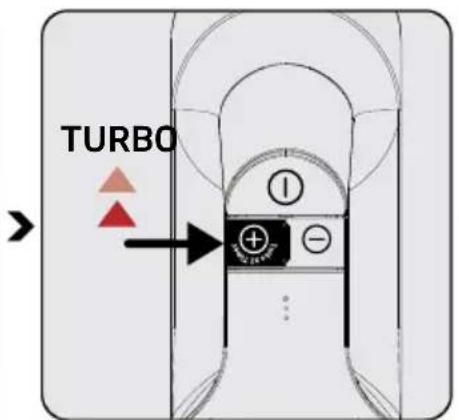
Press the “+” mode button (2) once to operate the appliance with medium speed. Press once more to operate it with the maximum speed.
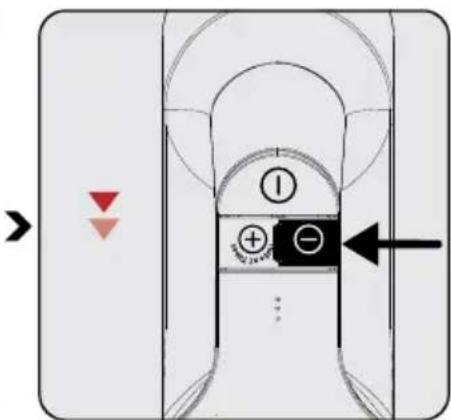
Press the “-” mode button (3) once to switch to a lower speed while operating at maximum speed or medium speed.
4 Operation
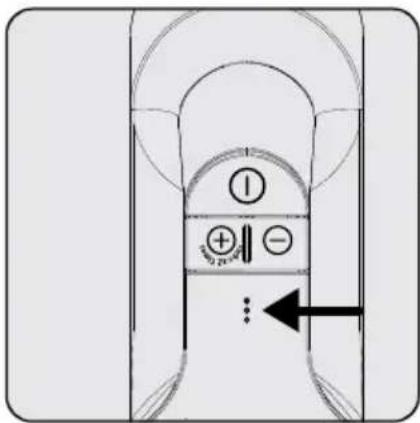

Pay attention to the power indicator LEDs during operation. These indicators gradually turn off as the charge level is reduced, and when all indicators are turned off and only one indicator illuminates in red, then the charge of the appliance is about to run out. The appliance stops operating automatically after a short while when the red LED illuminates.

If the appliance is placed on the charging unit while it is being operated, it shall be stopped automatically.
natural_image
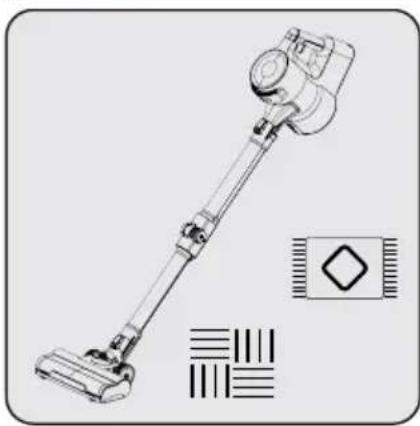
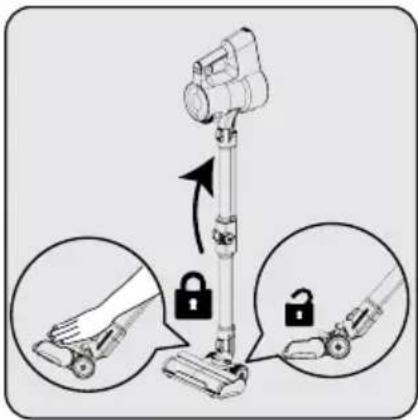
Technical line drawing of a vacuum cleaner with attached circuit symbols (no text or labels)This appliance is suitable for use on carpets and hard floors.

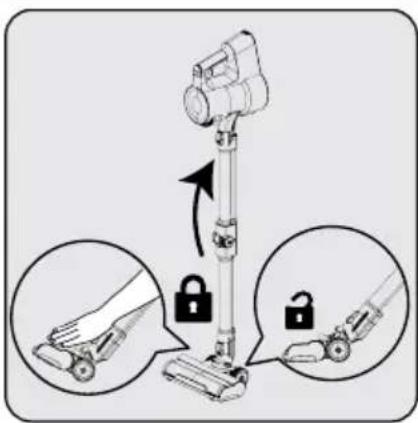
Open the lock manually for operation while the appliance is locked as upright.

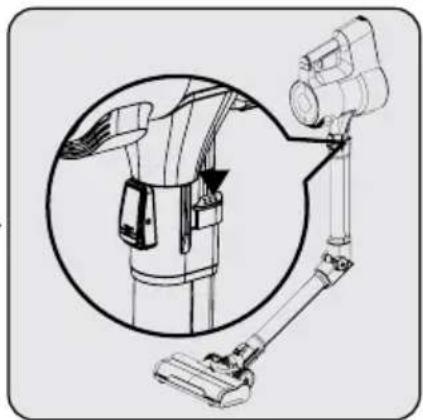
natural_image
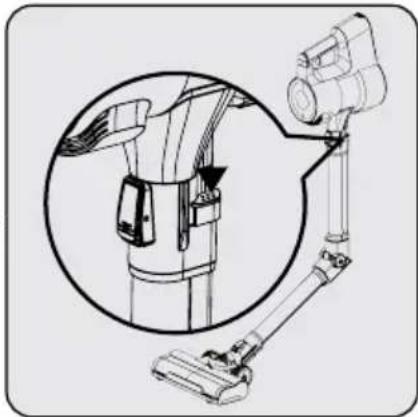
Technical line drawing of a robotic arm with a mounted device, showing internal components and a magnified inset (no text or symbols)Press one of the two buttons (12) on the wand to fold the wand. Thus, you may reach hard-to-reach areas such as the areas under the seats.

The appliance has a feature of standing upright thanks to the locking mechanism of the brush. The floor shall be flat to ensure correct operation of this feature. (hard floor, hardwood, etc.) The appliance shall be kept in the charging dock when it is not used and while it is stored. The vacuum may be placed upright for short periods (2-3 minutes) during the cleaning thanks to the locking of the brush. (hard floor, hardwood, etc.)
4 Operation
4.3 Accessories
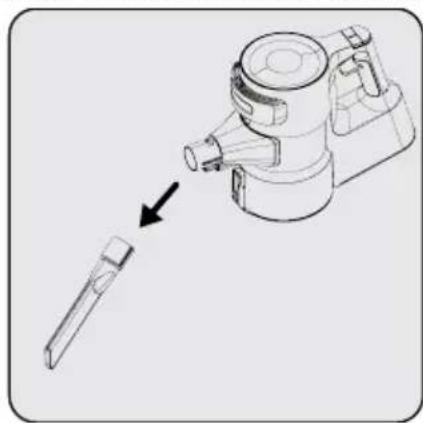
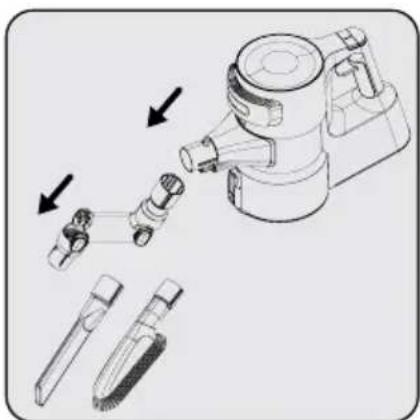
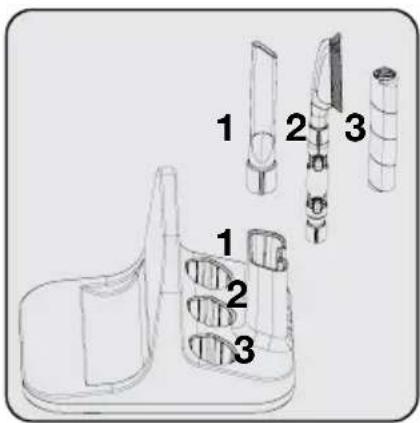
You may use the accessories by installing them to the end of the body.
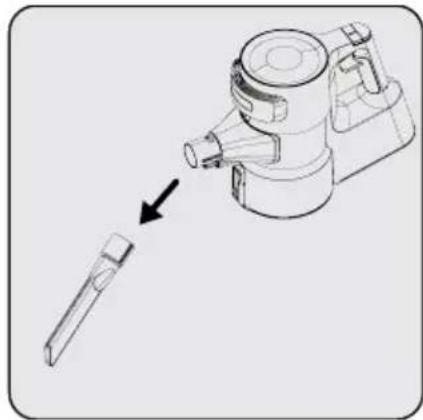
natural_image
Diagram of a mechanical device with an arrow pointing to a small component (no text or symbols present)Crevice tool (19): Suitable for vacuuming the rear of the furnitures, hard to reach areas and crevice areas.
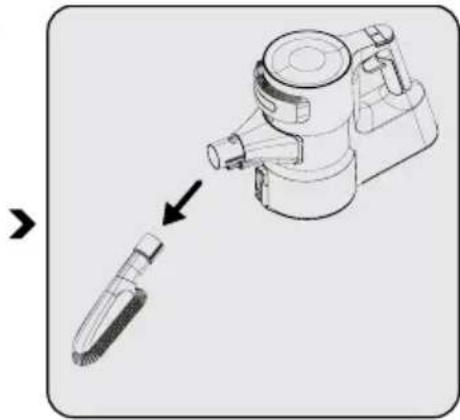
natural_image
Diagram of a hairdryer with a tool inserted, showing the process from an arrow to a small component (no text or symbols present)Dust brush (21): Suitable for vacuuming curtains, waxed furniture and delicate and fragile objects.
natural_image
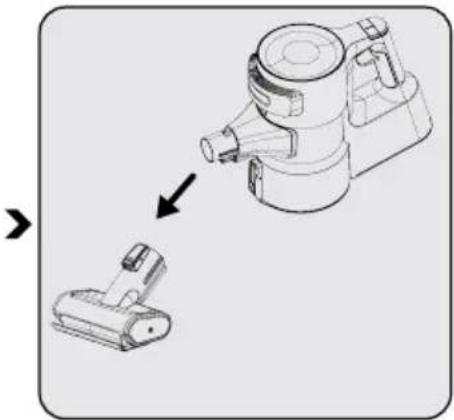
Diagram showing a hand tool interacting with a vacuum cleaner (no text or symbols present)Mini turbo brush (20): Suitable for vacuuming floorings, stair steps, car interiors, sofas and seat, etc. It is also used for vacuuming pet hair on such surfaces.
natural_image
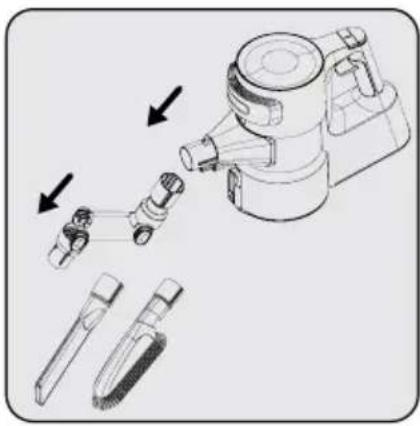
Technical illustration of a mechanical device with exploded view and assembly steps (no text or symbols)You may use the accessories to access hard to reach places by installing the elbow to the end of the body.
natural_image
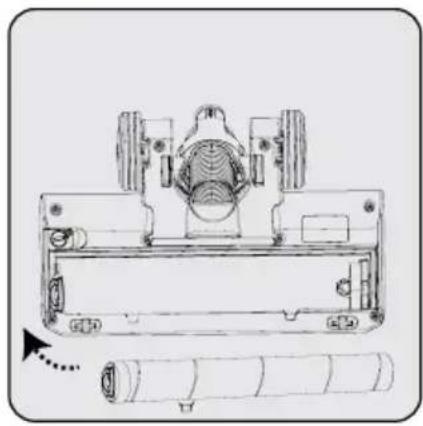
Technical line drawing of a mechanical assembly with no visible text or symbolsThis accessory is suitable for use on delicate hard floors (natural hardwood, etc.).
5 Cleaning and maintenance
Turn off and unplug the appliance before cleaning.

WARNING: Never use gasoline, solvent, abrasive cleaners, metal objects or hard brushes to clean the appliance.

WARNING: Deformation may occur on the filters within time as a result of usage. It shall be replaced with a new one to prevent loss of performance. Contact with the customer services to buy a new one.
5.1 Cleaning of the dust reservoir

We recommend you to clean the dust reservoir (10) after each operation.
natural_image
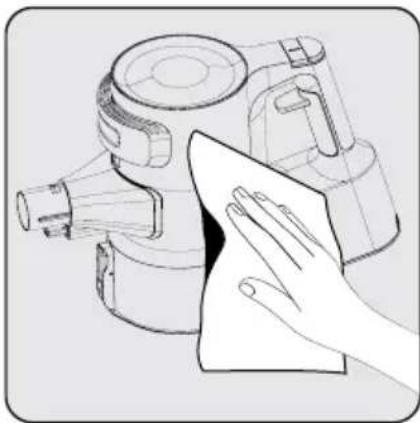
Line drawing of a hand cleaning a mechanical device with a cloth (no text or symbols)Wipe the surface of the body with a wet cloth (9).

natural_image
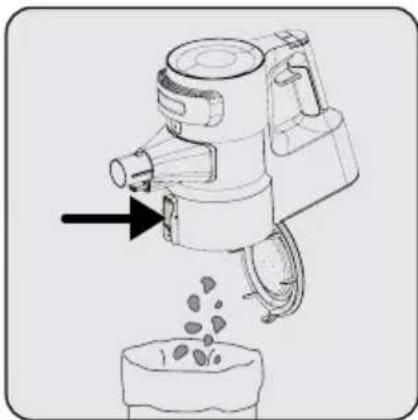
Line drawing of a manual blender with a spool of food being poured into a container (no text or symbols)Press the dust reservoir lid opening button (11) to open the dust reservoir (10) and discharge the dust collected inside.

natural_image
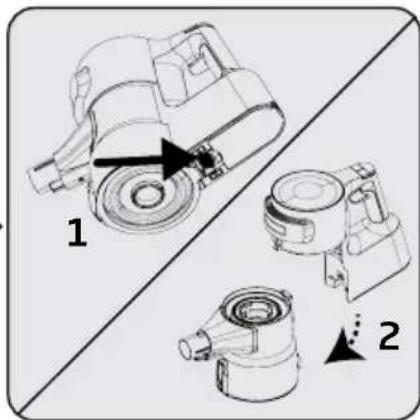
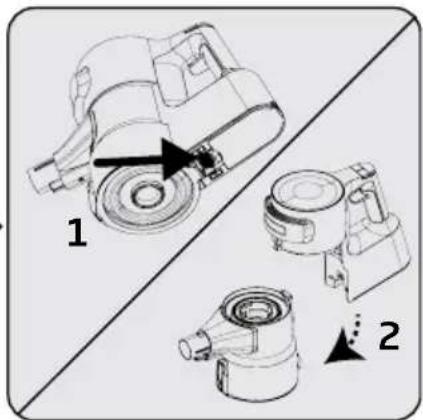
Technical illustration of a mechanical component with two views (1 and 2), showing internal parts and directional arrows (no text or symbols)Push the trigger under the appliance to clean the dust reservoir (10). Detach the dust reservoir (10) from the body (9).
natural_image
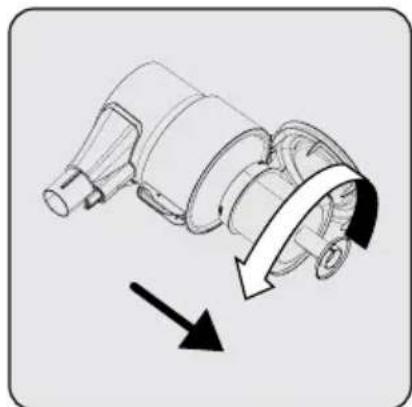
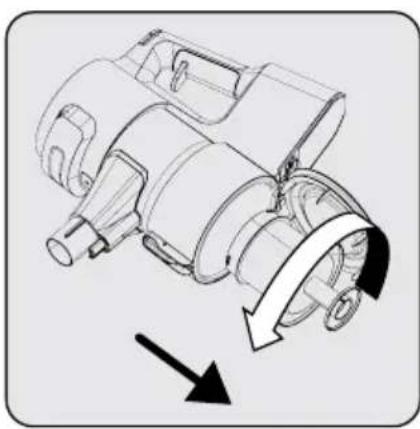
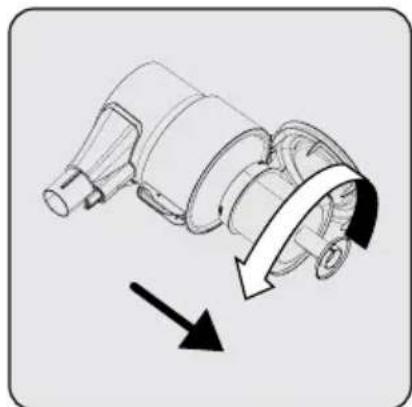
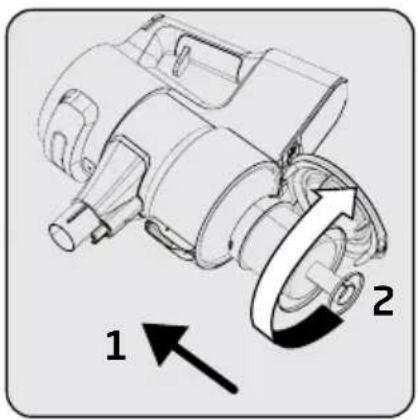
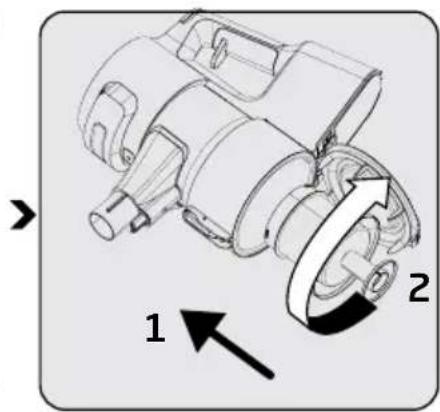
Mechanical component diagram showing a rotating shaft and housing with directional arrows indicating motion (no text or symbols)Remove the metal filter and inlet foam inside the dust reservoir (10) by rotating the metal filter counter-clockwise.

natural_image
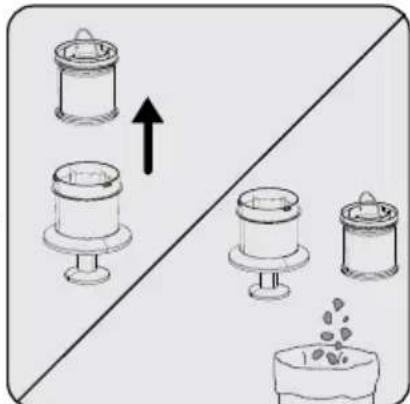
Diagram showing four cylindrical containers arranged on a divided surface with an upward arrow, and a small container pouring liquid into a bowl (no text or symbols)Remove the inlet foam inside the metal filter.
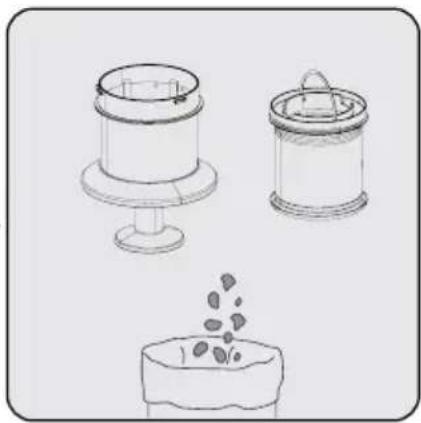
Remove the dust on the metal filter and inlet foam by tapping them to a hard surface such as a waste bin or by using a brush.

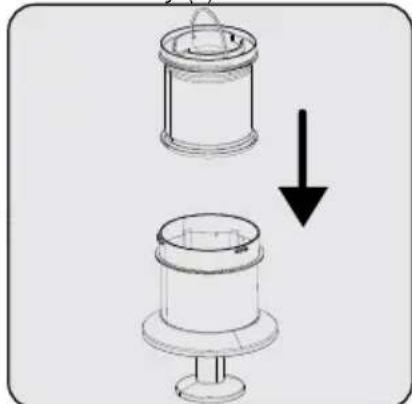
natural_image
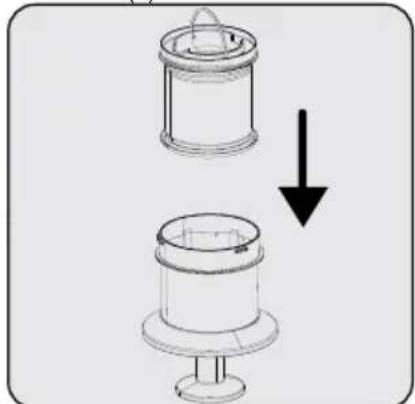
Diagram showing two cylindrical containers with a handle, one downward and one upward, both without any text or symbols.Install the inlet foam to the metal filter.
5 Cleaning and maintenance
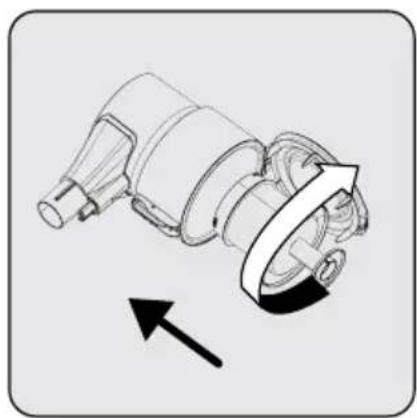
natural_image
Mechanical component diagram showing a rotating shaft and housing with an arrow indicating rotation direction (no text or symbols)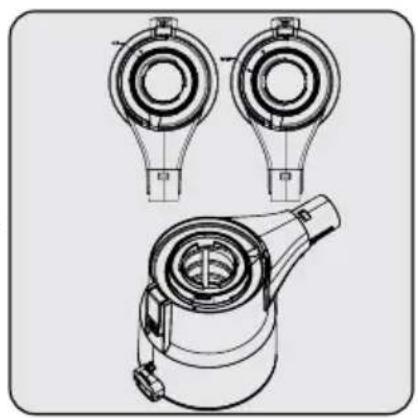
natural_image
Technical line drawing of a mechanical component with three views (top, front, side), no text or symbols present.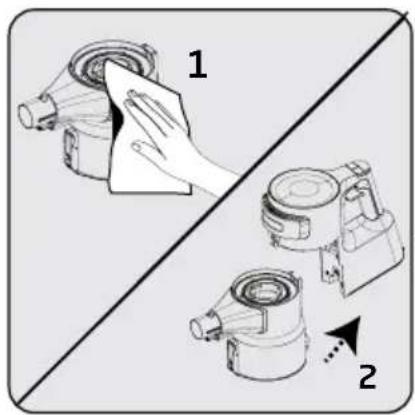
Install the metal filter inside the dust reservoir (10) by rotating it clockwise.
While installing the metal filter and inlet foam to the dust reservoir you have detached them from, place them as per the lock symbols on the dust reservoir.
- Wipe the body (9) with a wet cloth.
- Install the body (9) to the dust reservoir (10).
5.2 Cleaning of the metal filter and inlet foam

The metal filter and inlet foam shall be cleaned regularly.
natural_image
Mechanical component diagram showing a rotating assembly with directional arrows (no text or symbols)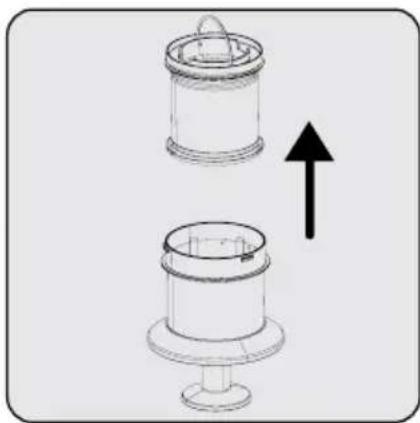
natural_image
Diagram of two cylindrical mechanical components with an upward arrow indicating motion (no text or symbols)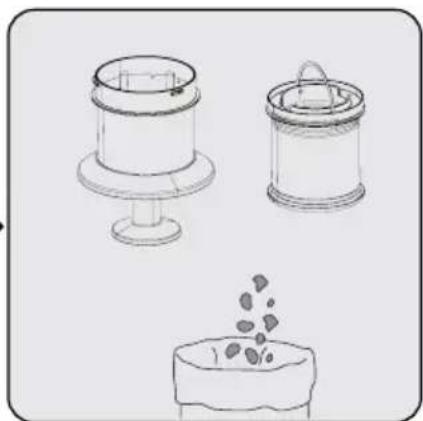
natural_image
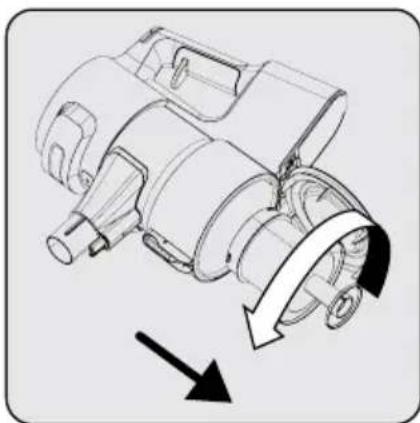
Three line drawings of kitchenware: a cylindrical stand, a lid with a lid, and a cake with food drops (no text or symbols)Remove the metal filter and inlet foam inside the dust reservoir (10) by rotating the metal filter counterclockwise.
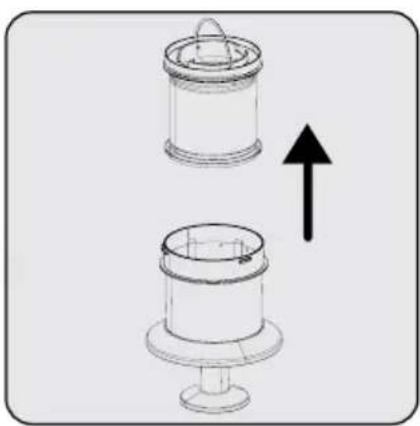
Remove the inlet foam inside the metal filter.
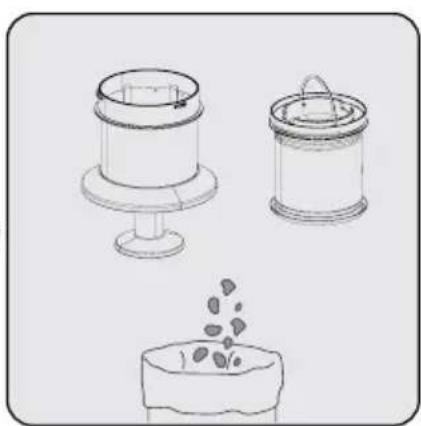
Remove the dust on the metal filter and inlet foam by tapping them to a hard surface such as a waste bin or by using a brush.
5 Cleaning and maintenance
natural_image
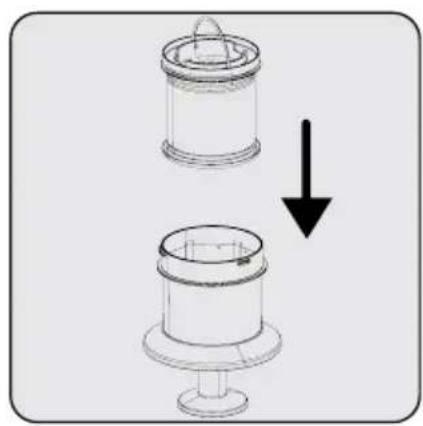
Diagram showing two mechanical components with a downward arrow indicating motion (no text or symbols)Install the inlet foam to the metal filter.
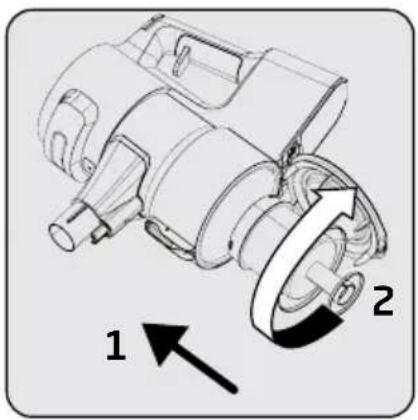
Install the metal filter and inlet foam inside the dust reservoir (10) by rotating the metal filter clockwise.

Clean the metal filter and inlet foam by washing under running cold water once a month after removing the dust on them.
natural_image
Mechanical component diagram showing a rotating assembly with directional arrows (no text or symbols)Remove the metal filter and inlet foam inside the dust reservoir (10) by rotating the metal filter counterclockwise.
natural_image
Diagram of two cylindrical mechanical components with an upward arrow indicating motion (no text or symbols)Remove the inlet foam inside the metal filter.
natural_image
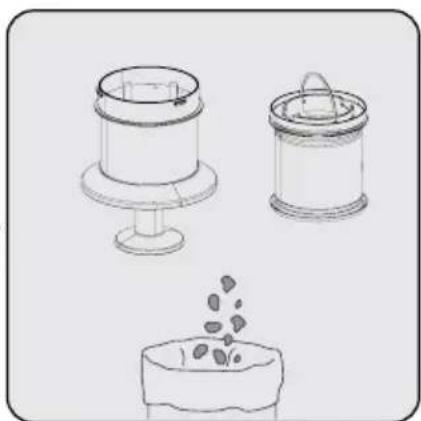
Illustration of three containers: a cylindrical container, a cylindrical container with lid, and a small container with granular substance (no text or symbols)Remove the dust on the metal filter and inlet foam by tapping them to a hard surface such as a waste bin or by using a brush.
5 Cleaning and maintenance

WARNING: Wash with cold water. Warm water deteriorates the structure of the filter.
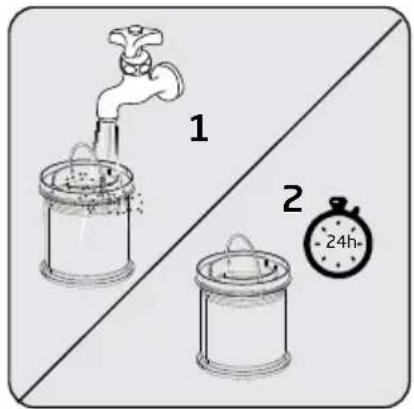
Wash the inlet foam under running cold water and let it dry.
natural_image
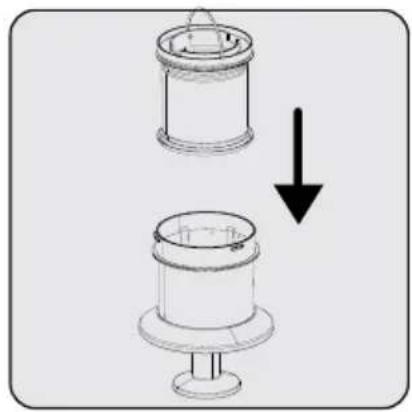
Diagram showing two mechanical components with a downward arrow indicating motion (no text or symbols)Install the dried inlet foam to the metal filter.
Install the metal filter and inlet foam inside the dust reservoir (10) by rotating the metal filter clockwise.

It may 24 to 48 hours to dry the washed inlet foam. Reinstall it once you are sure that it is dried.
5.3 Cleaning of the EPA E10 Filter and outlet foam

Clean the EPA E10 filter and outlet foam regularly.

WARNING: Do not wash the EPA E10 filter.
natural_image
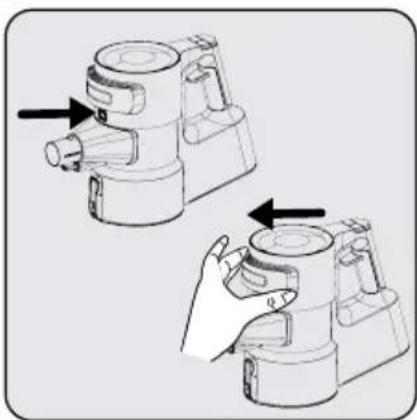
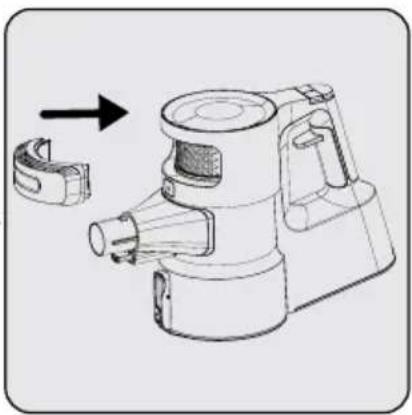
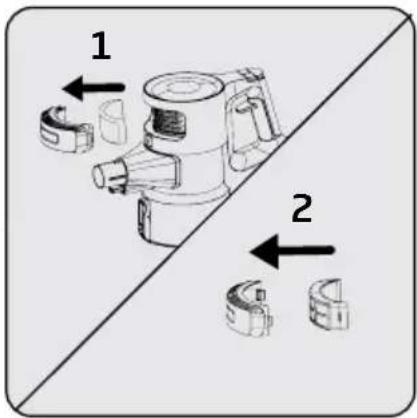
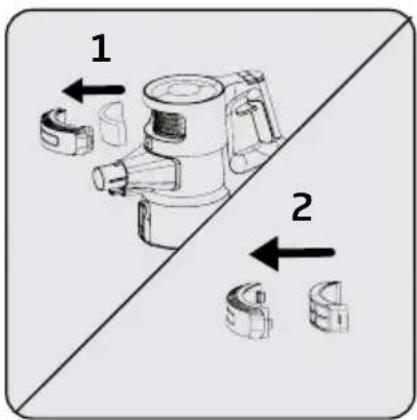
Illustration of two mechanical devices with arrows indicating motion or assembly (no text or symbols)Remove the lid simultaneously while pressing the EPA E10 filter release button (4).

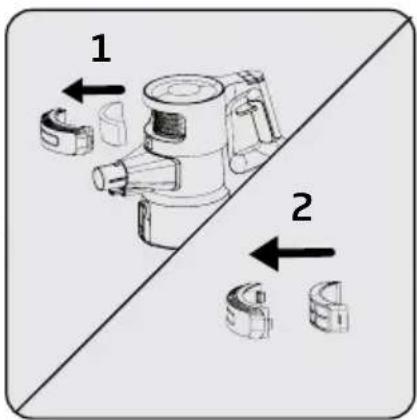
Remove the EPA E10 filter and the outlet foam inside it.

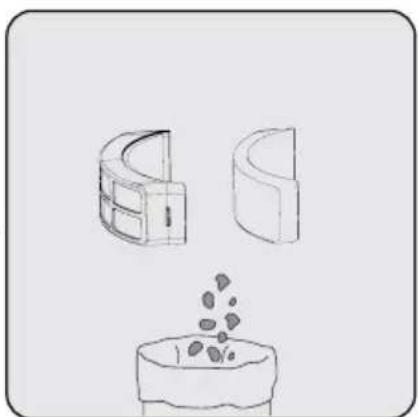
natural_image
Illustration of three abstract geometric shapes with a small container pouring granular material (no text or symbols)Remove the dust on the EPA E10 filter and outlet foam by tapping them to a hard surface such as a waste bin or by using a brush.
5 Cleaning and maintenance

WARNING: Wash with cold water. Warm water deteriorates the structure of the filter.
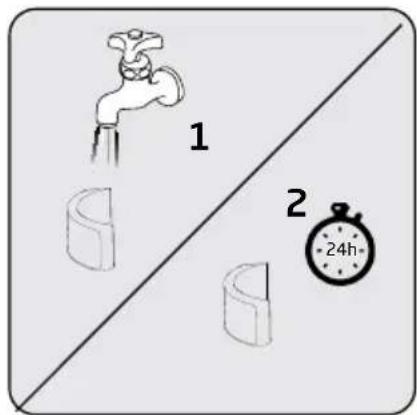
Inspect the outlet foam regularly. Clean it by washing under running cold water after removing the dust on them in case of excessive dust. Reinstall it once it is dried.

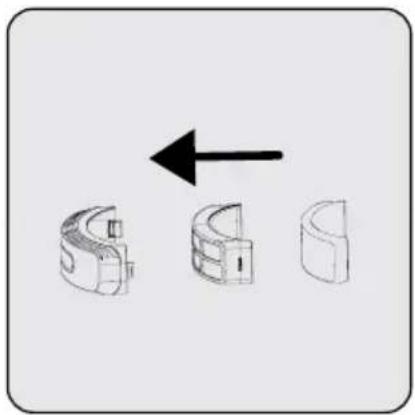
natural_image
Three 3D mechanical parts with an arrow indicating direction, no text or symbols presentInstall the EPA E10 filter and outlet foam to the lid.

natural_image
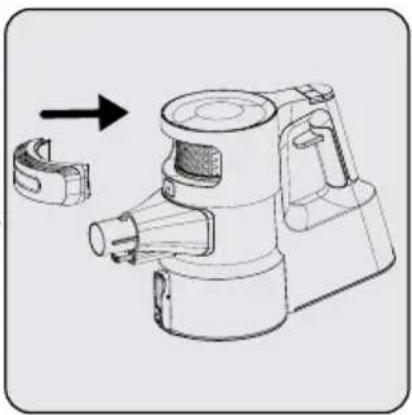
Technical line drawing of a mechanical device with an arrow indicating assembly or transformation (no text or symbols present)Place the lid back.
5.4 Cleaning of the brush

WARNING: Do not wash the turbo brush (9) and the main roll brush.
natural_image
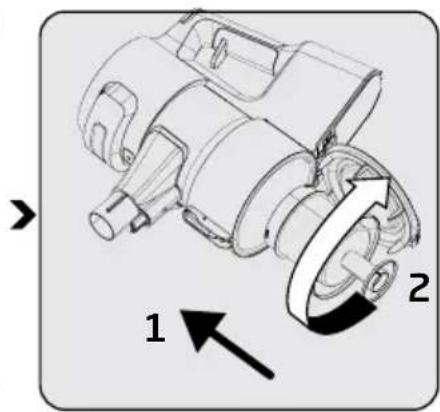
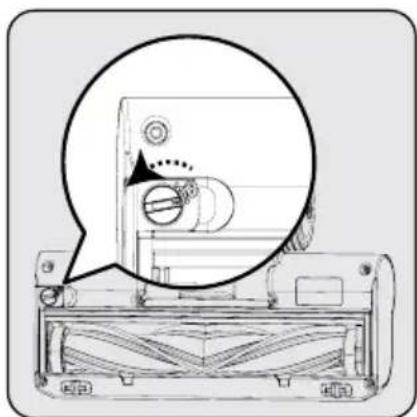
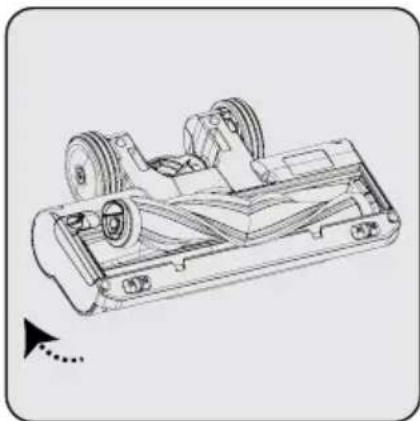
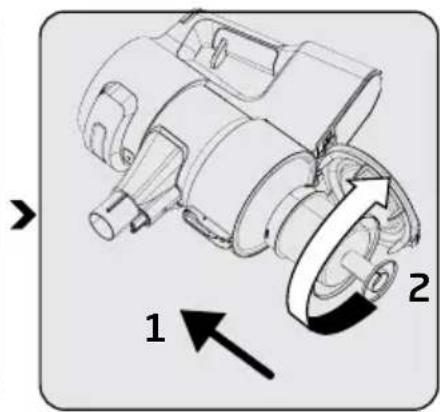
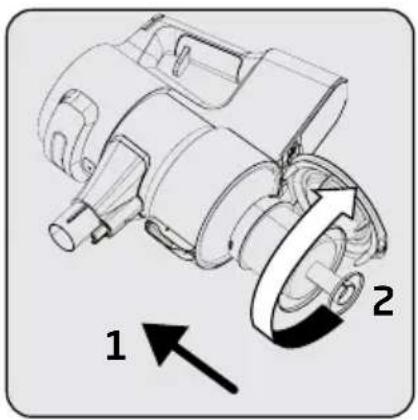
Technical line drawing of a mechanical device with a magnified circular detail showing internal components (no text or symbols)To remove the electric turbo brush (7), open the lock with the roll brush release tab in the direction of the arrow. (You may use a coin to open it.)

natural_image
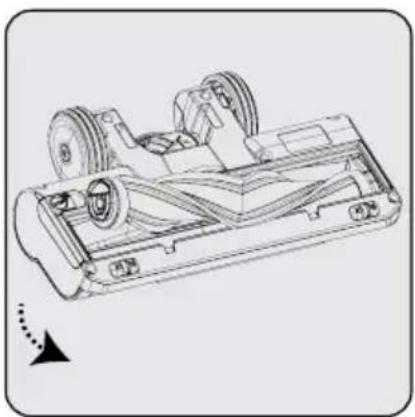
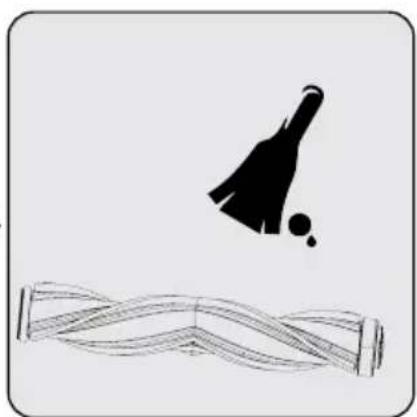
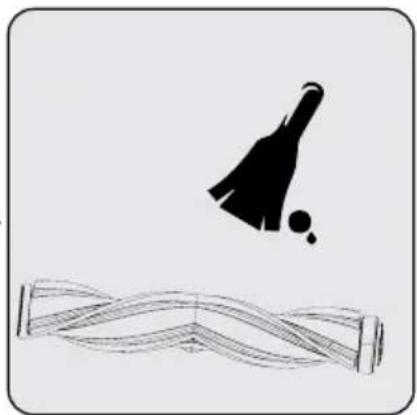
Technical line drawing of a vehicle chassis frame with wheels and suspension components (no text or symbols)Remove the roll brush. Remove the dust on it by tapping it

natural_image
Simple line drawing of a broom and a ball above a wavy object (no text or symbols)lightly to a hard surface or remove the dust with a brush. If any hair, etc. is tangled, remove it by cutting it off.
5 Cleaning and maintenance
natural_image
Technical line drawing of a mechanical assembly with gears and housing (no text or symbols)After cleaning the roll brush, re-install it and lock the tab.
5.5 Storage
- If you do not intend to use the appliance for a long time, store it carefully.
- Unplug the appliance.
- Ensure that the appliance is kept out of reach of children.
- If you shall not be using the battery for a long period of time, please keep it in a cool and dry place at half charged condition. Do not charge or discharge completely.
- Store the battery on a non-conducting material, and do not allow the battery to contact metal directly. This shall damage the battery.
5.6 Transport and shipping
- During transport and shipping, carry the appliance with its original packaging. The packaging of the appliance will protect the appliance against physical damage.
- Do not put heavy objects on the appliance or its packaging. Otherwise the appliance may be damaged.
- If the appliance is dropped, the appliance may not operate or permanent damage may occur.

WARNING: Check the following points before asking for repair assistance from the service department.
| PROBLEM POSSIBLE CAUSE SOLUTION | ||
| Not OK | Battery is discharged. Charge it. | |
| Battery may be unseated. | Remove the battery and install it again. | |
| Vacuum connection is blocked. | Separate the appliance as body (9), brush (7) and wand. Inspect and clean the connection points. | |
| Suction power is getting reduced. | Dust reservoir (10) is full. | Clean the dust reservoir (10) and the filter. |
| You may have reached the cleaning period of the filters. | Clean the filters. | |
| Filters may be deformed as a result of operation and their replacement period may have come. | Please contact the customer services to buy a new filter. | |
| Motor inlet foam is not cleaned. | Clean the filters and recharge the appliance. | |
| Hair and similar materials may have tangled on the rotating roll on the turbo brush (7). | Clean the turbo brush roll. | |
| There is disturbing noise from the motor. | Vacuum connection is blocked. | Separate the appliance as body (9), brush (7) and wand. Inspect and clean the connection points. |
| Something may have stuck between the dust reservoir and the filter. | Open the dust reservoir and inspect the filter area. | |
| Cannot charge the vacuum cleaner. | The vacuum cleaner is not installed to the charging dock. | Install the vacuum cleaner to the charging dock. Make sure that it is seated properly. Check the connection. |
6 Problems and remedies
| Operates for a very short time after charging. | It is not charged for the adequate period. | Charge for 4-5 hours as per the instructions. |
| Motor inlet foam is not cleaned. | Clean the filters and recharge the appliance. | |
| Battery life is deteriorated. | Contact the customer services to buy a new battery. | |
| 1 LED light on the appliance, closest to the handle, flashes rapidly in red. | Your appliance has been discharged. | Charge it. |
| A red and white LED is illuminated continuously during operation. | Battery is faulty. | Contact the customer services. |
| 1 LED light on the appliance, closest to the handle, illuminates continuously in red during operation. | Hair and similar materials may have tangled on the rotating roll on the turbo brush. | Clean the turbo brush roll. |
| 1 LED light on the appliance, closest to the handle, illuminates continuously in red during charging. | Current may be excessive. | Use the proper adaptor. |
| A red and white LED is illuminated continuously during charging. | The body is not installed properly to the charging dock. | Remove the adaptor from the charging dock, place the body to the charging dock again and plug the adaptor to the charging dock again. |
| A bad smell (slight humidity, dust, plastic material odour) occurs on the air outlet. | Have you purchased the appliance within the last 3 months? | It is normal that a bad smell (slight odour of plastic) occurs within 3 months after the purchase date. |
| The dust reservoir and the filters are not cleaned properly. | Clean the dust reservoir and the filters. | |
| Filters may be installed while wet after they are washed. | Remove the filters and ensure that they are dry before installing them to the appliance. | |
| Filters may be deformed as a result of the frequency of operation and their replacement period may have come. | Please contact the customer services to buy a new filter. |
Dongguan Yinli Electronics Co., Ltd
Model Kimliği : YLS0241A-E360060
natural_image
Technical line drawing of a mechanical device with arrows indicating motion or assembly (no text or symbols)natural_image
Diagram showing a vacuum cleaner with arrows indicating motion, no text or symbols presentnatural_image
Illustration of a vacuum cleaner with a mounted device and a side-mounted stand, showing no text or symbols.
natural_image
Technical line drawing of a vacuum cleaner with attached circuit symbols (no text or labels)natural_image
Technical line drawing of a robotic arm with a mounted device, showing internal components and a circular inset view (no text or symbols)natural_image
Diagram of a mechanical device with an arrow pointing to a small component (no text or symbols present)natural_image
Diagram showing a hand inserting into a device with an arrow indicating the process (no text or symbols present)natural_image
Diagram showing a mechanical device being processed into a small cylindrical component, with an arrow indicating process direction (no text or symbols present)natural_image
Technical illustration of a mechanical device with three parts and directional arrows indicating assembly or operation (no text or symbols present)natural_image
Technical line drawing of a mechanical assembly with rollers and housing (no text or symbols)natural_image
Line drawing of a hand cleaning a mechanical device with a cloth (no text or symbols)natural_image
Line drawing of a manual blender with a spool of food being poured into a container (no text or symbols)natural_image
Technical illustration of mechanical components with numbered callouts (1 and 2), no visible text or symbolsnatural_image
Mechanical component diagram showing a rotating shaft and housing with directional arrows indicating motion (no text or symbols)natural_image
Diagram showing four cylindrical objects arranged on a divided surface with an upward arrow, no text or symbols present.natural_image
Diagram showing a cylindrical container being dropped with a downward arrow, no text or symbols presentnatural_image
Mechanical component diagram showing a rotating shaft and housing with an arrow indicating rotation direction (no text or symbols)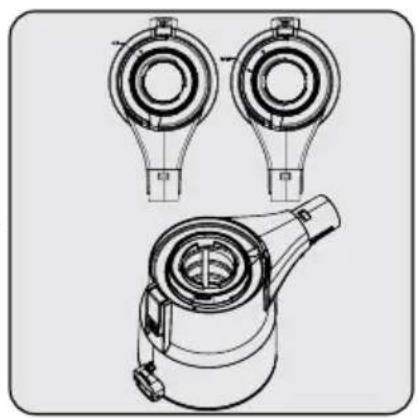
natural_image
Technical line drawing of a mechanical component with three views (top, front, side), no text or symbols present.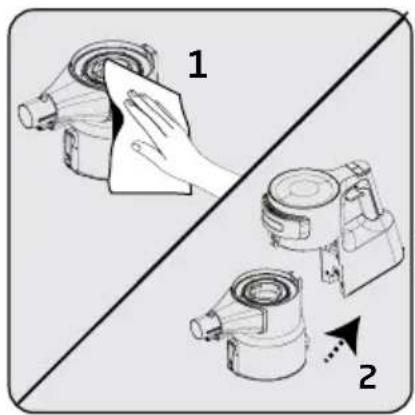
natural_image
Mechanical component diagram showing a rotating shaft and housing with directional arrows indicating motion (no text or symbols)natural_image
Diagram showing two cylindrical objects with a handle and an upward arrow, no text or symbols presentnatural_image
Three line drawings of different containers: a cylindrical container, a lid with lid, and a small cake with food drops (no text or symbols)natural_image
Mechanical assembly diagram showing a motor with rotational motion arrows (no text or labels)natural_image
Diagram showing two cylindrical containers with different top positions and an upward arrow, no text or symbols present.natural_image
Three line drawings of containers: a cylindrical container, a lid with a handle, and a potted plant (no text or symbols)natural_image
Diagram showing two mechanical components with a downward arrow indicating transformation (no text or symbols)natural_image
Illustration of two hand gestures interacting with a device, showing mechanical components and motion arrows (no text or symbols)natural_image
Illustration of three abstract 3D shapes with a small container pouring granular material (no text or symbols)natural_image
Three 3D mechanical component diagrams with an arrow indicating direction (no text or symbols)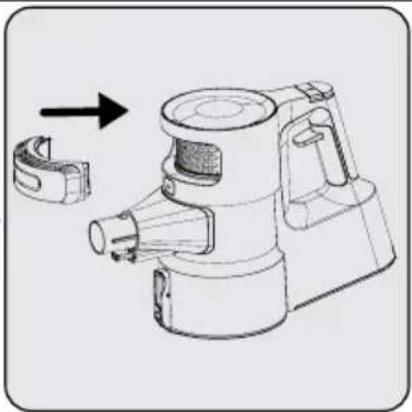
natural_image
Technical line drawing of a mechanical device with an arrow indicating assembly or transformation (no text or symbols present)natural_image
Technical line drawing of a mechanical device with a magnified circular detail showing internal components (no text or symbols)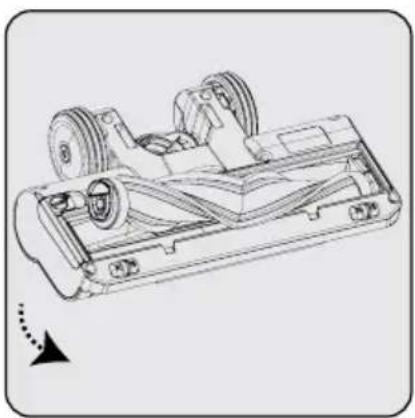
natural_image
Technical line drawing of a vehicle chassis frame with wheels and suspension components (no text or symbols)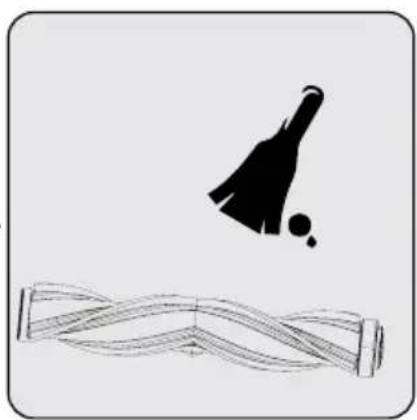
natural_image
Illustration of a broom with a black silhouette above it, no text or symbols presentnatural_image
Technical line drawing of a vehicle chassis with wheels and suspension components (no text or symbols)Dongguan Yinli Electronics Co., Ltd
ID modela: YLS0241A-E360060
Ulazna snaga: 100-240V\~
Instalirajte cijev stanice za punjenje (14) na držač stanice za punjenje (15), zatim instalirajte stanicu za punjenje (13) na cijev stanice za punjenje (14).
Tanki kraj punjača instalirajte na bazu stanice za punjenje (13). Ukopčajte adapter za punjenje (17) u zidnu utičnicu.
Ako stanicu za punjenje (13) želite instalirati na zid, odspojite stanicu za punjenje sa cijevi (14) i držača (15) pomoću dva odvojena gumba.
Postavite stanicu za punjenje (13) na visinu od približno 102-104 cm od poda.
Kraj adaptera punjača (17) instalirajte na bazu stražnjeg dijela stanice za punjenje (13). Učvrstite stanicu za punjenje (13) pomoću dva vijka i dva tipla.
3 Postavljanje
3.3 Instalacija kućišta i četke
natural_image
Technical illustration of a mechanical device with arrows indicating assembly or movement (no text or symbols)natural_image
Diagram showing a vacuum cleaner with arrows indicating motion, no text or symbols presentnatural_image
Technical diagram of a mechanical device with an inset close-up showing internal components (no text or symbols)Postavite mini turbo četku (20) na stanicu za punjenje (13).
Na držač stanice za punjenje stavite ostali pribor (15).
4 Rukovanje
natural_image
Illustration of a vacuum cleaner with a mounted device and a side-mounted stand, showing no text or symbols.Učvrstite kotačiće električne turbo četke (7) na razmak držača stanice za punjenje (15).
Postavite kućište (9) na stanicu za punjenje (13).
Jednom pritisnite gumb načina rada “-” (3) za prebacivanje na manju brzinu kada uređaj radi na maksimalnoj ili srednjoj brzini.
4 Rukovanje

natural_image
Technical line drawing of a vacuum cleaner with attached circuit symbols (no text or labels)Ovaj uređaj prikladan je za uporabu na tepisima i drvenim podnim oblogama.

Ručno otvorite blokadu za rad dok je uređaj blokiran u uspravnom položaju.

natural_image
Technical line drawing of a robotic arm with a mounted device, showing internal components and a circular inset view (no text or symbols)Pritisnite jedan od dva gumba (12) na štapu za preklapanje štapa. Međutim, tada možete dohvatiti područja koja su inače teško dohvatljiva poput područja ispod kutnih garnitura.

Uređaj ima funkciju uspravnog položaja zahvaljujući mehanizmu blokade četke. Pod treba biti ravan zbog ispravnog rada ove funkcije. (drvene podne obloge, drvo listača, itd.) Uređaj se treba držati na stanici za punjenje kada se ne koristi i kada je odložen. Usisivač se može držati u uspravnom položaj kratko vrijeme (2-3 minute) za vrijeme čišćenja spremnika kako bi se četka odblokirala. (drvene podne obloge, drvo listača, itd.)
4 Rukovanje
4.3 Pribor
Pribor možete koristiti tako da ih stavite na kraj kućišta.
natural_image
Diagram of a mechanical device with an arrow pointing to a small component (no text or symbols present)natural_image
Diagram of a hairdryer with a brush applying material to a small object (no text or symbols present)natural_image
Diagram showing a hand operating a vacuum cleaner with a separate lever mechanism (no text or symbols present)Mini turbo četka(20): Prikladna je za usisavanje podnih obloga, stepenica, unutrašnjosti automobila, kauča i sofa, itd. Koristi se i za usisavanje dlaka kućnih ljubimaca na takvim površinama.
natural_image
Illustration of a hand pump assembly with three tool tips and directional arrows indicating process (no text or symbols)natural_image
Technical line drawing of a mechanical assembly with no visible text or symbolsOvaj pribor prikladan je za upotrebu na osjetljivim podnim oblogama (prirodno drvo listača, itd.)
natural_image
Line drawing of a hand cleaning a mechanical device with a cloth (no text or symbols)natural_image
Line drawing of a manual blender with a spool of food being poured into a container (no text or symbols)Pritisnite gumb za otvaranje poklopca spremnika za prašinu (11) i otvorite spremnik za prašinu (10) i ispraznite unutra nakupljenu prašinu.

natural_image
Technical illustration of mechanical components with numbered callouts (1 and 2), no visible text or symbolsPritisnite prekidač ispod uređaja i očistite spremnik za prašinu (10). Odvojite spremnik za prašinu (10) s kućišta (9).
natural_image
Mechanical component diagram showing a rotating shaft and housing with directional arrows indicating motion (no text or symbols)natural_image
Diagram showing four cylindrical containers arranged on a divided surface with an upward arrow, and a small container pouring liquid into a bowl (no text or symbols)Uklonite spužvu s otvora za ulaz zraka unutar metalnog filtra.
Uklonite prašinu s metalnog filtra i spužve s otvora za ulaz zraka laganim tupkanjem o tvrdu površinu poput kante za smeće ili četke.

natural_image
Diagram showing two cylindrical containers with a handle, one downward and one upward, both without any text or symbols.natural_image
Mechanical component diagram showing a rotating shaft and housing with an arrow indicating rotation direction (no text or symbols)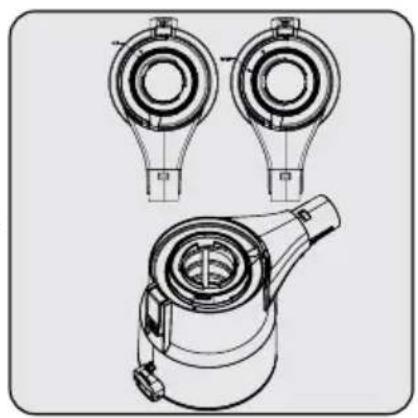
natural_image
Technical line drawing of a mechanical component with three views (top, front, side), no text or symbols present.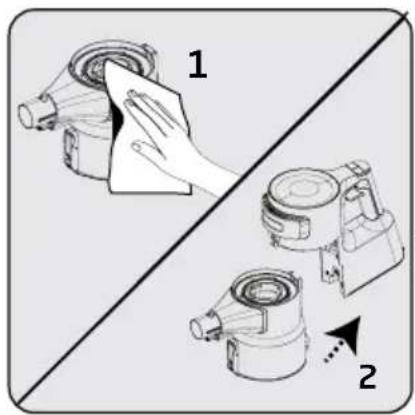
natural_image
Mechanical component diagram showing a rotating assembly with directional arrows (no text or symbols)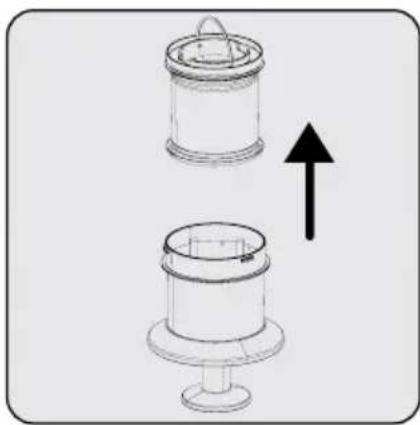
natural_image
Diagram showing two cylindrical containers with a handle and an upward arrow, no text or symbols present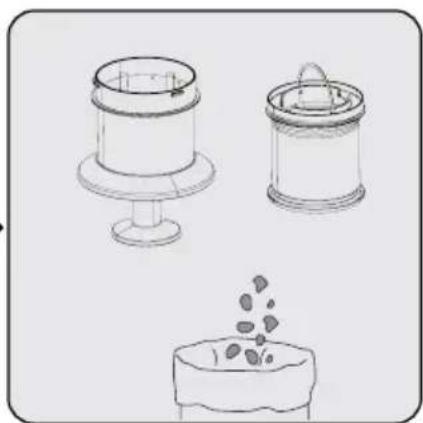
natural_image
Three line drawings of containers with different shapes and colors, one emitting granular material from a base (no text or symbols)natural_image
Diagram showing two mechanical components with a downward arrow indicating motion (no text or symbols)natural_image
Technical illustration of a mechanical device with directional arrows indicating motion (no text or symbols)natural_image
Diagram of two cylindrical mechanical components with an upward arrow indicating motion (no text or symbols)Uklonite spužvu s otvora za ulaz zraka unutar metalnog filtra.
natural_image
Three line drawings of containers: a cylindrical container, a lid with handle, and a bowl with granular contents (no text or symbols)Uklonite prašinu s metalnog filtra i spužve s otvora za ulaz zraka laganim tupkanjem o tvrdu površinu poput kante za smeće ili četke.
natural_image
Diagram showing two cylindrical objects with a downward arrow indicating transformation or change (no text or symbols present)Suhu spužvu otvora za ulaz zraka stavite na metalni filtar.
natural_image
Illustration of two hand gestures operating a device, showing mechanical components and motion arrows (no text or symbols)Uklonite poklopac dok istovremeno pritišćete gumb za odvajanje filtra EPA E10 (4).

natural_image
Illustration of three abstract 3D shapes with a small container pouring granular material (no text or symbols)Uklonite prašinu s filtra EPA E10 i spužve otvora za izlaz zraka laganim tupkanjem o tvrdu površinu poput kante za smeće ili četke.
natural_image
Three 3D mechanical component diagrams with an arrow indicating direction (no text or symbols)Na poklopac instalirajte filtar EPA E10 i spužvu otvora za izlaz zraka.

natural_image
Technical line drawing of a mechanical device with an arrow indicating assembly or transformation (no text or symbols present)natural_image
Technical line drawing of a mechanical device with a magnified circular detail showing internal components (no text or symbols)natural_image
Technical line drawing of a vehicle chassis frame with wheels and suspension components (no text or symbols)Uklonite okretnu četku. Uklonite

natural_image
Simple line drawing of a badminton racket and ball above a wavy surface (no text or symbols)prašinu s nje laganim
lupkanjem o tvrdu površinu ili prašinu uklonite četkom. Ako su se zapetljale dlake, odrežite ih.
natural_image
Technical line drawing of a vehicle chassis with wheels and suspension components (no text or symbols)Dongguan Yinli Electronics Co., Ltd
Model: YLS0241A-E360060
natural_image
Technical illustration of a mechanical device with arrows indicating assembly or movement (no text or symbols)natural_image
Diagram showing a vacuum cleaner with arrows indicating motion, no text or symbols presentnatural_image
Technical diagram of a mechanical device with an inset close-up showing a component detail (no text or symbols present)natural_image
Illustration of a vacuum cleaner with a mounted device and a side-mounted stand, showing no text or symbols.
natural_image
Technical line drawing of a vacuum cleaner with attached circuit symbols (no text or labels)natural_image
Technical line drawing of a robotic arm with a mounted device, showing internal components and a magnified inset (no text or symbols)natural_image
Diagram of a mechanical device with an arrow pointing to a small component (no text or symbols present)natural_image
Diagram of a hand tool interacting with a device, showing a mechanical component and a separate tool (no text or symbols present)Szczotka do kurzu (21):
natural_image
Diagram showing a hand tool interacting with a vacuum cleaner (no text or symbols present)natural_image
Technical illustration of a vacuum cleaner assembly with arrows indicating component movement (no text or symbols)natural_image
Technical line drawing of a mechanical device with internal components and a separate cylindrical component (no text or symbols)natural_image
Line drawing of a hand cleaning a mechanical device with a cloth (no text or symbols)natural_image
Line drawing of a manual blender with a spool of food being poured into a container (no text or symbols)natural_image
Technical illustration of a mechanical component with two views (1 and 2), showing internal parts and directional arrows (no text or symbols)natural_image
Mechanical component diagram showing a rotating shaft and housing with directional arrows indicating motion (no text or symbols)natural_image
Diagram showing four cylindrical containers with different shapes and an upward arrow, separated by a diagonal line (no text or symbols)natural_image
Diagram showing two cylindrical containers with a handle, one downward and one upward, both without any text or symbols.natural_image
Mechanical component diagram showing a rotating shaft and housing with an arrow indicating rotation direction (no text or symbols)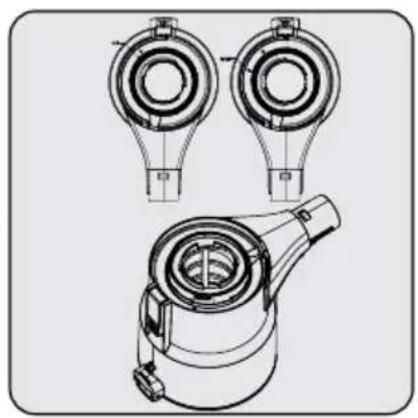
natural_image
Technical line drawing of a mechanical component with three views (top, front, side), no text or symbols present.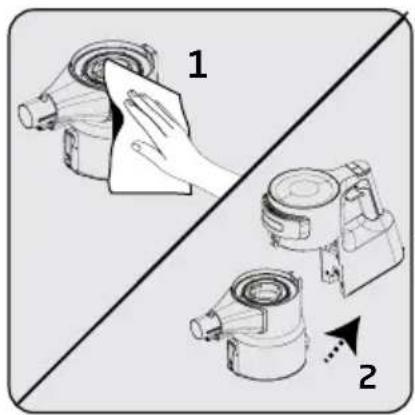
natural_image
Mechanical component diagram showing a rotating assembly with directional arrows (no text or symbols)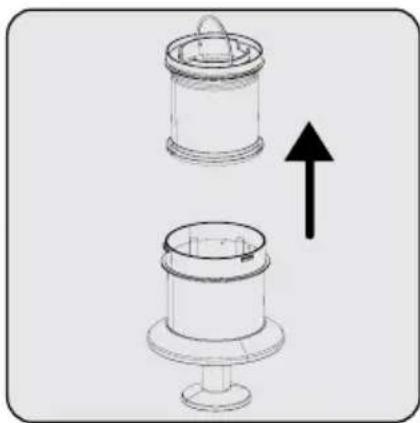
natural_image
Diagram of two cylindrical mechanical components with an upward arrow indicating motion (no text or symbols)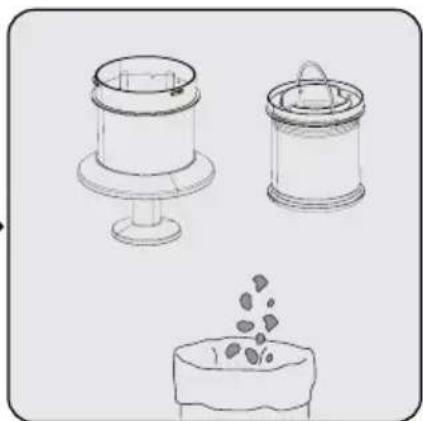
natural_image
Three line drawings of different containers: a cylindrical container, a lid with a handle, and a small cake with seeds (no text or symbols)natural_image
Diagram showing two mechanical components with a downward arrow indicating motion (no text or symbols)natural_image
Mechanical component diagram showing a rotating fan or pump mechanism with directional arrows (no text or symbols)natural_image
Diagram of two cylindrical mechanical components with an upward arrow indicating motion (no text or symbols)natural_image
Three hand-drawn illustrations of different storage or packaging designs: a cylindrical container, a cylindrical container with lid, and a small container with seeds (no text or symbols)natural_image
Diagram showing two cylindrical objects with a downward arrow indicating transformation or change (no text or symbols present)natural_image
Mechanical component diagram showing a rotating motor with labeled parts 1 and 2 (no text or symbols beyond labels)natural_image
Illustration of two hand gestures operating a device, showing mechanical components and motion arrows (no text or symbols)natural_image
Illustration of three abstract 3D shapes with a small container pouring granular material (no text or symbols)natural_image
Three 3D mechanical component diagrams with an arrow indicating direction (no text or symbols)natural_image
Technical line drawing of a mechanical device with an arrow indicating assembly or transformation (no text or symbols present)natural_image
Technical line drawing of a mechanical device with a circular inset showing a component (no text or symbols)natural_image
Technical line drawing of a vehicle chassis frame with wheels and structural components (no text or symbols)natural_image
Illustration of a broom with a flag and a ball above it, no text or symbols presentnatural_image
Technical line drawing of a vehicle chassis with wheels and suspension components (no text or symbols)Dongguan Yinli Electronics Co., Ltd
Modell-id: YLS0241A-E360060
natural_image
Technical illustration of a mechanical device with arrows indicating assembly or movement (no text or symbols)natural_image
Diagram showing a vacuum cleaner with arrows indicating motion, no text or symbols presentnatural_image
Technical diagram of a mechanical device with an inset close-up showing internal components (no text or symbols)Installera miniturboborsten (20) i laddningsstationen (13).
natural_image
Illustration of a vacuum cleaner with a mounted device and a side-mounted stand, showing no text or symbols.
natural_image
Technical line drawing of a vacuum cleaner with attached circuit symbols (no text or labels)natural_image
Technical line drawing of a robotic arm with attached device, showing internal components and alignment (no text or symbols)natural_image
Diagram of a mechanical device with an arrow pointing to a small component (no text or symbols present)natural_image
Diagram of a hand tool interacting with a device, showing a mechanical component and an arrow indicating direction (no text or symbols present)natural_image
Diagram showing a device being processed into a small mechanical component, with no visible text or symbols.natural_image
Technical illustration of a mechanical device with multiple tool tips and arrows indicating assembly or operation (no text or symbols present)natural_image
Technical line drawing of a mechanical device with internal components and a separate cylindrical component (no text or symbols)natural_image
Line drawing of a hand cleaning a mechanical device with a cloth (no text or symbols)natural_image
Line drawing of a manual blender with a spool of food being poured into a container (no text or symbols)natural_image
Technical illustration of mechanical components with numbered callouts (1 and 2), no visible text or symbolsnatural_image
Mechanical component diagram showing a rotating shaft and housing with directional arrows indicating motion (no text or symbols)natural_image
Diagram showing four cylindrical objects arranged on a divided surface with an upward arrow, no text or symbols present.Ta bort insugsskumfiltret ur metall-filtret.
natural_image
Diagram showing a cylindrical container being dropped with a downward arrow, no text or symbols presentInstallera insugsskumfiltret i metallfiltret.
natural_image
Mechanical component diagram showing a rotating shaft and housing with an arrow indicating rotation direction (no text or symbols)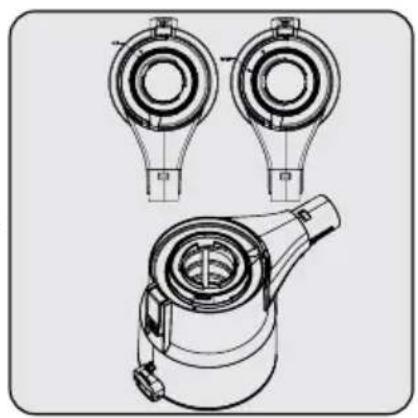
natural_image
Technical line drawing of a mechanical component with three views (top, front, side), no text or symbols present.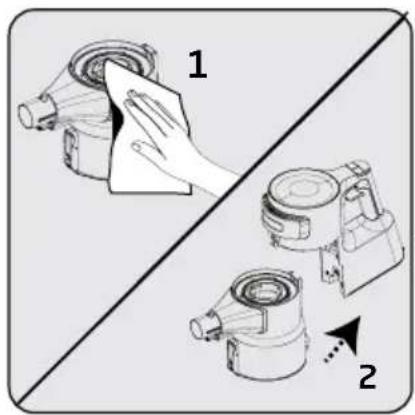
natural_image
Mechanical component diagram showing a rotating assembly with directional arrows (no text or symbols)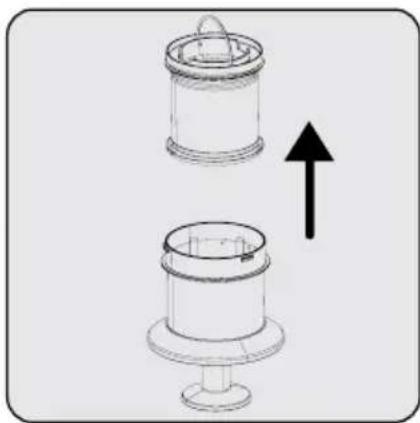
natural_image
Diagram of two cylindrical mechanical components with an upward arrow indicating motion (no text or symbols)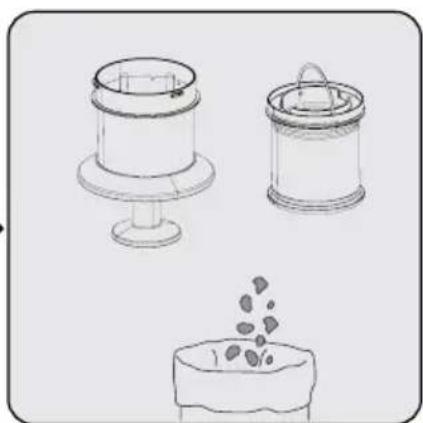
natural_image
Three hand-drawn illustrations of different containers: a tiered cylindrical container, a lid with a handle, and a small cake with food drops (no text or symbols)natural_image
Diagram showing two mechanical components with a downward arrow indicating motion (no text or symbols)Installera insugsskumfiltret i metallfiltret.
natural_image
Mechanical assembly diagram showing a motor with rotational arrow indicating motion (no text or symbols)natural_image
Diagram showing two cylindrical containers with a lid and a stand, one upward and one downward (no text or symbols)Ta bort insugsskumfiltret ur metall-filtret.
natural_image
Three hand-drawn diagrams showing a cylindrical container, a lid with a handle, and a small bowl with granular contents (no text or symbols)natural_image
Diagram showing two mechanical components with a downward arrow indicating transformation (no text or symbols)Installera den torra insugsskumfiltret i metallfiltret.
natural_image
Illustration of two mechanical devices with arrows indicating motion or assembly (no text or symbols)natural_image
Illustration of three abstract geometric shapes with a small container pouring particles (no text or symbols)natural_image
Three 3D mechanical component diagrams with an arrow indicating direction (no text or symbols)natural_image
Technical line drawing of a mechanical device with an arrow indicating assembly or transformation (no text or symbols present)natural_image
Technical line drawing of a mechanical device with a magnified circular detail showing internal components (no text or symbols)natural_image
Technical line drawing of a vehicle chassis frame with wheels and suspension components (no text or symbols)natural_image
Simple line drawing of a broom with a flag, no text or symbols presentnatural_image
Technical line drawing of a vehicle chassis with wheels and suspension components (no text or symbols)Dongguan Yinli Electronics Co., Ltd
Modell-ID: YLS0241A-E360060
Inngangsspenning: 100-240V\~
Utgangsspenning: 36,0 V
Utgangsstrøm: 0,6 A
Utgangseffekt: 21,6 W
natural_image
Diagram showing a mechanical assembly with a bracket, a vertical rod, and a base mount (no text or symbols)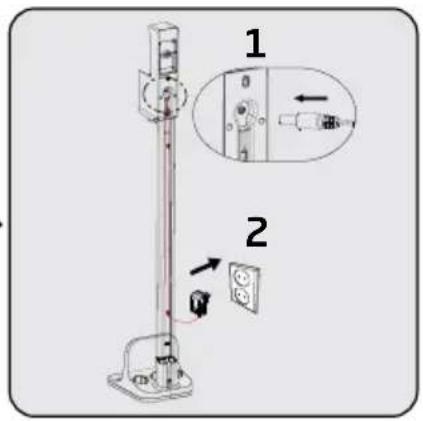
natural_image
Technical illustration of a mechanical device with arrows indicating assembly or movement (no text or symbols)Monter staven på enden av hoveddelen (9).
natural_image
Diagram showing a vacuum cleaner with arrows indicating motion, no text or symbols presentnatural_image
Illustration of a vacuum cleaner with a mounted device and a side-mounted stand, showing no text or symbols.Blinkende LED-lamper i hvit farge indikerer at apparatet lades.

natural_image
Technical line drawing of a vacuum cleaner with attached circuit symbols (no text or labels)natural_image
Technical line drawing of a robotic arm with a close-up inset showing internal components (no text or symbols)natural_image
Diagram of a mechanical device with an arrow pointing to a small component (no text or symbols present)natural_image
Diagram of a hand tool interacting with a mechanical device, showing a step and directional arrow (no text or symbols present)natural_image
Diagram showing a hand tool interacting with a vacuum cleaner (no text or symbols present)natural_image
Technical illustration of a vacuum cleaner assembly with arrows indicating component movement (no text or symbols)natural_image
Technical line drawing of a mechanical device with internal components and a separate cylindrical component (no text or symbols)natural_image
Line drawing of a hand cleaning a mechanical device with a cloth (no text or symbols)natural_image
Line drawing of a manual robotic device pouring granular material into a container (no text or symbols)natural_image
Technical illustration of mechanical components with numbered callouts (1 and 2), no visible text or symbolsnatural_image
Mechanical component diagram showing a rotating shaft and housing with directional arrows indicating motion (no text or symbols)natural_image
Diagram showing four cylindrical objects arranged on a divided surface with an upward arrow, no text or symbols present.natural_image
Diagram showing a cylindrical container being dropped with a downward arrow, no text or symbols presentInstaller inntaksskummet i metallfilteret.
natural_image
Mechanical component diagram showing a rotating shaft and housing with an arrow indicating rotation direction (no text or symbols)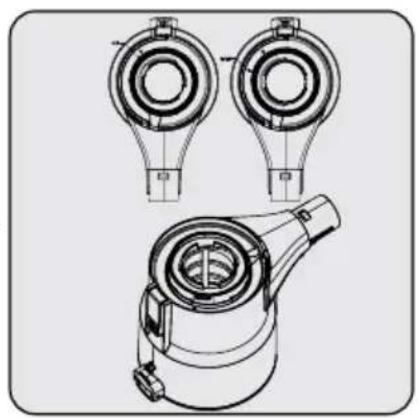
natural_image
Technical line drawing of a mechanical component with three views (top, front, side), no text or symbols present.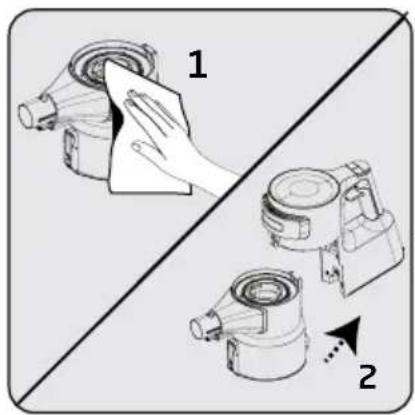
natural_image
Mechanical component diagram showing a rotating assembly with directional arrows (no text or symbols)natural_image
Diagram of two cylindrical mechanical components with an upward arrow indicating motion (no text or symbols)natural_image
Three line drawings of different containers: a cylindrical container, a lid with a handle, and a small cake with seeds (no text or symbols)natural_image
Diagram showing two mechanical components with a downward arrow indicating motion (no text or symbols)Installer inntaksskummet i metallfilteret.
natural_image
Mechanical component diagram showing a rotating fan or pump mechanism with directional arrows (no text or symbols)natural_image
Diagram of two cylindrical mechanical components with an upward arrow indicating motion (no text or symbols)natural_image
Three hand-drawn illustrations of different storage or packaging designs: a cylindrical container, a cylindrical container with lid, and a small container with seeds (no text or symbols)natural_image
Diagram showing two mechanical components with a downward arrow indicating transformation (no text or symbols)natural_image
Mechanical component diagram showing a rotating fan and housing with directional arrows (no text or symbols)natural_image
Illustration of two mechanical devices with arrows indicating motion, no text or symbols presentFjern lokket samtidig som du trykker på EPA E10-filterutløserknappen (4).

natural_image
Illustration of three abstract geometric shapes with a small container pouring particles (no text or symbols)natural_image
Three mechanical component diagrams with an arrow indicating direction (no text or symbols)natural_image
Technical line drawing of a mechanical device with an arrow indicating assembly or transformation (no text or symbols present)natural_image
Technical line drawing of a mechanical device with a magnified inset showing internal components (no text or symbols)natural_image
Technical line drawing of a vehicle chassis frame with wheels and suspension components (no text or symbols)natural_image
Simple line drawing of a broom with a broom and ball, no text or symbols presentnatural_image
Technical line drawing of a vehicle chassis with wheels and suspension components (no text or symbols)Dongguan Yinli Electronics Co., Ltd
Mallitunnus: YLS0241A-E360060
natural_image
Technical illustration of a mechanical device with arrows indicating assembly or movement (no text or symbols)natural_image
Diagram showing a vacuum cleaner with arrows indicating motion, no text or symbols presentAsenna miniturboharja (20) latausasemaan (13).
natural_image
Illustration of a vacuum cleaner with a mounted device and a side-mounted stand, showing no text or symbols.
natural_image
Technical line drawing of a vacuum cleaner with attached circuit symbols (no text or labels)natural_image
Technical line drawing of a robotic arm with a close-up inset showing internal components (no text or symbols)natural_image
Diagram of a mechanical device with an arrow pointing to a small component (no text or symbols present)natural_image
Diagram of a hairdryer with a tool inserted, showing the process from an arrow to a small component (no text or symbols present)natural_image
Diagram showing a hand tool interacting with a vacuum cleaner (no text or symbols present)natural_image
Technical illustration of a vacuum cleaner assembly with arrows indicating component movement (no text or symbols)natural_image
Technical line drawing of a mechanical assembly with no visible text or symbolsnatural_image
Line drawing of a hand cleaning a mechanical device with a cloth (no text or symbols)natural_image
Line drawing of a manual blender with a spool of food being poured into a container (no text or symbols)natural_image
Technical illustration of a mechanical component with two views (1 and 2), showing internal parts and directional arrows (no text or symbols)natural_image
Mechanical component diagram showing a rotating shaft and housing with directional arrows indicating motion (no text or symbols)natural_image
Diagram showing four cylindrical objects arranged on a divided background with an upward arrow, no text or symbols present.natural_image
Diagram showing a cylindrical container being dropped with a downward arrow, no text or symbols presentnatural_image
Mechanical component diagram showing a rotating shaft and housing with an arrow indicating rotation direction (no text or symbols)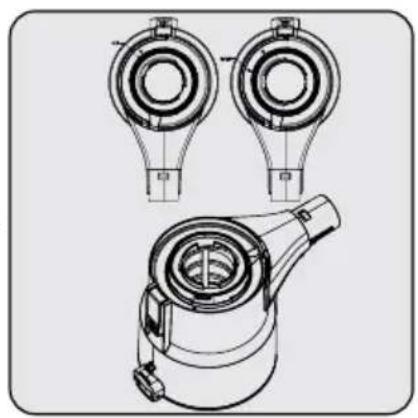
natural_image
Technical line drawing of a mechanical component with three views (top, front, side), no text or symbols present.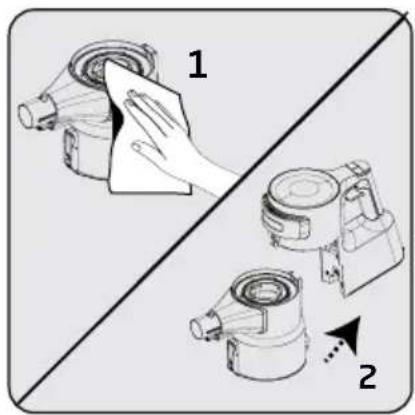
natural_image
Mechanical component diagram showing a rotating assembly with directional arrows (no text or symbols)natural_image
Diagram of two cylindrical mechanical components with an upward arrow indicating motion (no text or symbols)natural_image
Three line drawings of different containers: a cylindrical container, a lid with a handle, and a cake with food items (no text or symbols)natural_image
Diagram showing two mechanical components with a downward arrow indicating motion (no text or symbols)natural_image
Mechanical assembly diagram showing a motor with rotational arrow indicating motion (no text or symbols)natural_image
Diagram showing two cylindrical containers with a lid and an upward arrow, no text or symbols presentnatural_image
Three hand-drawn illustrations of different storage or packaging designs: a cylindrical container, a cylindrical container with lid, and a small container with seeds (no text or symbols)natural_image
Diagram showing two mechanical components with a downward arrow indicating transformation (no text or symbols)natural_image
Illustration of two mechanical devices with arrows indicating motion or assembly (no text or symbols)natural_image
Illustration of three abstract geometric shapes with a small container pouring particles (no text or symbols)natural_image
Three 3D mechanical parts with an arrow indicating direction, no text or symbols presentnatural_image
Technical line drawing of a mechanical device with an arrow indicating assembly or transformation (no text or symbols present)natural_image
Technical line drawing of a mechanical device with a magnified circular detail showing internal components (no text or symbols)natural_image
Technical line drawing of a vehicle chassis frame with wheels and suspension components (no text or symbols)natural_image
Simple line drawing of a broom with a flag, no text or symbols presentkopauttamalla
natural_image
Technical line drawing of a vehicle chassis with wheels and suspension components (no text or symbols)natural_image
Abstract geometric pattern composed of interlocking black lines on white background (no text or symbols)
natural_image
Pure electrical circuit lines without any symbolsVRT 94929 VV
VRT 94929 VI
EN - FR - ES - RO - IT - PL - SR - MK - SQ - CS - SL - RU
Dongguan Yinli Electronics Co., Ltd
Model ID: YLS0241A-E360060
natural_image
Technical illustration of a mechanical device with arrows indicating assembly or movement (no text or symbols)natural_image
Diagram showing a vacuum cleaner with arrows indicating motion, no text or symbols presentTryk på den elektriske frigivelsesknap til turbobørsten (7) på den elektriske turbobørste (6) og skub den i retning af stangen.
Installer miniturbobørsten (13) opladerdocken (20).
natural_image
Illustration of a vacuum cleaner with a mounted device and a side-mounted stand, showing no text or symbols.
natural_image
Technical line drawing of a vacuum cleaner with attached circuit symbols (no text or labels)Åben låsen for drift manuelt mens apparatet er låst i oprejst tilstand.

natural_image
Technical line drawing of a robotic vacuum cleaner with attached arm and lever mechanism (no text or symbols)natural_image
Diagram of a mechanical device with a tool and arrow indicating process (no text or symbols)natural_image
Diagram of a hand tool interacting with a mechanical device, showing a step and directional arrow (no text or symbols)natural_image
Diagram showing a hand holding a small mechanical component, with an arrow indicating the process (no text or symbols present)natural_image
Technical illustration of a vacuum cleaner assembly with arrows indicating component movement (no text or symbols)natural_image
Technical line drawing of a mechanical device with internal components and a separate cylindrical component (no text or symbols)natural_image
Line drawing of a hand cleaning a mechanical device with a cloth (no text or symbols)natural_image
Line drawing of a manual blender with a spool of seeds being poured into a container (no text or symbols)natural_image
Technical illustration of mechanical components with numbered callouts (1 and 2), no visible text or symbolsnatural_image
Mechanical component diagram showing a rotating shaft and housing with directional arrows indicating motion (no text or symbols)natural_image
Diagram showing four cylindrical containers with different shapes and an upward arrow, separated by a diagonal line (no text or symbols)natural_image
Diagram showing a cylindrical container being dropped with a downward arrow, no text or symbols presentnatural_image
Mechanical component diagram showing a rotating shaft and housing with an arrow indicating rotation direction (no text or symbols)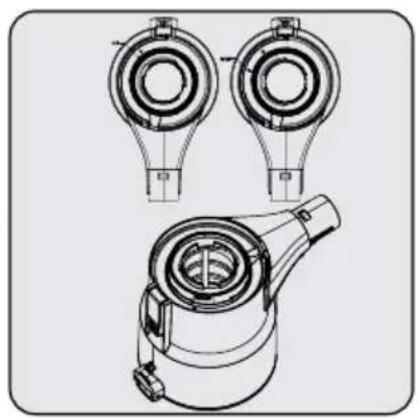
natural_image
Technical line drawing of a mechanical component with three views (top, front, side), no text or symbols present.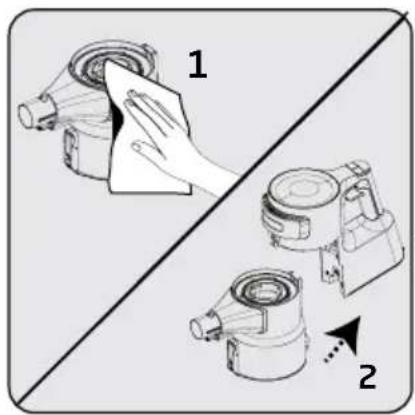
natural_image
Mechanical component diagram showing a rotating assembly with directional arrows (no text or symbols)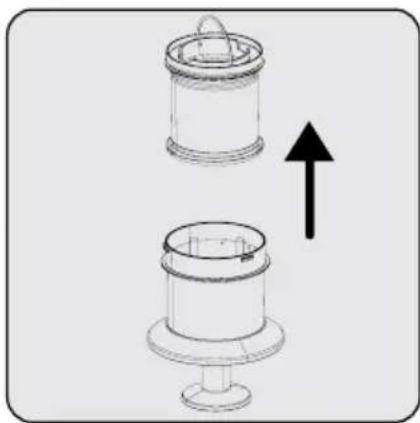
natural_image
Diagram of two cylindrical mechanical components with an upward arrow indicating motion (no text or symbols)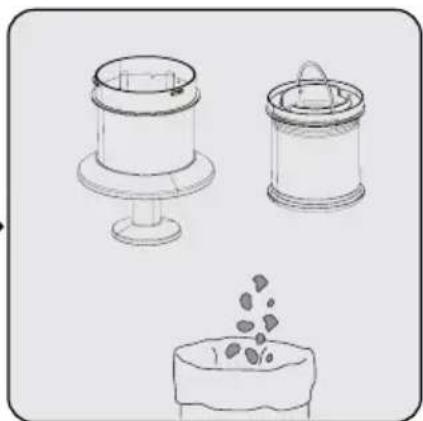
natural_image
Three line drawings of different containers: a cylindrical container, a lid with a handle, and a small cake with seeds (no text or symbols)natural_image
Diagram showing two mechanical components with a downward arrow indicating motion (no text or symbols)natural_image
Mechanical assembly diagram showing a motor with rotational arrow indicating motion (no text or symbols)natural_image
Diagram of two cylindrical mechanical components with an upward arrow indicating motion (no text or symbols)natural_image
Three hand-drawn illustrations of different storage or packaging designs: a cylindrical container, a cylindrical container with lid, and a small container with seeds (no text or symbols)natural_image
Diagram showing two cylindrical objects with a downward arrow indicating transformation or change (no text or symbols present)natural_image
Mechanical component diagram showing a rotating motor with labeled parts 1 and 2 (no text or symbols beyond labels)natural_image
Illustration of two hand gestures operating a device, showing mechanical components and motion arrows (no text or symbols)natural_image
Illustration of three abstract 3D shapes with a small container pouring granular material (no text or symbols)natural_image
Three mechanical component diagrams with an arrow indicating direction (no text or symbols)natural_image
Technical line drawing of a mechanical device with an arrow indicating assembly or transformation (no text or symbols present)natural_image
Technical line drawing of a mechanical device with a magnified inset showing internal components (no text or symbols)natural_image
Technical line drawing of a vehicle chassis frame with visible wheels and structural components (no text or symbols)natural_image
Illustration of a broom with a broom and ball above it, no text or symbols presentnatural_image
Technical line drawing of a vehicle chassis with wheels and suspension components (no text or symbols)- In 1 Cordless Stick Vacuum Cleaner
- Hartbodenwalze (16):
- Please read this guide first!
- Symbols and their meanings
- Important safety and environmental instructions
- General safety
- Compliance with the WEEE Regulations and Waste Disposal
- Packaging information
- Waste batteries
- Overview
- Controls and components
- Technical data
- External Power Supply Parameter
- Installation
- Intended use
- Installation of the mobile charging dock
- Installation of the body and the brush
- Operation
- Charging the appliance
- Start Up
- Accessories
- Cleaning and maintenance
- Cleaning of the dust reservoir
- Cleaning of the metal filter and inlet foam
- Cleaning of the EPA E10 Filter and outlet foam
- Cleaning of the brush
- Storage
- Transport and shipping
- Problems and remedies
- Postavljanje
- Instalacija kućišta i četke
- Rukovanje
- Pribor
Brand : GRUNDIG
Model : VCP 8931
Category : Vacuum Cleaner