EMP 1104 - Bread maker Essentiel B - Free user manual and instructions
Find the device manual for free EMP 1104 Essentiel B in PDF.


| Brand | Essentiel B |
| Model | EMP 1104 |
| Product type | Bread maker |
| Power | 580 Watts |
| Voltage / Frequency | 230-240 V~ / 50 Hz |
| Bread capacity | 500 g or 750 g |
| Number of programs | 12 bread programs + 1 yogurt program |
| Browning levels | 3 (light, medium, dark) |
| Keep warm | Up to 60 minutes automatic |
| Display | LCD screen |
| Delay timer | Up to 13 hours |
| Main functions | Kneading, rising, baking, jam, yogurt, pasta, cakes |
| Included accessories | Non-stick pan, kneading blade, measuring spoon, measuring cup (200 ml), yogurt container |
| Cleaning | Pan and blade dishwasher safe; body cleaned with damp cloth |
| Safety | Overheat protection, automatic shutdown, hot surface |
| Protection class | Class I |
| Repairability | Original parts recommended; contact customer service |
| Warranty | Legal warranty of conformity |
Frequently Asked Questions - EMP 1104 Essentiel B
User questions about EMP 1104 Essentiel B
0 question about this device. Answer the ones you know or ask your own.
Ask a new question about this device
Download the instructions for your Bread maker in PDF format for free! Find your manual EMP 1104 - Essentiel B and take your electronic device back in hand. On this page are published all the documents necessary for the use of your device. EMP 1104 by Essentiel B.
USER MANUAL EMP 1104 Essentiel B
natural_image
White bread loaf machine with a slice cut out of bread, showing its control panel and control buttons (no visible text or symbols on the device itself)Notice d'utilisation / Gebruiksaanwijzing / Instruction manual / Manual de instrucciones / Gebrauchsanweisung

| FR NL GB ES DE | |||||
| 1 | Fenêtre Kijkvenster Viewing window | Mirilla de inspección | Sichtfenster | ||
| 2 | Cuve à pain Bakblikken Bread pan | Bandejas para pan | Backformen | ||
| 3 | Écran LCD LCD-scherm LCD panel Pantalla LCD LCD-Bildschirm | ||||
| 4 | Panneau de commandes | Bedieningspaneel | Control panel Panel de control Bedienfeld | ||
| 5 | Gobelet à mesurer | Maatbeker | Measuring cup | Tazón para medir | Messbecher |
| 6 | Cuillère à mesurer Maatlepel | Measuring spoon | Cuchara para medir | Messlöffel | |
| 7 | Pale de pétrissage | Kneder | Kneider | Amasadore | Knethaken |
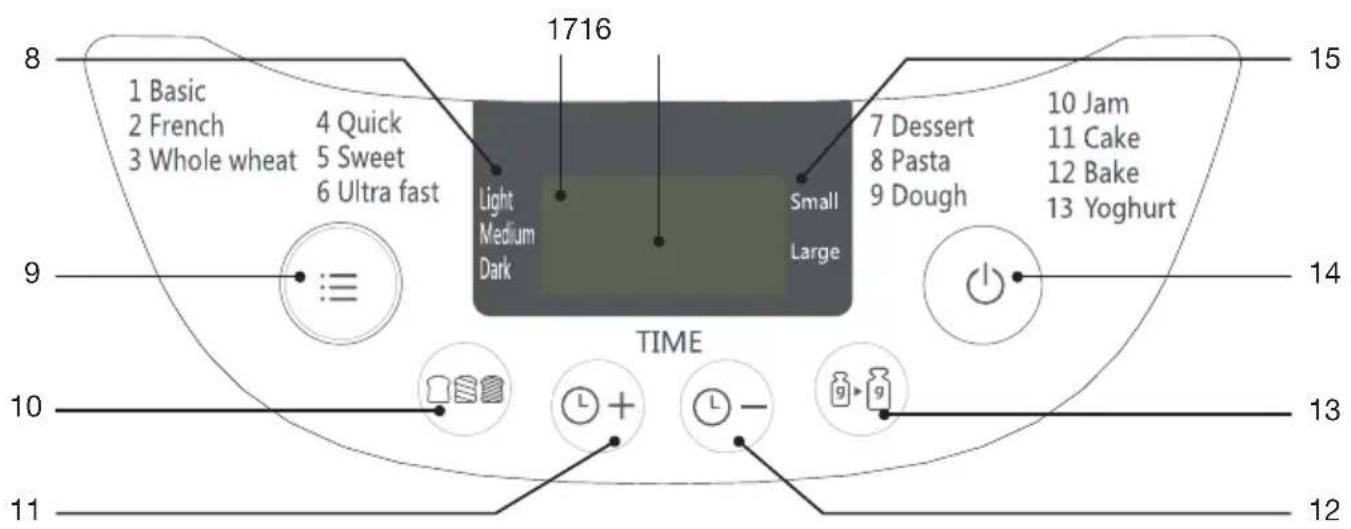
| 8 | Couleur de brunissage : claire, moyenne, foncée | Kleur: lichtbruin, medium bruin, donkerbruin | Browning color: light, medium, dark | Color: ligero, medio, oscuro | Bräunungsgrad: leicht, mittel, dunkel |
| 9 | Bouton de sélection du mode | Modus instelknop | Mode selection button | Botón de selección de modo | Modusaus wahltaste |
| 10 | Bouton de réglage du brunissage | Kleur instelknop | Color adjustment button | Botón de ajuste de color | Bräunungsgrad-Taste |
| 11 | Bouton minuterie + | Timer + knop | Timer + button | otón + del temporizador | Timertaste + |
| 12 | Bouton minuteur - | Timer - knop | Timer - button | Botón - del temporizador | Timertaste - |
| 13 | Bouton de réglage du poids | Gewicht instelknop | Weight adjustment button | Botón de ajuste de peso | Gewichtauswahl-Taste |
| 14 | Bouton marche/ arrêt | Start/Stop knop | Start/Stop button | Botón Inicio/ Parada | Start/Stopp-Taste |
| 15 | Poids du pain : 500g, 750g | Broodgewicht: 500g, 750g | Bread weight: 500g, 750g | Pan de 500 g/750 g de peso | Brotgewicht: 500g, 750g |
| 16 | Indicateur du temps | Tijdweergave | Time indicator | Indicador de tiempo | Zeitanzeige |
| 17 | Indicateur du mode | Modusweergave | Mode indicator | Indicador de modo | Modusanzeige |
sommaire
consignes d'usage 4
votre produit 7
Usage prévu 7
natural_image
Simple line drawing of a bucket with two circular arrows indicating rotation (no text or symbols)natural_image
Simple line drawing of a bucket with two circular arrows indicating rotation (no text or symbols)1 tl verse gist = 3/4 tl droge gist
1,5 tl verse gist = 1 tl droge gist
2 tl verse gist = 1,5 tl droge gist
Snel wit brood (modus 4 "Snel")
Chocoladecake (modus 11 "Cake")
Yoghurt (modus 13 "Yoghurt")
| Voor 1 liter yoghurt | |
| 1. Volle melk 1 liter | |
| 2. Yoghurt 100 g |
Scope of delivery 41
Technical data 41
before first use 42
Locking / unlocking the bread pan 42
use of the appliance 43
Operation of the breadmaker 43
Mode description 45
cleaning and care 47
Cleaning 47
Storage 47
troubleshooting 48
practical advice / recipes 50
Practical advice
Recipes 51
safety warnings
Read this instruction manual carefully before using the appliance. It contains important information for your safety as well as operating and maintenance advice. Observe all safety instructions to avoid damage through improper use!
Keep this instruction manual for future use. Should this appliance be passed on to a third party, then this instruction manual must be included.
- This appliance can be used by children aged from 8 years and above and persons with reduced physical, sensory or mental capabilities or lack of experience and knowledge if they have been given supervision or instruction concerning use of the appliance in a safe way and understand the hazards involved.
• Children shall not play with the appliance. - Cleaning and user maintenance shall not be made by children unless they are older than 8 and supervised.
- Keep the appliance and its cord out of reach of children less than 8 years.
- The appliance is not intended to be operated by means of an external timer or separate remote-control system.
- Regarding the instructions for cleaning surfaces in contact with food, please refer to chapter “Cleaning and care”.
- Regarding information on the maximum quantities of flour and raising agent that may be used, please refer to chapter “Use of the appliance”.
- This appliance is intended to be used in household and similar applications such as:
staff kitchen areas in shops, offices and other working environments;
-farm houses;
by clients in hotels, motels and other residential type environments;
-bed and breakfast type environments.
- If the supply cord is damaged, it must be replaced by the manufacturer, its service agent or similarly qualified persons in order to avoid a hazard.
- Caution – Hot surface! The surfaces of the appliance are liable to get hot during use.

- Never use accessories which are not recommended by the manufacturer. They could pose a safety risk to the user and might damage the appliance. Only use original parts and accessories.
- WARNING! Protect the appliance and its electrical parts against moisture. Do not immerse the appliance and its electrical parts in water or other liquids. Never hold the

appliance under running water. Do not touch the power plug with wet hands.
- Danger of electric shock! Do not attempt to repair the appliance yourself. In case of malfunction, repairs are to be conducted by qualified personnel only.
• Always place the appliance on an even, stable and heat-resistant surface able to hold the weight of the appliance.
- Never turn the appliance on when the bread pan is not properly placed in the appliance and/or the kneader is not properly inserted into the bread pan.
- To prevent a risk of fire, make sure that the appliance has sufficient space around it and does not come in contact with flammable material. Do not cover the appliance.
- Ensure the rated voltage shown on the rating label corresponds with the voltage of the power supply.
- Do not operate any appliance with a damaged power cord or plug, when the appliance malfunctions or has been dropped or damaged in any other way.
- Protect the power cord against damages. Do not let it hang over sharp edges, do not squeeze or bend it. Do not place the appliance on the power cord. Keep the power cord away from hot surfaces and open flames and ensure that nobody can pull on or trip over it.
- Do not open the housing under any circumstances. Do not insert fingers or foreign objects in any opening of the appliance and do not obstruct the air vents.
- Protect the appliance against heat. Do not place close to open flames or heat sources such as stoves or heating appliances.
your product
Intended use
- This appliance is intended for baking bread and cakes, kneading dough and making jam. Do not use it for other purposes.
- This appliance is only intended for private use and is not suitable for professional operation.
- This appliance is intended for indoor use only.
- Use the appliance only as described in this manual. Any other use might lead to damage of the appliance, property or personal injury.
- No liability will be accepted for injuries or damage resulting from improper use or non-compliance with this manual.
Scope of delivery
- 1 bread maker
- 1 measuring spoon
- 1 measuring cup
• 1 box for dairy product
• 1 instruction manual
Technical data
Rated voltage : 230-240V\~
Rated frequency : 50Hz
Rated power input : 580 W
Protection class : Class I
Bread weight : 500g or 750g
Number of bread programs : 12
Number of diary programs : 1
Degrees of browning : 3
Automatic keep warm function : 60 minutes
Display : LCD screen
before first use
- Check delivery contents for any missing items or any possible transport damage. If the appliance is damaged or some parts are missing, do not use it and bring it back to your dealer.
- Remove all packaging materials and keep them for future use.

Warning! Packaging materials are not a toy! Do not allow children to play with packaging materials as they pose a choking hazard if swallowed!
- Clean the appliance and its accessories ( Cleaning and care).
- Place the appliance on an even, stable and heat-resistant surface able to hold its weight.
Note: Fumes may be released during first use of the appliance. This is a normal condition that does not indicate any malfunction. During first use, place the appliance in a well-ventilated area. - Assemble the kneader in the bread pan and place the bread pan in the appliance so that it locks into place securely (Locking / unlocking the bread pan).
- Choose mode “12 Bake” and operate the appliance empty for about 10 minutes. This operation will remove manufacturing residues.
- Let the appliance cool down completely. Clean the appliance, the bread pan and the kneader again (Cleaning and care).
Locking / unlocking the bread pan
When inserting the bread pan into the appliance, turn it clockwise to lock it (▶LOCK).

natural_image
Simple line drawing of a bucket with two circular arrows indicating rotation (no text or symbols)To remove the bread pan from the appliance, turn it anticlockwise to unlock it (UNLOCK ◀).
Operation of the breadmaker
- Grease the bread pan with heat-resistant margarine or butter to prevent the dough from sticking to it.
- Grease the kneader with heat-resistant margarine or butter. This will prevent the dough from sticking to the kneader and facilitate its removal after use.
- Slide the kneader over the drive shaft in the bread pan. Make sure it is fully pushed down.
- Fill your ingredients into the bread pan ( Practical advice / recipes ).

Warning! Do not overfill the bread pan! Fill a maximum of 500g of flour and 11g of yeast into it to avoid overflowing and subsequent damage of the appliance.
- Place the appliance on an even, stable and heat-resistant surface able to hold its weight.
- Insert the bread pan into the appliance by turning it clockwise to lock it (▶LOCK). If necessary, pull down the handle of the bread pan. Close the lid.
- Connect the power plug to a suitable electrical outlet. An acoustic signal sounds and the display shows "2:50". The appliance is now in default mode "1 Basic" and set to medium colour and Large weight (750g).
- Press the mode selection button: repeatedly to select the desired mode ( Mode description).
- Adjust the colour of the crust and weight of the bread/cake with the weight and colour adjustment buttons (if adjustable for selected mode). Three colours of crust can be selected Light, Medium, Dark. Two weights of bread can be selected: Small (500g) or Large (750g).
- To delay the start of the appliance, set the timer with the timer ⏻ + and - ⏻ — buttons (if available for selected mode). A delay time is added to the baking time in 10-minute steps. The bread will be finished when the time shown on the display has elapsed. The maximum delay time is 13 hours.

Do not use the timer when your dough contains easily spoiling fresh ingredients such as eggs, milk, cream or cheese.
- Press the ⏻ button to start the operation. If the timer is activated, the appliance starts to count down the set delay time and then starts the operation. The symbol “:” flashes on the display.

To cancel the current program, hold the button pressed for approx. 2 seconds. An acoustic signal sounds and the screen displays the initial time of the selected program.
-
When operation is finished, an acoustic signal sounds. Optional: If the colour of the bread/cake is too light, baking time can now be added by choosing mode "12 Bake" and adjusting the time with the timer and buttons. Press the button to start the operation. When operation is finished, an acoustic signal sounds.
-
Keep the button pressed for approx. 2 seconds to pause the program.

If the button is not pressed after operation, the appliance keeps warm the bread/cake for up to 1 hour. An acoustic signal sounds after the keep-warm phase is finished.
- Disconnect the power plug from the electrical outlet.
- Put on oven gloves and open the lid. Beware of escaping hot steam! Lift the handle of the bread pan and rotate the bread pan anticlockwise to unlock it (UNLOCK ◀). Be aware that the bread pan is very hot!
- Place the bread pan onto a cooling rack on a heat-resistant surface. Let the bread pan cool down for a few minutes.
- Gently loosen the sides of the bread or cake from the bread pan with a non-stick spatula. Do not use hard or sharp objects such as knives to avoid damaging the bread pan's non-stick coating!
- Turn the bread pan upside-down on the cooling rack and gently shake it until the bread/cake falls out.
- Let the bread/cake cool down for at least 20 minutes.
- Remove the kneader from the bread or cake.
- Slice the bread/cake.

The appliance is equipped with a memory function in case of power outage or accidental unplugging. If the power interruption is under 10 minutes, operation will continue normally once power is restored. The button does not need to be pressed again.
If the power interruption exceeds 10 minutes, the appliance/mode must be restarted by pressing the button. Discard the dough if the operation was already advanced when power was interrupted. If it was interrupted early during operation, before the rising process, the dough can be reused.
Mode description

The operating time increases with colour and weight. A light colour 500g bread takes the least time, dark coloured 750g bread takes the longest.
| Mode Description | Color adjustable | Weight adjustable | Timer available | Operating time | |
 1Basic 1Basic | For white and mixed breads made from wheat flour or rye flour. The bread has a compact consistency. | Yes Yes Yes | 2:48 h - 2:50 h | ||
 2French 2French | For light breads made from fine flour. The bread has a crispy, nicely browned crust.Note: Not suitable for baking breads containing butter, margarine or milk. | Yes Yes Yes | 3:18 h - 3:20 h | ||
 3Whole wheat 3Whole wheat | For yeast breads with a significant portion of whole wheat flour (50% or more). The bread is brown to dark brown, depending on the amount of whole wheat flour in the recipe. | Yes Yes Yes | 3:28 h - 3:30 h | ||
 4Quick 4Quick | Quick “1 Basic” mode. The bread is smaller and has a denser texture than bread baked on mode “1 Basic”. | Yes Yes Yes | 1:55 h - 1:58 h | ||
 5Sweet 5Sweet | For breads with high amounts of sugar, fats and proteins, such as brioche. The bread is light and airy due to a longer rising phase.Note: Be aware that sugar, fat and protein increase browning. | Yes Yes Yes | 2:51 h - 2:53 h | ||
 6Ultra fast 6Ultra fast | Ultra fast “1 Basic” mode. The bread is smaller and rougher than bread baked on mode “1 Basic” and “4 Quick”. | Yes Yes No | 1:56 h - 1:58 h | ||
 7Dessert 7Dessert | For preparing desserts other than cakes (without the use of flour), such as flan, pudding.... | Yes No No 1:20 h | |||
 8Pasta 8Pasta | To knead only. This program is intended for unleavened pasta (e.g. noodles). | No No Yes 0:15 h | |||
 9Dough 9Dough | For kneading and rising dough, but without baking. Dough can be used for making bread rolls, pizza, steamed bread, etc. | No No Yes 1:30 h | |||
 10Jam 10Jam | For homemade jams and chutneys. The kneader keeps stirring the ingredients throughout the process. | No No No 1:20 h | |||
 11Cake 11Cake | For cakes and other baked goods containing baking soda or baking powder instead of yeast. | Yes No No 1:18 h | |||
 12Bake 12Bake | For additional baking of breads that are too light or not baked through. This mode does not include kneading or rising. Time can be set with timer + and -buttons. | Yes No | Yes(1 hour) | 0:10 min | |
| [4WW?]13yoghurt | For the preparation of yogurts. No No Yes 8:00 h | ||||
cleaning and care
Cleaning
- Clean the appliance and accessories after each use.
- Before cleaning, unplug the appliance and let it cool down completely.
- Do not clean the appliance with steel wool, strong chemicals, alkali, abrasive or disinfecting agents, as they may damage its surface.
- Do not immerse the appliance in water or other liquids to clean it. Make sure that the electrical parts/connections of the appliance do not become wet or damp.
- Clean the body of the appliance with a soft damp cloth and, if necessary, a mild detergent. Wipe with a dry and soft cloth.
- Clean the bread pan, kneader, measuring spoon, measuring cup in warm water, using a soft sponge and a mild detergent. Wipe with a dry and soft cloth.
- The bread pan and the kneader can also be cleaned in a dishwasher.
- Clean the heating element with a soft damp cloth and, if necessary, a mild detergent. Wipe with a dry and soft cloth.
- The appliance may only be used again after it is dried completely.
Storage
- Before storage, always make sure that the appliance is completely cooled down and dry.
• Always keep the lid of the appliance closed during storage. - Store the appliance in a cool, dry place, protected from moisture and out of the reach of children.
- Preferably store the appliance in its original packaging.
troubleshooting
Before contacting your after-sales service, perform the following basic checks. If you cannot solve the problem by following the instructions below, contact your store's after-sales service.
| Problem Cause Solution | ||
| Smoke emitting from ventilation openings during baking process. | Some ingredients or oil adhering to the heating element or the nearby area. | Unplug the appliance, let it cool down completely and clean the heating element (Cleaning and care). Let it dry completely. |
| Bottom crust of bread is too thick. | Bread was kept warm for too long so that it lost too much moisture. | Take bread out of the appliance directly after the baking process without keeping it warm. |
| The bread pan is difficult to be removed from the appliance. | The bread pan is locked | To remove the bread pan from the appliance, turn it anticlockwise to unlock it (UNLOCK). |
| It is very difficult to take the bread out/kneader cannot be removed from bread pan. | Kneader is sticking to the shaft in the bread pan. | Remove the bread around the kneader. Then put hot water into the bread pan so that the kneader is submerged. Wait for 10 minutes, then take the kneader out and clean it (Cleaning and care). |
| Ingredients are not kneaded evenly and bread is baked badly. | Selected mode is unsuitable for ingredients.Cover was opened frequently during operating process.Stir resistance is too large, so that kneader cannot knead properly. | Select an appropriate mode for your ingredients.Do not open the cover during operation, especially during the last rising process.Take the bread pan out and operate the appliance without load. If the kneader gears turn normally, add some liquid to your dough to remove resistance. If they don't turn normally, contact an authorized service facility for repair. |
| “HHH” is shown on display after pressing “Start/Stop” button. | Appliance is still hot from a previous operating process.High ambient temperature. | Turn off and unplug the appliance. Take the bread pan out, open the lid and let the appliance cool down 10-20 minutes.Transfer the appliance to a cooler place (15°C - 34°C). |
| 《EEE》is shown on display after pressing “Start/Stop” button. | Defective temperature sensor. | Contact an authorised service facility. |
| Motor noises can be heard, but dough isn't kneaded | Bread pan is not properly locked in place.Amount of dough is too large to be kneaded | Lock bread pan in place properly.Check dough and remove some of it, if necessary. |
| Bread is so large that is pushes the cover open. | Too much yeast, flour or water.High ambient temperature. | Adjust amounts of yeast, flour or water in your recipe.Transfer the appliance to a cooler place (15°C to 34°C). |
| Bread size is too small or bread has not risen. | No or too little yeast.Yeast did not react properly due to high water temperature, because yeast was mixed with salt, or because of low ambient temperature. | Check the amount and performance of yeast. Readjust water temperature, amount of salt or ambient temperature accordingly. |
| Dough is overflowing from bread pan. | Too much liquid or too much yeast. | Reduce the amount of liquid and yeast. |
| Bread collapses in the middle while baking. | No baking soda/baking powder.Yeast did not react properly due to high water temperatureExcessive water makes dough too wet and soft. | Use self-rising flour or add baking soda/ baking powder to the flour.Use yeast with room-temperature water.Adjust amount of water in the recipe. |
| Bread weight is very high and texture is too dense. | Too much flour/too little water.Too many fruit pieces in dough.Too much wheat flour. | Reduce amount of flour/increase amount of water.Reduce the amount of fruit pieces.Increase the amount of yeast. |
| Middle of the bread is hollow. | Too much water or yeast or no salt.Water temperature is too high. | Adjust amount of water or yeast or add salt.Adjust water temperature. |
| Dry/powdered ingredients sticking underneath the bread surface. | Strongly glutinous ingredients, such as butter and bananas, in bread.Not enough water. | Remove strongly glutinous ingredients from recipe.Adjust amount of water in the bread recipe. |
| Crust is too thick and baking colour is too dark when baking cakes/bread with a lot of sugar. | Amount of sugar is too high and increases browning. | Press the Start/Stop button to interrupt the operating process 5-10 min. before the end of the cooking cycle. Keep the cake/bread in the bread pan for approx. 20 minutes with the lid closed before removing it. |
practical advice / recipes
Practical advice
- Add the ingredients in the correct order and respect the proportions. For this purpose, use the measuring cup and measuring spoon. Only use fresh ingredients for optimum results.
- Always pour the liquid into the bread pan first, then the flour, then the yeast, so that the yeast does not come into contact with the liquid and does not start to ferment too early.
- Ingredients for immediate preparation should be at room temperature.
- The ideal temperature of water and other liquids is 20^ to 25^ .
- Yeast is fundamental to lifting the dough. It must be stored in the refrigerator because it loses its properties in high temperatures. Before using it, check the date and duration of conservation of your yeast. Return to the refrigerator as soon as possible after each use. Generally, if the dough does not rise, it is because the yeast has lost its properties.
-
To make sure that your bread will rise properly later, check whether your yeast is fresh and active with the below method:
-
Pour 1/2 cup warm water into a measuring cup.
- Put 1 tsp. white sugar into the cup and stir, then sprinkle 2 tsp. of yeast over the water.
- Place the measuring cup in a warm place for about 10 min. Do not stir the water.
- The froth should be up to the 1 cup marking. Otherwise, the yeast is expired or inactive.
- Fresh or dehydrated yeast can be used. For delayed cooking, fresh yeast cannot be used. Convert the amounts of fresh yeast and dehydrated yeast as follows:
1 tsp. fresh yeast = 3/4 tsp. dehydrated yeast
1.5 tsp. fresh yeast = 1 tsp. dehydrated yeast
2 tsp. fresh yeast = 1.5 tsp. dehydrated yeast
- Salt gives a good taste to bread if it is used in small quantities. Excessive use can prevent the dough from rising.
- Sugar influences the colour and thickness of the crust. For a darker and thinner crust, reduce the amount of sugar by 20%.
- A small amount of butter is already enough to refine the bread and make it softer. If you add a little butter to the dough for white bread, you get dough for pastry.
- Eggs give a nice colour to the bread. However, eggs tend to dry out the dough. Use eggs sparingly and always add them well-beaten.
- For a better bread consistency, mix white flour (60%) with whole flour (40%).
Recipes
Use the provided measuring cup and the measuring spoon.
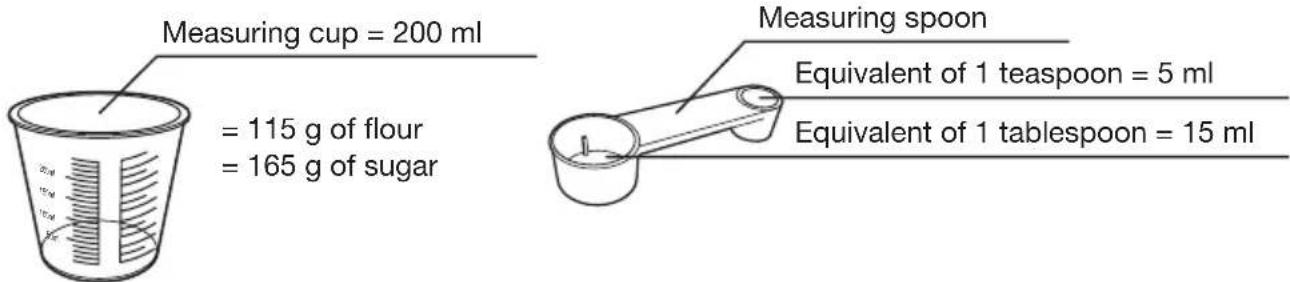
Insert the ingredients in the order shown below
In general, observe the following order: liquid ingredients, eggs, salt and milk powder, etc. While pouring the ingredients, do not soak the flour with liquids. Yeast can only be placed on dry flour. In addition, the yeast must absolutely not be in contact with the salt. An acoustic sound at the end of the second phase of kneading invites you to add ingredients such as grapes, sesame seeds, etc. If these are incorporated too early, the taste may be reduced. Some ingredients are perishable. Fresh milk, eggs, fruits and vegetables, especially fresh yeast cannot be used for delayed cooking.
| For a sweet bread of 500 g For a sweet bread of 750 g | ||
| 1. Water | 160 ml 225 ml | |
| 2. Beaten egg 1 | 1 | |
| 3. Oil 1 + 2/3 tablespoon | 2 + 1/3 tablespoon | |
| 4. Salt 1 teaspoon 1 + 12 teaspoon | ||
| 5. Sugar | 14 cup (40g) | 12 cup (60g) |
| 6. Bread flour | 2 + 3/4 cups (330g) | 3 + 3/4 cups (450g) |
| 7. Powdered milk | 1 teaspoon 1 + 12 teaspoon | |
| 8. Special bread yeast | 1 teaspoon 1 + 12 teaspoon | |
Melt the butter with the chocolate and pour the mixture into the pan.
Then add the beaten eggs, sugar, flour and yeast.
| 1. Whole milk | 1 liter |
| 2. Round rice for dessert | 150 to 175g |
| 3. Brown sugar | 100g |
| 4. Vanilla extract | 1 teaspoon |
| 1. Water 100 ml | |
| 2. Durum semolina (semolina with couscous) 500g | |
| 3. Eggs 4 | |
| 4. Salt 1 teaspoon |
Once finished, flour the work plan and spread using a rolling pin.
| 1. Strawberries 300g | |
| 2. Special sugar for jam with gelling agent 300g | |
| 3. Citrus juice 1 tablespoon |
| For 1 liter of yoghurt | |
| 1. Whole milk 1 liter | |
| 2. Yoghurt 100g |
The yogurt is more firm when the cooking time is longer.
Tabla de contenidos
natural_image
Simple line drawing of a bucket with two circular arrows indicating rotation (no text or symbols)Yogur (modo 13 "Yogur")
| Para un litro de yogur | |
| 1. Leche entera 1 litro | |
| 2. Yogur 100 g |
natural_image
Simple line drawing of a bucket with two circular arrows indicating rotation (no text or symbols)All information, designs, drawings and pictures in this document are the property of SOURCING & CREATION. SOURCING & CREATION reserves all rights to its brands, designs and information. Any copy and reproduction through any means shall be deemed and considered as counterfeiting.
Environmental Protection
This symbol attached to the product means that it is an appliance whose treatment as waste is subject to the Waste of Electrical and Electronic Equipment (WEEE) Regulations. Therefore, this appliance cannot be treated as household waste and must be specifically collected for this type of waste. Recovery and collection systems are made available to you by local authorities (waste disposal centres) and distributors. By guiding your device towards the end of its life cycle, you will help protect the environment and prevent any harmful consequences for your health.

Tested in our laboratories
Warranty valid from the date of purchase (authentic receipt). This warranty does not cover defects or damage resulting from improper installation, incorrect use, or normal wear of the product.

- sommaire
- consignes d'usage 4
- votre produit 7
- Yoghurt (modus 13 "Yoghurt")
- safety warnings
- your product
- Intended use
- Scope of delivery
- Technical data
- before first use
- Locking / unlocking the bread pan
- Operation of the breadmaker
- Mode description
- cleaning and care
- Cleaning
- Storage
- troubleshooting
- practical advice / recipes
- Practical advice
- Recipes
- Insert the ingredients in the order shown below
- Tabla de contenidos
- Environmental Protection
- Tested in our laboratories
Brand : Essentiel B
Model : EMP 1104
Category : Bread maker