
GK1330 - Service après-vente BLACK & DECKER - Free user manual and instructions
Find the device manual for free GK1330 BLACK & DECKER in PDF.


| Product type | Electric chainsaw |
| Brand | Black & Decker |
| Model | GK1330 |
| Guide bar length | 30 cm / 35 cm / 40 cm (depending on version) |
| Supply voltage | 230 V |
| Rated power | 1300 W / 1400 W / 1600 W (depending on version) |
| Chain speed (no load) | 8 m/s |
| Weight | 3.7 kg / 3.8 kg / 3.9 kg (depending on version) |
| Oil tank capacity | 180 ml |
| Safety class | II (double insulation) |
| Chain brake | Anti-kickback and inertia chain brake |
| Lubrication system | Automatic, integrated reservoir |
| Included accessories | Guide bar and chain, flat wrench, protective sheath |
| Optional accessories | Chain oil A6027, replacement chains A6154/A6155/A6156, sharpening kit A6039 |
| Sound pressure level | 88 dB(A) |
| Guaranteed sound power level | 103 dB(A) |
| Hand/arm vibration | 3.5 m/s² |
| Recommended maintenance | Check chain tension every 10 minutes; clean guide bar and chain regularly |
| Warranty | 24 months, subject to conditions of use |
Frequently Asked Questions - GK1330 BLACK & DECKER
User questions about GK1330 BLACK & DECKER
0 question about this device. Answer the ones you know or ask your own.
Ask a new question about this device
Download the instructions for your Service après-vente in PDF format for free! Find your manual GK1330 - BLACK & DECKER and take your electronic device back in hand. On this page are published all the documents necessary for the use of your device. GK1330 by BLACK & DECKER.
USER MANUAL GK1330 BLACK & DECKER
natural_image
Line drawing of a mechanical chain saw with labeled components (no text or symbols beyond branding)English 8
Deutsch 15
Français 23
Italiano 31
Nederlands 39
Español 46
Português 54
Svenska 62
Norsk 69
Dansk 76
Suomi 83
Ελληνικα 90
A
B
natural_image
Illustration of hands using a chain-linking power tool to cut grass or gravel (no text or symbols)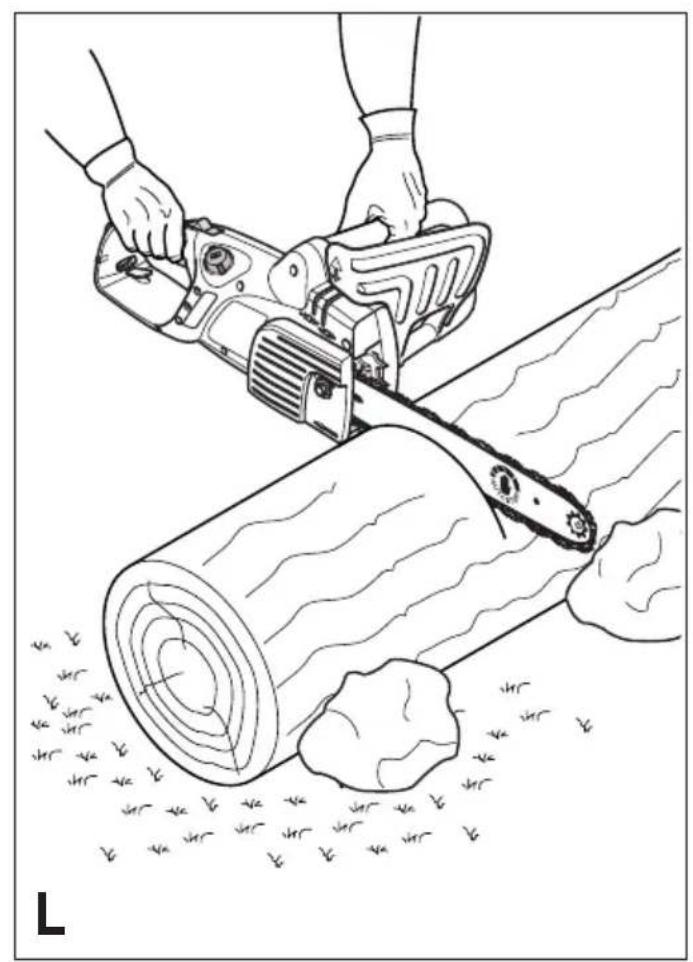
natural_image
Line drawing of hands using a power saw to cut a log with visible wood and grass (no text or symbols)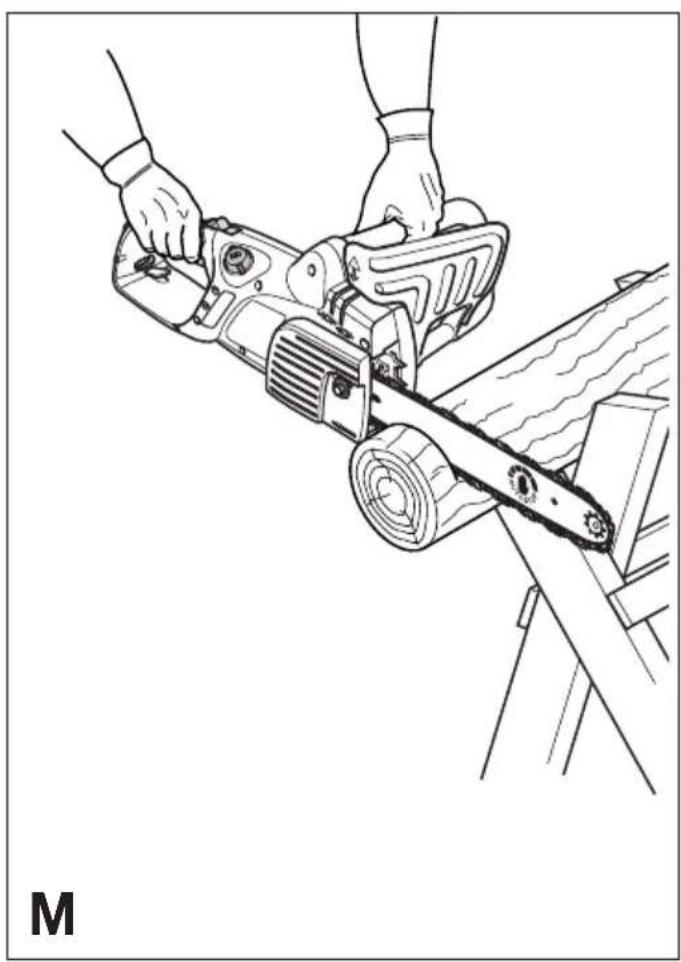
natural_image
Line drawing of hands operating a saw cutting machine on a wooden post (no text or symbols)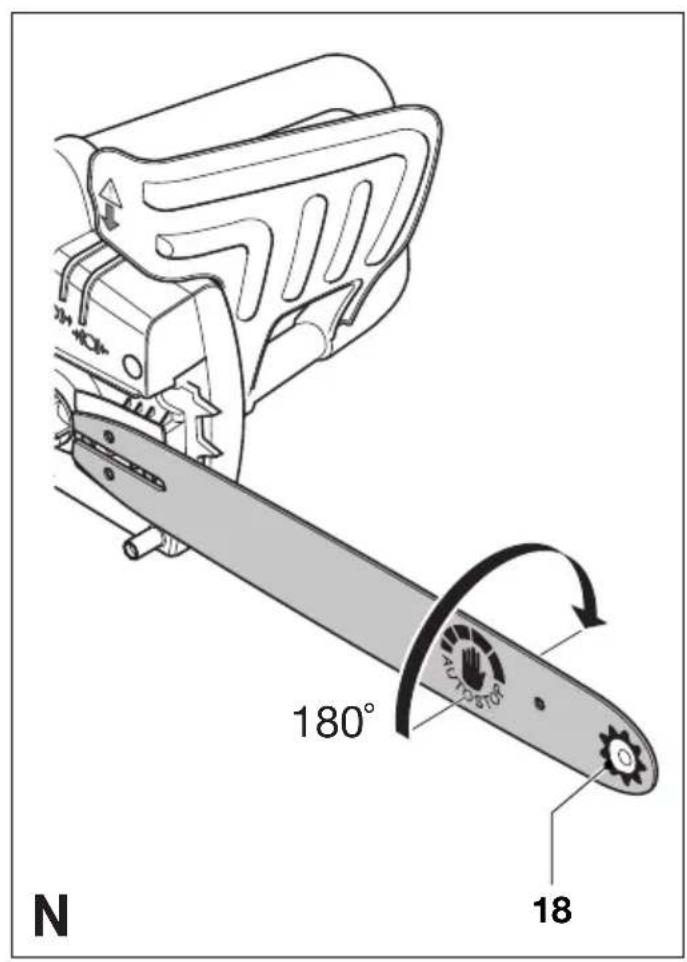
CHAINSAW

Know your chainsaw

Warning! When using electric tools, basic safety precautions should always be taken to reduce the risk of fire, electric shock and personal injury.

Read this user manual carefully, observing all of the recommended safety instructions before, during and after use of your chainsaw. Maintain your chainsaw in good working order. Familiarise yourself with the controls on your chainsaw before attempting to operate it, but above all, be sure you know how to stop the tool in an emergency. Retain this user manual and all other literature supplied for future reference.
SAFETY INSTRUCTIONS
◆Know your chainsaw. Please read this user manual carefully and familiarise yourself with your chainsaw, in particular with regard to the sawing of round wood. We strongly recommend that first time users practice sawing logs on a saw horse or cradle.
◆Avoid dangerous environments. Keep your work area clean and remove clutter. Keep the work area well lit. We strongly recommend the use of a sawhorse or cradle whenever possible.

Do not saw wet wood or use your chainsaw when it is raining.
- Keep people away while your chainsaw is in use. Do not allow children, other people or animals near your chainsaw while you are using it.
- Maintain your chainsaw when not in use. Do not store your chainsaw for any length of time without first removing the saw chain and guide bar which should be kept immersed in oil. Store all parts of your chainsaw in a dry, secure place out of reach of children.
We recommend you drain the oil reservoir prior to storage.
Do not force your chainsaw. It will do the job better and more safely at the rate for which it was intended.

Protective clothing. Wear close fitting and protective clothing including a safety helmet with visor/goggles, ear protectors, safety shoes, protective bib trousers and strong leather gloves.
Do not abuse the cable. Never carry a chainsaw by the cable or jerk it to disconnect the plug from the socket. Keep the cable away from heat, oil or sharp edges. Check the cable frequently for damage.
◆Secure your work using clamps or chocks. Be sure that you use both hands when operating your chainsaw.

Remove the plug from the mains before changing the work location, adjusting, sharpening or cleaning, changing any accessory such as the chain, or if the cord becomes entangled or damaged.
- Adjusting wrenches. Form a habit of checking to see that adjusting wrenches are removed from your chainsaw before starting.
♦Only use extension cable type HO7RN-F 2 x 1mm², as a minimum only.
◆Stay alert. Never operate your chainsaw when you are tired.
◆Check damaged parts. Before further use of your chainsaw, a guard or other part that is damaged should be carefully checked to determine whether it will operate properly and perform its intended function. Check for alignment of moving parts, binding of moving parts, breakage of parts, mounting and any other conditions that may affect its operation. A guard or other part that is damaged should be properly repaired or replaced by an authorised service agent. Do not use your chainsaw if the switch does not turn it on and off.

Warning! The use of an accessory or attachment other than those recommended in this user manual may present a risk of personal injury.
◆For all types of cutting, always hold the saw firmly with both hands, with thumbs and fingers encircling the saw handles. Do not release your grip until your chainsaw has stopped moving.
◆Be sure of your footing and pre-plan a safe exit from a falling tree or branches.
◆Use wedges to help control felling and prevent binding the guide bar and saw chain in the cut.
- Keep all parts of your body and clothing away from the saw chain when running your chainsaw. Before you switch on make sure your chainsaw is not contacting anything. Do not touch or try to stop a moving saw chain with your hand.
◆Carry your chainsaw carefully with the mains supply disconnected and with the guide bar and saw chain to the rear and the blade sheath fitted.
♦Keep your chainsaw clean. Do not allow dirt, oil or sawdust to build up on your chainsaw. Pay particular attention to the air inlet and outlet slots; these must not become clogged. Clean your chainsaw with a dry cloth but do not use any solvents or cleaning fluids.
◆Saw chain care. Keep the saw chain sharp and snug on the guide bar. Ensure the saw chain and guide bar are clean and well oiled.

Beware of kickback. Kickback is upward/ backward motion of the guide bar that may occur when the nose of the saw chain unexpectedly comes in contact with an object. Hold your chainsaw firmly with both hands when the motor is running. Use a firm grip with thumbs and fingers encircling the handles and watch carefully what you cut.
Kickback can be caused by:
◆Striking branches or other objects accidentally with a tip of the saw while the saw chain is moving.
◆Striking metal, cement or any other hard material near the wood, or buried in the wood.
◆A dull or loose chain.
◆Cutting above shoulder height.
◆Lack of attention when holding or guiding the saw while cutting.
◆Over-reaching. Keep proper footing and balance at all times and do not overreach.
Do not try to insert into a previous cut, as this could cause kickback. Make a fresh cut every time.
We strongly recommend you do not attempt to operate your chainsaw while in a tree, on a ladder or on any other unstable surface. If you decide to do so, be advised that these positions are extremely dangerous.
When cutting a branch that is under tension, be alert for spring back so that you will not be struck when the tension is released.
◆Avoid cutting:
◆Prepared timber.
◆Into the ground.
◆Into wire fences, nails, etc.
- Into small sized brush and saplings because slender material may catch the saw chain and be whipped towards you, or pull you off balance.
◆Do not use your chainsaw above shoulder height.
◆Ensure someone is nearby (but at a safe distance) in case of an accident.
If for any reason you have to touch the chain, make sure your chainsaw is disconnected from the mains.
◆The noise from this product can exceed 85 dB(A). We therefore recommend you take appropriate measures for the protection of hearing.
Warning symbols on your chainsaw

Read all of this manual carefully.

Do not use your chainsaw in wet conditions or expose it to rain.

Always wear ear and eye protection.

Always remove the plug from the socket before inspecting a damaged cable. Be careful not to use your chainsaw if the cable is damaged.
ENGLISH
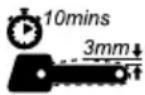
To ensure continued safe operation, check the chain tension as described in this manual after every 10 minutes of use, and adjust back to a clearance of 3 mm as required.
Double insulation

Your chainsaw is double insulated. This means that all external metal parts are electrically isolated from the power supply. This is achieved by placing an extra insulation barrier between the electrical and mechanical parts. Double insulation means greater electrical safety and obviates the necessity of having the machine earthed.
Electrical safety
◆Make sure your chainsaw is correct for your supply. The voltage can be found on the rating plate.
Technical data
| Bar length 30 cm 35 cm 40 cm | |||
| Supply voltage (V) 230 230 230 | |||
| Rated input (W) 1300/1400/ 1400/ 1400/ | |||
| 1600 | 1600 | 1600 | |
| Max. cutting length (cm) 30 35 40 | |||
| Chain speed (no load m/s) 8 8 | 8 | ||
| Weight (kg) | 3.7 | 3.8 | 3.9 |
| Oil capacity (ml) | 180 | 180 | 180 |
| Safety class | II | II | II |
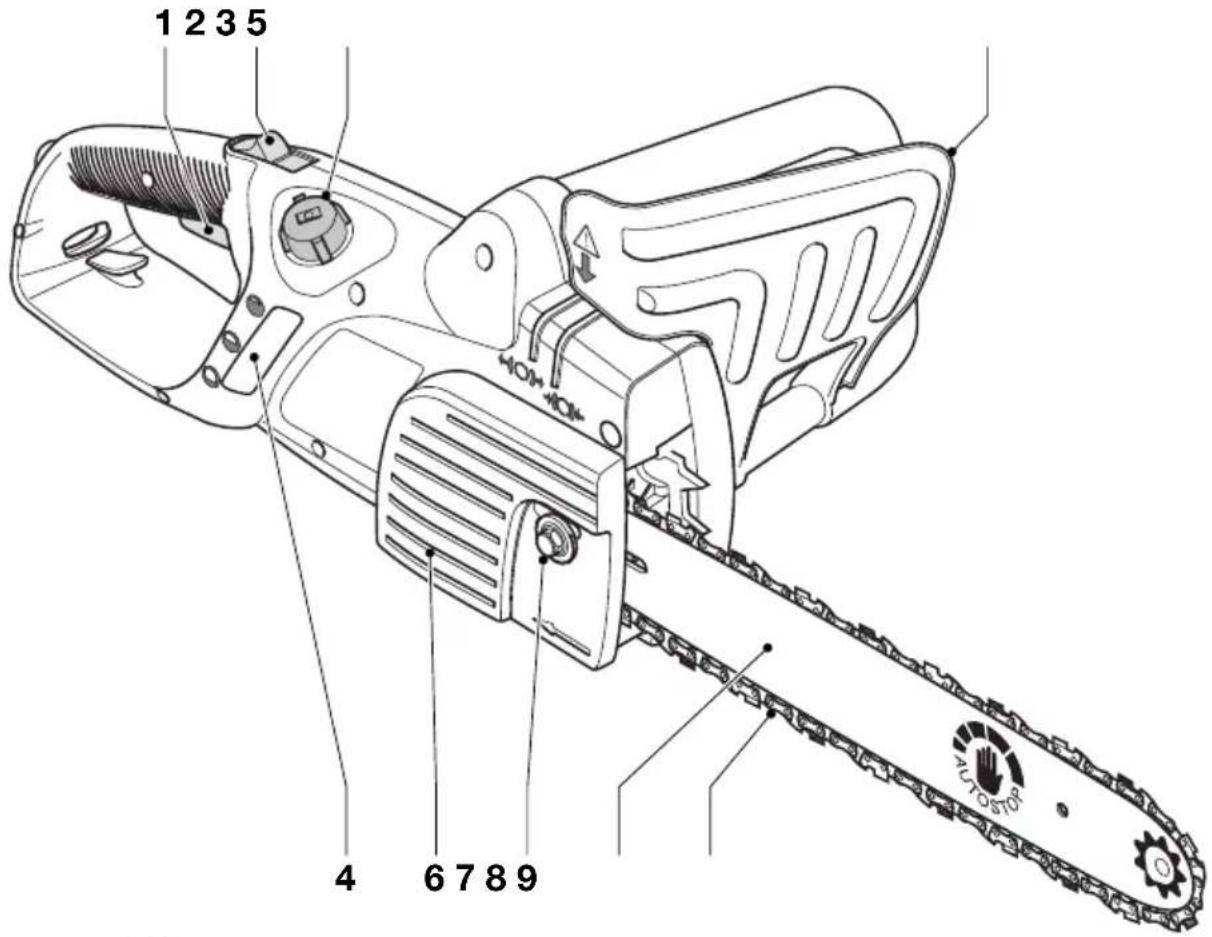
OVERVIEW (fig. A)
- On/off switch
- Lock-off button
- Oil cap
- Oil level indicator
- Front guard/chain brake
- Chain cover
- Chain cover bolt
- Guide bar
- Chain
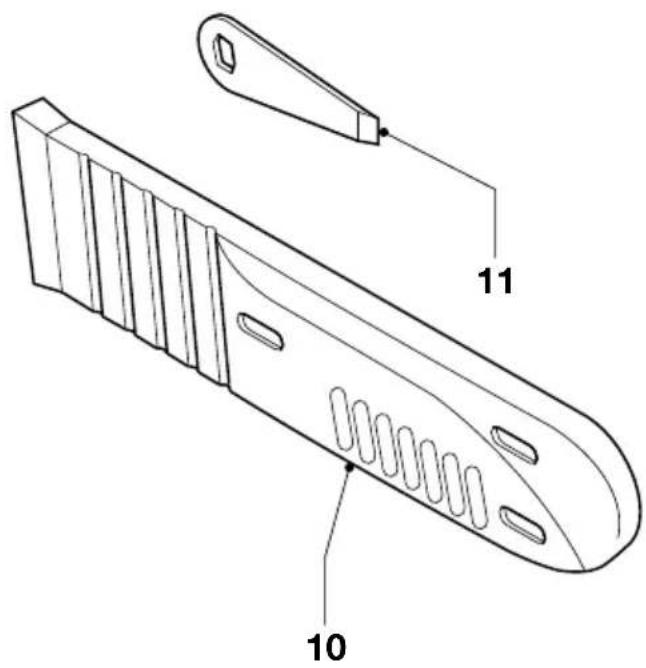
- Chain sheath
- Spanner

ASSEMBLY

Before assembly, make sure that the tool is switched off and unplugged.
Oiling the chain (fig. A)
- You must do this whenever you use a new chain for the first time. Take the new chain out of its plastic bag and soak it in chain oil for at least an hour before using it. Use Black & Decker chain oil (cat. no. A6027).
- We recommend that you use only one brand of oil during the lifetime of your chainsaw because mixtures of different oils could lead to the oil becoming degraded, which can drastically shorten the lifetime of the saw chain.
◆Never use waste oil, thick oil or very thin sewing machine oil. These may damage your chainsaw.
Fitting the guide bar and chain (fig. B, C & D)

Wear protective gloves.
◆Place the saw onto a stable surface.
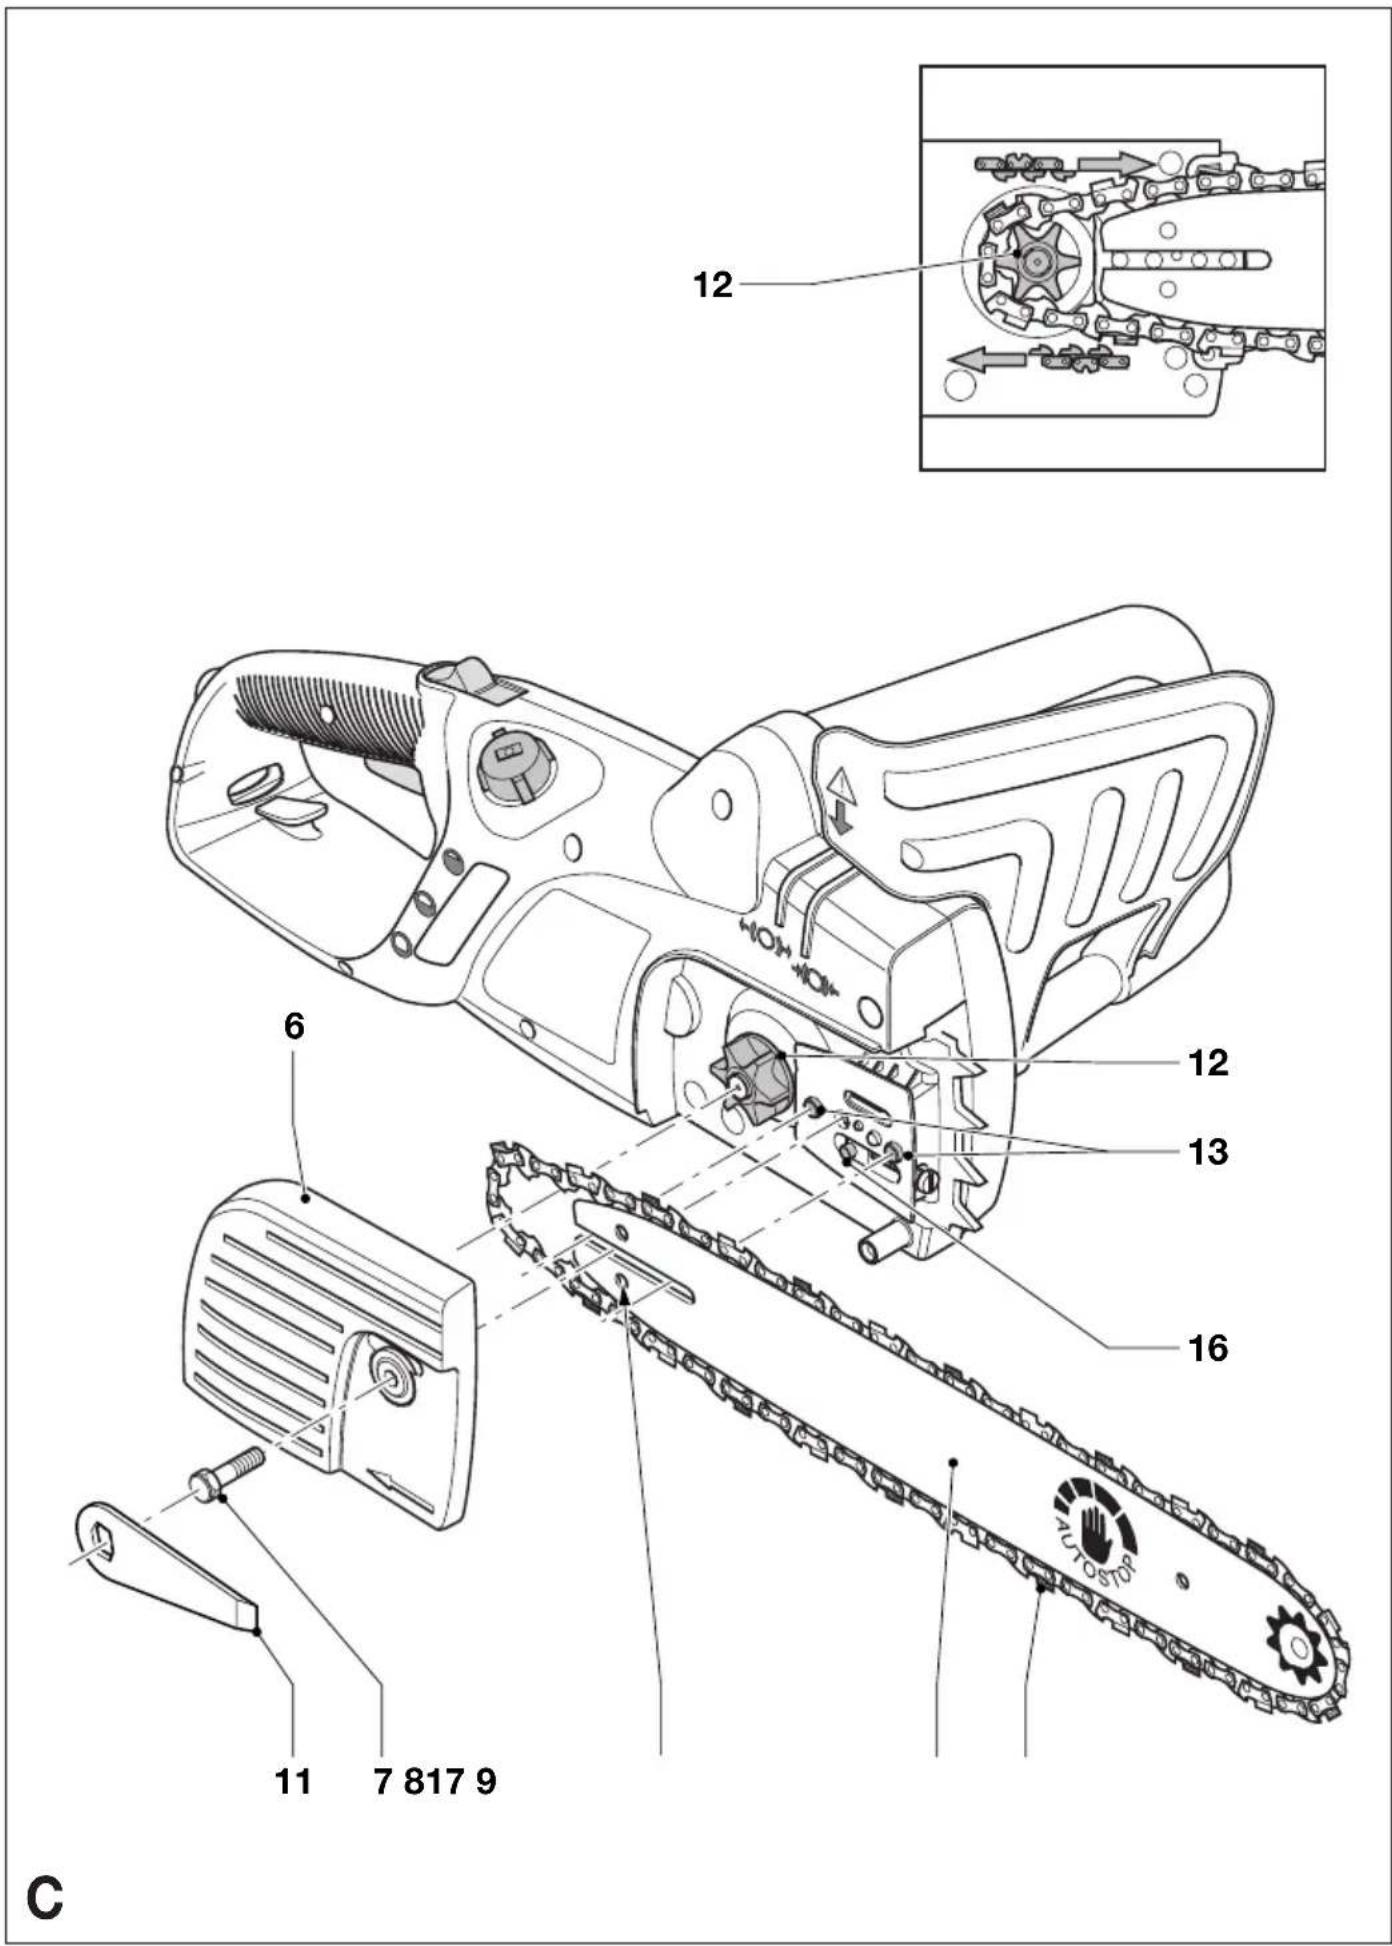
◆Loosen and remove the chain cover bolt (7) (fig. C).
◆Remove the chain cover (6).
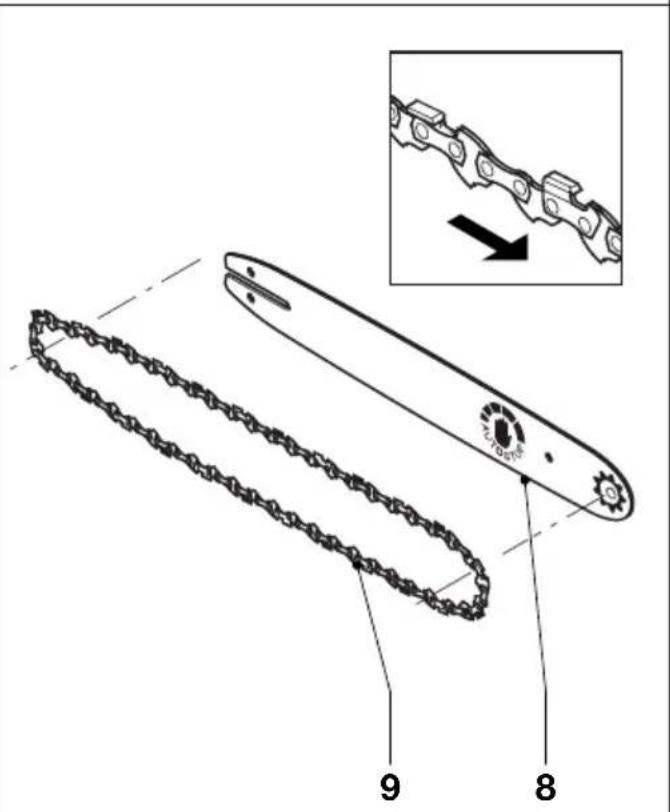
◆Place the chain (9) over the guide bar (8), making sure that the cutters on the upper part of the guide bar face towards the front (fig. B).
◆Guide the chain around the guide bar and pull it to create a loop at the rear end of the guide bar.
◆Place the chain and guide bar onto the saw. Guide the chain around the drive sprocket (12). Place the guide bar onto the studs (13). Make sure that the sliding nut peg (16) locates into the tensioning hole (17).
◆Place the chain cover (6) onto the saw.
◆Fit the chain cover bolt (7) and tighten it finger tight.
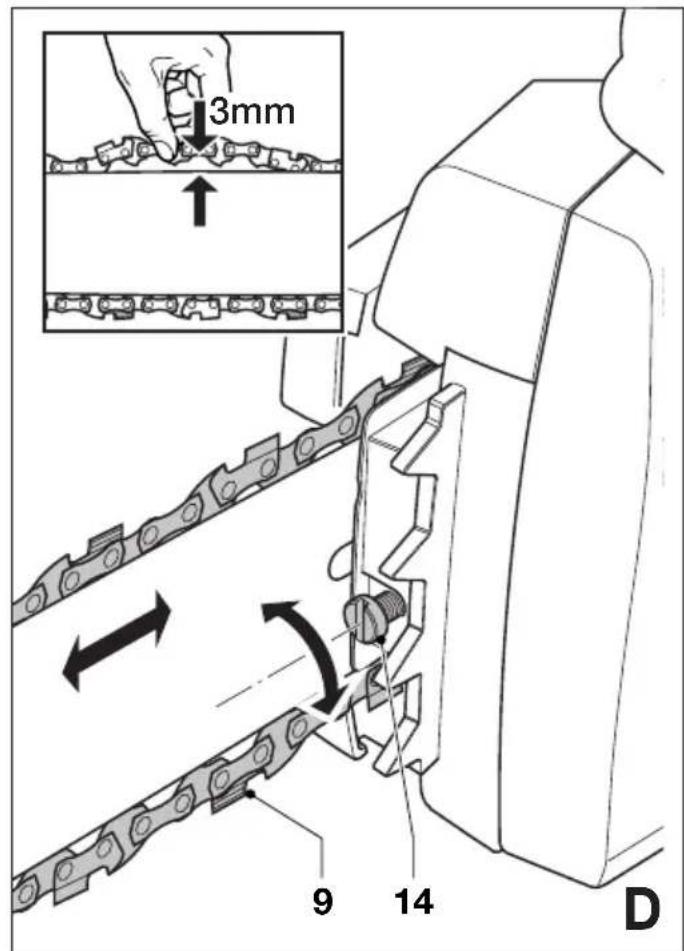
♦Turn the screw (14) (fig. D) clockwise until the chain is tight. Make sure that the chain is snug around the guide bar. Do not overtighten.
◆Tighten the chain cover bolt using the spanner supplied.
Checking and adjusting the chain tension (fig. D)
Before use and after every 10 minutes of use, you must check the chain tension.
Lightly pull on the chain as shown. The tension is correct when the chain snaps back after being pulled 3 mm away from the guide bar. There should be no "sag" between the guide bar and chain on the underside.
Note: Do not over-tension the chain as this will lead to excessive wear and will reduce the life of the bar and chain.
Note: When the chain is new, check the tension frequently (after disconnecting from the mains) during the first 2 hours of use as a new chain stretches slightly.
To increase the tension:
◆Turn the screw (14) clockwise.
USE

Let the tool work at its own pace. Do not overload.
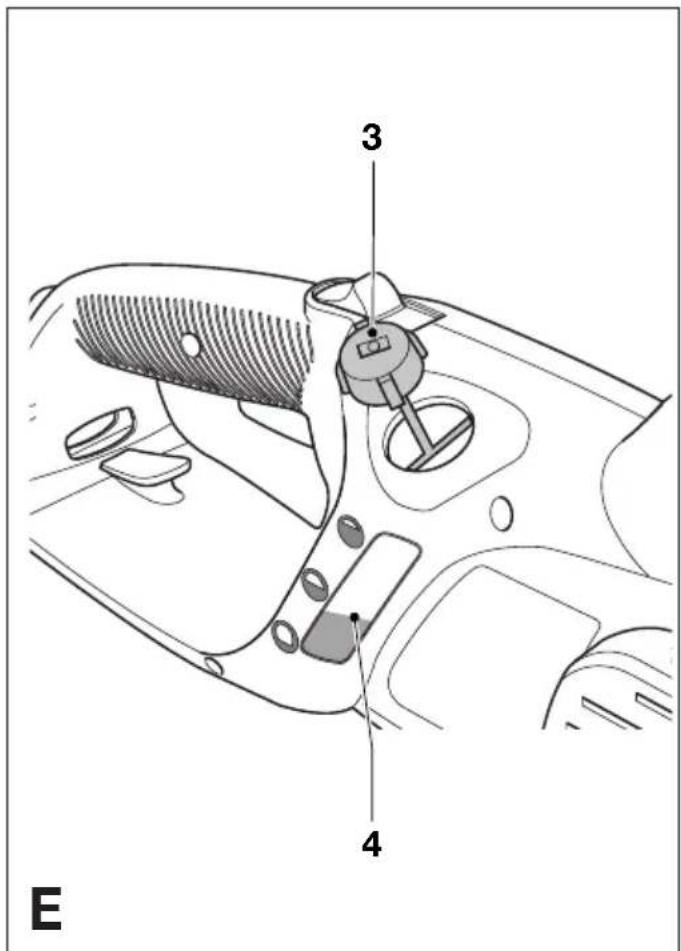
Filling oil into the reservoir (fig. E)
◆Remove the oil cap (3) and fill the reservoir with the recommended chain oil. You can see the oil level in the indicator slot (4). Refit the oil cap.
Periodically switch off and check the oil in the indicator; if it is less than a quarter full, disconnect your chainsaw from the mains and refill with the correct oil.
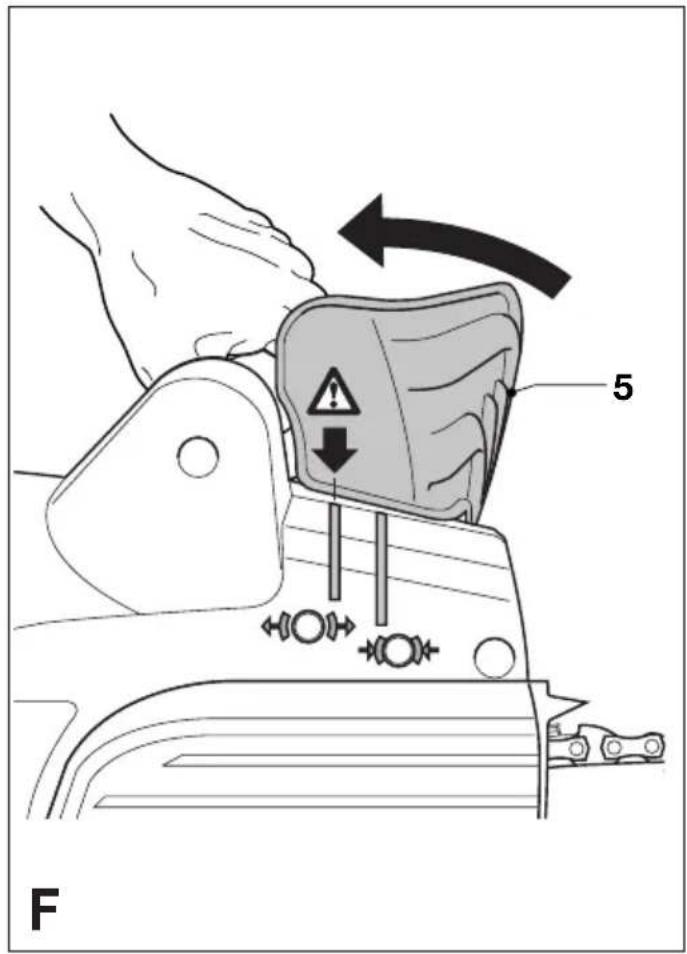
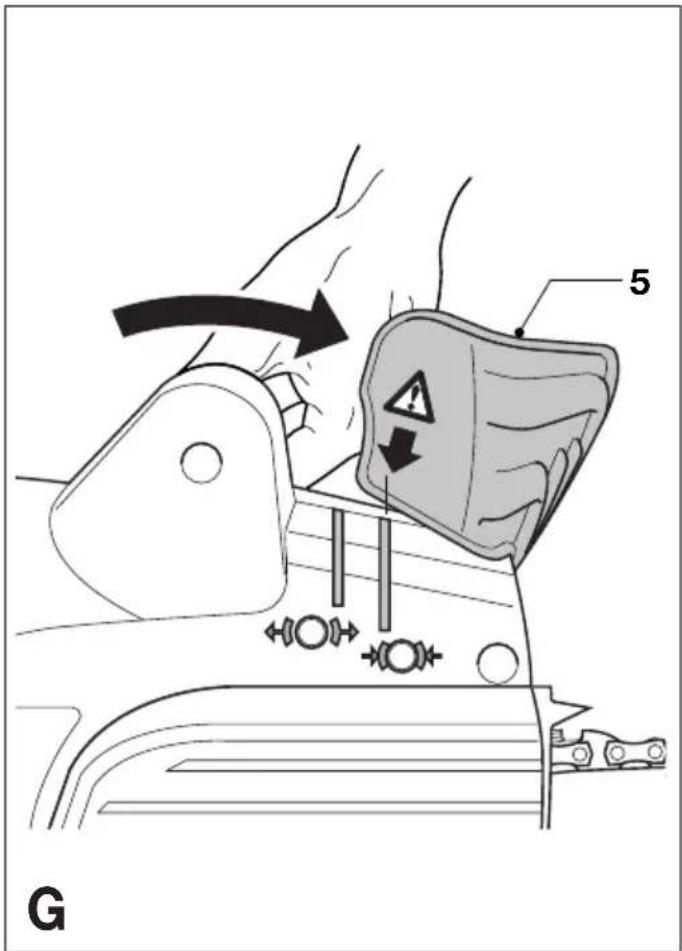
Auto-stop chainbrake (fig. F & G)
This tool is fitted with an auto-stop chainbrake which will stop the chain within 150 ms each time you release the rear trigger, or if kickback should occur. This brake should be tested before every use.
How to set the chainbrake
◆Make sure that the tool is disconnected from the mains supply.
◆Pull the front guard (5) back into the "set" position ◀
The tool is now ready to use.
How the anti-kickback chainbrake works
In the event of kickback, your left hand comes in contact with the front guard, pushing it backwards, and stops the tool within 150 ms.
How the inertia activated chainbrake works
The chainbrake is activated when the front hand guard is pushed forward, either manually, by the back of the users hand or by its own weight. The advantage of the inertia brake is that it is activated by a severe kickback, eg. when the chain hits metal, even if the users hand does not contact the front guard, ie. when the saw is in the felling position.
How to test the anti-kickback chainbrake
◆Grip the tool firmly in both hands on a firm surface - make sure the chain is clear of the ground and switch on (see "How to switch your chainsaw on").
◆Rotate your left hand forward around the front handle so that the back of your hand comes in contact with the front guard and pushes it backwards (fig. G). The chain should stop within a few fractions of a second.
To reset after the operation of the chainbrake
◆Follow the instructions for setting the chainbrake.
Notes:
It will not be possible to switch the tool on if the front guard is not in the "set" position.
◆Avoid re-starting the tool until you hear the motor come to a complete rest.
If the chain does not come to rest immediately then this indicates that it needs tensioning (see "Fitting the guide bar and chain").
How to switch the tool on (fig. A)
◆Grip your chainsaw firmly with both hands. Push the lock-off button (2) forward and then push the on/off switch (1) to start.
When the motor starts, remove your thumb from the lock button and grip the handle firmly.
Do not force the tool - allow it to do the work.
It will do a better and safer job at the speed for which it is designed. Excessive force will stretch the chain.
ENGLISH
If the saw chain or bar becomes jammed:
◆Switch the tool off.
◆Disconnect the tool from the mains supply.
◆Open the cut with wedges to relieve the strain on the guide bar. Do not try to wrench the saw free. Start a fresh cut.
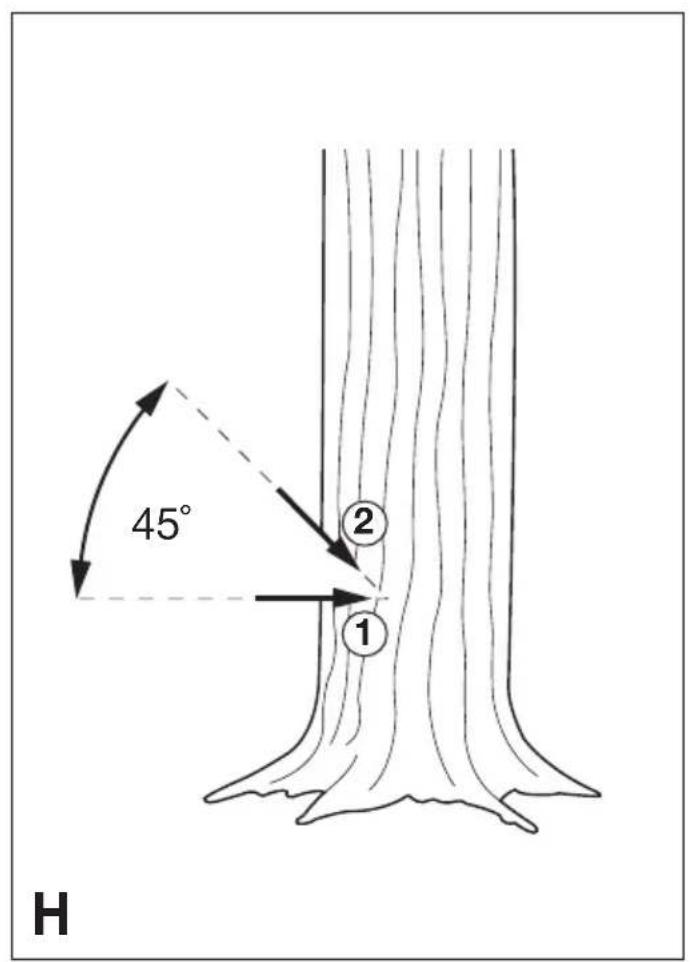
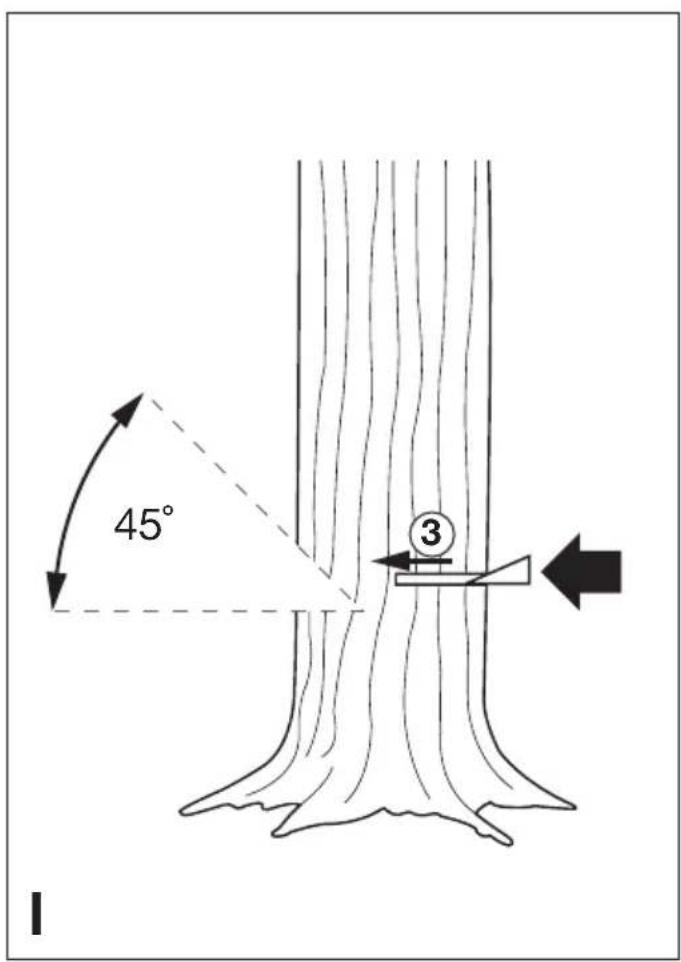
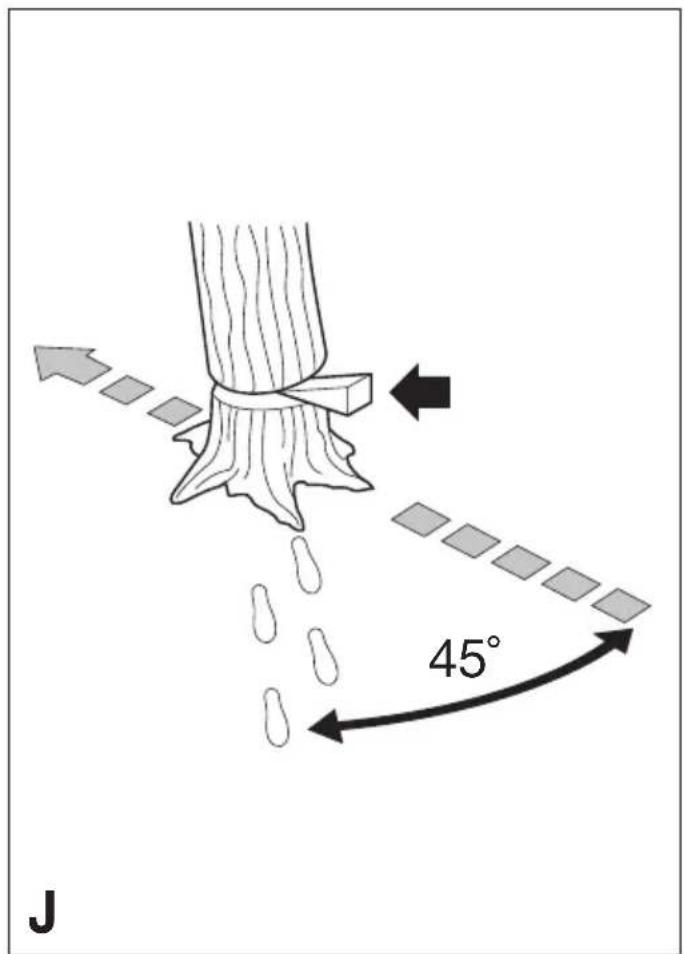
Felling (fig. H - J)
◆Pre-plan a safe exit from falling trees or branches.
◆Cut one third of the diameter of the tree (Fig. H). Then cut down from above to make a notch of about 45^ . This way you will avoid pinching the saw.
◆Make a single felling cut from the other side but stop before you cut through to the notch (fig. 1).
◆Drive a wedge or wedges into the felling cut to open it and drop the tree (fig. J).
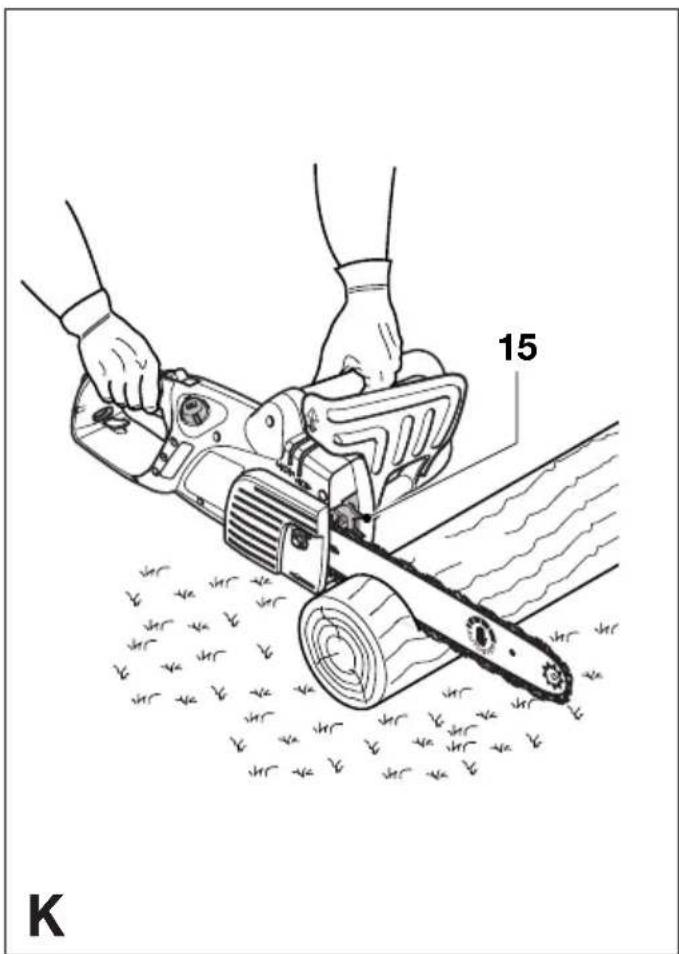
Logging (fig. K - M)
How you should cut depends on how the log is supported. Use a saw horse whenever possible. Always start a cut with the chain running and the spiked bumper (15) in contact with the wood (fig. K). To complete the cut use a pivoting action of the spiked bumper against the wood.
When supported along its whole length
◆Make a downward cut, but avoid cutting the earth as this will blunt your saw quickly.
When supported at both ends
- First, cut one third down to avoid splintering and second, cut again to meet the first cut.
When supported at one end
- First, cut one third up to avoid splintering and second, cut down to prevent splintering.
When on a slope (fig. L)
◆Always stand on the uphill side.
When using a saw horse (fig. M)
This is strongly recommended whenever possible.
◆Position the log in a stable position. Always cut on the outside of the saw horse arms.
MAINTENANCE (fig. N)
Regular maintenance ensures a long effective life for the tool. We recommend you make the following checks on a regular basis.
Oil level
The level in the reservoir should not be allowed to fall below a quarter full. Top up if low.
Chain and guide bar
◆After every few hours of use, remove the guide bar and chain and clean thoroughly.
On reassembling, the guide bar should be turned through 180° and the sprocket nose greased via the sprocket lubrication hole (18). This ensures an even distribution of wear around the guide bar rails.
TROUBLESHOOTING
If the tool does not operate correctly, check the following.
Fault Possible cause Action
| Tool will not start. Blown fuse. Replace fuse. |
| Tripped RCD. Check RCD. |
| Mains lead not connected. Check mains supply. |
| Tool will not start - lock-offbutton will not slide. Front guard in the brake position Reset front guard. |
| Chain does not stop instantlywhen the tool is switched off. Chain tension is too slack. Check chain tension. |
| Bar/chain appear hot/smoking. Oil tank empty. Check oil tank level. |
| Chain tension is too tight. Check chain tension. |
| Guide bar sprocket nose needs greasing. |
Saw chain sharpening
If you are to get the best possible performance from the tool it is important to keep the teeth of the saw chain sharp. Guidance for this procedure is found on the sharpener package. For this purpose we recommend the purchase of the Black & Decker saw chain sharpening kit (available from Black & Decker service agents and selected dealers).
Replacing worn out chains
Replacement chains are available through retailers or Black & Decker service agents. Always use genuine spare parts.
Saw chain sharpness
The cutters will blunt immediately if they touch the ground or a nail whilst cutting.
Saw chain tension
◆Regularly check the chain tension.
What to do if your chainsaw needs repair
Your chainsaw is in accordance with the relevant safety requirements. Repairs should only be carried out by a qualified persons using original spare parts, otherwise this may result in considerable danger to the user. We recommend you keep this user manual in a safe place.
ACCESSORIES
Cat. no. Description
| A6154 300 mm / 12" chain |
| A6155 350 mm / 14" chain |
| A6156 400 mm / 16" chain |
| A6039 Sharpening kit |
| A6027 0.5 l chain oil |
PROTECTING THE ENVIRONMENT

Black & Decker provides a facility for recycling Black & Decker products once they have reached the end of their working life. This service is provided free of charge. To take advantage of this service please return your product to any authorised repair agent who will collect them on our behalf.
You can check the location of your nearest authorised repair agent by contacting your local Black & Decker office at the address indicated in this manual. Alternatively, a list of authorised Black & Decker repair agents and full details of our after-sales service and contacts are available on the Internet at: www.2helpU.com.
Guarantee
Black & Decker is confident of the quality of its products and offers an outstanding guarantee.
This guarantee statement is in addition to and in no way prejudices your statutory rights.
The guarantee is valid within the territories of the Member States of the European Union and the European Free Trade Area.
If a Black & Decker product becomes defective due to faulty materials, workmanship or lack of conformity, within 24 months from the date of purchase, Black & Decker guarantees to replace defective parts, repair products subjected to fair wear and tear or replace such products to ensure minimum inconvenience to the customer unless:
◆The product has been used for trade, professional or hire purposes;
◆The product has been subjected to misuse or neglect;
◆The product has sustained damage through foreign objects, substances or accidents;
◆Repairs have been attempted by persons other than authorised repair agents or Black & Decker service staff.
To claim on the guarantee, you will need to submit proof of purchase to the seller or an authorised repair agent. You can check the location of your nearest authorised repair agent by contacting your local Black & Decker office at the address indicated in this manual. Alternatively, a list of authorised Black & Decker repair agents and full details of our after-sales service and contacts are available on the Internet at: www.2helpU.com.
EC DECLARATION OF CONFORMITY

GK1330/GK1430/GK1435/GK1440/
GK1630/1635/GK1640 series
Black & Decker declares that these
products conform to:
98/37/EC, 89/336/EEC, 73/23/EEC,
EN 50144, EN 55014
2000/14/EC, Chainsaw ≤ 1600 W, Annex V
Level of sound pressure, measured according to 2000/14/EC:
L_pA (sound pressure) dB(A) 88
L_WA (acoustic power) dB(A) 101
L_WA (guaranteed) dB(A) 103

Always wear ear protection if the sound pressure exceeds 85 dB(A).
Hand/arm weighted vibration value according to EN 50144:
3.5 m/s ^2
TÜV Rheinland
| Cert. No. | |
| BM981084801 |
Kevin Hewitt
Director of Consumer Engineering
Spennymoor, County Durham DL16 6JG,
United Kingdom
KETTENSÄGE

GK1330/GK1430/GK1435/GK1440/GK1630/1635/GK1640
Kevin Hewitt Director of Consumer Engineering Spennymoor, County Durham DL16 6JG, United Kingdom
TRONÇONNEUSE

GK1330/GK1430/GK1435/GK1440/
GK1630/1635/GK1640
98/37/CEE, 89/336/CEE, 73/23/CEE,
EN 50144, EN 55014
| Cert. No. | |
| BM981084801 |
GK1330/GK1430/GK1435/GK1440/GK1630/1635/GK1640
| Cert. No. | |
| BM981084801 |
K. Hewitt
◆Een botte of losse ketting.
GK1330/GK1430/GK1435/GK1440/GK1630/1635/GK1640
| Cert. No. | |
| BM981084801 |
Kevin Hewitt Director of Consumer Engineering Spennymoor, County Durham DL16 6JG, United Kingdom
MOTOSIERRA

GK1330/GK1430/GK1435/GK1440/
GK1630/1635/GK1640
98/37/CEE, 89/336/CEE, 73/23/CEE,
EN 50144, EN 55014
2000/14/CEE, motosierra ≤ 1600 W,
Annex V
| Cert. No. | |
| BM981084801 |
Kevin Hewitt
Spennymoor, County Durham DL16 6JG,
United Kingdom
ELECTROSSERRA

GK1330/GK1430/GK1435/GK1440/GK1630/1635/GK1640
2000/14/CEE, electrosserra ≤ 1600 W, Annex V
| Cert. No. | |
| BM981084801 |
Kevin Hewitt Engenheiro Responsável Spennymoor, County Durham DL16 6JG, United Kingdom
KEDJESÅG

♦Skruva skruven (14) medsols.
ANVÄNDNING

| Cert. No. |
| BM981084801 |
Kevin Hewitt Director of Consumer Engineering Spennymoor, County Durham DL16 6JG, United Kingdom
KJEDESAG

VEDLIKEHOLD (fig. N)
GK1330/GK1430/GK1435/GK1440/
GK1630/1635/GK1640
98/37/E∅F, 89/336/E∅F, 73/23/E∅F,
EN 50144, EN 55014
2000/14/E∅F, Kjedesag ≤ 1600 W, Annex V
Lydnivået, målt i henhold til 2000/14/E∅F:
L_pA (lydnivå) dB(A) 88
L_WA (akustisk effekt) dB(A) 101
L_WA (garantert) dB(A) 103

Director of Consumer Engineering
Spennymoor, County Durham DL16 6JG,
United Kingdom
KÆDESAV

Kend din kædesav

Reservedele / reparationer
GK1330/GK1430/GK1435/GK1440/
GK1630/1635/GK1640
| Cert. No. |
| BM981084801 |
Kevin Hewitt Director of Consumer Engineering Spennymoor, County Durham DL16 6JG, United Kingdom
KETJUSAHA

Tunne ketjusahasi

GK1330/GK1430/GK1435/GK1440/
GK1630/1635/GK1640
| Cert. No. |
| BM981084801 |
K. Hewitt
Kevin Hewitt Director of Consumer Engineering Spennymoor, County Durham DL16 6JG, United Kingdom
ΑΛΥΣΟΠΡΙΟΝΟ

| Cert. No. | |
| BM981084801 |
Kevin Hewitt
Spennymoor, County Durham DL16 6JG, United Kingdom
 |  | GK1430 GK1435 GK1440 GK1630 GK1635GK1640 GK1330 GK1630T GK1635T GK1640T | TYP4 |
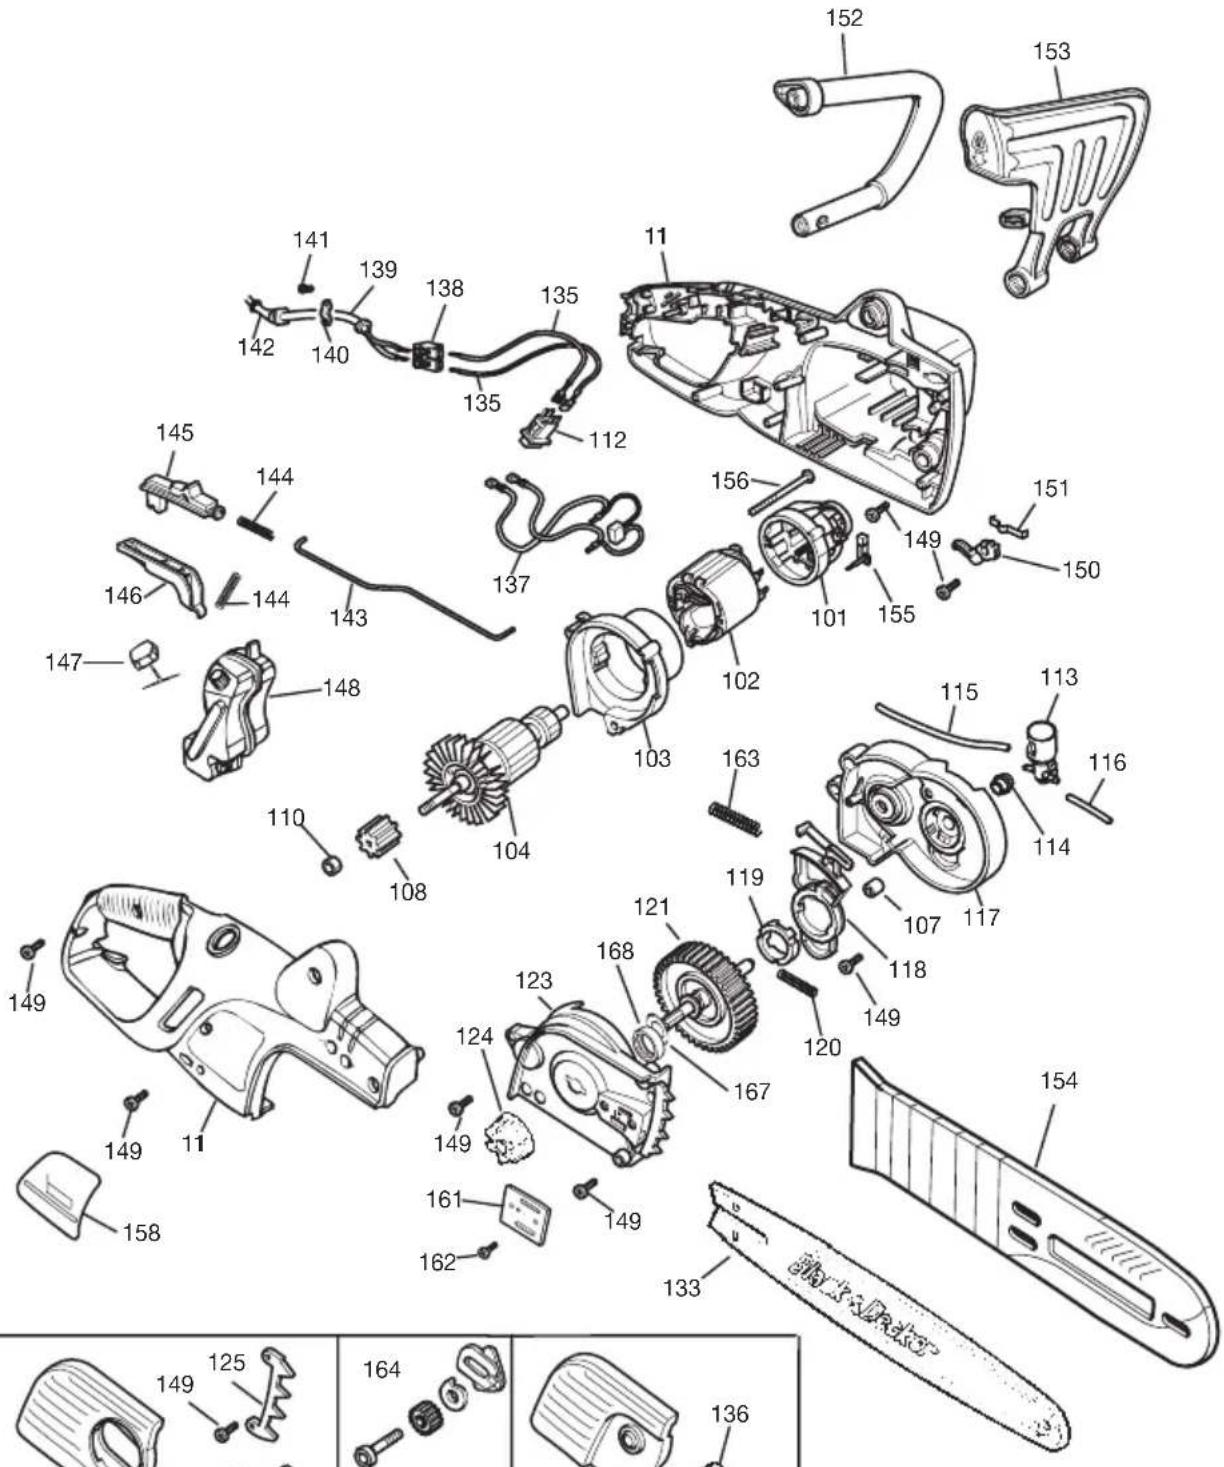 | |||
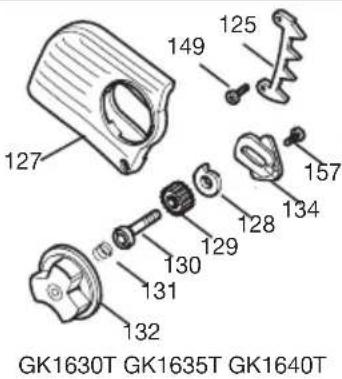 | 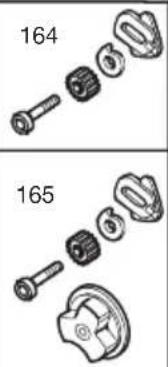 | 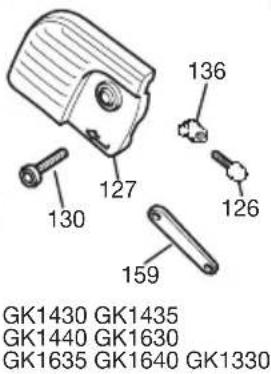 |  |
| E13317 | WWW.2helpU.com | 04 - 03 - 02 | |
| Australia | DEWALT Industrial Power Tool Company7 Clarice Road, Box Hill, Victoria 3128 Fax 03 9899 7465 | |
| Belgique/België Black & Decker (Belgium) N.V. Tel. 02/719.07.11Weihoek 1, 1930 Zaventem Fax 02/721.40.45 | ||
| Danmark Black & Decker Tel. 70 20 15 10Hejrevang 26B, 3450 Allerød Fax 48 14 13 99Internet: www.blackdecker.dk | ||
| Deutschland Black & Decker GmbH Tel. 06126/21 24 83Black & Decker Str. 40, D - 65510 Idstein Fax 06126/21 26 01 | ||
| ΕλλάςBlack & Decker (Ελλάς) A.E. Τηλ. (010) 8981 616Στράβωνος 7 & Βουλιαγμένης 159 Τηλ. (010) 8982 63016674 Γλυφάδα, Αθήνα, Ελλάδα Φαξ Service (010) 8983 285 | ||
| España Black & Decker Spain Tel. 934 797 400Parque de Negocios "Mas Blau" Fax 934 797 419Edificio Muntadas, c/Bergadá, 1, Of. A608820 El Prat de Llobregat (Barcelona) | ||
| France | Black & Decker (France) S.A.S.B.P. 21, 69571 Dardilly Cédex | Tel. 04 72 20 39 20Fax 04 72 20 39 00 |
| Helvetia | ROFO AGGewerbezone Seeblick3213 Kleinbösingen | Tel. 026-6749391Fax 026-6749394 |
| Italia | Black & Decker Italia SpAViale Elvezia 220052 Monza (MI) | Tel. 039-23871Fax 039-2387592/2387594Numero verde 800-213935 |
| Nederland | Black & Decker (Nederland) BVFlorijnstraat 10, 4879 AH Etten-Leur | Tel. 076-5082000Fax 076-5038184 |
| New Zealand | Black & Decker Tel. 09 579 760081 Hugo Johnson DrivePenrose, Auckland, New Zealand | Fax 09 579 8200 |
| Norge | Black & Decker (Norge) A/SPostboks 248, Leirdal, 1011 OsloInternet: www.blackdecker.no | Tlf. 22 90 99 00Fax 22 90 99 01 |
| Österreich | Black & Decker Vertriebsges.m.b.HErlaaerstraße 165, 1231 Wien | Tel. 01 66116-0Fax 01 66116-14 |
| Portugal | Black & Decker Tel. 214667500Rua Egas Moniz 173,S. João do Estoril 2766-651, Estoril | Fax 214667575 |
| South Africa | Black & Decker South Africa (Pty) LtdPhysical address:39 Commerce CrescentEastgate, ext. 12, Sandton, Kramerville 2148Postal address:Postnet Suite 107, Private Bag X65Halfway House 1685 | Tel. (011) 653-1400Fax (011) 653-1499 |
| Suomi Black & Decker Oy Palotie 3, 01610 Vantaa Brandvägen 3, 01610 Vanda | Puh: (09) 825 4540Fax: (09) 825 45 444Tel: (09) 825 4540Fax: (09) 825 45 444 | |
| Sverige | Black & Decker ABBox 603, 421 26 Västra Frölunda,Besöksadr. Ekonomivägen 11 | Tel: 031-68 60 00Fax: 031-68 60 08 |
| Türkiye | Black & Decker Merkez ServisDudullu Cad. Kerembey Sok. No. 1Küçükbakkalköy/Istanbul | Tel. 0216 455 89 73Faks 0216 455 20 52 |
| United Kingdom | Black & Decker Tel. 01753 511234210 Bath RoadSlough, Berkshire SL1 3YD | Fax 01753 551155Helpline 01753 574277 |
Dealer address Date of purchase Händleradresse Kaufdatum
◆ Is this tool your first purchase? ◆ Ist
you prefer not to receive further
The image contains a single, solid horizontal line, which is a stylistic or background element (like a rule line on paper). According to Rule 2, such lines must be ignored by the OCR result. Therefore, the corrected OCR text is:
[Empty]
The Ground Truth image displays a single, solid horizontal line. According to Rule 2 (UNDERSCORE & LINE RULES), this is a stylistic or background line, not a placeholder underscore. Therefore, the OCR result must ignore it and output nothing or only meaningful text. The provided OCR content is "____", which consists of four underscores. This is an incorrect interpretation of the line as a placeholder, violating the rule that stylistic lines must be ignored. The OCR has hallucinated placeholder underscores where none should exist in the GT. Hence, the OCR result is inconsistent with the Ground Truth.
◆ No ◆ Nein ◆ Non ◆ No ◆ Nee
The Ground Truth image displays a single, solid horizontal line. According to Rule 2 (UNDERSCORE & LINE RULES), this is a stylistic or background line, not a placeholder underscore. Therefore, the OCR result must ignore it and output nothing or only meaningful text. The provided OCR content is "____", which consists of four underscores. This is an incorrect interpretation of the line as a placeholder, violating the rule that stylistic lines must be ignored. The OCR has hallucinated placeholder underscores where none exist in the GT. Hence, the result is inconsistent with the Ground Truth.
◆ No ◆ Nein ◆ Non ◆ No ◆ Nee
m = 311
[Non-Text]
[Non-Text]
[Non-Text]
[Non-Text]
[Non-Text]
[Non-Text]
[Non-Text]
[Non-Text]
[Non-Text]
[Non-Text]
[Non-Text]
[Non-Text]
[Non-Text]
[Non-Text]
[Non-Text]
[Non-Text]
[Non-Text]
[Non-Text]
[Non-Text]
[Non-Text]
[Non-Text]
[Non-Text]
[Non-Text]
[Non-Text]
[Non-Text]
[Non-Text]
[Non-Text]
[Non-Text]
*
|
The Ground Truth image displays a single, solid horizontal line. According to Rule 2 (UNDERSCORE & LINE RULES), this is a stylistic or background line, not a placeholder underscore. Therefore, the OCR result must ignore it and output nothing or only meaningful text. The provided OCR content is "____", which consists of four underscores. This is an incorrect interpretation of the line as a placeholder, violating the rule that stylistic lines must be ignored. The OCR has hallucinated placeholder underscores where none should exist in the GT. Hence, the OCR result is inconsistent with the Ground Truth.
◆ Yes ◆ Ja ◆ Oui ◆ Si ◆ Ja ◆
◆ Sim ◆ Ja ◆ Ja ◆ Ja ◆ Kyllä ◆
广力云智慧零售收银系统
◆ No ◆ Nein ◆ Non ◆ No ◆ Ne
The Ground Truth image displays a single, solid horizontal line. According to Rule 2 (UNDERSCORE & LINE RULES), this is a stylistic or background line, not a placeholder underscore. Therefore, the OCR result must ignore it and output nothing or only meaningful text. The provided OCR content is "____", which consists of four underscores. This is an incorrect interpretation of the line as a placeholder, violating the rule that stylistic lines must be ignored. The OCR has hallucinated underscores where none should exist in the GT, violating the rule to ignore such lines. Hence, the OCR result is inconsistent with the Ground Truth.
[Non-Text]
[Non-Text]
[Non-Text]
The Ground Truth image displays a single, solid horizontal line, which is a stylistic or background element (like a rule line on paper). According to Rule 2, such lines must be ignored by the OCR result. The OCR content provided is "", which consists of no characters. Since the OCR output correctly ignores the background/stylistic line and produces no actual text, it complies with the “Stylistic/Background Lines (Ignore)” rule. Therefore, the OCR result is consistent with the Ground Truth.
Cat. no.:
Cust. Hov.
The Ground Truth image displays a single, solid horizontal line. According to Rule 2 (UNDERSCORE & LINE RULES), this is a stylistic or background line, not a placeholder underscore. Therefore, the OCR result must ignore it and output nothing or only meaningful text. The provided OCR content is "____", which consists of four underscores. This is an incorrect interpretation of the line as a placeholder, violating the rule that stylistic lines must be ignored. The OCR has hallucinated underscores where none should exist based on the GT's visual context. Hence, the OCR result is inconsistent with the Ground Truth.
12x^2+y^2=r^2
The Ground Truth image displays a single, solid horizontal line. According to Rule 2 (UNDERSCORE & LINE RULES), this is a stylistic or background line, not a placeholder underscore. Therefore, the OCR result must ignore it and output nothing or only meaningful text. The provided OCR content is "____", which consists of four underscores. This is an incorrect interpretation of the line as a placeholder, violating the rule that stylistic lines must be ignored. The OCR has hallucinated underscores where none should exist based on the GT's visual context. Hence, the OCR result is inconsistent with the Ground Truth.
The Ground Truth image displays a single, solid horizontal line. According to Rule 2 (UNDERSCORE & LINE RULES), this is a stylistic or background line, not a placeholder underscore. Therefore, the OCR result must ignore it and output nothing or only meaningful text. The provided OCR content is "____", which consists of four underscores. This is an incorrect interpretation of the line as a placeholder, violating the rule that stylistic lines must be ignored. The OCR has hallucinated underscores where none should exist based on the GT's visual context. Hence, the OCR result is inconsistent with the Ground Truth.
In this study, first year 2014
◆ Is this tool your first purchase? ◆ Ist
English Please complete this section immediately after the
purchase of your tool and send it to Black & Decker in your country. If you live in Australia or New Zealand,
please register by using the alternative guarantee card supplied.
- CHAINSAW
- Know your chainsaw
- SAFETY INSTRUCTIONS
- Warning symbols on your chainsaw
- ENGLISH
- Double insulation
- Electrical safety
- OVERVIEW (fig. A)
- ASSEMBLY
- Oiling the chain (fig. A)
- Fitting the guide bar and chain (fig. B, C & D)
- Checking and adjusting the chain tension (fig. D)
- USE
- Filling oil into the reservoir (fig. E)
- Auto-stop chainbrake (fig. F & G)
- How to set the chainbrake
- How the anti-kickback chainbrake works
- How the inertia activated chainbrake works
- How to test the anti-kickback chainbrake
- To reset after the operation of the chainbrake
- Notes:
- How to switch the tool on (fig. A)
- Felling (fig. H - J)
- Logging (fig. K - M)
- When supported along its whole length
- When supported at both ends
- When supported at one end
- When on a slope (fig. L)
- When using a saw horse (fig. M)
- MAINTENANCE (fig. N)
- Oil level
- Chain and guide bar
- TROUBLESHOOTING
- Saw chain sharpening
- Replacing worn out chains
- Saw chain sharpness
- Saw chain tension
- What to do if your chainsaw needs repair
- ACCESSORIES
- PROTECTING THE ENVIRONMENT
- Guarantee
- EC DECLARATION OF CONFORMITY
- KETTENSÄGE
- TRONÇONNEUSE
- MOTOSIERRA
- ELECTROSSERRA
- KEDJESÅG
- ANVÄNDNING
- KJEDESAG
- VEDLIKEHOLD (fig. N)
- KÆDESAV
- Kend din kædesav
- Reservedele / reparationer
- KETJUSAHA
- Tunne ketjusahasi
- ΑΛΥΣΟΠΡΙΟΝΟ
Brand : BLACK & DECKER
Model : GK1330
Category : Service après-vente