
SHAZ 22.2 C4 - Vacuum Cleaner SILVERCREST - Free user manual and instructions
Find the device manual for free SHAZ 22.2 C4 SILVERCREST in PDF.


| Product type | Cordless hand vacuum |
| Brand | SilverCrest |
| Model | SHAZ 22.2 C4 |
| Power supply | Li-ion battery 22.2 V, 2400 mAh (53.28 Wh) |
| Power adapter | Input 100-240 V~, output 27 V 780 mA |
| Charging time | Approx. 5 hours |
| Runtime | Approx. 20 minutes |
| Filters | HEPA filter, metal filter, motor protection filter, exhaust air filter |
| Included accessories | Suction tube, floor nozzle with rotating brush, crevice tool, large adjustable brush nozzle, small brush nozzle, adapters |
| Functions | On/Off switch, ECO mode (power reduction), LED charge indicator |
| Base station | Wall mount with automatic charging and accessory storage |
| Safety | Short-circuit protection, protective insulation, automatic shut-off in case of blockage |
| Maintenance | Washable filters with water, removable rotating brush for cleaning |
| Warranty | 3 years |
| Usage | Household, indoor only |
Frequently Asked Questions - SHAZ 22.2 C4 SILVERCREST
User questions about SHAZ 22.2 C4 SILVERCREST
0 question about this device. Answer the ones you know or ask your own.
Ask a new question about this device
Download the instructions for your Vacuum Cleaner in PDF format for free! Find your manual SHAZ 22.2 C4 - SILVERCREST and take your electronic device back in hand. On this page are published all the documents necessary for the use of your device. SHAZ 22.2 C4 by SILVERCREST.
USER MANUAL SHAZ 22.2 C4 SILVERCREST
natural_image
Black handheld vacuum cleaner with attached sensor module, shown against white background (no text or symbols on device body)2-IN-1 CORDLESS VACUUM CLEANER SHAZ 22.2 C4
HOYER Handel GmbH
Tasköprüstraße 3
DE-22761 Hamburg
DEUTSCHLAND
Status of information - Informationernes stand - Version des informations
05/2019 ID: SHAZ 22.2 C4 19 V1.5
GB IE NI CY Operating instructions
2-IN-1 CORDLESS VACUUM CLEANER
FR BE Mode d'emploi
ASPIRATEUR SANS FIL 2 EN 1
GR CY Οδηγία χρήσης
- Overview 3
- Intended purpose 4
- Safety information .... 5
- Items supplied 7
- Base station 7
5.1 Fastening the base station 7
5.2 Storing after use 8
-
Charging the battery 8
-
Installation 9
7.1 Engaging and disengaging connections 9
7.2 Prior to every use 9
7.3 Suction pipe.... 10
7.4 Floorhead 10
7.5 Crevice nozzle 11
7.6 Large brush nozzle.... 11
7.7 Small brush nozzle.... 11
-
Vacuum cleaning 11
-
Dust container and filters 12
9.1 Assembling the dust container 12
9.2 Emptying the dust container.... 12
9.3 Paper filter (HEPA) 13
9.4 Metal filter 13
9.5 Motor protection filter.... 13
9.6 Exhaust air filter.... 13
-
Cleaning and care 13
-
Storage 14
- Disposal 14
- Trouble-shooting 15
- Ordering accessories 15
- Technical specifications 16
- Warranty of the HOYER Handel GmbH 17
1. Overview
1 On/off switch
2 E C O ECO button with LED (reduces the suction power)
3 Handle
4 Socket for direct connection of the power adapter
5 Charging contacts (for charging on the base station)
6 Battery compartment with inspection window
7 Unlocking mechanism of the battery
8 Marking for mounting the dust container
9 Filter carrier with handle (in dust container)
10 Metal filter (on filter carrier)
11 Paper filter (HEPA) (in the filter carrier)
12 Dust container
13 Flap for emptying the dust container
14 Motor protection filter (in filter carrier above the paper filter)
15 Button for opening the dust container
16 Opening at the suction device for the suction pipe, the floorhead, the crevice nozzle and adapter
17 Socket for holding the plug of the suction pipe / floorhead
18 Suction device
19 Exhaust air filter
20 Filter cover
21 Unlocking mechanism for the filter cover
22 Plug for connection to the suction device
23 Release button (also present for floorhead, crevice nozzle and large brush nozzle, for simplicity only numbered once)
24 Suction pipe
25 Socket for holding the plug of the floorhead
26 Opening at the suction pipe for the floorhead, crevice nozzle, large brush nozzle and adapter
27 Floorhead (with joint)
28 Rollers of the floorhead
29 Inspection window of the floorhead
30 Rotating brush
31 Holder for the suction device
32 Power adapter with power cable
33 Socket for power adapter
34 Base station
35 Holders for two nozzles
36 Battery
37 Charging indicator of the battery + LEDs flash when rotating brush blocked
38 Small brush nozzle
39 Button for extension of large brush nozzle
40 Large brush nozzle (length adjustable)
41 Crevice nozzle
not shown:
Fixing material
(2 rawlplugs, 2 screws)
Drilling template
42 Adapter for small brush nozzle
43 Second adapter for small brush nozzle
Thank you for your trust!
Congratulations on your new battery-powered hand-held vacuum cleaner.
For safe handling of the product and in order to get to know the entire range of features:
- Read these user instructions through thoroughly prior to initial use.
- Above all, observe the safety information!
- The device should only be used as described in these user instructions.
- Keep this copy of the user instructions for reference.
- If you pass the device on to someone else, please include this copy of the user instructions. The user instructions are a component of the product.
We hope you enjoy your new battery-powered hand-held vacuum cleaner!
2. Intended purpose
The battery-powered hand-held vacuum cleaner is suited to vacuum normal, dry house dust and a little coarser dirt.
The device is designed for private home use and must not be used for commercial purposes.
The device must only be used indoors.
Foreseeable misuse

VARIOUS DANGERS!
- The following materials must not be sucked in:
- Liquids and damp dirt,
- Explosive or flammable materials such as flour or coal dust,
- Harmful substances such as asbestos dust,
- Embers, burning matches or other hot materials,
- Particularly fine dusts such as toner for copying machines. The filter inside the device is not suited for such materials.
3. Safety information
Warnings
If necessary, the following warnings are used in this copy of the user instructions:

DANGER! High risk: failure to observe this warning may result in injury to life and limb.
WARNING! Moderate risk: failure to observe this warning may result in injury or serious material damage.
CAUTION: low risk: failure to observe this warning may result in minor injury or material damage.
NOTE: circumstances and specifics that must be observed when handling the device.
Instructions for safe operation
- This device can be used by children from the age of 8 and people with restricted physical, sensory or intellectual abilities or people without adequate experience and/or understanding, if they are supervised or instructed on how to use this device safely and if they are aware of the resulting dangers. Children must not play with the device. Cleaning and maintenance by the user must not be performed by children without supervision.
- Children must not play with the device.
- Prior to cleaning, the battery must be removed from the suction device.
- Switch the device off and pull out the mains plug, ...
... before you assemble or disassemble the device,
... before you change the filters,
... before you eliminate blockages, and before you clean the device.
- The device must not be used after falling or when showing visible damage, or if it is leaking.
- If the power cable of this device should become damaged, it must be replaced by the manufacturer, the manufacturer's customer service department or a similarly qualified specialist in order to avoid any hazards.

DANGER for children
- Packing materials are not children's toys. Children should not be allowed to play with the plastic bags. There is a risk of suffocation.

DANGER to and from pets and livestock
Electrical devices can represent a danger to pets and livestock. In addition, animals can also cause damage to the device. For this reason you should keep animals away from electrical devices at all times.

DANGER! Risk of electric shock due to moisture
- Protect the device from moisture, water drops and water splashes.
- The device, the cable and the mains plug must not be immersed in water or any other liquids.
- If liquid gets into the device, remove the mains plug immediately. Have the device checked before reusing.
- If the device (suction device or base station) has nevertheless fallen into water, pull out the power adapter immediately, and only then take the device out of the water. Do not use the device again, and have it checked by a specialist workshop.
- Never touch the device with wet hands.

DANGER! Risk of electric shock
- Lay the power cable such that no one can step on it, get caught on it, or trip over it.
- Only connect the power adapter to a properly installed and easily accessible wall socket whose voltage corresponds to the specifications on the rating plate. The wall socket must still be easily accessible after connection.
- Ensure that the power cable cannot be damaged by sharp edges or hot spots. Do not wrap the power cable around the device (Danger! Risk of cable damage!).
- Ensure that the power cable cannot be trapped or crushed.
To pull the power adapter out of the wall socket, always pull on the power adapter, and never on the power cable.
- Disconnect the power adapter from the wall socket ...
... if there is a fault, ... as long as you do not charge the battery, ... prior to cleaning the base station, and ... during thunderstorms.
- If the power cable or the device (base station) is damaged, immediately pull the power adapter out of the wall socket.
Before use, regularly check all parts for damage. Do not use the device if there is visible damage to the housing, the base station, the power adapter with power cable, or the battery. Repairs must be performed exclusively by the service centre in order to avoid hazards.

DANGER - Danger of explosion
- Never throw the battery into open fire.
- Non-rechargeable batteries must never be used with this product.

DANGER from rotating parts
- Keep long hair and loose clothing away from the rotating parts of the floorhead.
- Switch the device off and pull out the mains plug from the wall socket before you exchange accessories or additional equipment that moves during operation.
WARNING! Risk of material damage
- Fasten the base station firmly to the wall. Check whether the enclosed fixing material is suitable. If necessary, use other screws and rawlplugs. If in doubt, have the assembly performed by an expert.
Before drilling, check that there are no water pipes or power cables in the wall at the relevant point.
- Only use the rechargeable vacuum cleaner with all filters installed. Vacuuming without the filters installed destroys the motor.
- Never come close to hair or loose clothing with the rotating brush.
- Only use original accessories.
- Do not use any sharp or abrasive cleaning agents.
NOTES on the battery
- Only use the original battery charger (base station) to load the batteries.
- The battery becomes warm during the charging process. This is normal.
4. Items supplied
1 suction device 18 with dust container 12
1 base station 34
1 power adapter 32
1 battery 36
1 suction pipe 24
1 floorhead 27
1 small brush nozzle 38
1 large brush nozzle (length adjustable) 40
1 crevice nozzle 41
1 adapter 42 for small brush nozzle
1 adapter 43 for extension of 38
1 drilling template
1 set of fixing material (2 rawlplugs, 2 screws)
1 copy of the user instructions
5. Base station
5.1 Fastening the base station
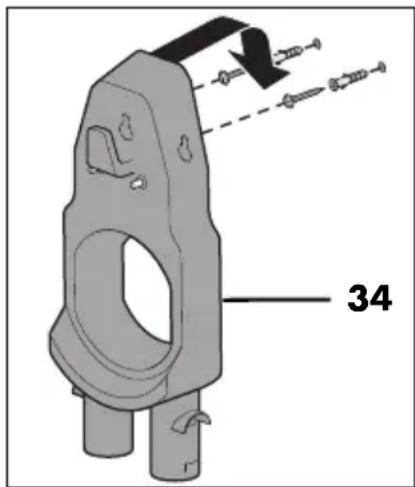
Fasten the base station 34 to the wall using the drilling template and the fixing material supplied.
NOTE: before fastening, check that the fixing material supplied meets your requirements (e.g. wall structure). If not, replace it with suitable fixing material.
- Look for a place on the wall for the base station 34. Make sure that there is a wall socket nearby.
- Using the drilling template, draw the marking for the drill holes on the wall.
- Drill holes with a diameter of 6 mm using a drill.
- Insert the rawlplugs into the drill holes.
- Tighten the screws in the rawlplugs.
- Hang the base station 34 up on the wall and check for a secure hold.
5.2 Storing after use
The base station 34 is used as a holder and battery charger for the suction device 18 with suction pipe 24, the large brush nozzle 40 and the crevice nozzle 41.
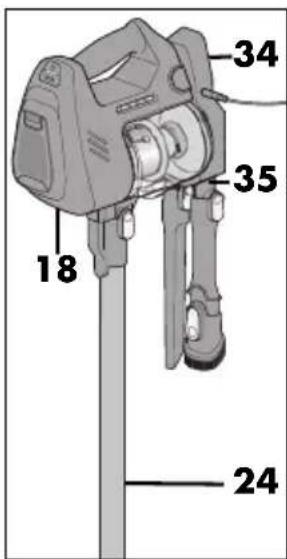
• After every use, hang the suction device 18 with the suction pipe 24 up in the base station 34. The battery 36 is charged automatically.
• The crevice nozzle 41 and the large brush nozzle 40 can be plugged onto the holders 35.
- The floorhead 27 can stay connected to the suction pipe 24.
6. Charging the battery
NOTES:
- Fully charge the battery 36 before using for the first time. This takes approx. 5 hours.
- After every use, hang the suction device 18 up in the holder of the base station 34. This ensures that the suction device will always work at full power. The battery 36 is not damaged by regular charging.
Charging the suction device via the base station
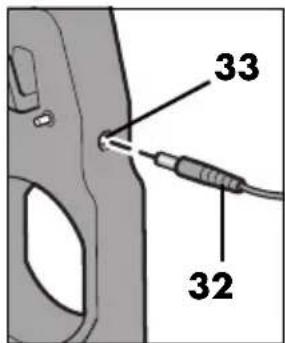
- Connect the power cable of the power adapter 32 to the socket 33 at the top right of the base station 34 and then insert the plug into a suitable wall socket.
The wall socket must still be easily accessible after connection.
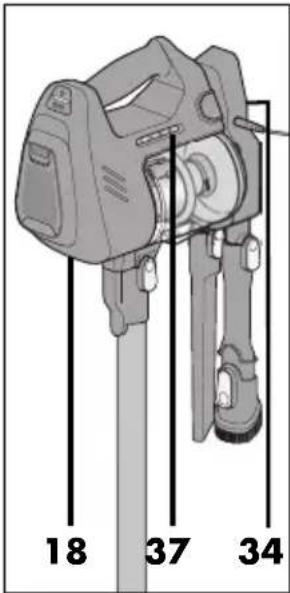
- After every use, hang the suction device 18 up in the holder for the suction device 31 in the base station 34. The LEDs of the charging indicator 37 are lit or start flashing. Once all LEDs are lit, the battery 36 is completely charged.
With a full charge, you can use the vacuum cleaner for approx. 20 minutes.
Connecting the suction device directly to the mains
You can also charge the battery 36 when the suction device is not in the battery charger.
- Connect the power cable of the power adapter 32 directly to the socket 4 under the handle 3 of the suction device 18 and then insert the plug into a suitable wall socket.
LED signals on the base station
- Lit LEDs show the current charging state.
- Flashing LEDs show the consumed portion. When all LEDs are flashing, you should charge the battery 36. With an insufficient charge, the device will stop working.
LED signals during operation
- Lit LEDs show the current charging state.
- Unlit LEDs show the consumed portion.
- Only the LED above Empty is flashing: battery 36 weak, the device will switch off soon.
7. Installation
With its extensive accessories, there are numerous options enabling you to react perfectly to almost any conceivable requirement of a vacuum cleaner. In this section, we describe the assembly for the most frequent applications.
CAUTION:
- During all assembly steps, the vacuum cleaner must be switched off.
7.1 Engaging and disengaging connections
There are two ways to mount and dismantle parts.
With locking
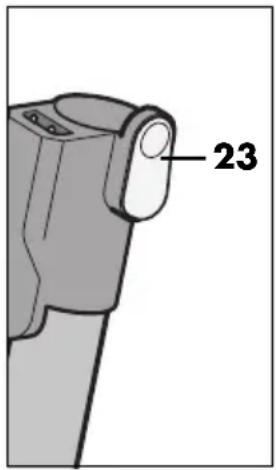
- The suction pipe 24, the floorhead 27, the large brush nozzle 40 and the crev-ice nozzle 41 are inserted until they audibly click into place.
- Press the respective release button 23 to disengage the connections.
NOTE: the button has only been numbered once, because it looks and works the same on all parts.
Without locking
All other nozzles and adapters are pushed on and pulled off. If necessary, slightly rotate the parts in opposite directions.
7.2 Prior to every use
Prior to every use, the following parts must be assembled:
Filter unit
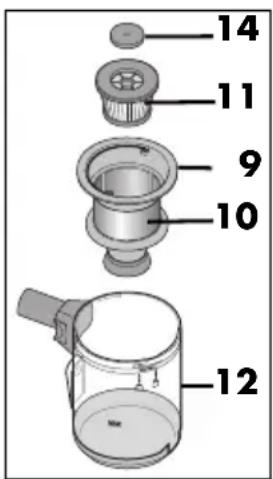
The filter unit consists of: the motor protection filter 14, the paper filter 11 and the filter carrier 9 with metal filter 10.
• Always insert the complete filter unit into the dust container 12.
Dust container
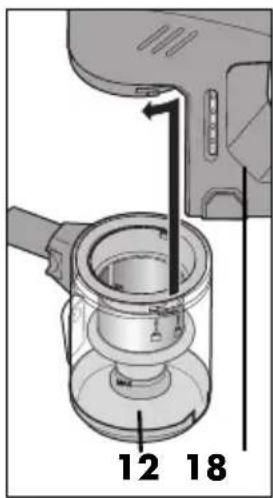
Only use the dust container 12 with the complete filter unit.
- Place the dust container 12 onto the suction device 18 (see "Assembling the dust container" on page 12) from below.
Battery
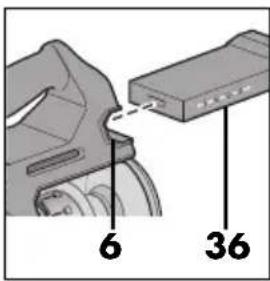
The vacuum cleaner cannot be operated without the charged battery 36 mounted.
- Insert the battery 36 into the battery compartment 6 until it engages audibly.
- In order to remove the battery 36 from the battery compartment 6, press down both unlocking buttons 7 of the battery and pull it out.
7.3 Suction pipe
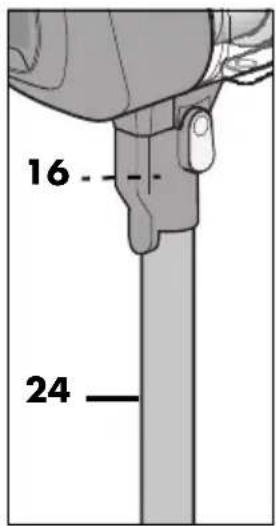
The suction pipe 24 is used as an extension. All parts that can be connected to the free end of the suction pipe can also be plugged directly into the opening 16 at the suction device 18.
- Insert the suction pipe 24 into the opening 16 until it engages. To do this, connect the plug 22 with the socket 17 on the suction device 18.
7.4 Floorhead
In many cases, you will work with the floorhead.
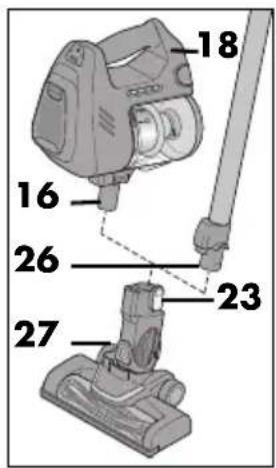
- Insert the floorhead 27 into the opening 16 of the suction device 18 or into the opening 26 of the suction pipe 24. To do this, connect the plug of the floorhead with the socket 17 on the suction device 18 or the socket 25 on the suction pipe 24.
• To release the floorhead 27, press the release button 23 and pull it off.
NOTE: when the rotating brush 30 is blocked, the 4 LEDs 37 on the battery 36 flash. After flashing briefly, the suction device switches itself off and cannot be switched on again for 1 minute.
7.5 Crevice nozzle
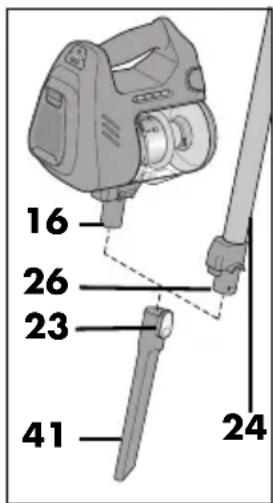
The crevice nozzle 41 can be inserted directly onto the suction device 18 or onto the suction pipe 24.
- Insert the crevice nozzle 41 into opening 16 or 26.
- To release the crev-ice nozzle 41, press the release button 23 and pull it off.
7.7 Small brush nozzle
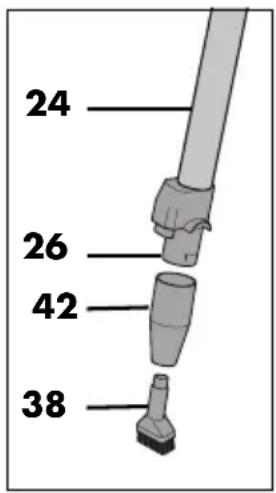
The small brush nozzle 38 is always used with the adapter 42.
- Plug the brush nozzle 38 onto the adapter 42.
- Insert the adapter 42 into the opening 26 of the suction pipe 24 or into the opening 16 of the suction device 18.
7.6 Large brush nozzle
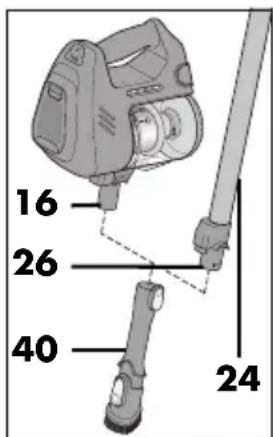
The large brush nozzle 40 can be inserted directly onto the suction device 18 or onto the suction pipe 24.
- Insert the brush nozzle 40 into opening 16 or 26.
- To release the large brush nozzle 40, press the release button 23 and pull it off.
- To adjust the length, press the button 39 on top of the large brush nozzle 40 and slide the brush section to one of the end positions until it audibly clicks into place.
NOTE: for extension, you can also use the adapter 43. This is then connected to the adapter 42.
8. Vacuum cleaning
CAUTION:
- Vacuum cleaning always requires all filters and the dust container 12 to be mounted.
- Assemble the accessories needed.
- Insert the battery 36 into the battery compartment 6.
- Press the on/off switch ⏻ 1 to switch the device on.
-
If you would like to reduce the suction power, press the ECO button 2 once. The LED under the button is lit green. To switch off the function, press the button again.
-
To switch off the suction device 18, press the on/off switch ⏻ 1 again.
- Empty the dust container 12 and hang the parts back in the base station 34.
NOTES:
• After switching on, it takes 1 - 2 seconds before the device can be switched off again.
• After switching on, it takes 1 - 2 seconds before the device can be switched to reduced suction power mode using the ECO 2 button.
Using the nozzles
In the following table, you will find an overview of the cleaning tasks for which the various nozzles are particularly suitable.
| No. | Nozzle Use | |
| 38 | Small brush nozzle | Sofas, armchairs, mattresses, furniture, textiles |
| 40 | Large brush nozzle | Bookshelves, hidden corners, floors |
| 41 | Crevice nozzle | Cabinets, crevices, corners, gaps |
9. Dust container and filters
CAUTION:
- Vacuum cleaning always requires all filters and the dust container 12 to be mounted.
Every operation requires the dust container 12 and all filters to be inserted:
- the metal filter 10 inside the dust container 12,
- the paper filter 11 in the filter carrier 9,
- the motor protection filter 14 on the paper filter,
- the exhaust air filter 19 at the top of the suction device 18.
9.1 Assembling the dust container
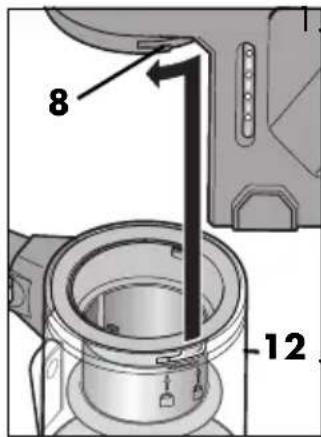
Place the dust container 12 onto the suction device 18 such that the arrow above the open padlock symbol is pointing to the marking 8.
Rotate the dust container 12 anticlockwise until it clicks into place. The arrow above the closed padlock symbol is now pointing to the marking 8.
• To remove, rotate the dust container 12 clockwise and pull it off downwards.
9.2 Emptying the dust container
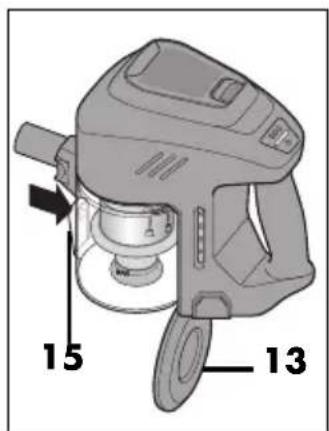
To empty the dust container 12, you do not have to first remove it from the suction device 18.
- Hold the suction device over a waste container and then press the button 15 to open the flap 13 on the bottom of the dust container 12.
- To lock the flap 13, close it again until it audibly clicks into place.
9.3 Paper filter (HEPA)
The paper filter 11 sits in the filter carrier 9.
- Remove the paper filter 11 by pulling it out upwards by the small handle in the middle.
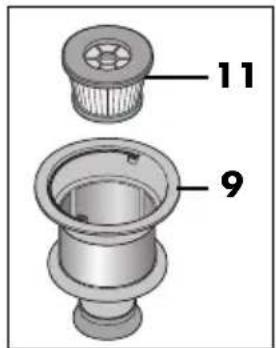
• To insert, place the paper filter 11 from above into the filter carrier 9.
9.4 Metal filter
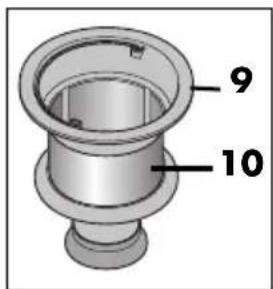
The metal filter 10 is firmly connected to the filter carrier 9. The filter carrier can simply be removed by the handle.
- When assembling the device, place the filter carrier 9 straight into the dust container 12. Ensure that it is positioned completely straight inside the dust container.
9.5 Motor protection filter
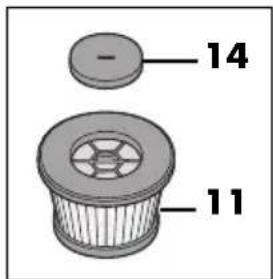
On top of the paper filter 11 sits the motor protection filter 14.
- Remove the dust container 12 from the suction device 18. The motor protection filter 14 can then be removed from the top of the paper filter 11.
9.6 Exhaust air filter
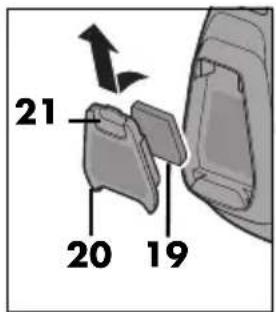
There is an exhaust air filter 19 at the top of the suction device 18.
- To remove the filters, press the unlocking mechanism 21 on the filter cover 20 and pull it upwards. Then, you can remove the exhaust air filter 19 from the filter cover 20.
- Insert the new exhaust air filter 19.
- Place the rear of the filter cover 20 back onto the suction device.
- Now press the unlocking mechanism 21 on the filter cover 20 so that it can be closed.
10. Cleaning and care

DANGER!
- Pull the mains plug out of the wall socket before you clean the device.
- Allow the device to cool down before cleaning.
CAUTION:
- All parts becoming damp or wet, must be dried completely prior to the next use.
- Do not use any sharp or abrasive cleaning agents.
Switch off the device prior to cleaning and remove the battery 36.
Cleaning of the suction device and the battery
- Use a damp, soft cloth to clean the suction device 18, the floorhead 27 and the battery 36.
Cleaning the nozzles (except for the floorhead) and the extensions
- The parts can be cleaned under running water.
Cleaning of the metal filter and the exhaust air filter
- The metal filter 10, the motor protection filter 14 and the exhaust air filters 19 can be cleaned under running water.
Cleaning of the motor protection filter and the paper filter
- The paper filter 11 can be emptied by tapping it.
Replacing the filters
- Check all filters regularly for damage or deformations. Damaged or deformed filters that can no longer be cleaned must be replaced. This is necessary to maintain the full performance of your vacuum cleaner and to prevent damage to the device.
- Filter sets can be reordered (see "Ordering accessories" on page 15).
Cleaning the rotating brush inside the floorhead
- Turn the floorhead 27 upside down.
- Press the fastener with the double arrow to the outside. This is a bit difficult so that it will not disengage during vacuum cleaning.
- Remove the rotating brush 30 from the floorhead 27.
- Tap out the brush 30 slightly. If, for example, hair got trapped, pull it out with your fingers.
- Reinsert the brush 30 into the floorhead 27.
- Press the small fastener back into the direction of the brush.
11. Storage
If you do not want to use the device for extended periods, keep it in a dry location.
12. Disposal
Batteries must not be discarded with your household waste. Spent batteries must be disposed of properly.
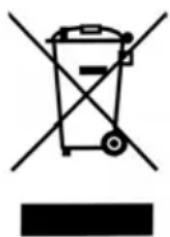
This product is subject to the provisions of European Directive 2012/19/EC. The symbol showing a wheelie bin crossed through indicates that the product requires separate refuse collection in the European Union. This applies to the product and all accessories marked with this symbol. Products identified with this symbol may not be discarded with normal household waste, but must be taken to a collection point for recycling electric and electronic appliances.
natural_image
Symbol of a trash bin crossed with no text or labels, accompanied by a black rectangular block below (no text or symbols present)This recycling symbol marks e.g. an object or parts of the material as valuable for recycling. Recycling helps to reduce the consumption of raw

materials and protect the environment.
Packaging
When disposing of the packaging, make sure you comply with the environmental regulations applicable in your country.
13. Trouble-shooting
If your device fails to function as required, please try this checklist first. Perhaps there is only a minor problem, and you can solve it yourself.

DANGER! Risk of electric shock!
- Do not attempt to repair the device yourself under any circumstances.
| Fault Possible causes/Action | |
| No function | Charge the battery 36. |
| ECO mode cannot be set. | After switching on, it takes 1 - 2 seconds before the device can be switched to reduced suction power mode using the ECO 2 button. |
| Suction power insufficient | Have all parts been properly connected?Is one of the nozzles or suction pipe 24 clogged?Is the dust container 12 full?Is one or several filters heavily contaminated?Is the LED under the ECO button lit 2?Does the rotating brush 30 turn within the floor-head 27?Battery 36 too weak?Check the LEDs of the charging indicator 37. |
| The 4 LEDs 37 flash | The rotating brush 30 is blocked. |
| Device switches off | Check the battery 36. |
14. Ordering accessories
Accessories and wearing parts for the battery-powered hand-held vacuum cleaner SHAZ 22.2 C4 can be reordered (e.g. filters, brushes or battery pack).
Ordering online shop.hoyerhandel.com

- Scan the QR code with your smart-phone/tablet.
- With the QR code you will access a website where you can submit your reorder.
15. Technical specifications
| Model: SHAZ 22 | 2 C4 |
| Base station: Input | 27 V, ===780 mA |
| Battery:(6INR19/66) | 1x 22.2 V Li ion, ===2400 mAh, (53.28 Wh)6 cells |
| Power unit:MODEL:GQ24-270078-AGGQ24-270078-AB | Input: 100 - 240 V ~50/60 Hz, 1.0 AOutput: ◇C◆27 V =780 mA |
| Protection classof the powerunit: II | |
| Operating temperature: 10 °C to +40 °C | |
Symbols used
 | Safety isolating transformer short circuit proof |
 | Double insulation |
 | Certified Safety. Devices must comply with the generally acknowledged rules of technology and the German Product Safety Act (Produktsicherheitsgesetz - ProdSG). |
 | With the CE marking, HOYER Handel GmbH declares the conformity with EU guidelines. |
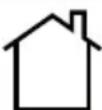 | Devices with this symbol may only be operated indoors (dry environment). |
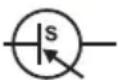 | Switched-mode power supply |
 | This symbol reminds you to dispose of the packaging in an environmentally friendly manner. |
 PAP PAP | Recyclable materials: cardboard (except corrugated cardboard) |
 | Direct current |
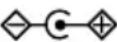 | Symbol for polarity |
Subject to technical modifications.
16. Warranty of the HOYER Handel GmbH
Dear Customer,
your device is provided with a 3 year warranty starting with the purchase date. In the event of product defects, you are entitled to statutory rights against the vendor. These statutory rights are not restricted by our warranty presented in the following.
Warranty conditions
The warranty period starts with the purchase date. Please keep the original purchase receipt in a safe place. This document is required to verify the purchase.
If within three years from the purchase date of this product a material or factory defect occurs, the product will be repaired or replaced by us – at our discretion – free of charge to you, or the purchase price will be refunded. This warranty implies that within the period of three years the defective device and the purchase receipt are presented, including a brief written description of the defect and the time it occurred.
If the defect is covered by our warranty, the repaired or a new product will be returned to you. No new warranty period starts with a repair or replacement of the product.
Warranty period and statutory claims for defects
The warranty period is not extended when the warranty has been claimed. This also applies to replaced and repaired parts. Any damages and defects already existing at the time of purchase must be reported immediately upon unpacking. Repairs arising after the expiration of the warranty period are subject to a charge.
Warranty coverage
The device was produced carefully according to strict quality guidelines and tested diligently prior to delivery. The warranty applies to material or factory defects.
Excluded from the warranty are wear parts subject to normal wear and damages to fragile parts, e.g. switches, batteries, lamps or other parts manufactured from glass.
This warranty expires if the product is damaged, not used as intended or not serviced. For the proper operation of the product, all instructions listed in the operating instructions must be observed carefully. Any form of use and handling that is advised against in the operating instructions or warned against must always be avoided.
The product is only intended for private and not for commercial use. In the case of incorrect and improper treatment, use of force and interventions not performed by our authorised Service Centre, the warranty shall cease.
Handling in case of a warranty claim
In order to ensure prompt processing of your matter, please observe the following notes:
- Please keep the article number IAN: 321720 and the purchase receipt as a purchase verification for all inquiries.
- The article number can be found on the rating plate, an engraving, the title page of your instructions (in the bottom left), or as a label on the rear or underside of the device.
- If faulty operation or other defects occur, first contact the Service Centre listed in the following by telephone or email.
- Then, you are able to send a product reported as defective free of charge to the service address specified to you, including the purchase receipt and the information on the defect and when it occurred.
At www.lidl-service.com you can download this and many other manuals, product videos and installation software.
This QR code takes you directly to the Lidl Service website (www.lidl-service.com), where you can enter the article number (IAN)
321720 to open your user instructions.
Service Centre
GB Service Great Britain
Tel.: 0800 404 7657
E-Mail: hoyer@lidl.co.uk
IE Service Ireland
Tel.: 1890 930 034
(0,08 EUR/Min., (peak))
(0,06 EUR/Min., (off peak))
E-Mail: hoyer@lidl.ie
MT Service Malta
Tel.: 80062230
E-Mail: hoyer@lidl.com.mt
CY Service Cyprus
Tel.: 8009 4409
E-Mail: hoyer@lidl.com.cy
IAN: 321720
Supplier
Please note that the following address is no service address. First contact the aforementioned Service Centre.
HOYER Handel GmbH
Tasköprüstraße 3
DE-22761 Hamburg
GERMANY
Indhold
9.3 Papirfilter (HEPA)
Papirfilteret 11 sidder i filterholderen 9.
natural_image
Symbol of a trash bin crossed with a diagonal line, no text or labels presentnatural_image
Symbol of a trash bin crossed with a diagonal line and a horizontal bar below (no text or labels)9.3 Papieren filter (HEPA)
natural_image
Symbol of a trash bin with crossed lines indicating no waste or discharge, and a solid black rectangle below (no text or labels)natural_image
Symbol of a trash bin with crossed lines indicating no waste, and a solid black rectangle below (no text or labels)- 2-IN-1 CORDLESS VACUUM CLEANER SHAZ 22.2 C4
- Overview
- not shown:
- Thank you for your trust!
- Intended purpose
- Foreseeable misuse
- VARIOUS DANGERS!
- Safety information
- Warnings
- Instructions for safe operation
- DANGER for children
- DANGER to and from pets and livestock
- DANGER! Risk of electric shock due to moisture
- DANGER! Risk of electric shock
- DANGER - Danger of explosion
- DANGER from rotating parts
- WARNING! Risk of material damage
- NOTES on the battery
- Items supplied
- Base station
- Fastening the base station
- Storing after use
- Charging the battery
- NOTES:
- Charging the suction device via the base station
- Connecting the suction device directly to the mains
- LED signals on the base station
- LED signals during operation
- Installation
- CAUTION:
- Engaging and disengaging connections
- With locking
- Without locking
- Prior to every use
- Filter unit
- Dust container
- Battery
- Suction pipe
- Floorhead
- Crevice nozzle
- Small brush nozzle
- Large brush nozzle
- Vacuum cleaning
- Using the nozzles
- Dust container and filters
- Assembling the dust container
- Emptying the dust container
- Paper filter (HEPA)
- Metal filter
- Motor protection filter
- Exhaust air filter
- Cleaning and care
- DANGER!
- Cleaning of the suction device and the battery
- Cleaning the nozzles (except for the floorhead) and the extensions
- Cleaning of the metal filter and the exhaust air filter
- Cleaning of the motor protection filter and the paper filter
- Replacing the filters
- Cleaning the rotating brush inside the floorhead
- Storage
- Disposal
- Packaging
- Trouble-shooting
- DANGER! Risk of electric shock!
- Ordering accessories
- Ordering online shop.hoyerhandel.com
- Technical specifications
- Warranty of the HOYER Handel GmbH
- Warranty conditions
- Warranty period and statutory claims for defects
- Warranty coverage
- Excluded from the warranty are wear parts subject to normal wear and damages to fragile parts, e.g. switches, batteries, lamps or other parts manufactured from glass.
- Handling in case of a warranty claim
- Service Centre
- Supplier
- Indhold
- Papirfilter (HEPA)
- Papieren filter (HEPA)
Brand : SILVERCREST
Model : SHAZ 22.2 C4
Category : Vacuum Cleaner