
SJB 18 A1 - Yogurt maker SILVERCREST - Free user manual and instructions
Find the device manual for free SJB 18 A1 SILVERCREST in PDF.

| Product type | Yogurt maker |
| Brand | SilverCrest |
| Model | SJB 18 A1 |
| Dimensions (L x W x H) | approx. 25 x 20 x 20 cm |
| Weight | approx. 1.2 kg |
| Power supply | 220-240 V ~, 50/60 Hz, 18 W |
| Number of jars | 7 jars of 150 ml each |
| Housing material | ABS plastic |
| Jar material | Borosilicate glass |
| Color | White |
| Main functions | Fermentation of plain yogurt, fruit yogurt, fresh cheese |
| Integrated timer | Yes, up to 12 hours |
| Automatic shut-off | Yes |
| Non-slip base | Yes |
| Included accessories | 7 glass jars with lids, 1 measuring spoon, instruction manual |
| Care and cleaning | Housing: wipe with a damp cloth; jars and lids: dishwasher safe |
| Warranty | 3 years |
| Repairability | Spare parts available through SilverCrest customer service |
| Certifications | CE, GS |
Frequently Asked Questions - SJB 18 A1 SILVERCREST
User questions about SJB 18 A1 SILVERCREST
0 question about this device. Answer the ones you know or ask your own.
Ask a new question about this device
Download the instructions for your Yogurt maker in PDF format for free! Find your manual SJB 18 A1 - SILVERCREST and take your electronic device back in hand. On this page are published all the documents necessary for the use of your device. SJB 18 A1 by SILVERCREST.
USER MANUAL SJB 18 A1 SILVERCREST
natural_image
Silver Crest digital kitchen appliance with transparent lid and control panel (no visible text or symbols on main body)YOGURT MAKER SJB 15 B1
GB IE
YOGURT MAKER
Operating instructions
FR BE
YAOURTIÈRE
Mode d'emploi
DE AT CH
JOGHURTBEREITER
Bedienungsanleitung
DK
YOGHURTMASKINE
ID: SJB 15 B1_16_V1.1


Overview / Oversigt / Aperçu de l'appareil / Overzicht / Übersicht
natural_image
Three geometric crosshair symbols with central dots and intersecting lines, no text or labels present
natural_image
Pure geometric diagram with crosshair and circular pattern (no text or symbols)Contents
- Overview 2
- Intended purpose .... 3
- Safety information .... 3
- Items supplied 6
- How to use .... 6
- Making yoghurt 6
6.1 This is how yoghurt is made 6
6.2 Making plain yoghurt 7
6.3 Ideas for recipes with yoghurt.... 7
- Cleaning 7
- Storage 8
- Disposal 8
- Trouble-shooting 8
- Technical specifications 8
- Warranty of the HOYER Handel GmbH 9
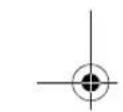
1. Overview
1 Lid
2 Yoghurt pots
3 Base section
4 On/ Off switch with indicator light
5 Power cable with mains plug

2
GB


natural_image
Pure geometric diagram with crosshair and circular pattern (no text or symbols)Thank you for your trust!
Congratulations on your new yoghurt maker.
For a safe handling of the device and in order to get to know the entire scope of features:
- Thoroughly read these operating instructions prior to initial commissioning.
- Above all, observe the safety instructions!
- The device should only be used as described in these operating instructions.
- Keep these operating instructions for reference.
- If you pass the device on to someone else, please include these instructions.
We hope you enjoy your new yoghurt maker!
2. Intended purpose
The yoghurt maker is suitable for making yoghurt. The preparation of other foods is not permissible.
The device is designed for private, domestic use. The device must only be used in dry, indoor areas.
This device must not be used for commercial purposes.
3. Safety information
Warnings
If necessary, the following warnings will be used in these operating instructions:

DANGER! High risk: failure to observe this warning may result in injury to life and limb.
WARNING! Moderate risk: failure to observe this warning may result in injury or serious material damage.
CAUTION: low risk: failure to observe this warning may result in minor injury or material damage.
NOTE: circumstances and specifics that must be observed when handling the device.


Instructions for safe operation
- This device can be used by children from the age of 3 and people with restricted physical, sensory or intellectual abilities or people without adequate experience and/ or understanding, if they are supervised or instructed on how to use this device safely and if they are aware of the resulting danger. Children must not play with the device. Cleaning and user maintenance must not be performed by unsupervised children unless they are older than 8 years and supervised.
- Children under the age of 3 must be kept away from the device and the power cable.
- Clean all parts and surfaces that will come into contact with food before using the device for the first time (see “Cleaning” on page 7).
- If the mains power cable of this device should become damaged, it must be replaced by the manufacturer, the manufacturer's customer service department or a similarly qualified specialist, in order to avoid any hazards.
- The base, the mains power cable and the mains plug must not be immersed in water or any other liquids.
- Should liquids enter the base, pull out the mains plug immediately. Have the device checked before reusing.
- Do not use any abrasive or corrosive cleaning agents.
- This device is not intended to be operated using an external timer clock or a separate remote control system.
- This device is equally intended for use in the home and in applications similar to the home, such as for example ...
... in kitchens for employees in shops, offices and other commercial areas;
... on agricultural estates;
... by customers in hotels, motels and other residential facilities;
... in bed-and-breakfast establishments.


DANGER for children
- Packing materials are not children's toys. Children should not be allowed to play with the plastic bags: there is a risk of suffocation.
- Keep the device out of the reach of children.

DANGER to and from pets and livestock
Electrical devices can represent a hazard to pets and livestock. In addition, animals can also cause damage to the device. For this reason you should keep animals away from electrical devices at all times.

DANGER! Risk of electric shock due to moisture
- The base, the mains power cable and the mains plug must not be immersed in water or any other liquids.
- Protect the base from moisture, water drops and water splashes: Failure to observe this instruction may result in an electrical shock hazard.
- Should liquids enter the base, pull out the mains plug immediately. Have the device checked before reusing.
- Never touch the device with wet hands.
- Make sure that the surface under the device is dry.

DANGER! Risk of electric shock
- Never put the device into operation if there are visible damages to the device or the power cable or if the device has been dropped before.
- Only connect the mains plug to a properly installed and easily accessible grounded power socket whose voltage corresponds to the specifications on the rating plate. The wall socket must continue to be easily accessible after the device is plugged in.
- Ensure that the power cable cannot be damaged by sharp edges or hot surfaces.
- When using the device, ensure that the power cable cannot be trapped or crushed.
The device is not fully disconnected from the power supply, even after it is switched off. In order to fully disconnect it, pull out the mains plug.
- When removing the mains plug from the wall socket, always pull the plug and never the cable.
- Disconnect the mains plug from the wall socket ...
... if there is a fault,
... when you are not using the device, ... before you clean the device and ... during thunderstorms.
- To avoid any risk, do not make modifications to the product.
WARNING! Risk of material damage
- Do not place any items on the appliance.
- It is not necessary to constantly supervise during operation, but just to check regularly.
- Never place the device on hot surfaces (e.g. hob plates) or near heat sources or open fire.
- Only use the original accessories.
The device is fitted with non-slip silicon feet. Because furniture can be coated with a wide variety of varnishes and plastics, and treated with various care products, the possibility cannot be excluded that some of these substances have ingredients that may attack and soften the silicon feet. If necessary, place a non-slip mat under the device.
- Do not use any astringent or abrasive cleaning agents.


4. Items supplied
1 Yoghurt maker, consisting of:
- 1 base section 3 with electrics
- 1 lid 1
- 7 yoghurt pots 2, 180 ml each
1 Set of operating instructions
5. How to use
- Remove all packing material.
- Check to ensure that all parts are present and undamaged.
- Clean the device prior to its first use! (see "Cleaning" on page 7)
- Place the device on a dry, level, non-slip surface.
6. Making yoghurt
6.1 This is how yoghurt is made
To make your own yoghurt you will need: - 1 I milk or cream
NOTE: The amount of fat contained in the yoghurt will be the same as the milk you use. To make creamy yoghurt, do not use milk but fresh cream, or add some cream to your milk.
- Several teaspoons of live yoghurt culture (organic yoghurt, probiotic yoghurt, home-made yoghurt, commercially available yoghurt with live cultures).
NOTE: Organic yoghurt, probiotic yoghurt and your own home-made yoghurt always contain live cultures. Some commercially available yoghurts are long-life products and no longer contain any live cultures. Just try out your "favourite yoghurt" as the starter culture and see whether you are happy with the result.
- yoghurt maker - approx. 10 - 12 hours' time
Milk contains lactose. It is converted into lactic acid by lactic bacteria (yoghurt culture), so allowing yoghurt to form. So this process is successful, the yoghurt maker ensures the best temperature for the yoghurt cultures to easily propagate.
The milk should not contain any other bacteria as this might contaminate the yoghurt. Therefore ensure absolute cleanliness, particularly where the yoghurt pots are concerned. In addition, you can boil the milk beforehand and allow it to cool down to around 40°C before adding the yoghurt culture.
NOTES:
• Home-made yoghurt is generally more creamy and not as thick as commercial products.
• Water may separate off during preparation, but this is normal. Just pour away the water or mix it back in.
- You can use the yoghurt you have made to start off the next batch. The more often you do this, the thinner your yoghurt will become. If it becomes too thin, you should start afresh with a new yoghurt you have bought.
• If you only use 900 ml milk, this will make your yoghurt a bit thicker.
- If you add 3 - 4 tablespoons of powdered milk, this will make your yoghurt thicker.
- Yoghurt will become thicker if you let it mature for a day in the refrigerator before eating.
- UHT milk does not need to be boiled before making yoghurt.
• Instead of using yoghurt cultures from another yoghurt, you can also use yoghurt powder bought from a health food shop or online.

- Yoghurt can also be made with soya milk. In this case use a yoghurt made with soya milk as the starter culture.
6.2 Making plain yoghurt
- Boil 1 l milk.
- Allow the milk to cool down until it is lukewarm.
NOTE: If the milk is too hot when you add the yoghurt culture, this will kill the bacteria, and no yoghurt will be produced.
- Once the milk has cooled down, add around 5 teaspoons of yoghurt containing live yoghurt cultures.
- Stir well to mix in the cultures properly.
- Fill the milk into the yoghurt pots 2, which have been carefully washed.
- Screw the tops back on to the yoghurt pots 2.
- Put the yoghurt pots 2 in the base section 3.
- Put the lid 1 on the base section 3.
- Insert the mains plug 5 into a wall socket corresponding to the specifications of the rating plate.
- Switch the yoghurt maker on using the On/ Off switch 4. The indicator light in the On/ Off switch 4 lights up. After around 10 to 12 hours the yoghurt will have set.
- Switch the appliance off.
- Remove the plug 5 from the wall socket after use. This is the only way to ensure that the appliance is completely de-energized.
- Allow the closed yoghurt pots 2 to cool down slightly and then put them in the refrigerator.
6.3 Ideas for recipes with yoghurt
You can use plain yoghurt to make yoghurt containing fruit or yoghurt with any flavour. There are no limits to your creativity! But do not do this until after you have made the yoghurt, or your recipe will not succeed.
Fruit yoghurt:
Mix in fresh fruit or a product made of fruit such as jam.
Other flavours:
Add vanilla sugar, vanilla, nuts, chocolate sprinkles, nougat, coconut flakes or other flavourings to the yoghurt.
Tsatsiki:
Add chopped cucumber and garlic to the yoghurt as well as a little olive oil.
7. Cleaning
Clean the device prior to its first use!

DANGER! Risk of electric shock!
- Always remove the plug 5 from the mains socket before starting to clean the appliance.
- Never immerse the appliance in water, and protect it from splashes and water droplets.
WARNING! Risk of material damage!
- Do not use any astringent or abrasive cleaning agents.
Do not leave it too long before cleaning the appliance: otherwise food residue may harden and be difficult to remove.
- Wipe the appliance inside and out with a soft, damp cloth. You may also use a little mild detergent, but should then wipe over again with clean water.
- Dry off using a dry cloth.
- Clean the yoghurt pots 2 (pots and lids) and lid 1 in the sink or in a dishwasher.


8. Storage

DANGER for children! Keep the device out of the reach of children. DANGER! In order to avoid accidents, the mains plug 5 must never be connected to a wall socket while in storage.
- Select a location where neither high temperatures nor moisture can affect the device.
9. Disposal
The symbol showing a wheelie bin crossed through indicates that the product requires separate refuse collection in the European Union. This applies to the product and all accessories marked with this symbol. Products identified with this symbol may not be discarded with normal household waste, but must be taken to a collection point for recycling electric and electronic appliances. Recycling helps to reduce the consumption of raw materials and protect the environment.
Packaging
When disposing of the packaging, make sure you comply with the environmental regulations applicable in your country.
10. Trouble-shooting
If your device fails to function as required, please try this checklist first. Perhaps there is only a minor problem, and you can solve it yourself.

DANGER! Risk of electric shock! Do not attempt to repair the device yourself under any circumstances.
| Fault | Possible causes / Action |
| No function | Has the device been connected to the power supply?Check the connection. |
11. Technical specifications
| Model: SJB 15 B1 | |
| Mains voltage: 230 V ~ 50 Hz | |
| Protection class: II ☐ | |
| Power rating: 15 W |
Subject to technical modification.
CE


12. Warranty of the HOYER Handel GmbH
Dear Customer,
your device is provided with a 3 year warranty starting with the purchase date. In the event of product defects, you are entitled to statutory rights against the vendor. These statutory rights are not restricted by our warranty presented in the following.
Warranty conditions
The warranty period starts with the purchase date. Please keep the original purchase receipt in a safe place. This document is required to verify the purchase.
If within three years from the purchase date of this product a material or factory defect occurs, the product will be repaired or replaced by us – at our discretion – free of charge to you. This warranty implies that within the period of three years the defective device and the purchase receipt are presented, including a brief written description of the defect and the time it occurred.
If the defect is covered by our warranty, the repaired or a new product will be returned to you. No new warranty period starts with a repair or replacement of the product.
Warranty period and statutory claims for defects
The warranty period is not extended when the warranty has been claimed. This also applies to replaced and repaired parts. Any damages and defects already existing at the time of purchase must be reported immediately upon unpacking. Repairs arising after the expiration of the warranty period are subject to a charge.
Warranty coverage
The device was produced carefully according to strict quality guidelines and tested diligently prior to delivery.
The warranty applies to material or factory defects. This warranty does not include product parts that are subject to standard wear and therefore can be considered wear parts; the same applies to damages at fragile parts, e.g. switches, rechargeable batteries or parts made of glass.
This warranty expires if the product is damaged, not used as intended or not serviced. For the proper operation of the product, all instructions listed in the operating instructions must be observed carefully. Any form of use and handling that is advised against in the operating instructions or warned against must always be avoided.
The product is only intended for private and not for commercial use. In the case of incorrect and improper treatment, use of force and interventions not performed by our authorised Service Centre, the warranty shall cease.
Handling in case of a warranty claim
In order to ensure prompt processing of your matter, please observe the following notes:
- Please keep the article number
IAN: 274314 and the purchase receipt as a purchase verification for all inquiries. - If faulty operation or other defects occur, first contact the Service Centre listed in the following by telephone or email.
- Then, you are able to send a product reported as defective free of charge to the service address specified to you, including the purchase receipt and the information on the defect and when it occurred.

Please visit www.lidl-service.com to download this and many other manuals, product videos and software.

Service Centre
GB Service Great Britain
Tel.: 0871 5000 720 (£ 0.10/ Min.)
E-Mail: hoyer@lidl.co.uk
IE Service Ireland
Tel.: 1890 930 034
(0,08 EUR/ Min., (peak))
(0,06 EUR/ Min., (off peak))
E-Mail: hoyer@lidl.ie
IAN: 274314

Supplier
Please note that the following address is no service address. First contact the aforementioned Service Centre.
HOYER Handel GmbH
Kühnehöfe 5
22761 Hamburg
Germany

10
GB


- Yoghurtmaskine - ca. 10 – 12 timer
natural_image
Pure color palette bar with no text or symbols, showing grayscale gradient and a gray rectangle at bottom (no text or symbols)HOYER HANDEL GMBH
Kühnehöfe 5
22761 Hamburg
Germany
Status of information · Informationernes stand · Version des informations ·
Stand van de informatie · Stand der Informationen: