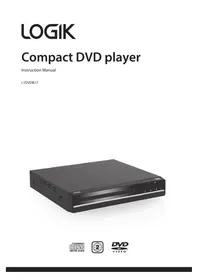
L1HDVD10E - DVD player Logik - Free user manual and instructions
Find the device manual for free L1HDVD10E Logik in PDF.
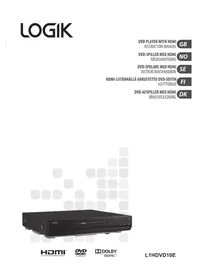


| Product Type | DVD Player |
| Model | L1HDVD10E |
| Brand | Logik |
| Dimensions (L x W x H) | 225 x 240 x 50 mm |
| Weight | 1.1 kg |
| Power Supply | 110-240 V ~ 50/60 Hz |
| Power Consumption | 12 W |
| Video Output | HDMI, SCART (RGB/CVBS) |
| Audio Output | 2-channel analog audio (L/R) |
| Supported Disc Types | DVD-VIDEO, DVD±R, DVD±RW, CD-R, CD-RW, Audio CD, JPEG |
| Region Code | 2 (United Kingdom) |
| Video System | PAL / NTSC |
| Remote Control Battery | CR2025 (not included) |
| HDMI Resolution | Selectable (480p/576p/720p/1080i) |
| Audio Decoding | Dolby Digital, DRC, Downmix (Lt/Rt, Stereo) |
| Playback Features | Repeat (Chapter/Title/All), A-B Repeat, Zoom, Angle, Subtitle, Audio Channel, Search, Program, OSD, Last Memory, Screen Saver |
| JPEG Playback | Slideshow, Rotation, Zoom, Digest (thumbnail), Repeat |
| Parental Control | Password-protected rating levels (1-8), default password 136900 |
| Safety Features | Auto power-off, screen saver, child lock |
| Cleaning Instructions | Wipe discs from center to edge with soft cloth; do not use solvents |
| Repair | No user-serviceable parts; contact qualified service personnel |
| Spare Parts | Contact Partmaster (UK) or authorized dealer |
Frequently Asked Questions - L1HDVD10E Logik
User questions about L1HDVD10E Logik
0 question about this device. Answer the ones you know or ask your own.
Ask a new question about this device
Download the instructions for your DVD player in PDF format for free! Find your manual L1HDVD10E - Logik and take your electronic device back in hand. On this page are published all the documents necessary for the use of your device. L1HDVD10E by Logik.
USER MANUAL L1HDVD10E Logik
Unpacking....5
Product Overview....6
Front Panel 6
Rear Panel 6
Remote Control 7
Installing the Battery 9
Handling the Battery 9
Handling the Remote Control 10
Remote Control Operation Range 10
Connections 11
- Connecting to Devices with an HDMI Cable 11
- Connecting to a TV with a SCART Cable 11
- Connecting to a Stereo System with an Audio Cable 11
Connecting to the Mains Socket.... 12
Compatible Disc Types 13
Supported Formats 13
Region Code 13
Start Up....14
Basic Playback.... 14
Stop Playback 14
Previous and Next 14
Fast Forward and Fast Reverse.... 15
Pause Playback 15
Single Step Playback 15
Volume Adjustment 15
Advanced Playback 16
Search 16
Program 16
OSD....16
Title 16
Subtitle Language 16
Repeat 17
A-B Repeat 17
Clear 17
Zoom 17
Angle 17
Audio Channel 17
JPEG Disc Playback 18
Repeat 18
Image Rotation 18
Zoom 18
Digest 19
System Setup 20
- General Setup Page 20
TV Display 20
Angle Mark 21
OSD (On Screen Display) Language 21
Captions 21
Screen Saver 21
Last Memory 21
- Audio Setup Page 22
Speaker Setup Page 22
Dolby Digital Setup Page 22
Dual Mono 22
DRC....22
- Video Setup Page 23
Video Output 23
Resolution Setup Page 23
Video Quality Setup Page 23
- HDMI Setup Page 24
HDMI Setup 24
Audio Source 24
Deep Colour 24
- Preference Setup Page 24
TV System 24
Audio 24
Subtitle 24
Disc Menu 24
Parental 25
Password Mode 25
Default....25
Maintenance....26
Hints and Tips 27
Specifications.... 28
Safety Warnings.... 125
Unpacking 29
Product Overview....30
Front Panel 30
Back Panel 30
Remote Control 31
Inserting the Battery 33
Handling the Battery 33
Color Settings 47
- HDMI Setup Page 48
HDMI Setup 48
Audio Source 48
Deep Colour 48
- Preferences page 48
Audio (Soundtrack) 48
Subtitles....48
CD Menu (Disc Menu) 48
Parental Control 49
Password....49
Standard 49
Maintenance....50
Tips and Hints 51
Video Quality Setup 71
- HDMI Setup 72
HDMI Setup 72
Audio Source 72
Deep Colour 72
- Preferences Page 72
TV Type 72
Audio Language 72
Subtitles 72
Disc Menu 72
Parental 73
Password Mode 73
Original 73
Maintenance 74
Tips and Advice....75
Specifications 76
Congratulations on the purchase of your new Logik DVD Player with HDMI.
We recommend that you spend some time reading this instruction manual in order that you fully understand all the operational features it offers. You will also find some hints and tips to help you resolve any issues.
Read all the safety instructions carefully before use and keep this instruction manual for future reference.
Unpacking
Remove all packaging from the DVD Player. Retain the packaging. If you dispose of it, please do so according to local regulations.
DVD Player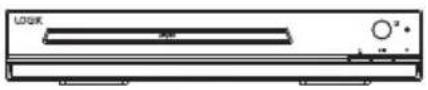
Remote Control (P.N.: 1-3000-A655-0001-R)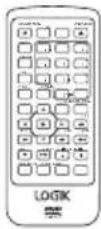
Instruction Manual (P.N: 1-3090-A655-0001-R)
Quick Start Guide (P.N: 1-3010-A655-0001-R & 1-3010-A655-0002-R)
If items are missing or damaged, please contact Partmaster (UK only).
Tel: 0844 800 3456 for assistance.
GB
Front Panel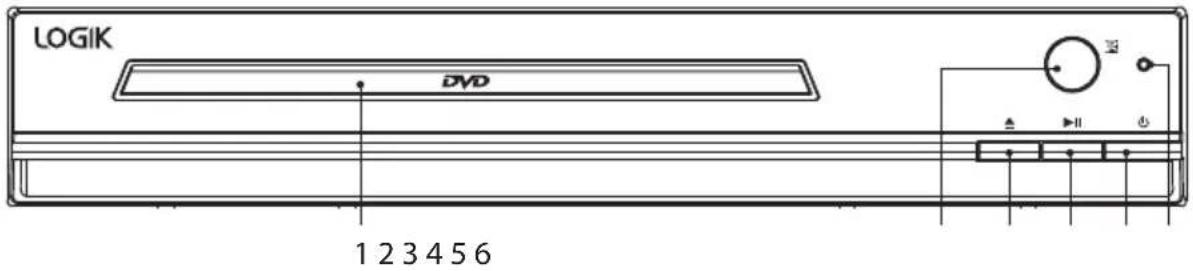
| No Control Function | ||
| 1 | Disc Tray To load a disc into the disc drive. | |
| 2 | Remote Control Sensor Receive infrared signals from the remote control. | |
| 3 | OPEN/CLOSE▲ button | To open and close the disc tray. |
| 4 | PLAY/PAUSE ▶II button To | start playback/stop playback momentarily |
| 5 | STANDBY ⏻ button To turn | the power on or restores the DVD player to standby mode. |
| 6 | Power Indicator | Illuminate red when the DVD player is in standby mode and light off when the DVD player is power on. |
Rear Panel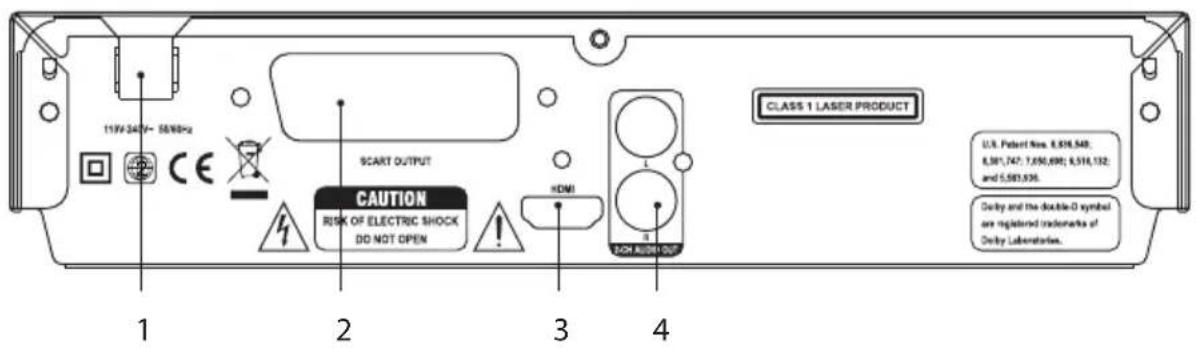
| No Control | Function | ||
| 1 | Power Line Input Connect the | supplied mains cable to the mains socket. | |
| 2 | SCART Output | Connect to a TV or a monitor equipped with a composite video input terminal. | |
| 3 | HDMI Output | Connect to a TV, a monitor or an AV amplifier equipped with a HDMI input terminal. | |
| 4 | Channels Audio Output | Connect to a stereo system equipped with an AUDIO input terminal. | |
Remote Control
GB
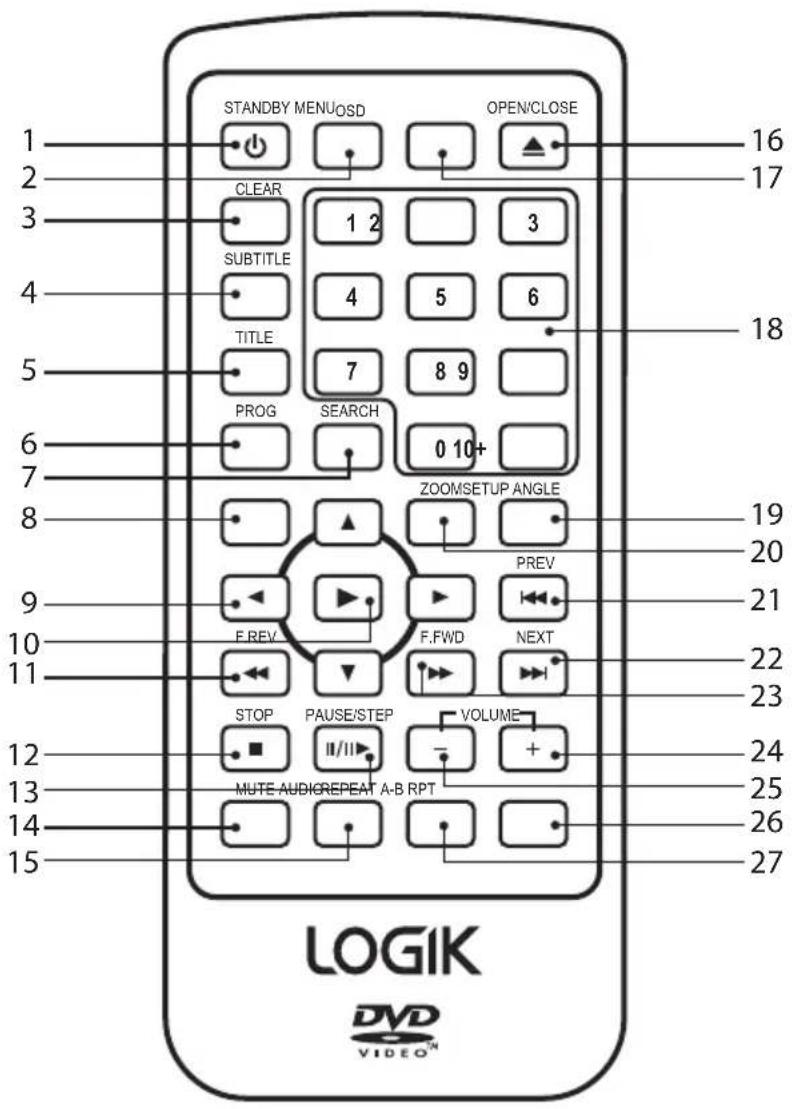
| No Control Function | ||
| 1 | STANDBY | To turn the power on or restores the DVD player to standby mode. |
| 2 | OSD (On screen Display) | To display the disc information. |
| 3 | CLEAR To clear and | cancel the previous input information. |
| 4 | SUBTITLE To switch | between different subtitle languages. (Available languages depend on the DVD features) |
| No | Control Function | |
| 5 | TITLETo go back to | the previous menu or show title menu. |
| 6 | PROGTo program and view the selected starting point of a chapter and title in the DVD disc. | |
| 7 | SEARCHTo search and start playback from a selected point on the disc. | |
| 8 | SETUPTo display the Setup Menu of the DVD. | |
| 9 | CURSORTo move up, down, left and right in Setup Menu◀/▶Starts the forward and reverse search during playback.▲/▼Allows slow forward and backward during playback. | |
| 10 | ENTER/PLAY▶ | To confirm the selection or play the DVD disc. |
| 11 | F.REV◀◀ | To fast reverse during playback. |
| 12 | STOP■ | To stop the playback. |
| 13 | PAUSE/STEPII / II▶ | To play or move the playback forward frame by frame. |
| 14 | MUTETo mute and restore your DVD sound output. | |
| 15 | REPEATTo select between different repeat modes - REPEAT CHAPTER, REPEAT TITLE, REPEAT ALL. | |
| 16 | OPEN/CLOSE▲ | To open or close the DVD disc tray. |
| 17 | MENUTo enter or exit the disc contents menu. | |
| 18 | 0-10+To select the numeric items in a menu. | |
| 19 | ANGLE | To switch / change the camera angle during playback. (If it is available in the DVD features) |
| 20 | ZOOMTo enlarge the picture on the TV. | |
| 21 | PREV◀◀ | To return back to the previous title, chapter or track. |
| 22 | NEXT▶▶ | To skip to the next title, chapter or track. |
| 23 | F.FWD▶▶ | To fast forward during playback. |
| 24 | VOLUME +To increase the volume. | |
| 25 | VOLUME -To decrease the volume. | |
| 26 | AUDIOTo change the audio mode. | |
| 27 | A-B RPTTo repeat playback between 2 particular points on a disc. | |
Installing the Battery
- Press and hold the battery release tab in the direction of arrow 1.
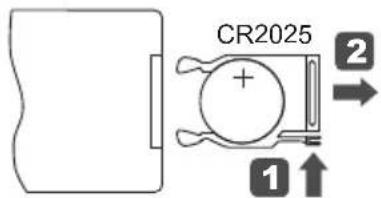

- Pull out the battery holder completely in the direction of arrow 2.
- Place a new CR2025 battery (not supplied) in the holder.

Install the battery correctly by following the polarity (+ and -) indications in the battery compartment.
- Push the holder back into the remote control.

Danger of explosion if battery is incorrectly replaced. Replace only with the same or equivalent type.
Handling the Battery
- Improper or incorrect use of battery may cause corrosion or battery leakage, which could cause fire, personal injury or damage to property.
- When the battery is exhausted, the remote will not function. • Only use the battery type indicated in this manual.
- Do not dispose of used batteries as domestic waste. Dispose of them in accordance with local regulations.
- Small button cell batteries such as the one used in the remote control are easily swallowed by young children and this is dangerous. Keep loose button cells away from young children and make sure that the battery holder tray is secure in the remote control. Seek medical advice if you believe a cell has been swallowed.
Handling the Remote Control
• Take care of your fingernails when you press and hold the battery release tab. - To avoid possible failure, read the following instructions and handle the remote control properly. • Do not drop or cause impact to the remote control. • Do not spill water or any liquid on the remote control. • Do not place the remote control on a wet object. - Do not place the remote control under direct sunlight or near sources of excessive heat. - Remove the battery from the remote control when not to use for a long period of time, as it could cause corrosion or battery leakage and may result in physical injury and/or property damage including fire.
Remote Control Operation Range
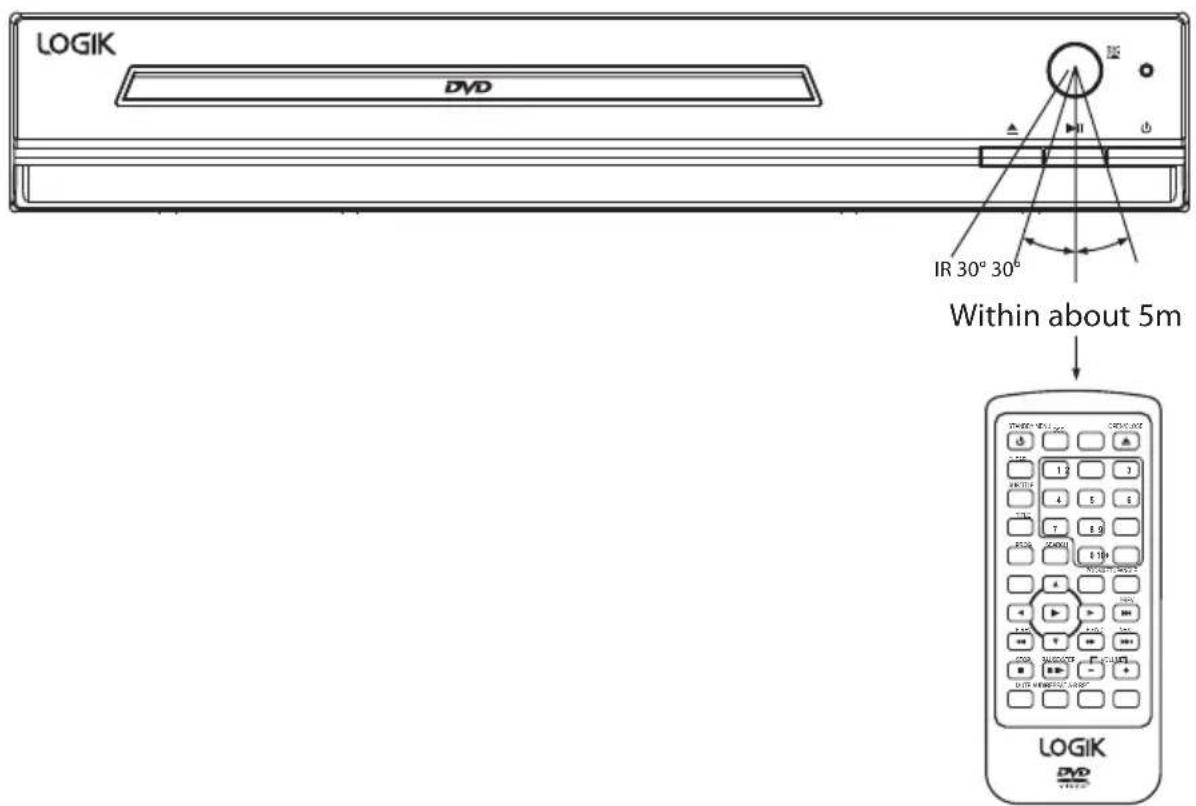
Point the remote control at the DVD player no more than 5 metres from the remote control sensor and within 60° of the front of the DVD player. The operating distance may vary depending on the brightness of the room.
![graph TD A["Television"] --> B["Method 1 HDMI cable"] B --> C["To SCART input"] B --> D["To SCART output"] C --> E["SCART cable"] D --> E E --> F["Class 1 LASER PRODUCT"] F --> G["U.S. Patent Res. 8,835,549; 6,381,747; 7,690,898; 6,578,132; and 5,583,938"] F --> H["Red"] H --> I["Method 3 AUDIO cabl…](/content/2026/05/871076/images/db2b899dd339be17c27103527f387d032712f2a3671dc9489eed0eb60275e03f.jpg)
1. Connecting to TV with an HDMI Cable
Use the HDMI cable (not supplied) to connect between the DVD player's HDMI OUT and the TV's HDMI IN.
2. Connecting to a TV with a SCART Cable
Use the SCART cable (not supplied) to connect between the DVD player's SCART OUT and the TV's SCART IN.

If your DVD player will not be connected to a stereo system or an AV receiver, a SCART or an HDMI connection is sufficient for both audio and video connections between your DVD player and TV.
3. Connecting to a Stereo System with an Audio Cable
Use the audio cables (not supplied) to connect AUDIO OUT (L/R) socket of the DVD player to AUDIO IN on the Stereo System. (Audio Left = White; and Audio Right = Red)

Connecting to the Mains Socket
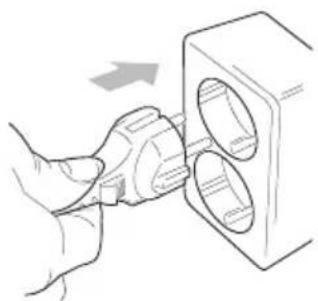
- After all connections are properly completed, connect the mains cable into the mains socket. Never make or change any connections when the DVD player is connected to the mains socket.
- Press the STANDBY ⏻ button on the DVD player or remote control to turn the DVD player on.
- When the DVD player is power on and there is no disc in it, the TV screen will show "No Disc" to indicate there is no disc in the DVD Player.
Compatible Disc Types
| Disc Types Disc Logo Recorded Content | ||
| DVD-VIDEO (Digital Versatile Disc) |  | AUDIO + VIDEO |
| DVD±RW (Audio/Video format or JPEG files) |  | AUDIO + VIDEO + JPEG |
| DVD±R (DVD Recordable - Audio/Video format or JPEG files) |  ---- ---- | AUDIO + VIDEO + JPEG |
| CD-R (CD Recordable - Audio/Video format or JPEG files) |  | AUDIO + VIDEO + JPEG |
| CD-RW (CD-Rewritable - Audio/Video format or JPEG files) |  | AUDIO + VIDEO + JPEG |
| AUDIO-CD (Compact Disc Digital Audio) |  | AUDIO |
Supported Formats
• The file extension must be .jpg and not .jpeg. • Pictures encoding must comply with JPEG/ISO format. - This DVD player can only display DCF-standard still pictures or JPEG pictures such as TIFF.

Some recorded files may not be able to be played due to the type and format of disc or condition of the recording.
Region Code
Both the DVD player and the discs are coded by region. These regional codes must match in order to play the disc. If the codes do not match, the disc will not play.
The Region Number for this DVD player is described on the rear panel of the DVD player.
| Disc Type DVD-VIDEO | |
| Region code |  ___ ___ |
Start Up

Press the STANDBY ⏻ button on the DVD player or remote control. Turn on the TV and select the video input connected to the DVD player.
Basic Playback
- Press the OPEN/CLOSE▲ button to open the disc tray, place a disc into the disc tray with the label facing up.
• For a double-sided disc, load the side which you want to play facing down. - There are two different disc sizes. Place the disc in the correct guide on the disc tray. If the disc is out of the guide, it may damage the disc and cause the DVD player to malfunction. - Do not place a disc which is unplayable in this DVD player.
- Press the OPEN/CLOSE ▲ button to close the disc tray, the playback will automatically start.
- Some discs may not playback automatically, you can press the ENTER/PLAY button to start playback.
- Depending on the disc, a menu may appear on the TV screen by pressing the MENU button. Press the ▲▼ ◀buttons on the remote control to select menu options and press the ENTER/PLAY▶ button to start, or press digits to select a menu options directly.
Stop Playback
- Press the STOP ■ button to go to pre-stop mode, the TV screen will display "Press Play Key to Continue". With some discs, the DVD player can recall the stopped location, such as on DVDs and on audio CDs.
- Press the ENTER/PLAY ▶ button to resume playback from the location where playback was stopped or from the beginning of the disc.
- Press the STOP ■ button twice to stop completely.
Previous and Next
- During playing, press the PREV button to go back to the start of the previous chapter. Each press of this button will skip a chapter until the start of the disc.
- Each press of the NEXT ▶ button during playing will skip the current chapter and play the next one.
Fast Forward and Fast Reverse
- Press the F.FWD▶ button to fast forward through the disc. Each time the F.FWD▶ button is pressed, the fast forward motion speed changes.
- Press the ENTER/PLAY ▶ button to resume normal playback.
- Press the F.REV ◀ button to fast reverse through the disc. Each time the F.REV ◀ button is pressed, the fast reverse motion speed changes.
- Press the ENTER/PLAY ▶ button to resume normal playback.
Pause Playback
- Press the PAUSE/STEP II/III▶ button to pause playback (still mode). The sound will be muted during still mode.
- Press the ENTER/PLAY ▶ button to resume normal playback.
Single Step Playback
- Press the PAUSE/STEP II/II▶ button repeatedly during PAUSE mode to play in step.
- Press the ENTER/PLAY ▶ button to resume normal playback.
Volume Adjustment
- Press the VOL +/- button to adjust the volume.
- Press the MUTE button to switch the sound off. Press the MUTE button again or the VOL +/- button to cancel this function.

"may appear on the TV screen during operation." "means that the operation is not permitted by the DVD Player or the disc.
The DVD Player will switch to screen saver mode after being idle for sometime. Press any button to exit the screen saver.
The following functions are applicable only to DVD discs. If other disc formats are played, the screen display and operation will be different.
Search
- Press the SEARCH button once, and the screen will display the search menu.
- Press the ▲▼ buttons to select the item that you want, then press the ENTER/PLAY▶button to confirm.
Program
- Press the PROG button and the screen will display the info window.
- Press the 0-10+ buttons to input the desired chapter and title (for DVD movie) or track number (for Audio CD).
- Press the ▲▼◀buttons to select the START logo and press the ENTER/PLAY▶button to play. At this time the DVD player will start program playback and the screen will display the "PROGRAM" logo.
- Press the STOP ■ button twice or press the PROG button again and select the STOP ■ button if you want to cancel this function.
OSD
Press the OSD button and the screen will display some information about the disc, such as: "Title Elapsed", "Title Remain", "Chapter Elapsed", "Chapter Remain" and "Display Off".
Title
With some DVD discs, press the TITLE button to display the title menu. You can press digits to select the chapters preferred. Press the ENTER/PLAY ▶ button to play. (Depending on the DVDs)
Subtitle Language
- Press the SUBTITLE button repeatedly to switch between different subtitle languages that are available in the disc.
- The screen will display "SUBTITLE 01/XX XXXXX", where "01" indicates the original number of this language; "XX" indicates the total number of languages; "XXXXXX" indicates the name of the selected language. (The number of languages depends on the disc).
Repeat
Press the REPEAT button repeatedly to select different repeat modes.
| Press Once | Chapter (Repeat Chapter) |
| Press Twice | Title (Repeat Title) |
| Press Three Times | All (Repeat All) |
| Press Four Times All repeat functions are cancelled | |
A-B Repeat
Repeat a section between points A and B within a Title / Chapter / Track.
- Press the A-B RPT button to choose a starting point A.
- Press the A-B RPT button again to set an ending point B and complete the setting.
- The selected section A-B will be repeated. Press the A-B RPT button the third time to cancel and exit.
Clear
Press the CLEAR button during information input to cancel the previous input.
Zoom
- Press the ZOOM button to enlarge pictures. Each time the ZOOM button is pressed, the picture enlarges in sequence.
- Press the ▲▼ buttons to navigate in the enlarged picture.
Angle
Press the ANGLE button repeatedly to switch between different camera angles that are available in the disc.
Audio Channel
Press the AUDIO button on the remote control repeatedly to change the audio mode.
For example: Audio 1/2: Dolby D 2 CH English
Audio 2/2: Dolby D 5.1 CH English

The number of audio tracks available depends on the disc.

When a JPEG disc is inserted into the DVD player, a navigation menu will be displayed automatically.
- In the menu, use the ▲▼ buttons to select a file, then press the ENTER/PLAY▶ button to start the slide show. Press the PREV◀◀ button or the NEXT▶ button during the slide show, to return to the previous or to skip to the next picture. Press the PAUSE/STEPII / ||▶ button during the slide show to pause the current picture. Then, press the ENTER/PLAY▶ button to resume the slide show.

Some JPEG discs may not be played due to the configuration and characteristics of the discs or condition of the recording.
- Press the PROG button repeatedly to change the slide show effect.
Repeat
- Press the REPEAT button repeatedly to play a single photo. You can choose to repeat the photo playback by once or by folder. Press the REPEAT button again to cancel the repeat mode.
Image Rotation
- There are four modes to rotate a picture: "Invert", "Mirror", "Left", and "Right". These operations are allowed only when a picture is being displayed normally and will be cancelled automatically when a new picture is displayed. The arrow keys are used to select the different rotation modes:
▲ - Invert / Normal - Turn left
▼ - Mirror / Normal - Turn right ▶
Zoom
- The ZOOM button is used to turn on or off this function. When this mode is on, the pictures will be displayed at the last ratio selected by the user. A message on the screen will indicate the current zoom ratio.
- If ZOOM mode is on, the F.REV◀ / F.FWD▶ buttons are used to control the ratio of zoom in/out. With ZOOM mode off, a picture is scaled to fit the whole TV screen.

During zoom function, slide-show transition and image rotation are disabled. To cancel the zoom function press the ZOOM button again to resume the slide-show.
Digest
- The STOP button is used to display thumbnail size pictures. After it is enabled, some scaled-down thumbnail pictures will be displayed on the screen. The
PREV ◀◀ / NEXT ▶▶ buttons can be used to display the next / previous pictures in the JPEG disc.
- You can select any of the displayed thumbnails by using the ▼ buttons and pressing the ENTER/PLAY▶ button.
- The thumbnail will enlarge to fit the TV screen and the slide show will start. If you desire to display an image indefinitely, press the PAUSE/STEP button. To view the next or previous picture, press the PREV/NEXT buttons. To resume the slide show, press the ENTER/PLAY button.

Quality of pictures displayed on the screen is highly dependent on the viewing device.
When you press the SETUP button on the remote control, the setup menu will be displayed.
- Within the setup menu, you can use the up/down buttons on the remote control to move the cursor, and then press the ENTER/PLAY button to make your selection. Press the left button to return to the previous menu.
- To exit the setup menu, press the SETUP button again.
1. General Setup Page
Setup TV screen format, video type and all DVD functions.
TV Display
In order to display the playback in the correct size format, both the DVD player and the TV should select the same display size format.
| General | Audio | Dolby D | Video | Preferen |
| ** General Setup Page ** | ||||
| TV Display WideAngle Mark OnOSD Lang ENGCaptions OffScreen Saver OnLast Memory Off | ||||
| Go To General Setup Page | ||||
- Normal / PS
Select this if you have a standard TV and want both sides of the picture to be trimmed or formatted to fit your TV screen.
- Normal / LB
Select this if you have a standard TV and want to display upper and lower bands with a wide-screen picture display.
- Wide
Select this if you have a wide-screen TV.
- No matter which display format is selected, a picture recorded in standard 4:3 format always displays in the 4:3 aspect ratio.
- The display format of DVD titles may vary; please refer to the information that accompanies your specific DVD title.
- If the DVD title is recorded in 16:9 wide display format while the TV is a standard 4:3 screen, horizontal compression of the image will result.
- Some DVD titles may be recorded in special formats. In such cases, the DVD titles will always appear on the screen in their original format, regardless of which TV display format you select.
Angle Mark
You can select a particular camera angle when playing a DVD that offers multiple angles.
OSD (On Screen Display) Language
Allows you to select the setup menu and OSD language.
Captions
For hearing-impaired people, the program can be displayed with recorded explanatory captions.

This is valid for a disc that has captions.
Screen Saver
- Select ON to display the screen saver. A moving DVD logo appears on a dark screen when disc playback is stopped, paused, or you have not used the player or the remote control for more than 5 minutes when the power is still on.
- Select OFF to turn off the screen saver function.
Last Memory
- Select ON to activate the Last Memory function. This function is convenient when you want to continue viewing a disc from the point where you were last watching it. Unlike the resume function, the Last Memory function is effective even if the DVD has been removed from the player.
- Select OFF to turn off the Last Memory function.
2. Audio Setup Page
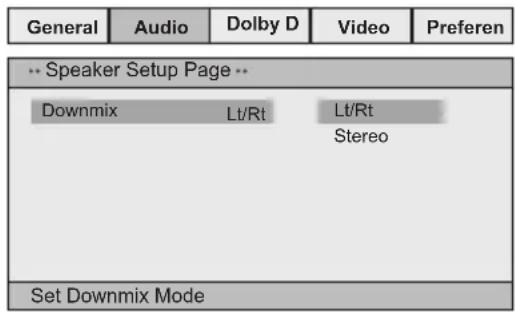
Speaker Setup Page
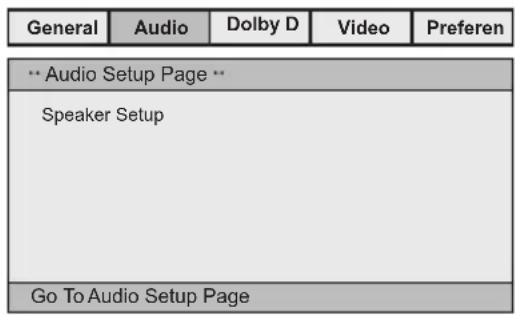
Downmix Setup
Set front speakers to Lt/Rt or Stereo.
Lt/Rt
Select this option if your DVD player is connected to a Dolby decoder.
- Stereo
Select this option to change channel output to stereo which delivers sound from only the two front speakers.
3. Dolby Digital Setup Page
Dual Mono
If your amplifier / decoder has Dolby Digital output, you may select stereo, left mono, right mono, or mixed mono mode for your amplifier decoder.
DRC
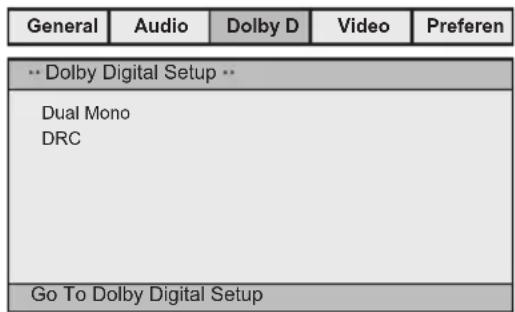
This function is generally used when playing
high volume programs at night to minimise disturbances. This setting can dynamically lower the volume and still keep
the original tone quality. This is the range, measured in decibels (dB), between the loudest and the quietest sound registers in a sound track.
4. Video Setup Page
Video Output
Set the video output. RGB and CVBS video signal can be set.
Resolution Setup Page
You can select the resolution output of the player from HDMI to match your TV. (The Video Output option must select "HDMI", the Resolution option is valid.)
Video Quality Setup Page
- Sharpness
Set the sharpness level of video output.
- Brightness
Set the brightness level of video output.
- Contrast
Set the contrast level of video output.
- Gamma
Sets the gamma level of the video.
- Hue
Set the hue level of the video.
- Saturation
Set the saturation level of the video.
- Luma Delay
Set the luminance delay of video output depending on the TV's brightness and color. It is commonly set to 1T for DVD.
| General | Audio Dolby D Video | Preferen |
| -- Video Setup Page -- | ||
| Video Output RGBResolutionQualityHDMI Setup | ||
| Go To Video Setup Page | ||
| General | Audio | Dolby D | Video | Preferen |
| ** Video Quality Setup** | ||||
| Sharpness | MID | High | ||
| Brightness | 00 | Medium | ||
| Contrast | 00 | Low | ||
| Gamma | None | |||
| Hue | 00 | |||
| Saturation | 00 | |||
| Luma Delay | 1 T | |||
| Sharpness | ||||
5. HDMI Setup Page
GB
HDMI Setup
You can turn HDMI output On or Off.
Audio Source
You can set the audio source as Auto or PCM (Pulse Code Modulation).
Deep Colour
Enrich the picture colour.
| General | Audio D | Dolby D Video | Preferen |
| HDMI Setup | |||
| HDMI Setup | On | On | |
| Audio Source Deep Colour | Auto | Off | |
| HDMI Setup | |||
6. Preference Setup Page
The preference setting is only active when there is no DVD disc in the player or the DVD player is in STOP mode. The setting will be saved and effective whenever the player is power on.
TV System
In order for the disc to play, the colour system of the DVD player, disc and TV should match.
| General | Audio | Dolby D | Video | Preferen |
| ** Preference Page ** | ||||
| TV System | PAL | |||
| Audio | ENG | |||
| Subtitle | ENG | |||
| Disc Menu | ENG | |||
| Parental | ||||
| Password | ||||
| Default | ||||
| Go To Preference Page | ||||
• PAL
This is the format used in UK.
• NTSC
This format is used by some other countries, e.g. USA.
Audio
Allows you to choose the preferred audio language of your disc. If the preferred language is not available on the disc, the DVD player will automatically use the DVD disc's default language.
Subtitle
Allows you to choose the preferred subtitle language of your disc. If the preferred language is not available on the disc, the DVD player will automatically use the DVD disc's default language.
Disc Menu
Allows you to choose the preferred menu language of your disc. If the preferred language is not available on the disc, the DVD player will automatically use the DVD disc's default language.
Parental
This feature allows you to block disc playback with specific ratings. The rating levels are from 1 to 8 and are country dependent. You can prohibit the playing of certain discs that are not suitable for your children, or you can have certain discs played with alternative scenes.
- Unlock the disc by entering the 6-digit password you have set in PASSWORD setup before you can access the RATING menu.

If you change the control level, you must input password. (Initial password: 136900)
• To disable the parental control and allow to play all discs, select ADULT. • Use the 0-9 buttons to enter the 6-digit password again. - The DVD discs that are rated above the selected level will not be played unless the 6-digit password is entered.
Tips:
The following disc types will not be affected by the Parental Control feature:
• Discs that are not coded by the disc manufacturer. - Discs that are not coded by the disc manufacturer despite having movie rating printed on the disc cover. • CDs as they have no rating level indication. • Most copied DVD discs or illegal DVDs.
Password Mode
The Parental Control can be set up in the DVD player to block video and to change password.
A 6-digit password will be required to play a prohibited disc.
If the disc is locked and the system prompts you to enter the password.
• Use the 0-9 buttons to enter your password.

In case you forgot your password, the master password is "136900"
To change your password, you will need to unlock the system by entering your password or the master password "136900".
• Once the lock icon is unlocked, you need to enter your new 6-digit password.
Default
Resets to all the manufacturer's original settings for this DVD player. Press the ENTER/PLAY button to perform the reset.
Maintenance
GB
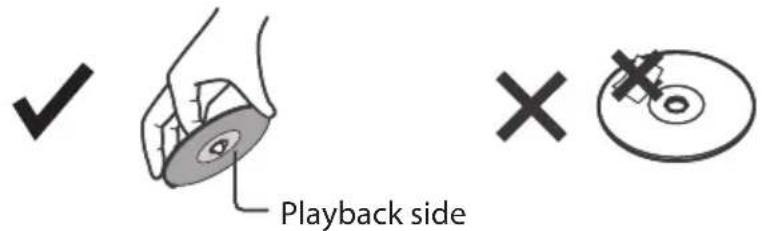
Handling Discs
• Do not touch the playback side of the disc. • Do not attach paper or tape to the disc.
Cleaning Discs
- Fingerprints and dust on the disc cause picture and sound deterioration. Wipe the disc from the centre outwards with a soft cloth. Always keep the disc clean.
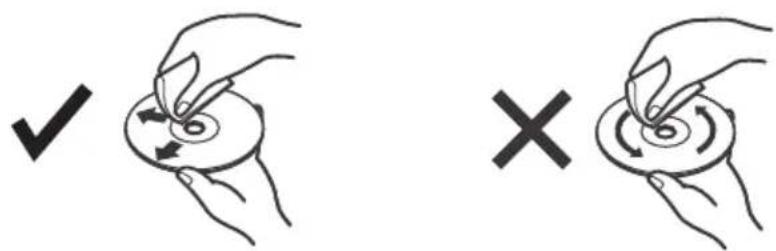
- If you cannot wipe off the dust with a soft cloth, wipe the disc lightly with a slightly moistened soft cloth and finish with a dry cloth.
- Do not use any type of solvent such as thinner, benzine, commercially available cleaners or antistatic spray. They may damage the disc.
Storing Discs
• Do not store discs in places subjected to direct sunlight or near heat sources. - Do not store discs in places subjected to moisture and dust such as a bathroom or near a humidifier. - Storing discs vertically in a case, stacking discs or placing objects on discs outside of their cases may cause warping.
| PROBLEM SOLUTION | |
| No operation can be performed with the remote control. | Check the batteries in the remote control. They may need replacing.Operate the remote control at a distance of no more than 6m.Removes batteries and hold down one or more buttons for several minutes to drain the microprocessor inside the remote control to reset it. Reinstall batteries and try to operate the remote control again. |
| Disc does not play. | Ensure that the disc is installed with the label side facing up.Check the region number of the DVD. |
| Disc Menu does not appear. | Check if the disc has a Menu. |
| No power • Press | the OPEN/CLOSE ▲ button on the DVD or on the Remote Control to turn on the unit.Make sure the mains socket has power. |
| The picture is distorted or turns black and white during colour playback. | The disc does not match with the TV colour system standard (PAL/NTSC).The disc is dirty. Clean the disc.Sometimes a small amount of picture distortion may appear. This is not a malfunction of the unit. |
| The screen aspect ratio cannot be changed. | The Screen Aspect Ratio is fixed on your DVDs.Depending on the TV, it may not be possible to change the Screen Aspect Ratio.This is not a problem with the DVD player. |
| No audio. • Make | sure you have securely connected the DVD player and other devices.Make sure the TV and the amplifier are in good condition and are setup properly. |
| Not able to select some items in the setup/ system menu. | Press the STOR button twice before selecting the setup/ system menu.Depending on the disc availability, some menu items cannot be selected. |
| The DVD player does not start the playback. | Insert a readable disc with the playback side facing down.Check the disc type, colour system (PAL/NTSC) and region code.Check for any scratches or smudges on the disc.Press SETUP button to turn off the setup menu.Enter the password in order to change the parental rating level or to unlock the disc for playback.Moisture may have condensed inside the system. Remove the disc and leave the system turned on for about an hour.Disconnect the mains cable from the mains socket for a few minutes. Reconnect the mains cable and try to operate the DVD player. |
| Picture freezes momentarily during playback. | Check the disc for fingerprint or scratches, and clean with a soft cloth wiping from centre to edge. |
Specifications
| VF Signal System PAL/NTSC | |
| Frequency Response | CD: 20Hz-20KHz(EIAJ)DVD: 20Hz-22KHz(48KHz)(Sample result)20Hz-44KHz(96KHz)(Sample result) |
| Audio S/N Ratio >90 dB | |
| Video/Picture MPEG2 | |
| Audio MPEG1 standard | |
| Audio Output (Analog Audio) | Electric level output: 1.8V ± 0.2resistance: 10K ohms |
| Video Output | Electric level output: 1.0Vp--presistance: 75 ohms Unbalanced negative |
| Power 110V - 240V ~ 50/60Hz | |
| Power Consumption 12W | |
| Dimensions | L: 225mm W: 240mm H: 50mm |
| Weight | 1.1 kg |
| Operating Temperature | 5°C to 35°C (41°F to 95°F) |
| Operating Humidity | 5% to 90% |
Features and Specification are subject to change without notice.
Quick Start Guide (P.N: 1-3010-A655-0001-R &1-3010-A655-0002-R)
If any items are missing or damaged, contact Partmaster (UK only).
Tel.: 0844 800 3456 for assistance.
Front panel
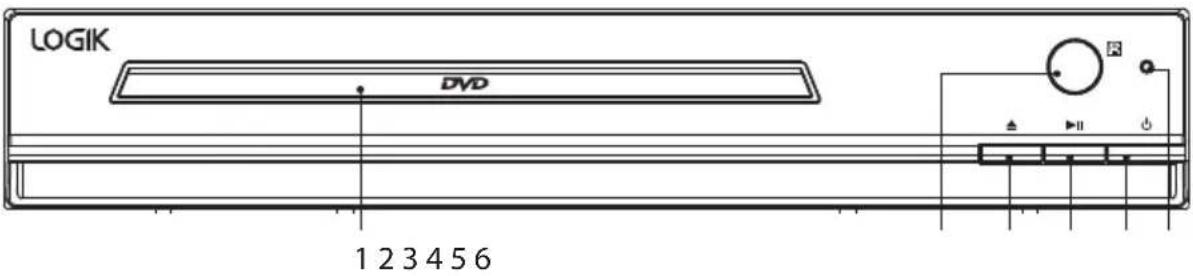
| Nr. | Kontroll Funksjon | |
| 1 | Plateskuff Laste en plate inn i | platestasjonen. |
| 2 | Fjernkontrollsensor Motta infr | arøde signaler fra fjernkontrollen. |
| 3 | ÅPNE/LUKKE ▲-knapp | Åpne og lukke plateskuffen. |
| 4 | SPILL AV / PAUSE ►II -knapp | Starte avspilling / stoppe avspilling midlertidig |
| 5 | VENTEMODUS ⏻ -knapp F | for å slå på eller sette DVD-spilleren tilbake i ventemodus. |
| 6 | Strømindikator Rødt lys når D | VD-spilleren er i ventemodus. Lyset slukker når DVD-spilleren slås på. |
Back panel
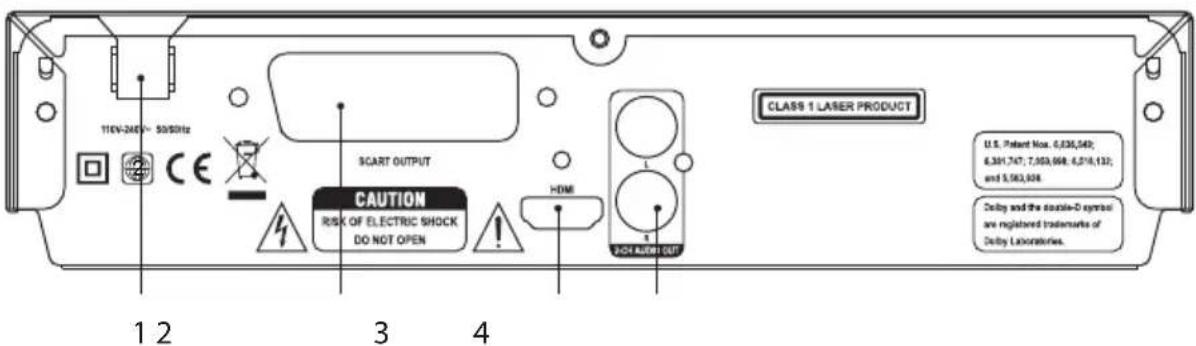
| Nr. | Kontroll Funksjon | |
| 1 | Strøminntak | Forbinder den medfølgende strømledningen med stikkontakten. |
| 2 | SCART Output (SCART-utgang) | Kople til en TV eller monitor med en SCART-kontakt med komposittvideo. |
| 3 | HDMI-utgang | Kople til en TV, en monitor eller en AV-forsterker utstyrt med en HDMI-kontakt. |
| 4 | 2-kanals lydutgang | Kople til et stereosystem utstyrt med en lydkontakter. |
Remote control
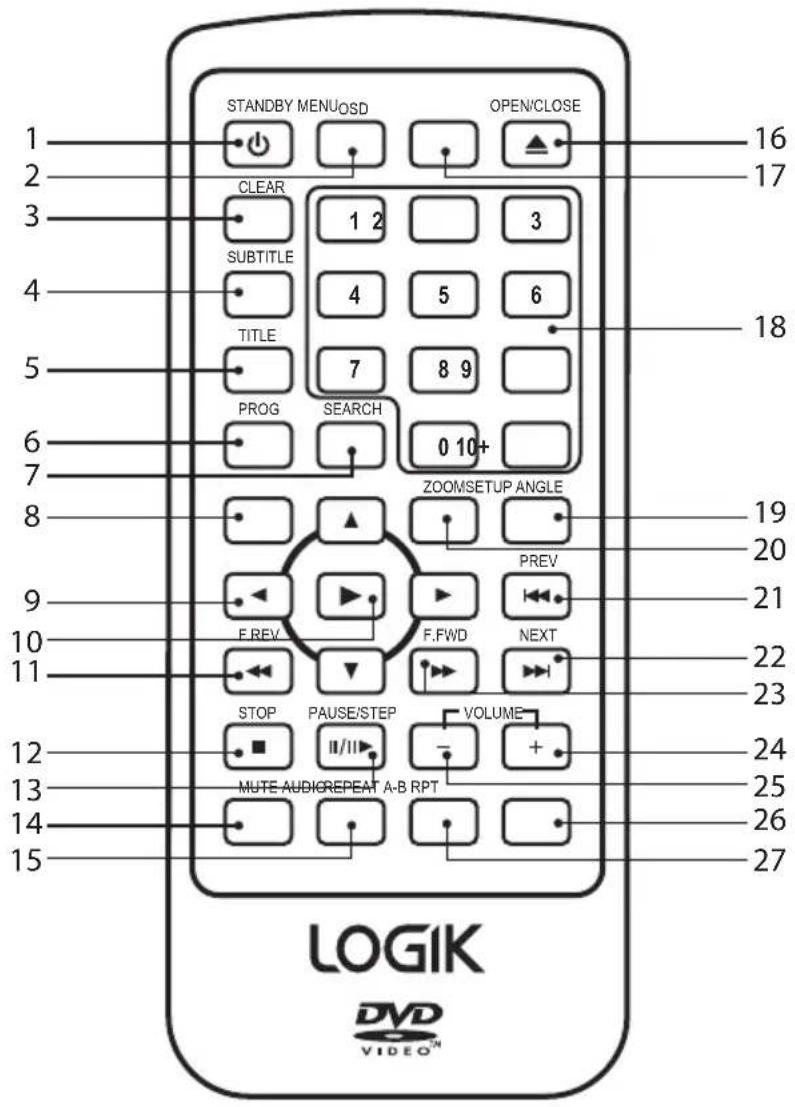
Compatible disc types
| Platetyper Platelogo Innspilt innhold | ||
| DVD-VIDEO (DVD = Digital Versatile Disc) |  | LYD + VIDEO |
| DVD±RW (overskrivbare plater med lyd/video eller JPEG-filer) |  | LYD + VIDEO + JPEG |
| DVD±R (skrivbare plater med lyd/video eller JPEG-filer) |  ---- ---- | LYD + VIDEO + JPEG |
| CD-R (skrivbare plater med lyd/video eller JPEG-filer) |  | LYD + VIDEO + JPEG |
| CD-RW (overskrivbare plater med lyd/video eller JPEG-filer) |  | LYD + VIDEO + JPEG |
| LYD-CD (CD = Compact Disc) |  | LYD |
2. Audio setup page
5. HDMI setup page
HDMI Setup
In "HDMI Setup" you can turn the HDMI signal On or Off.
Audio Source
In "Audio Source" you can set the audio source to Auto or PCM (= Pulse Code Modulation).
Deep Colour
In "Deep Colour" you can set the color richness.
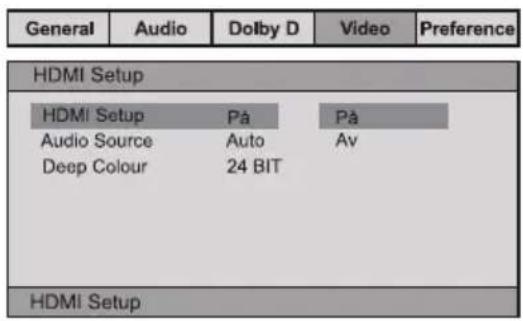
6. Preferences page

- Read all the instructions carefully before using the unit and keep them for future reference.
- Retain the manual. If you pass the unit onto a third party make sure to include this manual.
- Check that the voltage marked on the rating label matches your mains voltage.
Damage
- Please inspect the unit for damage after unpacking.
- Do not continue to operate the unit if you are in any doubt about it working normally, or if it is damaged in any way - switch off, withdraw the mains plug and consult your dealer.
Location of Unit
• The unit must be placed on a flat stable surface and not subjected to vibrations.
- Do not place the unit on sloped or unstable surfaces as the unit may fall off or tip over.
• The mains socket must be located near the unit and should be easily accessible.
• This unit is designed for indoor use only.
Temperature
- Avoid extreme degrees of temperature, either hot or cold. Place the unit well away from heat sources such as radiators or gas/electric fires.
- Avoid exposure to direct sunlight and other sources of heat.
Naked Flames
• Never place any type of candle or naked flame on the top of or near the unit.
Moisture
- To reduce the risk of fire, electric shock or product damage, do not expose this unit to rain, moisture, dripping or splashing. No objects filled with liquids, such as vases, should be placed on the unit. • If you spill any liquid into the unit, it can cause serious damage. Switch it off at the mains immediately. Withdraw the mains plug and consult your dealer.
Ventilation
• To prevent the risk of electric shock or fire hazard due to overheating, ensure that curtains and other materials do not obstruct the ventilation vents.
- Do not install or place this unit in a bookcase, built-in cabinet, or another confined space. Ensure the unit is well ventilated.
Safety
- Always disconnect the unit from the mains supply before connecting or disconnecting other devices or moving the unit. - Unplug the unit from the mains socket during a lightning storm.
Mains Cable
- Make sure the unit or unit stand is not resting on top of the mains cable, as the weight of the unit may damage the mains cable and create a safety hazard.
- If the mains cable is damaged, it must be replaced by the manufacturer, its service agent, or similarly qualified persons in order to avoid a hazard.
Earphones
- Listening to loud sounds for prolonged periods of time may permanently damage your hearing.
- Before putting on earphones, turn the volume down, then put the earphones on and slowly increase the volume until you reach a comfortable listening level.
Interference
- Do not place the unit on or near appliances which may cause electromagnetic interference. If you do, it may adversely affect the working of the unit and cause a distorted picture or sound.
Standby
- The STANDBY button on the remote control does not switch off the unit completely. The unit will continue to draw electricity from the mains supply while in standby. In the interests of safety and to avoid unnecessary energy consumption, never leave the unit in standby while unattended for long periods of time, e.g., overnight, while on holiday, or while out of the house. Switch it off and disconnect the mains plug from the mains socket.
Batteries
- Batteries used in the remote control for this unit are easily swallowed by young children, and this is dangerous.
- Keep loose batteries away from young children and make sure that the battery holder tray is secure in the remote control. Seek medical advice if you believe a cell has been swallowed.
- Please dispose of batteries correctly by following the guidance in this manual.
Supervision
• Children should be supervised to ensure that they do not play with the unit and the remote control.
- Never let anyone, especially children, push anything into the holes, slots, or any other openings in the case - this could result in a fatal electric shock.
DVD
• Class 1 Laser Product
- This unit utilises a laser. Use of controls, adjustments, or performance of procedures other than those specified herein may result in hazardous radiation exposure.
• Before moving the unit, ensure the disc tray is empty.
• Always remove the disc when the unit is not in use.
• Failure to do so will risk severely damaging the disc and the unit.
• Do not stack devices; heat from other devices may affect the performance of the unit.

CAUTION
RISK OF ELECTRIC SHOCK DO NOT OPEN


The lightning flash with arrowhead symbol, within an equilateral triangle, is intended to alert the user to the presence of uninsulated "dangerous voltage" within the product's enclosure that may be of sufficient magnitude to constitute a risk of electric shock.
The exclamation point within an equilateral triangle is intended to alert the user to the presence of important operating and maintenance (servicing) instructions in the manual accompanying the appliance.
Service
• To reduce the risk of electric shock, do not remove screws. The unit does not contain any user-serviceable parts. Please leave all maintenance work to qualified personnel. • Do not open any fixed covers as this may expose dangerous voltages.
Maintenance
- Ensure to unplug the unit from the mains socket before cleaning.
- Do not use any type of abrasive pad or abrasive cleaning solutions as these may damage the unit's surface. • Do not use liquids to clean the unit.
Safety warnings
This symbol on the product or in the instructions means that your electrical and electronic equipment should be disposed at the end of its life separately from your household waste. There are separate collection systems for recycling in the EU. For more information, please contact the local authority or your retailer where you purchased the product.
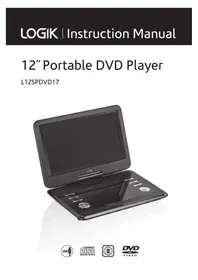
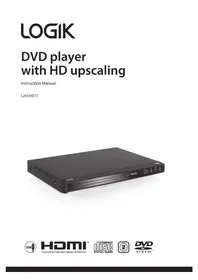
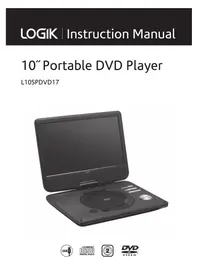
- UNPACKING
- REMOTE CONTROL
- INSTALLING THE BATTERY
- HANDLING THE BATTERY
- HANDLING THE REMOTE CONTROL
- REMOTE CONTROL OPERATION RANGE
- CONNECTING TO TV WITH AN HDMI CABLE
- CONNECTING TO A TV WITH A SCART CABLE
- CONNECTING TO A STEREO SYSTEM WITH AN AUDIO CABLE
- CONNECTING TO THE MAINS SOCKET
- COMPATIBLE DISC TYPES
- SUPPORTED FORMATS
- REGION CODE
- START UP
- BASIC PLAYBACK
- STOP PLAYBACK
- PREVIOUS AND NEXT
- FAST FORWARD AND FAST REVERSE
- PAUSE PLAYBACK
- SINGLE STEP PLAYBACK
- VOLUME ADJUSTMENT
- SEARCH
- PROGRAM
- OSD
- TITLE
- SUBTITLE LANGUAGE
- REPEAT
- A-B REPEAT
- CLEAR
- ZOOM
- ANGLE
- AUDIO CHANNEL
- IMAGE ROTATION
- DIGEST
- GENERAL SETUP PAGE
- TV DISPLAY
- NORMAL / PS
- NORMAL / LB
- WIDE
- ANGLE MARK
- OSD (ON SCREEN DISPLAY) LANGUAGE
- CAPTIONS
- SCREEN SAVER
- LAST MEMORY
- AUDIO SETUP PAGE
- SPEAKER SETUP PAGE
- DOWNMIX SETUP
- LT/RT
- STEREO
- DOLBY DIGITAL SETUP PAGE
- DUAL MONO
- DRC
- VIDEO SETUP PAGE
- VIDEO OUTPUT
- RESOLUTION SETUP PAGE
- VIDEO QUALITY SETUP PAGE
- SHARPNESS
- BRIGHTNESS
- CONTRAST
- GAMMA
- HUE
- SATURATION
- LUMA DELAY
- HDMI SETUP PAGE
- GB
- HDMI SETUP
- AUDIO SOURCE
- DEEP COLOUR
- PREFERENCE SETUP PAGE
- TV SYSTEM
- PAL
- NTSC
- AUDIO
- SUBTITLE
- DISC MENU
- PARENTAL
- TIPS
- PASSWORD MODE
- DEFAULT
- MAINTENANCE
- HANDLING DISCS
- CLEANING DISCS
- STORING DISCS
- FRONT PANEL
- BACK PANEL
- PREFERENCES PAGE
- DAMAGE
- LOCATION OF UNIT
- TEMPERATURE
- NAKED FLAMES
- MOISTURE
- VENTILATION
- SAFETY
- MAINS CABLE
- EARPHONES
- INTERFERENCE
- STANDBY
- BATTERIES
- SUPERVISION
- DVD
- CLASS 1 LASER PRODUCT
- SERVICE
- SAFETY WARNINGS
Brand : Logik
Model : L1HDVD10E
Category : DVD player