
50 DIAMOND S - Smartphone ARCHOS - Free user manual and instructions
Find the device manual for free 50 DIAMOND S ARCHOS in PDF.
Pick your language and provide your email: we'll send you a specifically translated version.
| Product type | Smartphone |
| Brand | ARCHOS |
| Model | 50 DIAMOND S |
| Dimensions (H x W x D) | 142 x 71.5 x 7.5 mm |
| Weight | 134 g |
| Screen | 5.5-inch IPS HD (1280 x 720 pixels) |
| Processor | Mediatek MT6735P Quad Core 1.0 GHz |
| RAM | 2 GB |
| Internal storage | 16 GB expandable via microSD up to 64 GB |
| Main camera | 13 megapixels with autofocus and LED flash |
| Front camera | 5 megapixels |
| Battery | 2500 mAh removable Li-ion |
| Operating system | Android 6.0 Marshmallow |
| Connectivity | Wi-Fi 802.11 b/g/n, Bluetooth 4.0, GPS, 4G LTE |
| Sensors | Accelerometer, proximity, ambient light |
| Care and cleaning | Use a soft, dry cloth. Avoid abrasive products. Do not immerse. |
| Security | Supports locking with PIN, password, or pattern. Data encryption possible. |
| Spare parts and repairability | Removable and replaceable battery. Other parts available from the manufacturer or authorized resellers. |
| General information | Dual SIM smartphone (micro-SIM). Built-in speaker, 3.5 mm headphone jack. Color: white/gold. |
Frequently Asked Questions - 50 DIAMOND S ARCHOS
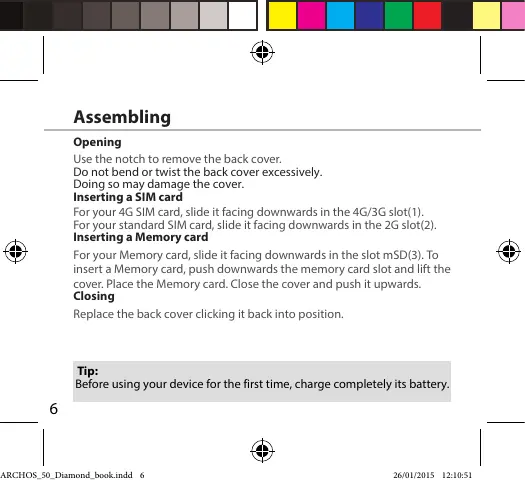
How to insert the SIM card and microSD card?
Turn off the smartphone. Remove the back cover by prying it off. Insert the SIM cards into the designated slots (micro-SIM) and the microSD card into the dedicated slot. Replace the cover and turn on the device.
How to take a screenshot?
Simultaneously press the Volume Down button and the Power button for a few seconds. The screen will flash and the screenshot will be saved in the gallery.
Why is my touch screen not responding?
Try restarting the phone by holding down the power button for 10 seconds. If the problem persists, check for dirt or a poorly placed screen protector. A non-responsive touch screen may require a reset.
How to reset the smartphone to factory settings?
Go to Settings > Backup & reset > Factory data reset. Confirm the operation. Caution, all personal data will be erased.
What to do if the battery discharges too quickly?
Check apps that consume a lot of power in Settings > Battery. Reduce screen brightness, disable Wi-Fi, Bluetooth, and GPS when not in use. A restart may also help.
How to transfer files to a computer?
Connect the smartphone to the computer via USB cable. On the phone, select File Transfer (MTP) mode. The computer will recognize the device as a storage device.
How to update the operating system?
Go to Settings > About phone > System updates. If an update is available, follow the on-screen instructions. Make sure you are connected to a Wi-Fi network and have sufficient battery.
The smartphone does not pick up the 4G network, what to do?
Check that mobile data is enabled in network settings. Make sure the SIM card is 4G compatible and properly inserted. Restart the phone. If the problem persists, contact your operator.
How to clean the screen without damaging it?
Use a slightly damp microfiber cloth (no liquid directly on the screen). Avoid alcohol or ammonia-based products. Dry with a dry cloth to avoid streaks.
How to change the battery?
Turn off the phone and remove the back cover. Remove the battery by gently lifting the edge. Insert the new battery respecting polarity, then replace the cover.
User questions about 50 DIAMOND S ARCHOS
0 question about this device. Answer the ones you know or ask your own.
Ask a new question about this device
No questions yet. Be the first to ask one.
Download the instructions for your Smartphone in PDF format for free! Find your manual 50 DIAMOND S - ARCHOS and take your electronic device back in hand. On this page are published all the documents necessary for the use of your device. 50 DIAMOND S by ARCHOS.
USER MANUAL 50 DIAMOND S ARCHOS
Manual assistant
Powered by Anthropic
Waiting for your message
Product information
Brand : ARCHOS
Model : 50 DIAMOND S
Category : Smartphone