
Weekday WMO-D20L700W - Microwaves WILFA - Free user manual and instructions
Find the device manual for free Weekday WMO-D20L700W WILFA in PDF.


| Product Type | Microwave Oven |
| Brand | Wilfa |
| Model | Weekday WMO-D20L700W |
| Capacity | 20 Liters |
| Power Output | 700 Watts |
| Power Consumption | 1050 Watts |
| Dimensions (W x D x H) | 440 x 340 x 260 mm |
| Weight | 10.5 kg |
| Voltage | 230 V / 50 Hz |
| Control Type | Mechanical Knobs |
| Turntable | Yes, 245 mm diameter |
| Door Type | Side-opening with handle |
| Interior Light | Yes |
| Timer | Up to 30 minutes |
| Defrost Function | Yes, by weight or time |
| Auto Cook Menus | 5 presets (popcorn, potato, pizza, beverage, reheat) |
| Child Safety Lock | Yes (press Stop for 3 seconds) |
| Cleaning | Wipe interior with damp cloth; do not use abrasive cleaners |
| Spare Parts Availability | Turntable, waveguide cover, fuse available via Wilfa service |
| Repairability Index | 7.5/10 (easy access to main components) |
Frequently Asked Questions - Weekday WMO-D20L700W WILFA
User questions about Weekday WMO-D20L700W WILFA
0 question about this device. Answer the ones you know or ask your own.
Ask a new question about this device
Download the instructions for your Microwaves in PDF format for free! Find your manual Weekday WMO-D20L700W - WILFA and take your electronic device back in hand. On this page are published all the documents necessary for the use of your device. Weekday WMO-D20L700W by WILFA.
USER MANUAL Weekday WMO-D20L700W WILFA
natural_image
White microwave oven with control panel and display screen (no visible text or symbols on main body)Wilfa Weekday
Microwave oven
Bruksanvisning
Bruksanvisning
Operating Instructions
WMO-D20L700W
LES ALLE ANVISNINGER F∅R BRUK
LÄS IGENOM ALLA INSTRUKTIONER INNAN PRODUKTEN ANVÄNDS
LÆS ALLE VEJLEDNINGER INDEN BRUG
LUE OHJEET HUOLELLISESTI ENNEN KÄYTTÖÄ
READ ALL INSTRUCTIONS BEFORE USING
Slik stiller du inn betjeningsknappene på ovnene
Barnesikring (Child Lock)
Auto-påmindelse
Read these instructions carefully before using your microwave oven, and store them carefully.
IMPORTANT SAFETY INSTRUCTIONS....5
Installation....10
Product overview....10
Cooking principles and tips for better result ....11
Utensils guide ....11
Operation....12
Troubleshooting....17
Technical data....18
IMPORTANT SAFETY INSTRUCTIONS
- To reduce the risk of fire, electric shock, injury to persons or exposure to excessive microwave oven energy when using your appliance, follow basic precautions, including the following:
- Warning: Liquids and other foods must not be heated in sealed containers since they are liable to explode.
- Warning: It is hazardous for anyone other than a trained person to carry out any service or repair operation that involves the removal of a cover which gives protection against exposure to microwave energy.
- Warning: If the door or door seals are damaged, the oven must not be operated until it has been repaired by a trained person.
- Only use utensils suitable for use in microwave ovens.
- The oven should be cleaned regularly and any food deposits should be removed.
- Read and follow the specific: "Precautions to avoid possible exposure to excessive microwave energy".
- When heating food in plastic or paper containers, keep an eye on the oven due to the possibility of ignition.
- The microwave oven is intended for heating food and beverages. Drying of food or clothing and heating of warming pads, slippers, sponges, damp cloth and similar may lead to risk of injury, ignition or fire.
- If smoke is observed, switch off or unplug the appliance and keep the door closed in order to stifle any flames.
- Do not overcook food.
- Do not use the oven cavity for storage purposes. Do not store items, such as bread, cookies, etc. inside the oven.
- Remove wire twist-ties and metal handles from paper or plastic containers/bags before placing them in the oven.
• Install or locate this oven only in accordance with the installation instructions provided.
- Eggs in the shell and whole hard-boiled eggs should not be heated in microwave ovens since they may explode, even after microwave heating has ended.
- Use this appliance only for its intended uses as described in the manual. Do not use corrosive chemicals or vapors in this appliance. This oven is especially designed for heating. It is not designed for industrial or laboratory use.
- If the supply cord is damaged, it must be replaced by the manufacturer, its service agent or similarly qualified persons in order to avoid a hazard.
- Do not store or use this appliance outdoors.
- Do not use this oven near water, in a damp basement or near a swimming pool.
- The temperature of accessible surfaces may be high when the appliance is operating. The surfaces are liable to get hot during use. Keep cord away from heated surface, and do not cover any vents on the oven.
- Do not let the cord hang over the edge of the table or counter.
- Failure to keep the oven in a clean condition could lead to deterioration of the surface that could adversely affect the life of the appliance and possibly result in a hazardous situation.
- The contents of feeding bottles and baby food jars must be stirred or shaken and the temperature checked before consumption, in order to avoid burns.
- Microwave heating of beverages can result in delayed eruptive boiling; therefore care must be taken when handling the container.
- Keep the appliance and its cord out of reach of children aged less than 8 years.
- This appliance can be used by children aged from 8 years and above and persons with reduced physical, sensory or mental capabilities or lack of experience and knowledge if they have been given supervision or instruction concerning use of the appliance in a safe way and understand the hazards involved. Children shall not play with the appliance. Cleaning and user maintenance shall not be made by children without supervision.
PRECAUTIONS TO AVOID POSSIBLE EXPOSURE TO EXCESSIVE MICROWAVE ENERGY
- Do not attempt to operate this oven with the door open since this can result in harmful exposure to microwave energy. It is important not to break or tamper with the safety interlocks.
- Do not place any object between the oven front face and the door or allow dirt or cleaner residue to accumulate on sealing surfaces.
ADDENDUM
If the apparatus is not kept in a good state of cleanliness, its surface could become degraded and affect the lifespan of the apparatus and lead to a dangerous situation.
CLEANING
Be sure to unplug the appliance from the power supply.
- Clean the inside of the oven after use with a slightly damp cloth.
- Clean the accessories in the usual way in soapy water.
- The door frame and seal and neighboring parts must be cleaned carefully with a damp cloth when they are dirty.
TWO-ROUND-PIN PLUG
Warning: Electric Shock Hazard. Improper use of the grounding can result in electric shock. Do not plug into an outlet until appliance is properly installed and grounded.

This appliance must be grounded. In the event of an electrical short circuit, grounding reduces the risk of electric shock by providing an escape wire for the electric current. This appliance is equipped with a cord having a grounding wire with a grounding plug. The plug must be plugged into an outlet that is properly installed and grounded.
Consult a qualified electrician or service engineer if the grounding instructions are not completely understood or if doubt exists as to whether the appliance is properly grounded. If it is necessary to use an extension cord, use only a 3-wire extension cord.
A short power-supply cord is provided to reduce the risks resulting from becoming entangled in or tripping over a longer cord.
If a long cord set or extension cord is used:
- The marked electrical rating of the cord set or extension cord should be at least as great as the electrical rating of the appliance.
- The extension cord must be a grounding type 3-wire cord.
- The long cord should be arranged so that it will not drape over the counter top or tabletop where it can be pulled on by children or tripped over.
INSTALLATION
For correct operation, the oven must have sufficient airflow. A minimum clearance of 10 cm is required between the oven and any adjacent walls.
- Leave a minimum clearance of 20 cm above the oven.
- Leave a minimum clearance of 5cm at both sides.
- Do not remove the legs from the bottom of the oven.
- Blocking the inlet and/or outlet openings can damage the oven.
- Place the oven as far away from radios and TV as possible. Operation of the microwave oven may cause interference to your radio or TV reception.
Plug your oven into a standard household outlet. Be sure the voltage and the frequency are the same as the voltage and the frequency on the rating label.
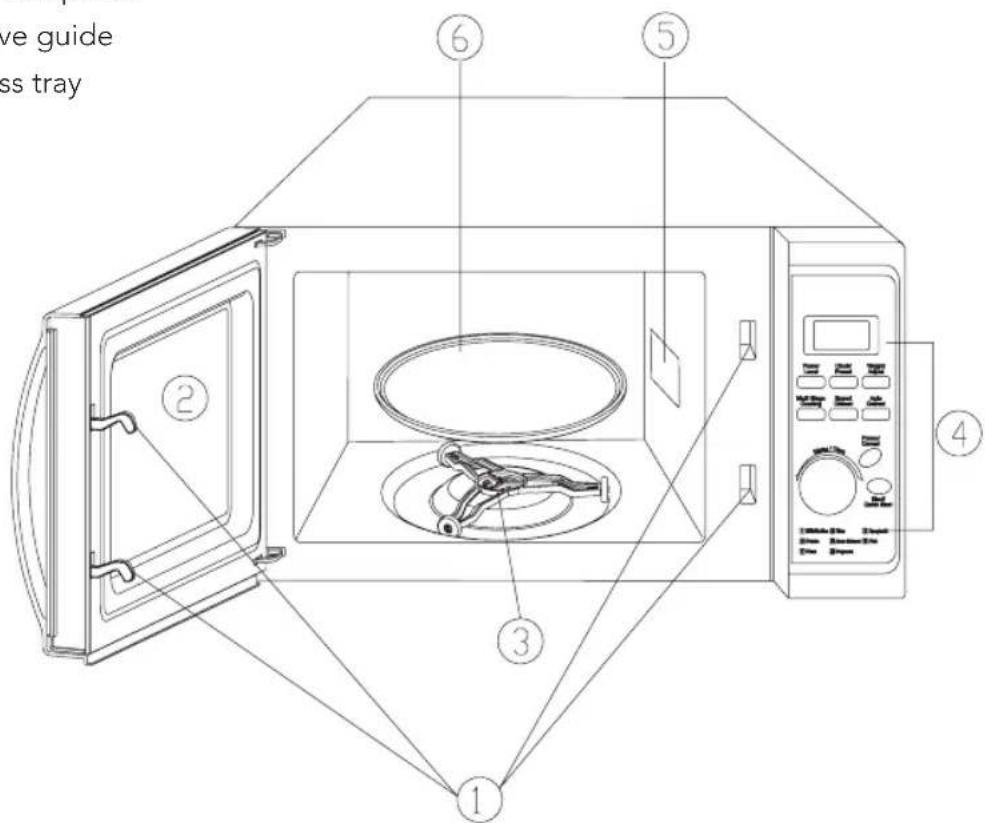
PRODUCT OVERVIEW
① Door Safety Lock System
② Oven Window
③ Turntable support
④ Control panel
⑤ Wave guide
⑥ Glass tray
COOKING PRINCIPLES AND TIPS FOR BETTER RESULT
- Arrange food carefully. Place thickest areas towards outside of dish.
- Watch cooking time. Cook for the shortest amount of time indicated and add more as needed. Food severely overcooked can smoke or ignite.
- Cover foods while cooking. Covers prevent spattering and help foods to cook evenly.
- Turn foods over once during microwave cooking to speed cooking of such foods as chicken and hamburgers. Large items like roasts must be turned over at least once.
- Rearrange foods such as meatballs halfway through cooking both from top to bottom and from the center of the dish to the outside
UTENSILS GUIDE
- The ideal material for a microwave utensil is transparent to microwave, it allows energy to pass through the container and heat the food.
- Microwave cannot penetrate metal, so metal utensils or dishes with metallic trim should not be used.
- Do not use recycled paper products when microwave cooking, as they may contain small metal fragments which may cause sparks and/or fires.
- Round /oval dishes rather than square/oblong ones are recommend, as food in corners tends to overcook.
- Narrow strips of aluminum foil may be used to prevent overcooking of exposed areas. But be careful don't use too much and keep a distance of 1 inch (2.54 cm) between foil and cavity.
The list below is a general guide to help you select the correct utensils:
| Cookware Microwave | |
| Heat-Resistant Glass Yes | |
| Non Heat-Resistant Glass No | |
| Heat-Resistant Ceramics Yes | |
| Microwave-Safe Plastic Dish Yes | |
| Kitchen Paper Yes | |
| Metal Tray No | |
| Metal Rack No | |
| Aluminum Foil & Foil Containers No |
OPERATION
Control panel
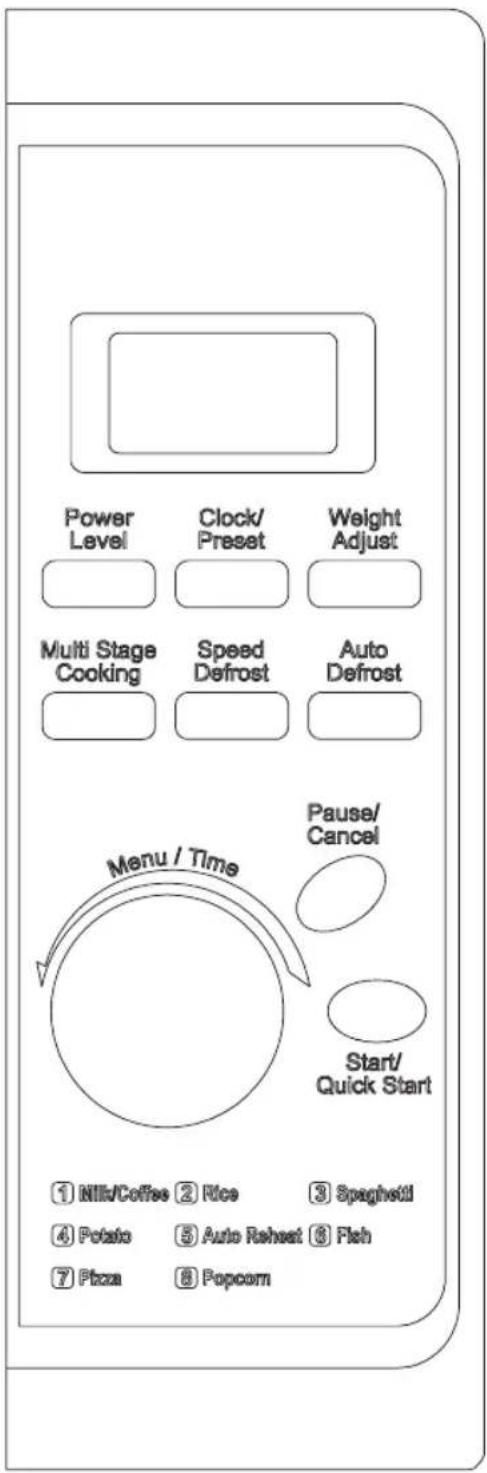
- MENU ACTION SCREEN Cooking time, power, action indicators, and clock time are displayed.
- POWER LEVEL Touch this button a number of times to set microwave cooking power level.
- CLOCK/PRESET Touch this button to start setting the oven clock and ending by touching it again. Used to set a preset program to start the oven at a specified time.
- WEIGHT ADJUST
Touch this button to select specify food weight or number of servings.
• MULTI STAGE COOKING Touch to several consecutive functions. - SPEED DEFROST
Touch to defrost food by time.
• AUTO DEFROST Use to defrost food by weight. - MENU/TIME Turn the dial to set cooking time or menu.
- START/QUICK START Touch to start a cooking program. Simply touch it a number of times to begin express cooking without previously setting power level and cooking time
- PAUSE/CANCEL Press to cancel setting or reset the oven before setting a cooking program.
How to set the oven controls
Each time a button is touched, a beep will sound to acknowledge the touch.
Auto reminder
After finishing a cooking program, the system will sound 4 beeps with END in display, and the system will continue sound 3 beeps every 2 minutes until pressing PAUSE/CANCEL or opening the oven door, the system will back to the standby mode.
Setting digital clock
With the oven ready for input, touch the CLOCK/PRESET button to set the digital clock in 12 hour or 24 hours cycle.
For example: Suppose you want to set the oven clock time to 8:30.
- Press CLOCK/PRESET button once or twice.
- Turn MENU/TIME to indicate the hour digit 8.
- Press CLOCK/PRESET button.
- Turn MENU/TIME dial to indicate the minute digits until the screen shows 8:30.
- Press CLOCK/PRESET to confirm the setting.
Note: You can press the CLOCK/PRESET button once to check clock time during cooking.
Microwave cooking
Select power level by pressing the POWER LEVEL button:
| Press power level button Cooking power | |
| once 100% | |
| twice 80% | |
| 3 times 60% | |
| 4 times 40% | |
| 5 times 20% | |
| 6 times 0% |
For example, suppose you want to cook for 1 minute at 60% of microwave power.
- Press POWER LEVEL button a number of time to select power level.
- Turn MENU/TIME to 1:00 (the longest cooking time you can enter is 60 minutes).
- Press START/QUICK START button.
Quick start cooking
This feature allows you to start the oven quickly. Press the START/QUICK START button a number of times to set the cooking time (the longest cooking time you can enter is 12 minutes), the oven starts work at full power level immediately.
Auto defrost
The oven allows the defrosting of meat, poultry, and seafood. The time and the defrosting power are adjusted automatically once the weight is programmed.
For example: Suppose you want to defrost 600 g of shrimp.
- Place the shrimp to be defrosted into the oven.
- Press AUTO DEFROST button.
- Turn MENU/TIME to choose the weight 600 g (the weight is between 100 g and 1800 g).
- Press START/QUICK START button.
During defrosting program, the system will pause to remind user to turn food over, and then press START/QUICK START to resume the defrosting.
Speed defrost
The oven can quickly defrost food to the set time you entered.
For example: Suppose you want to defrost shrimp.
- Place the shrimp to be defrosted into the oven.
- Press SPEED DEFROST button once.
- Turn MENU/TIME dial to set cooking time (the longest cooking time you can enter is 60 minutes).
- Press START/QUICK START button.
Note: During defrosting program, the system will pause to remind user to turn food over, and then press START/QUICK START to resume the defrosting.
Preset
Suppose you want to set the oven to start-up at 2:30 o'clock. Steps:
- Input a cooking program.
- Press WEIGHT ADJUST and Turn MENU/TIME dial to select weight or number of portions.
- Press CLOCK/PRESET pad
-
Turn MENU/TIME to enter 2:00.
-
Press CLOCK/PRESET pad.
- Turn MENU/TIME to enter 2:30.
- Press START/QUICK START pad.
Note: Be sure the time of day clock is set at the correct time before programming PRESET.
Touch CLOCK/PRESET can check the presetting time during the process; press PAUSE/CANCEL can cancel the preset function.
SPEED DEFROST, AUTO DEFROST cannot be set in PRESET program.
Note: Use preset function with supervision.
Mutli Stage cooking
The oven can be programmed for up to 2 automatic cooking sequences.
The oven has the ability to be programmed to do several consecutive functions.
Suppose you want set the following cooking program:
1st stage: Cook for 5 minutes at 100%;
2nd stage: Cook for 10 minutes at 60%.
Steps:
- Touch PAUSE/CANCEL pad.
- Touch POWER LEVEL pad and select power level 100%.
- Turn the MENU/TIME wheel until cooking time corresponds to 5 minutes.
- Touch MULTI STAGE COOKING pad.
- Touch POWER LEVEL pad and select power level 60%.
- Turn the MENU/TIME wheel until cooking time corresponds to 10 minutes.
- Touch START/QUICK START pad.
Note: Only MICROWAVE COOKING can be set in multi-stage cooking program.
Auto cook
For food or the following cooking mode, it is not necessary to program the duration and the cooking power. It is sufficient to indicate the type of food that you wish to cook as well as the weight of this food. In order to do this, rotate the MENU/TIME button to select a category of food/cooking mode, and then press WEIGHT ADJUST to indicate weight of food to be cooked. The oven begins cooking once the START/QUICK START button is engaged. You may need to turn food over at the middle of cooking time to obtain uniform cooking. For example: to cook 400g of fish.
- Turn MENU/TIME dial until "06" displays.
- Press WEIGHT ADJUST to indicate a weight of 400 g.
- Press START/QUICK START button.
Auto Cook Menu
After finishing a cooking program, the system will sound 4 beeps with END in display, and the system will continue sound 3 beeps every 2 minutes until pressing PAUSE/CANCEL or opening the oven door, the system will back to the standby mode.
| Code Food/cooking mode 1. Turn ME | MENU/TIME dial to indicate category of food. Press WEIGHT ADJUST to select weight2. The result of auto cooking depends on factors such as fluctuation of voltage, the shape and size of food, your personal preference as to the doneness of certain foods and even how well you happen to place food in the oven. If you find the result at any rate not quite satisfactory, please adjust the cooking time a little bit accordingly.3. For Spaghetti, add boiled water before cooking. | |
| 01 Milk/coffee (200ml/share) | ||
| 02 Rice (g) | ||
| 03 Spaghetti (g) | ||
| 04 Potato (230g/each) | ||
| 05 Auto | Reheat (g) | |
| 06 Fish (g) | ||
| 07 Pizza (g) | ||
| 08 Popcorn (99g) | ||
Child lock
Use to prevent unsupervised operation of the oven by little children. The CHILD LOCK indicator will show up on display screen, and the oven cannot be operated while the CHILD LOCK is set.
To set the CHILD LOCK: Press and hold the PAUSE/CANCEL button for 3 seconds, a beep sounds and LOCK indicator lights.
To cancel the CHILD LOCK: Press and hold the PAUSE/CANCEL button for 3 seconds until lock indicator on display turns off.
TROUBLESHOOTING
Before you contact any service agent please make sure that you have read and checked possible causes stated in the information below.
| Normal | |
| Microwave oven interfering with TV reception | Radio and TV reception may be interfered with when microwave oven operating. It is similar to the interference from small electrical appliances, like mixers, vacuums cleaners, and electric fans and is quite normal. |
| Dim oven light In low power microwave cooking, the oven light may become dim. This is normal. | |
| Steam accumulating on door, hot air coming out of vents | During cooking, steam may come out of food. Most will escape through the vents but some may accumulate on cool places like the oven door. This is normal. |
| Oven starts accidentally with no food in. | It is forbidden to run the unit without any food inside. This is very dangerous. |
| Problem Possible Cause | Remedy | |
| Oven fails to operate. | Power cord not plugged in tightly. | Unplug. Then plug in again after 10 seconds. |
| Fuse blows or circuit breaker activated. | Replace fuse or reset circuit breaker (must be repaired by a professional service agent) | |
| Not responding only double beeps. | Ensure that the control panel is correctly programmed and that the timer is set. | |
| Problem with outlet. Test outlet with other electrical appliances. | ||
| Oven does not heat. | Door not closed properly. Close door properly. | |
| Glass turntable makes noise when microwave oven operates | Roller rest and oven bottom are dirty. | Refer to “Maintenance of Microwave” for cleaning dirty parts. |
IF NONE OF THE ABOVE RECTIFIES THE SITUATION, THEN CONTACT A QUALIFIED TECHNICIAN. DO NOT TRY TO ADJUST OR REPAIR THE OVEN YOURSELF.
TECHNICAL DATA
Model:
WMO-D20L700W
Power Supply: AC 220 V-240 V 50 Hz
Power Consumption: 1200 W
Output: 700 W
Under the Waste Electrical and Electronic Equipment Directive (WEEE), such waste must be collected separately and processed. If in future you need to discard this product, please do not throw it out with your normal rubbish. Please send this product to a collection point where one is available.
AS WILFA
Industriveien 25
1481 Hagan
Norway wilfa.com
in homes since 1948
AS WILFA
Industriveien 25
1481 Hagan
Norway
wilfa.com

- Wilfa Weekday
- Barnesikring (Child Lock)
- Auto-påmindelse
- IMPORTANT SAFETY INSTRUCTIONS
- PRECAUTIONS TO AVOID POSSIBLE EXPOSURE TO EXCESSIVE MICROWAVE ENERGY
- ADDENDUM
- CLEANING
- TWO-ROUND-PIN PLUG
- INSTALLATION
- PRODUCT OVERVIEW
- COOKING PRINCIPLES AND TIPS FOR BETTER RESULT
- UTENSILS GUIDE
- OPERATION
- Control panel
- How to set the oven controls
- Auto reminder
- Setting digital clock
- Microwave cooking
- Quick start cooking
- Auto defrost
- Speed defrost
- Preset
- Mutli Stage cooking
- Steps:
- Auto cook
- Auto Cook Menu
- Child lock
- TROUBLESHOOTING
- TECHNICAL DATA
Brand : WILFA
Model : Weekday WMO-D20L700W
Category : Microwaves