073-008 - Hand Tools Meec Tools - Free user manual and instructions
Find the device manual for free 073-008 Meec Tools in PDF.


| Brand | Meec Tools |
| Model | 073-008 |
| Product Type | Pneumatic Impact Wrench |
| Square Retainer | 1/2" |
| Capacity | 16 mm |
| No-Load Speed | 7000 rpm |
| Maximum Torque | 340 Nm |
| Air Intake | 1/2" |
| Recommended Inner Diameter, Air Hose | 3/8" |
| Average Air Consumption | 226 l/min |
| Operating Pressure | 6.2 bar |
| Weight | 2.18 kg |
| Sound Pressure Level (LpA) | 95 dB(A) with K=3 dB |
| Sound Power Level (LwA) | 106 dB(A) with K=3 dB |
| Vibration Level | 9.1 m/s² with K=1.5 m/s² |
| Safety Equipment Required | Eye protection, hearing protection, dust mask, gloves |
| Lubrication Method | Manual or line-mounted lubricator; SAE 10 or sewing machine oil |
| Storage Instructions | Store in dry location; lubricate before storage |
| Warranty and Support | Contact Jula service department |
Frequently Asked Questions - 073-008 Meec Tools
User questions about 073-008 Meec Tools
0 question about this device. Answer the ones you know or ask your own.
Ask a new question about this device
Download the instructions for your Hand Tools in PDF format for free! Find your manual 073-008 - Meec Tools and take your electronic device back in hand. On this page are published all the documents necessary for the use of your device. 073-008 by Meec Tools.
USER MANUAL 073-008 Meec Tools
Operating Instructions for Pneumatic Impact Wrench
073-008
natural_image
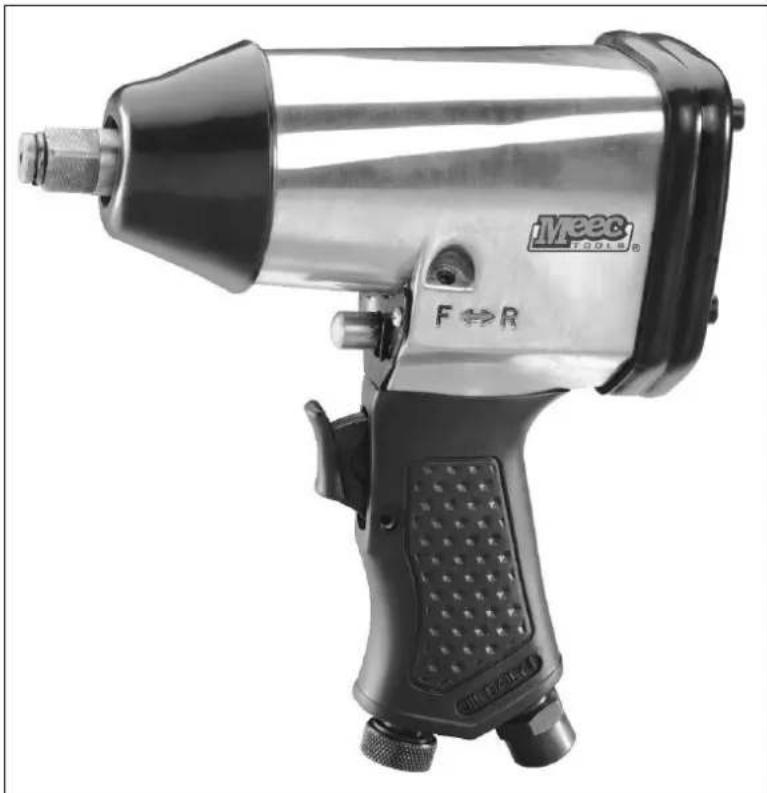
Exterior view of a Meac Tool (no visible text or symbols on the device body)SV Bruksanvisning i original
NO Bruksanvisning i original
EN Operating instructions in original
SVENSKA 3
SÄKERHETSANVISNINGAR 3
TEKNISKA DATA 3
BESKRIVNING 3
HANDHAVANDE 4
Användning 4
Lossdragning 4
Ätdragning/iskruvning 4
Tightening/screwing in 16
Compressed air supply 17
MAINTENANCE 17
Lubrication 17
Storage 17
TROUBLESHOOTING 18
SÄKERHETSANVISNINGAR
Read these instructions carefully before use!
- Always wear suitable eye protection. Harmful dust can be formed when working with the tool. Always wear a dust mask. Wear ear protection and gloves, if required.
- Do not overreach – always maintain a firm footing and good balance. Secure the workpiece with clamps or in a vice. Always operate the tool with both hands.
- Loose hair, jewellery, loose-fitting clothes, etc., can become caught in tools with moving parts. This can cause serious injuries.
- Keep the work area clean. Keep children and onlookers at a safe distance when using the tool. Make sure the workplace is well ventilated.
- Always disconnect the air hose before assembling/adjusting the tool and/or accessories.
- The tool must always be turned off when it is connected to the compressed air supply.
- Always disconnect the air hose when the tool is not in use. Switch off the tool if the compressed air supply is interrupted.
- Never carry the tool by the hose.
WARNING!
- Do not use the tool in areas where there is a risk of explosion.
- Do not overreach – always maintain a firm footing and good balance. Always wear gloves to avoid the risk of crushing injuries caused by reaction forces.
- Unexpected tool movements caused by reaction forces or tool breakages can cause personal injury.
- Loose hair, jewellery, loose-fitting clothes, ties, scarves, etc., can become caught in tools with moving parts or that drive other moving parts. This can cause serious injuries.
- Use approved ear protection if the noise level in the workplace exceeds 85 dB(A).
- Unexpected tool kickback may cause personal injury.
- Falling is a common cause of personal injury and death. Look out for hose bends in your area of movement and in the work area. Also look out for the part of the hose that is permanently connected to the tool.
- Excessive air pressure or excessively long operation without a load shortens the tool's service life and can entail a risk of personal injury or damage to property.
- Continuous use and unsuitable working conditions can cause hand injury. Stop using the tool if your hands become numb or start to hurt. Do not resume work until your hands feel normal again. Consult a doctor immediately if the problem persists.
- Never make any modifications to the tool. This can make the tool dangerous to use.
TECHNICAL DATA
| Square retainer | 1/2" |
| Capacity | 16 mm |
| Speed (no load) | 7000 rpm |
| Max. torque | 340 Nm |
| Air intake | 1/2" |
| Recommended inner diameter, air hose | 3/8" |
| Average air consumption | 226 l/min |
| Operating pressure | 6.2 bar |
| Weight | 2.18 kg |
| Sound pressure level, LpA | 95 dB(A), K=3 dB |
| Measured Sound power level, LwA | 106 dB(A), K=3 dB |
| Vibration level | 9,1 m/s ^2 , K=1,5 m/s ^2 |
Always use hearing protection!
The declared vibration value, which has been measured by a standardised test method, can be used to compare different tools with each other and for a preliminary assessment of exposure.
Warning! The actual vibration level when using power tools may differ from the specified maximum value, depending on how the tool is used. It is therefore necessary to determine which safety precautions
are required to protect the user, based on an estimate of exposure in actual operating conditions (taking into account all stages of the work cycle, e.g. the time when the tool is switched off and when it is idling, in addition to the start-up time).
The figures quoted are emission levels and are not necessarily safe working levels. Whilst there is a correlation between the emission and exposure levels, this cannot be used reliably to determine whether or not further precautions are required. Factors that influence the actual level of exposure of the workforce include the characteristics of the work room and the other sources of noise etc. i.e. the number of machines and other adjacent processes. Also the permissible exposure level can vary from country to country. This information, however, will enable the user of the machine to make a better evaluation of the hazard and risk.
DESCRIPTION
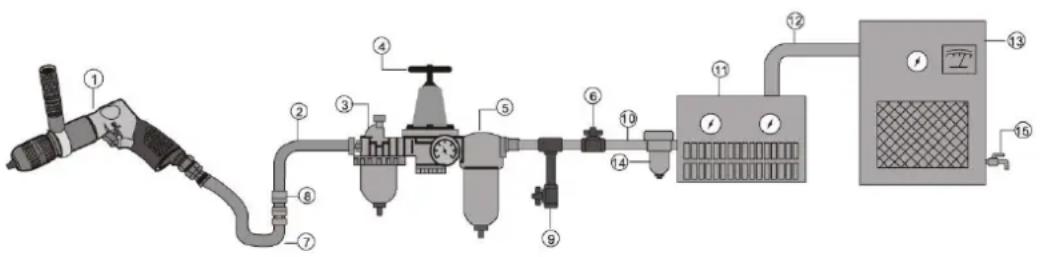
- Pneumatic tool
- Air hose, inner diameter 3/8"
- Lubricating device
- Pressure regulator
-
Filter
-
Shut-off valve
- Anti-vibration hose
- Quick-release coupling
- Empty daily
-
Pipe and connection, min. 1/2"
-
Air drier
- Pipe and connection, min. 1"
- Compressor
- Automatic drainage
- Empty daily
OPERATION
Use
The torque is set using the tool's air regulator, which is located beside the air intake. 1 indicates the minimum torque, suitable for small nuts, and 4 indicates the maximum torque.
Loosening
- Attach a suitable size socket onto the holder.
- Set the compressor's pressure regulator to 6.2 bar. Do not set the pressure higher than 6.2 bar.
- Connect the air hose to the tool. If a leak is detected, disconnect the air hose immediately. Do not use the tool until the leak has been repaired.
- Place the socket over the nut that is to be loosened.
- Hold the tool firmly. Press in the switch above the trigger so that it protrudes on the rear of the casing. The tool is now set for backwards rotation (loosening). Start the tool by squeezing the trigger. IMPORTANT: Check that the nut can withstand the set torque.
NOTE!
- Do not increase the pressure in the compressor's pressure regulator if the tool cannot undo the nut.
- If the tool's torque setting is low, you can increase this setting and try again. Do not continue attempting to undo the nut if the tool's regulator is already in position 4. Undo the nut in another way.
- When the nut has been undone, stop the tool by releasing the trigger. Lift the socket away from the nut. Remove the nut from the socket, if necessary.
Tightening/screwing in
The impact wrench has a maximum torque of 340 Nm. Check that the nut can withstand the set torque.
- Hand screw the nut on as far as possible.
- Place the socket over the nut that is to be loosened. Press the switch above the trigger forwards so that it protrudes on the front of the casing. The tool is now set for forwards rotation (tightening). Start the tool by squeezing the trigger.
NOTE!
- Do not increase the pressure in the compressor's pressure regulator if the tool cannot tighten the nut all the way.
- If the tool's torque setting is low, you can increase this setting and try again. Do not continue trying to tighten the nut if the tool's regulator is already in position 4. Tighten the nut in another way.
- When the nut has been tightened, lift the socket away from the nut. Do not overtighten.
- If possible, check the recommended tightening torque for the nut and check the tightening torque with a torque wrench after tightening with the impact wrench.
Compressed air supply
- Check that the relevant compressor provides sufficient air flow.
- The tool must always be turned off when it is connected to the compressed air supply.
- Normal operating air pressure for the tool is 6.2 bar. Excessively high pressure and contaminated air cause the tool to wear unreasonably quickly, and can also entail a risk of personal injury or damage to property.
- Drain off any water from the compressor's air container daily. Otherwise, water from the air hoses can penetrate the tool and damage it.
- Clean the air intake filter cartridge each week. The chart below shows the recommended connection.
- If hoses are very long (normally longer than 8 metres), the line pressure must be increased to compensate for the pressure drop. The minimum inner diameter of the hose is 1/4". Couplings must have the same inner diameter. An air hose with an inner diameter of 3/8" is normally recommended for optimum tool function.
- Use appropriate hoses and couplings. We do not recommend connecting quick-release couplings directly to the tool, as they can cause malfunction as a result of vibration. Instead, connect a hose to the tool and install a quick-release coupling between the air hose from the compressor and the anti-vibration hose that is attached to the tool.
- Keep the hose away from heat, oil and sharp edges. Check each hose for wear before use. Make sure that all connections are secure.
MAINTENANCE
Lubrication
- The tool can be lubricated with a line-mounted lubricating device or manually. During manual lubrication, disconnect the compressed air supply, apply a few drops of compressed air oil in the tool's air intake and operate the tool for a few seconds. Oil SAE 10 or sewing machine oil can be used. Do not use flushing oil.
- Before connecting the air hose, apply 4 or 5 drops of compressed air oil in the air intake. Reconnect the air hose and press the trigger a few times to distribute the oil evenly. Do not use oil with a high viscosity. This can impair the tool's performance.
- Lubricate the tool after every 1 or 2 hours of operation.
- Before putting the tool away after use, disconnect the air hose and apply 4 or 5 drops of pneumatic oil in the air intake. Reconnect the air hose and operate the tool for approx. 30 seconds to distribute the oil evenly. This will ensure the tool lasts longer.
- Clean the air intake filter cartridge each week.
Storage
- Do not store the tool in a damp location. This can result in corrosion damage to the mechanism. Always lubricate the tool before storage.
TROUBLESHOOTING
| Problem | Possible cause | Action |
| The tool operates slowly or at varying speeds. | Insufficient air flow (air pressure too low).Faulty speed regulator/trigger.Worn or damaged rotor blades. | Check that the air hose is not blocked or folded.Check that the compressor is supplying the correct air pressure.Replace the rotor blades. |
| The motor is clogged. | Dust in the motor. | Dismantle and clean the tool as instructed. |
| The tool starts on its own when the compressed air supply is connected. | Trigger catch or trigger defective.Air leak at the inlet or elsewhere. | Check and repair the trigger catch and trigger.Locate and seal the leak as instructed. |
| Low torque. | Bearing damage.Corresponding O-rings are worn out or out of position. | Replace the bearings.Replace damaged O-rings. Adjust O-rings that are out of position. |
| Abnormal vibrations, the casing feels hot. | Insufficient lubrication. | Lubricate the tool as instructed until it operates at the correct speed and torque. |
Jula reserves the right to make changes. In the event of problems, please contact our service department.
www.jula.com
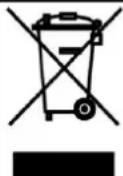
Care for the environment!
Must not be discarded with household waste! This product contains electrical or electronic components that should be recycled. Leave the product for recycling at the designated station e.g. the local authority's recycling station.
CE
EC DECLARATION OF CONFORMITY EG FÖRSÄKRAN OM ÖVERENSSTÄMMELSE EF SAMSVARSERKLÆRING DEKLARACJA ZGODNOŚCI WE
Jula AB, Box 363, SE-532 24 SKARA, SWEDEN
This product was CE marked in year -10
Name and address of the person authorised to compile the technical file:
Jonas Backstad Box 363, SE-532 37 Skara, Sweden
Skara 2013-06-24
Bo Eriksson PRODUCT MANAGER
- Operating Instructions for Pneumatic Impact Wrench
- SVENSKA 3
- SÄKERHETSANVISNINGAR
- Read these instructions carefully before use!
- WARNING!
- Always use hearing protection!
- OPERATION
- Use
- Loosening
- NOTE!
- Tightening/screwing in
- Compressed air supply
- MAINTENANCE
- Lubrication
- Storage
- Care for the environment!
- CE
- EC DECLARATION OF CONFORMITY EG FÖRSÄKRAN OM ÖVERENSSTÄMMELSE EF SAMSVARSERKLÆRING DEKLARACJA ZGODNOŚCI WE
Brand : Meec Tools
Model : 073-008
Category : Hand Tools