
K6C7/NO - Cooker INDESIT - Free user manual and instructions
Find the device manual for free K6C7/NO INDESIT in PDF.

| Product Type | Freestanding Electric Cooker with Ceramic Hob |
| Brand | Indesit |
| Model | K6C7/NO |
| Oven Volume | 56 Liters |
| Oven Inner Dimensions (WxDxH) | 43.5 cm x 40 cm x 32 cm |
| Oven Maximum Power Absorption | 2800 W |
| Hob Type | Ceramic Glass with 4 Cooking Zones |
| Hob Zones Configuration | 2 Radiant (1200 W each) + 2 Halogen Extendable (700/1700 W each) |
| Hob Maximum Power Absorption | 5800 W |
| Voltage / Frequency | 230V/400V 3N~ 50/60 Hz |
| Oven Cooking Modes | 7: Traditional, Baking, Fast Cooking, Multi-cooking, Pizza, Grill, Gratin |
| Oven Features | Interior Light, Thermostat Light, Door Lock Device, 5 Rack Positions |
| Plate Warmer Drawer Dimensions (WxDxH) | 46 cm x 42 cm x 8.5 cm |
| Energy Consumption (Natural Convection) | Not specified (conforms to EN 50304) |
| Cleaning & Maintenance | Enamel interior; hob cleaned with ceramic hob cleaner and scraper; oven lamp replaceable (25W, E14, 300°C) |
| Safety Features | Automatic shutdown? Not specified; requires proper earthing; child safety via door lock; hot surface indicator lights |
| Spare Parts & Repairability | Use only original spare parts; service by authorized centers |
| Installation | Built-in or freestanding; adjustable feet; height adjustable from 850 mm to 900 mm |
| Country of Origin | Not specified (Indesit brand, likely Italy/Europe) |
Frequently Asked Questions - K6C7/NO INDESIT
User questions about K6C7/NO INDESIT
0 question about this device. Answer the ones you know or ask your own.
Ask a new question about this device
Download the instructions for your Cooker in PDF format for free! Find your manual K6C7/NO - INDESIT and take your electronic device back in hand. On this page are published all the documents necessary for the use of your device. K6C7/NO by INDESIT.
USER MANUAL K6C7/NO INDESIT
Installation and use
Komfur
To maintain the EFFICIENCY and SAFETY of this appliance, we recommend:
- call only the Service Centers authorized by the manufacturer
• always use original Spare Parts
1 This appliance is intended for non-professional use within the home.
2 Before using the appliance, carefully read the instructions contained in this manual, as they provide important information for ensuring safe installation, use and maintenance. Keep this manual as a reference guide.
3 Remove the packing and make sure the appliance hasn't been damaged during transport. If you have any doubts, don't use the appliance. Call a qualified technician for assistance. For safety, keep packing materials (plastic bags, polystyrene foam, tacks, etc.) away from children.
4 The appliance must be installed by a qualified technician in accordance with the manufacturer's instructions. No liability for injury or damage to persons, animals or property will be accepted by the manufacturer arising from failure to follow these instructions.
5 The electrical safety of this appliance is ensured only if it is correctly connected to an efficiently earthed system in accordance with electrical safety regulations. Make sure this basic safety requirement has been complied with. If in doubt, have it checked by a qualified technician. No liability for damage will be accepted by the manufacturer because of defective earthing.
6 Before connecting the appliance, make sure the specifications on the rating plate correspond with those of your power supply.
7 Check that your supply and sockets are sufficient for the total load taken by your appliance which is stated on the rating plate. If you have any doubts, contact a qualified technician for service.
8 A multipole circuit breaker with a space between contacts of 3 mm or more must be fitted for installation
9 If the socket and cooker plug are not compatible, have the socket replaced with a suitable model by a qualified technician who should also check that the cross-section of the socket cable is suited to the power absorbed by the appliance. The use of adaptors, multiple sockets and/or extensions, is not recommended. If their use can not be avoided, remember to use only single or multiple adapters and extensions which comply with current safety regulations. In these cases, never exceed the maximum current capacity indicated on the single adaptor or extension and the maximum power indicated on the multiple adapter.
10 Do not leave the appliance plugged in if it is not necessary. Switch off the main switch and gas cock when you are not using the cooker.
11 The openings and slots used for ventilation and dispersion of heat must never be closed or plugged.
12 The user must not replace the supply cable of this appliance. Always call an after-sales servicing centre authorised by the manufacturer in the case of cable damage or replacement.
13 This appliance must be used for the purpose for which it was expressly designed.
Any other use (e.g. heating rooms) is considered to be improper and consequently dangerous.
The manufacturer declines all responsibility for damage resulting from improper and irresponsible use.
14 A number of fundamental rules must be followed when using electrical appliances. The following are of particular importance:
•do not touch the appliance when your hands or feet are wet
•do not use the appliance barefooted
- do not use extensions, but if these are necessary caution must be exercised.
- never pull the power supply cable or the appliance to unplug the appliance plug from the mains.
- never leave the appliance exposed to atmospheric agents (rain, sun etc.)
- do not allow children or persons who are not familiar with the appliance to use it, without supervision.
15 Always unplug the hob from the mains or switch off the main switch before cleaning or carrying out maintenance operations.
16 If the surface of the glass breaks, disconnect the appliance immediately. For repairs call only an authorised after-sales servicing centre and request the use of original spare parts only. Failure to comply with the above may compromise the safety of the appliance.
17 If you are no longer using the appliance, remember to make it unserviceable by unplugging the appliance from the mains and cutting the supply cable. Also make all potentially dangerous parts of the appliance, safe, above all for children who could play with the appliance.
18 The vitreous china hob is resistant to temperature fluctuations and shockproof. Remember however that sharp kitchen tools or cutters may break the surface of the hob. If this happens, unplug the cooker immediately from the mains and call your local servicing centre.
19 Remember that the cooking surface remains hot for at least half an hour after you switch off the surface. Do not place containers or other objects on the hot surface.
20 Avoid setting anything on the glass surface of the cooktop.
21 Do not turn on the cooking surfaces if there are sheets of aluminium foil or plastic on the hob.
22 Keep away from the hot surfaces.
23 When using small electrical household appliances close to the hob, ensure that the power cable does not rest on the hot surfaces
24 Keep pot handles turned inwards to avoid knocking the pot off the hob.
25 When you turn on the cooking surface always place a pot on the surface immediately as it will otherwise overheat very quickly and possibly damage the heating elements.
26 Preliminary instructions. The glass sealant utilised may leave traces of grease on the glass. Remember to wipe these away with a normal non abrasive detergent before you turn on the appliance. During the first few hours of use there may be a smell of rubber which will disappear very quickly.
27 When the appliance is in use, the heating elements and some parts of the oven door become extremely hot. Make sure you don't touch them and keep children well away.
28 Make sure the knobs are in the “•”/“o” position when the appliance is not in use.
29 If the cooker is placed on a pedestal, take the necessary precautions to prevent the same from sliding off the pedestal itself.
The following instructions should be read by a qualified technician to ensure that the appliance is installed, regulated and technically serviced correctly in compliance with current regulations.
Important: The power supply to the appliance must be cut off before any adjustments or maintenance work is done on it.
Installation of the cooker
The appliance can be installed next to furniture units which are no taller than the top of the cooker hob. The wall in direct contact with the back panel of the cooker must be made of non-flammable material. During operation the back panel of the cooker could reach a temperature of 50^ C above room temperature. For proper installation of the cooker, the following precautions must be taken:
a) The appliance can be placed in a kitchen, dining room or bedsit, but not in a bathroom.
b) All furniture around the appliance must be placed at least 200 mm from the top of the cooker, should the surface of the appliance be higher than the worktop of this furniture. Curtains should not be placed behind the cooker or less than 200 mm away from the sides of the appliance.
c) Any hoods must be installed according to the requirements in the installation manual for the hoods themselves.
d) If the cooker is installed beneath a wall cabinet, the latter must be situated at a minimum of 420 mm above the hob. The minimum distance between the worktop and kitchen units made of combustible material is 700 mm.
e) The wall in direct contact with the back panel of the cooker must be made of non-flammable materials.
Levelling Your Appliance (only on certain models)
4 support feet which are adjusted using screws are located in the lower part of the cooker. These level off the oven when necessary. It is essential that the cooker be standing level.
natural_image
Diagram showing a mechanical or fluid system with a spring-like component and directional arrows (no text or symbols)Mounting the legs (only on certain models)
Press-fit legs are supplied which fit under the base of your cooker.
natural_image
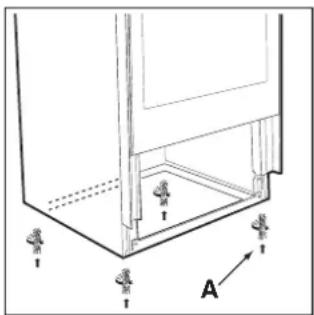
Diagram of a mechanical component with an upward arrow indicating motion (no text or symbols)Cooker height adjustment
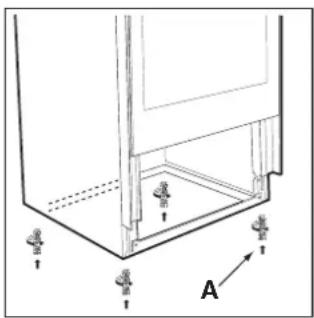
The cooker is factory-set to a 900 mm height. It can be reduced to an 850 mm height by dismounting the removable part of the base. Remove the warming drawer. Using a screwdriver, unscrew the 6 "B" screws. Remove the adjustable feet "A" too (see fig. A). To level the cooker, screw in adjustable feet "A" on the cooker bottom (see fig. B).
natural_image
Technical line drawing of a mechanical assembly with mounting holes and labeled component A (no text or symbols beyond labels)Fig. A Fig. B
Electrical Connection
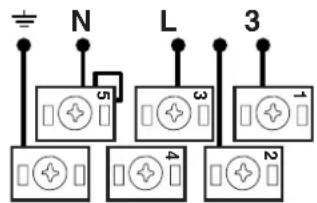
Those ovens equipped with a three-pole power supply cable are designed to operate with an alternating current with the voltage and frequency indicated on the data plate (located on the appliance) and in the instruction manual. The wire for earthing the appliance is yellow-green in colour.
Fitting on a Power Supply Cable
Opening the terminal board:
- Using a screwdriver, prise on the side tabs of the terminal board cover;
- Pull open the cover of the terminal board.

natural_image
Diagram showing a screwdriver inserted into a device component, with arrows indicating direction (no text or symbols present)To install the cable, proceed as follows:
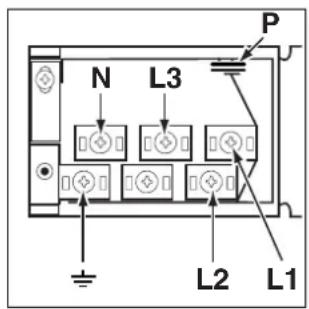
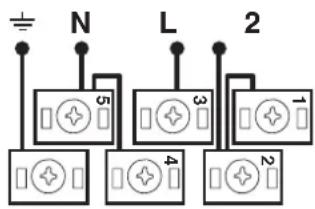
- unscrew the wire clamp screw and the contact screws Note: the jumpers are factory-set for a single-phase 230V connection (Fig. A).
- to make the electrical connections illustrated in fig. C and fig. D, use the two jumpers housed in the box (fig. B - reference "P")
- fasten the supply cable in place with the clamp and close the cover of the terminal board.
230V \~
Fig. A
H05RR-F/ 3x4 CEI-UNEL 35363
H05VV-F/ 3x4 CEI-UNEL 35746
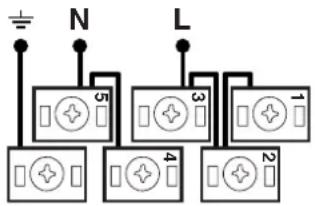
Fig. B
400V 2N\~
H05RR-F 4x4 CEI-UNEL 35363
H05VV-F 4x4 CEI-UNEL 35 46
L Fig. C
400V 3N\~
H05RR-F 5x2.5 CEI-UNEL 35363
H05VV-F 5x2.5 CEI-UNEL 35746
Connecting the supply cable to the mains
Install a standardised plug corresponding to the load indicated on the data plate. When connecting the cable directly to the mains, install an omnipolar circuit-breaker with a minimum contact opening of 3 mm between the appliance and the mains. The omnipolar circuit breaker should be sized according to the load and should comply with current regulations (the earth wire should not be interrupted by the circuit breaker).
The supply cable should be positioned so that it does not reach a temperature of more than 50^ C with respect to the room temperature, anywhere along its length.
Before making the connection, check that:
- The electrical safety of this appliance can only be guaranteed if the cooker is correctly and efficiently earthed, in compliance with regulations on electrical safety. Always ensure that the earthing is efficient; if you have any doubts call in a qualified technician to check the system. The manufacturer declines all responsibility for damage resulting from a system which has not been earthed.
- Before plugging the appliance into the mains, check that the specifications indicated on the date plate (on the appliance and/or packaging) correspond to those of the electrical mains system of your home.
- Check that the electrical capacity of the system and sockets will support the maximum power of the appliance, as indicated on the data plate. If you have any doubts, call in a qualified technician.
- If the socket and appliance plug are not compatible, have the socket replaced with a suitable model by a qualified technician. The latter, in particular, will also have to ensure that the cross section of the socket cables are suitable for the power absorbed by the appliance. The use of adapters, multiple sockets and/or extensions, is not recommended. If their use cannot be avoided, remember to use only single or multiple adapters and extensions which comply with current safety regulations. In these cases, never exceed the maximum current capacity indicated on the single adapter or extension and the maximum power indicated on the multiple adapter. The plug and socket must be easily accessible.
Technical Characteristics
Inner Dimensions of the Oven:
Width: 43.5 cm
Depth: 40 cm
Height: 32 cm
Inner Volume of the Oven:
56 Liters
Max. Oven Power Absorption:
2800 W
Innder dimensions of the plate warmer:
Width: 46 cm
Depth: 42 cm
Height: 8.5 cm
Ceramic Hob
Back Right: 700/1700 W
Front Right: 1200 W
Front Left: 700/1700 W
Back Left: 1200 W
Hob Ceramic absorption Max: 5800 W
Voltage and Frequency
230V/400V 3N\~50/60Hz
ENERGY LABEL
Directive 2002/40/EC on the label of electric ovens
Norm EN 50304
Energy consumption for Natural convection
heating mode: — Traditional
Declared energy consumption for Forced convection Class
heating mode: making

This appliance conforms with the following European Economic Community directives:
- 2006/95/EEC of 12/12/06 (Low Voltage) and subsequent modifications;
- 89/336/EEC of 03/05/89 (Electromagnetic Compatibility) and subsequent modifications;
- 93/68/EEC of 22/07/93 and subsequent modifications.
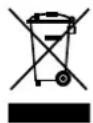
- 2002/96/EC
The European Directive 2002/96/EC on Waste Electrical and Electronic Equipment (WEEE), requires that old household electrical appliances must not be disposed of in the normal unsorted municipal waste stream. Old appliances must be collected separately in order to optimise the recovery and recycling of the materials they contain and reduce the impact on human health and the environment. The crossed out “wheeled bin” symbol on the product reminds you of your obligation, that when you dispose of the appliance it must be separately collected. Consumers should contact their local authority or retailer for information concerning the correct disposal of their old appliance.
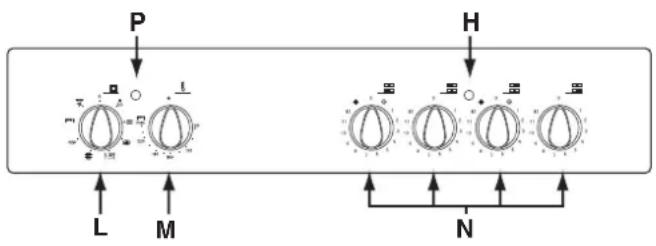
Cooker description
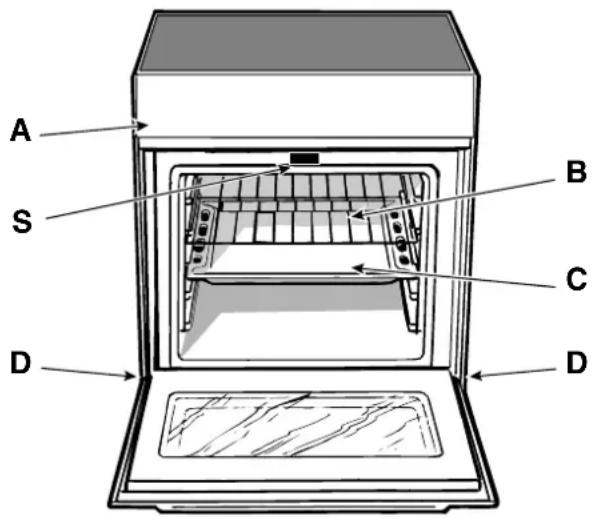
A Control Panel
B Oven Rack
C Dripping Pan or Baking Sheet
D Adjustable Feet
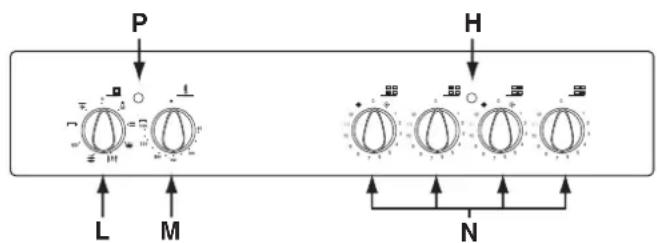
H Electric hotplate indicator light
L Selector Knob
M Thermostat Knob
N Electric hotplate control knobs
P Thermostat Light
S Door lock device
flowchart
graph TD
    P["Power"] --> A["Control knob 1"]
    H["Higher Power"] --> B["Control knob 2"]
    L["Low Power"] --> C["Control knob 3"]
    M["Medium Power"] --> D["Control knob 4"]
    N["Lower Power"] --> E["Control knob 5"]
    H --> F["Output"]
    style P fill:#f9f,stroke:#333
    style H fill:#f9f,stroke:#333
    style L fill:#ccf,stroke:#333
    style M fill:#ccf,stroke:#333
    style N fill:#ccf,stroke:#333
The 7 Cuochi oven combines the advantages of traditional convection ovens with those of the more modern fan assisted models in a single appliance.
It is an extremely versatile appliance that allows you to choose easily and safely between 7 different cooking modes. The various features offered by the oven are selected by means of selector knob "L" and thermostat "M" situated on the control panel.
Notice: The first time you use your appliance, we recommend that you set the thermostat to the highest setting and leave the oven on for about half an hour with nothing in it, with the oven door shut. Then, open the oven door and let the room air. The odour that is often detected during this initial use is due to the evaporation of substances used to protect the oven during storage and until it is installed.
Notice: Place the dripping pan provided on the bottom shelf of the oven to prevent any sauce and/or grease from dripping onto the bottom of the oven only when grilling food or when using the rotisserie (only available on certain models). For all other types of cooking, never use the bottom shelf and never place anything on the bottom of the oven when it is in operation because this could damage the enamel. Always place your cookware (dishes, aluminium foil, etc. etc.) on the grid provided with the appliance inserted especially along the oven guides.
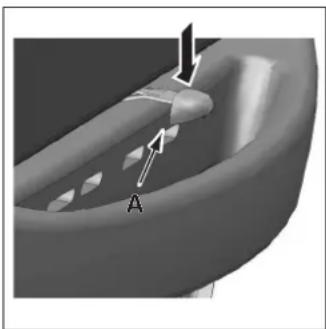
Door lock device
Some models are equipped with a "door lock" device situated between the control panel and the oven door. To open the door, push down device "A" indicated in the figure.
natural_image
3D rendered mechanical component with labeled parts A and 1, showing internal features and arrows (no text or symbols beyond labels)The oven light
Set knob "L" to the 🔔 symbol to turn it on. It lights the oven and stays on when any of the electrical heating elements in the oven come on.
Traditional
Position of thermostat knob "M": between 60°C and Max. On this setting, the top and bottom heating elements come on. This is the classic, traditional type of oven which has been perfected, with exceptional heat distribution and reduced energy consumption. The convection oven is still unequalled when it comes to cooking dishes made up of several ingredients, e.g. cabbage with ribs, Spanish style cod, Ancona style stockfish, tender veal strips with rice, etc. Excellent results are achieved when preparing veal or beef-based dishes as well (braised meats, stew, goulash, wild game, ham etc.) which need to cook slowly and require basting or the addition of liquid. It nonetheless remains the best system for baking cakes as well as fruit and cooking using covered casserole dishes for oven baking. When cooking in Traditional, only use one dripping pan or cooking rack at a time, otherwise the heat distribution will be uneven. Using the different rack heights available, you can balance the amount of heat between the top and the bottom of the oven. Select from among the various rack heights based on whether the dish needs more or less heat from the top.
Baking
Position of thermostat knob "M": between 60°C and Max. The rear heating element and the fan come on, guaranteeing delicate heat distributed uniformly throughout the oven.
This mode is ideal for baking and cooking delicate foods - especially cakes that need to rise - and for the preparation of certain tartlets on 3 shelves at the same time. Here are a few examples: cream puffs, sweet and savoury biscuits, savoury puffs, Swiss rolls and small portions of vegetables au gratin, etc....
"Fast cooking" Mode
Position of thermostat knob "M": between 60°C and Max. The heating elements and the fan come on, guaranteeing constant heat distributed uniformly throughout the oven. This mode is especially recommended for cooking pre-packed food quickly (as pre-heating is not necessary), such as for example: frozen or pre-cooked food) as well as for a few "home-made" dishes.
The best results when cooking using the "Fast cooking" mode are obtained if you use one cooking rack only (the second from the bottom), please see the table entitled "Practical Cooking Advice".
Multi-cooking Mode
Position of thermostat knob "M": between 60°C and Max. The heating elements, as well as the fan, will come on. Since the heat remains constant and uniform throughout the oven, the air cooks and browns food uniformly over its entire surface. With this mode, you can also cook various dishes at the same time, as long as their respective cooking temperatures are the same. A maximum of 2 racks can be used at the same time, following the instructions in the section entitled: "Cooking On More Than One Rack". This Multi-cooking mode is particularly recommended for dishes requiring a gratin finish or for those requiring considerably prolonged cooking times, such as for example: lasagne, pasta bakes, roast chicken and potatoes, etc... Moreover, the excellent heat distribution makes it possible to use lower temperatures when cooking roasts. This results in less loss of juices, meat which is more tender and a decrease in the loss of weight for the roast. The Multi-cooking mode is especially suited for cooking fish, which can be prepared with the addition of a limited amount of condiments, thus maintaining their flavour and appearance.
Desserts: the Multi-cooking mode is also perfect for baking leavened cakes.
Moreover, this mode can also be used to thaw quickly
white or red meat and bread by setting the temperature to 80 °C . To thaw more delicate foods, set the thermostat to 60 °C or use only the cold air circulation feature by setting the thermostat to 0 °C .
Pizza Mode
Position of thermostat knob "M": between 60°C and Max. The bottom and circular heating elements, as well as the fan, will come on. This combination rapidly heats the oven due to the large amounts of power used by the appliance, which results in the production of considerable heat coming prevalently from the bottom.
The pizza mode is ideal for foods requiring high temperatures to cook, like pizzas and large roasts. Only use one dripping pan or rack at a time. However, if more than one is used, these must be switched halfway through the cooking process.
Grill |
Position of thermostat knob "M": Max.
The top central heating element come on.
The extremely high and direct temperature of the grill makes it possible to brown the surface of meats and roasts while locking in the juices to keep them tender. The grill is also highly recommended for dishes that require a high temperature on the surface: beef steaks, veal, rib steak, filets, hamburgers etc...
Some grilling examples are included in the “Practical Cooking Advice” paragraph.
Gratin
Position of thermostat knob "M": between 60°C and 200°C. The top central heating element and the fan come on.
This combination of features increases the effectiveness of the unidirectional thermal radiation of the heating elements through forced circulation of the air throughout the oven. This helps prevent food from burning on the surface, allowing the heat to penetrate right into the food. Excellent results are achieved with kebabs made with meats and vegetables, sausages, ribs, lamb chops, chicken in a spicy sauce, quail, pork chops, etc.
This mode is also ideal for cooking fish steaks, like sword-fish, tuna, grouper, stuffed cuttlefish etc.
Thermostat Light (P)
This light indicates that the oven is heating. When it turns off, the temperature inside the oven has reached the setting made with the thermostat knob. At this point, the light will turn on and off as the oven maintains the temperature at a constant level.
Electric hotplate indicator light (H)
This light comes on when any of the electrical hotplates on a hob which features electric hotplates have been turned on.
Practical Cooking Advice
The oven offers a wide range of alternatives which allow you to cook any type of food in the best possible way. With time you will learn to make the best use of this versatile cooking appliance and the following directions are only a guideline which may be varied according to your own personal experience.
Preheating
If the oven must be preheated (this is generally the case when cooking leavened foods), the “Pizza Mode” can be used to reach the desired temperature as quickly as possible in order to save on energy.
Once the food has been placed in the oven, the most appropriate cooking mode can then be selected.
Cooking on More Than One Rack
If you have to cook food using several racks, use either the "baking" mode or the "Multi-cooking" mode, as these are the only modes that allow you to do so.
When cooking delicate food on more than one rack, use the “baking” mode, which allows you to cook on 3 racks at the same time (the 1st, 3rd and 5th from the bottom). Some examples are included in the “Practical Cooking Advice” table.
When cooking other food on several racks, use the “Multi-cooking” mode keeping the following suggestions in mind:
- The oven is fitted with 5 racks. During fan assisted cooking, use two of the three central racks; the lowest and highest racks receive the hot air directly and therefore delicate foodstuffs could be burnt on these racks.
- As a general rule, use the 2nd and 4th rack from the bottom, placing the foodstuffs that require greater heat on the 2nd rack from the bottom. For example, when cooking meat roasts together with other food, place the roast on the 2nd rack from the bottom and the more delicate food on the 4th rack from the bottom.
- When cooking foodstuffs that require differing times and temperatures, set a temperature that is somewhere between the two temperatures required, place the more delicate food on the 4th rack from the bottom and take the food requiring less time out of the oven first.
- Use the dripping pan on the lower rack and the grid on the upper;
Using the "Fast Cooking" Mode
Functional, fast and practical for those of you who use pre-packed products (such as for example: frozen or pre-cooked food) along with other food items. You will find useful suggestions in the “Practical Cooking Advice” table.
Using the Grill
The "7 Cuochi" oven offers you several different grilling modes.
Use the |▼▼▼| “grill” mode, with the oven door shut, placing the food under the centre of the grill (situated on the 3rd or 4th rack from the bottom) because only the central part of the top heating element is turned on.
To catch any fat and/or grease that may drip from the rack, place the dripping pan provided on the first rack from the bottom.
When using this mode, we recommend you set the thermostat to the highest setting. Lower temperatures can also be set, simply by setting the thermostat knob to the temperature required.
Setting “Gratin”, only with the oven door shut, is extremely useful for grilling foods rapidly, as the distribution of heat makes it possible not only to brown the surface, but also to cook the bottom part.
Moreover, it can also be used for browning foods at the end of the cooking process, such as adding that gratin finish to pasta bakes, for example.
When using this mode, place the grid on the 2nd or 3rd oven rack from the bottom (see cooking table) then, to prevent fat and grease from dripping onto the bottom of the oven and thus smoke from forming, place a dripping-pan on the 1st rack from the bottom.
Important: always cook in “Gratin” mode with the oven door shut. This will allow you both to obtain excellent results and to save on energy (approximately 10%).
When using this mode, we advise you to set the thermostat to 200^ C, as it is the most efficient way to use the grill, which is based on the use of infrared rays. However, this does not mean you cannot use lower temperatures, simply by adjusting the thermostat knob to the desired temperature.
Therefore the best results when using the grill modes are obtained by placing the grid on the lower racks (see cooking table) then, to prevent fat and grease from dripping onto the bottom of the oven and smoke from forming, place a dripping-pan on the 1st oven rack from the bottom.
Baking Cakes
When baking cakes, always place them in a preheated oven. Make sure you wait until the oven has been preheated thoroughly (the red light "P" will turn off). Do not open the oven door during baking to prevent the cake from dropping. In general:
| Cooked well on the inside but sticky on the outside |
| Use less liquid, lower the temperature, and increase the cooking time. |
| The pastry sticks to the pan |
| Grease the pan well and sprinkle it with a dusting of flour or use greaseproof paper. |
| Pastry is too dry |
| Increase the temperature by 10°C and reduce the cooking time. |
| Pastry dropped |
| Use less liquid or lower the temperature by 10°C. |
| Pastry is too dark on top |
| Place it on a lower rack, lower the temperature, and increase the cooking time. |
I used more than one level (in the function "ventilated oven") and they are not all at the same cooking point
| Use a lower temperature setting. It is not necessary to remove the food from all the racks at the same time. |
Cooking Pizza
For best results when cooking pizza, use setting 📄 for
" Pizza Mode":
- Preheat the oven for at least 10 minutes
- Use a light aluminium pizza pan, placing it on the rack supplied with the oven. If the dripping pan is used, this will extend the cooking time, making it difficult to get a crispy crust;
- Do not open the oven door frequently while the pizza is cooking;
- If the pizza has a lot of toppings (three or four), we recommend you add the mozzarella cheese on top halfway through the cooking process.
- If cooking on more than one rack (up to 2), we advise you to use the Multi-cooking Mode as the Pizza Mode would heat the bottom rack more than the others.
Cooking Fish and Meat
When cooking white meat, fowl and fish, use temperature settings from 180 °C to 200 °C.
For red meat that should be well done on the outside while tender and juicy in the inside, it is a good idea to start with a high temperature setting (200°C-220°C) for a short time, then turn the oven down afterwards.
In general, the larger the roast, the lower the temperature setting. Place the meat on the centre of the grid and place the dripping pan beneath it to catch the fat.
Make sure that the grid is inserted so that it is in the centre of the oven. If you would like to increase the amount of heat from below, use the low rack heights. For savoury roasts (especially duck and wild game), dress the meat with lard or bacon on the top.
User's instructions the ceramic hob
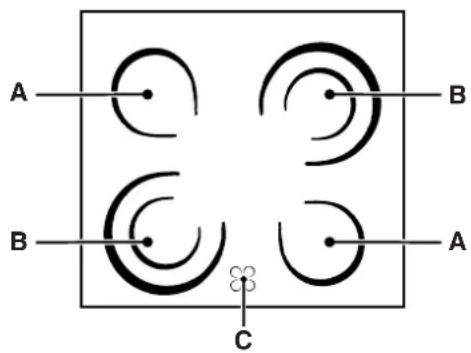
Description
The hob is provided with 2 conventional radiant heating zones and 2 halogen heating with extendable cooking zones. These heaters are incorporated under the surface of the hob as zones which redden while they are in use:
A. Radiant heating zones
B. Extendable radiant cooking zones
C. Lights which indicate whether the corresponding heaters are at a temperature in excess of 60^ C; even if the hob/zone has been switched off.
Description of the cooking zones
Traditional cooking zones are made up of circular heating elements. They turn red approximately ten seconds after they have been turned on.
Extendable radiant cooking zones.
These operate in a similar way to traditional cooking zones, and can be recognised for their extendable heating zone (see Fig. C). You can turn on only the smaller inner cooking zone or both.
- Traditional cooking zone control knobs. Each cooking zone is fitted with a control knob allowing you to select from 12 different temperature settings from a minimum of 1 to a maximum of 12.
- Special cooking zone control knobs. These control knobs allow you to choose from two different power levels, both adjustable from a minimum setting of 1 to a maximum setting of 12. Turn the knob clockwise from 1 to 12 to set the lower power level. Turn the knob to the travel limit stop (●), which is indicated by a slight click, to enable the maximum power level, which in turn can be adjusted between 12 and 1 by turning the knob anticlockwise. To restore the minimum power level, turn the knob and set it back to the zero setting. With glass ceramic hobs featuring extendable cooking zones (see Fig. C), the first part of the knob travel enables the smaller (inner) cooking zone, to enable both cooking zones and thus have an extended cooking zone, turn the knob to setting (●) and then select the desired power level from 12 to 1.
| Set. | Radiant Burner |
| 0 | Off |
| 1 | To melt butter and chocolate. |
| 2 | To heat liquids. |
| 3 | |
| 4 | For creams and sauces. |
| 5 | |
| 6 | For cooking at the boiling point. |
| 7 | |
| 8 | For roasts. |
| 9 | |
| 10 | For boiling large pieces of meat. |
| 11 | |
| 12 | For frying. |
| ◎ | For utilising both cooking areas. |
Instructions for using the pyroceramic top
To obtain the best results from your hob, there are some basic rules to follow when cooking or preparing food.
- All types of pots and pans may be used on the ceramic glass cooktop. However, the bottom surface must be perfectly flat. Naturally, the thicker the bottom of the pot or pan, the more uniformly the heat is distributed.

natural_image
Three identical line drawings of cooking pots with crossed x marks, placed horizontally on a surface (no text or symbols)- Make sure that the base of the pan completely covers the cooking ring, so as to make full use of the heat produced

natural_image
Three schematic symbols showing crossed-out electrical contacts on a surface, no text or labels present· Always make sure that the pan base is always dry and clean so as to guarantee proper contact as well as longer-lasting pans and the long life-span of the hob.
- Do not use the same pans which are used for cooking on gas burners. The heat strength of gas burners may deform the pan base and will not give the same results if it is subsequently used on a glazed ceramic hob.
| Setting made | Type of food Weig- | ht (in kg) | Position of the rack from the oven bottom | Preheating time (min.) | Thermostat setting | Cooking time (min.) |
| 1 Traditional | Duck | 1 | 3 | 15 | 200 | 65-75 |
| Roast veal or beef | 1 | 3 | 15 | 200 | 70-75 | |
| Pork roast | 1 | 3 | 15 | 200 | 70-80 | |
| Biscuits (short pastry) | - | 3 | 15 | 180 | 15-20 | |
| Tarts | 1 | 3 | 15 | 180 | 30-35 | |
| 2 Baking | Tarts | 0.5 | 3 | 15 | 180 | 20-30 |
| Fruit cakes | 1 | 2/3 | 15 | 180 | 40-45 | |
| Plum cake | 0.7 | 3 | 15 | 180 | 40-50 | |
| Sponge cake | 0.5 | 3 | 15 | 160 | 25-30 | |
| Stuffed pancakes (on 2 racks) | 1.2 | 2-4 | 15 | 200 | 30-35 | |
| Small cakes (on 2 racks) | 0.6 | 2-4 | 15 | 190 | 20-25 | |
| Cheese puffs (on 2 racks) | 0.4 | 2-4 | 15 | 210 | 15-20 | |
| Cream puffs (on 3 racks) | 0.7 | 1-3-5 | 15 | 180 | 20-25 | |
| Biscuits (on 3 racks) | 0.7 | 1-3-5 | 15 | 180 | 20-25 | |
| Meringues (on 3 racks) | 0.5 | 1-3-5 | 15 | 90 | 180 | |
| 3 Fast cooking | Frozen food | |||||
| Pizza | 0.3 | 2 | - | Max | 12 | |
| Courgette and prawn pie | 0.4 | 2 | - | 200 | 20 | |
| Country style spinach pie | 0.5 | 2 | - | 220 | 30-35 | |
| Turnovers | 0.3 | 2 | - | 200 | 25 | |
| Lasagne | 0.5 | 2 | - | 200 | 35 | |
| Golden Rolls | 0.4 | 2 | - | 180 | 25-30 | |
| Chicken morsels | 0.4 | 2 | - | 220 | 15-20 | |
| Pre-cooked food | ||||||
| Golden chicken wings | 0.4 2 - 200 20-25 | |||||
| Fresh Food | ||||||
| Biscuits (short pastry) | 0.3 | 2 | - | 200 | 15-18 | |
| Plum cake | 0.6 | 2 | - | 180 | 45 | |
| Cheese puffs | 0.2 | 2 | - | 210 | 10-12 | |
| 4 Multi-cooking | Pizza (on 2 racks) | 1 | 2-4 | 15 | 230 | 15-20 |
| Lasagne | 1 | 3 | 10 | 180 | 30-35 | |
| Lamb | 1 | 2 | 10 | 180 | 40-45 | |
| Roast chicken + potatoes | 1+1 | 2-4 | 15 | 200 | 60-70 | |
| Mackerel | 1 | 2 | 10 | 180 | 30-35 | |
| Plum cake | 1 | 2 | 10 | 170 | 40-50 | |
| Cream puffs (on 2 racks) | 0.5 | 2-4 | 10 | 190 | 20-25 | |
| Biscuits (on 2 racks) | 0.5 | 2-4 | 10 | 180 | 10-15 | |
| Sponge cake (on 1 rack) | 0.5 | 2 | 10 | 170 | 15-20 | |
| Sponge cake (on 2 racks) | 1.0 | 2-4 | 10 | 170 | 20-25 | |
| Savoury pies | 1.5 | 3 | 15 | 200 | 25-30 | |
| 5 Pizza | Pizza | 0.5 | 3 | 15 | 220 | 15-20 |
| Roast veal or beef | 1 | 2 | 10 | 220 | 25-30 | |
| Chicken | 1 | 2/3 | 10 | 180 | 60-70 | |
| 6 Grill | Soles and cuttlefish | 1 | 4 | 5 | Max | 8-10 |
| Squid and prawn kebabs | 1 | 4 | 5 | Max | 6-8 | |
| Cod filet | 1 | 4 | 5 | Max | 10 | |
| Grilled vegetables | 1 | 3/4 | 5 | Max | 10-15 | |
| Veal steak | 1 | 4 | 5 | Max | 15-20 | |
| Cutlets | 1 | 4 | 5 | Max | 15-20 | |
| Hamburgers | 1 | 4 | 5 | Max | 7-10 | |
| Mackerels | 1 | 4 | 5 | Max | 15-20 | |
| Toasted sandwiches | n.° 4 | 4 | 5 | Max | 2-3 | |
| 7 Gratin | Grilled chicken | 1.5 | 3 | 5 | 200 | 55-60 |
| Cuttlefish | 1.5 | 3 | 5 | 200 | 30-35 | |
N.B.: cooking times are approximate and may vary according to personal taste. When cooking using the grill or gratin, the dripping pan must always be placed on the 1st oven rack from the bottom.
Routine Maintenance and Cleaning
Disconnect the oven from the source of electricity before performing any maintenance or cleaning. To ensure a long life for your oven, clean it frequently and carefully, keeping in mind that:
- Do not use steam equipment to clean the appliance.
- the enamelled parts and the self-cleaning panels should be washed with warm water without the addition of abrasive powders or corrosive substances which could damage the finish;
- stainless steel may become marked if it comes into contact with very hard water or harsh detergents (containing phosphorous) for long periods of time. After cleaning, it is advisable to rinse thoroughly and dry. It is also recommended to dry any water drops;
- avoid dirt and grease accumulating on the control panel by cleaning it frequently. Use non-abrasive sponges or soft cloths to avoid scratching enamelled or shiny steel parts.
Cleaning the hob surface
Prior to cooking, the hob surface should always be cleaned using a damp cloth to remove any dust or stray food particles. The hob surface should be regularly cleaned with a lukewarm solution of water and a mild detergent. Periodically it may be necessary to use a proprietary ceramic hob cleaner. First remove all spilt food and fat with a window scrape, preferably the razor blade type
CERA ^1 (not supplied) or, failing that, the fixed blade razor edge type (see Fig. A). Then clean the hob while it is still warm to the touch with a suitable cleaner and paper towel.
Then rinse it and wipe it dry with a clean cloth. If aluminium foil or plastic items are accidentally allowed to melt on the hob surface they should be immediately removed from the hot cooking area with a scraper. This will avoid any possible damage to the surface. This also applies to sugar or any food with a high sugar content.
Do not use abrasive sponges or scourers of any type. Corrosive cleaners such as oven sprays and stain removers should also not be used (see Fig. B).
| Glass ceramic hob cleaners | Available from |
| Window scraper Razor blade scrapers | DIY Stores |
| Replacement blades DIY Stores | supermarkets, chemists |
| COLLO lunetaHOB BRITEHob CleanSWISSCLEANER | Boots, Co-op stores, department stores, Regional Electricity Company shops, supermarkets |
Replacing the Oven Lamp
- Disconnect the oven from the power supply by means of the omnipolar switch used to connect the appliance to the electrical mains; or disconnect the plug if it is accessible.
- Remove the glass cover of the lamp-holder.
-
Remove the lamp and replace it with a lamp resistant to high temperatures (300°C) with the following specifications:
-
Voltage: 230V
- Wattage: 25W
- Socket: E14
- Replace the glass cover and connect the oven to the mains.

natural_image
Diagram showing two circular components with directional arrows, no text or symbols present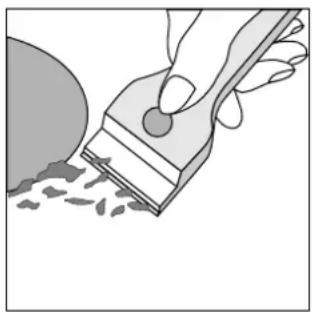
natural_image
Illustration of a hand using a tool to brush or brush over scattered particles (no text or symbols)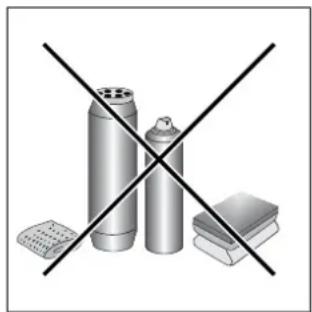
natural_image
Illustration of three metallic containers crossed out by a black X (no text or symbols)Fig. A Fig. B
Instruktioner
For at opretholde dette komfurs EFFEKTIVITET, og sørge for SIKRE FORHOLD, skal følgende regler overholdes:
natural_image
Pure diagram of a mechanical or fluid system with no text, numbers, or symbolsnatural_image
Diagram of a mechanical component with an arrow indicating upward motion (no text or symbols)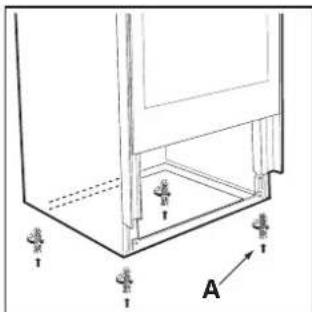
natural_image
Technical line drawing of a mechanical assembly with labeled components and directional arrow (no text or symbols)Fig. A Fig. B
Elektrisk tilslutning
natural_image
Diagram showing a screwdriver inserted into a device inside a cabinet, with arrows indicating direction (no text or symbols present)Dimensioner (BxDxH): 43,5x40x32 cm
Volumen 56 I
Max optagelse, ovn 2800 W
natural_image
3D rendered mechanical component with labeled section A and directional arrows (no text or symbols beyond labels)Ovnlys
Ovnen "Fast cooking"
natural_image
Illustration of a hand using a tool to brush or brush onto a surface, with no visible text or symbols.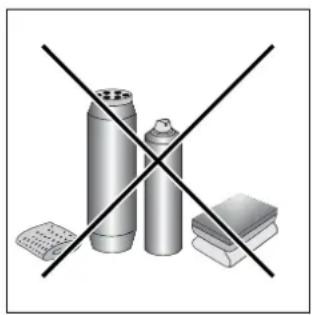
natural_image
Crossed black-and-white diagram of three metallic containers and a box, no text or symbols presentFig. A Fig. B
natural_image
Pure mechanical diagram showing two circular components with a curved arrow indicating rotation (no text or symbols)natural_image
Diagram showing a mechanical or structural component with a curved arrow indicating motion, no text or symbols present.natural_image
Diagram of a mechanical press or valve mechanism with an upward arrow indicating motion (no text or symbols present)Fig. A Fig. B
Elektrisk tilkobling
natural_image
Diagram showing a screwdriver inserted into a device inside a room, with an arrow indicating the direction (no text or symbols present)A Betjeningspanel
B Stekerist
C Langpanne eller platetopp
D Regulerbare føtter
H Lampe
natural_image
3D rendered mechanical component with labeled section A, showing internal features and arrows (no text or symbols beyond labels)Stekeovnsbelysning
Stekeovn "Fast cooking"
Lampe for termostat (P)
natural_image
Illustration of a hand using a power tool to brush or paint over granular material (no text or symbols)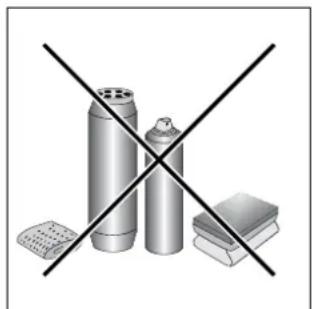
natural_image
Illustration of three cylindrical objects with crosshair lines, no text or symbols presentFig. A Fig. B
natural_image
Diagram of a mechanical component with two circular features and an arrow indicating rotation (no text or symbols)Instruktioner
natural_image
Diagram showing a mechanical component with a spring-like structure and directional arrow (no text or symbols)natural_image
Diagram of a mechanical component with an arrow indicating upward motion (no text or symbols)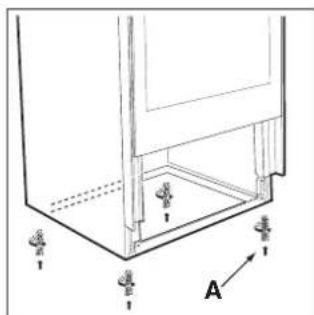
natural_image
Technical line drawing of a mechanical assembly with mounting holes and labeled component A (no text or symbols beyond labels)Fig. A Fig. B
Elektrisk anslutning
natural_image
Diagram showing a screwdriver inserted into a device inside a cabinet, with arrows indicating direction (no text or symbols present)natural_image
3D rendered mechanical component with labeled parts A and directional arrows (no text or symbols beyond labels)Konventionell ugn —
natural_image
Illustration of a hand using a paintbrush to brush the powder onto a surface (no text or symbols)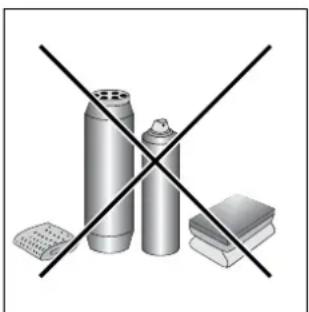
natural_image
Illustration of three metallic cylindrical objects crossed with a black X symbol, no text or labels presentFig. A Fig. B
natural_image
Diagram showing two circular components with directional arrows, no text or symbols presentKäyttöohjeet
natural_image
Mechanical component diagram showing a cylindrical shaft with an upward arrow indicating motion (no text or symbols)Kuva A Kuva B
natural_image
Technical line drawing of a mechanical assembly with labeled components and directional arrows (no text or symbols)natural_image
Diagram showing a device with a screwdriver inserted into a housing, enclosed in a circular arrow (no text or symbols)natural_image
3D rendered mechanical component with labeled section A, showing internal features and arrows (no text or symbols beyond labels)Uunin valo
"Fast cooking" -uuni
Termostaatin nappulan asento "M": 60°C - Max.
natural_image
Diagram showing two circular components with curved arrows indicating rotation or movement, no text or symbols present
natural_image
Illustration of a hand using a tool to brush or brush over scattered debris (no text or symbols)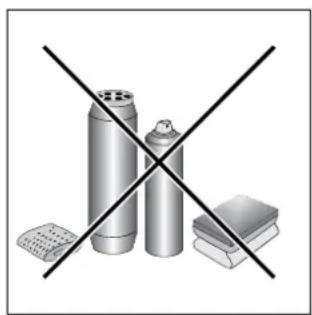
natural_image
Diagram showing three metallic cylindrical objects crossed out by a black X mark, with a separate rectangular block below (no text or symbols)Kuva A Kuva B
Σημαντικό
natural_image
Pure diagram of a mechanical or fluid system with no text, numbers, or symbolsnatural_image
Diagram of a mechanical component with an upward arrow indicating motion (no text or symbols)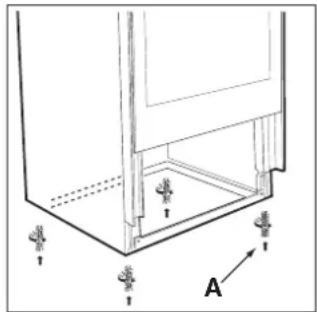
natural_image
Technical line drawing of a mechanical assembly with labeled components A and directional arrows (no text or symbols beyond labels)Eik. A Eik. B
Ηλεκτρική σύνδεση
natural_image
Diagram showing a screwdriver inserted into a device component, with arrows indicating direction (no text or symbols present)natural_image
3D rendered mechanical component with labeled feature A, showing internal structure and arrows indicating motion (no text or symbols beyond labels)Το φως του φούρνου
natural_image
Illustration of a hand using a paintbrush to brush residue in a circular container (no text or symbols)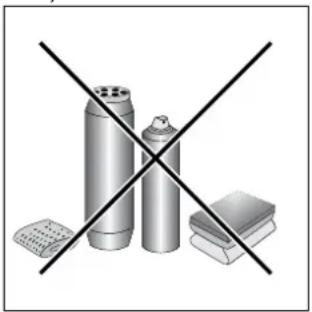
natural_image
Illustration of three metallic cylindrical objects crossed with a black 'X' line, no text or symbols presentEik. A Eik. B
natural_image
Diagram showing two circular components with curved arrows indicating rotation or movement, no text or symbols present
natural_image
Blank gray image with no visible content, text, or symbols
natural_image
Blank white image with no visible content, text, or symbols.
natural_image
Blank white image with no visible content, text, or symbols.
natural_image
Blank white image with no visible content, text, or symbols.
natural_image
Blank white image with no visible content, text, or symbols.
natural_image
Blank white image with no visible content, text, or symbols.
natural_image
Blank white image with no visible content, text, or symbols.
natural_image
Blank white image with no visible content, text, or symbols.
natural_image
Blank white image with no visible content, text, or symbols.
natural_image
Blank white image with no visible content, text, or symbols.
natural_image
Blank white image with no visible content, text, or symbols.
natural_image
Blank white image with no visible content, text, or symbols.
natural_image
Blank white image with no visible content, text, or symbols.
natural_image
Blank white image with no visible content, text, or symbols.
natural_image
Blank white image with no visible content, text, or symbols.
natural_image
Blank white image with no visible content, text, or symbols.
natural_image
Blank white image with no visible content, text, or symbols.
natural_image
Blank white image with no visible content, text, or symbols.
natural_image
Blank white image with no visible content, text, or symbols.
natural_image
Blank white image with no visible content, text, or symbols.
natural_image
Blank white image with no visible content, text, or symbols.
natural_image
Blank white image with no visible content, text, or symbols.
natural_image
Blank white image with no visible content, text, or symbols.
natural_image
Blank white image with no visible content, text, or symbols.
natural_image
Blank white image with no visible content, text, or symbols.
natural_image
Blank white image with no visible content, text, or symbols.
natural_image
Blank white image with no visible content, text, or symbols.
natural_image
Blank white image with no visible content, text, or symbols.
natural_image
Blank white image with no visible content, text, or symbols.
natural_image
Blank white image with no visible content, text, or symbols.
natural_image
Blank white image with no visible content, text, or symbols.
natural_image
Blank white image with no visible content, text, or symbols.
natural_image
Blank white image with no visible content, text, or symbols.
natural_image
Blank white image with no visible content, text, or symbols.
natural_image
Blank white image with no visible content, text, or symbols.
natural_image
Blank white image with no visible content, text, or symbols.
natural_image
Blank white image with no visible content, text, or symbols.
natural_image
Blank white image with no visible content, text, or symbols.
natural_image
Blank white image with no visible content, text, or symbols.
natural_image
Blank white image with no visible content, text, or symbols.
natural_image
Blank white image with no visible content, text, or symbols.
natural_image
Blank white image with no visible content, text, or symbols.
natural_image
Blank white image with no visible content, text, or symbols.
natural_image
Blank white image with no visible content, text, or symbols.
natural_image
Blank white image with no visible content, text, or symbols.
natural_image
Blank white image with no visible content, text, or symbols.
natural_image
Blank white image with no visible content, text, or symbols
natural_image
Blank white image with no visible content, text, or symbols
natural_image
Blank white image with no visible content, text, or symbols.
natural_image
Blank white image with no visible content, text, or symbols
natural_image
Blank white image with no visible content, text, or symbols.
natural_image
Blank white image with no visible content, text, or symbols
natural_image
Blank white image with no visible content, text, or symbols.
natural_image
Blank white image with no visible content, text, or symbols
natural_image
Blank gray image with no visible content, text, or symbols
natural_image
Blank white image with no visible content or text
natural_image
Blank white image with no visible content, text, or symbols
natural_image
Blank white image with no visible content, text, or symbols.
natural_image
Blank gray image with no visible content, text, or symbols
natural_image
Blank gray image with no visible content, text, or symbols- To maintain the EFFICIENCY and SAFETY of this appliance, we recommend:
- Installation of the cooker
- Levelling Your Appliance (only on certain models)
- Mounting the legs (only on certain models)
- Cooker height adjustment
- Electrical Connection
- Fitting on a Power Supply Cable
- Connecting the supply cable to the mains
- Technical Characteristics
- ENERGY LABEL
- This appliance conforms with the following European Economic Community directives:
- Cooker description
- Door lock device
- The oven light
- Traditional
- Baking
- "Fast cooking" Mode
- Multi-cooking Mode
- Pizza Mode
- Grill |
- Gratin
- Thermostat Light (P)
- Electric hotplate indicator light (H)
- Practical Cooking Advice
- Preheating
- Cooking on More Than One Rack
- Using the "Fast Cooking" Mode
- Using the Grill
- Baking Cakes
- Cooking Pizza
- " Pizza Mode":
- Cooking Fish and Meat
- User's instructions the ceramic hob
- Description
- Description of the cooking zones
- Extendable radiant cooking zones.
- Instructions for using the pyroceramic top
- Routine Maintenance and Cleaning
- Cleaning the hob surface
- Replacing the Oven Lamp
- Instruktioner
- Elektrisk tilslutning
- Ovnlys
- Ovnen "Fast cooking"
- Elektrisk tilkobling
- Stekeovnsbelysning
- Stekeovn "Fast cooking"
- Lampe for termostat (P)
- Elektrisk anslutning
- Konventionell ugn —
- Käyttöohjeet
- Uunin valo
- "Fast cooking" -uuni
- Σημαντικό
- Eik. A Eik. B
- Ηλεκτρική σύνδεση
- Το φως του φούρνου
Brand : INDESIT
Model : K6C7/NO
Category : Cooker