721-095 - Lawn mower Meec Tools - Free user manual and instructions
Find the device manual for free 721-095 Meec Tools in PDF.


| Product Type | Petrol Powered Scarifier / Lawn Mower |
| Model | 721-095 |
| Brand | Meec Tools |
| Rated Output | 1.7 kW at 3600 rpm |
| Engine Type | Single cylinder, fan-cooled 4-stroke |
| Start Method | Cord start |
| Working Width | 380 mm |
| Weight | 24.5 kg |
| Scarifying Depth | Approx. 5 - 15 mm |
| Collector | Cloth bag with metal frame |
| Fuel Tank Capacity | 2.5 L |
| Oil Volume | 0.5 L |
| Recommended Spark Plug | F6RTC |
| Electrode Gap | 0.70 - 0.80 mm |
| Measured Sound Power Level | 96 dB(A), K=2.3 dB |
| Guaranteed Sound Power Level | 98 dB(A), K=2.3 dB |
| Sound Pressure Level | 84 dB(A), K=3 dB |
| Max Vibration Level | 7.2 m/s², K=1.5 m/s² |
| Safety Features | Engine switch, blade brake, emergency shut-off |
| Maintenance | Oil change, air filter cleaning, spark plug inspection |
| Included Accessories | Scarifier, operating instructions, bag of screws |
Frequently Asked Questions - 721-095 Meec Tools
User questions about 721-095 Meec Tools
0 question about this device. Answer the ones you know or ask your own.
Ask a new question about this device
Download the instructions for your Lawn mower in PDF format for free! Find your manual 721-095 - Meec Tools and take your electronic device back in hand. On this page are published all the documents necessary for the use of your device. 721-095 by Meec Tools.
USER MANUAL 721-095 Meec Tools
Bruksanvisning för bensindriven vertikalskärare Bruksanvisning for bensindrevet vertikalskjærer Instrukcja obsługi wertykulatora spalinowego Operating Instructions for Petrol Powered Scarifier
721-095
natural_image
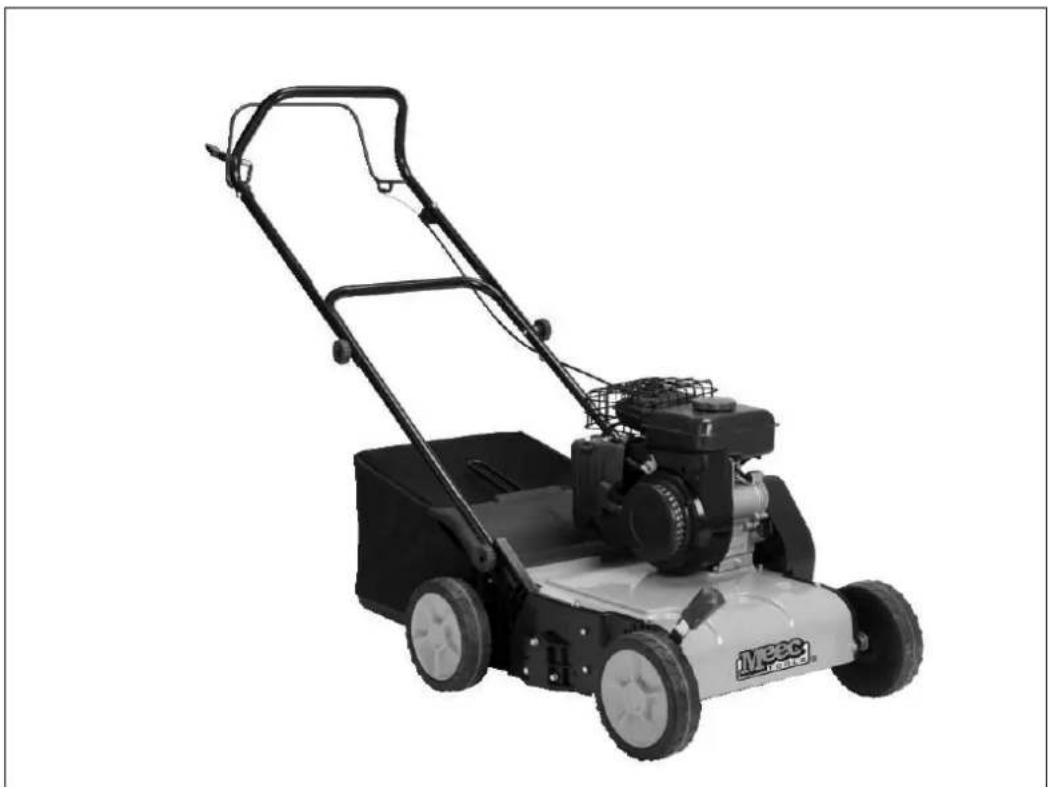
Black and white photo of a M380 lawn mower with visible blades and wheels (no text or symbols)SV Bruksanvisning i original
NO Bruksanvisning i original
EN Operating instructions in original
SVENSKA 1
SÄKERHETSANVISNINGAR 4
Förberedelser 4
Användning 4
Maintenance and storage 39
Warning stickers 39
TECHNICAL DATA....40
DESCRIPTION 40
OPERATION....41
Unpacking and inspection....41
Oil level inspection 41
Fuel 42
Inspection of the area to be scarified....43
Scarifying depth 43
Installation of collector 43
Starting 43
Use....44
Shutting off 45
Emergency shut-off 45
MAINTENANCE 45
Changing the oil 45
Air filter maintenance 46
Inspection and cleaning of spark plug 47
Transport....47
Storage 47
Empty the fuel tank 47
TROUBLESHOOTING 48
SÄKERHETSANVISNINGAR
natural_image
Technical line drawing of a mechanical assembly with no visible text or symbolsnatural_image
Technical line drawing of a mechanical component with arrows indicating force or movement (no text or symbols)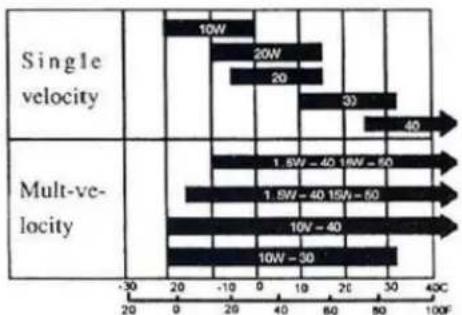
bar
| Category | Power Consumption (W) | |---|---| | Single velocity | 10W | | Single velocity | 20W | | Single velocity | 20 | | Single velocity | 33 | | Single velocity | 40 | | Multi-velocity | 1.5W - 40 15W - 60 | | Multi-velocity | 1.5W - 40 15W - 50 | | Multi-velocity | 10V - 40 | | Multi-velocity | 10W - 30 | The chart displays a horizontal bar for each scenario, with values ranging from -30 to 100F on the x-axis. The y-axis labels are in English. The right arrow indicates direction of increase.MONTERING AV UPPSAMLARE
natural_image
Close-up of a mechanical component with a tire and arrow indicating direction (no visible text or symbols)natural_image
Close-up of a mechanical component with a perforated lid and handle (no visible text or symbols)natural_image
Close-up of mechanical components including a lever and clamping mechanism (no visible text or symbols)natural_image
Line drawing of a manual lawn mower with motion arrows and an inset showing foot positioning (no text or symbols)VIKTIGT!
natural_image
Close-up of a mechanical device with a circular component and a white arrow pointing to a button (no visible text or symbols)NÖDAVSTÄNGNING
natural_image
Three labeled diagrams of a plastic component: grid, square, and rectangular (no text or symbols present)natural_image
Technical line drawing of a mechanical assembly with no visible text or symbolsnatural_image
Technical line drawing of a mechanical component with internal structure and directional arrows (no text or symbols)bar
| Category | Power Consumption (W) | |---|---| | Single velocity | 10W | | Single velocity | 20W | | Single velocity | 20 | | Single velocity | 33 | | Single velocity | 40 | | Multi-velocity | 1.5W - 40 15W - 60 | | Multi-velocity | 1.5W - 40 15W - 50 | | Multi-velocity | 10V - 40 | | Multi-velocity | 10W - 50 | The chart displays a horizontal bar for each category, with the x-axis scaled in degrees of freedom (20 to 100F). The right arrow indicates the direction of the bars.natural_image
Close-up of a mechanical component with a tire and arrow indicating direction (no visible text or symbols)natural_image
Close-up of a mechanical component with a perforated lid and handle (no visible text or symbols)natural_image
Close-up of mechanical components including a lever and clamping mechanism (no visible text or symbols)natural_image
Technical line drawing of a manual lawn mower with motion arrows and a magnified inset showing blade joint detail (no text or symbols)OBS!
natural_image
Close-up of a mechanical device with a circular component and a white arrow pointing to a button (no visible text or symbols)Nødstopp
natural_image
Three labeled images of rectangular objects: grid, square, and circular (no text or symbols)- Holder
- Filterelement av skumgummi
- Luftfilterdeksel
natural_image
Technical line drawing of a mechanical assembly with no visible text or symbolsnatural_image
Technical line drawing of a mechanical component with arrows indicating force or movement (no text or symbols)Montaż pojemnika
natural_image
Close-up of a mechanical component with a tire and arrow indicating direction (no visible text or symbols)natural_image
Close-up of a mechanical component with a perforated lid and handle (no visible text or symbols)natural_image
Close-up of mechanical components including a lever and clamping mechanism (no visible text or symbols)natural_image
Line drawing of a manual lawn mower with motion arrows and a close-up inset showing foot positioning (no text or symbols)WAŻNE!
natural_image
Close-up of a mechanical device with a white arrow pointing to a button, next to a perforated disc (no visible text or symbols)Wyłączanie awaryjne
natural_image
Three labeled diagrams of plastic components: grid, square, and rectangular (no text or symbols)UWAGA!
Read the Operating Instructions carefully before use!
Preparations
- Never allow children, or persons who have not read and understood these instructions, to use the machine. There may be local regulations for the minimum age of persons allowed to use the machine.
• Do not use the machine when other persons, especially children, or pets are in the vicinity. - The user is responsible for any accidents or risks to other persons or property.
• Always wear ear and eye protection when using the machine. - Always wear heavy-duty shoes and long trousers when using the machine. Do not use the machine if you are barefoot or wearing open shoes.
- Carefully inspect the area where the machine is to be used and remove any stones, wires, bones or other foreign objects.
WARNING! Petrol is highly flammable and can be explosive in certain circumstances.
- Only store fuel in an approved container.
- Fill up with fuel outdoors. Smoking prohibited!
- Fill up with fuel before starting the engine. Never remove the fuel cap or add fuel while the engine is running. Allow the engine to cool before filling up with fuel.
- Do not start the machine if fuel has been spilled. Move the machine away from any fuel spill before starting. Be careful not to ignite spilled petrol.
- Securely replace the fuel cap and the lid of the fuel container.
- Replace damaged muffler.
- Always check the machine before use to make sure that the scarifier wheels and screws are not worn or damaged. Always replace the complete set of wheels or screws if they are worn or damaged to avoid imbalance.
Use
- Do not use the machine in enclosed spaces where harmful carbon monoxide gas can accumulate.
- Only use the machine in daylight, or in good artificial lighting.
- Do not use the machine in wet grass.
- Make sure you always have a good footing on sloping ground.
- Use the machine carefully. Never run with the machine.
- Mow across slopes, never up or down.
• Always be very careful when changing direction on slopes. - Do not use the machine on steep slopes.
- Be very careful when going backwards or pulling the machine towards you.
- Stop the scarifier wheels if the machine has to be tilted when moving it over an ungrassed surface, or when moving to and from the area to be scarified.
- Never use the machine if the guards or covers are dismantled or damaged. Never use the machine without the safety devices fitted, e.g. ejector guide and/or collector.
- Do not change the motor control settings or overspeed the motor.
- Disengage and place all controls in neutral before starting the engine.
- Start the engine carefully according to the instructions. Keep your feet away from the scarifier wheels.
- Do not tilt the machine when starting the engine, unless this is necessary to start it. If the machine has to be tilted, do not tilt it more than is absolutely necessary. Lift up the end furthest away from the user.
- Do not stand in front of the ejector opening when starting the engine.
- Keep your hands and feet away from moving parts. Always keep at a safe distance from the ejector opening.
- Never lift or carry the machine when the motor is running.
- Shut off the engine and disconnect the ignition cable from the spark plug in the following situations. If the machine has electric start, you must remove the ignition key.
- Before rectifying blockages or cleaning the ejector.
- Before checking, cleaning or doing any other work on the machine.
- If you hit a foreign object. Check the machine and repair any damage before you use it again.
- If the scarifier starts vibrating abnormally (check immediately).
- Shut off the engine and disconnect the ignition cable from the spark plug in the following situations. If the machine has electric start, you must remove the ignition key.
- Before you leave the machine.
- Before filling up with fuel.
- Reduce the throttle and turn off the fuel cock (if present) before stopping the engine.
- Children below the age of 16 and people who are unfamiliar with these instructions must not use the machine.
Maintenance and storage
- Ensure that all screw connections are always properly tightened to keep the machine in perfect condition.
- Never store the machine with fuel in the tank in areas with sources of ignition.
- Allow the engine to cool before storing the machine.
- Keep the engine, mufflers, battery compartment and areas where fuel is to be stored free from grease, grass, moss, leaves, etc., as these pose a fire risk.
- Regularly check the collector for wear or damage.
- Regularly check the machine. Worn or damaged parts must be replaced for safety reasons.
- If the tank needs to be emptied, this must be done outside. Store the drained fuel in an approved container or dispose of in accordance with local regulations.
- Avoid prolonged skin contact with fuel and/or oil. Avoid inhaling the fumes. Wash your hands immediately with soap and water after handling fuel/oil.
- Used engine oil must be disposed of in accordance with local regulations.
Warning stickers
The warning stickers indicate the risk of serious personal injury or damage to property. Read and observe all safety instructions and warnings in this manual and on the machine. People who are unfamiliar with these instructions and warning stickers must not use the machine. Stickers bearing safety information and instructions must always be clean and legible. Replace the stickers if necessary.

Please read these instructions carefully before use

Onlookers should be kept away from the work area.
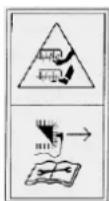
Disconnect the ignition cable from the spark plug before carrying out work on the scarifier wheels.
Keep your hands and feet at a safe distance from the scarifier wheels. Turn off the machine and disconnect the ignition cable from the spark plug before carrying out checks, adjusting settings and/or cleaning the machine.

Wear ear and eye protection.
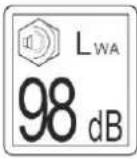
Guaranteed sound power.
TECHNICAL DATA
| Rated output | 1.7 kW at 3,600 rpm |
| Type | Single cylinder, fan-cooled 4-stroke engine |
| Lighting the BBQ | Transistorised magnetic ignition |
| Start method | Cord start |
| Working width | 380 mm |
| Casing | Steel plate |
| Measured Sound power level, LwA | 96 dB(A), K=2,3 dB |
| Sound pressure level, LpA | 84 dB(A), K=3 dB |
| Guaranteed Sound power level, LwA | 98 dB(A), K=2,3 dB |
| Max Vibration level | 7,2 m/s2, K=1,5 m/s2 (EN 1033:1995) |
| Weight | 24.5 kg |
DESCRIPTION
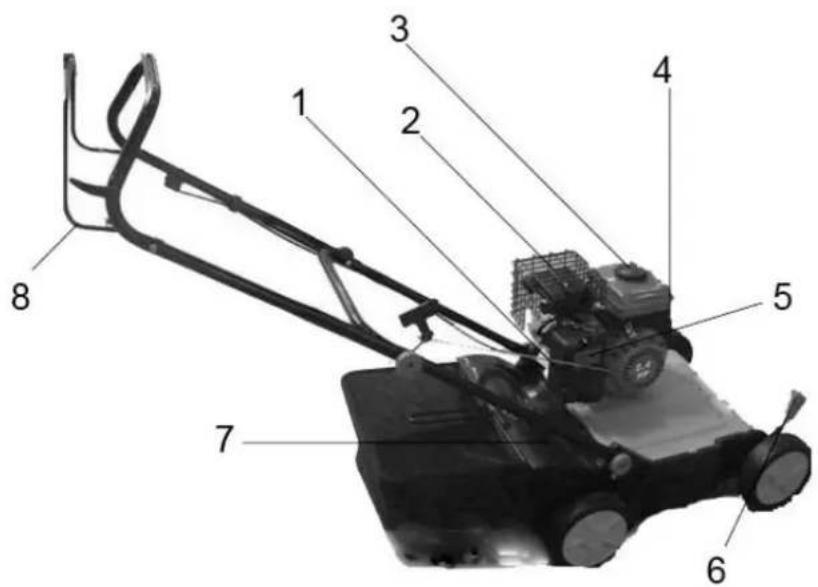
-
Pull handle
-
Muffler
-
Filler cap
-
Engine switch
-
Air filter
-
Lever for height adjustment
-
Warning stickers
-
Handle with power switch
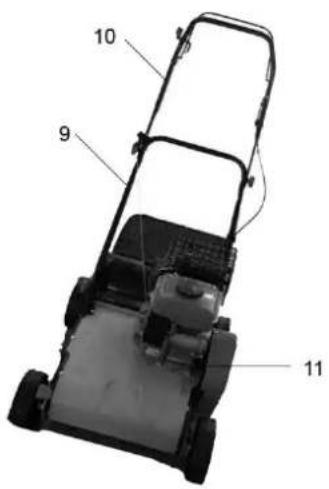
- Adjustment lever, lower section
- Adjustment lever, upper section
- Oil dipstick
OPERATION
The machine is intended for use in private gardens etc. It is not intended for use in public areas, sports facilities, agriculture or similar. This machine must be used and maintained in accordance with these instructions.
Unpacking and inspection
Check that all the parts are present. Package contents: Scarifier, operating instructions, bag of screws. Check that all covers and guards are correctly installed and that all screw joints are tightened. Check the muffler for wear. Repair or replace damaged parts in accordance with these instructions.
Oil level inspection
IMPORTANT!
- The quality of the engine oil is important for the performance and service life of the engine. Only use oil of the recommended type and quality.
- Turn off the engine and place the machine horizontally before checking the oil level.
- Use oil intended for 4-stroke petrol engines. Select an oil that provides the correct lubrication in the climate in which the machine is to be used.
If the engine stops and cannot be started, first check the oil level as described below.
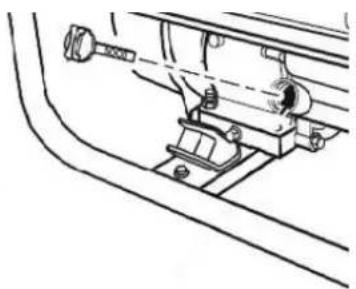
- Remove the oil filler cap and the dipstick and wipe the dipstick.
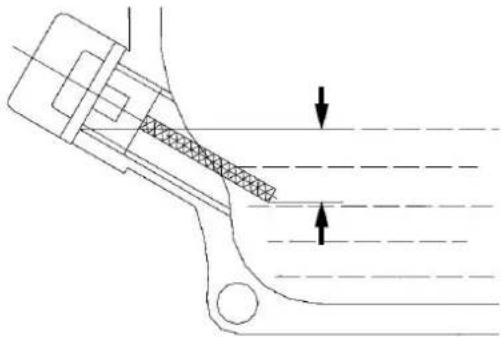
- Put the cap/dipstick back without tightening and take it out again to check the oil level.
natural_image
Technical line drawing of a mechanical assembly with no visible text or symbols-
Top up with oil of the recommended grade if the oil level is near or below the lower limit mark on the dipstick. Top up to the upper level mark/oil filler hole bottom edge. Do not overfill.
-
Put the oil filler cap back with dipstick.
natural_image
Technical line drawing of a mechanical component with arrows indicating force or movement (no text or symbols)Other viscosities shown in the table can be used when the prevailing average temperature is within the indicated range.
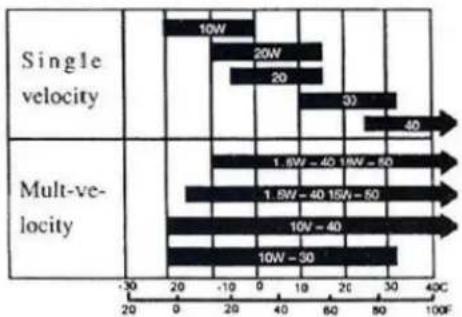
bar
| Condition | Power (W) | Power (kW) | Power (kW) Range | |---|---|---|---| | Single velocity | 10 | 20 | 20 - 50 | | Single velocity | 20 | 30 | 30 - 60 | | Single velocity | 30 | 40 | 40 - 80 | | Multi-velocity | 1.5W - 40 | 1.5W - 50 | 1.5W - 40 - 1.5W - 60 | | Multi-velocity | 1.5W - 40 | 1.5W - 50 | 1.5W - 40 - 1.5W - 60 | | Multi-velocity | 10V - 40 | 10V - 50 | 10V - 40 - 10V - 50 | The chart displays a scale bar ranging from 20 to 100F. The bars are labeled with the corresponding power values in watts.NOTE! Do not run the engine with insufficient oil – risk of serious engine damage.
Fuel
- Open the filler cap and check the fuel level.
- Fill up with fuel if the level is low. Do not fill above the fuel strainer.
NOTE! Fuel tank capacity: 2.5 l
WARNING!
- Petrol is highly flammable and can be explosive in certain circumstances. Keep out of the reach of children.
- Only refuel in a well-ventilated area with the engine switched off. Keep petrol away from sparks and naked flames, and do not smoke where petrol is stored or when filling petrol.
- Do not overfill. Spilled fuel and fuel fumes constitute a fire risk. Wipe up any spilled fuel before starting the engine.
- Avoid repeated or prolonged skin contact with fuel and/or inhalation of fuel fumes. Use unleaded petrol with a rating of at least 86 octane. The engine is designed to operate on unleaded petrol. Do not use leaded petrol as this will leave deposits in the engine and on the spark plug and will shorten engine life.
NOTE!
- The fuel can damage paint and some types of plastic. Be careful not to spill fuel when filling Damage caused by spilled fuel is not covered by the warranty.
- Never use old or contaminated fuel. Avoid getting water and debris in the fuel tank.
Inspection of the area to be scarified
Carefully inspect the area where the machine is to be used and remove any stones, wires, bones or other foreign objects.
Scarifying depth
The values for scarifying depth are approximate. The appropriate depth depends on the nature of the grass and the ground. Move the depth setting lever forwards for smaller depths and backwards for larger depths. The scarifying depth can be set between approx. 5 and approx. 15 mm. Select the desired depth using the height adjustment lever.
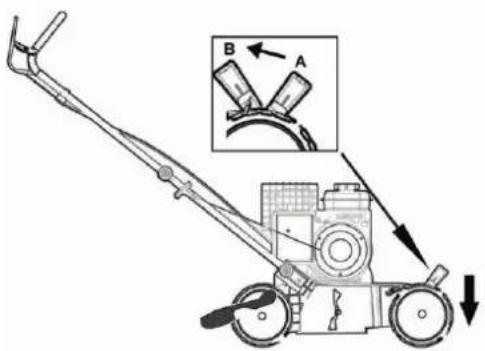
Installation of collector
- Insert the metal frame in the slots in the cloth bag.
- Hold up the cover with one hand and hook the collector onto the axle with the other.
WARNING!
Always turn off the engine before installing or removing the collector.
Never start the engine unless the collector is installed.
Starting
- Put into starting position (pos. A) with the adjustment lever. The scarifier wheel must not come into contact with the ground.
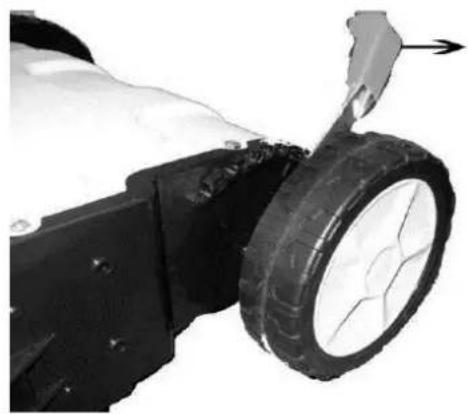
natural_image
Close-up of a mechanical component with a tire and arrow indicating direction (no visible text or symbols)- Push the fuel cock to ON. Open position (ON) and closed position (OFF)
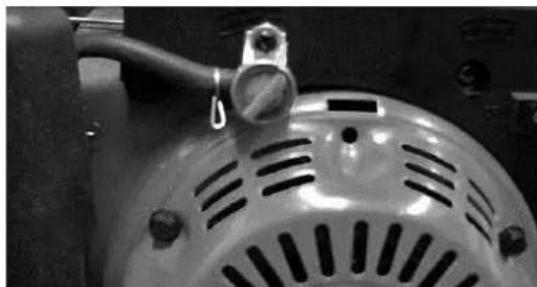
natural_image
Close-up of a metallic industrial fan or vent with a handle and mounting holes (no visible text or symbols)- Close the choke control (OFF) to start the engine when it is warm or when the ambient temperature is high. Open the choke control (ON position) to start if the engine is cold.
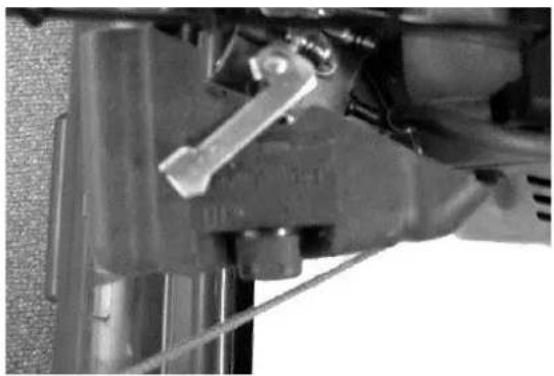
natural_image
Close-up of mechanical components with no visible text or symbols- Start the engine by gently pulling the starter cord until you feel resistance, and then giving it firm pull.
- Carefully return the starter handle.
NOTE!
- Do not let the starter cord grip snap back against the engine when the cord retracts. Hold the cord grip as it retracts to avoid damaging the starter.
- Keep your hands and feet away from moving parts when starting. Always keep at a safe distance from the ejector opening.
The engine speed is factory-set and cannot be altered by the customer. Contact your dealer if the engine speed has to be adjusted.
Use
- Set the required scarifying depth.
- Stand behind the machine, press the button and pull in the wheel rotation handle so that it rests against the handle.
- Press in the handle to start rotation of the scarifier wheels.
- Release the handle to stop the scarifier wheels rotating.
NOTE!
Always wait until the scarifier wheels have stopped before adjusting the scarifying depth.
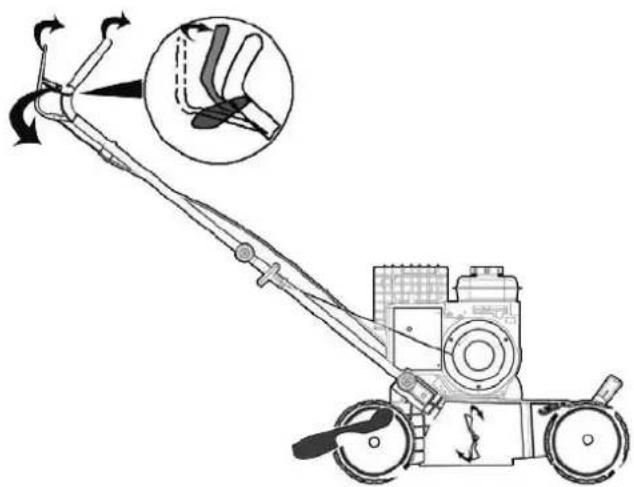
natural_image
Line drawing of a manual lawn mower with motion arrows and an inset showing foot positioning (no text or symbols)IMPORTANT!
- Do not touch the machine's casing when the engine is running. Never put your feet or other body parts under the casing.
- Turn off the engine and lock the scarifier wheels before transporting or lifting the machine. Stop the engine before crossing gravel paths or similar with the machine. Turn off the engine, allow it to cool and disconnect the ignition cable from the spark plug before performing cleaning, maintenance and/or repairs. Wear protective gloves when working close to the scarifier wheels.
Shutting off
- Release the wheel rotation handle to stop the scarifier wheels.
- Turn off the engine.
- Close the fuel cock (position OFF).
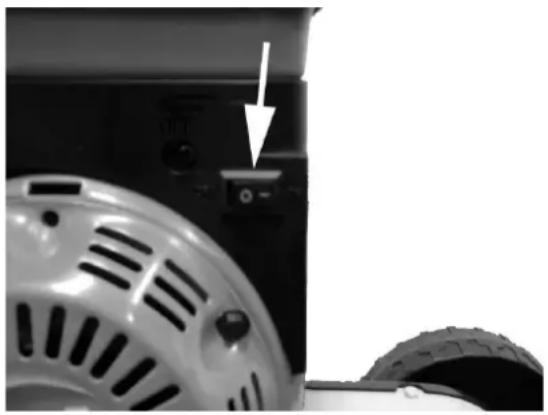
natural_image
Close-up of a mechanical device with a white arrow pointing to a control panel and a perforated disc (no visible text or symbols)Emergency shut-off
In an emergency, release the power switch handle to turn off the engine.
MAINTENANCE
Follow the maintenance schedule below.
| Item\Interval | Every time | 1 month or 20 operating hours | 3 months or 50 operating hours | 6 months or 100 operating hours | 1 year or 300 operating hours | |
| Engine oil | Check the oil level | √ | ||||
| Replace | √ | |||||
| Air filter | Check | √ | ||||
| Clean | 1 | 1 | ||||
| Replace | √★ | |||||
| Spark plug | Clean, adjust | √ | ||||
| Replace | √ | |||||
| Spark arrestor | Clean | √ | ||||
| Valve clearance | Check, adjust | 2 | ||||
| Fuel hose | Clean | 2 years | ||||
| Scraper blade | Check | √ | ||||
| Clean | √ | |||||
| Replace | If the blade is damaged. | |||||
IMPORTANT! Only use spare parts from the manufacturer or of an equivalent quality, as the engine can otherwise be damaged.
NOTE!
★: Only for air filters with filter elements of paper.
(1) More frequently than specified in the schedule in the event of dusty conditions.
(2) Must be carried out by the dealer or a qualified person with appropriate tools.
Changing the oil
Drain the engine oil when the engine is warm so that all the oil runs out quickly.
WARNING! The oil is hot when the engine is turned off. Allow the engine to cool a little before changing the oil.
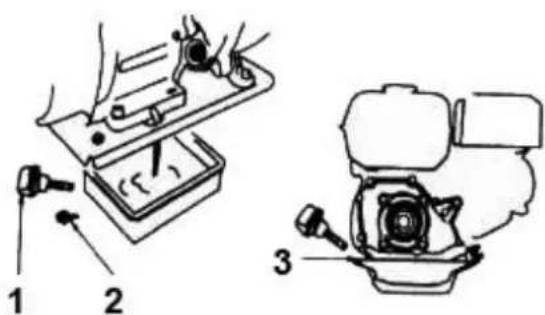
- Oil dipstick
- Drain plug
-
Oil level mark
-
Place a suitable container next to the engine to catch the draining oil.
- Remove the dipstick and the drain plug and allow the oil to run down into the container.
- Put the drain plug back and tighten properly.
- Fill with oil of the recommended grade to the indicated level. Oil volume: 0.5 l
NOTE! Used oil must be disposed of in accordance with local regulations.
Air filter maintenance
Clean the air filter regularly. Clean more often in dusty environments.
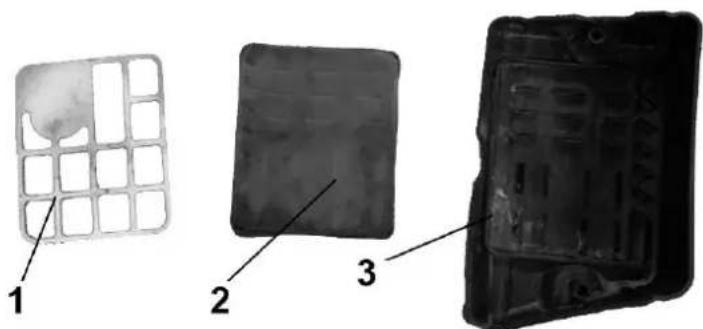
- Undo the wing nut, remove the air filter cover and take out the foam filter element.
- Clean the foam rubber filter unit with washing-up liquid and hot water. Do not use non flammable detergents or detergents with high flashpoint. Allow to dry.
- Soak the filter element in clean engine oil and squeeze out excess oil. If the filter element contains too much oil, the engine will smoke when it is started.
- Replace the filter unit and the cover.
natural_image
Three labeled diagrams of a plastic component: grid, square, and rectangular (no text or symbols present)- Holder
- Foam filter element
- Air filter cover
WARNING! Never run the engine without an air filter, or with a damaged air filter. Contaminants could enter the engine and cause serious wear.
Inspection and cleaning of spark plug
NOTE! Remove the muffler cover before removing the spark plug.
- Remove the spark plug cap.
- Disconnect the spark plug.
- Remove any dirt from the base of the spark plug.
- Unscrew the spark plug with a suitable spanner.
-
Inspect the spark plug. Replace the spark plug if the insulator is damaged. Clean the spark plug with a steel brush if it is to be used again.
-
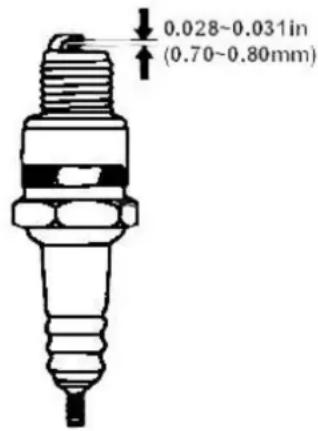
Measure the electrode gap using a feeler gauge. Correct the gap, if necessary, by gently bending the electrode. The electrode gap should be 0.70–0.80 Nm.
-
Check the sealing washer for damage. Unscrew the spark plug carefully by hand to avoid threading problems.
- Tighten the spark plug with a suitable spanner to compress the sealing washer. Tighten a new spark plug a 1/2 turn after it seats to compress the sealing washer. If refitting the same, used spark plug, tighten it 1/8–1/4 turn after it seats to compress the sealing washer.
NOTE!
- Tighten the spark plug correctly. A loose spark plug can overheat and damage the engine.
- Never use a spark plug with an unsuitable heat rating. Only use recommended spark plugs or the equivalent.
Recommended spark plug: F6RTC
For good engine performance, the spark plug must be clean and have the correct spark gap.
WARNING! The muffler is hot when the engine has been running – risk of burns.
Transport
The fuel cock must be closed when the engine is transported. Allow the engine to cool before transporting/storing, as it can otherwise cause burns or a fire.
IMPORTANT! Do not tilt the machine as fuel can leak out. Spilled fuel and fuel fumes constitute a fire risk.
Storage
- The machine must be prepared for storage if it is not going to be used for a prolonged period of time.
- Store the machine in a clean, dry place.
- Change the engine oil.
- Remove the spark plug and pour a tablespoon of pure engine oil of the recommended type into the cylinder. Turn the engine a few times to distribute the oil and put back the spark plug.
- Pull the starter cord handle until you feel resistance. Continue pulling until the triangle on the starter device's wheel is aligned with the starter device's screw hole. In this position, both the intake and exhaust valves are closed, which prevents internal engine damage during storage.
• The triangle on the starter device's wheel aligned with the starter device's screw hole - Cover the machine to protect it from dust.
Empty the fuel tank
- Close the fuel cock (OFF position), remove the drain plug from the float housing and drain off the fuel from the carburettor into a suitable container.
- Push the fuel cock to ON.
- Put back the drain plug in the float housing.
TROUBLESHOOTING
| Problem | Possible cause | Action |
| Rattling sound | Loose screw joints. | Tighten the screw joints. |
| The engine runs irregularly and stops with a jarring sound. | The engine has jarred as a result of insufficient engine oil. | Allow an authorised service representative to check the engine. |
| The engine cannot be started. | Check that there is sufficient fuel.Check that the fuel cock is open.Check that fuel is reaching the carburettor by undoing the drain plug in the float housing.Check that the engine switch is in the ON position.Make sure the oil level is adequate.Check that the spark plug has spark.WARNING:Wipe up any spilled fuel before inspecting the spark plug and before starting. Spilled fuel and fuel fumes constitute a fire risk. | |
The manufacturer assumes no liability for damage that arises as a result of unauthorised repairs or the use of non-approved spare parts.
Jula reserves the right to make changes. In the event of problems, please contact our service department.
www.jula.com

Care for the environment!
Must not be discarded with household waste!
This product contains electrical or electronic
components that should be recycled.
Leave the product for recycling at the designated
station e.g. the local authority's recycling station.
CE
EC DECLARATION OF CONFORMITY
EG FÖRSÄKRAN OM ÖVERENSSTÄMMELSE
EF SAMSVARSERKLÆRING
DEKLARACJA ZGODNOŚCI WE

Jula Postorder AB, Box 363, SE-532 24 SKARA, SWEDEN
certify that the design and manufacturing of this product
Rated engine power: 1,7 kW 3600/min
Cutting width: 380 mm
Item number / Artikelnummer / Artikelnummer / Numer artykułu
721-095
Machinery Directive 2006/42/EC,
Electromagnetic Compatibility 2004/108/EC,
Outdoor Noise Directive 2000/14/EC, amended by 2005/88/EC
EN 13684/A2:2009, EN ISO 14982:2009
This product was CE marked in year -10
Name and address of the person
authorised to compile the technical file:
Erik Svedén
Box 363, SE-532 37 Skara, Sweden
Skara
2010-01-17
natural_image
Abstract line drawing with overlapping curved shapes and a horizontal dashed line (no text or symbols)Stefan Rundberg
PRODUCT MANAGER
- Bruksanvisning för bensindriven vertikalskärare Bruksanvisning for bensindrevet vertikalskjærer Instrukcja obsługi wertykulatora spalinowego Operating Instructions for Petrol Powered Scarifier
- SVENSKA 1
- SÄKERHETSANVISNINGAR 4
- SÄKERHETSANVISNINGAR
- MONTERING AV UPPSAMLARE
- VIKTIGT!
- NÖDAVSTÄNGNING
- OBS!
- Nødstopp
- Montaż pojemnika
- WAŻNE!
- Wyłączanie awaryjne
- UWAGA!
- Read the Operating Instructions carefully before use!
- Preparations
- Use
- Maintenance and storage
- Warning stickers
- OPERATION
- Unpacking and inspection
- Oil level inspection
- IMPORTANT!
- Fuel
- WARNING!
- NOTE!
- Inspection of the area to be scarified
- Scarifying depth
- Installation of collector
- Starting
- Shutting off
- Emergency shut-off
- Changing the oil
- Air filter maintenance
- Inspection and cleaning of spark plug
- Transport
- Storage
- Empty the fuel tank
- Care for the environment!
- CE
- EC DECLARATION OF CONFORMITY
- EG FÖRSÄKRAN OM ÖVERENSSTÄMMELSE
- EF SAMSVARSERKLÆRING
- DEKLARACJA ZGODNOŚCI WE
Brand : Meec Tools
Model : 721-095
Category : Lawn mower