78503 - Lawn mower Power Craft - Free user manual and instructions
Find the device manual for free 78503 Power Craft in PDF.


| Product Type | Petrol lawn mower, walk-behind |
| Brand | Power Craft |
| Model | 78503 |
| Engine Power | 6.5 hp |
| Fuel Type | 95 octane unleaded petrol |
| Engine Oil | 15W40 |
| Blade Rotation Speed | 3,200 RPM |
| Cutting Width | 558 mm |
| Cutting Height | 15-70 mm (6 levels) |
| Forward Speed (Self-Propelled) | 3.8 km/h |
| Drive Type | Self-propelled with clutch handle |
| Grass Collection | Grass bag (fabric) included |
| Mulching Capability | Mulching plug included |
| Weight (Approx.) | 40 kg |
| Safety Features | Cut-out handle, blade brake, safety guards |
| Cutting Height Adjustment | Lever-operated, 6 positions |
| Air Filter Cleaning Interval | Every 25 hours of use |
| Spark Plug | Replaceable; clean when sooty |
| Handlebar Adjustment | 3 angle positions |
| Wheel Size | Front: 8", Rear: 9" |
Frequently Asked Questions - 78503 Power Craft
User questions about 78503 Power Craft
0 question about this device. Answer the ones you know or ask your own.
Ask a new question about this device
Download the instructions for your Lawn mower in PDF format for free! Find your manual 78503 - Power Craft and take your electronic device back in hand. On this page are published all the documents necessary for the use of your device. 78503 by Power Craft.
USER MANUAL 78503 Power Craft
Instruction manual 23
D
RASENMÄHER
natural_image
Red lawn mower with black handle and wheels, no visible text or symbols
Fremstillet i P.R.C.
6001 - JiangSu Word, Danyang, JiangSu
EU-Importør:
HP Værktøj A/S
7080 Børkop
Danmark
Manufactured in P.R.C.
6001 - JiangSu Word, Danyang, JiangSu
EU importer:
HP Værktøj A/S
7080 Børkop
Denmark
All rights reserved. The content of this user guide may not be reproduced in part or whole in any way, electronically or mechanically (e.g. photocopying or scanning), translated or stored in a database and retrieval system without the prior written consent of HP Værktøj A/S.

Produsert i P.R.C.
6001 - JiangSu Word, Danyang, JiangSu
EU-importør
HP Værktøj A/S
7080 Børkop
Danmark
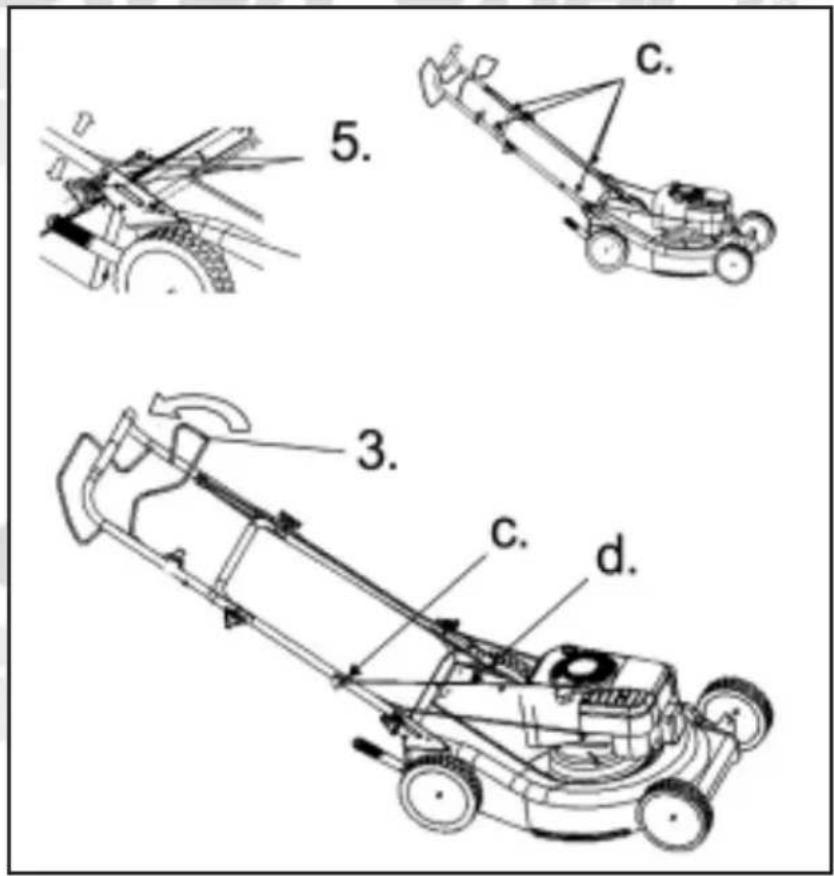
Skru styret fast på beslaget med monteringsskruene (5). Velg ønsket hull på beslaget avhengig av hvilken vinkel styret skal sitte i (3 valgmuligheter).
Fest styrekablene til styret med ledningsbeslagene (c) på styret.
Trykk knivsikkerhetsbøylen (3) inn mot håndtaket og trekk ut startsnoren (d) langsomt. Fest startsnoren til styret med ledningsbeslaget.
To get the most out of your new lawn mower, please read through this manual and the enclosed safety instructions before use. Please also save the instructions in case you need to refer to them at a later date.
Technical data
Blade rotation speed: 3,200 RPM
Speed: 3.8 km/h
Cutting width: 558 mm
Cutting height: 15-70 mm (6 levels)
Engine power output: 6.5 hp
Fuel: 95 octane unleaded petrol
Oil: 15W40
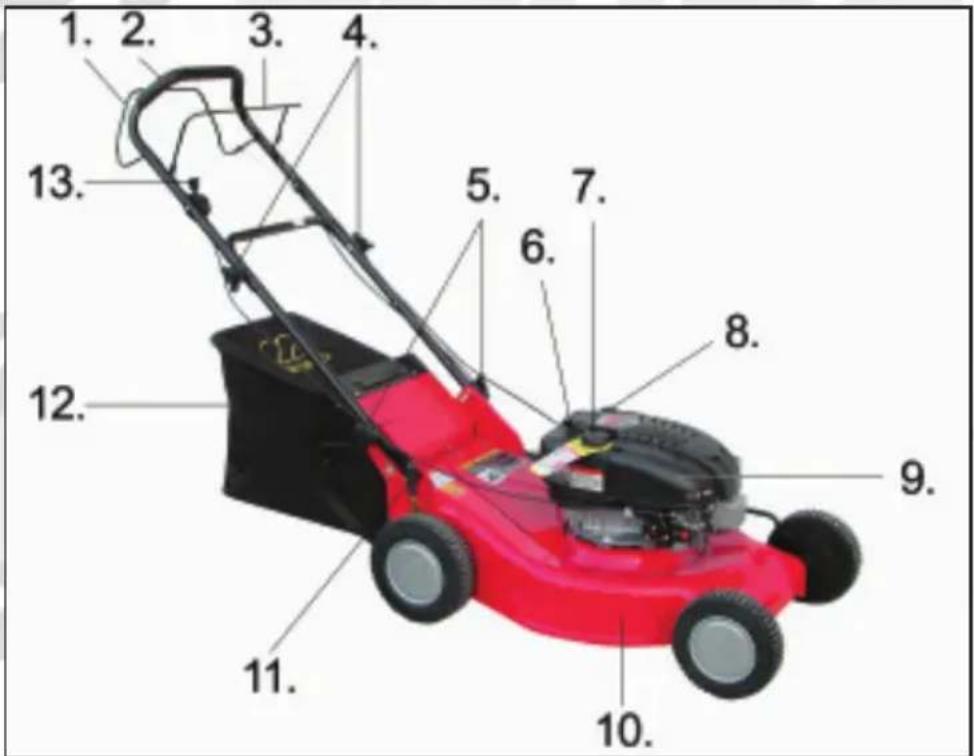
Main components
-
Clutch handle
-
Handlebar
-
Cut-out handle
-
Adjustment knob
-
Retaining screw handle
-
Starting handle
-
Fuel cap
-
Oil filler cap
-
Air filter cover
-
Skirt:
-
Height adjustment handle
-
Grass bag
-
Throttle lever
Special safety instructions
Personal safety
Always wear protective glasses, work trousers and safety shoes when using the mower to protect your eyes, feet and legs against loose items that can be thrown up by the blade.
Always use ear protectors when using the mower, as noise from the motor can cause hearing damage.
Keep other people and animals away from the area whilst using the mower.
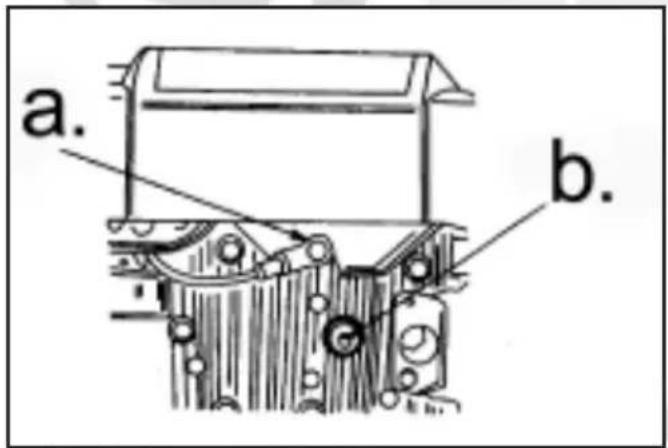
NEVER place hands, fingers or other parts of the body under the skirt unless the mower cannot start (spark plug cable (a) must be removed from the spark plug (b); see illustration)! Remember that the blade takes a few seconds to stop when the motor is cut off.
Never use the mower if the safety control handles do not work!
Exercise caution and wear heavy duty gloves when handling the blade.
Using the mower
For outdoor use only.
IMPORTANT! The mower is supplied with no motor oil or petrol. Remember to fill up with oil and petrol before starting the motor!
Always switch off the motor before adjusting the mower or motor, and before fitting or removing the grass bag.
Remove all objects from the grass to be cut before starting to avoid them being thrown up by the blade. Blade life will be shortened if it hits stones, roots, toys etc and such objects can cause serious personal injury if thrown out by the blade.
Never use the mower on uneven surfaces or steep slopes (incline of over 15%). If the skirt's ground clearance is too high the blade can throw out objects that can cause injury, and when using on slopes, can cause you to lose control over the mower.
Avoid cutting wet grass. The grass forms clumps and can be slippery.
Always ensure good footing when using the mower. Release the mower if you feel you are falling. The mower will stop automatically when you release the clutch handle.
Check you have plenty of room behind you and that you are not in danger of tripping over before pulling the mower towards you.
The motor parts become very hot when in use. Avoid touching them.
Fuel
Never smoke or use naked flame when using the mower or when fuelling it.
Stop the motor and allow to cool off before adding fuel.
Ensure there is sufficient ventilation when mixing and filling fuel.
Store fuel out of the reach of children and in a clearly marked, approved container.
Wipe off any spilt fuel from the outside of the motor before starting it.
Never fill the fuel tank right up as the fuel can expand.
Store the mower well away from sources of heat, as the fuel or its vapours can be ignited.
Never remove the fuel cap while the motor is running.
Remember to dispose of residual fuel, oil and used filters in accordance with local rules.
INSTRUCTION MANUAL
Assembly
Remove the spark plug cable as shown in the illustration under Special Safety Instructions.
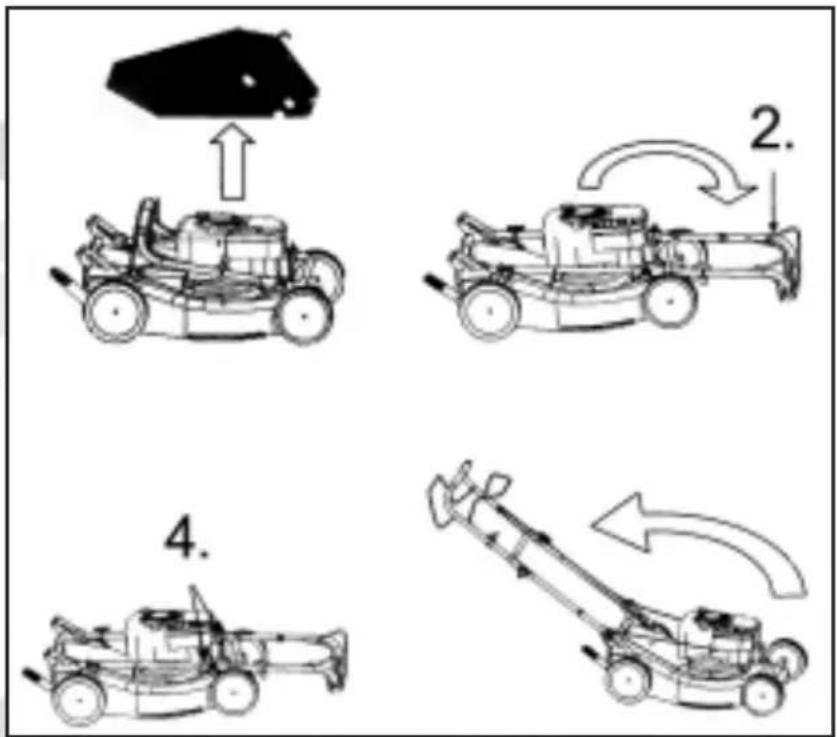
Remove the grass bag (12). Fold the handlebar out (2) so that its upper and lower parts are in line with each other. Tighten the adjustment knobs (4). Lift the entire handlebar off the mower. Take care to avoid bending or breaking the control cables.
Screw the handlebar tight against the bracket using the retaining screw handles (5). Select a hole on the bracket according to the angle you want the handlebar to be at (3 options). Fasten the control cables to the handlebar using the brackets (c) on the bar. Press the cut-out handle (3) inwards and pull the starting handle (d) slowly out. Secure the starting handle to the handlebar using the cable bracket. Attach spark plug cable to spark plug.
INSTRUCTION MANUAL
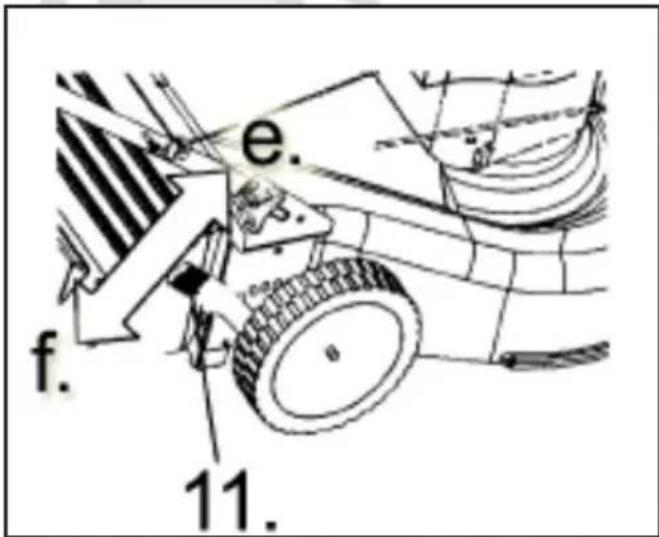
Adjust cutting height by pulling the height adjustment handle (11) out and putting it in the required position. Push it in towards the motor (e) to increase cutting height and away from the motor (f) to reduce. Release the handle.
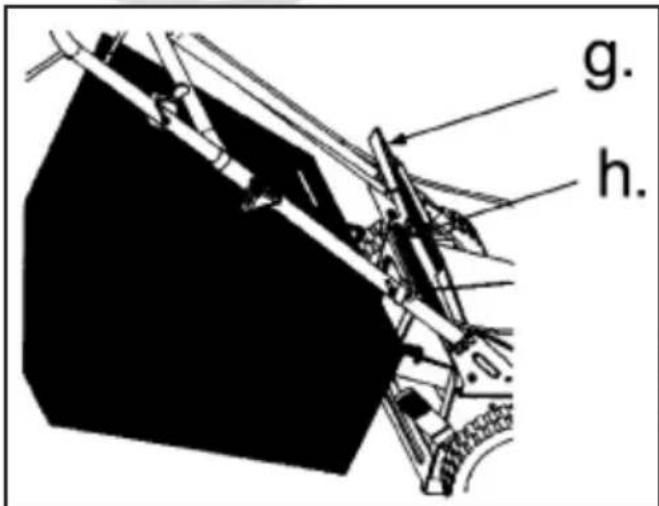
Fit the grass bag by lifting the flap (g) on the rear of the mower and fit the bag on the adapter (h). Check the bag is secure before starting the mower. The grass bag can be secured to the handlebar.
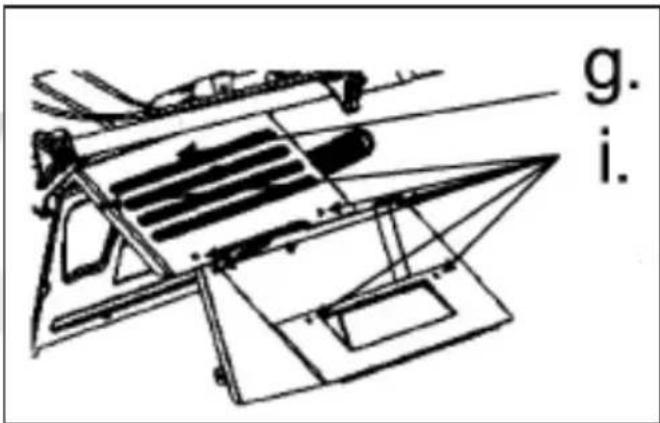
Instead of the grass box, a direct exhaust chute can be fitted using six nuts and bolts (i).
IMPORTANT! The mower is supplied with no motor oil or petrol. Remember to fill up with oil and petrol before starting the motor!
Use
Filling petrol:
Remove the filler cap (7) from the fuel tank and fill up with petrol. Screw the filler cap on again and check that it will not work loose during use. Check for fuel leaks.
Filling oil:
Remove the oil filler cap (8). Check oil level using the dipstick on the underside of the filler cap. Top up if necessary. Replace filler cap.
Starting the motor:
Check that the clutch handle is not activated before starting the motor.
Set the throttle (13) to START (furthest forward). Hold the cut-out handle in and pull the starter handle (6).
Allow the motor to warm up for a few minutes before use.
If you release the cut-out handle, the motor will stop immediately.
Use
Hold the cut-out handle in and adjust the motor to the required speed using the throttle lever.
INSTRUCTION MANUAL
Cut the grass evenly and systematically. To activate the mower drive function for automatic drive, press the clutch handle all the way in towards the handlebar. The mower will move forward until you release the clutch handle. Always release the clutch handle when turning or stopping the mower.
If you release the cut-out handle, the motor will stop immediately.
Tip:
Always ensure you can see what you are doing. Never cut the grass in the dark or poor visibility and take extra care around house corners.
Always cut across the face of slopes, never up and down. Be careful when changing direction on slopes.
Be very careful when clipping near walls, thick branches, wire fencing or other obstructions.
Stopping the motor:
Set throttle handle in off position, and release cut-out handle.
Follow the instructions for maintenance under Cleaning and Maintenance.
Transport and storage
Stop the blade before running the mower over gravel, asphalt or the like.
Empty the fuel tank and start the motor to remove all fuel in the motor.
Take the spark plug out when the engine has run dry and cooled off. Pour a little motor oil into the spark plug hole and replace the spark plug.
Clean the mower, and store in a clean, dry and dust-free place.
Cleaning and maintenance
Engine oil:
Fill and change the oil as required. (See Filling Oil During Use).
Air cleaner:
Clean the air filter regularly (after every 25 hours of use). Remove air filter cover (9). Clean the filter element by washing it in warm water with a little detergent. Allow to dry completely before replacing. Wipe the inside of the filter cover with a damp cloth.
Spark plug:
If the plug is very sooty, clean or replace. Never remove the spark plug from the motor if the motor is warm as it can damage the thread.
Cleaning:
Wipe all parts of the mower with a damp cloth. Lubricate moving parts with oil.
Remove the spark plug cable and prop one side of the mower up. Scrape the underside of the skirt (10) to remove accumulated grass and dirt with a wooden or plastic scraper.
Removing the blade:
Remove the spark plug cable and prop one side of the mower up. Slacken the bolt (m) and washer (l) retaining the blade (k) and adapter (j) on the drive shaft and remove the blade. Caution: The blade can be sharp!
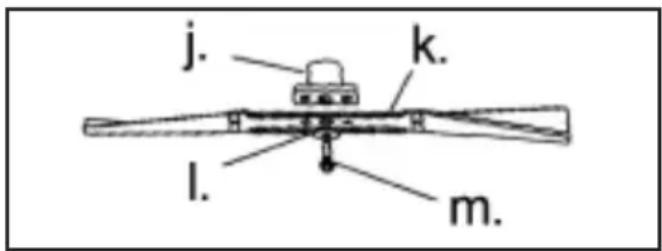
Sharpen or replace the blade when it is worn. Ensure the blade is sharpened evenly on both sides. Replace the adapter and blade in reverse order and check the blade is secure.
GEBRAUCHSANWEISUNG
Einführung
GEBRAUCHSANWEISUNG
| REF. NO. | PART NO. | DESCRIPTION | QTY. |
| 1 | 122602 | Engine | 1 |
| 2 | WORLD22-1A | Handlebar & Console | 1 |
| 3 | WORLD22-2A | Mower Deck Assembly | 1 |
| 4 | WORLD22-3A | Drive Assembly | 1 |
| 5 | WORLD22-3A | Straight Blade Assembly | 1 |
| 6 | WORLD22-4A | Grass Bag Assembly | 1 |
| 7 | WORLD22-5A | Swing Blade Assembly | 1 |
ILLUSTRATION
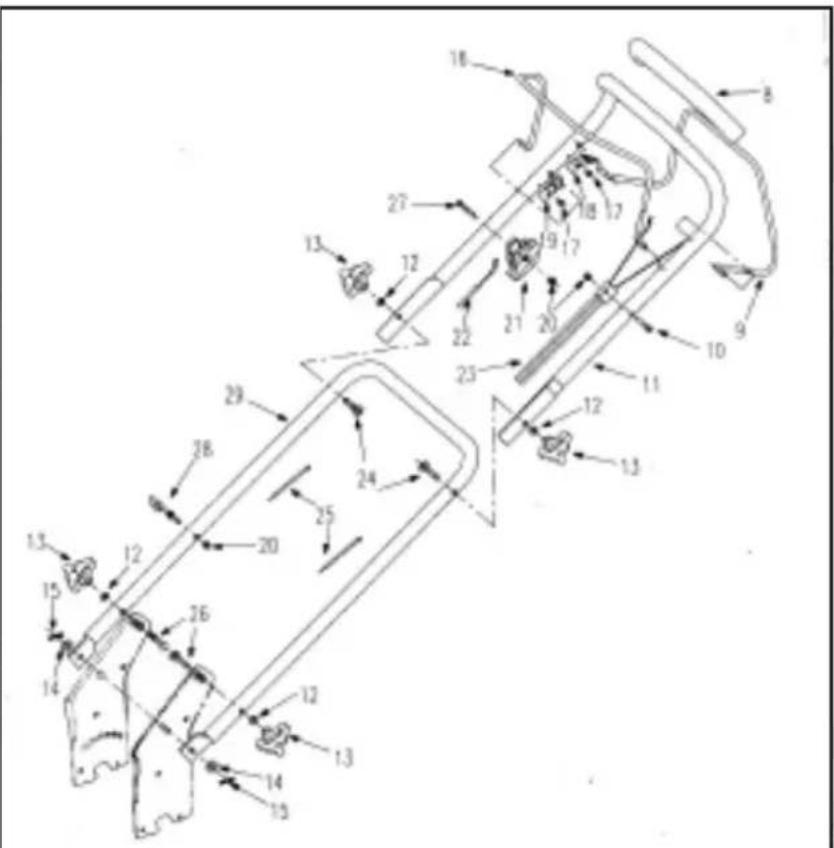
| REF NO. | PART NO. | DESCRIPTION | QTY. |
| 8 | XSZ56-01 | Handle Grip | 1 |
| 9 | XSZ56-1-13 | Drive Bail Wire | 1 |
| 10 | GB820-85 | Phillips Hd Screw M5x40mm | 1 |
| 11 | XSZ56A-1-06 | Upper Handle | 1 |
| 12 | GB955-87 | Wave Spring Washer 8mm | 2 |
| 13 | XSZ56-1-09 | Knob Nut M8mm | 4 |
| 14 | GB97.1-85 | Flat Washer 8mm | 2 |
| 15 | XSZ56-1-17 | Hair Pin | 2 |
| 16 | XSZ56-1-12 | Start Bail Wire | 1 |
| 17 | GB/T15856.4-1995 | Self-Drilling Screw ST4.8x19mm | 2 |
| 18 | XSZ56-1-11 | Bracket, Downstop | 1 |
| 19 | XSZ56-1-10 | Bracket, Upstop | 1 |
| 20 | GB8182-88 | Nylon Insert Lock Nut M8mm | 3 |
| 21 | XSZ56-7.1 | Switch, Throttle Control Assby. | 1 |
| 22 | XSZ56-7.2 | Cable, Throttle Control Assby. | 1 |
| 23 | XSZ58A-5 | Cable Unit | 1 |
| 24 | XSZ56-1-15 | Bolt, Handle | 4 |
| 25 | WORD18-09 | Wire Tie | 4 |
| 26 | GB801-88 | Square Neck Bolt M8×40mm | 2 |
| 27 | GB5788-86 | Hex Hd. Flange Bolt M5x50mm | 1 |
| 28 | XSZ56-1-07 | Rope Guide | 1 |
| 29 | XSZ56A-1-05 | Lower Handle | 1 |
ILLUSTRATION
ILLUSTRATION
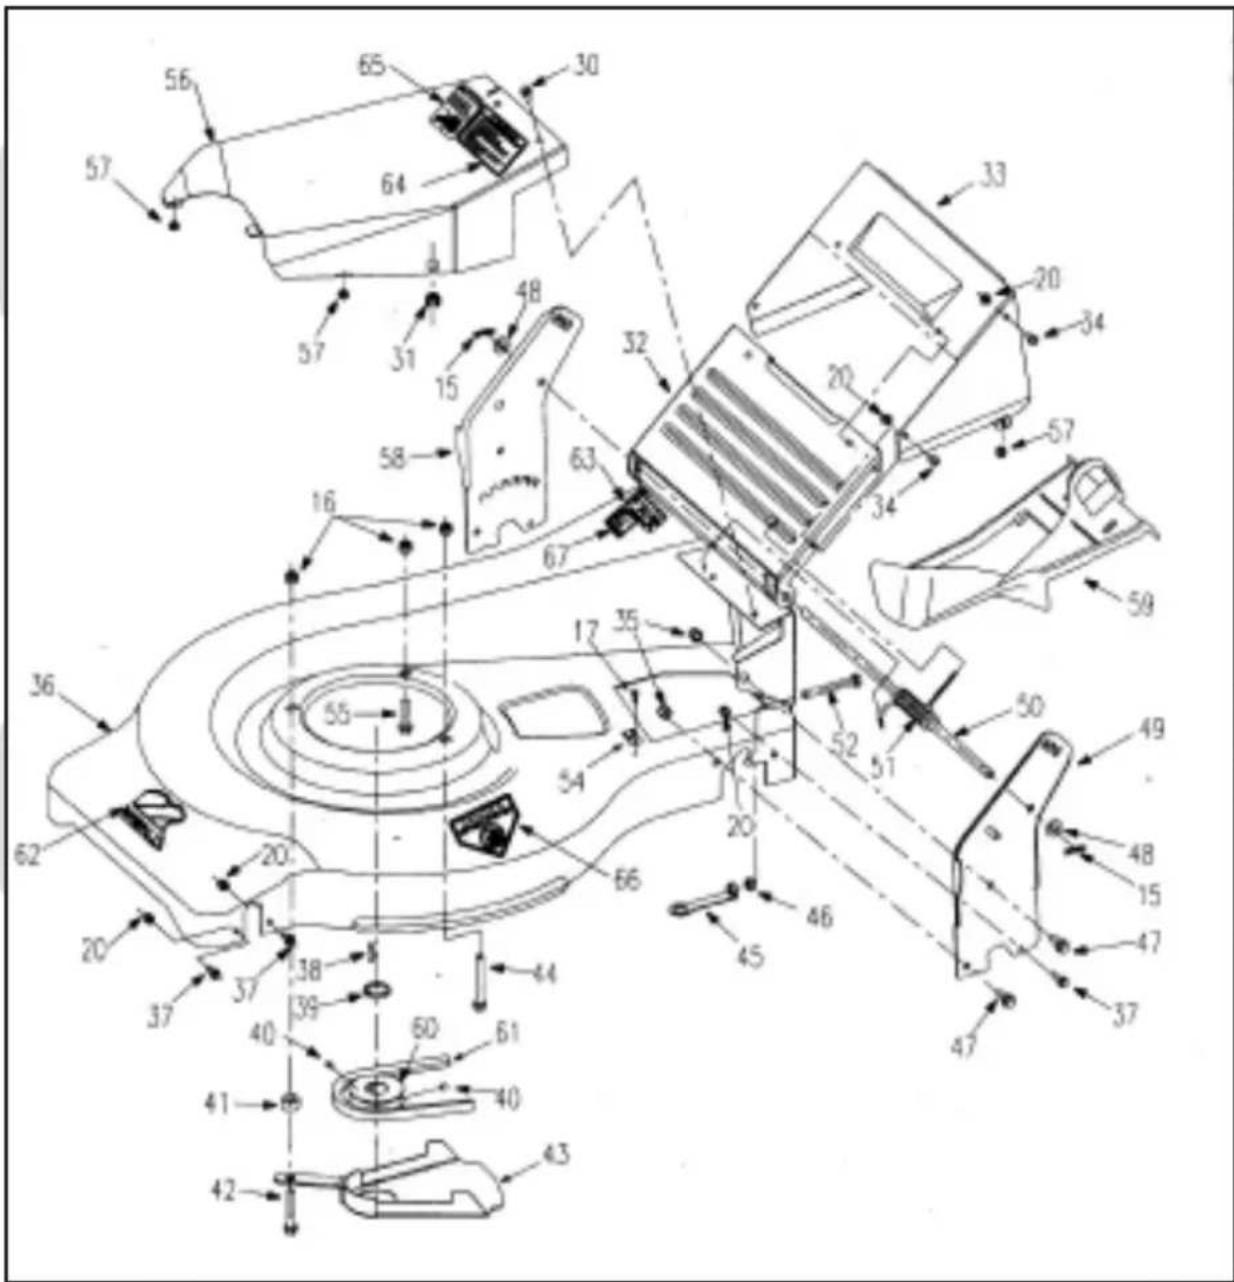
| REF NO. | PART NO. | DESCRIPTION | QTY. |
| 15 | XSZ56-1-17 | Hair Pin | 4 |
| 17 | GB/T15856.4-1995 | Self-Drilling Screw ST4.8x19mm | 1 |
| 20 | GB6182-86 | Nylon Insert Lock Nut M6mm | 12 |
| 30 | GB5787-86 | Hex Hd, Flange Bolt M6x12mm | 2 |
| 31 | XSZ56-1.2-02 | Rubber Clamp 7 | 1 |
| 32 | XSZ56-1-08 | Rear Cover | 1 |
| 33 | XSZ56A-1-16 | Rear Discharge Chute | 1 |
| 34 | GB818-85 | Phillips Pan Hd, Screw M6x10mm | 4 |
| 35 | GB6182-86 | Nylon Insert Lock Nut M8mm | 7 |
| 36 | XSZ56-1.1 | Mower Deck | 1 |
| 37 | GB5787-86 | Hex Hd, Flange Bolt M6x16mm | 6 |
| 38 | XSZ56-2-20 | Woodruff Key | 1 |
| 39 | XSZ56-2-21 | Pulley Spacer | 1 |
| 40 | GB78-85 | Socket Set Screw M6x8mm | 2 |
| 41 | XSZ56-2-23 | Spacer, Pulley Guard | 1 |
| 42 | GB5787-86 | Hex Hd, Flange Bolt M8x50mm | 1 |
| 43 | XSZ56-2.5 | Pulley Guard | 1 |
| 44 | GB5787-86 | Hex Hd, Flange Bolt M8x55mm | 1 |
| 45 | XSZ56-2.6 | Stretching Arm | 1 |
| 46 | GB6170-86 | Hex Nut M8mm | 2 |
| REF NO. | PART NO. | DESCRIPTION | QTY. |
| 47 | GB5787-86 | Hex Hd, Flange Bolt M8x20mm | 4 |
| 48 | GB97.1-85 | Flat Washer 10mm | 2 |
| 49 | XSZ56A-1.4 | Left Bracket | 1 |
| 50 | XSZ56A-1-03 | Rod, Rear Cover | 1 |
| 51 | XSZ56-1-04 | Torsion Spring | 1 |
| 52 | GB5783-86 | Hex Hd, Bolt M8x70mm | 1 |
| 54 | XSZ56-1-18 | Cable Clamp | 1 |
| 55 | GB5787-86 | Hex Hd, Flange Bolt M8x35mm | 1 |
| 56 | XSZ56-1.2.1 | Transmission Cover | 1 |
| 57 | XSZ56-1.2-01 | Rubber Pad | 4 |
| 58 | WORD22-1.3 | Right Bracket | 1 |
| 59 | 2200018 | Mulching Plug | 1 |
| 60 | XSZ56-2-22 | Pulley | 1 |
| 61 | XSZ56-2-24 | V-Belt A39(991mm) | 1 |
| 62 | 8031 | Decal, Logo | 1 |
| 63 | WORLD22-6508 | Decal, Model Plate | 1 |
| 64 | 8006 | Decal, Warning | 1 |
| 65 | 8008 | Decal, Caution | 1 |
| 66 | 8007 | Decal, Danger | 1 |
| 67 | 8032 | Decal, 100dB | 1 |

natural_image
Abstract camera aperture icon with no text or symbolsPOWER CRAFT®
GARDEN
ILLUSTRATION
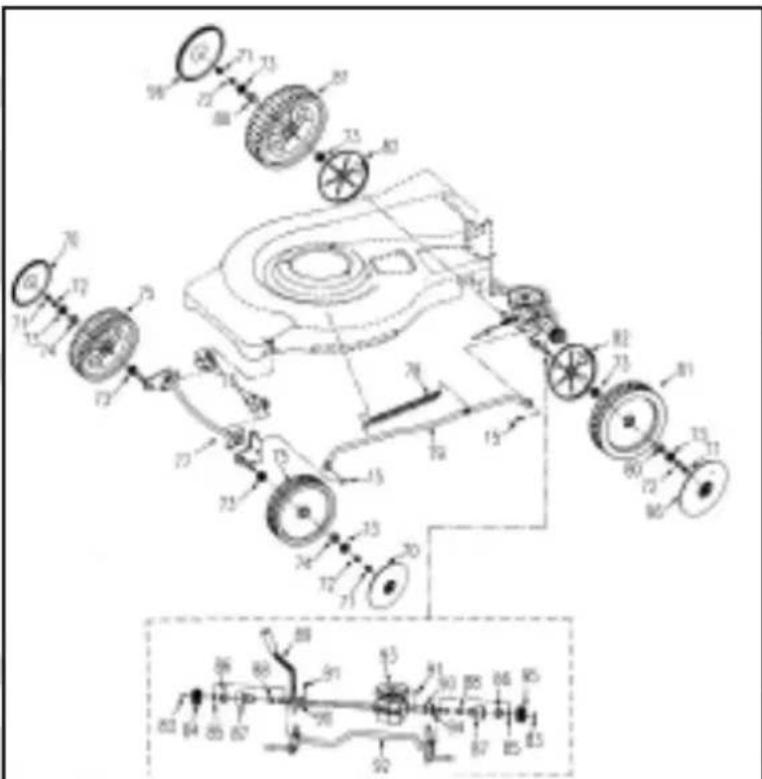
| REF NO. | PART NO. | DESCRIPTION | QTY. |
| 15 | XSZ56-1-17 | Hair Pin | 2 |
| 70 | XSZ56-9-02 | Hub Cap, Front Wheel | 2 |
| 71 | GB0182-66 | Nylon Insert Lock Nut M10mm | 4 |
| 72 | XSZ56-2-11 | Flat Washer | 4 |
| 73 | GB278-82 | Ball Bearing 80/101 | 8 |
| 74 | XSZ56-2-15 | Spacer, Front Wheel | 2 |
| 75 | XSZ56-9-01 | Wheel Assembly, Front 8"×2" | 2 |
| 76 | XSZ56A-2-14 | Nylon Bearing | 4 |
| 77 | WORD22-2-3 | Front Shaft Assembly | 1 |
| 78 | XSZ56-02 | Tension Spring | 1 |
| 79 | XSZ56A-2-2 | Haul Shark Seam | 1 |
| 80 | XSZ56-2-12 | Spacer, Rear Wheel | 2 |
| 81 | XSZ56-10-01 | Wheel Assembly, Rear 9"×2" | 2 |
| 82 | XSZ56-2-13 | Cover | 2 |
| 83 | GB866-86 | E-Clip 5mm | 2 |
| 84 | XSZ56-2-01 | Pinion Gear, Right | 1 |
| 85 | XSZ56-2-08 | Roll Pin | 2 |
| 86 | XSZ56-2-25 | Bearing 1/2" | 2 |
| 87 | XSZ56A-2-10 | Bearing Housing | 2 |
| 88 | XSZ56-2-16 | Bronze Bushing | 2 |
| 89 | XSZ56A-2-7 | Cutting Height Adjustment Lever | 1 |
| 90 | XSZ56-2-06 | E-Clip 19mm | 2 |
| 91 | GB079-86 | Spring Pin 5x10mm | 2 |
| 92 | WORD22-2-1 | Rear Axle Assembly | 1 |
| 93 | XSZ56-8 | Transmission1:5 | 1 |
| 94 | XSZ56-2-07 | Flat Washer | 1 |
| 95 | XSZ56-2-09 | Pinion Gear, Left | 1 |
| 96 | XSZ56-10-02 | Hub Cap, Rear Wheel | 2 |
ILLUSTRATION
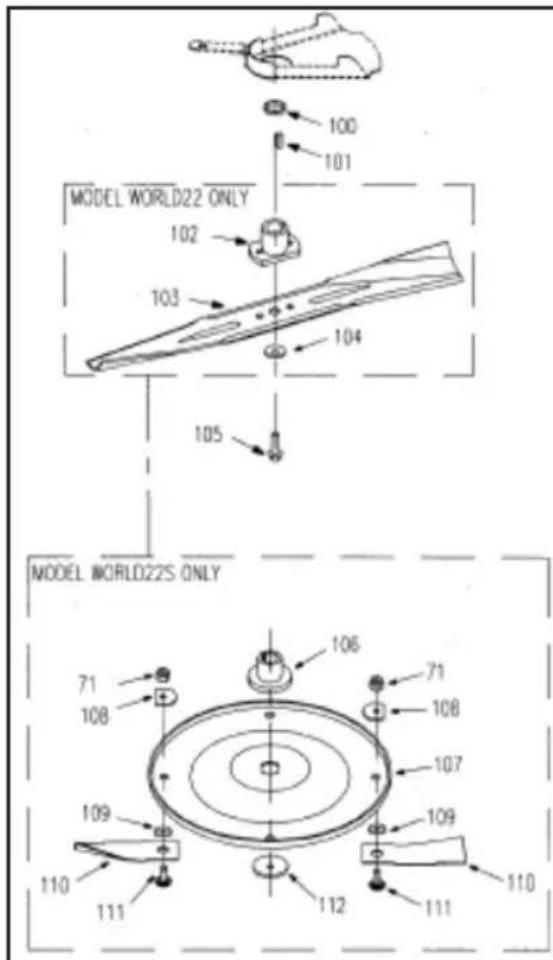
| REF NO. | PART NO. | DESCRIPTION | QTY. |
| 71 | GB6182-86 | Nylon insert Lock Nut M10mm | 2 |
| 100 | XSZ56-2-19 | Adapter Spacer | 1 |
| 101 | XSZ56-2-18 | Square Key | 1 |
| 102 | XSZ56-2.4 | Blade Adapter | 1 |
| 103 | XSZ56-2-04 | Blade | 1 |
| 104 | XSZ56-2-17 | Blade Washer | 1 |
| 105 | 2200010 | Hex Hd. Bolt 3/8" -24 /1" ×2" | 1 |
| 106 | WORD22-2-01 | Blade Adaptor | 1 |
| 107 | WORD 22-2.8-01 | Blade Hub | 1 |
| 108 | WORD18.4-02 | Slice pillow | 2 |
| 109 | WORD18.4-03 | Curved Washer | 2 |
| 110 | WORD18.4-05 | Blade | 2 |
| 111 | WORD18.4-01 | Blade Bolt M10mm | 2 |
| 112 | WORD18-04 | Blade Washer | 1 |
natural_image
Technical line drawing of a mechanical component with two views (no text or symbols)| REF NO. | PART NO. | DESCRIPTION | QTY. |
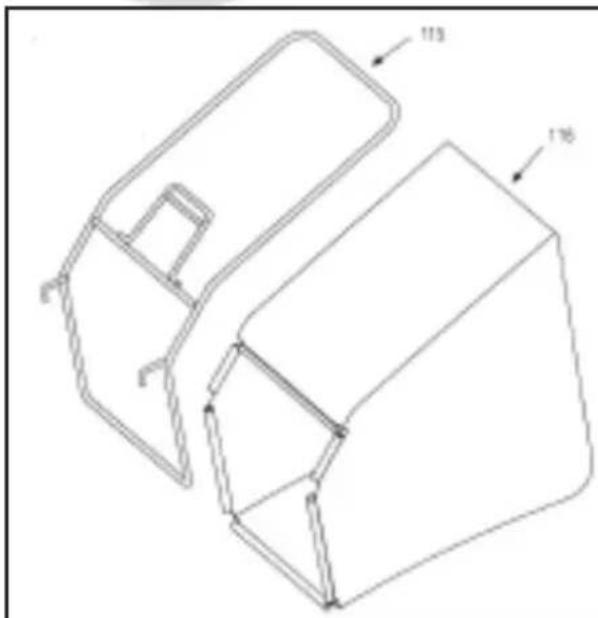
| 115 | XSZ58-3 | Bag Frame | 1 |
| 116 | XSZ58-4 | Fabric Bag | 1 |
CE-ERKLÆRING
CE mark placed: 2005
EC-DECLARATION OF CONFORMITY
Hereby, on our own responsibility declare that:
Is manufactured in compliance with the following:
98/37/EC: Safety of machinery with amendments.
73/23/EEC: Low tension directive.
89/336/EEC: EMC- directive + ( amendments 93/68/EEC )
STANDARDER, NORMER, NORMER, NORMIT, STANDARDS, NORMEN:
EN 836:1997+A1+A2
Brand : Power Craft
Model : 78503
Category : Lawn mower