721-396 - Lawn mower Meec Tools - Free user manual and instructions
Find the device manual for free 721-396 Meec Tools in PDF.


| Product Type | Lawn mower |
| Brand | Meec Tools |
| Model | 721-396 |
| Power Source | Electric corded, 230V |
| Motor Power | 1500 W |
| Cutting Width | 40 cm |
| Cutting Height Range | 25-75 mm |
| Cutting Height Positions | 6 |
| Grass Collector Capacity | 50 L |
| Mulching Function | Yes |
| Wheel Type | Plastic with grip |
| Folding Handle | Yes, for compact storage |
| Weight | 25 kg |
| Dimensions (L x W x H) | 1400 x 450 x 1000 mm |
| Noise Level | 90 dB(A) |
| Safety Features | Double switch safety, blade brake |
| Maintenance | Sharpen blade annually, clean after use |
| Spare Parts | Replacement blade available |
| Warranty | 2 years |
| Manual Languages | EN, NO, PL, SV |
Frequently Asked Questions - 721-396 Meec Tools
User questions about 721-396 Meec Tools
0 question about this device. Answer the ones you know or ask your own.
Ask a new question about this device
Download the instructions for your Lawn mower in PDF format for free! Find your manual 721-396 - Meec Tools and take your electronic device back in hand. On this page are published all the documents necessary for the use of your device. 721-396 by Meec Tools.
USER MANUAL 721-396 Meec Tools
natural_image
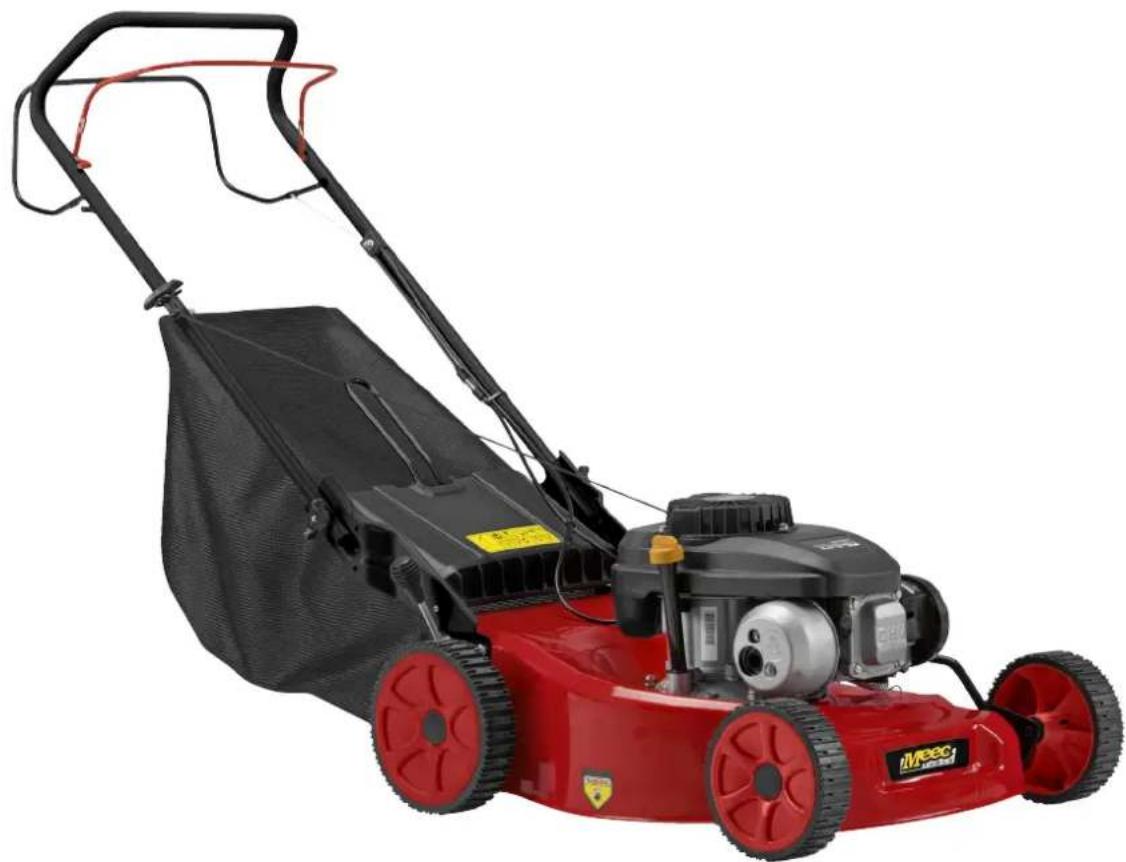
Red and black lawn mower with attached mesh cover and power unit (no visible text or symbols)EN User instructions for lawnmower
SE - Bruksanvisning i original
NO - Bruksanvisning i original
EN - Operating instructions in original
Date of production: 2015-06-08
© Jula AB
SVENSKA....5
SÄKERHETSANVISNINGAR....5
SAFETY INSTRUCTIONS 32
Description of symbols 34
TECHNICAL DATA 34
DESCRIPTION 35
ASSEMBLY 36
Handle 36
Grass collector 36
Cutting height 37
OPERATION....37
MAINTENANCE 38
Maintenance 38
Cleaning....39
Storage instructions....39
Troubleshooting....39
SÄKERHETSANVISNINGAR
natural_image
Close-up of a metallic mechanical component with rivets and bolts (no visible text or symbols)natural_image
Close-up of a mechanical clamp securing a car wheel (no visible text or symbols)GRÄSUPPSAMLARE
Montering
natural_image
Person working on a black rectangular device with wires and tools nearby (no visible text or symbols)Demontering
natural_image
Person assembling or adjusting a black rectangular object with wires and components (no visible text or symbols)KLIPPHÖJD
natural_image
Close-up of a hand adjusting a small mechanical component on a wheeled cart (no visible text or symbols)HANDHAVANDE
natural_image
Person using a walker with attached resistance band (no text or symbols visible)natural_image
Person standing in a mobility walker, wearing checkered shirt and pants (no visible text or symbols)natural_image
Three technical diagrams showing mechanical assembly and component views (no text or labels)RENGÖRING
natural_image
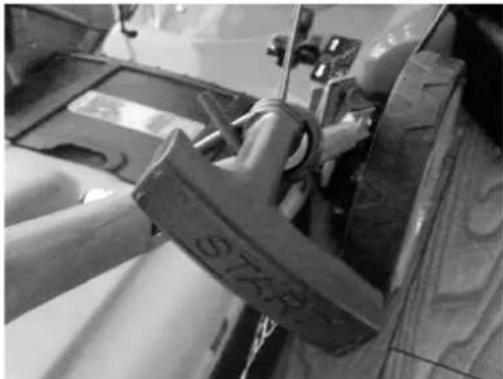
Close-up of a metallic mechanical component with bolts and grooves (no visible text or symbols)- Stram begge låseknottene.
- Sett fast vaierne med vedlagte plastringer.
- Plasser startsnoren med starthåndtaket i holderen dens.
natural_image
Close-up of a mechanical component with a metal clamp labeled 'STABR' (no readable text or symbols beyond label)GRESSOPPSAMLER
Montering
natural_image
Person working on a black electronic device with wires and components (no visible text or symbols)Demontering
natural_image
Person assembling or adjusting a black electronic device with wires and components (no visible text or symbols)KLIPPEH∅YDE
natural_image
Close-up of a hand using a small tool to clean or repair a large wheeled robot on a wooden floor (no visible text or symbols)HÄNDTERING
natural_image
Person using a walker with attached resistance band, standing indoors (no text or symbols visible)natural_image
Person standing in a wheelchair wearing a checkered shirt and pants, with wooden flooring visible below (no text or symbols)natural_image
Three technical diagrams showing mechanical components with no visible text or symbolsRENGJ∅RING
ADVARSEL! Spyl ikke av motoren. Vann kan skade motor og/eller drivstoffsystem.
natural_image
Close-up of a metallic mechanical component with ribbed texture and mounting holes (no visible text or symbols)natural_image
Close-up of a mechanical clamp or bracket with a wooden handle, no visible text or symbolsZBIORNIK NA TRAWE
Montaż
natural_image
Person assembling a black electronic device with wires and components (no visible text or symbols)Demontaż
natural_image
Person assembling or repairing a black electronic device with wires and components (no visible text or symbols)WYSOKOŚĆ KOSZENIA
natural_image
Close-up of a hand adjusting a small mechanical component on a wheeled cart (no visible text or symbols)OBSŁUGA
natural_image
Person using a walker with attached lever, standing indoors (no visible text or symbols)natural_image
Person standing in a mobility wheelchair, wearing a checkered shirt and pants (no visible text or symbols)natural_image
Three technical diagrams showing mechanical components and a rotating fan mechanism (no text or labels)CZYSZCZENIE
Read the operating instructions carefully before use!
Please retain for future reference.
• Always use the lawnmower with a grass collector or deflector fitted.
- Stop the engine before emptying the grass collector or adjusting the cutting height.
- Never place hands or feet under the lawnmower or under the ejection area while the engine is running.
- Remove all objects from the lawn before using the lawnmower.
- Keep children, pets and other people at a safe distance while using the lawnmower.
- Never lift the lawnmower while the engine is running.
- Never touch rotating blades.
- Never allow children or people unfamiliar with these instructions to use the lawnmower. Local regulations may impose an age limit.
- Never use the lawnmower if there are people, especially children, or pets in the vicinity.
- Remember that the user is responsible for accidents or any risk to other people and their property.
• Always wear sturdy shoes and long trousers when mowing. Do not wear open shoes, and never go barefoot.
- Examine the area where the lawnmower is to be used, and remove all objects which may be in the way.
WARNING! Petrol is highly flammable.
- Store fuel in a container specially designed for the purpose.
– Always refuel outdoors, and never smoke while refuelling. - Refuel before starting the engine. Never remove the petrol cap or refuel while the engine is running or while it is warm.
-
Do not start the engine if there is a petrol spillage. Remove the lawnmower from the spillage area and avoid causing sparks until the petrol has evaporated.
– Replace petrol tanks and caps safely. -
Replace damaged mufflers.
- Before using the lawnmower, always check the blades, blade bolts and cutting unit for wear and damage. At the same time, replace worn or damaged blades and bolts.
- Do not start the engine in an enclosed space where hazardous carbon dioxide fumes can accumulate.
- Only use the lawnmower in daylight or good artificial light.
- Do not use the lawnmower on wet grass.
- Be careful on sloping ground.
- Do not run with the lawnmower.
- Never operate the lawnmower up and down a slope; only operate it along the slope.
• Take care when changing direction on a slope. - Do not use the lawnmower on extremely steep slopes.
- Be careful when pulling the lawnmower towards the user.
- Stop the blades if the lawnmower has to be tilted to be moved across non-grass surfaces.
- Never use the lawnmower with a defective guard, or without protective equipment such as deflectors and/or grass collector.
- Do not change the engine's regulator setting, and do not rev the engine.
-
Disconnect all fastening devices before starting the engine.
-
Start the engine in accordance with the instructions and keep your feet away from the blades.
- Do not tilt the lawnmower when starting the engine.
- Do not start the engine if there is anyone standing in front of the ejector.
- Keep hands and feet away from rotating parts and from the ejector.
- Never lift or carry the lawnmower while the engine is running.
Stop the engine, loosen the spark plug lead, check that all moving parts have stopped completely and remove the key:
- when clearing the ejector.
- when inspecting, cleaning or servicing the lawnmower.
- after hitting an object. Check the lawnmower for damage and carry out any necessary repairs before using it again.
- if the lawnmower starts to vibrate more than usual.
Stop the engine, loosen the spark plug lead, check that all moving parts have stopped completely and remove the key:
– when leaving the lawnmower unattended.
– before refuelling.
- Reduce the throttle before stopping the engine. If the engine is fitted with a shut-off valve, the fuel supply should be shut off when the engine has stopped.
- Check that all nuts, bolts and screws are properly tightened.
- Never store the lawnmower with petrol in the tank in a place where petrol vapour might come into contact with open flames or sparks.
- Allow the engine to cool before storing the lawnmower.
- Minimise the risk of fire by keeping the engine, muffler and petrol tank free from grass, leaves and grease.
- Check the grass collector regularly for wear and damage.
- Replace worn or damaged parts.
- If the petrol tank has to be emptied, this should only be done outdoors.
DESCRIPTION OF SYMBOLS
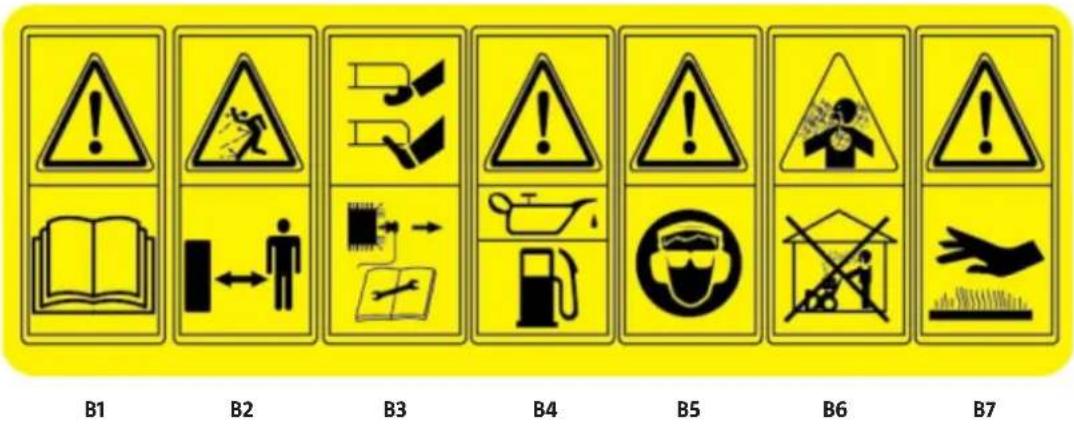
B1: Read the operating instructions carefully before use.
B2: Keep other people away from the work area.
B3: Risk of injury to hands and feet. Remove the spark plug before carrying out any repairs.
B4: Fuel is flammable; keep the lawnmower away from fire. Never fill the fuel tank while the engine is running.
B5: Wear protective glasses and ear protection while mowing.
B6: Hazardous exhaust fumes. Do not use the lawnmower in enclosed spaces with no ventilation.
B7: Hot surfaces.
TECHNICAL DATA
| Net weight 28,4 kg |
| Engine displacement 141 CC |
| Nominal engine output 2.4 kW |
| Nominal rpm 2 800 rpm |
| Cutting width 457 mm |
| Cutting height 25-75 mm |
| Propulsion Self-propelled |
| Collector volume 50 l |
| Sound pressure level, LpA: 81 dB(A), K= 2,5 d |
| Measured Sound power level, LwA: 94 dB(A), K= 2,5 dB |
| Guaranteed Sound power level, LwA: 96 dB(A), K= 2,5 dB |
| Vibration level: 6,8 m/s2, K= 1,5 m/s2 |
Always use hearing protection!
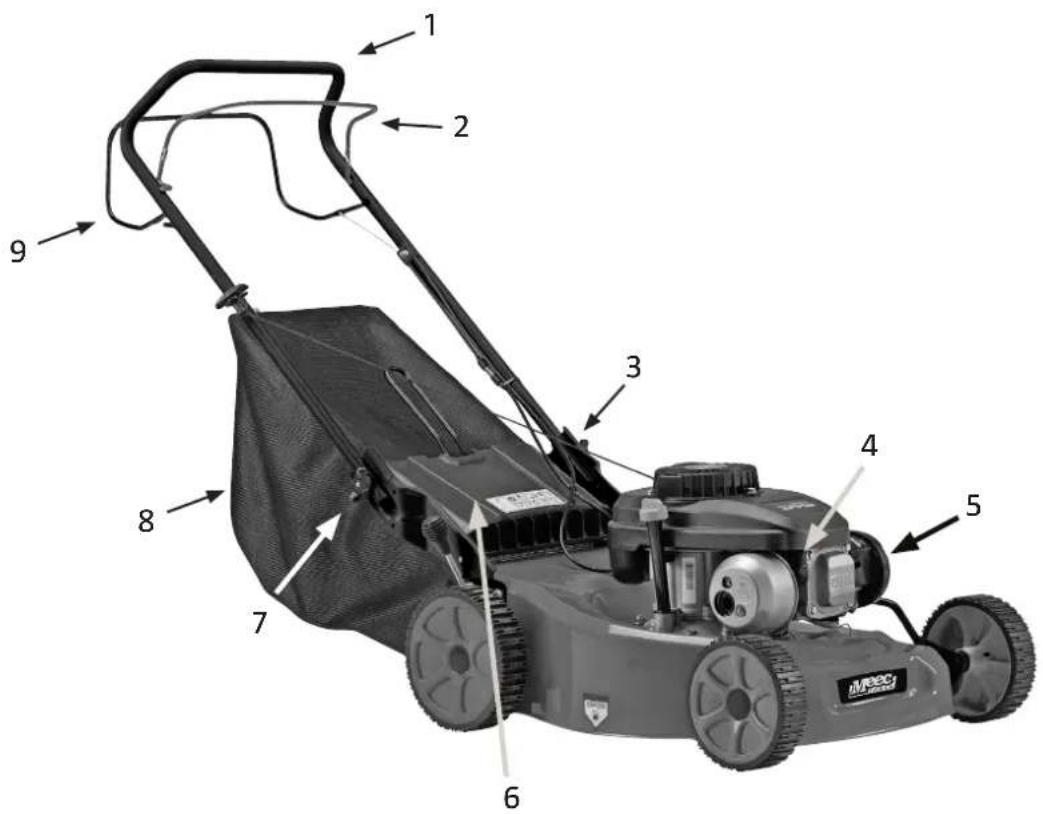
1 Handle 6 Rear cover
2 Brake lever 7 Adjustment screw, height
3 Quick connectors 8 Grass collector
4 Spark plug 9 Starting lever
5 Primer bulb
ASSEMBLY
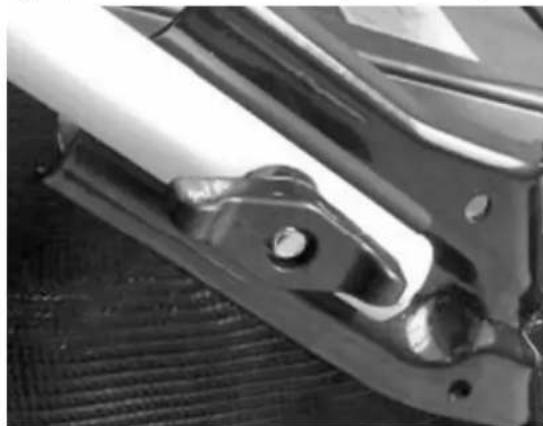
HANDLE
- Fit the upper part of the handle to the lower part with locking knobs.
natural_image
Close-up of a metallic mechanical component with rivets and bolts, resting on a textured surface (no visible text or symbols)- Tighten both locking knobs.
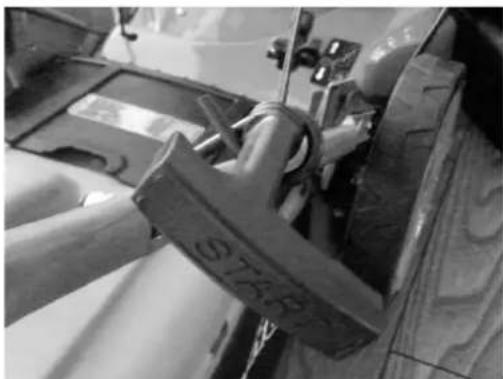
- Attach the cables with the plastic rings included.
- Place the starter cord, with its starting handle, in its holder.
natural_image
Close-up of a mechanical assembly with a metal clamp and tire, no visible text or symbolsGRASS COLLECTOR
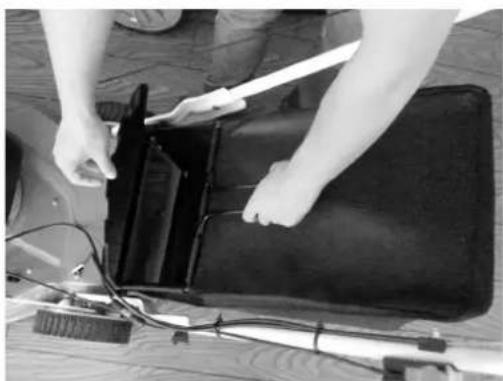
Installation
Raise the rear cover and hook the grass collector into place.
natural_image
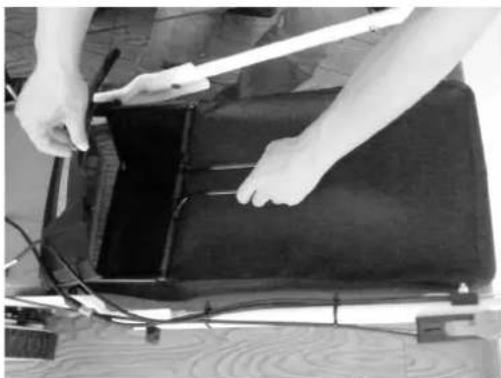
Person working on a black electronic device with wires and components (no visible text or symbols)Dismantling
Take hold of the grass collector and lift it upwards.
natural_image
Person assembling or adjusting a black rectangular object with wires and tools (no visible text or symbols)CUTTING HEIGHT
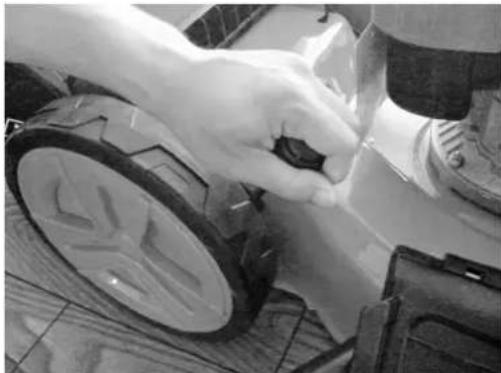
Loosen the lever by pressing outwards. Adjust the cutting height by moving the lever forwards or backwards.
natural_image
Close-up of a hand using a power tool to clean or repair a small white object on a wooden lawn (no text or symbols visible)OPERATION
IMPORTANT! Read the engine manual and fill with petrol and oil before using the lawnmower.
Starting the engine
Start the engine as follows, after checking petrol and oil.
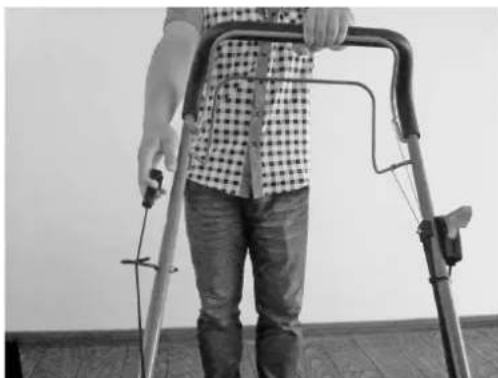
- Stand behind the lawnmower, take hold of the brake lever and press it against the upper handle.
- Take hold of the brake lever and quickly pull up the starter cord. Slowly release the starter cord after the engine has started. The engine and blades stop when the brake lever is released.
- Adjust the speed using the throttle fitted on the handle.
natural_image
Person using a walker with adjustable straps, standing indoors (no text or symbols visible)NB The blades rotate when the engine has been started. Hold the brake lever in the working position when the lawnmower is in operation. The engine stops when the brake lever is released.
Forward operation
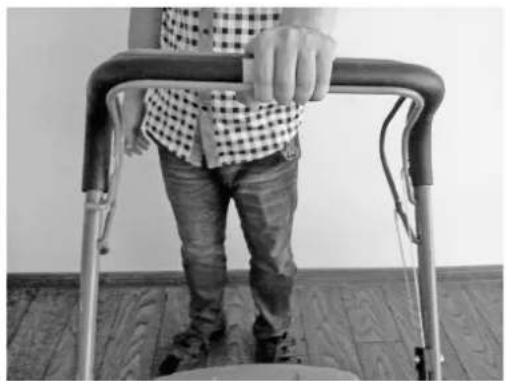
The lawnmower moves forward automatically when the starting lever is held in. Hold the lever firmly with both hands while the lawnmower is in operation.
natural_image
Person standing in a mobility walker, wearing a checkered shirt and pants (no visible text or symbols)Stopping the engine and the lawnmower
Stop the engine and blades by releasing the brake lever.
Grass collector
Empty and clean the bag, and check that the ventilation net is not clogged.
MAINTENANCE
MAINTENANCE
Warning! Stop the engine and loosen the spark plug lead before carrying out repairs and maintenance.
- Maintenance instructions for the engine can be found in the engine manual.
- Stop the engine and loosen the spark plug lead before carrying out repairs or maintenance.
• Information about four-stroke engines can be found in the engine manual. Check the oil level regularly, and add or change oil as necessary. - Check the lawnmower regularly to ensure that all grass has been removed from the cutting cover.
- Grease the wheel axle and bearings regularly.
- Check the blades frequently; they should always be sharp and well balanced.
- Check regularly to ensure that bolts and screws are tight. Worn or loose nuts can damage the engine or chassis.
- If the blades hit an object with force, the lawnmower should be stopped and taken in for servicing.
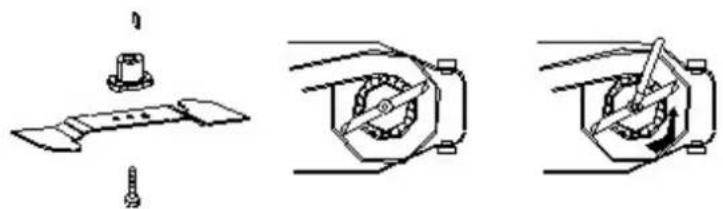
The blades are made of pressed steel. Ensure that the blades are sharp by whetting them regularly, after about 25 hours of operation. Ensure that the blades are always well balanced.
IMPORTANT! Only use original spare parts. Using spare parts of inferior quality may result in the risk of injury or damage.
natural_image
Three technical diagrams showing mechanical assembly and rotation, with no visible text or symbols.CLEANING
WARNING! Do not rinse the engine with water. Water can damage the engine and/or fuel system.
-
Wipe the cover with a dry cloth.
-
Rinse under the cover by tilting the lawnmower so that the spark plug is pointing upwards.
-
Instructions for cleaning the engine can be found in the separate engine manual.
STORAGE INSTRUCTIONS
Prepare the lawnmower for storage as follows.
- After the lawnmower has been used for the last time at the end of the season, fuel remaining in the tank should be used up.
- Clean and lubricate the lawnmower carefully, following the instructions.
- Storage instructions for the engine can be found in the engine manual.
- Prevent the blades from rusting by lubricating them with chassis grease.
- Store the lawnmower in a clean, dry place.
NB
- Take steps to prevent the lawnmower from rusting if it is to be stored in an unventilated area or a toolshed. Lubricate the lawnmower, especially the leads and all moving parts, with oil or silicone.
- Check that the leads are not bent.
- If the starter cord comes out of its holder, the spark plug lead should be disconnected and earthed. Press the blade control handle down and carefully pull the starter cord out of the engine. Feed the starter cord into the holder on the handle.
TROUBLESHOOTING
| PROBLEM POSSIBLE CAUSE ACTION | ||
| The engine does not start. | The choke handle is not in the correct position. | Move the choke handle to the correct position. |
| The fuel tank is empty. Fill the tank with fuel. Further information can be found in the ENGINE HANDBOOK. | ||
| The air filter is dirty. Clean the air filter. | Further information can be found in the ENGINE HANDBOOK. | |
| The spark plug is loose. Tighten the spark plug to 25-30 Nm. | ||
| The spark plug lead is loose or disconnected from the plug. | Connect the spark plug lead to the spark plug. | |
| The spark plug gap is incorrect. Set the gap between the electrodes to between 0.7 and 0.8 mm. | ||
| The spark plug is damaged. Install a new spark plug with the correct gap. Further information can be found in the ENGINE HANDBOOK. | ||
| The carburettor is full of fuel. Remove the air filter and pull on the starter cord until the carburettor is cleared; then replace the air filter. | ||
| Damaged ignition module. | Contact the service centre. | |
| The engine is difficult to start or loses power. | Dirt, water or blocked fuel tank. Empty | the fuel out and clean the tank. Fill the tank with clean new fuel. |
| The ventilation opening in the fuel tank cap is blocked. | Clean or replace the fuel tank cap. | |
| The air filter is dirty. Clean the air filter. | ||
| The engine runs irregularly. | The spark plug is broken. Install a new | spark plug with the correct gap. Further information can be found in the ENGINE HANDBOOK. |
| The spark plug gap is incorrect. Set the | gap between the electrodes to between 0.7 and 0.8 mm. | |
| The air filter is dirty. Clean the air filter. | Further information can be found in the ENGINE HANDBOOK. | |
| Problem with idling. | The air filter is dirty. Clean the air filter. | Further information can be found in the ENGINE HANDBOOK. |
| The engine fan cover is blocked. Remove the dirt. | ||
| The cooling fins and air ducts under the engine's fan housing are blocked. | Remove dirt from the cooling fins and air ducts. | |
| The engine jumps when run at high speed. | The gap between the spark plug's electrodes is too small. | Set the gap between the electrodes to between 0.7 and 0.8 mm. |
| The engine overheats. | The flow of cooling air is restricted. Remove dirt from the fan cover, fan housing and air ducts. | |
| Incorrect spark plug. Fit the engine with a spark plug and cooling fins. | ||
| The engine vibrates abnormally. | The cutting unit is loose. Tighten the blades. | |
| The cutting unit is unbalanced. Balance the blades. | ||
Jula reserves the right to make changes. In the event of problems, please contact our service department. www.jula.com
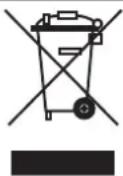
Care for the environment!
Must not be discarded with household waste! This product contains electrical or electronic components that should be recycled. Leave the product for recycling at the designated station e.g. the clocal authority's recycling station.
CE
EC DECLARATION OF CONFORMITY
EG FÖRSÄKRAN OM ÖVERENSSTÄMMELSE
EF SAMSVARSERKLÆRING
DEKLARACJA ZGODNOŚCI WE

Jula AB, Box 363, SE-532 24 SKARA, SWEDEN
certify that the design and manufacturing of this product
Machinery Directive 2006/42/EC
EN ISO 5395-1:2013, EN ISO 5395-2:2013
Electromagnetic Compatibility Directive 2004/108/EC
EN ISO 14982:2009
Outdoor Noise Directive 2000/14/EC, amended by 2005/88/EC
Where applicable, name and address of the notified body involved:
This product was CE marked in year -15
Name and address of the person authorised to compile the technical file:
- SVENSKA....5
- SÄKERHETSANVISNINGAR....5
- SÄKERHETSANVISNINGAR
- GRÄSUPPSAMLARE
- Montering
- Demontering
- KLIPPHÖJD
- HANDHAVANDE
- RENGÖRING
- GRESSOPPSAMLER
- KLIPPEH∅YDE
- HÄNDTERING
- RENGJ∅RING
- ZBIORNIK NA TRAWE
- Montaż
- Demontaż
- WYSOKOŚĆ KOSZENIA
- OBSŁUGA
- CZYSZCZENIE
- Read the operating instructions carefully before use!
- WARNING! Petrol is highly flammable.
- ASSEMBLY
- HANDLE
- GRASS COLLECTOR
- Installation
- Dismantling
- CUTTING HEIGHT
- OPERATION
- Starting the engine
- Forward operation
- Stopping the engine and the lawnmower
- MAINTENANCE
- CLEANING
- STORAGE INSTRUCTIONS
- NB
- Care for the environment!
- CE
- EC DECLARATION OF CONFORMITY
- EG FÖRSÄKRAN OM ÖVERENSSTÄMMELSE
- EF SAMSVARSERKLÆRING
- DEKLARACJA ZGODNOŚCI WE
- This product was CE marked in year -15
Brand : Meec Tools
Model : 721-396
Category : Lawn mower