Twin Cangaroo - Stroller Emmaljunga - Free user manual and instructions
Find the device manual for free Twin Cangaroo Emmaljunga in PDF.


| Product Type | Twin Stroller (Pushchair/Pram convertible) |
| Brand | Emmaljunga |
| Model | Twin Cangaroo |
| Dimensions (Outer L x W) | 800 mm x 330 mm |
| Maximum Child Weight per Seat | 15 kg (33 lb) |
| Age Range (Seat Unit) | From 6 months (when child can sit unaided) to 3 years |
| Age Range (with Carrycot) | From birth (max 9 kg per carrycot, for one child only) |
| Number of Children | 2 (twin) or 1+1 sibling with accessory |
| Compliance | EN 1888:2005 |
| Harness Type | 5-point harness (adjustable) |
| Front Wheels | Swivel 360° (lockable for uneven terrain) |
| Rear Wheels | Fixed, with foot brake |
| Folding | Yes, with safety catch; handle folds for compact storage |
| Handle Height | Adjustable (grey buttons) |
| Weight (Approx., Chassis Only) | Approximately 14 kg (31 lb) – not specified in manual |
| Basket Capacity | 5 kg (11 lb) – shopping tray |
| Hood | Twin hood (adjustable), separate single hood for sibling mode |
| Bumper Bar | Removable and adjustable, with fabric cover |
| Convertible Modes | Twin pushchair, twin pram (with carrycots), sibling pram |
| Care Instructions | Hand wash fabrics in lukewarm water; drip dry; lubricate axles every 3 months |
| Safety Features | Locking chassis, parking brake, 5-point harness, safety catch |
Frequently Asked Questions - Twin Cangaroo Emmaljunga
User questions about Twin Cangaroo Emmaljunga
0 question about this device. Answer the ones you know or ask your own.
Ask a new question about this device
Download the instructions for your Stroller in PDF format for free! Find your manual Twin Cangaroo - Emmaljunga and take your electronic device back in hand. On this page are published all the documents necessary for the use of your device. Twin Cangaroo by Emmaljunga.
USER MANUAL Twin Cangaroo Emmaljunga
IMPORTANT INFORMATION. KEEP FOR FUTURE REFERENCE. FOR THE PROPER USE OF THIS VEHICLE, BE SURE TO READ THIS USER'S MANUAL CAREFULLY. This product complies with EN 1888:2005
This product is intended as a means of transportation for two (2) children aged 6 months to 3 years, with a maximum weight of 15 kg. With the Twin Cangaroo Carrycot (original accessory), the pushchair can be used from birth.
Warning! The seat unit is not intended for children under 6 months. The seat unit can be used when the child is old enough to sit unaided.
This product is not intended for jogging, skating/inlines. The outer length/width is 800mm/330 mm.
Warning! The Twin Cangaroo Carrycot is only intended for one child, which cannot sit unaided, roll over to the side or stand up on hands or knees. Maximum weight of the child in the carrycot is 9kg.
Warning! Do not use the Twin Cangaroo Carrycot on a stand.
FI
natural_image
Person assisting a person in a wheelchair with patterned back cover (no text or symbols visible)2
natural_image
Close-up of a person adjusting a jacket with numbered buttons and an upward arrow (no text or symbols visible)3
natural_image
Person adjusting a black jacket with a zipper, no visible text or symbols4
natural_image
Close-up of hands adjusting a black fabric or garment with a zipper (no visible text or symbols)5
natural_image
Close-up of hands adjusting a black object with a circular symbol, no visible text or symbolsManual Twin Cangaroo v. 1.0
natural_image
Close-up of hands adjusting a small black object on a dark surface, with no visible text or symbols.natural_image
Close-up of a mechanical component with grid and mounting brackets (no visible text or symbols)natural_image
Close-up of hands adjusting a metal object on a dark surface (no visible text or symbols)natural_image
Close-up of hands adjusting a black fabric or garment with a metal clip (no visible text or symbols)natural_image
Person handling a black garment with patterned fabric underneath (no visible text or symbols)natural_image
Close-up of a hand adjusting a dark fabric or material on a car surface (no visible text or symbols)natural_image
Close-up of hands adjusting a black mechanical component with a circular mark (no visible text or symbols)natural_image
Black tactical vest with multiple pockets and straps, mounted on a stand (no visible text or symbols)natural_image
Close-up of a rope tied with a metal bracket, showing mesh texture and a black cable (no text or symbols visible)natural_image
Mechanical assembly showing a vehicle wheel and suspension components with numbered parts (8 and 7), no visible text or symbols.17
natural_image
Close-up of a mechanical component with a numbered arrow pointing to a specific part (no visible text or symbols)18
19
20
MONTERA BÅDA BAKHJULEN
natural_image
Close-up of a hand adjusting a black jacket on a bicycle wheel (no visible text or symbols)natural_image
Close-up of a bicycle wheel and suspension system with a numbered arrow indicating direction (no text or symbols on the diagram itself)natural_image
Close-up of a black exercise chair with two side panels, no visible text or symbolsnatural_image
Close-up of hands adjusting a black belt buckle (no text or symbols visible)natural_image
Close-up of a fabric strap with an arrow indicating compression or texture (no text or symbols visible)2
natural_image
Illustration of a mechanical device with a rotating arrow indicating motion (no text or symbols)3
4
natural_image
Black and white photo of a baby stroller with twin panels and wheels (no text or symbols visible)5
natural_image
Close-up of a hand adjusting a small mechanical component on a motorcycle wheel (no visible text or symbols)JUSTERING AV RYGGSTÖDET
natural_image
Close-up of a hand adjusting a bicycle wheel component with a tool (no visible text or symbols)natural_image
Person installing or adjusting a metal frame structure with arrows indicating motion (no text or symbols visible)natural_image
Close-up of a bicycle's wheel and foot assembly with a hand adjusting the wheel (no visible text or symbols)natural_image
Diagram of a vehicle chassis frame with labeled component '3' (no text or symbols beyond label)Fälla in styreshandtaget
natural_image
Person adjusting a black and patterned backpack (no visible text or symbols)MONTERA AV SITTDELSKLÄDSELN
natural_image
Close-up of hands using a tool to adjust or install a mechanical component (no visible text or symbols)natural_image
Close-up of a mechanical bicycle suspension system with labeled parts (no text or symbols beyond label)natural_image
Close-up of a mechanical lever mechanism with a hand adjusting the part (no visible text or symbols)MONTERA ADAPTORERNA SOM SITTER MOT STYRESRÖRET
natural_image
Close-up of hands using a tool to adjust or install a mechanical component (no visible text or symbols)MONTERA ADAPTORERNA SOM SITTER MOT STYRESRÖRET (forts)
natural_image
Close-up of a black metal blade with cutouts and an arrow indicating direction (no text or symbols)MONTERA ADAPTORERNA SOM SITTER MOT MITTSTAGET
natural_image
Close-up of a hand using a tool to adjust or install a mechanical component (no visible text or symbols)MONTERA ADAPTORERNA SOM SITTER MOT MITTSTAGET
natural_image
Close-up of hands using a metal tool to adjust a curved metal object (no visible text or symbols)MONTERA ADAPTORERNA SOM SITTER MOT MITTSTAGET
natural_image
Close-up of hands adjusting a metal tool with a clip (no visible text or symbols)MONTERA ADAPTORERNA SOM SITTER MOT MITTSTAGET
natural_image
Close-up of hands using a tool to adjust or install a mechanical component (no visible text or symbols)natural_image
Close-up of hands using a tool to adjust a bicycle wheel (no text or symbols visible)natural_image
Person adjusting a patterned backpack on a chair (no visible text or symbols)natural_image
Close-up of a hand pressing down on a dark fabric or cloth component (no visible text or symbols)natural_image
Person assisting another person in a wheelchair seat, no visible text or symbolsnatural_image
Close-up of hands using a tool to adjust or install a metal bicycle component (no visible text or symbols)natural_image
Close-up of a mechanical support structure with labeled component '1' (no text or symbols beyond label)natural_image
Close-up of a hand using a metal tool to cut a mechanical part (no text or symbols visible)MONTERA ADAPTORN SOM SITTER MOT STYRESRÖRET
natural_image
Close-up of hands using a tool to adjust or install a mechanical component (no visible text or symbols)natural_image
Close-up of a hand holding a metal bicycle handle with a black bracket and tool, no visible text or symbolsnatural_image
Close-up of a hand using a tool to adjust or install a mechanical component (no visible text or symbols)MONTERA ADAPTORN SOM SITTER MOT MITTSTAGET
natural_image
Black and white photo of a baby stroller with patterned back cover (no text or symbols visible)natural_image
Close-up of hands using a tool to adjust or install a metal component (no visible text or symbols)natural_image
Close-up of hands using a tool to adjust or install a mechanical component (no visible text or symbols)natural_image
Person assisting a person in a wheelchair seat, no visible text or symbolsnatural_image
Close-up of hands adjusting a small object on a dark garment (no visible text or symbols)natural_image
Close-up of a mechanical component with labeled parts (1 and 2), no readable text or symbols beyond labelsnatural_image
Close-up of a person wearing a patterned black and white outfit, holding a dark jacket (no visible text or symbols)natural_image
Close-up of a person wearing a black stroller with patterned fabric, seated in a wheelchair (no visible text or symbols)natural_image
Black and white photo of a baby stroller with patterned back cover and wheels (no text or symbols visible)natural_image
Diagram of a bathtub with two arrows pointing to the interior area (no text or symbols)natural_image
Line drawing of a hand using a tool to cut a piece of material, with arrows indicating the process (no text or symbols present)natural_image
Close-up of a car wheel rim and wheelbase (no text or symbols visible)7
natural_image
Line drawing of a car seat assembly with directional arrows indicating rotation (no text or symbols)8
9
natural_image
Close-up of a person using a laptop to adjust or install a seatbelt (no visible text or symbols)10
natural_image
Black and white photo of a two-wheeled baby stroller with two black-and-white rearcases (no text or symbols visible)Manual Twin Cangaroo v. 1.0
ANVÄNDA BROMSEN
natural_image
Person assisting a person in a wheelchair seatbelt (no visible text or symbols)natural_image
Close-up of a person adjusting a jacket with a numbered detail (no visible text or symbols)ADVARSEL
natural_image
Person adjusting a black jacket with a metal clip (no visible text or symbols)natural_image
Close-up of hands adjusting a dark fabric or cushion component (no visible text or symbols)natural_image
Close-up of hands adjusting a black mechanical component with a circular base (no visible text or symbols)natural_image
Close-up of hands adjusting a small black object on a dark surface, with no visible text or symbols.natural_image
Close-up of a mechanical component with grid and mounting brackets (no visible text or symbols)natural_image
Close-up of hands adjusting a metal object on a dark surface (no visible text or symbols)Fastgør ryglænsremmene, som sidder bagpå hver ryglæn, rundt om styrstangen og rundt om midterstangen med trykknapperne (totalt 4 stk. trykknapper).
natural_image
Close-up of hands adjusting a black fabric or garment with a metal clip (no visible text or symbols)natural_image
Person handling a black garment with patterned fabric underneath (no visible text or symbols)natural_image
Close-up of a hand pressing down on a dark fabric or material surface (no visible text or symbols)natural_image
Close-up of hands adjusting a black mechanical component with a circular base (no visible text or symbols)natural_image
Back view of a black backpack with multiple compartments and straps (no visible text or symbols)natural_image
Close-up of a mechanical cable being tied with a spring, no visible text or symbolsnatural_image
Close-up of a mechanical component with a numbered arrow pointing to a specific part (no visible text or symbols)18
19
20
natural_image
Close-up of hands fastening a bicycle seatbelt with a numbered component (15), no visible text or symbols beyond the number.natural_image
Close-up of a hand adjusting a black jacket on a bicycle wheel (no visible text or symbols)natural_image
Close-up of a bicycle's wheel and suspension system with a numbered arrow indicating direction (no text or symbols on the diagram itself)natural_image
Close-up of a black athletic equipment with ribbed plates and a white cable inserted (no visible text or symbols)natural_image
Close-up of hands adjusting a black belt buckle (no text or symbols visible)natural_image
Close-up of a person's arm holding a rope tied with a strap, showing a black arrow indicating direction (no text or symbols visible)natural_image
Illustration of a mechanical device with a rotating arrow indicating motion (no text or symbols)Anvend bremsen
natural_image
Black and white photo of a baby stroller with twin wheels and a canopy cover (no text or symbols visible)natural_image
Close-up of a hand adjusting a car wheel handle with a numbered callout (19), no visible text or symbols on the diagram itself.natural_image
Close-up of a hand adjusting a car tire component (no visible text or symbols)Inden du klapper vognen sammen skal forhjulene rotere frit.
natural_image
Person operating a bicycle tire with a wheel, no visible text or symbolsnatural_image
Close-up of a motorcycle's wheel and foot assembly with a hand adjusting the wheel (no visible text or symbols)natural_image
Diagram of a vehicle chassis frame with labeled component '3' (no text or symbols beyond label)Fold styret ind
natural_image
Person assembling a patterned backpack in a small vehicle (no visible text or symbols)natural_image
Close-up of hands using a tool to adjust or install a bicycle wheel (no visible text or symbols)natural_image
Close-up of a mechanical support structure with labeled component '1' (no text or symbols beyond label)natural_image
Close-up of a mechanical lever mechanism with a hand adjusting the part (no visible text or symbols)natural_image
Close-up of hands using a tool to adjust or install a mechanical component (no visible text or symbols)natural_image
Close-up of a black metal bracket with a white slot and an arrow pointing to it (no text or symbols visible)natural_image
Close-up of a hand using a tool to adjust or install a mechanical component (no visible text or symbols)natural_image
Close-up of hands using a tool to adjust a metal rod (no text or symbols visible)natural_image
Close-up of hands adjusting a metal tool with a handle (no visible text or symbols)natural_image
Close-up of hands using a tool to adjust or install a mechanical component (no visible text or symbols)natural_image
Close-up of hands using a tool to adjust or install a mechanical component (no visible text or symbols)natural_image
Person adjusting a child's seatbelt in a wheelchair (no visible text or symbols)natural_image
Close-up of a hand pressing down on a dark fabric or cloth component (no visible text or symbols)natural_image
Person assisting another person in a wheelchair seat, no visible text or symbolsnatural_image
Close-up of hands using a tool to adjust or install a metal pipe clamp (no text or symbols visible)natural_image
Close-up of a mechanical support structure with labeled component '1' (no text or symbols beyond label)natural_image
Close-up of a hand holding a metal tool with a clamped band (no text or symbols visible)MONTERINGF AF ADAPTERN SOM SIDDER MOD STYRBENET.
natural_image
Close-up of hands using a tool to adjust or install a mechanical component (no visible text or symbols)Fastgør skruerne, med låsemøtrikkerne på ydersiden•
7
natural_image
Close-up of a hand holding a metal pipe with a black clamp and tool, no visible text or symbolsnatural_image
Close-up of a hand using a tool to adjust or install a mechanical component (no visible text or symbols)MONTERINGF AF ADAPTERN SOM SIDDER MOD MIDTERR∅RET.
natural_image
Black and white photo of a baby stroller with patterned back cover (no text or symbols visible)natural_image
Close-up of hands using a tool to adjust or install a metal component (no visible text or symbols)natural_image
Close-up of hands using a tool to adjust or install a mechanical component (no visible text or symbols)natural_image
Person assisting a person in a wheelchair seat, no visible text or symbolsnatural_image
Close-up of hands adjusting a small object with a tool, wearing a patterned jacket (no visible text or symbols)natural_image
Close-up of a person wearing a black and white patterned children's seatbelt, no visible text or symbolsnatural_image
Close-up of a person wearing a black stroller with patterned back cover, seated in a wheelchair (no visible text or symbols)natural_image
Black and white photo of a baby stroller with patterned back cover and wheels (no text or symbols visible)natural_image
Line drawing of a car interior with two arrows pointing to the seat area (no text or symbols)• Læg madrassen i vognen (3).
ADVARSEL
natural_image
Line drawing of a hand using a tool to cut or adjust a piece of material, with arrows indicating the process (no text or symbols present)natural_image
Close-up of a car wheel rim and wheelbase (no text or symbols visible)Anvend bremsen
natural_image
Line drawing of a car seat assembly with directional arrows indicating rotation (no text or symbols)Justere kalechen
natural_image
Illustration of a hand adjusting a car seatbelt with a downward arrow and a small mechanical device (no text or symbols)natural_image
Close-up of a person wearing a dark jacket and holding a small object, seated on a chair (no visible text or symbols)Twin City Bag tages af vognen
natural_image
Black and white photo of a two-wheeled baby stroller with two rear covers (no text or symbols visible)Billede 10 viser Twin Cangaroo med 2 stk. Twin City Bag.
natural_image
Person assisting a person in a black jacket with patterned bedding (no visible text or symbols)Om du vil montere sportsvogntrekket skal adapterne vare avmontert.
natural_image
Close-up of a person adjusting a jacket with a numbered detail (no visible text or symbols)natural_image
Person adjusting a black jacket with a metal clip (no visible text or symbols)natural_image
Close-up of hands adjusting a black fabric or cushion component (no visible text or symbols)natural_image
Close-up of hands adjusting a black mechanical component with a circular base (no visible text or symbols)natural_image
Close-up of hands adjusting a small black object on a dark fabric surface (no visible text or symbols)natural_image
Close-up of a mechanical component with mesh grid and structural supports (no visible text or symbols)natural_image
Close-up of hands adjusting a mechanical component (no visible text or symbols)natural_image
Close-up of hands holding a black fabric piece with metal pins, no visible text or symbolsnatural_image
Person handling a black garment with patterned fabric (no visible text or symbols)natural_image
Close-up of a hand adjusting a dark fabric or material on a surface (no visible text or symbols)Dra fliken over midtglidlåsen og fest med lynlåsen. Det er viktig at • fliken festes ordentlig.
ADVARSEL
natural_image
Close-up of hands adjusting a black wristband with a circular button, next to a bicycle wheel (no visible text or symbols)natural_image
Black tactical vest with multiple pockets and straps, mounted on a stand (no visible text or symbols)natural_image
Close-up of a bicycle seatbelt with mesh strap and metal frame (no text or symbols visible)natural_image
Close-up of a car tire assembly with labeled parts 7 and 8, showing mechanical components without any readable text or symbols.17
natural_image
Close-up of a mechanical component with a numbered arrow pointing to a specific part (no visible text or symbols)18
19
20
natural_image
Close-up of hands tying a knot on a bicycle, showing fabric and rope details (no text or symbols)natural_image
Close-up of a hand adjusting a black jacket on a bicycle wheel (no visible text or symbols)natural_image
Close-up of a bicycle tire with a hand adjusting the wheel, showing a numbered arrow pointing to the wheel (no text or symbols on the diagram itself)natural_image
Close-up of a fabric garment with a numbered label pointing to a seam detail (no readable text or symbols)natural_image
Close-up of a black mechanical device with two side panels, no visible text or symbolsnatural_image
Close-up of hands adjusting a black belt buckle (no text or symbols visible)- Fest varekurvens bakre bänd med spennen som bildet viser.
natural_image
Close-up of a fabric strap with an arrow indicating compression or texture (no text or symbols visible)natural_image
Illustration of a mechanical device with a rotating arrow indicating motion (no text or symbols)Bruk av bremsen
natural_image
Black and white photo of a baby stroller with twin wheels and a canopy cover (no text or symbols visible)ADVARSEL
- Bruk alltid selen när barnet sitter i vognen.
- Kontroller at selen er fastgjort til vognens trekk.
Justering av handtaket
natural_image
Close-up of a hand adjusting a bicycle wheel rim with a wrench, no visible text or symbolsLa framhjulene rotere fritt 360
For å kunne manøvrere vognen, la framhjulene rotere fritt i 360 gra- der.
natural_image
Close-up of a hand using a tool to adjust or install a car wheel (no visible text or symbols)natural_image
Person installing or adjusting a metal frame with a wheel, no visible text or symbolsnatural_image
Close-up of a motorcycle's wheel and foot assembly with a hand adjusting the wheel (no visible text or symbols)natural_image
Diagram of a vehicle chassis frame with labeled component '3' (no text or symbols beyond label)VIKTIG
natural_image
Person assembling a patterned backpack in a small vehicle (no visible text or symbols)natural_image
Close-up of hands using a tool to adjust or install a bicycle wheel (no visible text or symbols)natural_image
Close-up of a mechanical support structure with labeled component '1' (no text or symbols beyond label)natural_image
Close-up of a mechanical lever mechanism with a hand adjusting the part (no visible text or symbols)MONTERE ADAPTERNE SOM SITTER MOT HANDTAGSBENET
natural_image
Close-up of hands using a tool to adjust or install a mechanical component (no visible text or symbols)natural_image
Close-up of a black metal bracket with a white slot and an arrow pointing to it (no text or symbols visible)MONTER ADAPTERENE SOM SITTER MOT MIDT BenET
natural_image
Close-up of a hand adjusting a mechanical lever mechanism (no visible text or symbols)- Før skruen igjennom metallet – midtbenet – metallet og fest den med mutteren på utsiden(bruk ikke kuppelmutteren!). Dra til skruen.
VIKTIG
natural_image
Close-up of hands using a metal tool to adjust a curved metal object (no text or symbols visible)natural_image
Close-up of hands adjusting a metal tool with a handle (no visible text or symbols)natural_image
Close-up of hands using a tool to adjust or install a mechanical component (no visible text or symbols)natural_image
Close-up of hands using a tool to adjust or install a metal pipe fitting (no visible text or symbols)Monter frambøylen med hjelp av de skruer som du tok vare på • sammen med frontbøylen. Mutterene skal sitte på utsiden av handtagsbenet. •
3
natural_image
Person adjusting a child's seatbelt in a wheelchair (no visible text or symbols)natural_image
Close-up of a hand pressing down on a dark fabric or cloth component (no visible text or symbols)natural_image
Person adjusting a child's seatbelt in a wheelchair (no visible text or symbols)natural_image
Close-up of hands using a tool to adjust or install a metal pipe clamp (no text or symbols visible)natural_image
Close-up of a mechanical support structure with labeled component '1' (no text or symbols beyond label)natural_image
Close-up of a hand holding a metal tool with a clamped blade (no text or symbols visible)MONTERE ADAPTERNE SOM SITTER MOT HANDTAGSBENET
natural_image
Close-up of hands adjusting a metal pipe fitting (no visible text or symbols)natural_image
Close-up of a hand holding a metal bicycle handle with a black tool, no visible text or symbolsnatural_image
Close-up of a hand using a tool to adjust or install a mechanical component (no visible text or symbols)MONTER ADAPTEREN SOM SITTER MOT MIDT BenET
Sett fast den venstre adapteren på midtbenet på samme måte • som vises på bilde 4-7 på forrige side.
9
natural_image
Black and white photo of a baby stroller with patterned back cover and wheels (no text or symbols visible)natural_image
Close-up of hands using a tool to adjust or install a metal pipe (no visible text or symbols)natural_image
Close-up of hands using a tool to adjust or install a mechanical component (no visible text or symbols)Monter frambøylen med hjelp av de skruer som du tok vare på • sammen med frontbøylen. Mutterne skal sitte på utsiden av handtagsbenet.
3
natural_image
Person assisting a person in a wheelchair seat, no visible text or symbols- Monter sportsvogntrekket iflg. veiledningen fra side 45-48.
• Monter kalesjen iflg. veiledning fra side 48. - Følg veiledning på side 55-59 montering og bruk av Twin sportsvogn.
natural_image
Close-up of hands adjusting a small object with a tool, no visible text or symbolsnatural_image
Close-up of a person wearing a black and patterned striped suit, holding a dark jacket (no visible text or symbols)Sett fast singel kalesjen ved å trykke fast de svarte klemmene på • rammen(2 stk på hver side)
natural_image
Close-up of a person in a stroller wearing patterned fabric, seated with hands and legs (no visible text or symbols)natural_image
Black and white photo of a baby stroller with patterned back cover (no text or symbols visible)natural_image
Line drawing of a baby bathtub with two arrows pointing to the interior area (no text or symbols)Legg madrassen i vognen (3)
ADVARSEL
natural_image
Line drawing of a hand holding a tool with arrows indicating movement or force (no text or symbols)natural_image
Close-up of a car wheel rim and suspension mechanism (no text or symbols visible)Bruk av bremsen
natural_image
Line drawing of a car seat assembly with directional arrows indicating rotation (no text or symbols)natural_image
Close-up of a person wearing a wheelchair seatbelt, handling a small object (no visible text or symbols)natural_image
Black and white photo of a two-wheeled baby stroller with two rear seats (no text or symbols visible)ADVARSEL
- La aldri barn ligge i bagen när du setter den på eller tar den av understellet.
- Kontroller alltid at overdelen sitter ordentlig fast i låst posisjon på begge sidene.
- Hold fast i bagen til den har klikket inn på begge sidene.
- Løft aldri vogenen etter bagen når den sitter fast på understellet.
Bilde 10 viser Twin Cangaroo med 2 stk bager.
natural_image
Person assembling a black athletic vest with patterned back cover (no visible text or symbols)natural_image
Close-up of a person adjusting a jacket with a numbered detail (no visible text or symbols)natural_image
Person adjusting a black jacket with a metal rod (no visible text or symbols)natural_image
Close-up of hands adjusting a black fabric or cushion component (no visible text or symbols)natural_image
Close-up of hands adjusting a black mechanical component with a circular base (no visible text or symbols)natural_image
Close-up of hands adjusting a small black object on a dark surface, with no visible text or symbols.natural_image
Close-up of a mechanical component with grid and mounting brackets (no visible text or symbols)natural_image
Close-up of hands adjusting a metal object on a dark surface (no visible text or symbols)natural_image
Close-up of hands adjusting a black fabric or garment with a metal clip (no visible text or symbols)WARNUNG!
natural_image
Person handling a black garment with patterned fabric underneath (no visible text or symbols)natural_image
Close-up of a hand pressing down on a dark fabric or garment piece (no visible text or symbols)natural_image
Close-up of hands adjusting a black object with a circular symbol, next to a bicycle wheel (no visible text or symbols)natural_image
Black rectangular backpack with multiple side pockets, mounted on a stand (no visible text or symbols)natural_image
Close-up of a mechanical rope knot securing a chair frame (no text or symbols visible)natural_image
Close-up of a mechanical component with a numbered arrow pointing to a specific part (no visible text or symbols)18
19
20
MONTAGE BEIDER HINTERRÄDER
natural_image
Close-up of a hand adjusting a black jacket on a bicycle wheel (no visible text or symbols)natural_image
Close-up of a bicycle tire with a hand adjusting the wheel, showing a numbered arrow pointing to the wheel (no text or symbols on the diagram itself)natural_image
Close-up of a garment zipper with a numbered label pointing to a seam detail (no text or symbols on the zipper itself)natural_image
Close-up of a black mechanical device with two side panels, no visible text or symbolsnatural_image
Close-up of hands adjusting a black belt buckle (no text or symbols visible)natural_image
Close-up of a person's arm wearing a tarp, with arrows indicating movement direction (no text or symbols visible)2
natural_image
Illustration of a mechanical device with a rotating arrow indicating motion (no text or symbols)3
4
natural_image
Black and white photo of a baby stroller with twin wheels and a canopy cover (no text or symbols visible)5
natural_image
Close-up of a hand adjusting a bicycle wheel component with a numbered callout (19) on the left side.natural_image
Close-up of a hand adjusting a small mechanical component on a motorcycle wheel (no visible text or symbols)natural_image
Person operating a bicycle wheel system with arrows indicating motion direction (no text or symbols visible)natural_image
Close-up of a motorcycle's wheel and foot assembly with a hand adjusting the wheel (no visible text or symbols)natural_image
Diagram of a vehicle chassis frame with labeled component '3' (no text or symbols beyond label)natural_image
Person adjusting a black children's seat with patterned bedding (no visible text or symbols)natural_image
Close-up of hands using a tool to adjust or install a bicycle wheel (no visible text or symbols)natural_image
Close-up of a mechanical support structure with labeled component '1' (no text or symbols beyond label)natural_image
Close-up of a mechanical lever mechanism with a hand adjusting the part (no visible text or symbols)MONTAGE DER ADAPTER AN DEN SCHIEBERROHREN
natural_image
Close-up of hands using a tool to adjust or install a mechanical component (no visible text or symbols)MONTAGE DER ADAPTER AN DEN SCHIEBERROHREN (Forts.)
natural_image
Close-up of black metal mechanical components with a white arrow pointing to a feature (no text or symbols visible)MONTAGE DER ADAPTER AN DER MITTELSTREBE
natural_image
Close-up of a hand using a tool to adjust or install a mechanical component (no visible text or symbols)MONTAGE DER ADAPTER AN DER MITTELSTREBE
natural_image
Close-up of hands using a tool to adjust a metal rod (no text or symbols visible)MONTAGE DER ADAPTER AN DER MITTELSTREBE
natural_image
Close-up of hands adjusting a metal tool with a handle (no visible text or symbols)MONTAGE DER ADAPTER AN DER MITTELSTREBE
natural_image
Close-up of hands using a tool to adjust or install a mechanical component (no visible text or symbols)natural_image
Close-up of hands adjusting a metal pipe clamp and cable (no text or symbols visible)natural_image
Person adjusting a child's seatbelt in a wheelchair (no visible text or symbols)natural_image
Close-up of a hand pressing down on a dark fabric or cloth component (no visible text or symbols)natural_image
Person assisting another person in a wheelchair seat, no visible text or symbolsnatural_image
Close-up of hands using a tool to adjust a metal bicycle chain (no text or symbols visible)natural_image
Close-up of a mechanical support structure with labeled component '1' (no text or symbols beyond label)natural_image
Close-up of a hand holding a metal tool with a clamped band (no text or symbols visible)MONTAGE DES ADAPTER AN DEM SCHIEBERROHR
natural_image
Close-up of hands using a tool to adjust or install a mechanical component (no visible text or symbols)natural_image
Close-up of a hand holding a metal bicycle handle with a tool, showing a cross mark on the handle (no text or symbols visible)natural_image
Close-up of a hand using a tool to adjust or install a mechanical component (no visible text or symbols)MONTAGE DES ADAPTERS AN DER MITTELSTREBE
natural_image
Black and white photo of a baby stroller with patterned back cover and wheels (no text or symbols visible)natural_image
Close-up of hands using a tool to adjust or install a metal component (no visible text or symbols)natural_image
Close-up of hands using a tool to adjust or install a mechanical component (no visible text or symbols)natural_image
Person assisting a person in a wheelchair seatbelt (no visible text or symbols)natural_image
Close-up of hands adjusting a small object with a tool, no visible text or symbolsnatural_image
Close-up of a person wearing a black and patterned outfit with a zipper, no visible text or symbolsnatural_image
Person in a wheelchair wearing patterned pants and a black jacket, with visible legs and torso (no text or symbols)natural_image
Black and white photo of a baby stroller with patterned back cover and wheels (no text or symbols visible)natural_image
Line drawing of a baby bathtub with two arrows pointing to the interior area (no text or symbols)natural_image
Line drawing of a hand using a tool to cut or adjust a piece of material, with arrows indicating the process (no text or symbols present)natural_image
Line drawing of a backpack with labeled parts (no text or symbols)natural_image
Close-up of a car wheel rim and wheelbase (no text or symbols visible)7
natural_image
Line drawing of a car seat assembly with directional arrows indicating rotation (no text or symbols)8
9
natural_image
Close-up of a person wearing a dark jacket and holding a small object, seated on a chair (no visible text or symbols)10
natural_image
Black and white photo of a two-wheeled baby stroller with two black covers (no text or symbols visible)Manual Twin Cangaroo v. 1.0
Contents of the box 82
Emmaljunga's original accessories 82
Important safety information 83-84
Assembly of the pushchair 85-89
Using the pushchair 90
Folding the pushchair 91
Changing the pushchair from a twin pushchair to a twin pram .....92-93
Changing the pushchair from a twin pram to a twin pushchair .....94
Changing the pushchair from a twin pushchair to a sibling pram .....94-96
Changing the pushchair from a sibling pram to a twin pushchair .....96
Assembly of Sibling Package (accessory)....97
Assembly and usage of the Twin Cangaroo Carrycot (accessory) .....98-99
Care and maintenance ....100-101
Please observe!
We congratulate you on the purchase of this Emmaljunga stroller. You have bought a quality product which is manufactured in Sweden and we hope that you will enjoy using this product for a long time to come.
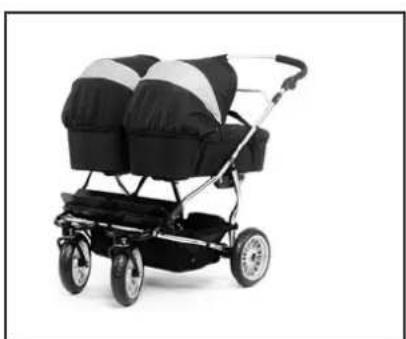
Twin Cangaroo offers several different combinations and can be used as a twin pushchair, a twin pram for two newborns or a sibling pram for baby and toddler. If you want to change the Twin Cangaroo from a twin pushchair to a twin pram or to a sibling pram, you will need to purchase one or two Twin Cangaroo Carry-cots, which are available as accessories, with an accompanying adaptor.
Your retailer should provide your pram/pushchair fully assembled, in the mode in which you want to use it. Make sure that your retailer has explained all the relevant safety details and correct usage of the product. In the future, if you wish to convert the product into a different mode, we recommend that you return to your retailer in order to ensure that the any reassembly is completed correctly.
Save the manual for future use. Also, if you have purchased the Twin Cangaroo Carrycot(s), ensure that you save all the necessary screws and washers in a safe place for future use when you wish to convert the Twin Cangaroo back into pushchair mode. Please check that you have received all the necessary parts with the carrycot adaptor kit.
Contents of the box
Twin Cangaroo
1pc folded chassis with tray
2 pc rear wheels
2 pc swivel wheels
1 pc twin hood
1 pc seat unit fabrics for the right side inc. 5-point harness
1 pc seat unit fabrics for the left side inc. 5-point harness
1 pc twin bumper bar
1 pc twin bumper bar cover
1 pc manual
Accessories
Sibling Package
1 pc single hood
1 pc single bumper bar
1 pc single bumper bar cover
1 pc exclusive apron
1 pc extra long screw with washer
Emmaljunga's original accessories
Please use Emmaljunga's original accessories for maximum safety and comfort. Information about accessories that match can be found in our brochure or at any of our authorised retailers.
Accessories
Twin Cangaroo Carrycot
1 pc carrycot
1 pc hood
1 pc mattress
1 pc apron
Inc. Adaptor Kit
2 pcs Easy Fix attachments
2 pcs screws and washers
1 pc alan key
Inc. Twin Screw Package (only required for the twin pram)
2 pcs screws and washers
1 pc rivet with starlock
Important Safety Information
Please read the following Warnings and IMPORTANT instructions before use. Keep this manual handy for future reference.
... WARNING ...
Failure to follow the proper usage or the assembly instructions may cause serious injury to your child/children and/or cause damage to the construction of the vehicle.
WARNING! Child/children should never be left unattended
WARNING! Ensure that all locking devices are engaged before use.
WARNING! Use a harness as soon as your child can sit unaided.
WARNING! The seat-unit is not suitable for children under 6 months.
WARNING! Any load attached to the handle affects the stability of the pram/ pushchair.
WARNING! The product is not suitable for running or skating
WARNING! Always use the crotch strap in combination with the waist belt.
WARNING! Check that the pram body or seat-unit attachment devices are correctly engaged before use.
WARNING! Accessories or spare parts that are not approved by the manufacturer shall not be used.
WARNING! The lying unit/carry-cot (accessory) is only suitable for a child who cannot sit up unaided.
WARNING! Do not use the lying unit/carry-cot (accessory) if any part is broken, torn or missing.
WARNING! Never use the carry-cot (accessory) on a stand.
WARNING! Do not let children play unattended near the carry-cot.
EMMALJUNGA RECOMMENDS THAT YOU ALWAYS SECURE THE CHILD IN THE VEHICLE WITH THE 5-POINT HARNESS.
- This pram is intended for transportations of one (1) child from 6 months with a maximum weight of 15 kg. With the City Carry-cot (original accessory) the pram can be used from birth. Only use Emmaljunga Original accessory. Use only the pram for the amount of children as it is build for.
- The safety of your child is your responsibility.
- Never leave your child unattended.
- The safe guards and instructions of this manual cannot cover all possible conditions and unforeseeable situations which may occur. It must be understood that common sense, caution, and care are factors which can not be built into this product. These factors are the responsibility of the person that uses the pram.
- It is important that these instructions are understood by all people who will use this vehicle and accessories. Always inform and instruct each person using the vehicle and accessories as to how this product should be used, even if the person will only use it for a short while.
Important Safety Information
Continued.
- If any instructions are unclear and need further explanation or if you have any further questions please contact an authorised Emmaljunga retailer.
- City Carry-cot: is intended for children within the age group of 0-6 months. The depth from the top of the mattress to the top of the side of the body at, or any position within 300 mm from the harness attachment points should not be reduced to less than 150 mm when the mattress is in position. Do not add a mattress thicker than 25 mm.
- Seat part or pram body may not be used as a car seat.
- The vehicle is made for transportation only. Never use this vehicle as a bed for your child/children.
• Always store the pram away from children and do not allow children to play with or in it. - Never leave this vehicle without first engaging the parking device.
- The parking device should always be engaged while placing or removing your child/children.
- Avoid parking on a hill.
- For safety reasons, please only use Emmaljunga's original accessories.
• Overloading, incorrect folding, and the use of non-approved accessories may cause injury to your child/children and damage or break this vehicle. - Never leave this vehicle in dangerous locations, even when not occupied.
- Avoid using this vehicle on steps, stairs or escalators, as it may be dangerous to your child/children.
- Do not hang any load on the handle as it will affect the stability of the vehicle
- Never place items on the top of the hood.
- The shopping tray included with the chassis has a weight limit of 5 kg. Always place heavy items in the centre of the basket. This vehicle may become unstable if the weight in the basket is unevenly distributed.
- Items in the shopping tray should not protrude over the sides as items can get caught in the wheel spokes.
- Follow care and maintenance instructions
Be aware of the risk of open fire and other source of strong heat, such as electric bar fires, gas fires, etc. In the near vicinity of the carry-cot.
Use the carry-cot only on a firm, horizontal level and dry surface. - Twin Cangaroo is only compatible with original Emmaljunga Twin Carry-cot. Do not use any other carry-cots.
Assembly of the pushchair - Assembly of the seat unit fabrics
1
natural_image
Person assisting a person in a wheelchair seatbelt (no visible text or symbols)Assembly of the seat unit fabrics
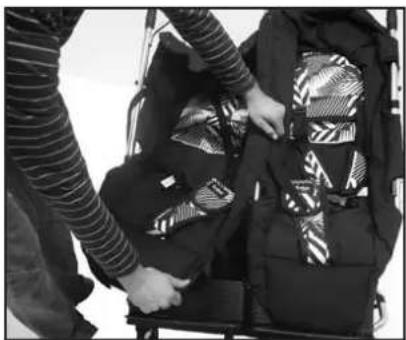
- To assemble the seat unit fabrics, ensure any adaptors required to attach the carrycots to the chassis are removed.
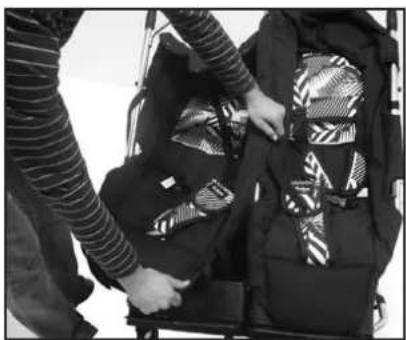
- Apply the brake by pressing the brake pedal down with your foot (see page 90, picture 2). Unfold the chassis by lifting the handle whilst placing your foot on one of the rear wheels, until it clicks into place.
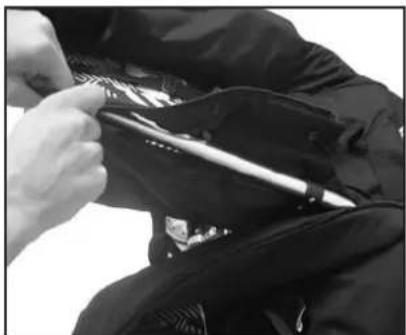
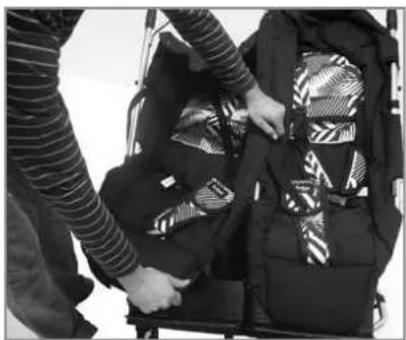
- Place the seat fabrics on the chassis frame. Please note! There are separate left and right hand side seat unit fabrics. The seat fabrics are correctly placed when the longest zip of both seat fabrics are placed against the middle bar of the chassis.
2
natural_image
Close-up of a person adjusting a jacket with a numbered button and arrow indicator (no text or symbols)WARNING
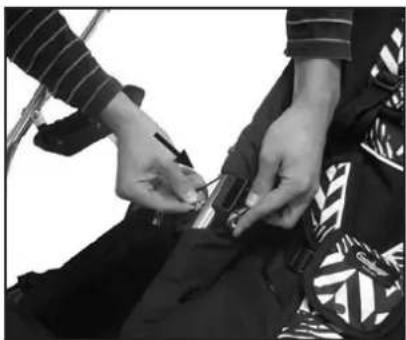
• The chassis locks must click into place.
- Make sure that the chassis locks are in locked position before using the pushchair.
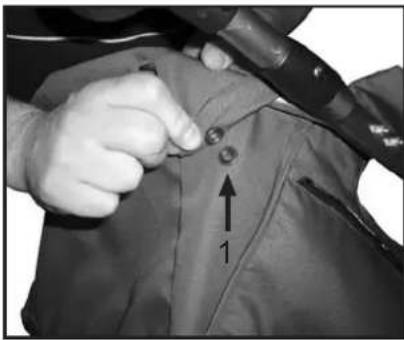
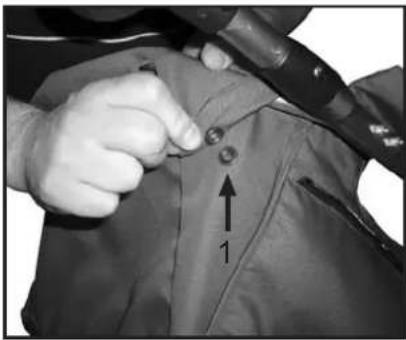
- Place the top part of the seat fabrics around the middle bar. Secure the 3 press studs around the bar (1). Repeat the same process with the other seat fabric (there are 6 press studs in total).
3
natural_image
Person adjusting a black jacket with a metal clip (no visible text or symbols)- Attaching the seat unit fabrics on the left side (as viewed from the handle)
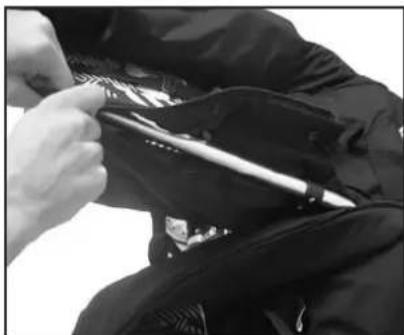
- Attach the left seat unit fabrics with a zip around the middle bar.
- Fold the strap around the middle barrier (2) and fasten it with the press stud.
- Fold the strap around the seat unit fabrics (closest to the footrest) over the middle barrier and fasten with the press stud.
4
natural_image
Close-up of hands adjusting a black fabric or cushion component (no visible text or symbols)Attaching the left seat unit fabrics:
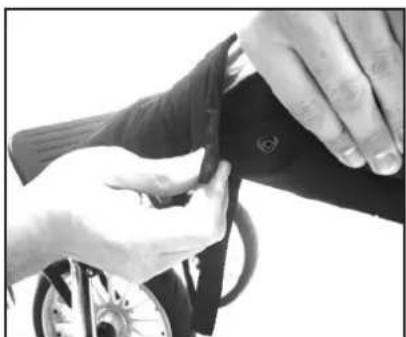
- Fold the front straps of the left seat unit fabrics around the middle bar and under the footrest.
5
natural_image
Close-up of hands adjusting a black mechanical component with a circular base (no visible text or symbols)- Fasten the two press studs by the footrest as shown on the picture.
Assembly of the pushchair - Assembly of the seat unit fabrics
6
natural_image
Close-up of hands adjusting a small black object on a dark surface, with no visible text or symbols.Attaching the right seat unit fabrics:
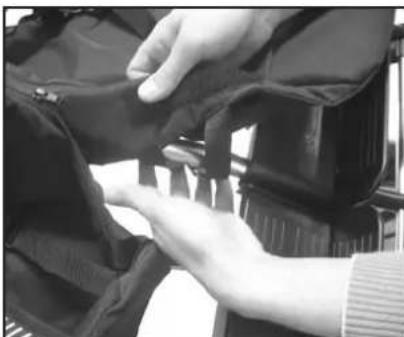
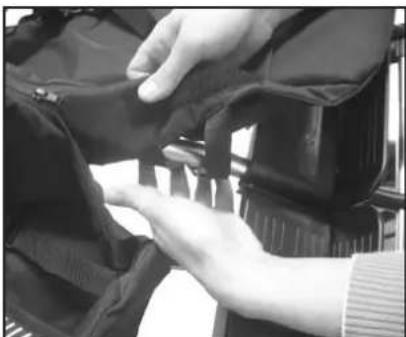
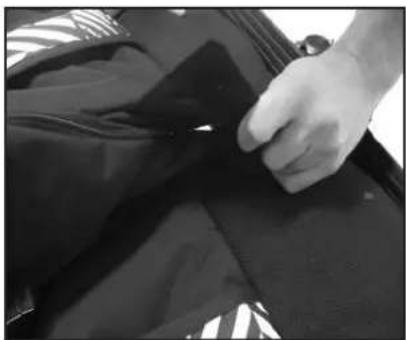
- Place the front straps from the right seat unit fabrics through the hole in the left seat unit fabrics so that they are placed around the middle bar.
7
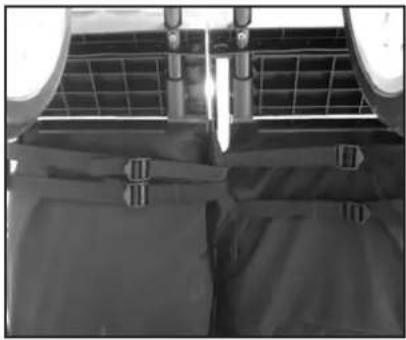
natural_image
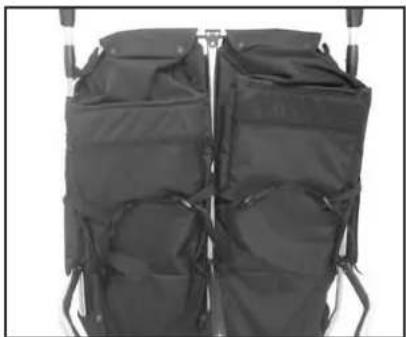
Close-up of a mechanical component with grid and mounting brackets (no visible text or symbols)- Attach the fabrics with the straps underneath the pushchair as the picture shows.
8
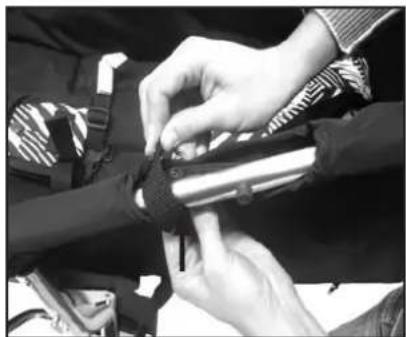
natural_image
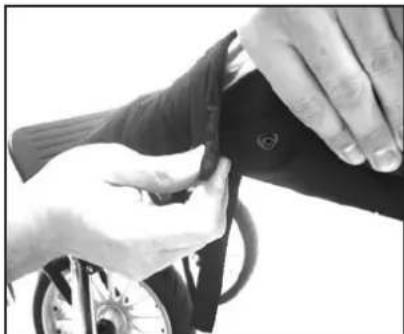
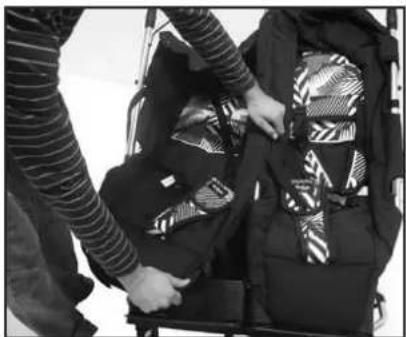
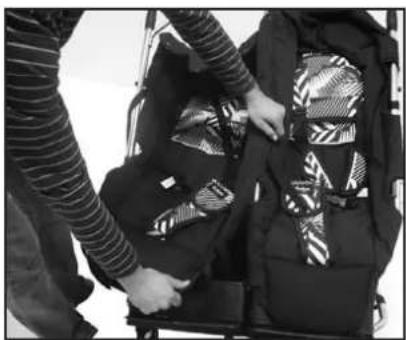
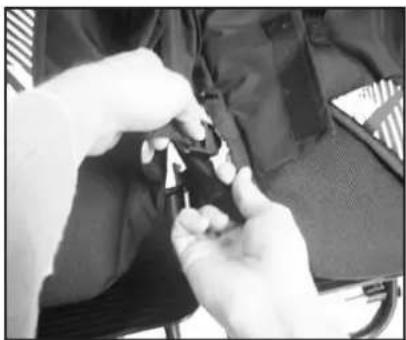
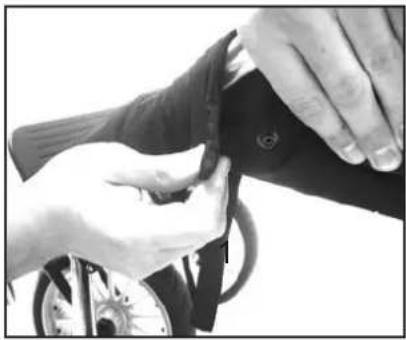
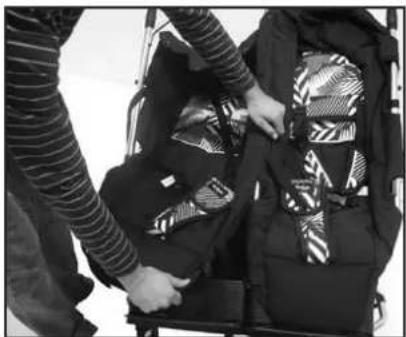
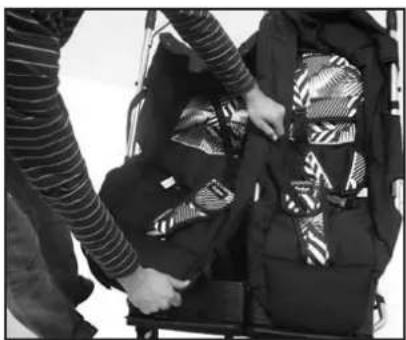
Close-up of hands adjusting a metal object on a dark mechanical component (no visible text or symbols)Attach the backrest straps that are placed behind each backrest round the side bar and around the middle bar and fasten them with the press studs (4 press studs in total)
- Attach one press stud around the side bar and one around the middle bar. The strap should be placed below the black plastic plug on the side bar. - Repeat the same procedure on the other backrest
9
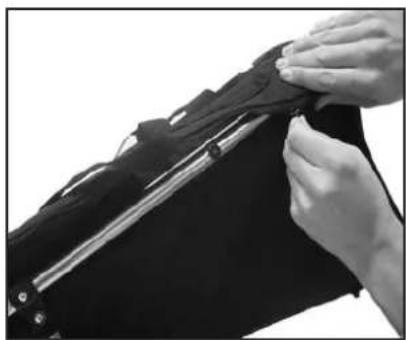
natural_image
Close-up of hands adjusting a black fabric or garment with a metal clip (no visible text or symbols)WARNING
Make sure that the press studs are correctly attached and fastened.
- Close the zips on the side
10
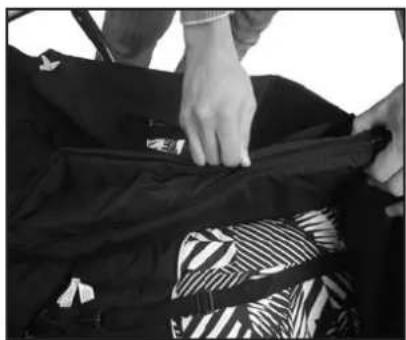
natural_image
Person handling a black garment with patterned fabric (no visible text or symbols)- Close the zip that connects the two seat fabrics in the middle
Assembly of the pushchair - Assembly of the seat unit fabrics
11
natural_image
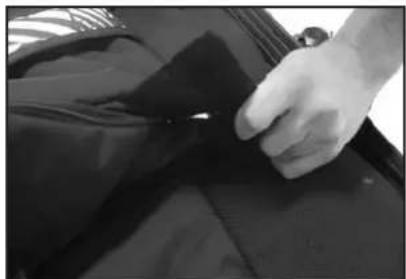
Close-up of a hand pressing down on a dark fabric or material surface (no visible text or symbols)Fold the loose piece of fabric over the middle zip and attach it with the velcro. It is important that the velcro is attached properly.
WARNING
Never let children play with the velcro or the zip when they are placed in the pushchair.
12
natural_image
Close-up of hands adjusting a black mechanical component with a circular base (no visible text or symbols)Fasten the press studs by the footrest (two press studs on each side).
13
natural_image
Black cylindrical backpacks with attached straps, no visible text or symbolsAttach the press stud behind the backrest in the plastic clips as shown in the picture.
14
natural_image
Close-up of a mechanical cable being tied with a spring, no visible text or symbols- Pull the strap underneath the backrest through the plastic clip as shown in the picture.
Assembly of the pushchair
16
17
natural_image
Close-up of a mechanical component with a numbered arrow pointing to a specific part (no visible text or symbols)18
19
20
natural_image
Close-up of hands tying a knot on a bicycle, showing fabric and rope details (no text or symbols)Attaching the rear wheels
- Remove the plastic protectors from the axles. Save them for future use.
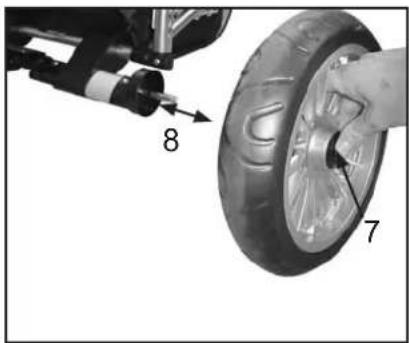
- Assemble the wheels on the wheel cogs. Press in the release button on the hubcaps (7) and push the wheels onto the axles as far as they can go (8). Release the button and pull the wheel towards you until you hear an audible click. Repeat the same procedure for the other rear wheel.
- Make sure that the wheels are properly attached and cannot be pulled off the axle.
IMPORTANT!
- The wheels are lubricated and can leave marks on textiles. Please use wheel protection indoors to protect your floors.
- Risk of suffocation. Do not let your child play with or handle the plastic wheel protectors.
Attaching the front wheels
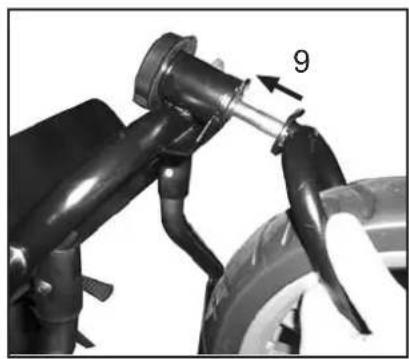
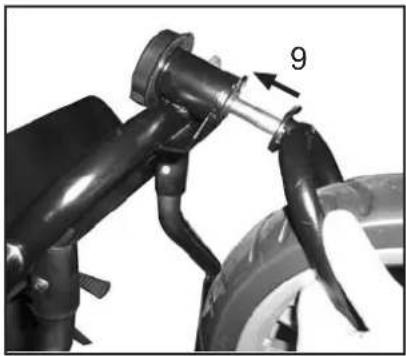
- Attach the front fork into the front fork lock, while you are pressing the release button on the fork lock, as far as it can go. Release the button. Make sure that the wheel is attached properly and cannot be pulled off.
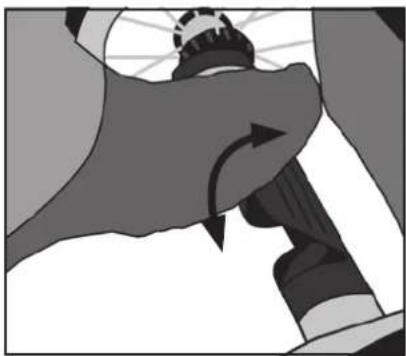
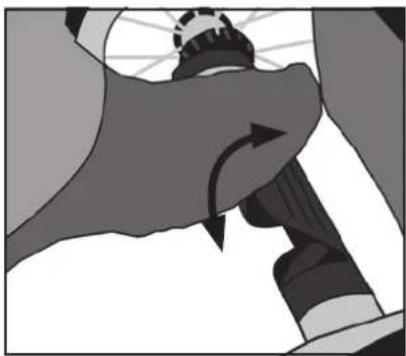
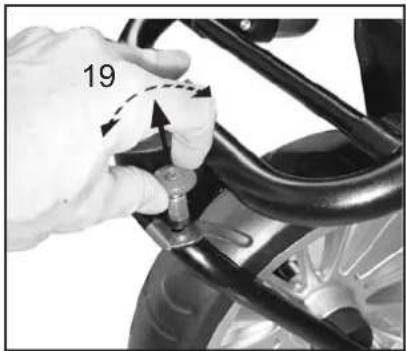
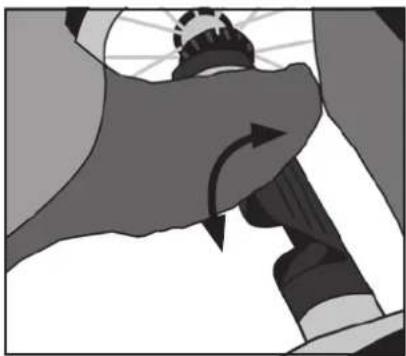
- You can lock the front wheels by pressing down the small round button on the front fork. To allow the wheel to swivel freely, pull the small button upwards and turn it 180 degrees (see page 91, picture 1).
Assembling and adjusting the bumper bar
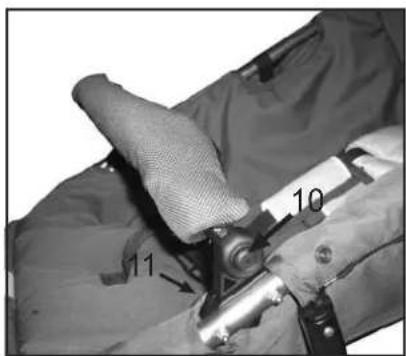
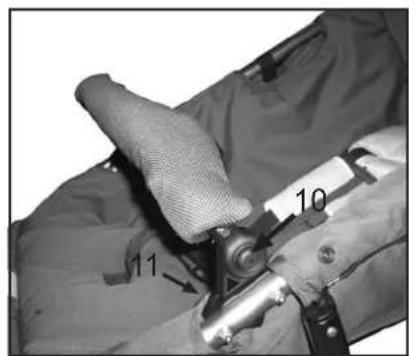
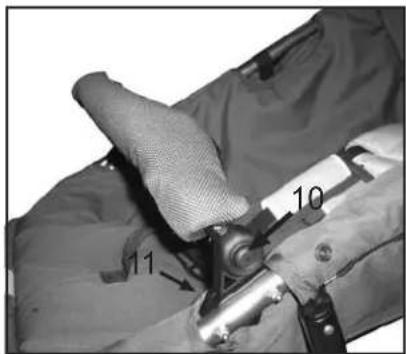
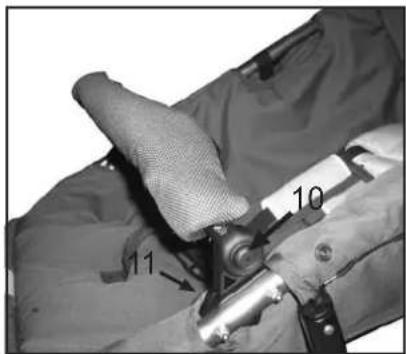
- Place the bumper bar into the plastic receivers. Place the bumper bar cover over the bar and zip the fabric into place.
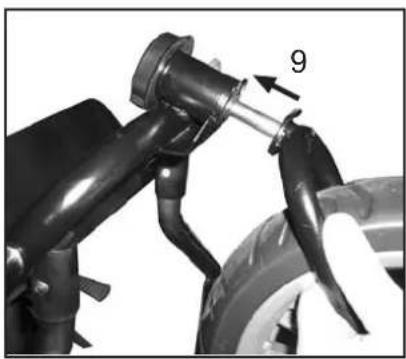
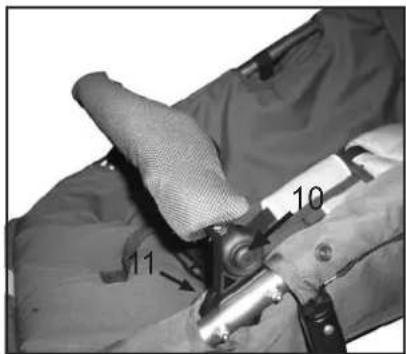
- You can adjust the bumper bar by pressing the button on the plastic receivers (10).
- You can remove the front bar by pressing the buttons on the inside of the plastic receivers.
WARNING
Never carry the pram by the bumper bar.
Assembly of the hood
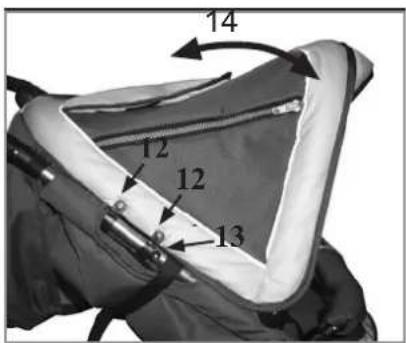
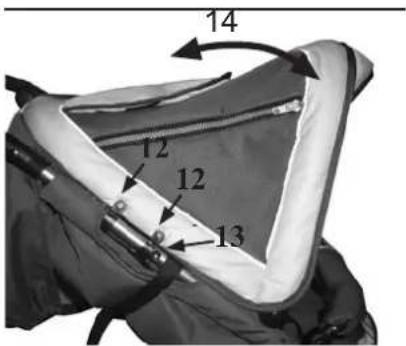
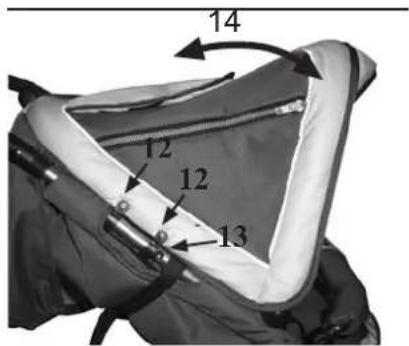
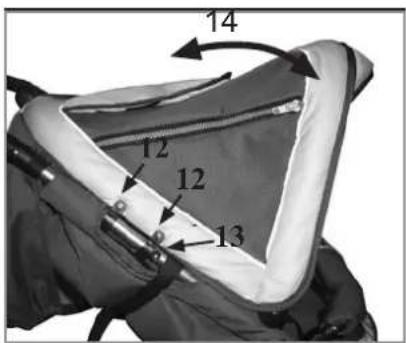
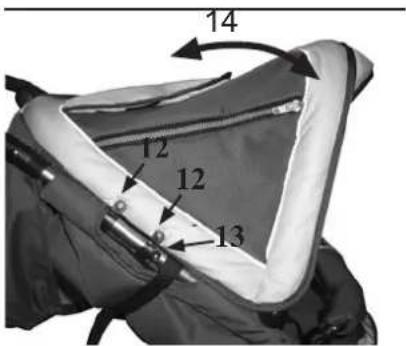
- Attach the hood by pressing the plastic clamps (12) around the chassis frame (two on each side).
- Important! The plastic parts have to be placed above the black plastic stud on the chassis (13).
Adjusting the hood
- Adjust the hood by gently pulling the front of the hood backwards or forwards until it reaches the desired position (14).
Adjusting the hood - attaching the hood apron with the hooks
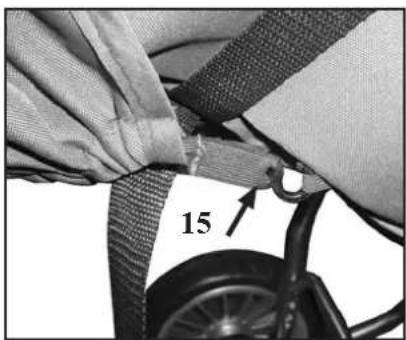
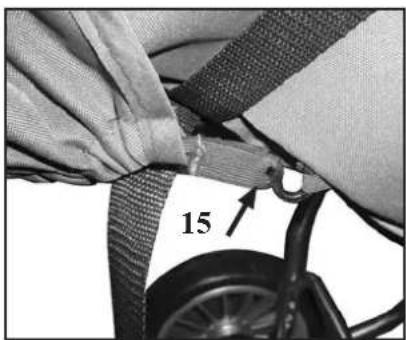
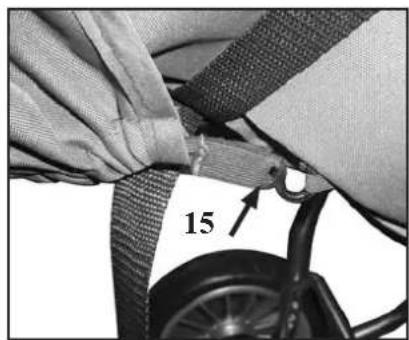
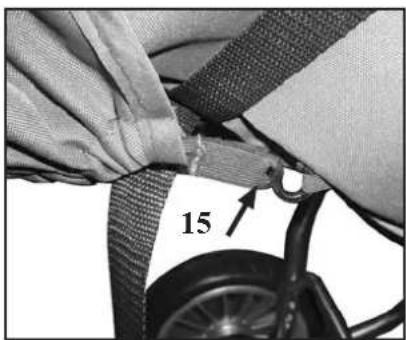
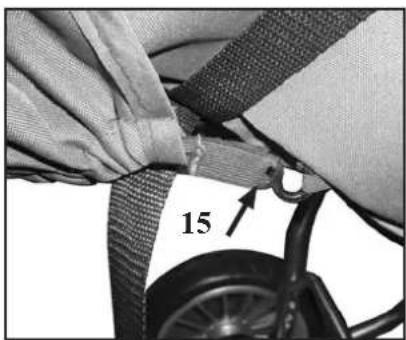
- Fasten the two plastic hooks on the apron of the hood to the rear of the backrest as shown (15)
IMPORTANT
- Never carry the pushchair by the hood. Fasten the two plastic hooks on the hood apron to the rear of the backrest.
Assembly of the pushchair - Assembly of the tray
21
natural_image
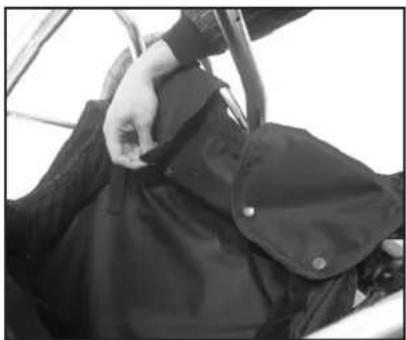
Close-up of a hand adjusting a black jacket on a bicycle wheel (no visible text or symbols)- Wrap the edge of the tray around the metal bar above the footbrake and secure it with the four press studs on the inside of the tray.
The tray can be removed for washing. Remove the wooden plate before washing.
22
natural_image
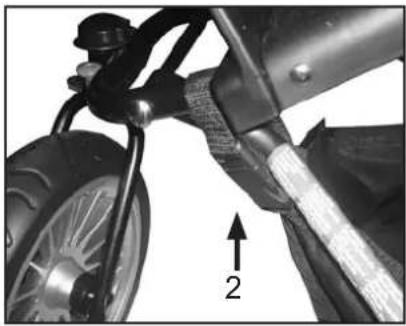
Close-up of a bicycle's wheel and suspension system with a numbered arrow indicating direction (no text or symbols on the diagram itself)- Wrap the two straps at the end of the tray around the chassis underneath the footrest and secure with the plastic clip (2).
23
natural_image
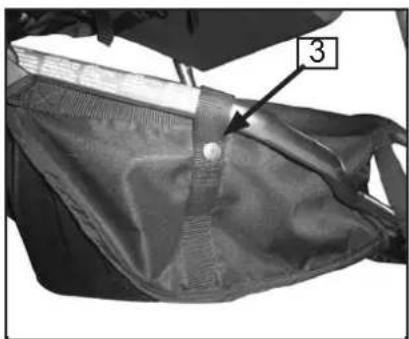
Close-up of a garment zipper with a numbered label pointing to a seam detail (no text or symbols on the zipper itself)- Wrap the tray straps around the sides of the chassis and secure with the press studs (3) - one on each side.
24
natural_image
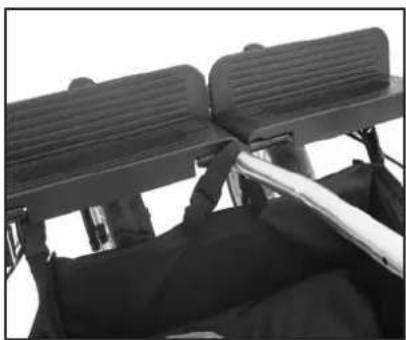
Close-up of a black exercise chair with two side seats and a white cable, no visible text or symbolsAttachment of the tray as seen from above (the seat unit fabric is removed in this picture in order to clearly illustrate the attachment of the tray)
- Attach the tray front strap around the middle bar as shown on the picture.
25
natural_image
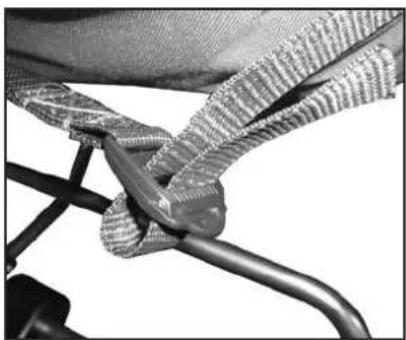
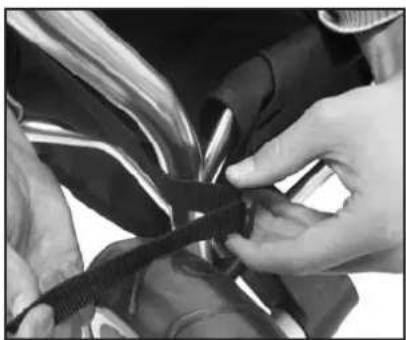
Close-up of hands adjusting a black belt buckle (no text or symbols visible)- Attach the rear tray straps with the clips as shown on the picture.
Using the pushchair
1
natural_image
Close-up of a fabric with a zipper and arrow indicating compression (no text or symbols)2
natural_image
Illustration of a mechanical device with a rotating arrow indicating motion (no text or symbols)3
4
natural_image
Black and white photo of a baby stroller with twin wheels and a canopy cover (no text or symbols visible)5
natural_image
Close-up of a hand adjusting a bicycle wheel rim with a wrench, no visible text or symbolsAdjustment of the backrest
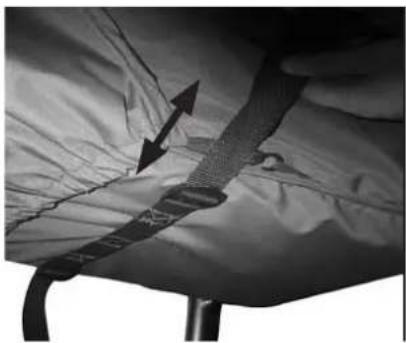
- The seat backrest can be adjusted by tightening the straps underneath the backrest. Ensure the backrest straps are adjusted to the same level on both sides of the seat unit.
- You lower the backrest by loosening the straps on both sides of the backrest to the desired position.
- The Twin Cangaroo has two backrests which can be adjusted independently of each other.
WARNING
- Please make sure that the backrest straps are adjusted to the same level on both sides
Engaging the brake
- Engage the brake by pushing the brake pedal down with your foot.
• Disengage the brake by lifting it up with your foot.
WARNING
- Never leave the pushchair without first engaging the brake.
- The brake should always be engaged when you lift your child in or out of the pram.
- Avoid uphill or downhill parking.
- Make sure that the cogs are attached properly on both rear wheels.
- Make sure that the brake pin engages into the cogs when the brake is applied.
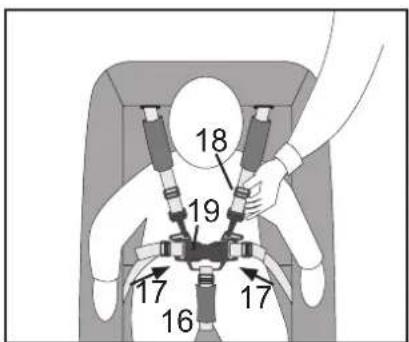
Adjusting the 5-point harness
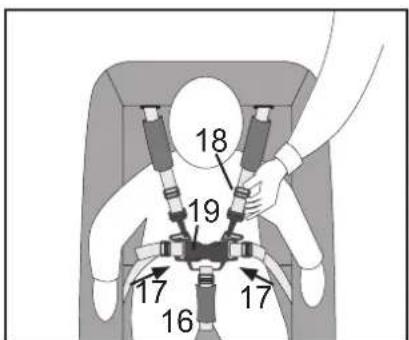
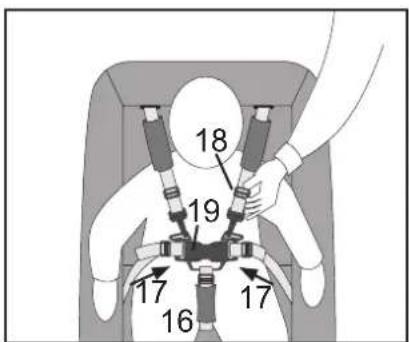
- Bring the crutch strap (16) forward between the child's legs and up toward the front of the waist. Insert the waist straps (17) into the harness buckle until they click into place. Make sure the waist straps are securely fastened.
- Adjust all straps using the sliders (18)
- To release the shoulder and waist straps, press the buttons (19) in the centre of the harness buckle.
WARNING
• Always use the harness when the child is placed in the pushchair
• Always make sure that the harness is attached to the fabrics
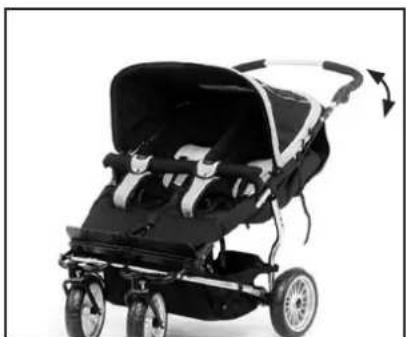
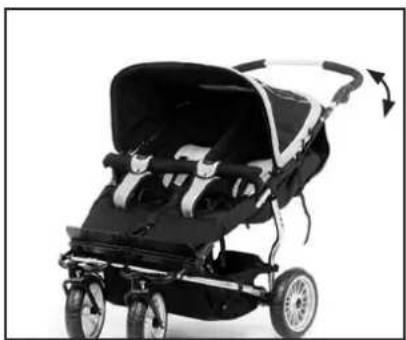
Adjusting the height of the handle
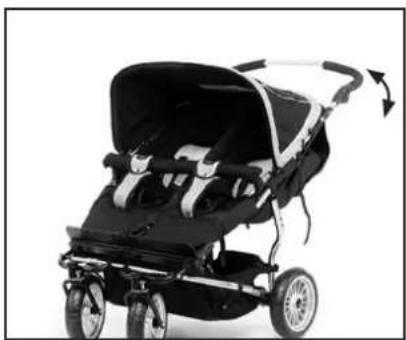
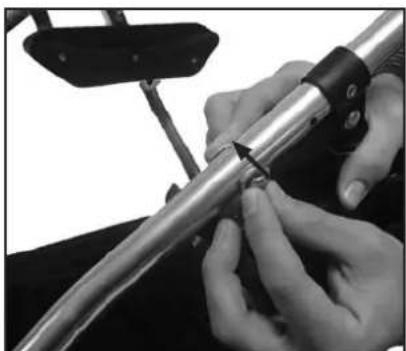
- Adjust the height by pressing the grey buttons on the inside of the handle. Keep the buttons pressed in whilst you adjust the handle to the desired position.
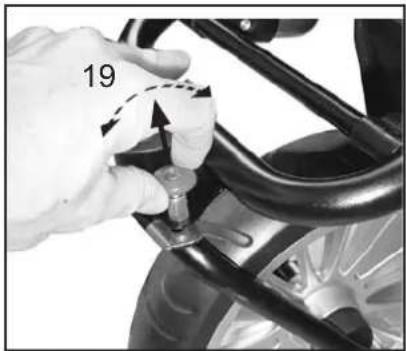
Allow the front wheel to swivel 360 degrees
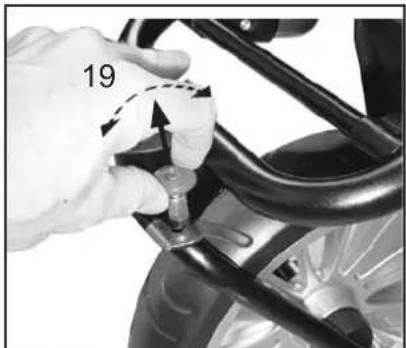
- To manoeuvre the pram more easily, the front wheels can swivel 360 degrees. This is done by lifting the small button on the front fork and turning it 180 degrees. Repeat the same procedure on the second wheel.
Locking the front wheel
- The front wheels can be locked for use on uneven terrain. Push the small button down to lock the wheel. Repeat the same procedure on the second wheel.
Folding the pushchair
1
natural_image
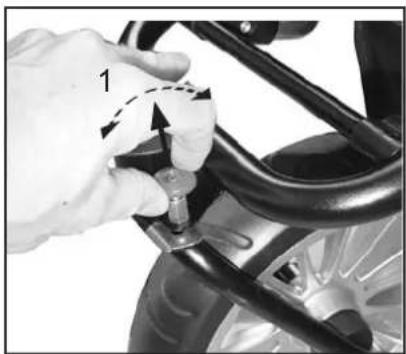
Close-up of a hand adjusting a car wheel rim with a tool (no visible text or symbols)Before folding the pushchair, ensure the front wheels are in swivel mode.
- Engage the brake.
- If the front wheels are locked, you should first unlock them by pulling up the small button on the front fork and turning it 180 degrees (1).
2
natural_image
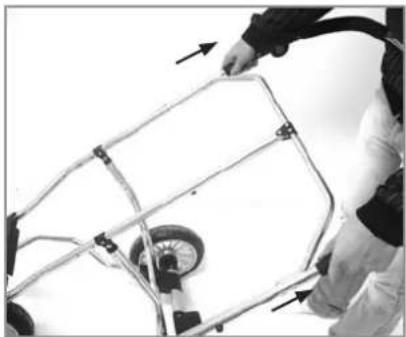
Person operating a wheeled cart with arrows indicating motion direction (no text or symbols visible)- Release the chassis locks located on both sides of the handle, by pulling the black plastic parts upwards with both hands.
WARNING
- Make sure that the area is clear. Remember the child's active safety is your responsibility.
3
natural_image
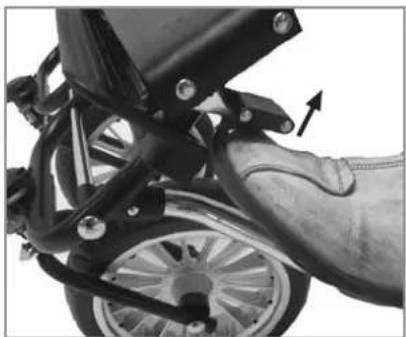
Close-up of a motorcycle's wheel and foot assembly with a hand adjusting the wheel (no visible text or symbols)- Pull the safety catch up towards you with your foot or hand. The safety catch is situated on the left side of the chassis by the footrest and prevents the chassis from folding involuntarily.
4
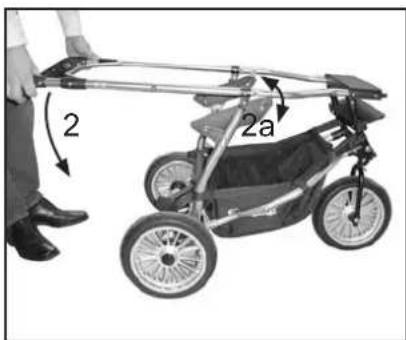
- Fold the pram by pushing the handle downwards (2). The front wheels automatically fold underneath the chassis.
- If you fold the pram with the carrycot attached to the chassis, the black Easy Fix attachments (2a) can turn so that the carrycot is no longer horizontal when you unfold the pram again. If that is the case, fold the pram again and hold the carrycot horizontal when you unfold the pram.
5
natural_image
Diagram of a vehicle chassis frame with labeled component '3' (no text or symbols beyond label)Adjusting the handle
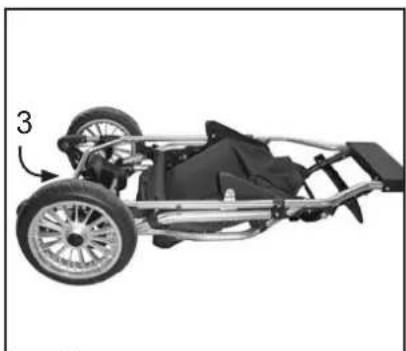
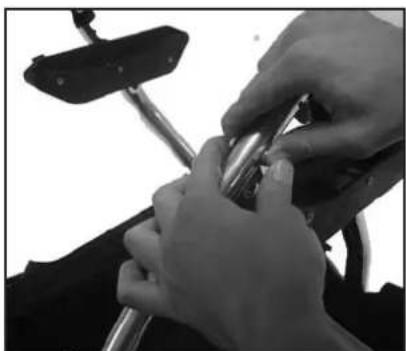
- If you want to make the folded chassis more compact, you can fold the handle inwards by pressing the grey buttons on the inside of the handle and adjusting it to the required position whilst holding the grey buttons pressed in (3).
- If you need to make more space you can also remove the wheels. Press in the release mechanism on the hubcaps and pull the wheels off the axles.
IMPORTANT!
- The wheels and axles are lubricated and can make marks on textiles and floors. Use wheel protection when placed indoors to protect floors.
Changing the pushchair from a twin pushchair to a twin pram
1
natural_image
Person assembling a patterned backpack in a small vehicle (no visible text or symbols)Assembling the carrycot adaptor
- Removing the seat unit fabrics
- Remove the hood by releasing the hood attachments from the chassis frame.
- Remove the bumper bar fabric.
- Release the straps behind the backrest, seat unit and footrest (Please note! Do not release the straps attaching the tray).
- Remove the seat fabrics by undoing the zips and the press studs.
2
natural_image
Close-up of hands using a tool to adjust or install a bicycle wheel (no visible text or symbols)- Remove the bumper bar and screws. Make sure you save the bumper bar and screws as you will need them when you re-assemble the seat unit.
3
natural_image
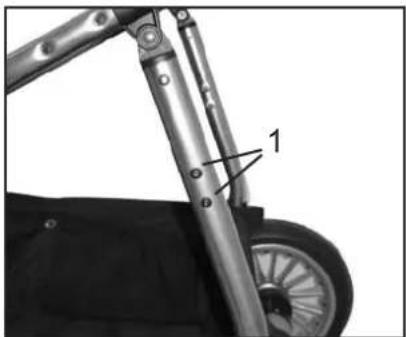
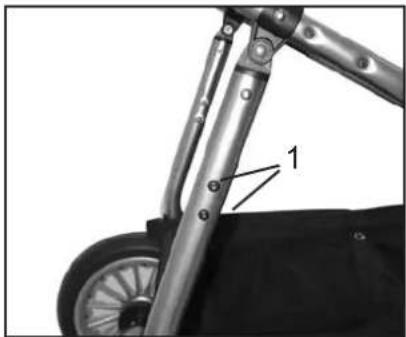
Close-up of a mechanical support structure with labeled component '1' (no text or symbols beyond label)- Release the two screws (1) located on the rear leg of the chassis frame. These screws are required to attach the metal plate as shown in picture 4. You also need to remove the washer. Make sure that you save all of these parts as they will be needed for reassembling the pushchair seat unit.
4
natural_image
Close-up of a mechanical lever mechanism with a hand adjusting the part (no visible text or symbols)Assembling the adaptors (on the rear leg of the chassis)
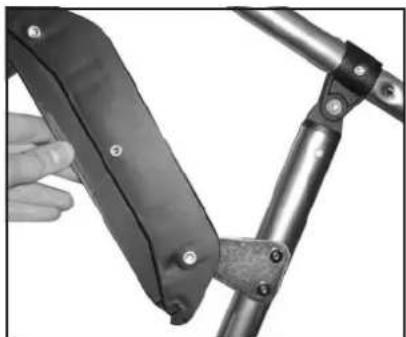
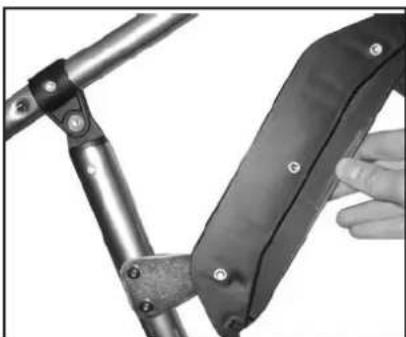
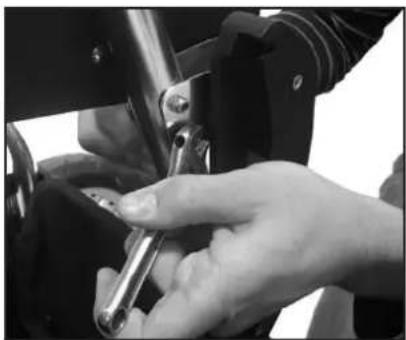
- Use the adaptor kit required to attach the carrycot to the chassis. Please note! There are left and right hand side parts to the adaptor, which are individually fitted to the left and the right hand side of the chassis.
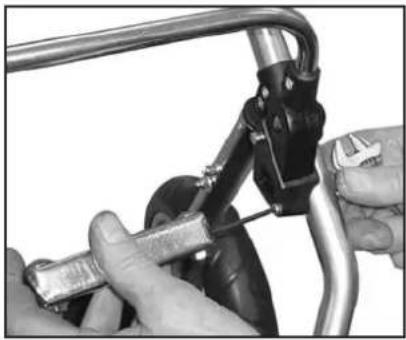
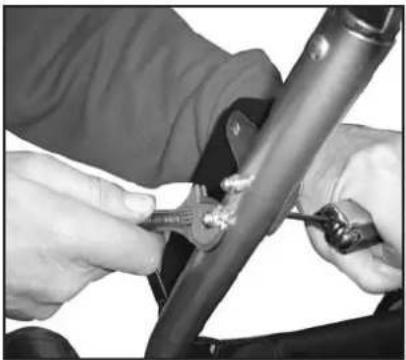
- Firstly, attach the adaptor to the rear leg of the chassis (from left to right, do not attach the adaptors to the chassis middle bar yet).
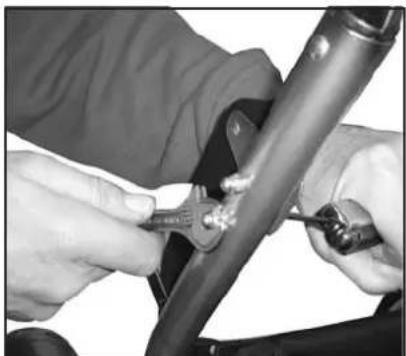
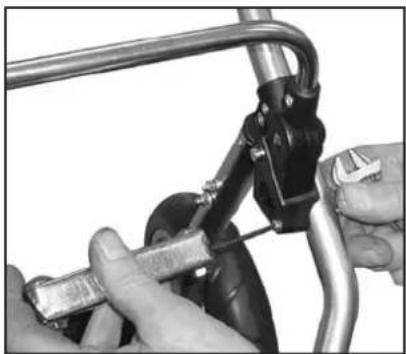
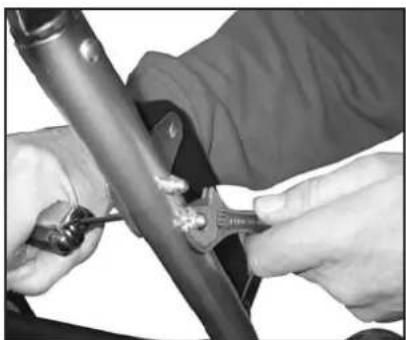
- Push the black screws through the triangular shaped metal plate and through the rear leg chassis tube from the inside of the chassis. Make sure that the domed cap is attached on the outside and not on the inside of the chassis. Make sure that the adaptor is angled toward the rear of the chassis when you attach the two black screws.
5
natural_image
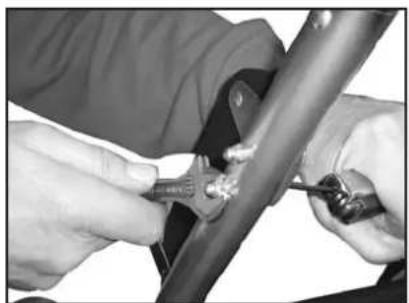
Close-up of hands using a tool to adjust or install a mechanical component (no visible text or symbols)Assembling the adaptors (on the rear leg of the chassis)
- The picture shows how the domed caps are attached on the outside of the chassis. Ensure that the screws are tightened.
Changing the pushchair from a twin pushchair to a twin pram
6
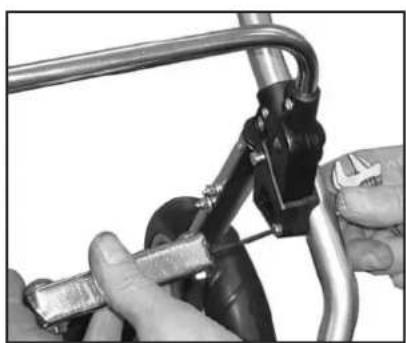
Assembling the adaptors (on the rear leg of the chassis)
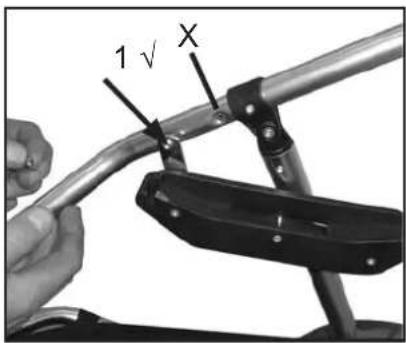
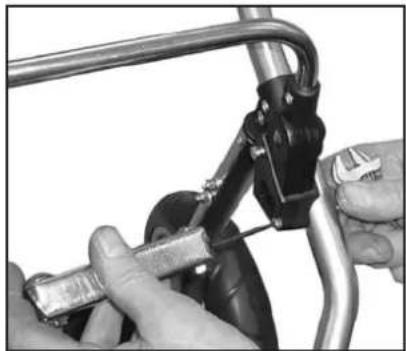
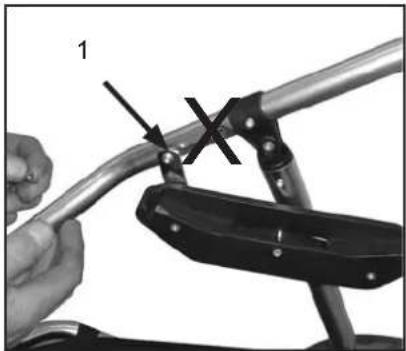
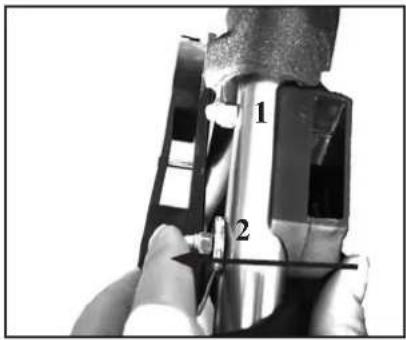
- Using the screw and the nut with the domed cap, which are included with the adaptor kit, attach the front metal plate. Push the screw through the chassis tube from the inside of the chassis and tighten it with the nut on the outside of the chassis.
Please note!
- Make sure there is a gap of 12 mm to enable the chassis to be folded with the carrycot attached.
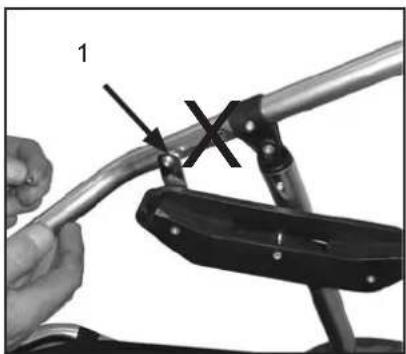
- Make sure that the metal plate is attached utilising the lower hole on the chassis tube (1), not the in the higher one!
7
natural_image
Close-up of black metal mechanical components with a white arrow pointing to a feature (no text or symbols visible)Assembling the adaptors (on the middle bar of the chassis)
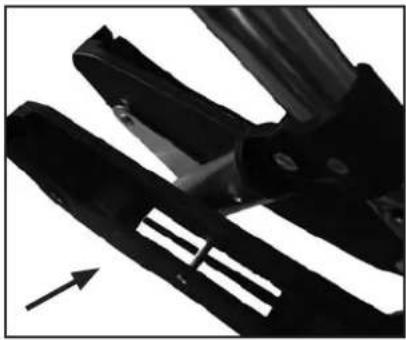
Now start to assemble both adaptors to the middle bar.
- The adaptors which are attached against the middle bar on the inside are attached in the same way as shown in pictures 2-6:
- Remove the screws which are located on the middle bar.
- Place both the triangular shaped metal plates against the middle bar (one on each side as shown in the picture). These two adaptors are attached with two screws with nuts to the middle bar.
8
natural_image
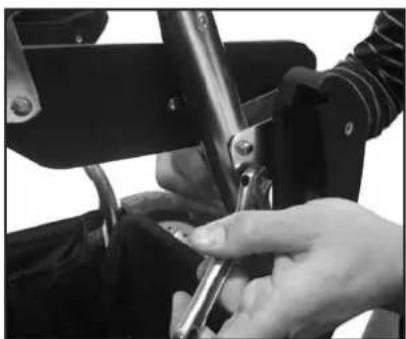
Close-up of a hand using a tool to adjust or install a mechanical component (no visible text or symbols)IMPORTANT
• Use the content of the twin screw package
Assembling the adaptors (on the middle bar of the chassis)
- Push the screw through the metal plate, the middle bar and the other metal plate and attach the nut on the outside (do not use the domed nut). Tighten the screw.
IMPORTANT!
• Use the content of the twin screw package
9
natural_image
Close-up of hands using a tool to adjust a metal rod (no text or symbols visible)Assembling the adaptors (on the middle bar of the chassis)
- Use the rivet with the star lock which is included in the adaptor kit. Push the rivet through the front metal plate, the middle bar and the front metal plate.
IMPORTANT
• Use the content of the twin screw package
10
natural_image
Close-up of hands adjusting a metal tool with a handle (no visible text or symbols)Assembling the adaptors (on the middle bar of the chassis)
- Push the rivet and star lock together by hand. You can use a pair of tongs to apply a bit more pressure if required.
- You can now attach two Twin Cangaroo Carrycots to the adaptors (see pages 18-19 for details on the assembly and use of the car-cycots).
Changing the pushchair from a twin pram to a twin pushchair
1
natural_image
Close-up of hands using a tool to adjust or install a mechanical component (no visible text or symbols)Reassemble the seat unit by following the instructions shown on • pages 12-13 in reverse. The screws and nuts must be replaced, together with the washers which you removed when you assembled the carrycot adaptor.
Please note that the nut and washer should now be placed on the inside of the chassis.
2
natural_image
Close-up of hands adjusting a metal pipe clamp and cable (no text or symbols visible)Attach the bumper bar using the screws which you saved together with the bumper bar. Please note! The domed nut and the washer should now be placed on the inside of the chassis.
3
natural_image
Person adjusting a child's seatbelt in a wheelchair (no visible text or symbols)The seat fabrics can now be attached using the straps, zips and press studs, located on the side of the fabrics. Follow the instructions on page 5-8.
Changing the pushchair from a twin pushchair to a sibling pram
1
natural_image
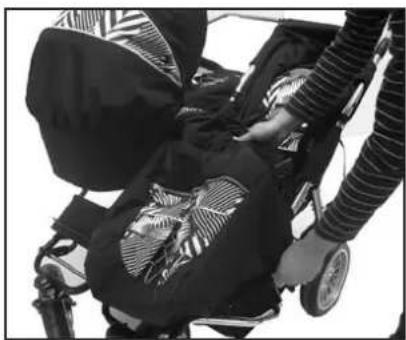
Close-up of a hand pressing down on a dark fabric or cloth component (no visible text or symbols)Open the piece of fabric which is placed between the two seat unit fabrics and then open the zip which holds together the two seat unit fabrics.
WARNING
Make sure that the area is clear and that there are no children in • the pram when you remove the seat unit fabrics. Never let children play with the piece of fabric or the zip.
2
natural_image
Person assisting another person in a wheelchair seat, no visible text or symbolsThe right hand side seat unit fabrics can now be removed (as seen from the handle)
Changing the pushchair from a twin pushchair to a sibling pram
3
natural_image
Close-up of hands using a tool to adjust a metal bicycle chain (no text or symbols visible)- Remove the bumper bar by undoing the screws. Make sure you save the bumper bar and screws for future use.
4
natural_image
Close-up of a mechanical support structure with labeled component '1' (no text or symbols beyond label)- Loosen the two screws (1) which are located on the outside of the right hand rear leg of the chassis, as shown in the picture (as seen from the handle). Remove the screws and washers (the washers are not needed when assembling the adaptor).
5
natural_image
Close-up of a hand holding a metal tool with a clamped blade (no text or symbols visible)ASSEMBLING THE ADAPTOR (ON THE REAR LEG OF THE CHASSIS)
- Use the adaptor required to attach the carrycot to the chassis. Please note! There are left and right hand parts to the adaptor, which are individually fitted to the left and the right side hand side.
- Always begin to attach the adaptor to the rear leg of the chassis (from left to right, do not place the adaptors on the middle bar at this point).
- Push the black screws through the triangular shaped metal plate and the rear leg of the chassis tube from the inside. Make sure that the domed nut is attached on the outside of the chassis tubing. Make sure that the adaptor is angled towards the rear of the chassis when you attach the two black screws.
- Tighten the screws with the domed caps on the outside of the chassis frame.
6
natural_image
Close-up of hands using a tool to adjust or install a mechanical component (no visible text or symbols)- Use the screw and the nut with the domed cap which are provided with the adaptor kit to attach the front metal plate. Push the screw (1) through the metal tube from the inside and tighten it with the nut on the outside.
7
natural_image
Close-up of a hand holding a metal bicycle handle with a black bracket and tool, no visible text or symbolsPlease note!
- Make sure there is a gap of 12 mm to allow the chassis to be folded with the carrycot attached.
Changing the pushchair from a twin pushchair to sibling pram
8
natural_image
Close-up of a hand using a tool to adjust or install a mechanical component (no visible text or symbols)MONTERINGF AF ADAPTERN SOM SIDDER MOD MIDTERR∅RET.
- Assembling the adaptor which is placed against the middle bar
- Place the left adaptor on the middle bar in the same way as shown in picture 4-7 on the previous page.
9
natural_image
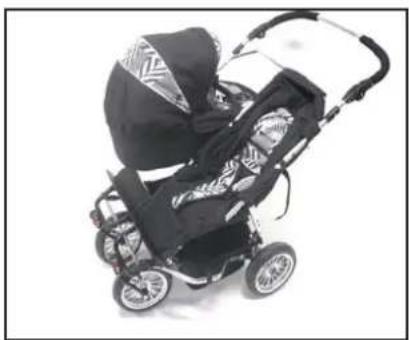
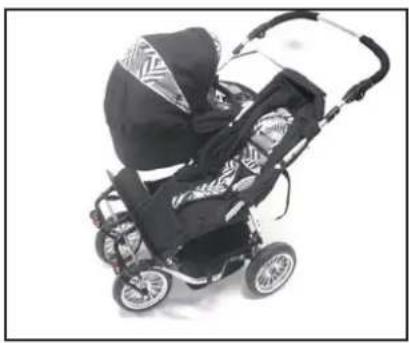
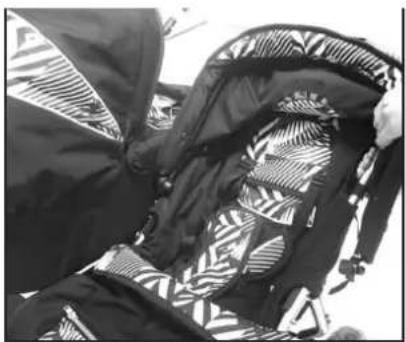
Black and white photo of a baby stroller with patterned back cover (no text or symbols visible)This picture shows the appearance of the sibling pram when assembled. The seat unit has no hood and no bumper bar.
WARNING
• Always ensure that children are secured with the harness when in the pushchair.
- To provide extra comfort and protection you can buy a Sibling Package, which comprises a single hood, single bumper bar, and an apron, as an accessory. For more details on the Sibling Package see page 97.
Changing the pushchair from a sibling pram to a twin pushchair
1
natural_image
Close-up of hands using a tool to adjust or install a metal component (no visible text or symbols)- Reassemble the seat unit by following the instructions shown on page 12-13 in reverse. The screws and nuts must be replaced, together with the washers which were removed when the carrycot adaptor was assembled.
Please note that the nut and washer should now be placed on the inside of the chassis.
2
natural_image
Close-up of hands using a tool to adjust or install a mechanical component (no visible text or symbols)- Attach the bumper bar using the screws which you saved together with the bumper bar.
Please note! The domed nut and the washer should now be placed on the outside of the chassis.
3
natural_image
Person assisting a person in a wheelchair seatbelt (no visible text or symbols)- The seat unit fabrics and hood can now be attached according to the instructions on pages 85-89
- Follow the instructions on page 85-89 for the assembly of the twin pushchair.
Assembly of the Sibling Package (accessory)
1
natural_image
Close-up of hands adjusting a small object with a tool, wearing patterned clothing (no visible text or symbols)Follow the instructions for changing the pushchair from a twin pushchair to a sibling pram on pages 94-96 (pictures 1-9) before assembling the sibling package.
- Attach the front left bumper bar receiver (as shown from the handle) according to page 94, Picture 2.
2
natural_image
Close-up of a mechanical component with labeled parts (1 and 2), no readable text or symbols beyond labelsAssembly of the bumper bar receiver on the middle bar
- Attach the screw with the domed cap through the top hole in the middle bar (1) of the bumper bar receiver.
- Attach the long screw (2) which is provided with the sibling package into the lower hole of the bumper bar receiver. The screw is a bit longer as it needs to go through the bumper bar receiver, the middle bar and the carrycot adaptor metal plate.
- The bumper bar can now be clicked into place.
3
natural_image
Black and white photo of a person adjusting a patterned seatbelt, no visible text or symbols- Attach the single hood by pressing the black clamps around the frame of the chassis (two on each side).
- Important! The clamps should be placed above the black stud on the chassis tubing.
4
natural_image
Close-up of a person in a stroller wearing patterned fabric, seated with hands and legs (no visible text or symbols)The apron can now be attached for extra protection and comfort. Pull the apron over the seat unit and attach the press studs by the hood.
Attach the apron strap underneath the footrest with the aid of the plastic attachments.
5
natural_image
Black and white photo of a baby stroller with patterned back cover (no text or symbols visible)This picture shows the Twin Cangaroo with the Sibling Package.
Assembly and usage of the Twin Cangaroo Carrycot (accessory)
1
Assembly of the carrycot
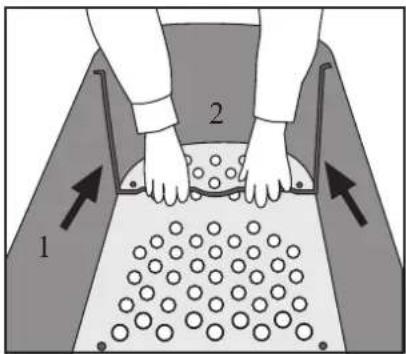
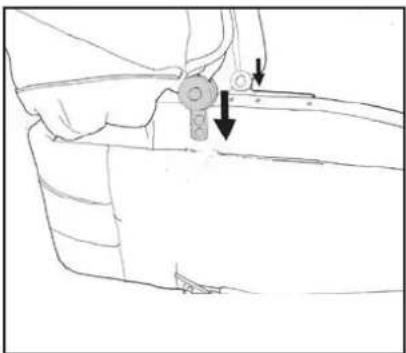
- Remove the plastic covers from the mattress and fabrics. Slide the two metal support brackets (1) onto the base (2) of the carrycot.
• The base is made of wood.
WARNING
- Risk of suffocation. Do not let your children play with the plastic bag.
- Make sure that the metal support bars are attached so that the carrycot's stability and safety will are not jeopardised.
2
natural_image
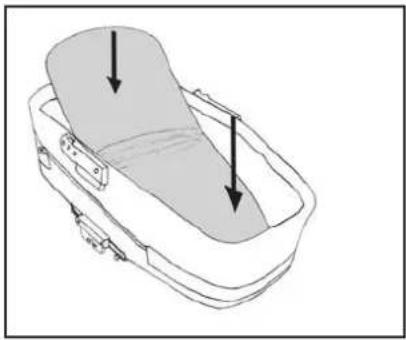
Line drawing of a baby bathtub with two arrows pointing to the interior area (no text or symbols)- Insert the mattress (3).
WARNING
- The depth from the top of the mattress together with other bed accessories to the carrycot rim must be a least 140mm when the mattress and bed accessories are in place.
- Do not add a mattress thicker than 25mm.
3
natural_image
Line drawing of a hand holding a tool with arrows indicating force or movement (no text or symbols)- Attach the hood to the carrycot by pushing the plastic arms of the hood into the plastic receivers on the carrycot. Make sure they click securely into place.
4
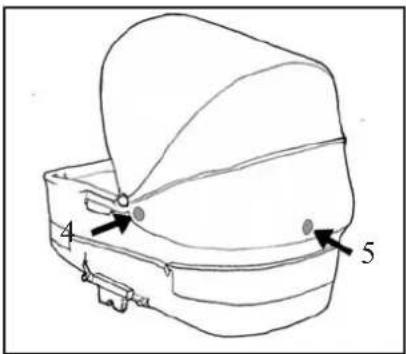
- Attach the hood fabric onto the plastic receiver utilising the press stud (4) on each side. Press the velcro (5) onto the carrycot.
- The press studs on the back of the hood are for use when the hood is rolled up for increased ventilation in warm weather.
5
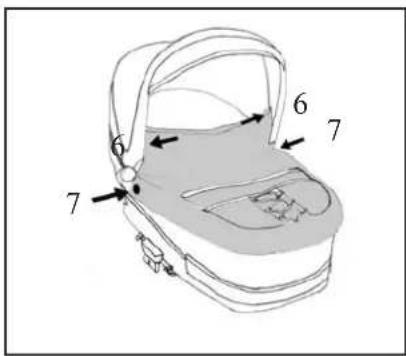
- Secure the apron to the hood (6) and the plastic receivers (7) on each side.
IMPORTANT:
The hood cannot be pushed back when the apron is attached to the hood without releasing the press studs (6).
Assembly and usage of the Twin Cangaroo Carrycot (accessory)
6
natural_image
Close-up of a car wheel rim and wheelbase (no text or symbols visible)Engaging the brake
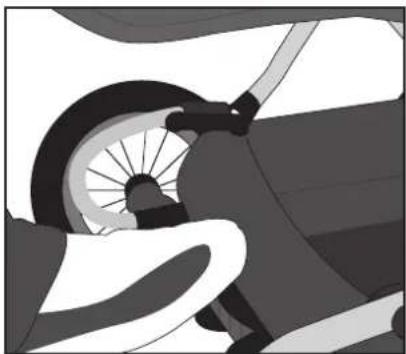
- Engage the brake by pushing it down with your foot.
• Disengage the brake by pulling it up with your foot.
WARNING
- Do not leave the pushchair without first engaging the brake.
- The brake should always be engaged when you lift your child in and out of the pushchair.
- Avoid uphill or downhill parking.
- Make sure that the brake pin engages into the cogs when the brake is applied.
7
natural_image
Line drawing of a car seat assembly with directional arrows indicating rotation (no text or symbols)Adjusting the hood
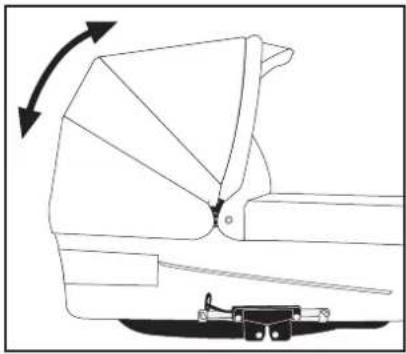
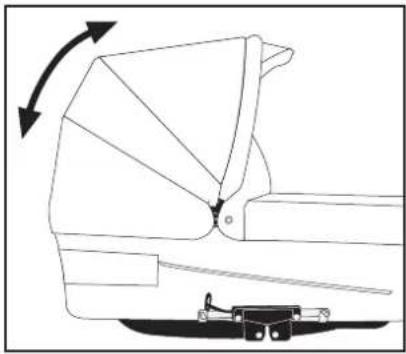
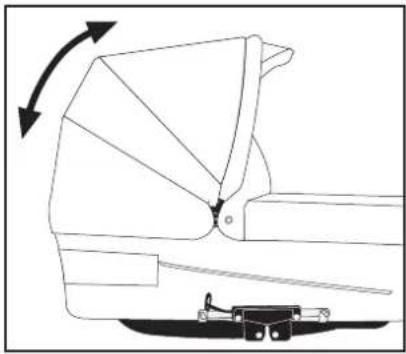
- Adjust the hood by gently pulling the hood forward into the desired position.
- Do not adjust the hood while the apron is attached
IMPORTANT
• Never carry the carrycot by the hood
- Never lift the carrycot when it is assembled on the chassis
8
Attaching the carrycot
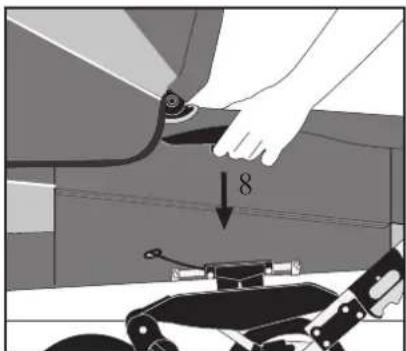
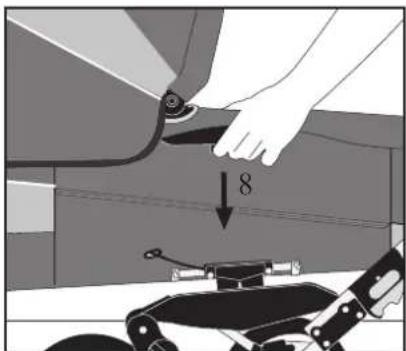
- Engage the brake
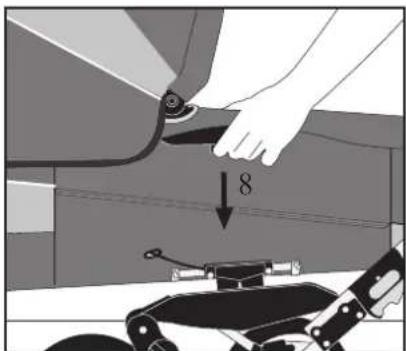
- Lift the carrycot by the handles and push the Easy Fix attachments into the receivers (8) on both sides of the chassis. Push the carrycot down into the receivers so that it locks into place with an audible click on both sides.
9
natural_image
Close-up of a person wearing a dark jacket and holding a small object, seated on a metal chair (no visible text or symbols)Removing the carrycot
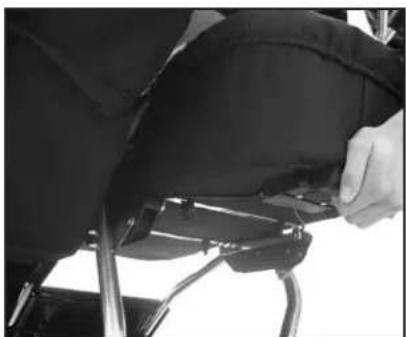
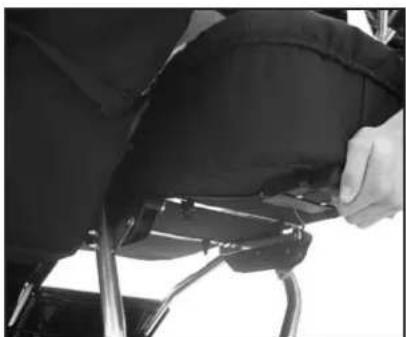
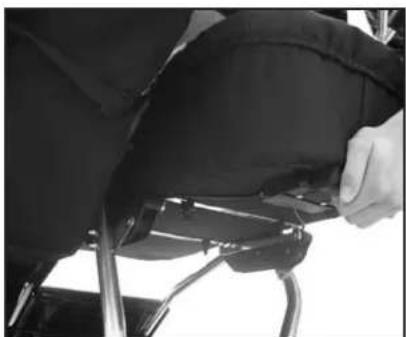
The picture shows the twin carrycot from below.
- Engage the brake
- Lift the twin carrycot by the carrying handles whilst pulling the handle which is placed underneath the carrycot, backwards towards the carrycot foot end.
• The carrycot can now be easily removed.
10
natural_image
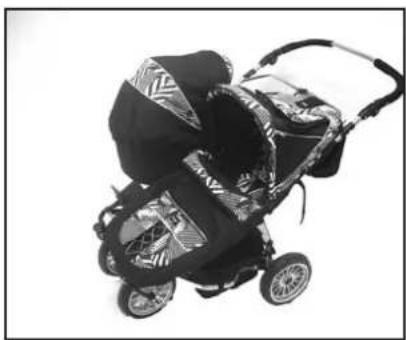
Black and white photo of a two-wheeled baby stroller with two black covers (no text or symbols visible)WARNING
- Never remove or attach the carrycot with a child is inside it.
• Make sure that the carrycot is correctly attached on both sides. - Hold the carrycot until it has clicked into place on both sides.
- Never lift the carrycot when the carrycot is attached to the chassis
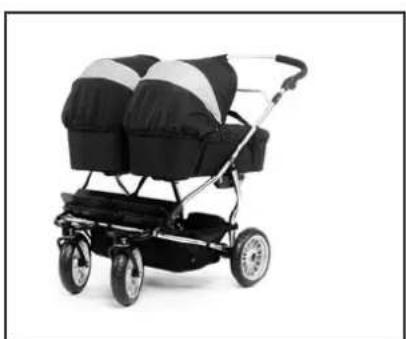
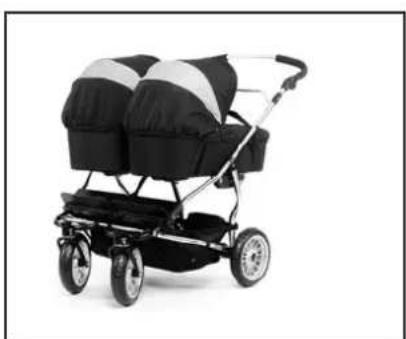
Picture 10 shows the Twin Cangaroo with two carrycots.
Care and maintenance
General care and maintenance instructions
- Never expose your vehicle to excessive sunlight for long periods of time.
• Always use a rain cover when it is snowing or raining. - Never store your vehicle in cold and/or damp places.
- Should the chassis become wet, dry it off promptly. Make sure the vehicle is completely dry before storing.
- If the vehicle is used near the ocean or salted roads, spray the chassis with a hose, and dry.
- Take care when transporting or storing the chassis since the surface is delicate. Scratches to the chassis surface, that arise after the sale is not a valid complaint.
Routine Inspection
- Regularly clean the chassis and metal parts of the vehicle dry off and lubricate all joints of the chassis. Spokes, and fenders on all wheels, should frequently be wiped off with a dry cloth. When the pram is used during the winter time, cleaning of the pram should be done at least once a week. Lack of maintenance could cause corrosion on the spokes and fenders. Should corrosion on the surface occur, which is a possibility, you are required to remove this with a corrosion cleaning agent.
- It is recommended to lubricate the wheel axles and suspension system every three months (clean axles with a cloth prior to lubrication). Axles may be lubricated with petroleum jelly or automobile oil.
Check that:
- all chassis locking devices are functioning properly.
- all rivets, nuts and bolts are firmly tightened and not broken.
- all plastic parts are not cracked or broken.
- the wheel bushings are in a good condition.
- all velcros are securely fastened on backrest pocket and seat board flap.
- the press-stud is securely fastened on the footrest flap.
- all elastic straps are in a good condition.
- the secondary locking mechanism is intact and can move freely.
PLEASE OBSERVE
- When in need of servicing with original parts and other technical issues that require a professional decision, always get in touch with your retailer where your Emmaljunga product was purchased. All Emmaljunga products come with a 6 month manufacturing guarantee. This guarantee does not apply when issues arise through normal wear and tear.
• This information is relevant for Great Britain only.
WARNING
- Tyres can when in contact with PVC-floor or other plastic materials cause discoloration. Always use wheel protection if the pram/stroller is stored on delicate surfaces.
Care and maintenance
Washing instructions
- Hood:
Take off and extend the hood. Shower the hood from the inside (interior fabric) with luke warm water. Use mild liquid soap as detergent. Cleanse it thoroughly. Drip dry the fully extended hood.
- Seat fabric and 5-point harness:
Remove the seat fabric from the chassis. Remove the seat-board; store it in a dry place. Hand wash seat fabrics in lukewarm water. Use mild liquid soap as detergent. Cleanse thoroughly. Drip dry the seat fabric. Only wipe the nylon straps and plastic parts clean with a damp cloth. Do not hand wash. Make sure the harness is dry before reassembly.
- Front bar padding:
Remove the front bar padding/apron. Hand wash in luke warm water. Use mild liquid soap as detergent on the surface of the exterior fabric. Handle non-woven interior material with care. Drip-dry.
- Pram body (City Carry-cot):
Wipe the exterior fabric and the interior lining material, clean with a damp cloth. Do not hand wash. Use a mild liquid soap as a detergent. Drip dry. Dry the pram body in its fully extended position. Make sure the wooden base is protected from any water.
General Information
- Ironing: If any fabric part needs to be ironed, always use a 100 % cotton cloth in-between the iron and the fabric to protect the fabric surface. Iron the exterior fabrics (100 %) polyester and the interior fabrics on gentle heat (110°C on the iron).
- Make sure all parts are completely dry before reassembly. Check the trimmings and the seam on the seat fabric underneath the backrest-pocket.
- You may apply a material protector (like Scotchgard™) on the exterior fabric after washing. Always apply before reassembly.
WARNING
- Do not place child/children in stroller for at least 24 hours after applying a material protector.
Reassembly after washing
WARNING
- Make sure all parts are assembled correctly according to the instructions in this manual.
Sisällysluettelo
natural_image
Person assembling a black athletic vest with patterned back cover (no visible text or symbols)natural_image
Close-up of a person adjusting a jacket with a numbered button and arrow indicator (no text or symbols)natural_image
Person adjusting a black jacket with a metal clip (no visible text or symbols)natural_image
Close-up of hands adjusting a black fabric or cushion component (no visible text or symbols)natural_image
Close-up of hands adjusting a black mechanical component with a circular base (no visible text or symbols)natural_image
Close-up of hands adjusting a small black object on a dark surface, with no visible text or symbols.natural_image
Close-up of a mechanical component with grid and mounting brackets (no visible text or symbols)natural_image
Close-up of hands adjusting a metal object on a dark surface (no visible text or symbols)natural_image
Close-up of hands adjusting a black fabric or garment with a metal clip (no visible text or symbols)natural_image
Person handling a black garment with patterned fabric (no visible text or symbols)natural_image
Close-up of a hand adjusting a dark fabric or material on a car surface (no visible text or symbols)natural_image
Close-up of hands adjusting a black mechanical component with a circular mark on the sleeve (no visible text or symbols)natural_image
Black tactical vest with multiple pockets, mounted on a stand (no visible text or symbols)natural_image
Close-up of a bicycle seatbelt with mesh insulation and metal frame (no text or symbols visible)natural_image
Close-up of a mechanical component with a numbered arrow pointing to a specific part (no visible text or symbols)18
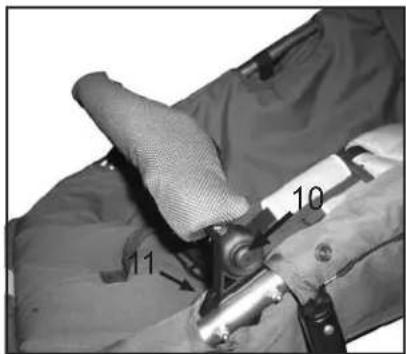
19
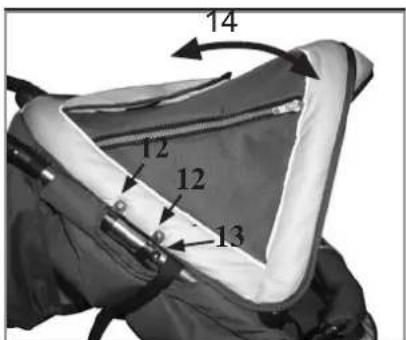
20
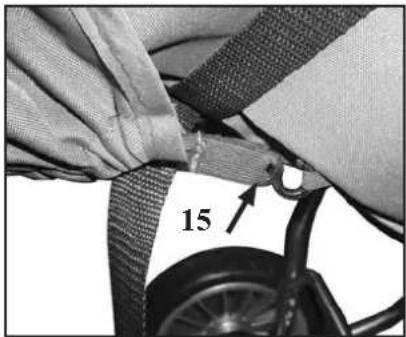
natural_image
Close-up of a hand adjusting a black jacket on a bicycle wheel (no visible text or symbols)natural_image
Close-up of a bicycle tire with a hand adjusting the wheel, showing a numbered arrow pointing to the wheel (no text or symbols on the diagram itself)natural_image
Close-up of a black exercise chair with two side seats and a white cable, no visible text or symbolsnatural_image
Close-up of hands adjusting a black belt buckle (no text or symbols visible)natural_image
Close-up of a fabric with a zipper and arrow indicating compression (no text or symbols)SELKÄNOJAN SÄÄTÄMINEN
natural_image
Illustration of a mechanical device with a rotating arrow indicating motion (no text or symbols)JARRUN KÄYTTÖ
natural_image
Black and white photo of a baby stroller with twin wheels and a canopy cover (no text or symbols visible)TYÖNTÖAISAN KORKEUDEN SÄÄTÄMINEN
natural_image
Close-up of a hand adjusting a bicycle wheel rim with a wrench, no visible text or symbolsETUPYÖRIEN VAPAUTTAMINEN
natural_image
Close-up of a hand using a tool to adjust or install a car wheel (no visible text or symbols)natural_image
Person operating a wheeled cart with arrows indicating motion direction (no text or symbols visible)natural_image
Close-up of a motorcycle's wheel and foot assembly with a hand adjusting the wheel (no visible text or symbols)natural_image
Diagram of a car chassis frame with wheels and structural components (no text or symbols)natural_image
Person assisting another person in a wheelchair seatbelt (no visible text or symbols)ISTUINKANKAAN IRROTTAMINEN
natural_image
Close-up of hands using a tool to adjust or install a mechanical component (no visible text or symbols)natural_image
Close-up of a bicycle steering wheel and suspension bracket (no text or symbols visible)natural_image
Close-up of a hand holding a black mechanical bracket with mounting holes (no text or symbols visible)TYÖNTÖAISAN PUOLELLA OLEVIEN ADAPTEREIDEN ASENNUS
natural_image
Close-up of hands using pliers to adjust or install a mechanical component (no visible text or symbols)TYÖNTÖAISAN PUOLELLA OLEVIEN ADAPTEREIDEN ASENNUS (JATKUU)
natural_image
Close-up of black metal mechanical components with a white arrow pointing to a feature (no text or symbols visible)RATTAAN KESKITANKOON TULEVIEN ADAPTEREIDEN ASENNUS
natural_image
Close-up of a hand using a tool to adjust or install a mechanical component (no visible text or symbols)RATTAAN KESKITANKOON TULEVIEN ADAPTEREIDEN ASEN- NUS
natural_image
Close-up of hands using a tool to adjust a metal rod (no text or symbols visible)RATTAAN KESKITANKOON TULEVIEN ADAPTEREIDEN ASEN- NUS
natural_image
Close-up of hands adjusting a metal tool on a chair (no visible text or symbols)RATTAAN KESKITANKOON TULEVIEN ADAPTEREIDEN ASEN-NUS
natural_image
Close-up of hands using a tool to adjust or install a mechanical component (no visible text or symbols)natural_image
Close-up of hands using a tool to adjust or install a mechanical component (no visible text or symbols)natural_image
Person adjusting a child's seatbelt in a wheelchair (no visible text or symbols)natural_image
Close-up of a hand pressing down on a dark fabric or cloth component (no visible text or symbols)natural_image
Person assisting another person in a wheelchair seat, no visible text or symbolsnatural_image
Close-up of hands using a tool to adjust a metal bicycle chain (no text or symbols visible)natural_image
Close-up of a mechanical support structure with labeled component '1' (no text or symbols beyond label)natural_image
Close-up of a hand holding a metal tool with a clamped blade (no text or symbols visible)natural_image
Close-up of hands using a tool to adjust or install a mechanical component (no visible text or symbols)natural_image
Close-up of a hand holding a metal bicycle handle with a black clamp and tool, no visible text or symbolsTYÖNTÖAISAN PUOLELLA OLEVIEN ADAPTEREIDEN ASENNUS
natural_image
Close-up of a hand using a tool to adjust or install a mechanical component (no visible text or symbols)RATTAAN KESKITANKOON TULEVAN ADAPTEREIDEN ASENNUS
natural_image
Black and white photo of a baby stroller with patterned back cover and wheels (no text or symbols visible)natural_image
Close-up of hands using a tool to adjust or install a metal component (no visible text or symbols)natural_image
Close-up of hands using a tool to adjust or install a mechanical component (no visible text or symbols)natural_image
Person assisting a person in a wheelchair seatbelt (no visible text or symbols)natural_image
Close-up of hands adjusting a small object on a patterned garment (no visible text or symbols)natural_image
Close-up of a person adjusting a black and patterned cushion seat (no visible text or symbols)natural_image
Close-up of a person wearing a black stroller with patterned fabric, seated in a wheelchair (no visible text or symbols)natural_image
Black and white photo of a baby stroller with patterned back cover (no text or symbols visible)natural_image
Line drawing of a baby bathtub with two arrows pointing to the interior area (no text or symbols)Aseta patja paikoilleen (4).
VAROITUS
natural_image
Line drawing of a hand holding a tool with arrows indicating force or movement (no text or symbols)natural_image
Close-up of a car wheel rim and wheelbase (no text or symbols visible)JARRUN KÄYTTÖ
natural_image
Line drawing of a car seat assembly with directional arrows indicating rotation (no text or symbols)KUOMUN SÄÄTÄMINEN
natural_image
Close-up of a person wearing a dark jacket and holding a small object, seated on a metal chair (no visible text or symbols)TWIN KOPAN IRROTTAMINEN
natural_image
Black and white photo of a two-wheeled baby stroller with two back cover compartments (no text or symbols visible)VAROITUS
Instruction manual for Twin Cangaroo & Twin Carrycot
© 2007 Emmaljunga Barnvagnsfabrik AB
All rights reserved
Emmaljunga Barnvagnsfabrik AB
- MONTERA BÅDA BAKHJULEN
- JUSTERING AV RYGGSTÖDET
- Fälla in styreshandtaget
- MONTERA AV SITTDELSKLÄDSELN
- MONTERA ADAPTORERNA SOM SITTER MOT STYRESRÖRET
- MONTERA ADAPTORERNA SOM SITTER MOT STYRESRÖRET (forts)
- MONTERA ADAPTORERNA SOM SITTER MOT MITTSTAGET
- MONTERA ADAPTORN SOM SITTER MOT STYRESRÖRET
- MONTERA ADAPTORN SOM SITTER MOT MITTSTAGET
- ANVÄNDA BROMSEN
- ADVARSEL
- Anvend bremsen
- Inden du klapper vognen sammen skal forhjulene rotere frit.
- Fold styret ind
- MONTERINGF AF ADAPTERN SOM SIDDER MOD STYRBENET.
- MONTERINGF AF ADAPTERN SOM SIDDER MOD MIDTERR∅RET.
- Justere kalechen
- Twin City Bag tages af vognen
- Bruk av bremsen
- Justering av handtaket
- La framhjulene rotere fritt 360
- VIKTIG
- MONTERE ADAPTERNE SOM SITTER MOT HANDTAGSBENET
- MONTER ADAPTERENE SOM SITTER MOT MIDT BenET
- MONTER ADAPTEREN SOM SITTER MOT MIDT BenET
- WARNUNG!
- MONTAGE BEIDER HINTERRÄDER
- MONTAGE DER ADAPTER AN DEN SCHIEBERROHREN
- MONTAGE DER ADAPTER AN DEN SCHIEBERROHREN (Forts.)
- MONTAGE DER ADAPTER AN DER MITTELSTREBE
- MONTAGE DES ADAPTER AN DEM SCHIEBERROHR
- MONTAGE DES ADAPTERS AN DER MITTELSTREBE
- Contents of the box
- Twin Cangaroo
- Accessories
- Sibling Package
- Emmaljunga's original accessories
- Twin Cangaroo Carrycot
- Inc. Adaptor Kit
- Inc. Twin Screw Package (only required for the twin pram)
- Important Safety Information
- ... WARNING ...
- EMMALJUNGA RECOMMENDS THAT YOU ALWAYS SECURE THE CHILD IN THE VEHICLE WITH THE 5-POINT HARNESS.
- Continued.
- Assembly of the pushchair - Assembly of the seat unit fabrics
- Assembly of the seat unit fabrics
- WARNING
- Attaching the left seat unit fabrics:
- Attaching the right seat unit fabrics:
- Assembly of the pushchair
- Attaching the rear wheels
- IMPORTANT!
- Attaching the front wheels
- Assembling and adjusting the bumper bar
- Assembly of the hood
- Adjusting the hood
- Adjusting the hood - attaching the hood apron with the hooks
- IMPORTANT
- Assembly of the pushchair - Assembly of the tray
- Using the pushchair
- Adjustment of the backrest
- Engaging the brake
- Adjusting the 5-point harness
- Adjusting the height of the handle
- Allow the front wheel to swivel 360 degrees
- Locking the front wheel
- Folding the pushchair
- Adjusting the handle
- Changing the pushchair from a twin pushchair to a twin pram
- Assembling the carrycot adaptor
- Assembling the adaptors (on the rear leg of the chassis)
- Please note!
- Assembling the adaptors (on the middle bar of the chassis)
- Changing the pushchair from a twin pram to a twin pushchair
- Changing the pushchair from a twin pushchair to a sibling pram
- ASSEMBLING THE ADAPTOR (ON THE REAR LEG OF THE CHASSIS)
- Changing the pushchair from a twin pushchair to sibling pram
- Changing the pushchair from a sibling pram to a twin pushchair
- Assembly of the Sibling Package (accessory)
- Assembly and usage of the Twin Cangaroo Carrycot (accessory)
- Assembly of the carrycot
- IMPORTANT:
- Attaching the carrycot
- Removing the carrycot
- Care and maintenance
- General care and maintenance instructions
- Routine Inspection
- Check that:
- PLEASE OBSERVE
- Washing instructions
- General Information
- Reassembly after washing
- Sisällysluettelo
- SELKÄNOJAN SÄÄTÄMINEN
- JARRUN KÄYTTÖ
- TYÖNTÖAISAN KORKEUDEN SÄÄTÄMINEN
- ETUPYÖRIEN VAPAUTTAMINEN
- ISTUINKANKAAN IRROTTAMINEN
- TYÖNTÖAISAN PUOLELLA OLEVIEN ADAPTEREIDEN ASENNUS
- TYÖNTÖAISAN PUOLELLA OLEVIEN ADAPTEREIDEN ASENNUS (JATKUU)
- RATTAAN KESKITANKOON TULEVIEN ADAPTEREIDEN ASENNUS
- RATTAAN KESKITANKOON TULEVIEN ADAPTEREIDEN ASEN- NUS
- RATTAAN KESKITANKOON TULEVIEN ADAPTEREIDEN ASEN-NUS
- RATTAAN KESKITANKOON TULEVAN ADAPTEREIDEN ASENNUS
- VAROITUS
- KUOMUN SÄÄTÄMINEN
- TWIN KOPAN IRROTTAMINEN
Brand : Emmaljunga
Model : Twin Cangaroo
Category : Stroller