
SCR 3300 - Dash cam SENCOR - Free user manual and instructions
Find the device manual for free SCR 3300 SENCOR in PDF.


| Product Type | Dashboard Camera (Dash Cam) |
| Brand | Sencor |
| Model | SCR 3300 |
| Dimensions | Diameter 35 mm x Height 43 mm |
| Weight | 40 g |
| Power Supply | 5V / 1.5A via car adapter (included), USB port, or external adapter |
| Image Resolution | 1920 x 1080 (Full HD) |
| Video Codec | HEVC (H.265) |
| Storage | Micro SD card (Class 10 or above, 16 GB to 256 GB) |
| Connectivity | Wi-Fi (for mobile app connection) |
| Display | None (display-free design with indicator light) |
| G-Sensor | Built-in accelerometer (3 levels or off), locks emergency recordings |
| Parking Mode | Supported (requires optional hardware kit) |
| Voice Notifications | Voice prompts in English (volume adjustable) |
| Mounting | Adhesive windscreen holder with bayonet lock, foldable |
| Operating Temperature | -20°C to +65°C |
| Storage Temperature | -30°C to +80°C |
| Special Features | SuperCap (battery-free), automatic power on/off, loop recording, emergency recording |
| Cleaning and Maintenance | Clean with dry cloth only; avoid solvents, petrol, or ammonia |
| Safety Notes | Protect lens from scratches; avoid extreme temperatures and moisture |
Frequently Asked Questions - SCR 3300 SENCOR
User questions about SCR 3300 SENCOR
0 question about this device. Answer the ones you know or ask your own.
Ask a new question about this device
Download the instructions for your Dash cam in PDF format for free! Find your manual SCR 3300 - SENCOR and take your electronic device back in hand. On this page are published all the documents necessary for the use of your device. SCR 3300 by SENCOR.
USER MANUAL SCR 3300 SENCOR
natural_image
Black cylindrical device with open lid and lens, shown in studio setting (no visible text or symbols)EN ■ User Manual
- Important Safety Instructions....3
- Description and Control of the Device....4
- Mounting the Camera on the Windscreen....6
- Connection and Power Supply....7
- Description of Basic and Special Functions....8
- Settings and Usage 11
- Technical Data 11
Product Features:
• Wi-Fi dashboard camera with easy control
• Full camera setup in the Android mobile application
• Image and file transfer to the Android mobile application
• Battery-free SuperCap technology
• Non-distracting, display-free design with indicator light
• Voice response of operational information
- Miniature windscreen holder with bayonet lock
1. Important Safety Instructions
Carefully read this manual before using the device. It contains important information about safe use, operation and possible troubleshooting. Keep the manual in a safe place for possible future reference. If selling or transferring the device to another person, provide the manual along with the device to allow the new owner to familiarise themselves with it.
Warning
- Protect the lens from scratching.
- Do not use force when connecting the USB cable. Always ensure that you connect the USB cable to the device when it is turned off.
- Do not insert connectors other than the specified USB connector for the port size.
- Handle the camera with care to avoid damage.
- Protect the device from impacts. Do not expose it to extreme temperatures, direct sunlight, etc.
- When installing, please degrease the windscreen contact area and ensure the holder is firmly attached to prevent the camera from falling.
- Insert the Micro SD card carefully, do not use force. Make sure the device is turned off before inserting the Micro SD card. Do not remove the Micro SD card during operation, but only when the device is turned off.
- Due to the wide range of Micro SD cards on the market, full compatibility with all Micro SD cards cannot be guaranteed.
- Do not expose the device or accessories to dripping or splashing water. Protect it from moisture, dust and dirt.
- Do not expose the device to heat sources, and do not place any open flame sources nearby.
- Use only a dry cloth for cleaning. Under no circumstances use petrol, solvents, ammonia or any other similar substances.
2. Description and Control of the Device
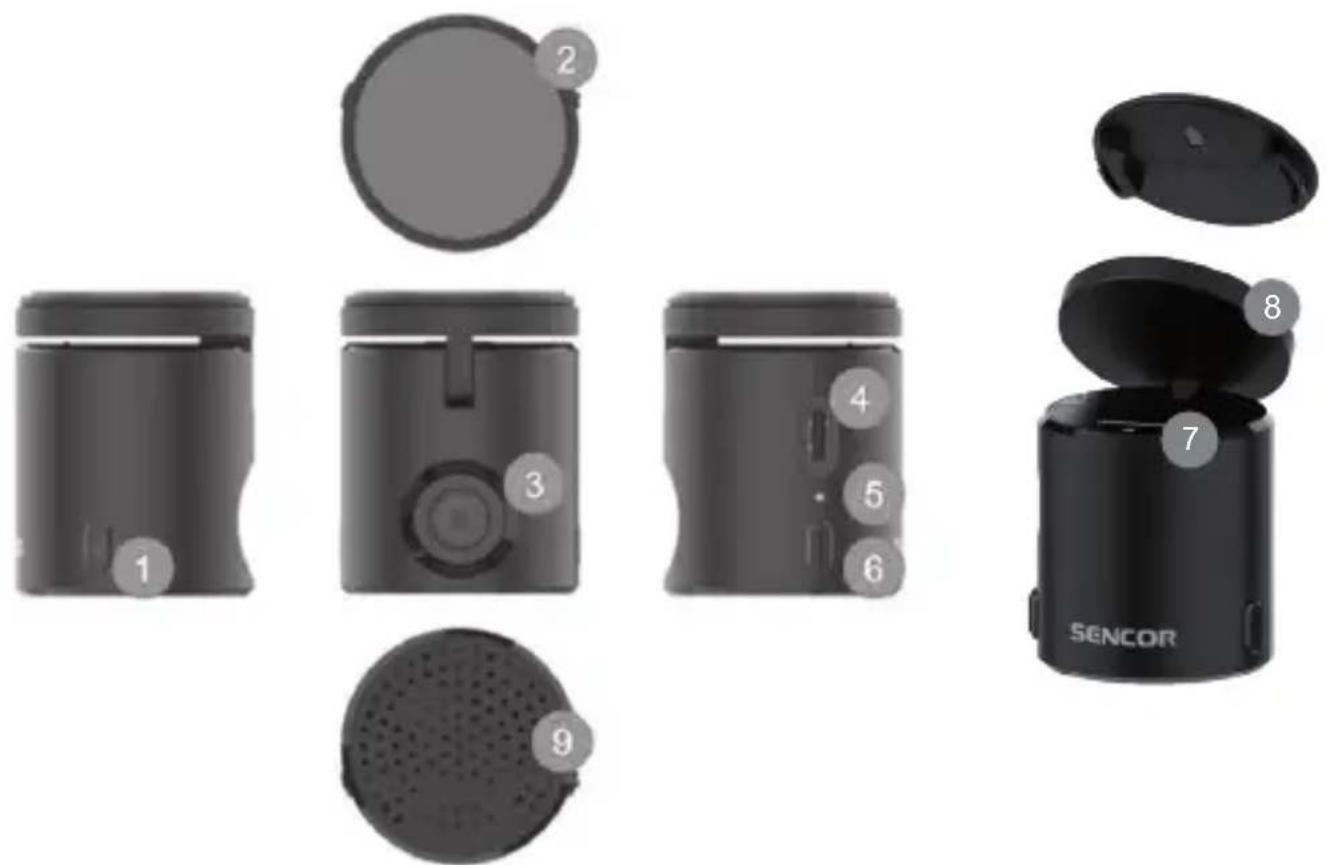
- Microphone button – press to turn off or on the audio recording in the cabin
- Windscreen holder with adhesive tape
- Camera lens
- Power connector
- Indicator light – description of colours and indications in the table below
- Power and recording button - description of functions in the table below
- SD card slot
- Foldable holder
- Speaker, microphone
Description of the Power Button Functions:
| Default State Action Function | ||
| Off (when powered) | Press the power button for 1 second | Turns on the camera |
| On | Press and hold the power button for 3 seconds | Turns off the camera |
| Press the on/off button Turns Wi-Fi on/off | ||
| Press the power button 3 times Formatting Micro SD card | ||
| Press the power button 5 times in a row | Restores factory settings | |
| Press and hold the power button for 10 seconds | Resets and restarts the device | |
Description of Light Indicators:
| Status Indication | |
| Solid green Normal recording | |
| Solid blue Recording off mode (e.g. when entering an album) | |
| Solid red Abnormal recording status or no SD card | |
| Green blinking Emergency video recording | |
| Blue blinking Operation in progress (e.g. during card update) | |
| Slow blinking ("breathing" from dark to light and back) | Wi-Fi is on |
Working with the SD Card:
- Inserting the card: Carefully insert the card INTO THE TURNED OFF DEVICE in the correct orientation (with the label facing towards you, gold contact pads facing downwards, inside the device). Insert the card, e.g. using a fingernail, until it clicks about 1 mm below the surface level, you will hear a faint click of the locking mechanism. When releasing your finger, the card will settle into the correct position.
- Removing the card: Press the card, e.g. using a fingernail, about 1 mm below the surface level, you will hear a faint click of the locking mechanism. Hold the card when releasing it, otherwise it may spring out sharply.
SD Card Notes
a) For recording, it is necessary to use a quality card with fast write speed, at least class 10 and appropriate size. Test the card size for your use beforehand, as a small card may fill up quickly. We recommend at least 16 GB, but no more than 256GB.
b) Despite maximum efforts for compatibility, usability and uninterrupted function with all devices on the market cannot be guaranteed. If the function or recording on the card does not meet your expectations, format the card in a computer and then in this device. If the function is still not satisfactory, use another card.
c) When inserting a new card, ALWAYS format it in the camera. Formatting will create separate spaces for regular recordings (approx. 60%) and emergency recordings (approx. 30%). The formatting will irreversibly erase the previous contents of the card!
d) When reading the card in a computer, do not change the structure of its contents or delete any items. The camera will detect the card as modified and will require formatting, which will erase the previous content.
e) Do not insert or remove the Micro SD memory card while the camera is turned on, as it may damage the stored video and the Micro SD memory card.

WARNING: The inserted card uses technology sensitive to high temperatures or thermal shocks. Avoid leaving the memory card in high temperatures (e.g., in a car window during summer) and do not expose it to temperature shocks (e.g., in winter). This could result in temporary or even permanent damage to the recordings in the memory. Due to the possible extreme stress on the memory card (vibrations, temperature fluctuations, humidity), it is advisable to occasionally check the integrity of the memory space of the card on a computer and, if necessary, reformat it on a computer and then in the camera. Cards with errors are recommended to be discarded from further use.
3. Mounting the Camera on the Windscreen

WARNING: Before mounting the camera, verify local rules and regulations for installing such devices in a car and their use.
Choose a location with a good view for the camera that does not obstruct the driver's view. Verify good mechanical accessibility for the power cable, including the ability to remove and remount the camera on the holder. Also, make several test recordings with different resolutions and camera positions to achieve the desired result. Clean and degrease the target area for attaching the camera holder. Only now, pull out the power cable and remove the adhesive tape (2) from the cover foil. Slightly tilt the folding holder away from the camera and continuously check the desired direction of the camera's view. Apply very little pressure when attaching the camera with holder to the target area on the windscreen. If there are no bubbles in the adhesive area, you can fully fold the camera to the windscreen and remove it from the holder by rotating it to the left. Press the holder itself onto the windscreen with slight pressure of your finger. Connect the power cable, gently insert the camera into the holder attached to the windscreen, and fix it in the holder by gently rotating it. The camera is ready for operation.
Note: The adhesive on the holder is very strong and heat-resistant. Choose the mounting location carefully. Remember the target direction of the camera's view.

WARNING: Do not use excessive force when handling and working with the holder and the camera. Both parts are lightweight and are not exposed to any mechanical stress during operation.
4. Connection and Power Supply
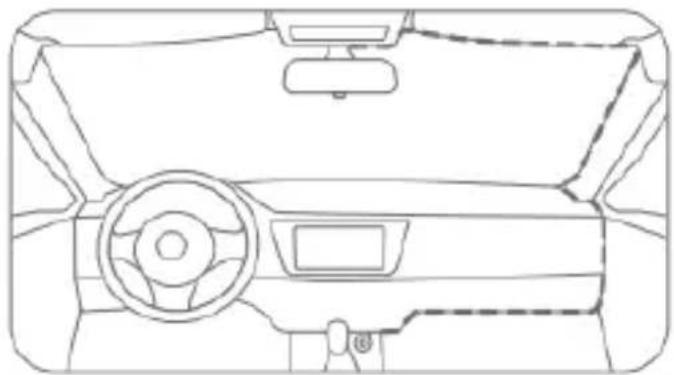
Arrange the power cable to upper part of the windscreen, A-pillar, passenger seat storage compartment, near the cigarette lighter, as shown in the diagram, and connect the power adapter to the cigarette lighter socket.
natural_image
Line drawing of a car dashboard and steering wheel (no text or symbols)Note: The location of the cigarette lighter socket may vary depending on the vehicle model, and the illustrations provided above are for reference only.
Power supply options: supplied car adapter, PC USB socket, external power adapter (puRchased separately).

WARNING: Use only 5V power supply; other voltage values may damage the device.
5. Description of Basic and Special Functions
Saving Recordings
Recordings are saved as segments of 1-3 minutes (depending on your choice), cyclically. When the allocated storage space is filled, each new video will replace the oldest video on the memory card. To prevent important files from being deleted, timely backup important videos to other devices such as mobile phones or computers.
G-sensor
An exceptional acceleration sensor, e.g. in the event of a collision or accident, locks the current file and saves it to a dedicated area on the card. It can be set to 3 levels or turned off. Try an appropriate setting to prevent the sensor from being triggered by normal road irregularities.
Automatic Power On and Off
When connected to power, the camera will turn on and start recording, and a few seconds after disconnecting the power, it will stop recording and turn off. For cards with large capacity, it may take several seconds to verify after power on. Wait until the indicator light is solid green. Most cars have a dashboard socket controlled by the ignition key, so you don't need to manually operate the camera or manipulate the power cable.
Note: The camera starts operating and recording even in the "Accessory" key position when the engine is off. If the on-board voltage significantly drops during later engine start-up, the camera may initiate operation limitations, stop recording, or completely turn off. In this case, turn the camera back on.
Parking Mode and Time-Lapse Recording
Parking mode and time-lapse recording in the application need to be activated with the appropriate equipped car hardware kit, which is not included in this camera set.
Voice Notifications
In addition to the regular operational beeps, some important device statuses are conveyed through short voice comments in English. Their volume can be adjusted in the application. If you don't need them, you can completely mute the volume in the application. The status information is then conveyed exclusively by the indicator light.
Overview of Important Information:
| Voice Notification Meaning | |
| Take photo Taking a photo. | |
| Start recording emergency video Initiating emergency video recording. | |
| Recording complete The recording is complete. | |
| Audio recording is on Audio recording is enabled. | |
| Audio recording is off Audio recording is disabled. | |
| Access point is on Wi-Fi transmission to the DashCamAssist app is enabled | |
| Access point is off Wi-Fi transmission to the DashCamAssist app is disabled | |
| Formatting started Formatting of the inserted card has started. | |
| Formatting succeeded Formatting of the inserted card is completed. | |
| Please insert memory card Please insert a memory card. | |
| Restore factory settings Restoring factory settings. | |
| Factory settings has been restored. Please restart the device | Factory settings have been restored. Please restart the device. |
| Please format memory card Please format the card. | |
| Memory card error. Please format or replace it. | Memory card error. Format it or use a different one. |
| Memory card class is low. Please replace it with class 10 or above. | The memory card class is low. Replace it with a class 10 or above. |
6. Settings and Usage
Installing the Application on Your Mobile Phone
- Download DashCamAssist from the app store
Scan the QR code below and download and install the DashCamAssist APP.

- Turn on the camera, make sure the Access Point is turned on ("On")
- Open the Wi-Fi settings on your mobile phone >>> Connect to the device Wi-Fi hotspot >>> Enter the initial Wi-Fi password: 12345678 >>> Successfully connected
- Open DashCamAssist: If the device and the APP are successfully connected, the APP will display the device's recording screen. (Warning: If the APP does not display the device's recording screen, reconnect.)
- In the application, you can see the image from the connected camera, with slight time delay. You can also view the recordings on the card inserted in the camera and save them to your mobile phone after enabling it.
- In the application you can set: turning on/off the microphone, length of individual video recordings (1-3 minutes), speaker volume (0-3), G-sensor sensitivity (0-3), set the time in the camera, format the card in the camera, set a custom Wi-Fi access code, and perform factory settings on the camera.
7. Technical Data
| Power supply: 5V/1.5A | |
| Power supply method: Car adapter | |
| Image resolution, codec: 1920×1080, HEVC | |
| Camera weight: 40g | |
| Operating temperature: -20°C ~ +65°C, 24H | |
| Storage temperature: -30°C ~ +80°C, 48H | |
| Dimensions: ∅ 35×43mm |
Note: In order to improve the performance or adaptation, we reserve the right to make future changers without prior notice.
The original version is in the Czech language.
Manufacturer's address: FAST ČR, a.s., U Sanitasu 1621, Říčany CZ-251 01
INSTRUCTIONS AND INFORMATION ON DISPOSAL OF USED PACKAGING MATERIAL
Dispose of used packaging material in the designated waste disposal area determined by the municipality.

DISPOSAL OFUSED ELECTRICAL AND ELECTRONIC EQUIPMENT
This symbol on products or original documents means that used electric or electronic products must not be added to ordinary municipal waste. For proper disposal and recycling of these products, deliver them to designated collection points. Alternatively, in some European Union states or other European countries the products can be returned to the local retailer when buying an equivalent new product. Disposing of this product correctly helps save valuable natural resources and prevents potentially negative impact on the environment and human health by improper waste disposal. For further details, contact your local authorities or the nearest collection point. Fines may be imposed for improper disposal of this type of waste in accordance with national regulations.
For Business Entities in European Union States
If you want to dispose of electric or electronic devices, ask your retailer or supplier for the necessary information.
Disposal in Other Countries Outside the European Union
This symbol is valid in the European Union. If you wish to dispose of this product, request the necessary information about the correct disposal method from the local council or from your retailer.

This product meets all the basic requirements of the applicable EU directives.
The text, design and technical specifications may be changed without prior notice and we reserve the right to make these changes.
SENCOR®
EN Warranty conditions
Warranty card is not a part of the device packaging.
This product is warranted for the period of 24 months from the date of purchase to the end-user. Warranty is limited to the following conditions. Warranty is referred only to the customer goods using for common domestic use. The claim for service can be applied either at dealer's shop where the product was bought, or at below mentioned authorized service shops. The end-user is obligated to set up a claim immediately when the defects appeared but only till the end of warranty period. The end user is obligated to cooperate to certify the claiming defects. Only completed and clean (according to hygienic standards) product will be accepted. In case of eligible warranty claim the warranty period will be prolonged by the period from the date of claim application till the date of taking over the product by end-user, or the date the end-user is obligated to take it over. To obtain the service under this warranty, end-user is obligated to certify his claim with duly completed following documents: receipt, certificate of warranty, certificate of installation.
This warranty is void especially if apply as follows:
■ Defects which were put on sale.
■ Wear-out or damage caused by common use.
The product was damaged by unprofessional or wrong installation, used in contrary to the applicable instruction manual, used in contrary to legal enactment and common process of use or used for another purpose which has been designed for.
■ The product was damaged by uncared-for or insufficient maintenance.
The product was damaged by dirt, accident of force majeure (natural disaster, fire, and flood).
■ Defects on functionality caused by low duality of signal, electromagnetic field interference etc.
■ The product was mechanically damaged (e.g. broken button, fall).
■ Damage caused by use of unsuitable media, fillings, expendable supplies (batteries) or by unsuitable working conditions (e.g. high temperatures, high humidity, quakes).
■ Repair, modification or other failure action to the product by unauthorized person.
■ End-user did not prove enough his right to claim (time and place of purchase).
■ Data on presented documents differs from data on products.
Cases when the claiming product cannot be identified according to the presented documents (e.g. the serial number or the warranty seal has been damaged).
Manufacturer:
FAST ČR, a.s., U Sanitasu 1621, Ričany 251 01, Czech Republic
Visit www.sencor.com for detailed information about authorized service centers.
The original version of the instructions is in the Czech language, other language versions are made by the appropriate translation.
Obsah
natural_image
Line drawing of a car dashboard and steering wheel (no text or symbols)natural_image
Line drawing of a car dashboard and steering wheel (no text or symbols)natural_image
Line drawing of a car dashboard and steering wheel (no text or symbols)natural_image
Line drawing of a car dashboard and steering wheel (no text or symbols)


- Product Features:
- Important Safety Instructions
- Warning
- Description and Control of the Device
- Working with the SD Card:
- SD Card Notes
- Mounting the Camera on the Windscreen
- Connection and Power Supply
- Description of Basic and Special Functions
- Saving Recordings
- G-sensor
- Automatic Power On and Off
- Parking Mode and Time-Lapse Recording
- Voice Notifications
- Settings and Usage
- Installing the Application on Your Mobile Phone
- Technical Data
- INSTRUCTIONS AND INFORMATION ON DISPOSAL OF USED PACKAGING MATERIAL
- DISPOSAL OFUSED ELECTRICAL AND ELECTRONIC EQUIPMENT
- For Business Entities in European Union States
- Disposal in Other Countries Outside the European Union
- SENCOR®
- EN Warranty conditions
- This warranty is void especially if apply as follows:
- Manufacturer:
- Obsah
Brand : SENCOR
Model : SCR 3300
Category : Dash cam