
A11 - Audio Amplifier DENON - Free user manual and instructions
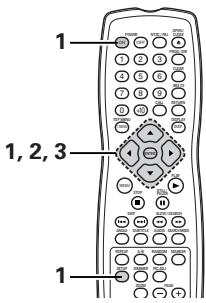
Find the device manual for free A11 DENON in PDF.
| Product type | DVD Audio-Video Player / Super Audio CD |
| Compatible disc formats | DVD-Audio, DVD-Video, Super Audio CD, Audio CD, CD-R/RW (MP3, WMA, JPEG) |
| Audio outputs | Analog 5.1-channel, digital coaxial, optical, DENON LINK, IEEE 1394 |
| Video outputs | Composite, S-Video, component (Y/Pb/Pr), DVI-D, SCART (European model) |
| Main functions | Multi-angle playback, audio/subtitle language switching, zoom, scene marking, programmed playback, repeat, random |
| Supported audio formats | Dolby Digital, DTS, Linear PCM, Compressed PCM, MP3, WMA, DSD (Super Audio CD) |
| Audio processing | AL24 Plus, adjustable low-pass filter (50/100 kHz), Pure Direct Mode |
| Remote control | Yes (RC-962) with AA batteries |
| Other connections | RS-232C, ROOM TO ROOM (wired remote control input/output), AC IN |
| Power supply | Mains 220-240 V AC, 50/60 Hz |
| Power consumption | 35 W (estimate) |
| Dimensions (W x H x D) | 434 x 133 x 409 mm (estimate) |
| Weight | 12.5 kg (estimate) |
| Maintenance and cleaning | Wipe with a soft, dry cloth. Do not use solvents or abrasive products. |
| Safety | Do not open the cover, avoid high temperatures, do not place objects inside the unit, handle the power cord with care |
| Spare parts and repairability | Contact an authorized DENON dealer for any repairs. Genuine parts are available. |
| General information | Semiconductor laser, operating temperature 10°C to 35°C. Compatible with copy protection signals. |
Frequently Asked Questions - A11 DENON
User questions about A11 DENON
0 question about this device. Answer the ones you know or ask your own.
Ask a new question about this device
Download the instructions for your Audio Amplifier in PDF format for free! Find your manual A11 - DENON and take your electronic device back in hand. On this page are published all the documents necessary for the use of your device. A11 by DENON.
USER MANUAL A11 DENON
Allow for sufficient heat dispersion when installed on a rack.
* (For sets with ventilation holes)
- Do not obstruct the ventilation holes.
Die Beluftungsöffnungen dürfen nicht verdeckt werden. - Ne pas obstruer les trouès d'aération.
Non coprite i fori di ventilazione.

- The ventilation should not be impeded by covering the ventilation openings with items, such as newspapers, table-cloths, curtains, etc.
- No naked flame sources, such as lighted candles, should be placed on the apparatus.
- Please be care the environmental aspects of battery disposal.
- The apparatus shall not be exposed to dripping or splashing for use.
- No objects filled with liquids, such as vases, shall be placed on the apparatus.

CAUTION:
TO REDUCE THE RISK OF ELECTRIC SHOCK, DO NOT REMOVE COVER (OR BACK). NO USER SERVICEABLE PARTS INSIDE. REFER SERVICING TO QUALIFIED SERVICE PERSONNEL.
alert the user to the presence of uninsulated "dangerous voltage" within the product's enclosure that may be of sufficient magnitude to constitute a risk of electric shock to persons.
triangle is intended to alert the user to the presence of important operating and maintenance (servicing) instructions in the literature accompanying the appliance.
- DECLARATION OF CONFORMITY
We declare under our sole responsibility that this product, to which this declaration relates, is in conformity with the following standards:
EN60065, EN55013, EN55020, EN61000-3-2 and EN61000-3-3.
Following the provisions of 73/23/EEC, 89/336/EEC and 93/68/EEC Directive.
CLASS 1 LASER PRODUCT
LUOKAN 1 LASERLAITE
KCLASS 1 LASERAPPARAT
ADVARSEL: USYNLIG LASERSTRAING VED ABNING, NAR SIKKERHEDSAFBRYDERE ER UDE AF FUNKTION. UNDGÅ USDASETTELSE FOR STRALING.
VAROITUS! LAITTEEN KÄYTTÄMINEN MUULLA KUN TÄSSÄ KÄYTTÖOHJEESSA MAINITULLA TAVALLA SAATTAA ALTISTAA KÄYTTÄJÄN TURVALLISUUSLUOKAN 1 YLITTÄVÄLLE NAKYMATTÖMALLE LASERSATEILYLLE
VARNING- OM APPARATEN ANVÄNDS PÄ ANNAT SÄTT ÄN I DENNA
BUKSANVISING SPECICERATS, KAN ANVANDARENUTSATTAS FOR OSYNLIG LASERSTRALNING SOMOVERSKRIDER GRANSEN FOR LASERCLASS 1.
"CLASS 1 LASER PRODUCT"

FRONT PANEL
FRONTPLATTE
PANNEAU AVANT
PANNELLO FRONTALE
PANEL DELANTERO
VOORPANEL
FRONT PANELEN
3 For only European model
33 Nur für europäisches Modell
Pour le modele d'Europe seulement
33 Solo per modelli europei
33 Sólo para el modelo europeo
Alleen voor Europees model
33 Endast på Europa-modelen
REAR PANEL
RUCKWAND
PANNEAU ARRIERE
IL PANNELLO POSTERIORE
PANEL TRASERO
ACHTERPANEL
BAKSIDAN
IMPORTANT TO SAFETY
WARNING:
TO PREVENT FIRE OR SHOCK HAZARD, DO NOT EXPOSE THIS APPLIANCE TO RAIN OR MOISTURE.
CAUTION:
1. Handle the power supply cord carefully
Do not damage or deform the power supply cord. If it is damaged or deformed, it may cause electric shock or malfunction when used. When removing from wall outlet, be sure to remove by holding the plug attachment and not by pulling the cord.
2. Do not open the top cover
In order to prevent electric shock, do not open the top cover.
If problems occur, contact your DENON DEALER.
3. Do not place anything inside
Do not place metal objects or spill liquid inside the DVD audio-video/Super audio CD player. Electric shock or malfunction may result.
Please, record and retain the Model name and serial number of your set shown on the rating label.
Model No. DVD-A11 Serial No.
NOTE:
This DVD audio-video/Super audio CD player uses the semiconductor laser. To allow you to enjoy music at a stable operation, it is recommended to use this in a room of 10^ (50^) 35^ (95^)
Copyrights
It is prohibited by law to reproduce, broadcast, rent or play discs in public without the consent of the copyright holder.
- ACCESSORIES
Please check to make sure the following items are included with the main unit in the carton:
① Audio cord 1
② Video cord 1
③ AC cord
④ DENON LINK cord
⑤ IEEE 1394 cord
TABLE OF CONTENTS
1 Features. 4,5
2 Discs 5
3 Cautions on Handling Discs 6
4 Connections. 6~11
5 Part Names and Functions. 11, 12
6 Remote Control Unit. 13
7 Loading Discs. 14
8 Changing the Default Settings. 14~23
9Playback. 24~26
10 Using the Mode Set Up 26, 27
11 Adjusting the Picture Quality. 27~29
12 Using the On-Screen Display. 29
13 Playing Repeatedly. 30
14 Playing Tracks in the Desired Order. 31
15 Playing Tracks in the Random Order. 31
16 Playing Back WMA 32
17 MP3Playback 32,33
18 Playing Still Picture Files (JPEG format).....33, 34
19 Using the Multiple Audio, Subtitle and Angle Functions 35, 36
20 Using the Menu 36, 37
21 Marking Scenes you want to see again 37
22 Playing in the Zoom Mode. 38
23 Troubleshooting 38
24 Main Specifications 39
1 FEATURES
1. Digital transfer connectors
The DVD-A11 can be connected to another digital transfer compatible Denon component (AV amplifier, etc.) using a single cable (included) for high quality digital sound with little transfer loss.
(1) Denon Link terminal
This terminal can be used for digital transfer of not only DVD video signals, but also multichannel audio signals of DVD audio.
(2) IEEE 1394 terminal
This terminal can be used for digital transfer of not only DVD video signals, but also DVD audio signals, Super Audio CD signals and other multi-channel audio signals.
2. Super Audio CD multi-channel playback compatibility
In addition to playing DVD audio and video discs, the DVD-A11 can play multi-channel Super Audio CDs with a playback frequency range covering 100kHz and a dynamic range of 120 dB or greater within the audible frequency range, and a maximum of 5.1 channels can be output.
3. AL24 Processing Plus at all channel
AL24 Processing Plus compensates the input digital data to reproduce the sound with analog waveforms as close as possible to those existing in nature and with 24-bit quality. The result is increased musical reproduction capabilities of reverberations, etc., at low levels, for a sound that seems to draw you into the concert hall.
Equipped for not only the front left and right channels but also for the surround left and right, center and subwoofer channels.
4. High precision 24-bit D/A converter
The audio playback circuit includes an advanced segment type D/A converter with the top technical specifications in the business, manufactured by Burr-Brown, a company with an established reputation for D/A converters. This high performance D/A converter allows not only input of the 24-bit/192 kHz data of DVD-Audio discs, it also includes an analog pure FIR filter for ideal DSD playback of Super Audio CDs. Furthermore, the same DAC is used unsparingly for the surround, center and LFE channels to provide optimum sound quality during multi-channel playback as well.
5. HDCD (High Definition Compatible Digital) decoder (NOTE 1)
HDCD is an encoding/decoding technology that greatly reduces the distortion occurring at the time of digital recording while maintaining compatibility with the conventional CD format. HDCD allows 24-bit data to be converted into the 16-bit data of current CDs with no loss in sound quality.
The use of this HDCD decoder makes it possible to achieve the high resolution and low distortion characteristic of HDCD when playing HDCD-compatible discs, and DENON's digital technology optimizes the high sound quality possibilities of HDCD technology. Furthermore, normal CDs and HDCD-compatible CDs are automatically identified, and the optimum digital signal processing for that type of disc is used.
6. Dolby Digital (AC-3)/DTS decoder (NOTES 2, 3)
The DVD-A11 is equipped with a built-in Dolby Digital (AC-3) /DTS decoder, allowing you to recreate the atmosphere of a movie theater or concert hall when using the DVD-A11 in combination with an AV amplifier and speakers.
7. Progressive Scan circuit "DCDiTM" (NOTE 4)
The DVD-A11 is equipped with a high precision Progressive Scan circuit "DCDiTM" allowing it to reproduce movies and other images on DVDs with a quality near that of the original.
8. 12-bit/216 MHz video D/A converter (NOTE 5)
The DVD-A11 uses a video D/A converter that conducts D/A conversion of all video signals at 12 bits and allows 8X oversampling in the progressive mode to achieve the high quality picture that DVDs are meant to provide. In addition, NSV technology reduces noise upon D/A conversion.
9. Thorough vibration-resistant design
(1) Mechanism using a hybrid loader.
(2) The pickup mechanism is positioned at the center to reduce the effects of external vibrations.
(3) A heavyweight chassis and low center of gravity make for a low vibration design.
10.Multiple functions
(1) Still picture playback function
Kodak Picture CD (NOTE 6) and Fujifilm Fujicolor CD (NOTE 7) can be played on the DVD-A11.
Still images stored in JPEG format on CD-R/RWs can also be played.
(2) Windows Media™ playback function (NOTE 8) Windows Media™ CDs can be played on the DVD-A11.
(3) Multiple audio function
Selection of up to 8 audio languages.
(The number of languages offered differs from DVD to DVD.)
(4) Multiple subtitle function
Selection of up to 32 subtitle languages.
(The number of languages offered differs from DVD to DVD.)
(5) Multiple angle function
The angle of view can be changed.
(For DVDs on which multiple angles are recorded.)
(6) GUI (Graphical User Interface) function
The DISPLAY button on the remote control unit can be used to display player and disc information on the TV screen.
(7) Marker function
The positions of up to five scenes can be stored in the memory, so you can watch your favorite scenes whenever you want.
(8) Playback disable function
This function can be used to disable playback of DVDs you do not want children to watch.
NOTES:
- HCDD® HDCD®, High Definition Compatible Digital® and Microsoft® are either registered trademarks or trademarks of Microsoft Corporation, Inc. in the United States and/or other countries. HDCD system manufactured under license from Microsoft Corporation, Inc. This product is covered by one or more of the following: In the USA: 5,479,168, 5,638,074, 5,640,161, 5,808,574, 5,838,274, 5,854,600, 5,864,311, 5,872,531, and in Australia: 669114. Other patents pending.
- Manufactured under license from Dolby Laboratories. "Dolby" and the double-D symbol are trademarks of Dolby Laboratories. Confidential Unpublished Work. ©1992 - 1998 Dolby Laboratories, Inc. All rights reserved.
- "DTS" and "DTS Digital Surround" are registered trademarks of Digital Theater Systems, Inc.
- "DCDiTM" is trademark of Faroodja, a division of Genesis Microchip Inc.
- "NSV" is a trademark of Analog Devices, Inc.
- "KODAK" is a trademark of Eastman Kodak Company.
- "FUJICOLOR CD" is a trademark of Fuji Photo Film Co, Ltd.
- "Windows MediaTM", "WindowsTM" are a trademarks of Microsoft Corporation, Inc.
DISCS
- The types of discs listed on the table below can be used on the DVD-A11.
The marks are indicated on the disc labels or jackets.
| Usable discs | Mark (logo) | Recorded signals | Disc size |
| DVD video DVD audio (NOTE 1)DVD-R DVD-RW (NOTE 2) | VIDEO VIDEO DVD R DVD RW | Digital audio + digital video (MPEG2) | 12 cm |
| 8 cm | |||
| Super audio CD | SUPER AUDIO CD | Digital audio | 12 cm |
| Video CD (NOTE 1) | COMPACT DISG DIGITAL VIDEO | Digital audio + digital video (MPEG1) | 12 cm |
| 8 cm | |||
| CD CD-R CD-RW (NOTE 3) | COMPACT DISG DIGITAL AUDIO PROGRESSIVE | Digital audio MP3 Digital picture (JPEG) | 12 cm |
| 8 cm | |||
| Picture CD | Kodak Picture CD COMPATIBLE | JPEG | 12 cm |
| Fujicolor CD | JPEG | 12 cm | |
| WMA (Windows Media Audio) | Digital audio | 12 cm |
The following types of discs cannot be played on the DVD-A11:
- For European model:
DVDs with region numbers other than "2" or "ALL"
For Oceanian, South American model:
DVDs with region numbers other than "4" or "ALL"
DVD-ROM/RAMs - CD-ROMs (unless MP3, JPEG, WMA Files)
CVD/VSDs - CDVs (Only the audio part can be played.)
- CD-Gs (Only the audio is output.)
Photo CDs
NOTE 1: Some DVD audio, DVD video and video CD discs do not operate as described in this manual due to the intentions of the discs' producers.
NOTE 2: Playing DVD-R and DVD-RW discs DVD-R and DVD-RW discs recorded in video format on a DVD recorder can be played on the DVD-A11.
Discs that have not be finalized cannot be played.
Depending on the disc's recording status, the disc may not be accepted or may not be played normally (the picture or sound may be not be smooth, etc.).
NOTE 3: According to recording quality, some CD-R/ RW cannot be played.
Disc terminology
- Groups and tracks (DVD-audios)
DVD-audios are divided into several large sections called "groups" and smaller sections called "tracks".
Numbers are allotted to these sections. These numbers are called "group numbers" and "track numbers".
For example:
- Titles and chapters (DVD-videos)
DVD-videos are divided into several large sections called "titles" and smaller sections called "chapters". Numbers are allotted to these sections. These numbers are called "title numbers" and "chapter numbers".
For example:

Tracks (Super audio CDs, video and music CDs)
Super audio CDs, video and music CDs are divided into sections called "tracks".
Numbers are allotted to these sections. These numbers are called "track numbers".
For example:
- Playback control (video CDs)
Video CDs including the words "playback control" on the disc or jacket are equipped with a function for displaying menus on the TV screen for selecting the desired position, displaying information, etc., in dialog fashion.
In this manual, playing video CDs using such menus is referred to "menu playback".
Video CDs with playback control can be used on the DVD-A11.
NOTE:
- This DVD player is designed and manufactured to respond to the Region Management Information that is recorded on a DVD disc.
If the Region number described on the DVD disc does not correspond to the Region number of this DVD player, this DVD player cannot play this disc.
For European model:
The Region number for this DVD player is 2.

For Oceanian, South American model:
The Region number for this DVD player is 4.

3 CAUTIONS ON HANDLING DISCS
Discs
Only the discs including the marks shown on page 5 can be played on the DVD-A11.
Note, however, that discs with special shapes (heart-shaped discs, hexagonal discs, etc.) cannot be played on the DVD-A11. Do not attempt to play such discs, as they may damage the player.


Holding Discs
Avoid touching the surface of discs when loading and unloading them.
Be careful not to get fingerprints on the signal surface (the side which shines in rainbow colors)

Cleaning Discs
Fingerprints or dirt on the disc may lower sound and picture quality or cause breaks in playback. Wipe off fingerprints or dirt.
Use a commercially available disc cleaning set or a soft cloth to wipe off fingerprints or dirt.
Wipe gently from the middle outwards.
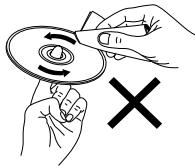
Do not wipe with a circular motion.
NOTE:
- Do not use record spray or antistatic. Also do not use volatile chemicals such as benzene or thinner.

Record spray
Thinner
Benzene
Cautions on Handling Discs
- Do not get fingerprints, grease or dirt on discs.
- Be especially careful not to scratch discs when removing them from their cases.
- Do not bend discs.
- Do not heat discs.
- Do not enlarge the center hole.
- Do not write on the labeled (printed) side with a ball-point pen or a pencil.
Water droplets may form on the surface if the disc is moved suddenly from a cold place to a warm one. Do not use a hairdryer, etc., to dry the disc.
Cautions on Storing Discs
Always eject discs after playing them.
- Keep discs in their cases to protect them from dust, scratches and warping.
- Do not put discs in the following places:
- Places exposed to direct sunlight for long periods of time
- Humid or dusty places
- Places exposed to heat from heaters, etc.
Cautions on Loading Discs
- Only load one disc at a time. Loading one disc on top of another may result in damage or scratch the discs.
- Load 8 cm discs securely in the disc guide, without using an adapter. If the disc is not properly loaded, it may slip out of the guide and block the disc tray.
- Be careful not to let your fingers get caught when the disc tray is closing.
- Do not place anything but discs in the disc tray.
- Do not load cracked or warped discs or discs that have been fixed with adhesive, etc.
- Do not use discs on which the adhesive part of cellophane tape or glue used to attach the label is exposed, or discs with traces of tape or labels that have been peeled off. Such discs may get stuck inside the player, resulting in damage.
CAUTIONS ON INSTALLATION
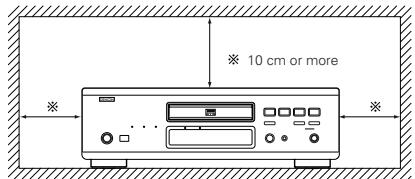
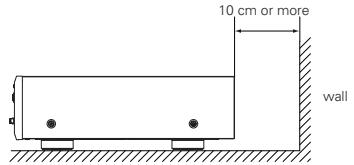
For heat dispersal, leave at least 10cm of space between the top, back and sides of this unit and the wall or other components.
4 CONNECTIONS
NOTES:
- Read the manuals of all the components when making connections.
- Keep the power supply cord unplugged until all connections have been completed.
-
If the power is on when connections are made, noise may be generated and damage the speakers.
-
Be sure to connect the left and right channels properly, L (left) to L, R (right) to R.
- Plug the power supply cord securely into the power outlet. Incomplete connection may result in noise.
- Binding the power supply cord together with connection cords may result in humming or noise.
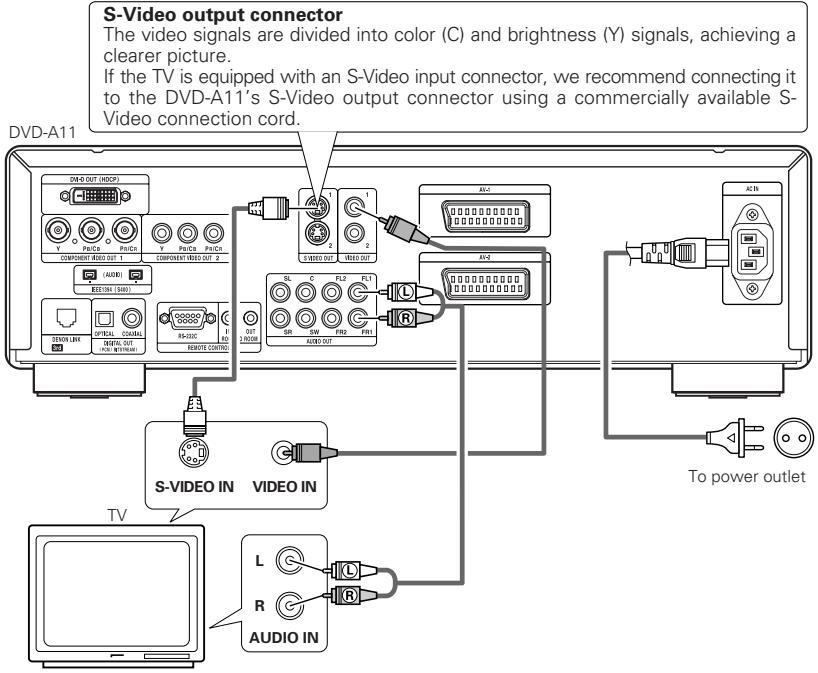
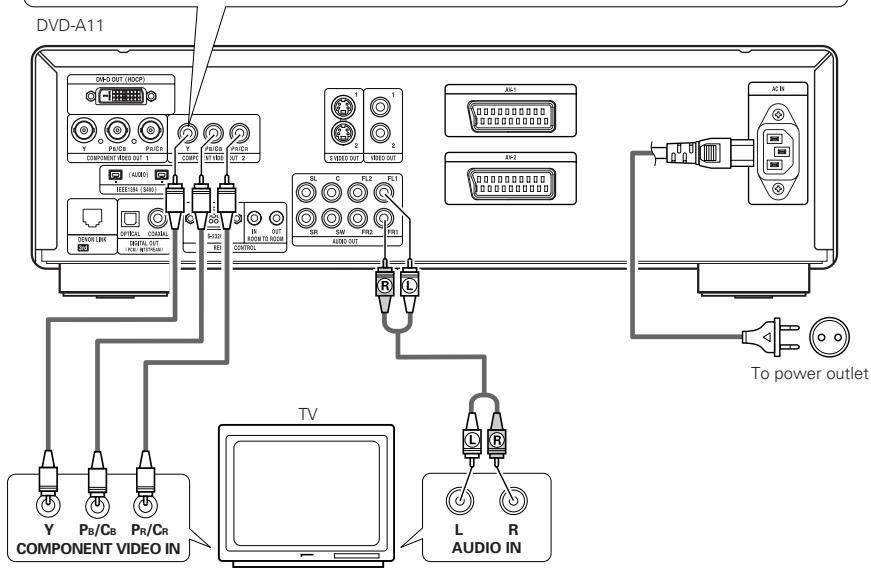
(1) Connecting to a TV
- Use the included audio video cord to connect the TV's video input connector and audio input connectors to the DVD-A11's VIDEO OUT or S-VIDEO OUT and AUDIO OUT.
NOTES:
- Connect the DVD-A11's video outputs to the TV either directly or through an AV amplifier. Do not connect it via a VCR (video cassette recorder). Some discs contain copy prohibit signals. If such discs are played via a VCR, the copy prohibit system may cause disturbance in the picture.
-
Set the "TV TYPE" in "VIDEO SETUP" in "SETUP" to comply with your TV's video format. When the TV is PAL formatted, set to PAL. (See page 18.)
-
To use with 2-channel audio output, set "2 CHANNEL" in "AUDIO CHANNEL" in "AUDIO SETUP" in "SETUP" at the initial settings. (See page 19.)
- Set the "TV ASPECT" in "VIDEO SETUP" in "SETUP" to comply with your TV's aspect. (See page 18.)
To use with video out or s-video output, set "INTERLACED" in "VIDEO OUT" in "VIDEO SETUP" in "SETUP" at the initial settings. (See page 18.)
(2) Connecting to a TV or Monitor Equipped with Color Component Input Connectors
Color component output connectors (PR / CR,PB / CB and Y
The red (PR / CR) , blue (PB / CB) and brightness (Y) signals are output independently, achieving more faithful reproduction of the colors.
- The color component input connectors may be marked differently on some TVs or monitors (PR, PB and Y/R-Y, B-Y and Y/CR, CB and Y, etc.). For details, refer to the TV's operating instructions.
- Connect in this way if your TV is compatible with Progressive Scan.
NOTES:
- Use the three commercially available video cords to connect the DVD-A11's color component output connectors to the TV or monitor.
- Set the "TV TYPE" in "VIDEO SETUP" in "SETUP" to comply with your TV's video format. When the TV is PAL formatted, set to PAL. (See page 18.)
- Set the "VIDEO OUT" in "VIDEO SETUP" in "SETUP" to comply with Progressive TV.
- To use with 2-channel audio output, set "2 CHANNEL" in "AUDIO CHANNEL" in "AUDIO SETUP" in "SETUP" at the initial settings. (See page 19.)
- Set the "TV ASPECT" in "VIDEO SETUP" in "SETUP" to comply with your TV's aspect. (See page 18.)
CONSUMERS SHOULD NOTE THAT NOT ALL HIGH DEFINITION TELEVISION SETS ARE FULLY COMPATIBLE WITH THIS PRODUCT AND MAY CAUSE ARTFACTS TO BE DISPLAYED IN THE PICTURE. IN CASE OF 525 PROGRESSIVE SCAN PICTURE PROBLEMS, IT IS RECOMMENDED THAT THE USER SWITCH THE CONNECTION TO THE "STANDARD DEFINITION" OUTPUT.
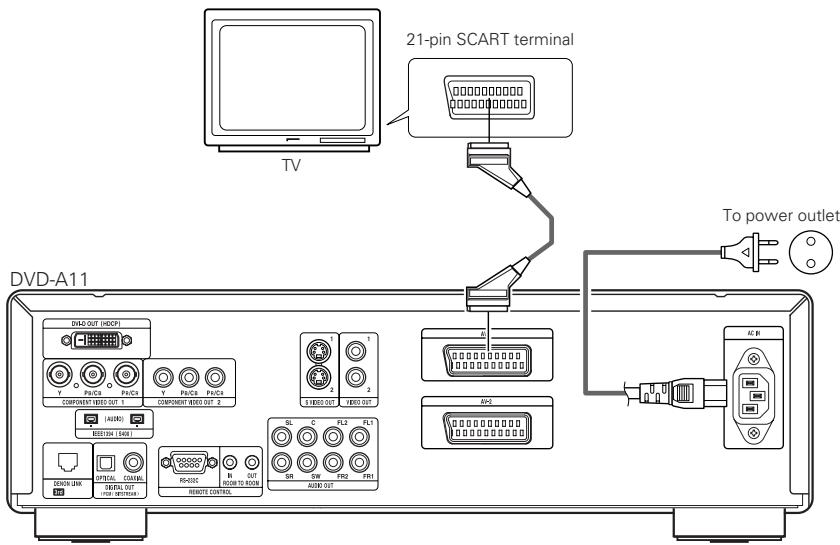
(3) Connecting to a TV with 21-pin SCART Terminal (For only European model)
- Use the commercially 21-pin SCART cable to connect the TV's 21-pin SCART terminal to the DVD-A11's 21-pin SCART terminal (AV1 / AV2).
NOTES:
-
Some discs contain copy prohibit signals. If such discs are played via a VCR, the copy prohibit system may cause disturbance in the picture.
-
Set the "TV TYPE" in "VIDEO SETUP" in "SETUP" to comply with your TV's video format. When the TV is PAL formatted, set to PAL. (See page 18.)
-
To improve picture quality, you can change the video signal output from the AV1 terminal from "Video" to either "S-Video" or "RGB" to suit the type of television you are using (See page 18).
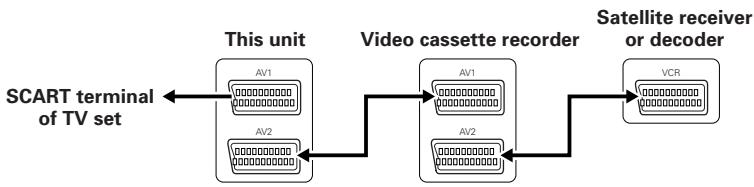
- You can also connect other equipment to AV2.
NOTES:
- Set the DVD-A11 to the standby mode to output video or audio signals of another device connected to the DVD-A11's 21-pin SCART terminal.
(If the power is on, the DVD-A11's video and audio signals are output. If the power is off, the signals of the other device will not be output.) - To use the 21-pin SCART terminal, set "AUDIO CHANNEL" under "AUDIO SETUP" at "SETUP" to "2 CHANNEL".
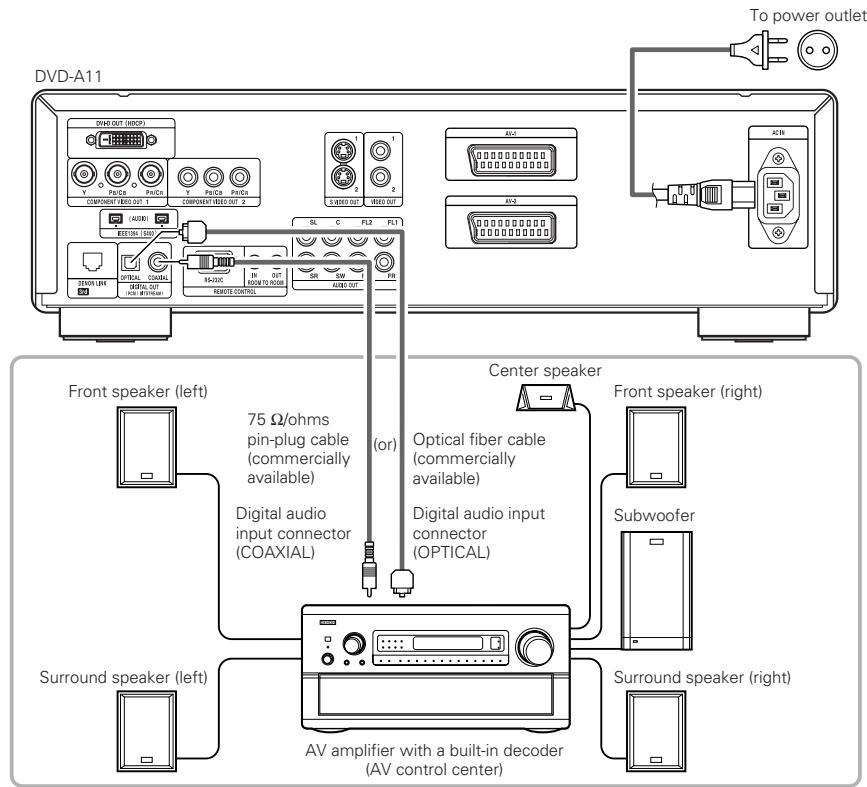
(4) Connecting to a AV amplifier with a Built-in decoder
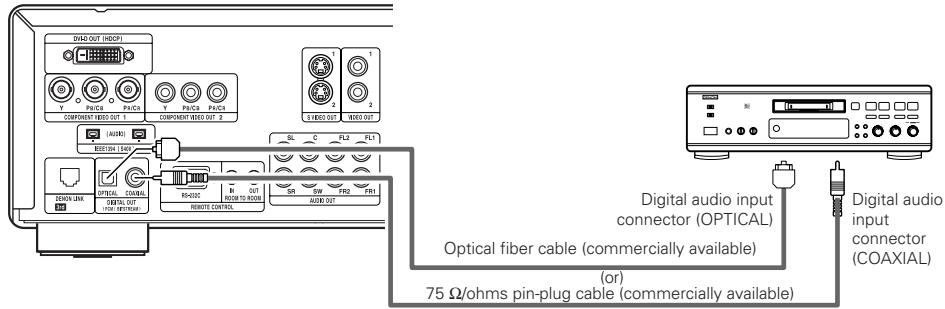
When DVDs recorded in Dolby Digital or DTS are played, Dolby Digital or DTS bitstream signals are output from the DVD player's digital audio output connectors. If a Dolby Digital or DTS decoder is connected, you can achieve sound with the power and sense of presence of a movie theater or concert hall.
NOTES:
- Harsh noise that could harm your ears or damage the speakers is generated when a DVD recorded in DTS is played while using a decoder, etc., that is not DTS-compatible.
- When playing copyright-protected linear PCM or packed PCM DVDs, in consideration of copyrights, no digital signals are output for sources exceeding 48 kHz/16 bits. When playing such sources, either set "LPCM (44.1 kHz/48 kHz)" under "AUDIO SETUP" at "SETUP" to "ON" (see page 20) or make analog connections. (See page 9.)
- When making digital connections to an AV amplifier that is not compatible with 96 kHz/88.2 kHz signals, set "LPCM (44.1 kHz/48 kHz)" under "AUDIO SETUP" at "SETUP" to "ON". (See page 20.)
- With Super audio CDs, digital audio signals cannot be output. Use analog connections. (See page 9.)
- Connecting an optical fiber cable (commercially available) to the digital audio input connector (OPTICAL)

Dust cap
Line up in proper direction
Remove the dust cap, line up the cable in the proper directly, then insert it securely as far as it goes.
NOTE:
- Store the dust cap in a safe place, and be careful not to lose it.
When not using the terminal, attach the cap to protect the terminal from dust.
Sound output from the DVD-A11's digital audio output connectors
In the case of bit stream output
| Settings | |||
| DIGITAL OUT | |||
| Audio recording format | NORMAL | PCM | |
| DVD video | Dolby Digital | Dolby Digital bitstream | 2 channels PCM (48 kHz / 16 bit) |
| DTS | DTS bitstream | 2 channels PCM (48 kHz / 16 bit) | |
| MPEG Audio | 2 channels PCM (48 kHz / 16 bit) | 2 channels PCM (48 kHz / 16 bit) | |
In the case of PCM output
| Settings | |||||
| LPCM SELECT | |||||
| OFF | ON | ||||
| Copy protection ON | Copy protection OFF | ||||
| DVD video | Linear PCM | 48 kHz / 16 ~ 24 bit | No output data (*1) | 48 kHz / 16 ~ 24 bit PCM | 48 kHz / 16 bit PCM |
| 96 kHz / 16 ~ 24 bit | No output data | 96 kHz / 16 ~ 24 bit PCM | 48 kHz / 16 bit PCM | ||
| DVD audio | Linear PCM or Packed PCM | 44.1 kHz / 16 ~ 24 bit | No output data (*2) | 44.1 kHz / 16 ~ 24 bit PCM | 44.1 kHz / 16 bit PCM |
| 48 kHz / 16 ~ 24 bit | No output data (*1) | 48 kHz / 16 ~ 24 bit PCM | 48 kHz / 16 bit PCM | ||
| 88.2 kHz / 16 ~ 24 bit | No output data | 88.2 kHz / 16 ~ 24 bit PCM | 44.1 kHz / 16 bit PCM | ||
| 96 kHz / 16 ~ 24 bit | No output data | 96 kHz / 16 ~ 24 bit PCM | 48 kHz / 16 bit PCM | ||
| 176.4 kHz / 16 ~ 24 bit | No output data | 88.2 kHz / 16 ~ 24 bit PCM | 44.1 kHz / 16 bit PCM | ||
| 192 kHz / 16 ~ 24 bit | No output data | 96 kHz / 16 ~ 24 bit PCM | 48 kHz / 16 bit PCM | ||
| Video CD | MPEG 1 | 44.1 kHz / 16 bit PCM | 44.1 kHz / 16 bit PCM | ||
| Music CD | 44.1 kHz / 16 bit Linear PCM | 44.1 kHz / 16 bit PCM | 44.1 kHz / 16 bit PCM | ||
| MP3 CD | MP3 (MPEG-1 Audio Layer 3) | 44.1, 48 kHz / 16 bit PCM | 44.1, 48 kHz / 16 bit PCM | ||
| WMA CD | WMA (Windows Media Audio) | 44.1, 48 kHz / 16 bit PCM | 44.1, 48 kHz / 16 bit PCM | ||
| Super audio CD | DSD (DIRECT STREAM DIGITAL) | No output data (*3) | No output data (*3) | ||
1 Only 48 kHz/16 bit sources are output.
2 Only 44.1 kHz/16 bit sources are output.
*3 44.1 kHz/16-bit PCM signals are output during CD layer playback.
- Down-mixed to 2 channels for multi-channel PCM sources. (Only the front left and right channels are output for sources for which down-mixing is prohibited.)
- When "OFF" is selected, digital signals are not output from the digital audio output at this time.
- Bitstream signals are signals that are compressed and converted into digital format. They are decoded into multi-channel audio signals (5.1-channels, etc.) by the decoder.
- Linear PCM audio is a signal recording format used for music CDs.
While signals are recorded at 44.1 kHz/16 bit for music CDs, for DVDs they are recorded at 44.1 kHz/16 bit to 192 kHz/24 bit, providing higher sound quality than music CDs.
- Packed PCM signals are high sound quality compressed PCM signals that are decompressed with virtually no loss of data.
(5) Connecting a basic 5.1-channel surround system
Analog 5.1-channel audio signals can be output from the DVD-A11.
The multichannel audio signals recorded in packed PCM and the multichannel Super audio CDs can be played when an AV amplifier equipped with analog 5.1-channel audio inputs is connected.
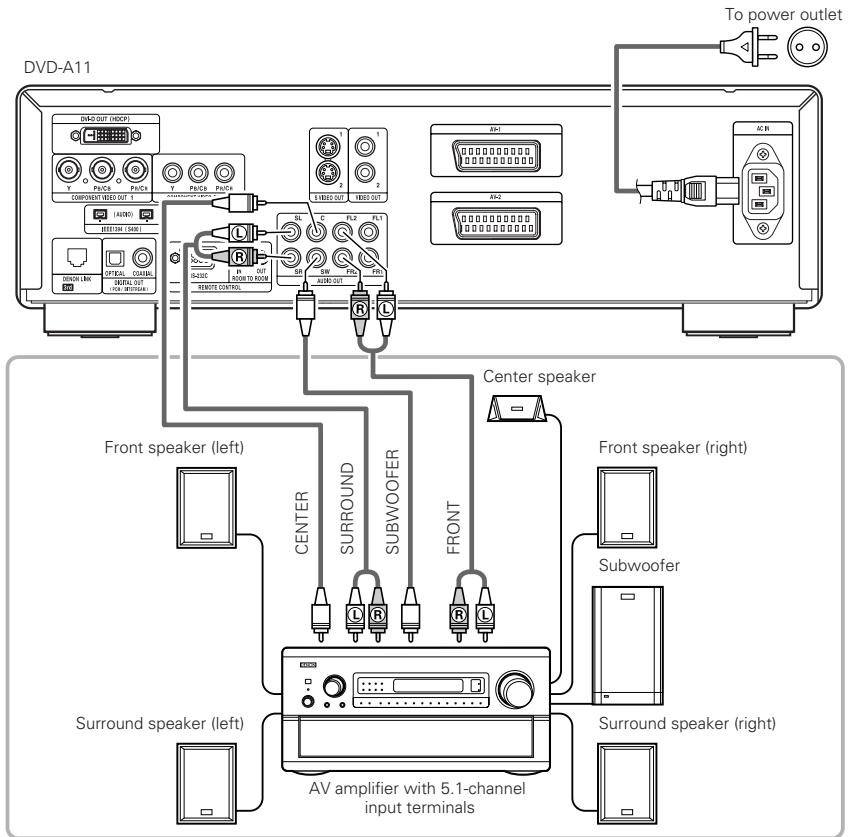
NOTES:
- For multi-channel connections, set "AUDIO CHANNEL" under "AUDIO SETUP" at "SETUP" to "MULTI CHANNEL" and make the "SPEAKER CONFIGURATION", "CHANNEL LEVEL" and "DELAY TIME" settings. (See pages 19, 20.)
- With the DVD-A11, we recommend turning the digital output off and only outputting analog signals in order to keep interference from the digital output circuitry to the minimum and allow you to enjoy high bit, high sampling frequency, high quality multi-channel sound.
(6) Connecting to a Digital Recorder (MD Recorder, DAT Deck, etc.)
* Set the "AUDIO SETUP" default setting as shown below. (See page 20.)
- "DIGITAL OUT" "PCM"
"LPCM (44.1 kHz / 48 kHz)" "ON"
Playing DVDs with incorrect settings may result noise that could damage your ears or the speakers.
DVD-A11
NOTE:
- Digital audio signals cannot be output when playing Super Audio CDs. Use analog connections to record Super Audio CDs.
(7) Connecting to a Stereo Component
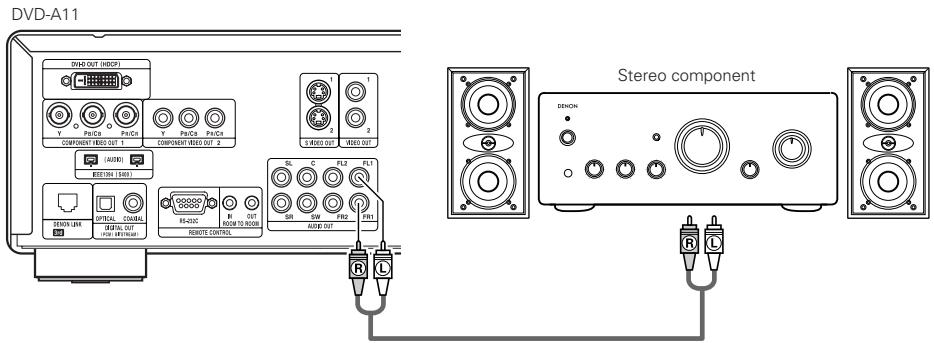
NOTE:
- When connecting to a 2-channel audio stereo device, set "AUDIO CHANNEL" under "AUDIO SETUP" at "SETUP" to "2 CHANNEL" (see page 19). For multi-channel sources, the signals are down-mixed into two channels (analog).
(Only the front left and right channels are output for sources for which down-mixing is prohibited.)
(8) Denon Link connections
High quality digital sound with reduced digital signal transfer loss can be enjoyed by connecting a separately sold Denon Link compatible AV amplifier.
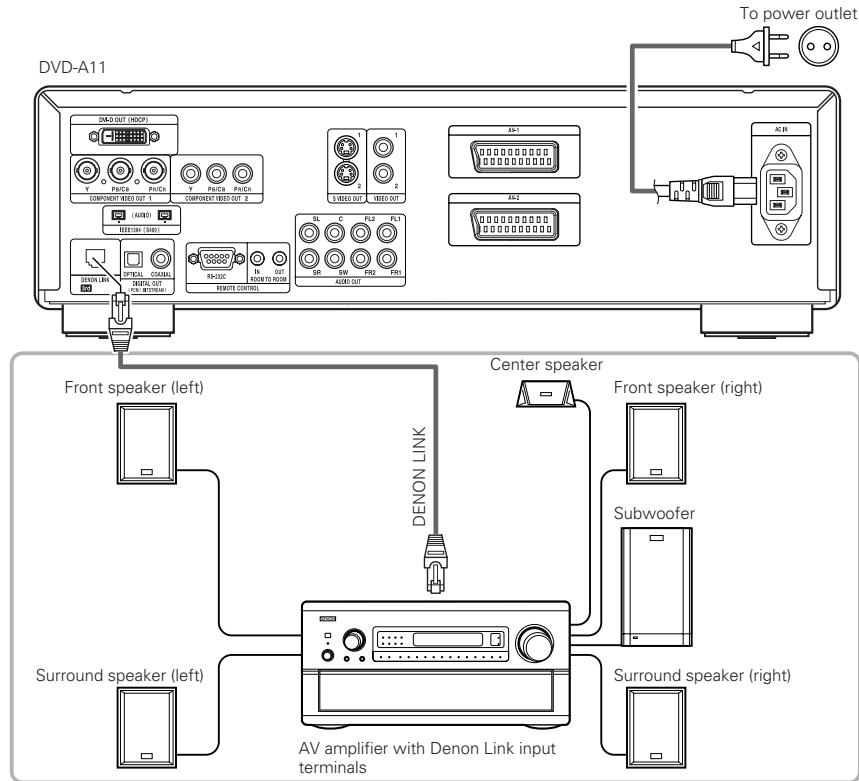
DENON LINK Second Edition:
- With the DENON LINK, Second Edition (2nd), the audio signals are transferred from the DVD player to the AV amplifier in digital form, with the same quality as the signals recorded on the disc. Digital transfer of the high quality multi-channel signals of DVD audio is possible for all discs. (A Second Edition compatible DVD player and AV amplifier are required for this.)
Compatibility with previous models:
- With Second Edition, the format of the signals handled differs from that of the previous version of DENON LINK. Thus, digital audio signals output from a DENON LINK S.E. compatible DVD player can only be played on a DENON LINK S.E. compatible AV amplifier (Playback with DENON LINK connections is not possible when using a DENON LINK S.E. compatible DVD player in combination with an AV amplifier that is not S.E. compatible.).
- If the DENON LINK connector on your AV amplifier is not S.E. compatible, please consult your authorized DENON dealer.
- "S.E." is indicated on the rear panel's DENON LINK connector on DENON LINK S.E. compatible products.
DENON LINK S.E. settings:
- At "AUDIO SETUP" under "Default Settings", set "DENON LINK" to "2nd". (See pages 19 to 21.)
- If you connect the DENON LINK, set to "2nd".
NOTES:
- When DENON LINK is set, the down-mixed audio signals are output from the only left and right terminals. To use the analog terminals, cancel the DENON LINK setting (set to "OFF").
- "AUDIO CHANNEL", "DIGITAL OUTPUT", "LPCM (44.1kHz/48kHz)", "IEEE1394", "SOURCE DIRECT" and "BASS ENHANCER" cannot be set at "AUDIO SETUP" under "Default Settings" when using the DENON LINK connector.
The "PURE DIRECT" "DIGITAL OFF" and "ALL OFF" settings cannot be made either. (See pages 26, 27.)
- The DVD-A11's speaker settings are invalidated when the DENON LINK connector is connected.
- When the DENON LINK 2nd connection, Super Audio CD's signals are not output from the DENON LINK connector. Please use the analog audio output terminals.
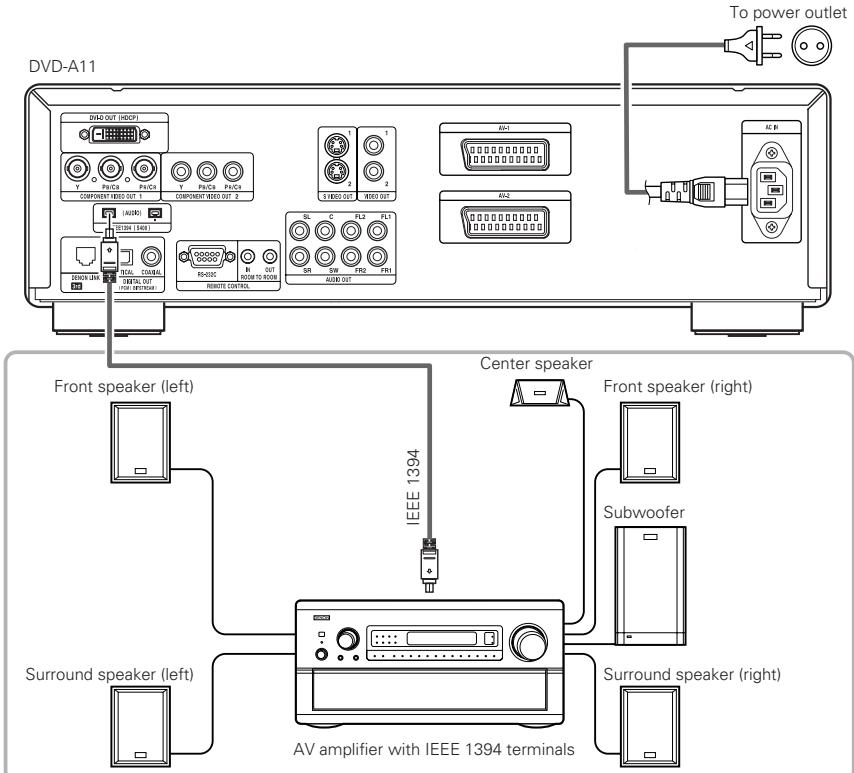
(9) IEEE 1394 connections
The simple connection of one IEEE 1394 cable permits high quality digital transfer of the following between devices having IEEE 1394 connectors: the audio of DVD video, DVD audio that up until now could only be connected by 5-conductor audio cable in an analog connection, or Super Audio CD and other multi-channel audio. (unless DENON LINK connections)
(IEEE 1394 is an international standard established by the Institute of Electrical and Electronics Engineers, Inc. of the U.S.)
NOTES:
- Please use the included IEEE 1394 cable. When using a cable other than the included IEEE 1394 cable, please use a 4-pin IEEE 1394 cable with a length of 3.5m or less for S400 or higher.
- The "IEEE 1394 audio signal (A&M protocol)" output from the DVD-A11's IEEE 1394 connector not out video signals, please connecting to a TV or Monitor with "component video output" or "S-video output" or "Video output". (See pages 6, 7).
- The "IEEE 1394 audio signal (A&M protocol)" output from the DVD-A11's IEEE 1394 connector can only be received on AV equipment equipped with an IEEE 1394 connector. Digital video (DV), personal computer, and i-Link (a Sony trademark) audio signals cannot be sent and received. Incorrect connections could lead to malfunction. Connect as instructed in the other device's operating manual. Note that there is no guarantee of the operation of the connection even between devices supporting IEEE 1394. Whether or not data and control signals can be transmitted and received between devices supporting IEEE 1394 depends on the functions of the respective devices.
- When connecting using the IEEE 1394 connector, only connect one cord between the two devices. Never connect two cords between the two devices (loop connection). If this is done, the signal output from one device will return to the same device, resulting in malfunction.
- No audio signals are output from the DVD-A11's analog connectors when IEEE 1394 is set. To use the analog connectors, set the IEEE 1394 setting to "Cancel (Off)".
- When using the IEEE 1394 mode, the "AUDIO CHANNEL", "DIGITAL OUTPUT", "LPCM (44.1 kHz/48 kHz)", "SOURCE DIRECT" and "BASS ENHANCER" settings under "SETUP" - "AUDIO SETUP" cannot be made.
The "PURE DIRECT" "DIGITAL OFF" and "ALL OFF" settings cannot be made either. (See pages 26, 27.)
- When the IEEE 1394 connector is connected, the DVD-A11's speaker settings are disabled.
- During playback of a device supporting IEEE 1394, please do not disconnect the IEEE 1394 cable of the other device, do not connect a new device, and do not switch the power on or off. Doing so may interrupt the audio.
- Among the devices that support IEEE 1394, when the power is in the standby mode or off, some devices are not able to relay data. Please see the operation manual of the connected device that supports IEEE 1394. This unit is not able to relay the IEEE 1394 data while in the standby mode.
- Devices that support IEEE 1394 have the maximum data transfer speed supported by that device marked in the vicinity of the IEEE 1394 connector. The maximum transfer speed of IEEE 1394 is defined as approximately 100/200/400 Mbps, with 200 Mbps items having S200 inscribed and 400 Mbps items having S400 inscribed. The maximum IEEE 1394 data transfer speed of this unit is 400 Mbps. The actual transfer speed may be slower than 400 Mbps when S100 or S200 devices are connected, or depending on the specifications of the device. Try to ensure that connections are made between devices that have the same maximum data transfer speed.
Mbps (Mega bps) is an abbreviation of "Mega bits per second" and indicates the volume of data that can be communicated in 1 second. At 400 Mbps, 400 Mega bits of data is transferred in 1 second.
-
The DVD-A11's IEEE 1394 mode is designed based on IEEE Std. 1394a-2000, Standard for a High Performance Serial Bus.
-
IEEE 1394 network
The following types of connections can be made between devices handling IEEE 1394 audio signals (A&M protocol):
① Daisy chain connections
Connect the sets in series using a single IEEE 1394 cord. Up to 15 sets can be connected.
② Tree (tower) connections
Connect the sets in parallel and in series using a single IEEE 1394 cord. Up to 63 sets can be connected.
Copyright Protection System
To play back through an IEEE 1394 connection the audio of Super Audio CD or DVD (except for discs that may be copied freely), both the player and the amplifier are required to support a copyright protection system called DTCP (Digital Transmission Content Protection). DTCP is copy protection technology comprising data encryption and the authentication of the remote device. This unit supports DTCP. Please see the operation manual of your amplifier for information about your amplifier.
PART NAMES AND FUNCTIONS
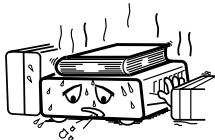
(1) Front Panel
See page 3.
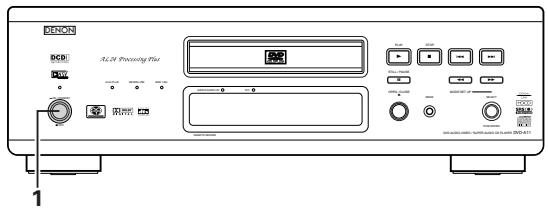
1 Power button
- Press once to turn the power on.
- Press again to set to the "OFF" position and turn the power off.
- Set the power to the standby mode by pressing the POWER OFF button on the remote control unit while the power is on.
- Turn the power on from the standby mode by pressing the POWER ON button on the remote control unit.
2 Power indicator
- This indicator lights when the power is on and when the power is in the standby mode.
3 AL24 PLUS indicator
This indicator lights when the audio signals of a DVD, etc., are being processed digitally with the AL24 processing Plus.
4 DENON LINK indicator
- This indicator lights when the audio signals are transferred by DENON LINK connections.
5 IEEE 1394 indicator
- This indicator lights when the audio signals are transferred by IEEE 1394 connections. (See page 21.)
6 Disc tray
- Load discs here. (See page 14.)
- Press the OPEN/CLOSE button 16 to open and close the disc tray.
- The disc tray is also closed when the PLAY button 7 is pressed.
7 PLAY button (▶)
- Press this button to play the disc. (See page 24.)
STOP button
- Press this to stop the disc. (See page 25.)
9 Skip button (I
- Press this to move back to the beginning of the current track (or chapter).
- Press again to move back to the beginning of the previous track (or chapter). (See page 25.)
10 Skip button (▶▶I)
- Press this to move ahead to the beginning of the next track (or chapter). (See page 25.)
Remote control sensor
12 SUPER AUDIO CD indicator
- This indicator lights when playing areas of Super audio CDs recorded in DSD format (STEREO/MULTI).
13 DVI indicator
- This indicator lights when the video signals output from the DVI-D output connector.
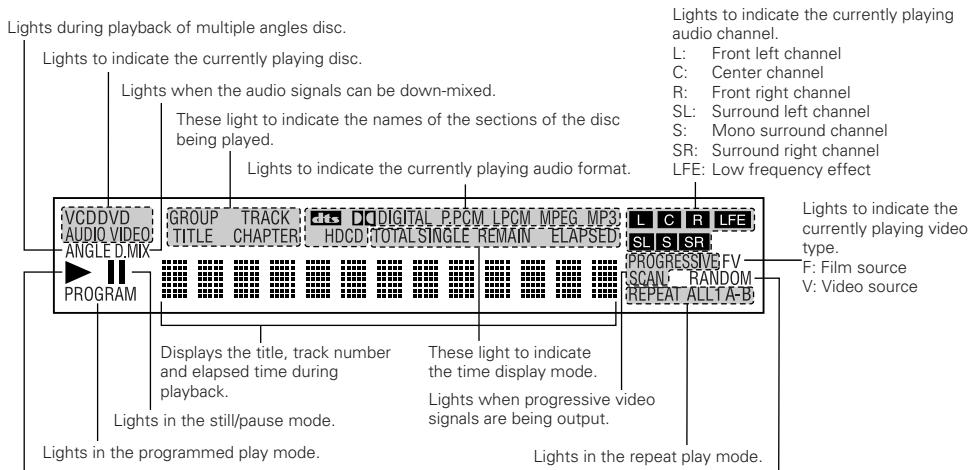
14 Display
Information on the disc that is currently playing is shown on the display. (See page 12.)
15 STILL/PAUSE button (II)
- Press this button to pause images or music or to play images frame by frame. (See page 25.)
16 OPEN/CLOSE button (△)
- Press this button to open and close the disc tray.(See page 14.)
MODE of MODE SETUP button
- Press this to set the MODE SETUP (20)
(Super Audio CD FILTER PURE DIRECT DVI SETUP DVI BK LEVEL)
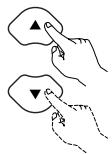
18 Slow/Search button (▲)
- Press this to set the slow play mode and to search in the reverse direction. (See page 25.)
19 Slow/Search button (▶▶)
- Press this to set the slow play mode and to search in the forward direction. (See page 25.)
20 SELECT of MODE SETUP selector
- Use this to switch the area/layer of the Super audio CDs played with priority, and turn the circuitry other than the analog audio signal circuitry on and off and to set the video signal output from the DVI connector, etc.
- SUPER AUDIO CD SETUP
Use this to set the area/layer of the Super audio CDs played with priority.
MULTI:
When playing Super audio CDs, the Multi-channel area is played with priority.
STEREO:
When playing Super audio CDs, the stereo area area is played with priority.
CD:
When playing Super audio CDs, the CDs layer area is played with priority.
- FILTER:
This sets the low pass filter value when playing Super Audio CDs.
50 kHz:
High frequencies of 50kHz and higher are cut. 100 kHz:
High frequencies of 100kHz and higher are cut.
Set to 100kHz when a high frequency compatible AV amplifier, etc., is connected.
- PURE DIRECT (AUDIO) MODE:
The circuits not being used (output signals) can be turned off.
NORMAL:
This turns the PURE DIRECT mode off. All signals are output.
VIDEO OFF:
This turns the video output off. Use this when only using audio signals.
DIGITAL OFF:
This turns the digital output off.
ALL OFF:
This turns the digital output, display and video output off.
- DVI (VIDEO output) SETUP MODE:
Use this to set the DVI connector's video signal output.
DVI OFF:
No signal from the DVI-D connector.
480P:
480P video signals are output from the DVI-D connector.
720P:
720P video signals are output from the DVI-D connector.
1080i:
1080i video signals are output from the DVI-D connector.
-
When the DVI-D connector output the signals, no programme signals from the component video connector.
-
DVI BK (Black) LEVEL:
This switches the digital RGB video level (data range) of the DVI-D terminal.
NORMAL:
Video level (data range): 16 (black) to 235 (white)
ENHANCED:
Video level (data range): 0 (black) to 246 (white)
- When the DVI-D terminal is connected, the black may seem to stand out, depending on the TV or Monitor you are using. In this case, set this to "ENHANCED".
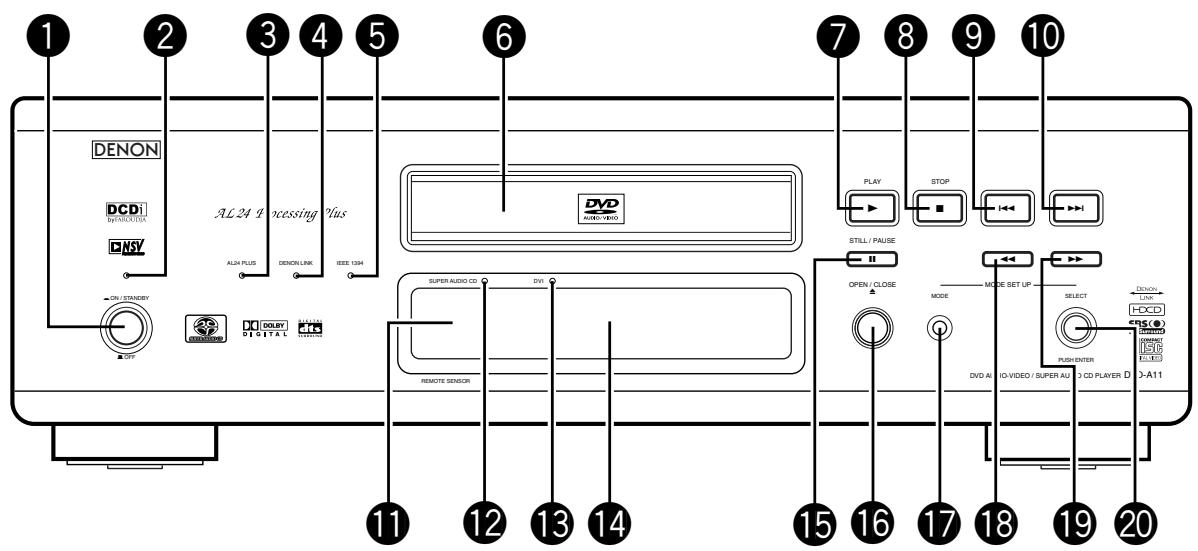
(2) Rear Panel
DVI-D-Video output connector (DVI-D OUT)
- Connect using DVI-D connection cord (available in stores).
22 Component video output connectors (COMPONENTVIDEOOUT)
- Connect using video cords (available in stores).
S-Video output connector (S-VIDEO OUT)
- Connect using an S-Video connection cord (available in stores).
24 Video output connector (VIDEO OUT)
- Connect using the included video cord.
Digital output connector (IEEE 1394)
- This is for connection of a separately sold AV amplifier equipped with a IEEE 1394 connector.
- Use it to achieve high quality digital sound with low data loss.
Digital output connector (DENON LINK)
- This is for connection of a separately sold AV amplifier equipped with a Denon Link connector.
- Use it to achieve high quality digital sound with low data loss.
±b Digital audio output connector (OPTICAL)
- Connect using an optical fiber cable (available in stores).
- Digital data is output from this connector.
28 Digital audio output connector (COAXIAL)
- Connect using an digital audio cord. Connect a commercially available 75 Ω/ohms pin-plug cord.
- Digital data is output from this connector.
29 Control connector (RS-232C)
- This is a terminal for future system expansion.
30 Control input connector (ROOM TO ROOM/IN)
- This is the input connector for wired remote control.
Consult your DENON dealer if you wish to use this connector.
3 Control output connector (ROOM TO ROOM/OUT)
- This is the output connector for wired remote control.
Consult your DENON dealer if you wish to use this connector.
Audio output connectors (AUDIO OUT)
- Connect using the included audio cord.
33 21-pin SCART terminal (AV1/AV2) (For only European model)
- Connect using a 21-pin SCART cable (available in stores).
34 Power input (AC IN)
- Connect to AC power supply using the included power supply cord.
(3) Display
Lights during playback, flashes when the resume play memory function is activated.
Lights in the random play mode.
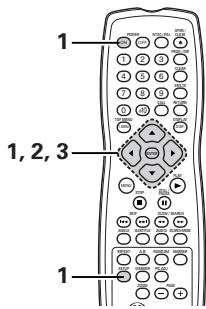
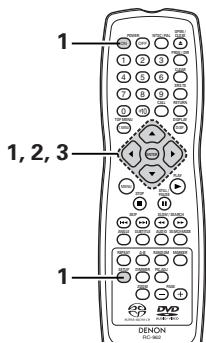
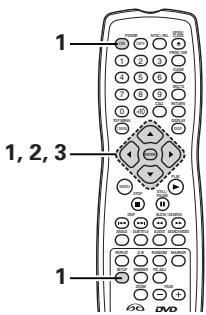
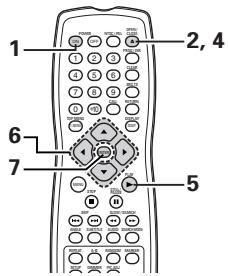
6 REMOTE CONTROL UNIT
The DVD-A11 can be controlled from a distance using the included remote control unit (RC-962).
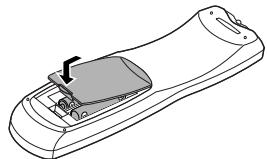
(1) Inserting Batteries
① Remove the remote control unit's rear cover.
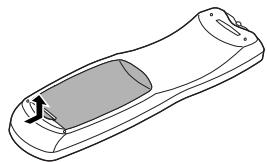
② Place two R6P/AA batteries in the battery compartment in the direction indicated by the marks.
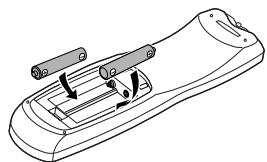
③ Close the rear cover.
Cautions On Batteries
- Use R6P/AA batteries in this remote control unit.
- Replace the batteries with new ones approximately once a year, though this depends on the frequency with which the remote control unit is used.
- If the remote control unit does not operate from close to the main unit, replace the batteries with new ones, even if less than a year has passed.
- The included battery is only for verifying operation. Replace it with a new battery as soon as possible.
- When inserting the batteries, be careful to do so in the proper direction, following the and marks in the remote control unit's battery compartment.
- To prevent damage or battery fluid leakage:
- Do not use a new battery with an old one.
- Do not use two different types of batteries.
- Do not short-circuit, disassemble, heat or dispose of batteries in flames.
- Remove the batteries when not planning to use the remote control unit for a long period of time.
- If the batteries should leak, carefully wipe off the fluid from the inside of the battery compartment, then insert new batteries.
(2) Using the Remote Control Unit
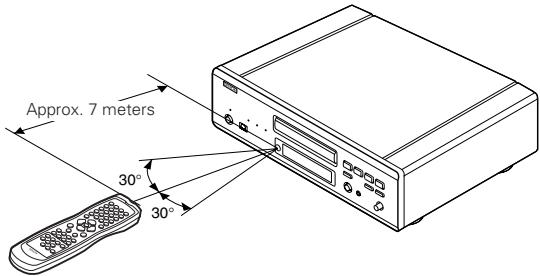
- When operating the remote control unit, point it at the remote control sensor as shown on the diagram.
- The remote control unit can be used from a direct distance of approximately 7 meters. This distance will be shorter, however, if there are obstacles in the way or if the remote control unit is not pointed directly at the remote control sensor.
- The remote control unit can be operated at a horizontal angle of up to 30^ with respect to the remote control sensor.
NOTES:
- It may be difficult to operate the remote control unit if the remote control sensor is exposed to direct sunlight or strong artificial light.
- Do not press buttons on the main unit and on the remote control unit at the same time. Doing so will result in malfunction.
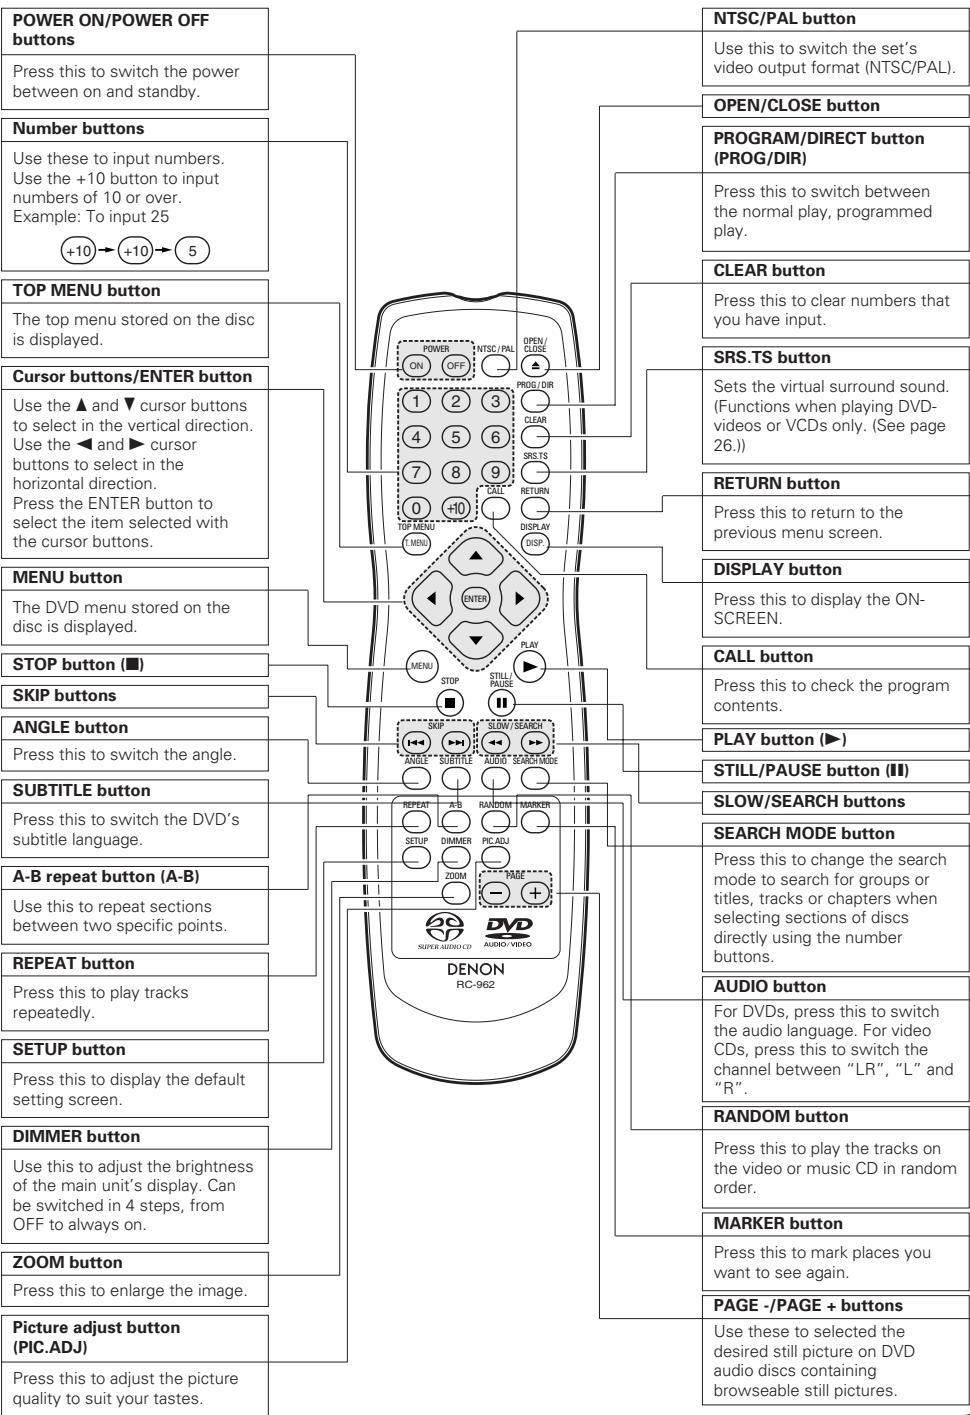
(3) Names and Functions of Remote Control Unit Buttons
- Button not explained here function in the same way as the corresponding buttons on the main unit.
7 LOADING DISCS
Set discs in the disc tray with the labeled (printed) side facing up.
NOTE:
- Do not move the DVD-A11 while a disc is playing. Doing so may scratch the disc.
(1) Opening and Closing the Disc Tray
① Turn on the power.
② Press the OPEN/CLOSE button.
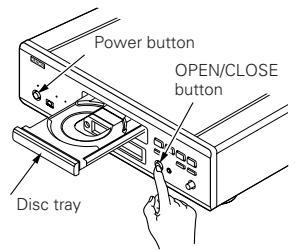
NOTES:
- Be sure to turn on the power before opening and closing the disc tray.
- Do not strike on the button with a pencil, etc.
(2) Loading Discs
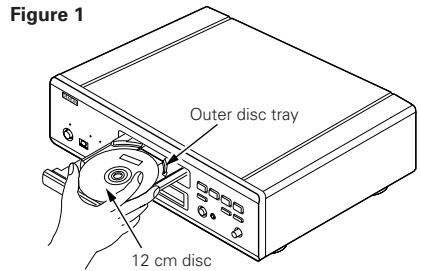
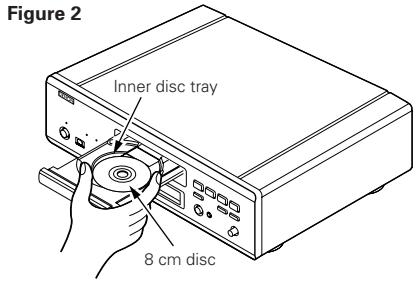
- Pick up the disc carefully so as not to touch the signal surface and hold it with the labeled side facing up.
- With the disc tray fully open, set the disc in the disc tray.
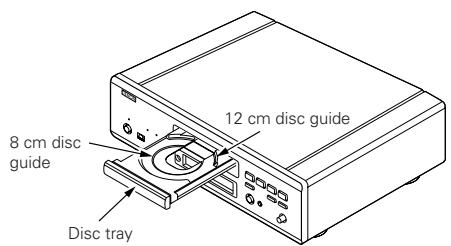
- Set 12 cm discs in the outer tray guide (Figure 1), 8 cm discs in the inner tray guide (Figure 2).
- Press the OPEN/CLOSE button. The disc is automatically loaded
- The disc tray can also be closed automatically to load the disc by pressing the PLAY button.
NOTES:
- If a foreign object is caught in the disc tray during closing, simply press the OPEN/CLOSE button again and the tray will open.
- Do not press the disc tray in by hand when the power is off. Doing so will damage it.
- Do not place foreign objects in the disc tray. Doing so will damage it.
8 CHANGING THE DEFAULT SETTINGS
■ Make the initial settings to suit your usage conditions before starting playback.
The initial settings are retained until they are next changed, even if the power is turned off.
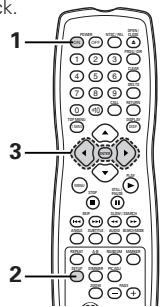
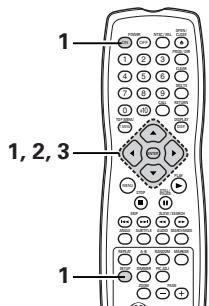
| 1 | Turn on the power. • Press the power button, the power indicator lights and the power turns on. | Light ON/STANDBY Main unit OFF Remote control unit |
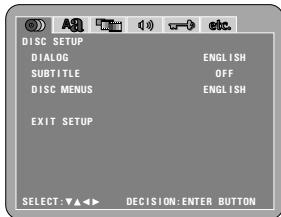
| 2 | In the stop mode, press the SETUP button. • The setup (default settings) screen appears. NOTE: For some menus, the initial values can be changed during playback. DISC SETUP Use this to set the language to be used when playing the disc. If the set language is not offered on that disc, the discs default language is set. OSD SETUP Use this to set the language for the default setting screen and messages displayed on the TV screen ("PLAY", etc.). VIDEO SETUP Use this to set the DVD-A11's screen mode. (TV aspect, TV type and AV1 video output.) AUDIO SETUP Use this to set the DVD-A11's audio output mode. (Digital and LPCM output settings.) RATINGS Use this to disable playback of adult DVDs so that children cannot watch them. Note that playback of adult DVDs cannot be disabled if the rating level is not recorded on the DVD, but that it is possible to disable playback of all DVDs. OTHER SETUP These include special settings CAPTIONS and COMPRESSION. | SETUP Remote control unit |
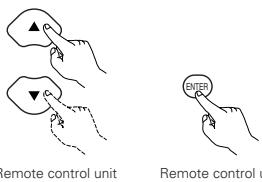
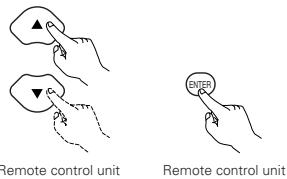
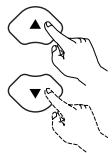
| 3 | Use the ▲ and ▲ cursor buttons to select the desired setting item, then press the ENTER button. Select "DISC SETUP". (See page 15.) Select "OSD SETUP". (See page 17.) Select "VIDEO SETUP". (See page 17.) Select "AUDIO SETUP". (See page 19.) Select "RATINGS". (See page 22.) Select "OTHER SETUP" (See page 23.) | SELECT ▼ ▲ ▲ ▲ ▲ ▲ ▲ ▲ ▲ ▲ ▲ ▲ ▲ ▲ ▲ ▲ ▲ ▲ ▲ ▲ ▲ ▲ ▲ ▲ ▲ ▲ ▲ ▲ ▲ ▲ ▲ ▲ ▲ ▲ ▲ ▲ ▲ ▲ ▲ ▲ ▲ ▲ ▲ ▲ ▲ ▲ ▲ ▲ ▲ ▲ ▲ ▅ DECISION: ENTER BUTTON |
| * To exit the setup mode Use the ▼ cursor button to select "EXIT SETUP", then press the ENTER button. It is also possible to quit by pressing the SETUP button on the remote control unit. | ||
Setup items for use
Bold characters indicate factory defaults.

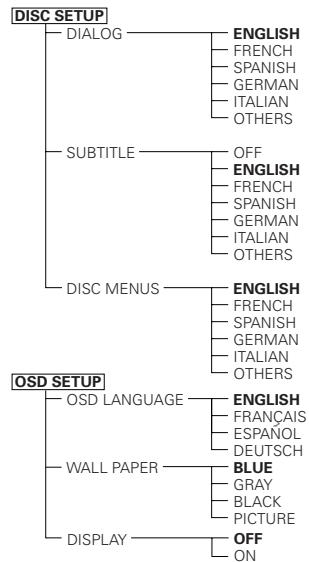
When "DISC SETUP" is selected
1 See page 14.
Use the and cursor buttons to select the desired setting, then press the ENTER button.
DIALOG
Use this to set the language of the sound output from the speakers.
2 SUBTITLE
Use this to set the language of the subtitles displayed on the TV.
DISC MENUS
Use this to set the language of the menus recorded on the disc (top menu, etc.).
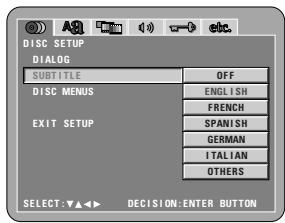
Use the and cursor buttons to select the desired setting, then press the ENTER button.
① When “DIALOG” is selected:
ENGLISH (Factory default)
Select this when you want to play the DVD with the sound in English.
FRENCH
Select this when you want to play the DVD with the sound in French.
-
SPANISH
Select this when you want to play the DVD with the sound in Spanish.
GERMAN
Select this when you want to play the DVD with the sound in German.
ITALIAN
Select this when you want to play the DVD with the sound in Italian.
OTHERS
Use the number buttons to input the language number. (See "Language code list" on page 16.)

3
② When "SUBTITLE" is selected:
OFF
Select this if you do not want to display the subtitles.
(For some discs it is not possible to turn off the subtitle display.)
ENGLISH (Factory default)
Select this when you want to play the DVD with the subtitles in English.
FRENCH
Select this when you want to play the DVD with the subtitles in French.
SPANISH
Select this when you want to play the DVD with the subtitles in Spanish.
GERMAN
Select this when you want to play the DVD with the subtitles in German.
ITALIAN
Select this when you want to play the DVD with the subtitles in Italian.
OTHERS
Use the number buttons to input the language number. (See "Language code list" on page 16.)
③ When "DISC MENU" is selected,
ENGLISH (Factory default)
Select this when you want to display the menus in English.
FRENCH
Select this when you want to display the menus in French.
SPANISH
Select this when you want to display the menus in Spanish.
GERMAN
Select this when you want to display the menus in German.
ITALIAN
Select this when you want to display the menus in Italian.
OTHERS
Use the number buttons to input the language number.
(See "Language code list" on page 16.)
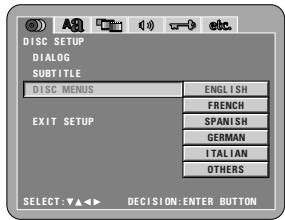
* To exit the setup mode
Use the cursor button to select "EXIT SETUP", then press the ENTER button. It is also possible to quit by pressing the SETUP button on the remote control unit.
Language code list
| Code | Language | Code | Language | Code | Language | Code | Language |
| 6565 | Afar | 7079 | Faroese | 7678 | Lingala | 8375 | Slovak |
| 6566 | Abkhazian | 7082 | French | 7679 | Laothian | 8376 | Slovenian |
| 6570 | Afrikaans | 7089 | Frisian | 7684 | Lithuanian | 8377 | Samoan |
| 6577 | Ameharic | 7165 | Irish | 7686 | Latvian, Lettish | 8378 | Shona |
| 6582 | Arabic | 7168 | Scotts Gaelic | 7771 | Malagasy | 8379 | Somali |
| 6583 | Assamese | 7176 | Galician | 7773 | Maori | 8381 | Albanian |
| 6588 | Aymara | 7178 | Guarani | 7775 | Macedonish | 8382 | Serbian |
| 6590 | Azerbaijani | 7185 | Gujarati | 7776 | Malayalam | 8385 | Sundanese |
| 6665 | Bashkir | 7265 | Hausa | 7778 | Mongolian | 8386 | Swedish |
| 6669 | Byelorussian | 7273 | Hindi | 7779 | Moldavian | 8387 | Swahili |
| 6671 | Bulgarian | 7282 | Croatian | 7782 | Marathi | 8465 | Tamil |
| 6672 | Bihari | 7285 | Hungarian | 7783 | Malay | 8469 | Telugu |
| 6678 | Bengali; Bangla | 7289 | Armenian | 7784 | Maltese | 8471 | Tajik |
| 6679 | Tibetan | 7365 | Interlingua | 7789 | Burmese | 8472 | Thai |
| 6682 | Breton | 7378 | Indonesian | 7865 | Nauru | 8473 | Tigrinya |
| 6765 | Catalan | 7383 | Icelandic | 7869 | Nepali | 8475 | Turkmen |
| 6779 | Corsican | 7384 | Italian | 7876 | Dutch | 8476 | Tagalog |
| 6783 | Czech | 7387 | Hebrew | 7879 | Norwegian | 8479 | Tonga |
| 6789 | Welsh | 7465 | Japanese | 7982 | Oriya | 8482 | Turkish |
| 6865 | Danish | 7473 | Yiddish | 8065 | Panjabi | 8484 | Tatar |
| 6869 | German | 7487 | Javanese | 8076 | Polish | 8487 | Twi |
| 6890 | Bhutani | 7565 | Georgian | 8083 | Pashto, Pushto | 8575 | Ukrainian |
| 6976 | Greek | 7575 | Kazakh | 8084 | Portuguese | 8582 | Urdu |
| 6978 | English | 7576 | Greenlandic | 8185 | Quechua | 8590 | Uzbek |
| 6979 | Esperanto | 7577 | Cambodian | 8277 | Rhaeto-Romance | 8673 | Vietnamese |
| 6983 | Spanish | 7578 | Kannada | 8279 | Romanian | 8679 | Volapuk |
| 6984 | Estonian | 7579 | Korean | 8285 | Russian | 8779 | Wolof |
| 6985 | Basque | 7583 | Kashmiri | 8365 | Sanskrit | 8872 | Xhosa |
| 7065 | Persian | 7585 | Kurdish | 8368 | Sindhi | 8979 | Yoruba |
| 7073 | Finnish | 7589 | Kirghiz | 8372 | Serbo-Croatian | 9072 | Chinese |
| 7074 | Fiji | 7665 | Latin | 8373 | Singhalese | 9085 | Zulu |
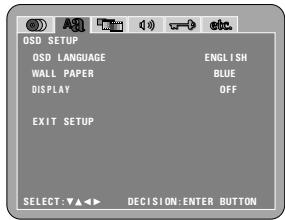
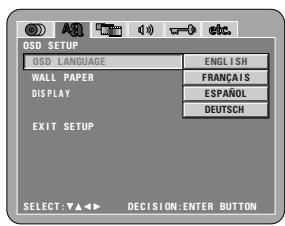
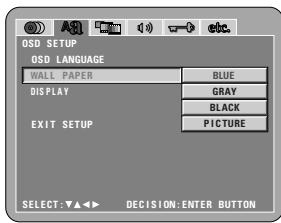
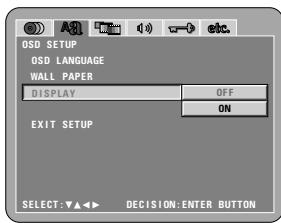
When "OSD SETUP" is selected
1 See page 14.
2
Use the and cursor buttons to select the desired setting, then press the ENTER button.
OSD LANGUAGE
Use this to set the language for the default setting screen and messages displayed on the TV screen ("PLAY", etc.)
WALL PAPER
Use this to select the image to be shown on the screen in the stop mode and CD play mode.
DISPLAY
The DIMMER button permits the setting of whether or not there will be an indication on the display of this unit only for the 2 seconds immediately following the S operation, even while the display has been off.
3
Use the and cursor buttons to select the desired setting, then press the ENTER button.
① When "OSD LANGUAGE" is selected:
ENGLISH (Factory default)
Select this to set the OSD language to English.
FRANÇAIS
Select this to set the OSD language to French.
ESPANOL
Select this to set the OSD language to Spanish.
DEUTSCH
Select this to set the OSD language to German.

Remote control unit

Remote control unit
Remote control unit

Remote control unit
② When “WALL PAPER” is selected:
BLUE (Factory default)
Select this to display a blue background on the TV display.
GRAY
Select this to display a gray background on the TV display.
BLACK
Select this to display a black background on the TV display.
PICTURE
Select this to display the wallpaper on the TV display.
3
③ When "DISPLAY" is selected:
OFF (Factory default)
This is valid when the display has been switched off with the DIMMER button. The display will not show an indication even when the button (ex. skip, stop, etc.) has been pressed.
ON
This is valid when the display has been switched off with the DIMMER button. When the button (ex. skip, stop, etc.) is pressed, the indication will appear on the display for approximately 2 seconds.
* To exit the setup mode
Use the cursor button to select "EXIT SETUP", then press the ENTER button. It is also possible to quit by pressing the SETUP button on the remote control unit.
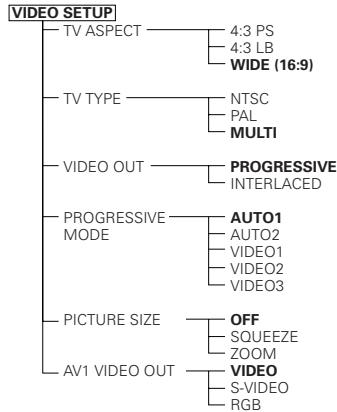
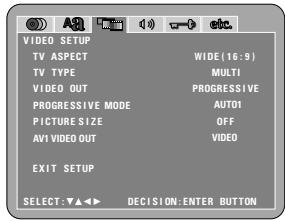
When "VIDEO SETUP" is selected
1 See page 14.
Use the and cursor buttons to select the desired setting, then press the ENTER button.
TV ASPECT
Use this to set the shape of your TV's screen.
TV TYPE
Use this to set your TV's video format (NTSC, PAL or MULTI).
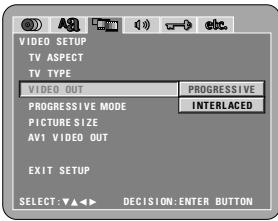
VIDEO OUT
Use this to select either the progressive image output or interlace image output.
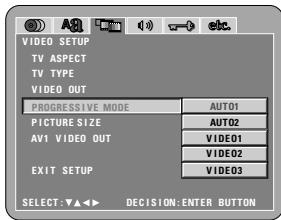
PROGRESSIVE MODE
A method of progressive conversion can be set depending on the image recorded to the DVD.
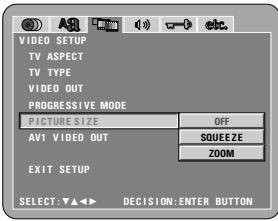
PICTURE SIZE
The size of the screen to be output can be switched.
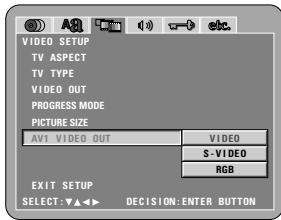
AV1VIDEO OUT (For only European model)
To select whether composite video signals or S video signals or RGB signals will be output from the AV1 SCART terminals.
Use the and cursor buttons to select the desired setting, then press the ENTER button.
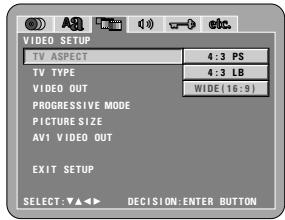
① When "TV ASPECT" is selected:
4:3PS
Select this to play wide DVDs in the pan & scan mode (with the sides of the picture cut off). Discs for which pan & scan is not specified are played in the letter box mode.
4:3 LB
Select this to play wide DVDs in the letter box mode (with black strips at the top and bottom).
WIDE (16:9) (Factory default)
Select this to play wide DVDs in the full-screen mode.
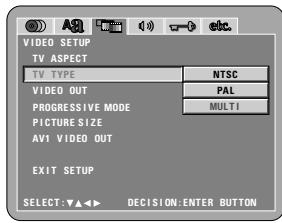
② When "TV TYPE" is selected:
NTSC
Select this when your TV's video format is NTSC. If NTSC is selected, output format is fixed to NTSC.
PAL
Select this when your TV's video format is PAL. If PAL is selected, output format is fixed to PAL.
MULTI (Factory default)
Select this when your TV is compatible with both the NTSC and PAL formats.
If you play the disc recorded NTSC format, signal from video output terminal will be switched to NTSC is selected, output format is fixed to NTSC.
NOTE:
- If "TV TYPE" is set to a format other than a registered TV format, the image may no longer be smooth and the top and bottom of the image may be cut off.
Remote control unit

Remote control unit

Remote control unit

Remote control unit
③ When "VIDEO OUT" is selected: (NOTES)
PROGRESSIVE (Factory default)
Select this when using the DVD-A11 connected to a progressive type TV.
INTERLACED
Select this when using the DVD-A11 connected to an interlace type TV.
NOTE:
- For the component output only, it is possible to switch between interlace image output and progressive image output. It is not possible to specify progressive image output for the Video output connectors or S-Video output connector.
④ When "PROGRESSIVE MODE" is selected:
AUTO 1 (Factory default)
Select this when the image recorded to the DVD is film material.
AUTO 2
Select this when the image recorded to the DVD is 30-frame film material.
VIDEO 1 TO 3
Select this when the image recorded to the DVD is video material.
VIDEO 1
Select this for regular video material.
VIDEO 2
Select this for video material having little movement.
VIDEO 3
Select this for video material having a lot of movement.
⑤ When "PICTURE SIZE" is selected:
OFF (Factory default)
Select this to display without changing the screen size.

TV
SQUEEZE
Select this when playing back a 4:3 image that you wish to display at 4:3 aspect ratio at the center of a 16:9 TV.

TV
ZOOM
Select this when you wish to display a uniformly enlarged image while maintaining the vertical and horizontal proportion.

TV
- Only effective for set to "WIDE (16:9)" at "TV ASPECT".
⑥ When "AV1VIDEO OUT" is selected:
VIDEO (Factory default)
Composite video signals will be output from the AV1 SCART terminal.
S-VIDEO
S video signals will be output.
RGB
RGB signals will be output.

Remote control unit

Remote control unit
* To exit the setup mode
Use the cursor button to select "EXIT SETUP", then press the ENTER button. It is also possible to quit by pressing the SETUP button on the remote control unit.
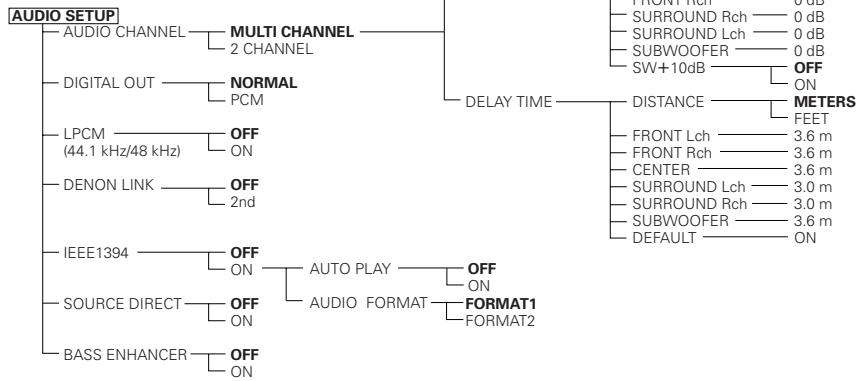
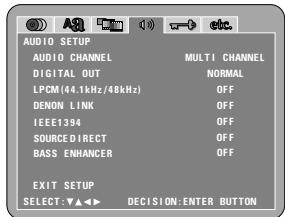
When "AUDIO SETUP" is selected
1 See page 14.
Use the and cursor buttons to select the desired setting, then press the ENTER button.
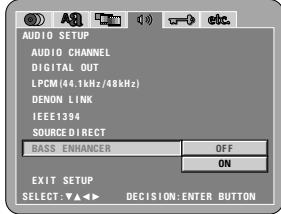
AUDIO CHANNEL
Use this to adjust for the connected speaker systems.
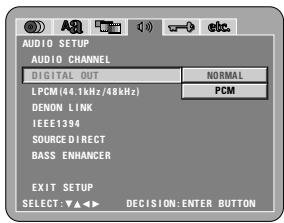
DIGITAL OUT
Use this to select the digital output's signal format.
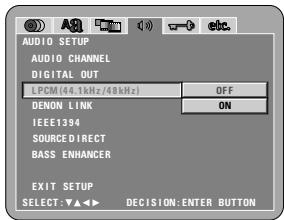
LPCM (44.1 kHz/48 kHz)
Use this to set the digital audio output when playing DVDs recorded in linear PCM audio.
2
DENON LINK
Use this to output digital signals from the DENON LINK terminal.
IEEE1394
Use this to output digital signals from the IEEE1394 terminal.
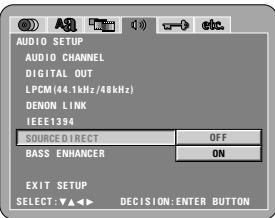
SOURCE DIRECT
This permits a setting to output the audio without adding speaker settings or channel level processing to the audio signals of DVD audio or Super Audio CD.
BASS ENHANCER
Set whether or not to output audio signals from the subwoofer when playing two-channel audio signals.
- The BASS ENHANCER settings do not apply to digital outputs.
3
Use the and cursor buttons to select the desired setting, then press the ENTER button.
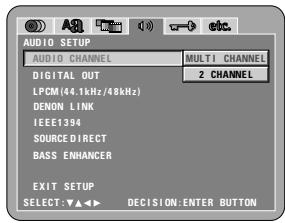
① When "AUDIO CHANNEL" is selected:
Use the and cursor buttons to select the item to be set, then press the ENTER button.
MULTI CHANNEL (Factory default)
Select this for systems in which three or more speakers are connected.
When MULTI CHANNEL is set, the speaker settings (SPEAKER CONFIGURATION), speaker output level adjustment (CHANNEL LEVEL) and speaker distances (DELAY TIME) can be set.
2 CHANNEL
Select this for systems in which only two speakers are connected.

Remote control unit

Remote control unit
Remote control unit

Remote control unit
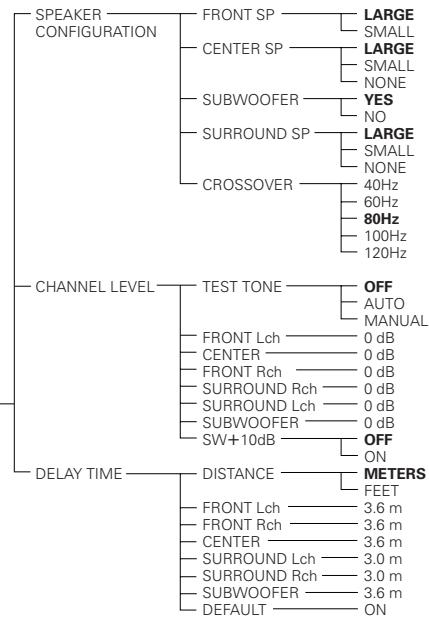
When "MULTI CHANNEL" is selected, use the and cursor buttons to select the item to be set, then press the ENTER button.
Use this to select the types of the different speakers.
CHANNEL LEVEL
Use this to adjust the output level of the different speakers.
DELAY TIME
Use this to set the distance from the different speakers to the listening position.
- To exit the SPEAKER SETUP mode
Use the cursor button to select "AUDIO SETUP" then press ENTER button. - The SPEAKER CONFIGURATION settings only apply to analog outputs.
When "SPEAKER CONFIGURATION" is selected, use the and cursor buttons to select the speaker to be set then press the ENTER button.
- The type of speaker used for the front speakers, center speaker, subwoofer and surround speakers can be set. Use the and cursor buttons to select the speaker type, then press the ENTER button.
LARGE
Select this when a large speaker is connected.
SMALL
Select this when a small speaker is connected
NONE
Select this when no speaker is connected.
YES
Select this when a subwoofer is connected.
NO
Select this when no subwoofer is connected.
- When "CROSSOVER" is selected: 40 Hz, 60 Hz, 80 Hz (Factory default), 100 Hz, 120 Hz, set the frequency of cross over.
- Press the RETURN button to return to the "SPEAKER SETUP" menu.
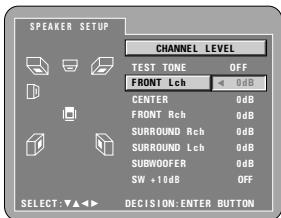
When "CHANNEL LEVEL" is selected, use the and cursor buttons to select the speaker to be adjusted, then use the and cursor buttons to set the level.
TEST TONE
- Use the and cursor buttons to select auto or manual.
Adjust so that the volume of the test tones output from the different speakers sounds the same. - The volume level output from the front speakers (left and right channels), center speaker, surround speakers (left and right channels) and subwoofer can be adjusted.
- The volume level can be adjusted between 0 and -10 dB in steps of 1 dB.
- Settings SW + 10 dB to "ON" increases by 10 dB the volume level that is output from the subwoofer.
- Press the RETURN button to return to the "SPEAKER SETUP" menu.
Remote control unit

Remote control unit
Remote control unit
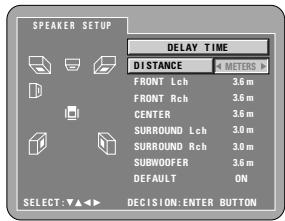
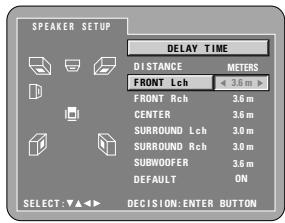
© When "DELAY TIME" is selected:
With 5.1-channel surround sound, ideally the distance between the listening position and all the speakers aside from the subwoofer should be the same. The delay time setting can be used to make the sound from the different speakers reach the listening position at the same time.
Use the and cursor buttons to select the setting item, then press the ENTER button.
- When "DISTANCE" is selected:
METERS (when the cursor button is pressed):
The unit of distance is set to meters ("m").
FEET (when the cursor button is pressed):
The unit of distance is set to feet ("ft").
- When "FRONT Lch", "FRONT Rch", "CENTER", "SURROUND Lch", "SURROUND Rch", "SUBWOOFER" is selected:
Use the and cursor buttons to set the distance from the listening position to the different speakers.
- The distance can be set within the range of 0 to 18 meters (60 feet).
-
The maximum difference in speaker distance for which adjustment is possible is 7.5 meters (25 feet).
-
When "DEFAULT" is selected:
When "DEFAULT" is selected and the ENTER button is pressed, all the items are restored to their factory default settings.
- When digital connections are made with an AV amplifier, make the speaker settings on the AV amplifier.
For DVD audio discs, the disc's settings are given priority, so the sound may not be produced as set with the above speaker mode setting.
- Press the RETURN button to return to the "SPEAKER SETUP" menu.

Remote control unit

Remote control unit

Remote control unit
② When "DIGITAL OUT" is selected:
NORMAL (Factory default)
When playing DVDs recorded in Dolby Digital or DTS, bitstream signals are output from the digital audio output terminals. When playing DVDs recorded in linear PCM or packed PCM, linear PCM signals are output.
Select "NORMAL" when making digital connections to an AV amplifier with built-in Dolby Digital and DTS decoder.
PCM
When playing Dolby Digital/DTS bitstream signals or DVDs recorded in linear PCM or packed PCM, the signals are converted into 48 kHz/16-bit PCM (2-channel) signals and output from the digital outputs. When playing DVDs recorded in PCM, linear PCM signals are output.
③ When "LPCM (44.1 kHz/ 48 kHz)" is selected:
OFF (Factory default)
When playing linear PCM or packed PCM DVDs that are not copyright-protected, for 2-channel PCM audio signals up to 96kHz , linear PCM signals are output as such without being converted from the digital outputs. (176.2 kHz and 192kHz signals are converted to 88.2kHz and 96kHz , respectively.)
For DVDs containing multi-channel PCM signals, the digital signals are down-mixed for output into two channels, front left and right. (Only the front left and right channels are output for sources for which down-mixing is prohibited.)
When playing copyright-protected linear PCM or packed PCM DVDs, in consideration of copyrights, no digital signals are output for sources exceeding 48kHz / 16 bits. When playing such sources, either set to "ON" or make analog connections. (See page 9.)
ON
Linear PCM and packed PCM signals are converted to 44.1kHz or 48kHz and output. (The PCM digital audio output signals are converted to 48kHz or less in consideration of copyrights.) When making digital connections to an AV amplifier that is not compatible with 96kHz / 88.2kHz signals, set to "ON".
④ When “DENON LINK” is selected:
OFF (Factory default)
Digital audio signals are not output from the DENON LINK terminal.
2nd
Set this when the amplifier to be connected is DENON LINK 2nd.

Remote control unit

Remote control unit

⑤ When "IEEE1394" is selected:
OFF (Factory default)
Digital audio signals are not output from the IEEE1394 terminal.
ON
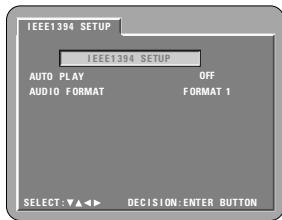
When "ON" is selected:
This will lead to the "AUTO PLAY", and "AUDIO FORMAT" setting screens. Select the item to be set using the ( ,) cursor buttons and press the ENTER button.
© Auto Play
Set this when automatically playing this unit from another device, under circumstances in which this unit is used in conjunction with a DENON device that supports IEEE1394.
© Audio Format
Set this format of audio signals from IEEE1394 connector.
© Auto Play Setting Method
OFF (Factory default)
Set this when you do not wish to control the operation of this unit from another device.
ON
Set this when you wish to control the operation of this unit from another device.
© Audio Format Setting Method
FORMAT 1 (Factory default)
Set this when you conjunction with a DENON device.
FORMAT2
This is a mode for future system expansion.
IEEE1394 indicator
When "IEEE1394" set to "ON", this indicator lights as below.
flashing . . . . . . . self check of IEEE1394
connections.
light. IEEE1394 connection is OK.
IEEE 1394

slow flashing. . . . IEEE1394 connection is NG.
(Loop connection) confirm the
connection.
fast flashing . . . . IEEE1394 connection is NG.
confirm the connection.

Remote control unit

Remote control unit

⑥ When “SOURCE DIRECT” is selected:
OFF (Factory default)
Please set to OFF when performing speaker settings or setting the delay time and playing back.
ON
Set to ON when playing back without performing the processing of speaker settings. Performing this setting will result in the setting of the DTS recommended all-channel, full bandwidth playback. (Note that the volume of the subwoofer will increase by 5 dB, and there will be an increase of 15 dB with a Super Audio CD.) This is also set when playing back a 6-channel source of DVD audio that has been recorded with all channels and full bandwidth. When set to "OFF", the speaker size will be set to "Large" for all speakers and the subwoofer will be set to "Yes". When playing back software such as this, perform the analog connections according to the software instruction manual.

Remote control unit

Remote control unit
3
When "BASS ENHANCER" is selected:
OFF (Factory default)
No sound is produced from the subwoofer.
ON
Sound is produced from the subwoofer.
In the case, set the subwoofer to "YES" at the speaker settings.
- This works only with analog audio output.
* To exit the setup mode
Use the cursor button to select "EXIT SETUP", then press the ENTER button. It is also possible to quit by pressing the SETUP button on the remote control unit.
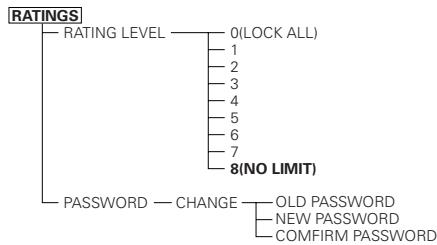
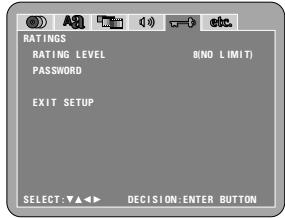
When "RATINGS" is selected
1 See page 14.
2
Use the and cursor buttons to select the desired setting, then press the ENTER button.
RATING LEVEL
Use this to restrict playback of adult DVDs you do not want children to view. Note that even with adult DVDs, viewing cannot be restricted unless the restriction level is recorded on the disc.
Password
Use this to change the password.
The set's password is set to "0000" by default.
Use the and cursor buttons to select the desired setting, then press the ENTER button.
① When “RATING LEVEL” is selected:
0 (LOCK ALL)
Select this to disable playback of all DVDs.
Use this for example to disable playback of adult DVDs on which the rating level is not recorded.
1
Select this to play only DVDs for children. (Adult and general audience DVDs cannot be played.)
2 to 7
Select this to play DVDs for general audiences and children. Adult DVDs cannot be played.
8 (NO LIMIT) (Factory default)
Select this to play all DVDs.
Remote control unit

Remote control unit
Remote control unit

Remote control unit
Use the number buttons to input a 4-digit password, then press the ENTER button.
- The set's password is set to "0000" by default.
- Do not forget the password.
- The setting cannot be changed without inputting the correct password.
3
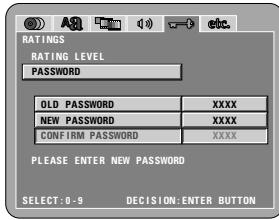
② When “password” is selected: Use the cursor button to select the “CHANGE”, then press the ENTER button.
Use the number buttons to input a OLD (current) 4-digit password.
- The set's password is set to "0000" by default.
Use the number buttons to input a new 4-digit password.
Use the number buttons to input a new 4-digit password again. (for the confirmation.)
Then press the ENTER button
* Do not forget the password
* The setting cannot be changed without inputting the correct password.

Remote control unit
Remote control unit
- To exit the setup mode
Use the cursor button to select "EXIT SETUP", then press the ENTER button. It is also possible to quit by pressing the SETUP button on the remote control unit.
When "OTHER SETUP" is selected
| 1 | See page 14. | |
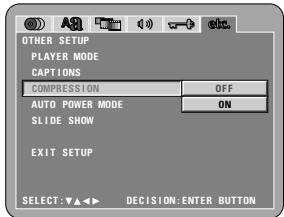
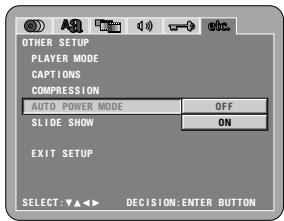
| 2 | Use the▲ and▼ cursor buttons to select the desired setting, then press the ENTER button. PLAYER MODE The DVD video play mode can be set to play the DVD video contents included on a DVD audio disc. CAPTIONS Use this to set whether or not to display the closed captions recorded on DVDs. COMPRESSION Use this to set the dynamic range output when playing discs. AUTO POWER MODE To save power, DVD-A11's can automatically be set to the standby mode when it is not used for long periods of time. SLIDE SHOW The time interval for switching to the next still picture when playing slide shows of still pictures (in JPEG format) can be set. | Remote control unit OTHER SETUP PLAYER MODE AUDIO CAPTIONS OFF COMPRESSION OFF AUTO POWER MODE OFF SLIDE SHOW SSEC EXIT SETUP SELECT:▲→DECISION:ENTER BUTTON |
| 3 | Use the▲ and▼ cursor buttons to select the desired setting, then press the ENTER button. ① When “PLAYER MODE” is selected: AUDIO (Factory default) Set this to play the DVD audio signals as such. VIDEO Set this to play the DVD video contents included on a DVD audio disc. | Remote control unit OTHER SETUP PLAYER MODE AUDIO CAPTIONS VIDEO COMPRESSION AUTO POWER MODE SLIDE SHOW EXIT SETUP SELECT:▲→DECISION:ENTER BUTTON |
② When “CAPTIONS” is selected:
OFF (Factory default)
Select this when you do not want to display the captions on the screen when playing DVDs containing English captions.
ON
Select this to display the captions on the screen when playing DVDs containing English captions.
③ When "COMPRESSION" is selected:
OFF (Factory default)
Select this for the standard range.
ON
Select this to achieve powerful sound even when the volume is low. This setting is suited for watching DVDs late at night with the volume low. (This setting is only valid for DVDs recorded in Dolby Digital.)
3
④ When "AUTO POWER MODE" is selected:
OFF (Factory default)
The power does not automatically switch to the standby mode.
ON
The DVD-A11's power turns off and the standby mode is set if the DVD-A11 remains in the stop mode for approximately 30 minutes.
⑤ When "SLIDE SHOW" is selected:
Use the and cursor buttons to set the time interval. The time interval can be set within 5 and 15 seconds.
(The factory default setting is 5 seconds.)


* To exit the setup mode
Use the cursor button to select "EXIT SETUP", then press the ENTER button. It is also possible to quit by pressing the SETUP button on the remote control unit.
NOTES:
- An English caption decoder is required to display English captions.
- DVDs with caption signals are indicated by the , , mark.
English captions cannot be displayed when playing DVDs which do not contain caption signals.
- The characters in which the captions are displayed (capital letters, small letters, italics, etc.) depend on the DVD and cannot be selected with the DVD-A11.
9 PLAYBACK
(1)Playback

| 1 | Turn on the power. • Press the power button, the power indicator lights and the power turn on. • When standby mode, press the POWER ON button of remote control unit. | Light ON/STANDBY OFF Main unit | POWER ON Remote control unit |
| 2 | Press the OPEN/CLOSE button to open the disc tray. | OPEN/CLOSE Main unit | OPEN/CLOSE Remote control unit |
| 3 | Set the disc in the disc tray. | ||
| 4 | Press the OPEN/CLOSE button. | OPEN/CLOSE Main unit | OPEN/CLOSE Remote control unit |
| 5 | Press the PLAY button. • For many interactive DVDs and video CDs with playback control, a menu screen appears. In this case use the procedure in step 6 to select the desired item. * Interactive DVDs are DVDs including multiple angles, stories, etc. | PLAY Main unit Example: For DVDs with menu screens TOP MENU Apple Banana Orange Strawberry Peach Pineapple Example: For videos with playback control 1. Opening 2. 1st movement 3. 2nd movement 4. 3rd movement 5. Ending |
| 6 | Use the cursor buttons (▲,▼,▲ and ▲) to select the desired item. • For some discs there is a second menu screen. If so, press the▶按钮 to display the next menu screen. (See the disc's jacket.) * The cursor buttons (▲,▼,▲ and ▲) do not work for video CDs. Use the number buttons to select the desired item. | |
| 7 | Press the ENTER button. • The desired item is selected and playback starts. • You can return to the menu screen by pressing the TOP MENU/MENU button while the DVD is playing, though this depends on the disc. • Press the RETURN button during playback of a video CD to return to the menu screen. | Example: When "Apple" is selected TOP MENU Apple Banana Orange Strawberry Peach Pineapple Example: For videos with playback control 1. Opening 2. 1st movement 3. 2nd movement 4. 3rd movement 5. Ending |
NOTES:
- If appears on the TV screen while buttons are being operated, that operation is not possible on the DVD-A11 or with that disc.
-
Set the disc in the disc guide.
-
Do not place more than one disc in the disc tray.
- The disc keeps turning while the menu screen is displayed on the TV screen.

(2) Stopping Playback
During playback, press the STOP button on the main unit or the remote control unit, playback stops and wall paper is displayed.
- With the DVD-A11, when the STOP button is pressed, that position is stored in the memory. At this time, "▶" flashes on the display. When the PLAY button is pressed after pressing the STOP button, playback resumes from the position at which it was stopped. The resume play memory function is canceled if the disc tray is opened or the STOP button is pressed a second time.
- After 30 minutes in the stop mode, the DVD-A11's power automatically turns off and the standby mode is set. (Auto Power Off)
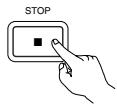
Main unit
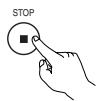
Remote control unit
- The resume play memory function only works for discs for which the elapsed time is shown on the display during playback.
NOTE:
- The resume play memory function does not work during menu playback of DVDVIDEO discs.
(3) Playing Still Pictures (Pausing)
During playback, press the STILL/PAUSE button on the main unit or the remote control unit.
- Press the PLAY button to resume normal playback.
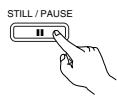
Main unit

Remote control unit
(4) Forward/Reverse Searching
During playback, press one of the SLOW/SEARCH buttons on the main unit or the remote control unit.
: Reverse direction
Forward direction
- When pressed again, the search speed increases.
- Variable in 4 steps for Super audio CDs and CDs, 7 steps for DVD audio (movie part), DVD video and video CD discs.
- Press the PLAY button to resume normal playback.

Main unit
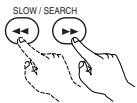
Remote control unit
NOTE:
- In some cases the menu screen may reappear when one of the SLOW/SEARCH buttons is pressed during menu playback on a video CD.
(5) Skipping to the Beginning of Chapters or Tracks
Cueing using the SKIP buttons
During playback, press one of the SKIP buttons on the main unit or the remote control unit.
: Reverse direction (PREVIOUS)
Forward direction (NEXT)
- A number of chapters or tracks equal to the number of times the button is pressed is skipped.
- When the SKIP button is pressed once, the pickup returns to the beginning of the currently playing chapter or track.

Reverse direction Forward direction (direction of playback)
Cueing using the number buttons
Press the SEARCH MODE button during playback.
- The search mode switches each time the button is pressed. For DVD audio discs : Group Track (Group) For DVD video discs : Title Chapter (Title) For Super audio CDs, CDs and video CDs : Track only
- The search mode set by pressing the SEARCH MODE button is stored in the memory until the button is pressed again.
However, the search mode returns to the default mode when the power is turned off.
- Use the number buttons to input the number to be played.
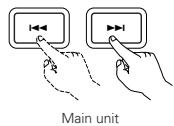
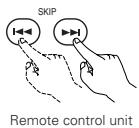
NOTE:
- In some cases the menu screen may reappear when one of the SKIP buttons is pressed during menu playback on a video CD.
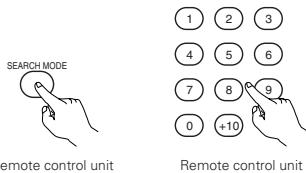
NOTE:
- Some DVD audio, DVD video and video CD discs do not operate as described in this manual due to the intentions of the discs' producers.
(6) Playing Frame by Frame (for DVD-videos and video CDs only)
During playback, press the STILL/PAUSE button on the main unit or the remote control unit.
- The picture moves forward one frame each time the button is pressed.
- Press the PLAY button to resume normal playback.
- With DVD audio discs, forward frame-by-frame skipping is only possible for the video part.

Main unit

Remote control unit
(7) SlowPlayback (forDVD-videos and video CDs only)
In the still mode, press one of the SLOW/SEARCH buttons on the main unit or the remote control unit.
: Reverse direction
Forward direction
- When pressed again, the slow play speed increases.
For video CDs there are three steps. - Press the PLAY button to resume normal playback.
- With DVD audio discs, the forward slow play function can only be used with the video part.
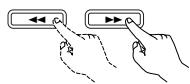
Main unit
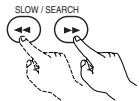
Remote control unit
NOTE:
- Reverse slow play is not possible on video CDs.
(8) Using the SRS TruSurround function (only for DVD-videos and Video CDs)
The multi-channel sound normally achieved with five speakers is recreated using only the two front stereo speakers. This results in a sound with a nearly natural sense of movement that seems to surround the head, without the strong directivity characteristic of multi-speaker systems.
During playback, press the SRS TS button on the remote control unit.
- Press the button again to cancel the TruSurround function.

Remote control unit
NOTES:
- This function only works with DVD-videos and video CDs only.
- The SRS TS function does not work at the time of multi-channel setting. Set "AUDIO CHANNEL" under "AUDIO SETUP" at "SETUP" to "2 CHANNEL".
Note that for some discs the effect will be weak or there will be no effect. - Turn off other surround functions (the TV's surround mode, etc.).
- The SRS TS function only works for analog audio output signals. The digital audio output signals do not change.
SRS(●)
Labs, Inc.
is a trademark of SRS Labs, Inc. TruSurround technology is incorporated under license from SRS
(9) Selecting the still image (only for DVD-audios)
During playback, press the PAGE + or PAGE - button on the remote control unit.
- For DVD audio discs with still images, the desired image can be selected.
- On some discs the image cannot be selected due to the intentions of the discs' producers.
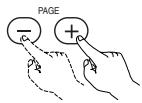
Remote control unit
(10) Playing bonus groups (only for DVD-audios)
| 1 | In the stop mode, press the SEARCH MODE button on the remote control unit to set the search mode to "GROUP". | SEARCH MODE Remote control unit | |
| 2 | Use the number buttons to input the bonus group number. | 1 2 3 4 5 6 7 8 9 0 +10 | Remote control unit |
| 3 | Use the number buttons on the remote control unit to input the password (4 digits), then press the ENTER button. • Playback starts from the first track in the specified group. | ENTER Enter Remote control unit | |
| · In some cases the password must be input at the menu screen. In these cases, follow the instructions on the screen. · Once the password is input, the disc can be played as many times as you want until it is removed. · If you make a mistake when inputting the password, press the CLEAR button on the remote control unit. | |||

USING THE MODE SET UP
■ High quality audio can be enjoyed by setting the priority ranking of the area/layers of the Super Audio CD that is to be played back by stopping the output of video signals, etc. and by outputting only the analog audio signal. The video output setting of the DVI connector can also be changed.
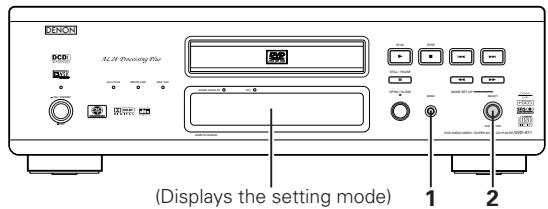
1
Press the mode button.
- The modes described below will appear on the display.
Super Audio CD
On a Super Audio CD, the stereo and multi-channel areas are separate. Hybrid discs comprise a 2-layer structure of a Super Audio CD layer and a CD layer. The area/layer can be set to be played with priority.
FILTER
The low pass filter value when playing Super Audio CDs can be set.
PURE DIRECT
Circuits other than analog audio circuits are turned off.
DVI SETUP
Changes the output signal settings of the DVI-D terminal.
DVI BK LEVEL
Switches the digital RGB video level (data range) of the DVI-D terminal.
© When "Super Audio CD" is selected:
Turning the select knob will display the following setting modes on the display.
MULTI (Factory default)
When playing a Super Audio CD disc, the multichannel area will be played back with priority.
STEREO
When playing a Super Audio CD disc, the stereo area will be played back with priority.
CD
When playing a Super Audio CD disc, the CD layer will be played back with priority.
When playing back a disc that does not have a selected area/layer, another area/layer will be played back automatically.
Select the item that you wish to set and press the select knob to define it. (Exit the setting mode automatically.)
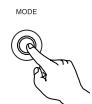
Main unit


Main unit
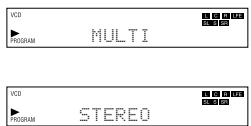

When "FILTER" is selected:
Turning the select knob will display the following setting modes on the display.
50 kHz: (Factory default)
When playing Super Audio CDs, high frequencies of 50kHz and higher are cut.
100 kHz: When playing Super Audio CDs, high frequencies of 100 kHz and higher are cut.
- Set to 100 kHz when a high frequency compatible AV amplifier is connected.
Select the item that you wish to set and press the select knob to define it.
(Exit the setting mode automatically.)
© When “PURE DIRECT” is selected:
Turning the select knob will display the following setting modes on the display.
NORMAL: (Factory default)
All signals out. (Stop the direct mode)
VIDEO OFF: Video signals are not output.
DIGITAL OFF: Digital signals are not output.
ALL OFF: No indicate in Display of the main unit, and video and digital signals are not output. (except analog audio output)
Select the item that you wish to set and press the select knob to define it.
(Exit the setting mode automatically.)
© When "DVI SETUP" is selected:
Turning the select knob will display the following setting modes on the display.
DVI OFF: (Factory default)
No output the signals from DVI-D connector.
480P: Outputs the image from the DVI-D connector at 480P.
720P: Outputs the image from the DVI-D connector at 720P.
1080i: Outputs the image from the DVI-D connector at 1080i.
Select the item that you wish to set and press the select knob to define it.
When playing back a PAL-formated disc, the DVI-D connector outputs a 576P signal.
For output of a 480P, 720P or 1080i signal, be sure to set the TV TYPE option to NTSC. (See page 18.)
© When "DVI BK (Black) LEVEL" is selected:
Turning the select knob will display the following setting modes on the display.
NORMAL: (Factory default)
Signals are output from the DVI-D terminal with a digital RGB video level (data range) of 16 (black) to 235 (white).
ENHANCED:
Signals are output from the DVI-D terminal with a digital RGB video level (data range) of 0 (black) to 246 (white).
- When the DVI-D terminal is connected, the black may seem to stand out, depending on the TV or Monitor you are using. In this case, set this to "ENHANCED".
Select the item that you wish to set and press the select knob to define it.
(Exit the setting mode automatically.)
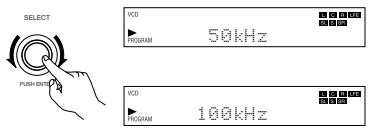
Main unit
Main unit
Main unit
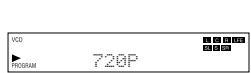

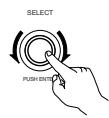
Main unit
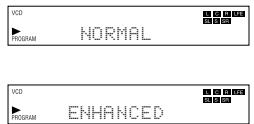
11 ADJUSTING THE PICTURE QUALITY
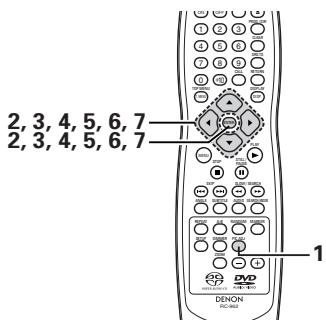
1
Press the PIC.ADJ button during playback or during pause.
The image quality adjustment screen will appear.
STD
Returns the settings to the factory default settings.
M1 TO M5
Image quality settings that have been adjusted to your preference can be stored to 5 memories, M1 to M5.
SET
SET permits set to setup level and setting of the screen display position (horizontal and vertical).
2
Select the memory using the 2 cursor buttons ( ,) and press the ENTER button.
IMAGE QUALITY ADJUSTMENT 1
This permits adjustment of the contrast, brightness, sharpness, tint, and enhancer. → Advance to Operation 3.
IMAGE QUALITY ADJUSTMENT 2
This permits adjustment of the setup level, black level, white level, color density, chroma delay, and fresh color. Advance to Operation 4.
NOISE REDUCTION (ADJUSTMENT 3)
The following types of noise reduction can be adjusted: 3D NR (3D noise reduction), BLNR (block noise reduction), MQNR (mosquito noise reduction), and CCS (cross color suppression). Advance to Operation 5.
GAMMA CORRECTION
This is selected when dark portions of the image are obscure, or bright portions are much brighter than necessary. Advance to Operation 6.

Remote control unit
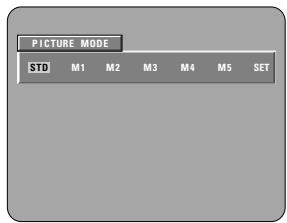
Remote control unit
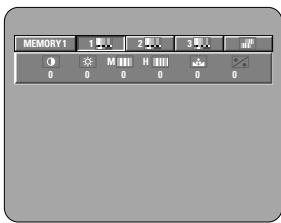

Remote control unit
| 3 | When Image Quality Adjustment 1 Is Selected and Adjusted: • Press cursor button (▼), then select the image quality adjustment item with cursor buttons (▲, ▲), set the adjustment value with cursor buttons (▲, ▼), and press the ENTER button. • All of the adjusted contents will be stored. CONTRAST (-6 to +6) (Factory default: 0) • This adjusts the light/dark difference of the image. BRIGHTNESS (0 to +12) (Factory default: 0) • This adjusts the brightness of the image. SHARPNESS (MID) (-6 to +6) (Factory default: 0) • This adjusts the sharpness of the image for the intermediate frequencies. SHARPNESS (HIGH) (-6 to +6) (Factory default: 0) • This adjusts the sharpness of the image for the high frequencies. (Only effective for progressive images.) HUE (-6 to +6) (Factory default: 0) • This adjusts the balance between green and red. (Not effective for progressive scan output nor component output.) ENHANCER (0 to +7) (Factory default: 0) This emphasizes the contour of the image. | Remote control unit Remote control unit |
| 4 | When Image Quality Adjustment 2 Is Selected and Adjusted: BLACK LEVEL (-5 to +5) (Factory default: 0) • This adjusts the black level. WHITE LEVEL (-5 to +5) (Factory default: 0) • This adjusts the white level. CHROMA LEVEL (-6 to +6) (Factory default: 0) • This adjusts the density of the color. CHROMA DELAY (-2 to +2) (Factory default: 0) • This adjusts the shift of the brightness signal and the color signal of the image. (Only effective for progressive images.) (Adjustment between -1 and +1 is possible for interlaced video.) | Remote control unit Remote control unit |
| 5 | When Noise Reduction (Adjustment 3) Is Selected and Adjusted: 3DNR (0 to +7) (Factory default: 0) • This reduces the noise of the overall image. BLNR (0 to +8) (Factory default: 0) • This reduces the block noise of the image. MQNR (0 to +8) (Factory default: 0) • This reduces the mosquito noise of the image. CCS (0 to +3) (Factory default: 0) • This performs removal of the color signal component for images in which the color signal component is mixed with the brightness signal. (Only effective with progressive images.) | Remote control unit Remote control unit |
| 6 | When Gamma Correction by Numerical Input Has Been Selected and Adjusted: (Press the cursor button (▼)) · All of the adjusted contents are stored. · The brightness level can be adjusted in a range of 16 to 235. · Pressing the cursor button (▲) raises the level (and the image becomes brighter), and pressing the cursor button (▼) lowers the level (and the image becomes darker). · A press of the CLEAR button returns all of the setting points to the standard level. The level of the selected point cannot exceed the level of the points above and below that point. (A dark portion cannot be set to exceed a portion that is brighter than it.) Ending the Image Quality Adjustment Press the PIC.ADJ button again. When Gamma Correction by Gamma Correction Graph Input Has Been Selected and Adjusted. | Remote control unit Enter Remote control unit |
| When Gamma Correction by Numerical Input Has Been Selected and Adjusted: (Press the enter button) · All of the adjusted contents are stored. · The brightness level can be adjusted in a range of 16 to 235. · Pressing the cursor button (▲) raises the level (and the image becomes brighter), and pressing the cursor button (▼) lowers the level (and the image becomes darker). · A press of the CLEAR button returns all of the setting points to the standard level. The level of the selected point cannot exceed the level or the points above and below that point. (A dark portion cannot be set to exceed a portion that is brighter than it.) Ending the Image Quality Adjustment Press the PIC.ADJ button again. When Gamma Correction by Gamma Correction Graph Input Has Been Selected and Adjusted. |
7
When the Display Position is Selected and Adjusted:
- Press the cursor button () , then select the horizontal/vertical direction with the cursor buttons (, ) , set the adjustment value with the (, ) cursor buttons, and press the ENTER button.
SETUP LEVEL (0 IRE, 7.5 IRE)
H. POSITION (-7 to +7) (Factory default: 0)
This corrects floating black.
A 15-step portion of position adjustment is permitted left and right.
V. POSITION (-3 to +7) (Factory default: 0)
- A 11-step portion of position adjustment is permitted up and down.
Remote control unit

Remote control unit
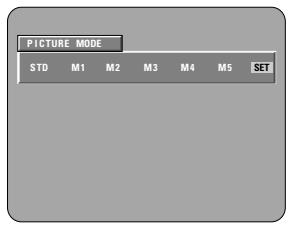
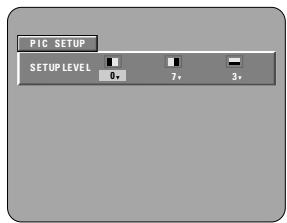
* To exit the picture adjust mode
Press the PIC.ADJ button.
REFERENCE:
- In the display of gamma correction, the horizontal axis indicates the brightness level of the image that is recorded on the disc, and the vertical axis indicates the brightness level of the image when it is output from this unit.
- When bright points of the disc side are adjusted to the "dark" of the output side, the fine parts of the bright portion that normally become hard to see, become an easily discerned image.
- When dark points of the disc side are adjusted to the "bright" of the output side, the fine parts of the dark portion that normally become hard to see, become an easily discerned image.
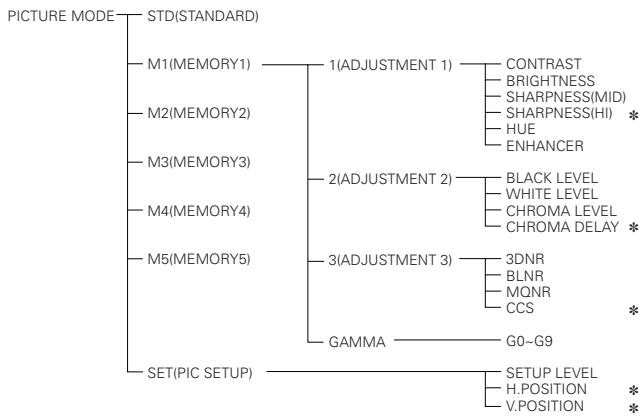

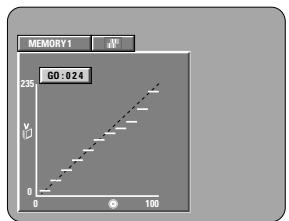
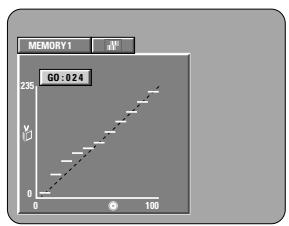
- Only effective for progressive scan.
- When DVI signals are output, the SHARPNESS (MID/HI), CHROMA DELAY and Gamma correction settings will have no effect.
12 USING THE ON-SCREEN DISPLAY
Use this function to display and change information on the disc (titles, chapters, time, etc.)
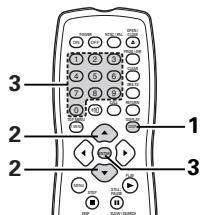
In the play mode, press the DISPLAY button.
The On-Screen Display appears.
- The picture on the TV screen switches each time the button is pressed.
- The items displayed differ from disc to disc.
Example: For DVD audio discs
- Normal playback screen

Disc information screen

GROUP REMAIN 0:57:59
TRACK ELAPSED 0:00:01
↓
TRACK REMAIN 0:05:59
Disc information screen
AUDIO 1/1:LPCM 2ch/96kHz/24BIT
Example: For DVD video discs
Normal playback screen

TITLE REMAIN 01:10:59
CHAPTER ELAPSED 00:00:01
↓
CHAPTER REMAIN 00:40:59
Disc information screen
TIME 01/10 CHAP
TIME ELAPSED 00:00
Disc information screen
AUDIO 1/2: DOLBY D3/2.1 ENGLISH
SUBTITLE OFF

Remote control unit
Example: For video CDs, Super audio CDs and music CDs
- Normal playback screen

Disc information screen
TRACK SINGLE ELAPPED
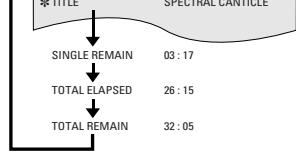
05/10
02:11 SPECTRAL CANTICULE
- Some Super audio CDs contain text data. In this case, the album title and artist are displayed in the stop mode, and the title of the currently playing track is displayed in the play mode.
1
Use the and cursor buttons to select the item you wish to change.
- The selected item is displayed with a yellow frame.
① For DVD audio discs
The elapsed time of groups and tracks can be selected.
② For DVD video discs
The elapsed time of titles, titles and chapters can be selected.
③ For video CDs, Super audio CDs and music CDs The elapsed time of tracks, tracks can be selected
① Changing the elapsed time Input using the number buttons, then press the ENTER button.
Example: For 1 minute 26 seconds "00126"
(2) Changing the title, track or chapter
For DVDs
Input using the number buttons, then press the ENTER button.
(For some discs it is not possible to change the title or chapter.)
For video CDs, Super audio CDs and music CDs Input using the number buttons. Playback sta that track.
Remote control unit


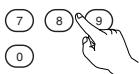
Remote control unit

Remote control unit
13 PLAYING REPEATEDLY
Use this function to play your favorite audio or video sections repeatedly.
Playing Repeatedly (Repeat Playback)
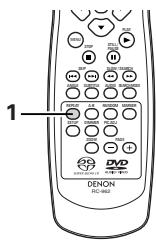
In the play mode, press the REPEAT button.
- The display on the TV screen switches each time the button is pressed, and the corresponding repeat play mode or normal playback mode is set.

Remote control unit
① For DVD audio discs
Normal playback
1
② For DVD video discs
Normal playback
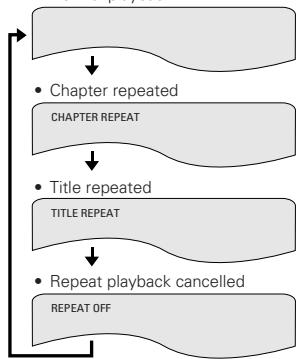
For video CDs, Super audio CDs and music CDs
Normal playback
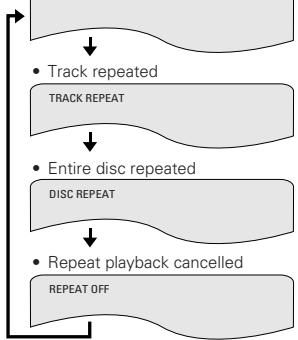
- To return to normal playback:
Return to normal playback by pressing the REPEAT button until "REPEAT OFF" appears on the TV screen.
Playing a Certain Section Repeatedly (A-B Repeat Playback)
1
During playback, press the A-B button.
This sets start point A.

Remote control unit
A TO B SET A
2
Press the A-B button again.
- This sets end point B, and repeat playback of the A-B section starts.
- To return to normal playback:
Press the A-B button until "A TO B CANCELED" appears on the TV screen.
NOTES:
- Repeat playback may not work for some DVDs.
- The repeat playback and A-B repeat playback functions will not work for DVDs and video CDs for which the elapsed time is not shown on the display during playback.
- In some cases, subtitles may not be displayed near the A and B points during A-B repeat playback.
14 PLAYING TRACKS IN THE DESIRED ORDER
■ Use this function with DVD-AUDIO discs, video CDs, Super audio CDs and music CDs to play the tracks in the desired order.
This function does not affect with DVD-VIDEO discs.
| 1 | In the stop mode, press the PROG/DIR button once. • The program selection screen appears. | PROG/DIR Remote control unit | PROGRAM NO. TRACK 1 MODE: NORMAL TOTAL TIME :----INPUT: 0-9, +10 CLEAR: CLEAR BUTTON |
| 2 | Use the number buttons to select the track number you want to program. EX: To program track 5 and track 12: • With DVD-audio, group numbers can be specified and programmed. Bonus tracks, however, cannot be programmed. | 1 2 3 4 5 6 7 8 9 0 +10 Remote control unit | PROGRAM NO. TRACK 1 8.5 2 12 3 MODE: NORMAL TOTAL TIME :10:35INPUT: 0-9, +10 CLEAR: CLEAR BUTTON |
| 3 | Press the PLAY button. • Playback of the tracks in the programmed order begins. | PLAY Main unit | PLAY Remote control unit |
| * To return to normal playback: Press the STOP button to stop programmed playback, then press the PROG/DIR button. Now press the PLAY button to start normal playback from the beginning of the disc. * To clear tracks from the program: Press the STOP button. The program play screen appears. Press the CLEAR button to clear the last track in the program. * To clear the entire program: The entire program is cleared when the power is turned off or the disc is ejected. * To check the programmed contents, press the CALL button in the stop mode. The programmed contents are displayed step by step. * Up to 20 tracks can be programmed. | |||
15 PLAYING TRACKS IN THE RANDOM ORDER
Use this function with video CDs, Super audio CDs and music CDs to play the tracks in random order. With DVD-AUDIO discs, random playback is performed within the selected group.
This function does not affect with DVD-VIDEO discs.
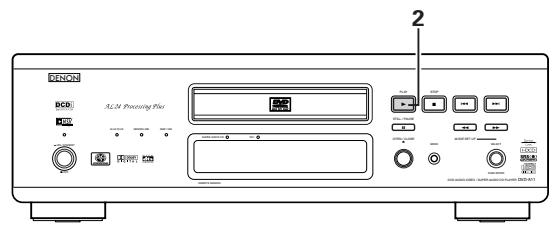
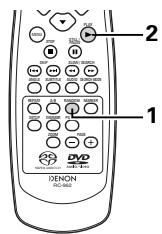
| 1 | In the stop mode, press the RANDOM button. • The random play screen appears. | RANDOM Remote control unit | RANDOM ON | |
| 2 | Press the PLAY button. • The tracks start playing in random order. * For DVD audio discs: When operating from the remote control unit, use the buttons to input the number of the group you want to play. | PLAY Main unit | SEARCH MODE Remote control unit * for DVD audio discs | PLAY Remote control unit |
| · Random playback is not possible for some discs. * To return to normal playback: Press the STOP button to stop random playback, then press the RANDOM button once. | ||||
16 PLAYING BACK WMA
■ Listening to WMA (Windows Media Audio) CD-R/CD-RW
- This unit can play CD-R/RW music files that have been recorded in the WMA (Windows Media Audio)* audio compression format.

Windows Media and the Windows logo are trademarks, or registered trademarks of Microsoft Corporation in the United States and/or other countries.
^ 念 WMA (Windows Media Audio): New audio coding of Microsoft Corporation.
* Uses of recordings you have made other than for your personal enjoyment are not permitted under the Copyright Law without permission of the copyright holder.
- The method of playback is the same as "Listening to Recorded MP3 CD/CD-R/CD-RW" on Pages 32 and 33.
- In the file display of the disc information screen, WMA files will be displayed with the "WMA" icon instead of the "MP3" icon. (Files for which the "WMA" icon is not displayed cannot be played. There will be a skip and the next file with an icon will be played.)
NOTES:
- Files recorded with a sampling frequency (fs) of 44.1, and 48 kHz are supported.
- Programmed playback cannot be performed with WMA discs.
- The digital output at the time of WMA file playback is converted to PCM regardless of the initial settings.
- Please use discs that have been recorded in conformity with the ISO 9660 level 1/level 2 CD-ROM file system. (Extended formats are excluded.)
Copyright protected files cannot be played. Also note that depending on the writing software and conditions, playback might not be possible, or the files might not be displayed properly. - Playback of the CD-R/RW might not be possible depending on the disc characteristics, soiling, scratches, and other factors.
- Bit rates of 64k to 160 kbps are supported for WMA files that have an extension of ".wma" or ".WMA".
- This unit can display the folder names and file names on the screen. Up to 11 half-width alphanumeric upper case characters and symbols (including the underscore symbol) can be displayed. Kanji, hiragana, katakana and other characters cannot be displayed.
- While in the stop condition, the DISPLAY button of the remote control can be used to switch and display the title names and the artist names. (One folder has a capacity of up to 99 files.)
- Recorded discs with no more than 99 files per folder are recommended. Multiple folder configurations are possible; however, depending on the configuration, recognition and playback of all the folders and files might not be possible.
- Multi-session discs and CD-R/RW that have not been finalized can also be played back; however, playback of discs that have had session closure within 10 sessions or have been finalized is recommended.
- Direct track selection using the remote control numerical keys (0 to 9, and +10) can specify up to 179 tracks (179 files) per folder. When 179 tracks are exceeded, while the unit is stopped, use the cursor buttons at the disc information screen to select the files, and use the play button or the ENTER button to play.
MP3 PLAYBACK
Listening to MP3 CD, CD-Rs and CD-RWs
There are many music distribution sites on the internet from which music files in MP3 format can be downloaded. Music downloaded as instructed on the site and written onto a CD-R/RW disc can be played on the DVD-A11.
If music recorded on commercially available music CDs is converted on a computer into MP3 files using an MP3 encoder (conversion software), the data on a 12cm CD is reduced into about 1/10 the amount of the original data. Thus, when written in MP3 format, the data of about 10 music CDs can fit onto the one CD-R/RW disc. The one CD-R/RW disc can contain over 100 tracks.
- Values when 5-minute tracks are converted with a standard bit rate of 128 kbps into MP3 files and using a CD-R/RW disc with a capacity of 650 MB.
- Uses of recordings you have made other than for your personal enjoyment are not permitted under the Copyright Law without permission of the copyright holder.
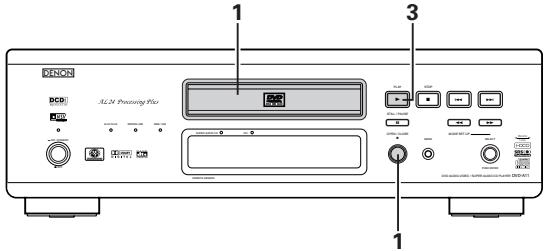
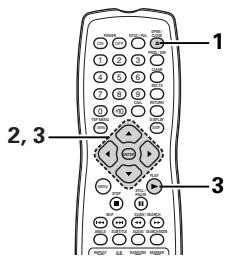
1
Load the CD-R/RW disc on which the MP3 format music files have been written into the DVD-A11. (See page 14.)
- When the disc is loaded in the DVD-A11, the disc information screen appears.
- If there are multiple folders, proceed to step 2.
- If there are no folders on the disc, proceed to step 3.

Main unit
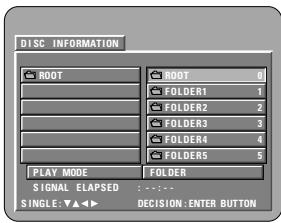
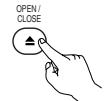
Remote control unit
2
Use the cursor buttons (, and to select the folder containing the file(s) you want to play, then press the ENTER button.
* To change the folder
Use the cursor buttons to select "ROOT", then press the ENTER button. The screen in step 1 reappears. Select the desired folder.
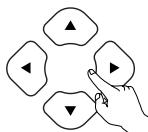
Remote control unit
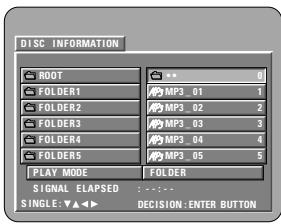

Remote control unit
3
Use the and cursor buttons to select the MP3 file you want to play, then press the PLAY button or ENTER button.
- Playback starts
- The display can be switched between the single elapsed time and the single remaining time and the track name by pressing the DISPLAY button.
- Programmed playback is not possible with MP3 discs.
* To change the MP3 file
Press the STOP button, then use the and cursor buttons to reselect the desired MP3 file.
* To set the random play mode
In the stop mode, press the RANDOM button. Then press the PLAY button or ENTER button.
* To set the repeat mode
The repeat mode changes each time the REPEAT button is pressed.
FOLDER SINGLE REPEAT FOLDER REPEAT<
* To return to the initial disc information screen
Press the STOP button, use the cursor button to select "ROOT", then press the ENTER button. The screen in step 1 reappears.
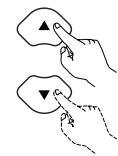
Remote control unit


Remote control unit
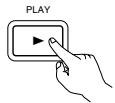
Main unit

Remote control unit
NOTES:
- The DVD-A11 is compatible with the "MPEG-1 Audio Layer 3" standards (sampling frequency of 44.1 or 48 kHz). It is not compatible with such other standards as "MPEG-2 Audio Layer 3", "MPEG-2.5 Audio Layer 3", MP1, MP2, etc.
- It may not be possible to play some CD-R/RW discs due to disc properties, dirt, warping, etc.
- The digital signals output when playing MP3 files are MP3 signals converted into PCM, regardless of whether the audio output presetting is set to "normal" or "PCM". The signals are output with the same sampling frequency as that of the music source.
In general, the higher an MP3 file's bit rate, the better the sound quality. On the DVD-A11, we recommend using MP3 files recorded with bit rates of 128 kbps or greater. - MP3 files may not be played in the expected order, since the writing software may change the position of the folders and the order of the files when writing them on the CD-R/RW.
- Programmed playback is not possible with MP3 discs.
- When writing MP3 files on CD-R/RW discs, select "ISO9660 level 1" as the writing software format. This may not be possible with some types of writing software. For details, refer to the writing software's usage instructions.
- The number of files playable with the DVD-A11 is approximately 600 or less.
- With the DVD-A11 it is possible to display folder names and file names on the screen like titles. The DVD-A11 can display up to 8 characters, consisting of numbers, capital letters, and the " _ " (underscore) mark.
- If recorded in a format other than "ISO9660 level 1", normal display and playback may not be possible. In addition, folder and file names including other symbols will not be displayed properly.
- Be sure to add the extension ".MP3" to MP3 files. Files cannot be played if they have any extension other than ".MP3" or if they have no extension. (with Macintosh computers, MP3 files can be played by adding the extension ".MP3" after the file name consisting of up to 8 capital or numbers and recording the files on the CD-R/RW.)
- Do not apply stickers, tape, etc., to either the label side or the signal side of CD-R/RW discs. If adhesive gets on the surface of a disc, the disc may get stuck inside the DVD-A11 and be impossible to eject.
- The DVD-A11 is not compatible with packet write software.
- The DVD-A11 is not compatible with ID3-Tag.
- The DVD-A11 is not compatible with play lists.
- The DVD-A11 is not compatible with MP3 PRO.
- Do not play CD-R/RW discs containing any files other than music CD files (in CDDA format), WMA, MP3 and JPEG files. Doing so may result in malfunction or damage, depending on the type of file.
18
PLAYING STILL PICTURE FILES (JPEG FORMAT)
JPEG files stored on Kodak picture CDs, Fujicolor CDs, CD-Rs and CD-RWs can be played as a slide show and enjoyed on the DVD-A11.
Playing still picture
■ Kodak picture CDs and Fujifilm Fujicolor CDs can be played on the DVD-A11
When a CD (recording still picture) is played, the photographs on the CD can be displayed on a TV. ("Picture CD" and "Fujicolor CD" are service by which photographs taken on conventional silver film cameras are converted into digital data and written on CDs. For details on Kodak picture CD, contact a store that offers Kodak development services. For details about Fuji Color CDs, please contact a store offering Fuji Photo Film developing services.)
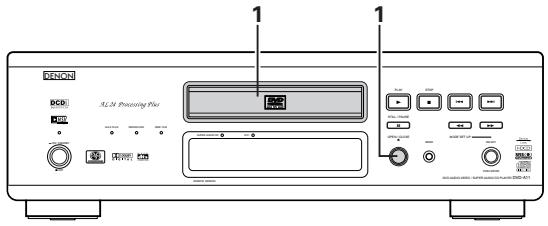
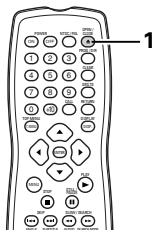
1
Load the Kodak picture CD into the DVD-A11.
- When the disc is loaded, a slide show of the still pictures begins automatically.
- The slide show continues until the STOP button is pressed.
Load the Fujicolor CD into the DVD-A11.
- When the disc is loaded, a maximum of 9 still pictures are displayed automatically.
- The slide show continues until the STOP button is pressed.
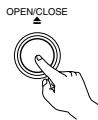
Main unit

Remote control unit
PI:
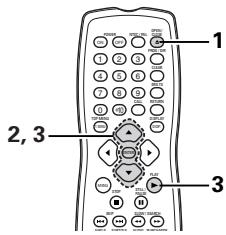
1
Load the CD-R/RW on which the still pictures have been written into the DVD-A11.
- When the disc is loaded in the DVD-A11, the disc information screen appears.
- If there are multiple folders proceed to step 2
- If there are no folders on the disc, proceed to step 3.
| 2 | Use the▲ and▼ cursor buttons to select the folder containing the file(s) you want to play, then press the ENTER button. * To change the folder Use the cursor button to select "ROOT", then press the ENTER button. The screen in step 1 reappears. Select the desired folder. | Remote control unit Enter Remote control unit | DISC INFORMATION DENON Root JPEG1 JPEG2 JPEG3 JPEG4 JPEG5 PLAY MODE FOLDER SIGNAL ELIPPED :----- SINGLE:▲DECISION:ENTER BUTTON |
| 3 | Use the▲ and▼ cursor buttons on the remote control unit to select the still picture file from which you want to start the slide show, then press the PLAY button or the ENTER button on the remote control unit. • The slide show starts. • Only the still picture files in the selected folder are played. * Once all the still picture files in the folder have been played, the disc information screen reappears. | Remote control unit Enter Remote control unit | DISC INFORMATION DENON Root JPEG1 JPEG2 JPEG3 JPEG4 JPEG5 PLAY Main unit Remote control unit Play Main unit Play Main unit |
| * To view several of the still pictures stored on the disc at once: • To select and view a still picture (to start the slide show from a specific still picture), use the cursor buttons (▼,▲,▲and▶) to select the desired still picture, then press the ENTER button. * To temporarily stop the slide show: • Press the STILL/PAUSE button. • To resume the slide show, press the PLAY button. * To cue a still picture you want to view (from which you want to start the slide show): • During the slide show, press one of the SKIP (■▲,■▲) buttons. Press the SKIP (■▲) button to cue back to the previous still picture, the SKIP (■▲) button to cue ahead to the next still picture. * Flipping and rotating still pictures: • Use the cursor buttons (▼,▲,▲and▶) to flip the still picture. ▲cursor button: The currently displayed still picture is flipped vertically. ▼cursor button: The currently displayed still picture is flipped horizontally. ▲cursor button: The currently displayed still picture is rotate 90° counterclockwise. ▲cursor button: The currently displayed still picture is rotate 90° clockwise. * Play the image in the zoom mode. When the ZOOM button is pressed while playing a JPEG image ("ZOOM ON" is displayed on the screen at this time) zoom in and zoom out using the search keys. ←: zoom out,▶: zoom in When the image is zoomed, use the cursor buttons (▼,▲,▲and▶) to move the zoomed picture. Continuous playback (SLIDE SHOW) is not possible in the zoom mode. Zooming is not possible with files that have a low resolution. * The way of switching to the next image during continuous JPEG image playback (SLIDE SHOW) can be selected. * Preset the V.S.S. button on the remote control unit. * Select from SLIDE SHOW MODE 1 to MODE 11, MODERAND and MODENONE. | |||
Special play modes for WMA and MP3 and JPEG files
Use the and cursor buttons to select the play mode, the and cursor buttons to select the special play mode.
- FOLDER (the WMA and MP3 and JPEG files in the folder are played in order starting from the selected file)
- FOLDER REPEAT (all the WMA and MP3 and JPEG files in the folder are played repeatedly starting from the selected file)
DISC (all the WMA and MP3 and JPEG files on the disc are played in order starting from the selected file) - DISC REPEAT (all the WMA and MP3 and JPEG files on the disc are played repeatedly starting from the selected file)
- RANDOM ON (all the WMA and MP3 and JPEG files in the folder are played in random order starting from the selected file)
- TRACK REPEAT (the select WMA, MP3 or JPEG file is played repeatedly)
NOTES:
- The DVD-A11 is compatible with image data stored in JPEG format, but Denon does not guarantee that all image data stored in JPEG format can be viewed.
- Files with sizes of up to 30 Mbytes can be displayed.
- It may not be possible to play some CD-Rs/RWs due to disc properties, dirt, scratches, etc.
- When storing JPEG files on the CD-R/RW, set the writing program to store the files in the "ISO9660 level 1" format.
- Be sure to give JPEG files the extension“.JPG” and“.JPE”. Files with other extensions or with no extensions cannot be viewed on the DVD-A11.
- Do not apply stickers, tape, etc., to either the label side or the signal side of CD-R/RW discs. If adhesive gets on the surface of a disc, the disc may get stuck inside the DVD-A11 and be impossible to eject.
- Do not play CD-R/RW discs containing any files other than music CD files (in CDDA format), WMA, MP3 and JPEG files. Doing so may result in malfunction or damage, depending on the type of file.
- JPEG files written using Macintosh computers cannot be played.
19 USING THE MULTIPLE AUDIO, SUBTITLE AND ANGLE FUNCTIONS
Switching the Audio Language (Multiple Audio Function)
■ With DVDs containing multiple audio language signals, the audio language can be switched during playback.
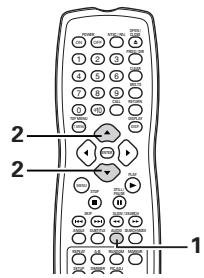
| 1 | During playback, press the AUDIO button. • The current audio language number is displayed. | AUDIO Remote control unit | AUDIO 3:0DLBY D3/2.1 ENGLISH |
| 2 | Use the▲ and▼ cursor buttons to select the desired language. • The display turns off when the AUDIO button is pressed. | ▲ Remote control unit | AUDIO 2:3:0DLBY D3/2.1 FRENCH |
NOTES:
- With some discs it is not possible to change the audio language during playback. In such cases, select from the DVD menu. (See page 36.)
- If the desired language is not set after pressing the and cursor buttons several times, the disc does not include that language.
- The language selected in the default settings (see page 15) is set when the power is turned on and when the disc is replaced.
Switching the Subtitle Language (Multiple Subtitle Function)
■ With DVDs containing multiple subtitle language signals, the subtitle language can be switched during playback.
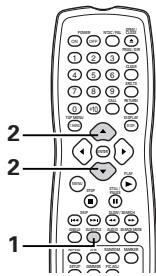
| 1 | During playback, press the SUBTITLE button. • The current subtitle language number is displayed. | SUBTITLE Remote control unit | SUBTITLE 01/03: ENGLISH |
| 2 | Use the ▲ and ▼ cursor buttons to select the desired language. • The display turns off when the SUBTITLE button is pressed. | Remote control unit | SUBTITLE 02/03: FRENCH |
NOTES:
- If the desired language is not set after pressing the and cursor buttons several times, the disc does not include that language.
- The subtitle language set with the default settings (see page 15) is set when the power is turned on and when the disc is replaced. If that language is not included on the disc, the disc's default language is set.
- When the subtitle language is changed, several seconds may be required for the new language to appear.
- When a disc supporting the closed caption is played, the subtitle and the closed caption may overlap each other on the TV monitor. In this case, turn the subtitle off.
Switching the Angle (Multiple Angle Function)
■ With DVDs containing multiple angle signals, the angle can be switched during playback.
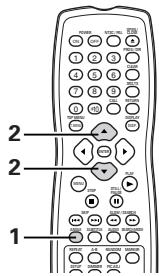
| 1 | During playback, press the ANGLE button. • The current angle number is displayed. | ANGLE Remote control unit | 3/5 |
| 2 | Use the▲ and▼ cursor buttons to select the desired angle. • The display turns off when the ANGLE button is pressed. | ▲ ▼ Remote control unit | 4/5 |
NOTES:
- The multiple angle function only works with discs on which multiple angles are recorded.
- "ANGLE" lights on the main unit's display when playing a section recorded in the multi-angle mode.
- At scenes where multiple angles are recorded, the angle can be switched.

USING THE MENUS
Using the Top Menu
For DVDs containing multiple titles, the desired title can be selected and played from the top menu.

| 1 | During playback, press the TOP MENU button. • The top menu appears. | Example: TOP MENU Top Menu Apple Banana Orange Strawberry Peach Pineapple |
| 2 | Use the cursor or number buttons to select the desired title. • If you select the title number using the number buttons, skip step 3 below. | Example: When "Orange" is selected TOP MENU Apple Banana Orange Strawberry Peach Pineapple |
| 3 | Press the ENTER button. •Playback starts. •Playback also starts if the PLAY button is pressed. | Remote control unit |
Using the DVD Menu
Some DVDs include special menus called DVD menus.
For example, DVDs with complex contents may contain guide menus, and DVDs with multiple languages may contain audio and subtitle language menus.
These menus are called "DVD menus"
Here we describe the general procedure for using DVD menus.
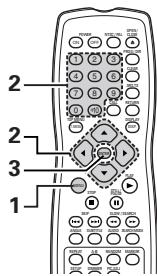
| 1 | During playback, press the MENU button. • The DVD menu appears. | Remote control unit | Example: DVD MENU 1. SUB TITLE 2. AUDIO 3. ANGLE |
| 2 | Use the cursor or number buttons to select the desired item. • If you select the item using the number buttons, skip step 3 below. | Remote control unit 1 2 3 4 5 6 7 8 9 0 +10 Remote control unit | Example: "AUDIO" is selected DVD MENU 1. SUB TITLE 2. AUDIO 3. ANGLE |
| 3 | Press the ENTER button. • The selected item is set. • If more menus appear, repeat steps 2 and 3. | Remote control unit | |
21 MARKING SCENES YOU WANT TO SEE AGAIN
Set marks at scenes you want to see again so that you can start playback from the marked position whenever you want.
Setting Marks (DVD-AUDIO / DVD-VIDEO)
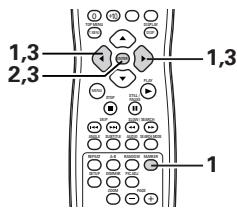
| 1 | During playback, press the MARKER button. • The marker screen appears. • Use the < and > cursor buttons to select the "X" marks. • "X" is displayed if the mark is not set. | MARKER Remote control unit |
| 2 | Press the ENTER button at the scene you want to mark. • A number is displayed. • Up to five marks can be set. (To select another marker, use the cursor buttons (▲, ▲).) | ENTER Remote control unit |
Calling Out Marked Scenes and Clearing Marks
| 3 | Use the \(\triangleleft\) and \(\triangleright\) cursor buttons to select the marker number and press the ENTER button. ·If the marker screen is not displayed during playback, press the MARKER button to display it. | Remote control unit Remote control unit |
| * To clear the marker display: Press the MARKER button. *To clear a marker: Use the \(\triangleleft\) and \(\triangleright\) cursor buttons to select a marker number and press the CLEAR button. ·You can clear existing markers, but they are restored when you open the disc tray or switch the unit to standby. | ||
NOTES:
- All the markers added with this unit are cleared when the unit is switched to standby or the disc tray is opened.
- Depending on where the marker is set, subtitles may not be displayed.
22 PLAYING IN THE ZOOM MODE
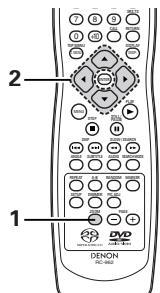
| 1 | In the play or pause mode, press the ZOOM button. • The zoom rate increases each time the ZOOM button is pressed. For DVD video discs and video CDs: OFF → x1.5 → x2 → x4 → OFF For DVD audio discs: OFF → x2 → x4 → OFF • When “PLAYER MODE” at “OTHER SETTING” in “SETUP” is set to “AUDIO”, zooming is not possible at the top menu or with still pictures. • When “PLAYER MODE” at “OTHER SETTING” in “SETUP” is set to “VIDEO”, zooming is not possible at the top menu. | Remote control unit |
| 2 | Use the cursor buttons (▼,▲,← and▶) to move the zoomed picture. | Remote control unit |
NOTES:
- Zooming is not possible with some discs.
- The zoom function may not work properly at some scenes.
- Zooming is not possible at the top menu or the menu screen.
- When the picture is enlarged, the picture quality may be decreased and the picture may be blurred.
23 TROUBLESHOOTING
Check again before assuming the player is malfunctioning
Are all the connections correct?
Are you following the instructions in the manual?
Are the amplifier and speakers operating properly?
If the DVD-A11 does not seem to be functioning properly, check the table below. If this does not solve the problem, the DVD-A11 may be damaged. Turn off the power, unplug the power supply cord from the power outlet, and contact your store of purchase or nearest DENON sales office.
| Symptom | Check | Page |
| Power does not turn on. | Plug the power supply cord securely into the power outlet. | 6~12 |
| Playback does not start when PLAY button is pressed.Playback stops immediately. | Is there condensation on the disc or player ? (Let stand for 1 or 2 hours.)Discs other than DVDs,SuperAudio CDs, video CDs and music CDs cannot be played.Disc is dirty.Wipe off the dirt. | 56 |
| Picture does not appear. | Check the connections.Check that VIDEO OUT has not been set to "VIDEO OFF" or "ALL OFF" for PURE DIRECT MODE.Set the TV's input to "video".When the DVI connector output the signals, no progressive signals from the component video connector.If you wish to use the component video output, set to "DVI OFF" for DVI SETUP. | 6~1126,27—26,27 |
| Sound is not produced or sound quality is poor. | Check the connections.Properly set the input of the TV, stereo, etc.Check the "DIGITAL OUT" and "COMPRESSION" settings.Digital signals cannot be output with Super audio CDs. Use analog connections.Area/layer of Super audio CD being played (CD/stereo/multi-channel) does not match amplifier connections. | 6~11—19,20,238,98,9,19,20 |
| Menu playback of video CD's is not possible. | Menu playback is not possible with anything but video CDs with playback control. | 24 |
| Picture is disturbed during the search operation. | Some disturbance is normal. | — |
| Buttons do not operate. | Some operations are disabled for some discs. | 24 |
| No subtitles are displayed. | Subtitles are not displayed for DVDs not containing subtitles.Subtitles are turned off. Turn the subtitles setting on. | —15 |
| Audio (or subtitle) language does not switch. | The audio (or subtitle) language does not switch for discs which do not include multiple audio (or subtitle) languages.For some discs the audio (or subtitle) language cannot be switched when the operation to switch it is performed, but can be switched on the menu screens. | —36 |
| Angle does not switch. | The angle cannot be switched for DVDs which do not contain multiple angles. In some cases multiple angles are only recorded for specific scenes. | 35 |
| Playback does not start when the title is selected. | Check the "RATINGS" setting. | 19 |
| The password for rating level has been forgotten.Rest all the setting to Factory Preset. | While the player is in the stop mode, hold the player's SKIP▶I button and the PLAY button down simultaneously and then hold the OPEN/CLOSE button down for longer than 3 seconds (until "INITIALIZE" disappears from the TV monitor).The lock will be released and all default settings and picture settings will return to the default values. | — |
| The disc is not played with the audio or subtitle language set as the default setting. | The disc does not play with the selected audio or subtitle language if that audio or subtitle language is not included on that DVD. | 15~17 |
| Picture is not displayed in 4:3 (or 16:9). | Set the "TV ASPECT" default setting to the proper setting for the connected TV. | 18 |
| Menu screen messages for the desired language do not display. | Check the default setting for the disc language's menu language. | 15,16 |
| Remote control unit does not operate. | Check that the batteries are inserted in the proper "⊕" and "Θ" directions.The batteries are dead. Replace them with new batteries.Point the remote control unit at the remote control sensor when operating it.Operation the remote control unit within a distance of 7 meters from the remote control sensor.Remove the obstacle between the remote control unit and remote control sensor. | 131313131313 |
24 MAIN SPECIFICATIONS
| Signal system: | NTSC/PAL |
| Applicable discs: | (1) DVD-Audio/DVD-Video discs |
| 1-layer 12 cm single-sided discs, 2-layer 12 cm single-sided discs, | |
| 2-layer 12 cm double-sided discs (1 layer per side) | |
| 1-layer 8 cm single-sided discs, 2-layer 8 cm single-sided discs, | |
| 2-layer 8 cm double-sided discs (1 layer per side) | |
| (2) Super audio CDs | |
| Single layer 12 cm discs, Dual layer 12 cm discs, Hybrid layer 12 cm discs | |
| (3) Compact discs (CD-DA, Video CD) | |
| 12 cm discs, 8 cm discs | |
| S-Video output: | Y output level: 1 Vp-p (75 Ω/ohms) C output level: 0.286 Vp-p |
| Output connectors: S connectors, 2 sets / AV 1 connector, 1 set, AV 2 connector, 1 set | |
| Video output: | Output level: 1 Vp-p (75 Ω/ohms) |
| Output connector: Pin-plug jacks, 2 sets / AV 1 connector, 1 set, AV 2 connector, 1 set | |
| Component output: | Y output level: 1 Vp-p (75 Ω/ohms) |
| Pb/CB output level: 0.7 Vp-p (75 Ω/ohms) PR/CR output level: 0.7 Vp-p (75 Ω/ohms) | |
| Output connector: Pin jack, 1 set, BNC jack, 1 set | |
| RGB output: | Output level: 0.7 Vp-p (75 Ω/ohms) |
| Output connector: AV 1 connector, 1 set, AV 2 connector, 1 set | |
| Audio output: | Output level: 2 Vrms |
| 2 channel (FL, FR) output connector: Pin jacks, 2 sets | |
| Multi channel (C, SW, SL, SR) output connector: Pin jack, 1 set | |
| AV 1 connector, 1 set, AV 2 connector, 1 set | |
| Audio output properties: | (1) Frequency response |
| ① DVDs (linear PCM) : 2 Hz to 22 kHz (48 kHz sampling) | |
| (2) Super audio CDs : 2 Hz to 100 kHz | |
| ③ CDs : 2 Hz to 20 kHz | |
| (2) S/N ratio : 120 dB | |
| (3) Total harmonic distortion : 0.0008% | |
| (4) Dynamic range : 110 dB | |
| Digital audio output: | Optical digital output : Optical connector, 1 set |
| Coaxial digital output : Pin jack, 1 set | |
| DENON LINK output : DENON LINK connector, 1 set | |
| IEEE 1394 terminal : IEEE 1394 connector, 2 sets | |
| Power supply: | AC 230 V, 50 Hz |
| Power consumption: | 49 W |
| Maximum external dimensions: | 434 (width) x 139 (height) x 434 (depth) mm (including protruding parts) |
| Mass: | 12.8 kg |
| Remote control unit: | RC-962 |
| Type: | Infrared pulse |
| Power supply: | DC 3 V, 2 R6P/AA batteries |
This product incorporates copyright protection technology that is protected by method claims of certain U.S. patents and other intellectual property rights owned by Macrovision Corporation and other rights owners. Use of this copyright protection technology must be authorized by Macrovision Corporation, and is intended for home and other limited viewing uses only unless otherwise authorized by Macrovision Corporation. Reverse engineering or disassembly is prohibited.
* Design and specifications are subject to change without notice in the course of product improvement.
(8) Denon Link-Anschlüsse
DENON LINK Second Edition:
② Baum- (Turm-) Anschlüsse
F: Source Film
V: Source video
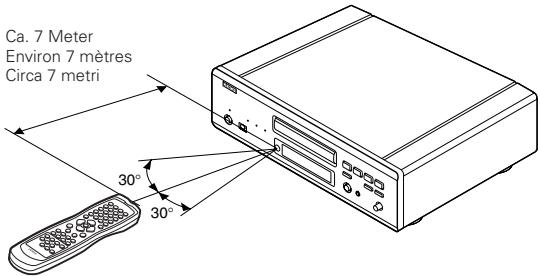
Ca.7 Meter Environ 7 metres Circa 7 metro
HINWEISE:
LPCM (44.1 kHz / 48 kHz)
LPCM (44.1 kHz / 48 kHz)
▶▶1: Vorwärts (NEXT)
| VCD PUSHERM | MULTI |
| VCD PUSHERM | STEREO |
10 UTILISATION DU MODE SET UP
SETUP LEVEL (0IRE,7,5IRE)
- La lecture commence.
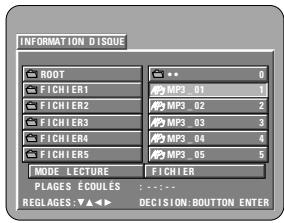
AUDIO 1/3 :DOLBY D3/2.1 ENGLISH
2
AUDIO1/3:00LBY D3/2.1 ENGLISH
2
AUDIO 1/3 :DOLBY D3/2.1 ENGLISH

- CAUTION:
- - DECLARATION OF CONFORMITY
- IMPORTANT TO SAFETY
- WARNING:
- Handle the power supply cord carefully
- Do not open the top cover
- Do not place anything inside
- NOTE:
- Copyrights
- - ACCESSORIES
- TABLE OF CONTENTS
- FEATURES
- Digital transfer connectors
- Super Audio CD multi-channel playback compatibility
- AL24 Processing Plus at all channel
- High precision 24-bit D/A converter
- HDCD (High Definition Compatible Digital) decoder (NOTE 1)
- Dolby Digital (AC-3)/DTS decoder (NOTES 2, 3)
- Progressive Scan circuit "DCDiTM" (NOTE 4)
- 12-bit/216 MHz video D/A converter (NOTE 5)
- Thorough vibration-resistant design
- 10.Multiple functions
- NOTES:
- DISCS
- The following types of discs cannot be played on the DVD-A11:
- Disc terminology
- For example:
- - Titles and chapters (DVD-videos)
- - Playback control (video CDs)
- CAUTIONS ON HANDLING DISCS
- Holding Discs
- Cleaning Discs
- Cautions on Handling Discs
- Cautions on Storing Discs
- Cautions on Loading Discs
- CAUTIONS ON INSTALLATION
- CONNECTIONS
- Connecting to a TV
- Connecting to a TV or Monitor Equipped with Color Component Input Connectors
- Color component output connectors (PR / CR,PB / CB and Y
- Connecting to a TV with 21-pin SCART Terminal (For only European model)
- Connecting to a AV amplifier with a Built-in decoder
- - Connecting an optical fiber cable (commercially available) to the digital audio input connector (OPTICAL)
- Sound output from the DVD-A11's digital audio output connectors
- Connecting a basic 5.1-channel surround system
- Connecting to a Digital Recorder (MD Recorder, DAT Deck, etc.)
- Connecting to a Stereo Component
- Denon Link connections
- DENON LINK Second Edition:
- Compatibility with previous models:
- DENON LINK S.E. settings:
- IEEE 1394 connections
- Copyright Protection System
- PART NAMES AND FUNCTIONS
- Front Panel
- See page 3.
- Power button
- Power indicator
- AL24 PLUS indicator
- DENON LINK indicator
- IEEE 1394 indicator
- Disc tray
- PLAY button (▶)
- STOP button
- Skip button (I
- Skip button (▶▶I)
- Remote control sensor
- SUPER AUDIO CD indicator
- DVI indicator
- Display
- STILL/PAUSE button (II)
- OPEN/CLOSE button (△)
- MODE of MODE SETUP button
- Slow/Search button (▲)
- Slow/Search button (▶▶)
- SELECT of MODE SETUP selector
- MULTI:
- STEREO:
- CD:
- kHz:
- NORMAL:
- VIDEO OFF:
- DIGITAL OFF:
- ALL OFF:
- DVI OFF:
- 480P:
- 720P:
- 1080i:
- ENHANCED:
- Rear Panel
- DVI-D-Video output connector (DVI-D OUT)
- Component video output connectors (COMPONENTVIDEOOUT)
- S-Video output connector (S-VIDEO OUT)
- Video output connector (VIDEO OUT)
- Digital output connector (IEEE 1394)
- Digital output connector (DENON LINK)
- Digital audio output connector (OPTICAL)
- Digital audio output connector (COAXIAL)
- Control connector (RS-232C)
- Control input connector (ROOM TO ROOM/IN)
- Control output connector (ROOM TO ROOM/OUT)
- Audio output connectors (AUDIO OUT)
- 21-pin SCART terminal (AV1/AV2) (For only European model)
- Power input (AC IN)
- Display
- REMOTE CONTROL UNIT
- Inserting Batteries
- Cautions On Batteries
- Using the Remote Control Unit
- Names and Functions of Remote Control Unit Buttons
- LOADING DISCS
- Opening and Closing the Disc Tray
- Loading Discs
- CHANGING THE DEFAULT SETTINGS
- Setup items for use
- When "DISC SETUP" is selected
- DIALOG
- SUBTITLE
- DISC MENUS
- ENGLISH (Factory default)
- FRENCH
- -
- SPANISH
- GERMAN
- ITALIAN
- OTHERS
- OFF
- * To exit the setup mode
- When "OSD SETUP" is selected
- OSD LANGUAGE
- WALL PAPER
- DISPLAY
- FRANÇAIS
- ESPANOL
- DEUTSCH
- BLUE (Factory default)
- GRAY
- BLACK
- PICTURE
- OFF (Factory default)
- ON
- When "VIDEO SETUP" is selected
- TV ASPECT
- TV TYPE
- VIDEO OUT
- PROGRESSIVE MODE
- PICTURE SIZE
- AV1VIDEO OUT (For only European model)
- 4:3PS
- 4:3 LB
- WIDE (16:9) (Factory default)
- NTSC
- PAL
- MULTI (Factory default)
- PROGRESSIVE (Factory default)
- INTERLACED
- AUTO 1 (Factory default)
- AUTO 2
- VIDEO 1 TO 3
- VIDEO 1
- VIDEO 2
- VIDEO 3
- SQUEEZE
- ZOOM
- VIDEO (Factory default)
- S-VIDEO
- RGB
- When "AUDIO SETUP" is selected
- AUDIO CHANNEL
- DIGITAL OUT
- LPCM (44.1 kHz/48 kHz)
- DENON LINK
- IEEE1394
- SOURCE DIRECT
- BASS ENHANCER
- MULTI CHANNEL (Factory default)
- CHANNEL
- CHANNEL LEVEL
- DELAY TIME
- LARGE
- SMALL
- NONE
- YES
- NO
- TEST TONE
- NORMAL (Factory default)
- PCM
- 2nd
- FORMAT 1 (Factory default)
- FORMAT2
- 3
- When "RATINGS" is selected
- RATING LEVEL
- Password
- (LOCK ALL)
- (NO LIMIT) (Factory default)
- When "OTHER SETUP" is selected
- PLAYBACK
- (1)Playback
- Stopping Playback
- Playing Still Pictures (Pausing)
- Forward/Reverse Searching
- Skipping to the Beginning of Chapters or Tracks
- Cueing using the SKIP buttons
- Cueing using the number buttons
- Playing Frame by Frame (for DVD-videos and video CDs only)
- SlowPlayback (forDVD-videos and video CDs only)
- Using the SRS TruSurround function (only for DVD-videos and Video CDs)
- Selecting the still image (only for DVD-audios)
- Playing bonus groups (only for DVD-audios)
- USING THE MODE SET UP
- STEREO
- CD
- ADJUSTING THE PICTURE QUALITY
- 7
- SETUP LEVEL (0 IRE, 7.5 IRE)
- POSITION (-7 to +7) (Factory default: 0)
- POSITION (-3 to +7) (Factory default: 0)
- * To exit the picture adjust mode
- REFERENCE:
- USING THE ON-SCREEN DISPLAY
- Example: For DVD audio discs
- Example: For DVD video discs
- Example: For video CDs, Super audio CDs and music CDs
- 1
- PLAYING REPEATEDLY
- Playing Repeatedly (Repeat Playback)
- Playing a Certain Section Repeatedly (A-B Repeat Playback)
- PLAYING TRACKS IN THE DESIRED ORDER
- PLAYING TRACKS IN THE RANDOM ORDER
- PLAYING BACK WMA
- MP3 PLAYBACK
- Listening to MP3 CD, CD-Rs and CD-RWs
- 2
- * To change the folder
- * To change the MP3 file
- * To set the random play mode
- * To set the repeat mode
- * To return to the initial disc information screen
- 18
- PLAYING STILL PICTURE FILES (JPEG FORMAT)
- Playing still picture
- PI:
- Special play modes for WMA and MP3 and JPEG files
- USING THE MULTIPLE AUDIO, SUBTITLE AND ANGLE FUNCTIONS
- Switching the Audio Language (Multiple Audio Function)
- Switching the Subtitle Language (Multiple Subtitle Function)
- Switching the Angle (Multiple Angle Function)
- USING THE MENUS
- Using the Top Menu
- Using the DVD Menu
- MARKING SCENES YOU WANT TO SEE AGAIN
- Setting Marks (DVD-AUDIO / DVD-VIDEO)
- Calling Out Marked Scenes and Clearing Marks
- PLAYING IN THE ZOOM MODE
- TROUBLESHOOTING
- Check again before assuming the player is malfunctioning
- MAIN SPECIFICATIONS
- Denon Link-Anschlüsse
- HINWEISE:
- LPCM (44.1 kHz / 48 kHz)
- UTILISATION DU MODE SET UP
- SETUP LEVEL (0IRE,7,5IRE)
Brand : DENON
Model : A11
Category : Audio Amplifier