
FreeTalk XM2-2 - Talkie Walkie Evolveo - Free user manual and instructions
Find the device manual for free FreeTalk XM2-2 Evolveo in PDF.


| Product Type | Two-way radio (walkie-talkie) |
| Brand | Evolveo |
| Model | FreeTalk XM2-2 |
| Frequency Range | PMR446 (446.00625 – 446.09375 MHz) |
| Number of Channels | 16 |
| Maximum Range | Up to 10 km (open area) |
| Output Power | 0.5 W (ERP) |
| Power Supply | 3x AAA batteries (not included) or rechargeable NiMH pack |
| Battery Life | Approximately 20 hours (typical use) |
| Dimensions (H x W x D) | 170 x 55 x 33 mm |
| Weight (without batteries) | 120 g |
| Display | LCD with backlight |
| Key Features | VOX (voice-activated transmission), 38 CTCSS tones, scan, monitor, key lock |
| Water Resistance | IP54 (splash proof) |
| Operating Temperature | -10°C to +50°C |
| Charging | Via USB charging cable (for rechargeable pack) |
| Accessories Included | Belt clip, earpiece (optional), USB cable |
| Spare Parts Availability | Battery packs, chargers, antennas available from manufacturer |
| Repair Service | Authorized service centers in selected countries |
| Regulatory Compliance | CE, RoHS |
| Warranty | 2 years |
| Maintenance | Clean with dry cloth; avoid water and solvents |
| Safety | Do not operate near explosives or flammable gases |
Frequently Asked Questions - FreeTalk XM2-2 Evolveo
User questions about FreeTalk XM2-2 Evolveo
0 question about this device. Answer the ones you know or ask your own.
Ask a new question about this device
Download the instructions for your Talkie Walkie in PDF format for free! Find your manual FreeTalk XM2-2 - Evolveo and take your electronic device back in hand. On this page are published all the documents necessary for the use of your device. FreeTalk XM2-2 by Evolveo.
USER MANUAL FreeTalk XM2-2 Evolveo
natural_image
Two EvolveWi-Fi walkiehios with digital displays and control knobs (no visible text or symbols on the devices themselves)Obsah / Content / Spis treści / Tartalom
Česky 3
Slovensky 11
English 19
Polska....27
Magyar.... 35
CZ
SK
EN
PL
HU
Vážený zákazníku,
Planá 2, 370 01, Czech Republic
Made in China
Copyright © Abacus Electric, s.r.o.
www.evolveo.com
www.facebook.com/EvolveoCZ
Planá 2, 370 01, Czech Republic
Made in China
Copyright © Abacus Electric, s.r.o.
www.evolveo.com
www.facebook.com/EvolveoCZ
We believe you will enjoy a lot of fun and happiness.
Preparations before first use
- Slide out the battery cover downwards, insert the supplied Ni-MH rechargeable batteries facing the correct polarity, and slide the battery cover back.
- Slide the attached plastic clip on the back of the transmitter. You will hear a click sound, when it is correctly attached.
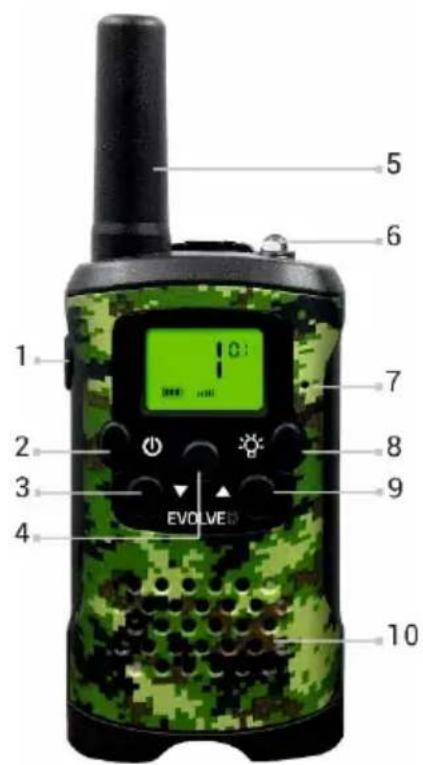
- Transmission (PTT)
- On/Off
- Monitoring/Down
- Menu
- Antenna
- Flashlight
- Microphone
- Flashlight: on/off
- Scanning/Up
- Speaker
Important warning
- If you are not using the transmitter, turn it OFF by pressing the button "2".
• If you are not going to use the transmitter for a long
time, remove the batteries.
- Use supplied rechargeable batteries or batteries of the same manufacturer and type.
(3 alkaline batteries, type AAA)
BATTERY CHARGING
- Plug the cable with the micro USB connector into the side of the radio and connect it to the charger.
- Charging will start automatically and the battery symbol will flash on the display.
- It takes approximately 12 hours to charge the battery to full capacity, after successful charging the battery symbol will light up continuously on the display.
TURNING ON
- Press and hold the button "2" for more than 3 seconds, the LED display will light up.
TURNINH OFF
- Press and hold the "2" button for more than 3 seconds, you will hear a beep sound and the LED display will turn off.
TRANSMISSION/RECEIVING
When the transmitter is on and a number of a channel is selected, the transmitter is in the Receive mode. To start transmitting, you only need to press the "1" button. If the second transmitter is set to the same channel number as the first transmitter, you will be able to hear the transmission.
Transmission is not encrypted, so everyone who has their transmitter set to the same channel number as you and is within range of your transmitting will be able to listen to
your communication.
- It is necessary to set both transmitters on the same channel number, otherwise transmission and receiving will not work.
- Press the "4" button and the number of a channel on the LED display will start flashing.
- Use the "3" and "9" buttons to select the desired channel.
- Select one of the eight channels on one of the transmitters, for example channel number 3.
- Select the same channel, in our case channel number 3, on the second transmitter.
- Press and hold the "1" button to start transmitting on the selected channel number 3.
- Talk to the microphone at a distance of approximately 5 cm.
- To end the transmission, release the "2" button.
VOLUME SETTING
- Use the "3" and "9" buttons to decrease or increase the volume of the speaker.
ROGER BEEP
The "Roger Beep" check sound follows after releasing the "2" button. It indicates the end of your transmission and switches to "Receive" mode.
- You can enable or disable this feature.
- Press the "4" button five times. The LED display will show the "RO" sign.
- Use the "3" and "9" buttons to turn the feature ON
(enable) or OFF (disable).
- Press the "2" button to confirm and return to "Receive" mode.
RING TONE
- Press the "4" button four times. The LED display will show "CA" sign and you can choose from 10 ring tones.
- Press the transmit button "2" once to send a short ring tone to other users on the same channel.
VOX (voice controlled)
In VOX mode, the transmitter will only transmit the signal if it is activated by your voice or other sounds in your area.
- The VOX sensitivity level (1-3, 3 is the highest sensitivity level) is displayed on the display.
- At the highest level of sensitivity, the transmitter captures even the weakest noises (including ambient noise).
- At the lowest level of sensitivity, it captures only very loud sounds.
- VOX mode is not recommended for use in a very noisy or windy environment.
- You can enable or disable this feature by pressing the "4" button three times.
- Use the "3" and "9" buttons to select the VOX sensitivity level or turn it OFF (disable).
- Press the "1" button to confirm.
CTCSS SUB CHANNELS (multiple call groups on a single channel)
Each channel contains 38 sub channels. If you have a sub channel selected, you can communicate with another PMR user on the same channel using a sub channel.
- You can enable or disable this feature.
- Press the "4" button two times.
- Use the "3" and "9" buttons to select a sub channel or turn it OFF (disable).
- Press the "1" button to confirm.
SCANNING FOR ACTIVE CHANELS
The transmitter allows you to search all the channels and find the active ones. It also allows you to search for another channel without need to change the channel you are in.
- Press and hold the "9" button for two seconds.
- The LED display will show "SCAN" sign and scanning for active channels will start.
- If the active channel is found, scanning stops and you can listen to the communication.
- If you press the "2" button during listening, it will switch to the "Receive" mode.
- When the communication on the found channel ends, scanning will start to continue.
MONITORING
- Use it to detect a weak signal on a selected channel.
- Press and hold the "3" button for three seconds to activate the MONITOR function.
- Release the button to return to the "Receive" mode.
BATTERY SAVER MODE
The transmitter is equipped with a battery-saving system. If the transmitter is not being used for more than 4 seconds, it switches to standby mode (display turns off). Battery saver mode does not affect signal reception. When a signal is detected, it automatically switches to full mode.
FLASHLIGHT
Press the "8" button to turn the flashlight on/off.
LOCKING/UNLOCKING
Press and hold the "4" button for 3 seconds to lock or unlock.
TECHNICAL SPECIFICATION
Transmitting power 0.5 W
Number of channels 8
| Channel Frequency | Channel Frequency | Channel Frequency | |
| 1 | 446.00625 4 | 446.04375 7 | 446.08125 |
| 2 | 446.01875 5 | 446.05625 8 | 446.09375 |
| 3 | 446.03125 6 | 446.06875 | |
TROUBLESHOOTING
First read "FAQ - Frequently Asked Questions" at www.evolveo.com/en/freetalk-xm2-2 or contact EVOLVEO Technical Support.
TECHNICAL SUPPORT
www.evolveo.com/en/support
The warranty DOES NOT APPLY to:
- using the device for other purposes than it was designed to
- installing a firmware other than the one installed on your device
- electrical or mechanical damage caused by improper use
- damage caused by natural elements such as fire, water, static electricity, power surges etcetera
• damage caused by an unauthorized repair - unreadable serial number
- the battery capacity drops after 6 months of using (6-months battery life warranty)

Disposal
The symbol of crossed out wheelie bin on the product, within the literature or on the packaging reminds you that in the European Union, all electric and electronic products, batteries and accumulators must be stored as assorted waste after the end of their service life. Do not throw these products into the unsorted municipal waste.

DECLARATION OF CONFORMITY
Hereby, the company Abacus Electric s.r.o. declares that the EVOLVEO FreeTalk XM2-2 is in compliance with the requirements of the standards and regulations, relevant for the given type of device.
Find the complete text of Declaration of conformity at http://ftp.evolveo.com/ce/
Importer / Manufacturer Abacus Electric, s.r.o. Planá 2, 370 01, Czech Republic
Made in China
Copyright © Abacus Electric, s.r.o. www.evolveo.com www.facebook.com/EvolveoCZ
All rights reserved. Design and specification may be changed without prior notice.
Szanowny kliencie,
ROZWIĄZANIE PROBLEMÓW
Planá 2, 370 01, Czech Republic
Made in China

- Obsah / Content / Spis treści / Tartalom
- Vážený zákazníku,
- We believe you will enjoy a lot of fun and happiness.
- Preparations before first use
- Important warning
- BATTERY CHARGING
- TURNING ON
- TURNINH OFF
- TRANSMISSION/RECEIVING
- VOLUME SETTING
- ROGER BEEP
- RING TONE
- VOX (voice controlled)
- CTCSS SUB CHANNELS (multiple call groups on a single channel)
- SCANNING FOR ACTIVE CHANELS
- MONITORING
- BATTERY SAVER MODE
- FLASHLIGHT
- LOCKING/UNLOCKING
- TECHNICAL SPECIFICATION
- TROUBLESHOOTING
- TECHNICAL SUPPORT
- The warranty DOES NOT APPLY to:
- Disposal
- DECLARATION OF CONFORMITY
- Szanowny kliencie,
- ROZWIĄZANIE PROBLEMÓW
Brand : Evolveo
Model : FreeTalk XM2-2
Category : Talkie Walkie