
ZW1600 - Rowing Machine HMS Premium - Free user manual and instructions
Find the device manual for free ZW1600 HMS Premium in PDF.


| Product Type | Water Rowing Machine, Class S (semi-commercial) |
| Model | ZW1600 |
| Max User Weight | 150 kg |
| Resistance Mechanism | Water tank with adjustable water level (up to level 10) |
| Water Tank Capacity | Up to level 10 (standard calibration level 9) |
| Display Console | Meter with Time, Time/500M, SPM, Distance, Strokes, Total Strokes, Calories, Pulse, Calendar, Temperature, Clock, Alarm, Recovery |
| Power Supply | 2 AA batteries (included) |
| Heart Rate Monitor | Chest belt (5.3 kHz, CR2032 battery, transmission range 130 cm) |
| Dimensions (Approx.) | Not specified; requires 0.6 m clearance from other objects |
| Weight | Not specified; transport via wheel on base frame |
| Material | Steel frame, plastic covers, rubber parts |
| Assembly | Step-by-step instruction included; tools provided (Allen wrenches, combinational wrench, syphon pump, funnel) |
| Safety Features | Stoppers on rail, fixing lever for folding, emergency stop via START/STOP button, recovery program |
| Maintenance | Water purification tablet every 4-6 months; clean rail and tank; avoid chlorine bleach; check bolts regularly |
| Warranty | 24 months (Poland), 6 months for charger; post-guarantee service available |
| Spare Parts | Original parts only; list of 112 components in manual |
| Intended Use | Semi-commercial; not for therapeutic or rehabilitation purposes |
| Water Type | Municipal water; distilled water with purification tablet if municipal not available |
| Storage | Clean and dry; empty tank if storing longer than one month; remove batteries if storing over one year |
Frequently Asked Questions - ZW1600 HMS Premium
User questions about ZW1600 HMS Premium
0 question about this device. Answer the ones you know or ask your own.
Ask a new question about this device
Download the instructions for your Rowing Machine in PDF format for free! Find your manual ZW1600 - HMS Premium and take your electronic device back in hand. On this page are published all the documents necessary for the use of your device. ZW1600 by HMS Premium.
USER MANUAL ZW1600 HMS Premium
natural_image
Line drawing of a rowing machine with levers and head-mounted sensors (no text or symbols)INSTRUKCJA UŻYTKOWANIA – MANUAL INSTRUCTION – NÁVOD K OBSLUZE – GEBRAUCHSANWEISUNG
Instrukcja montażu
Krok 4:
INSTRUKCJA KORZYSTANIA Z PASA TELEMETRYCZNEGO
natural_image
Person wearing a black athletic top and holding a black fitness tracker on the lower abdomen (no text or symbols visible)Wymiana baterii
KONSERWACJA
- Read this manual carefully before first using and retain it for future reference.
- Observe all warnings and precautions including assembly steps. Use it only for intended purpose.
- Assemble and use it only according to this manual to assure your safety. Inform all other users about safe usage.
- Keep it away from children and pets. Don't let children unattended near this device. Only an adult person may assemble and use it.
- Ask your physician for advice before starting any exercise program. It is especially necessary if your suffer from some health problems or if you take some medication that could affect your heart rate, blood pressure or cholesterol level.
- Observe body signals. If you feel some problems (pain, tightness in chest, irregular heartbeat, breathing shortness, dizziness or nausea), stop immediately, improper exercising can result in serious health problems or in an injury.
- Put it only on a flat, dry and clean surface and keep a safety safety clearance of at least 0.6 m from other objects for higher safety. Use a protective cover to protect carpet or floor.
- Wear adequate sports clothes and sports shoes. Avoid too loose clothes.
- Don't use it outdoors.
- Check this device for damage or wearing before each using. Regularly check all bolts and nuts. They should be well tightened, Re-tighten, if necessary. Never use damaged or worn device to assure your safety.
- If some sharp edges occur, stop using.
- If you hear some unusual noises coming from this device, stop using.
- No adjustable part should protrude and obstruct user movements. Only one person may use it at time.
- Braking is independent of the speed.
- It is not intended for therapeutic purpose.
- Pay attention while lifting or transporting it to avoid back injury. Use only proper lifting techniques or ask some other person for help.
- Don't do any improper modification of this product. If necessary, contact authorized service.
- Max user weight: 150 kgs
- The equipment is classified as Class S according to EN ISO 20957-1 and is intended for semi-commercial use.
WARNING! The heart rate frequency monitoring may not be completely accurate. Overexertion during training can lead to a serious injury or even death. If you start to feel faint, stop the exercise immediately.
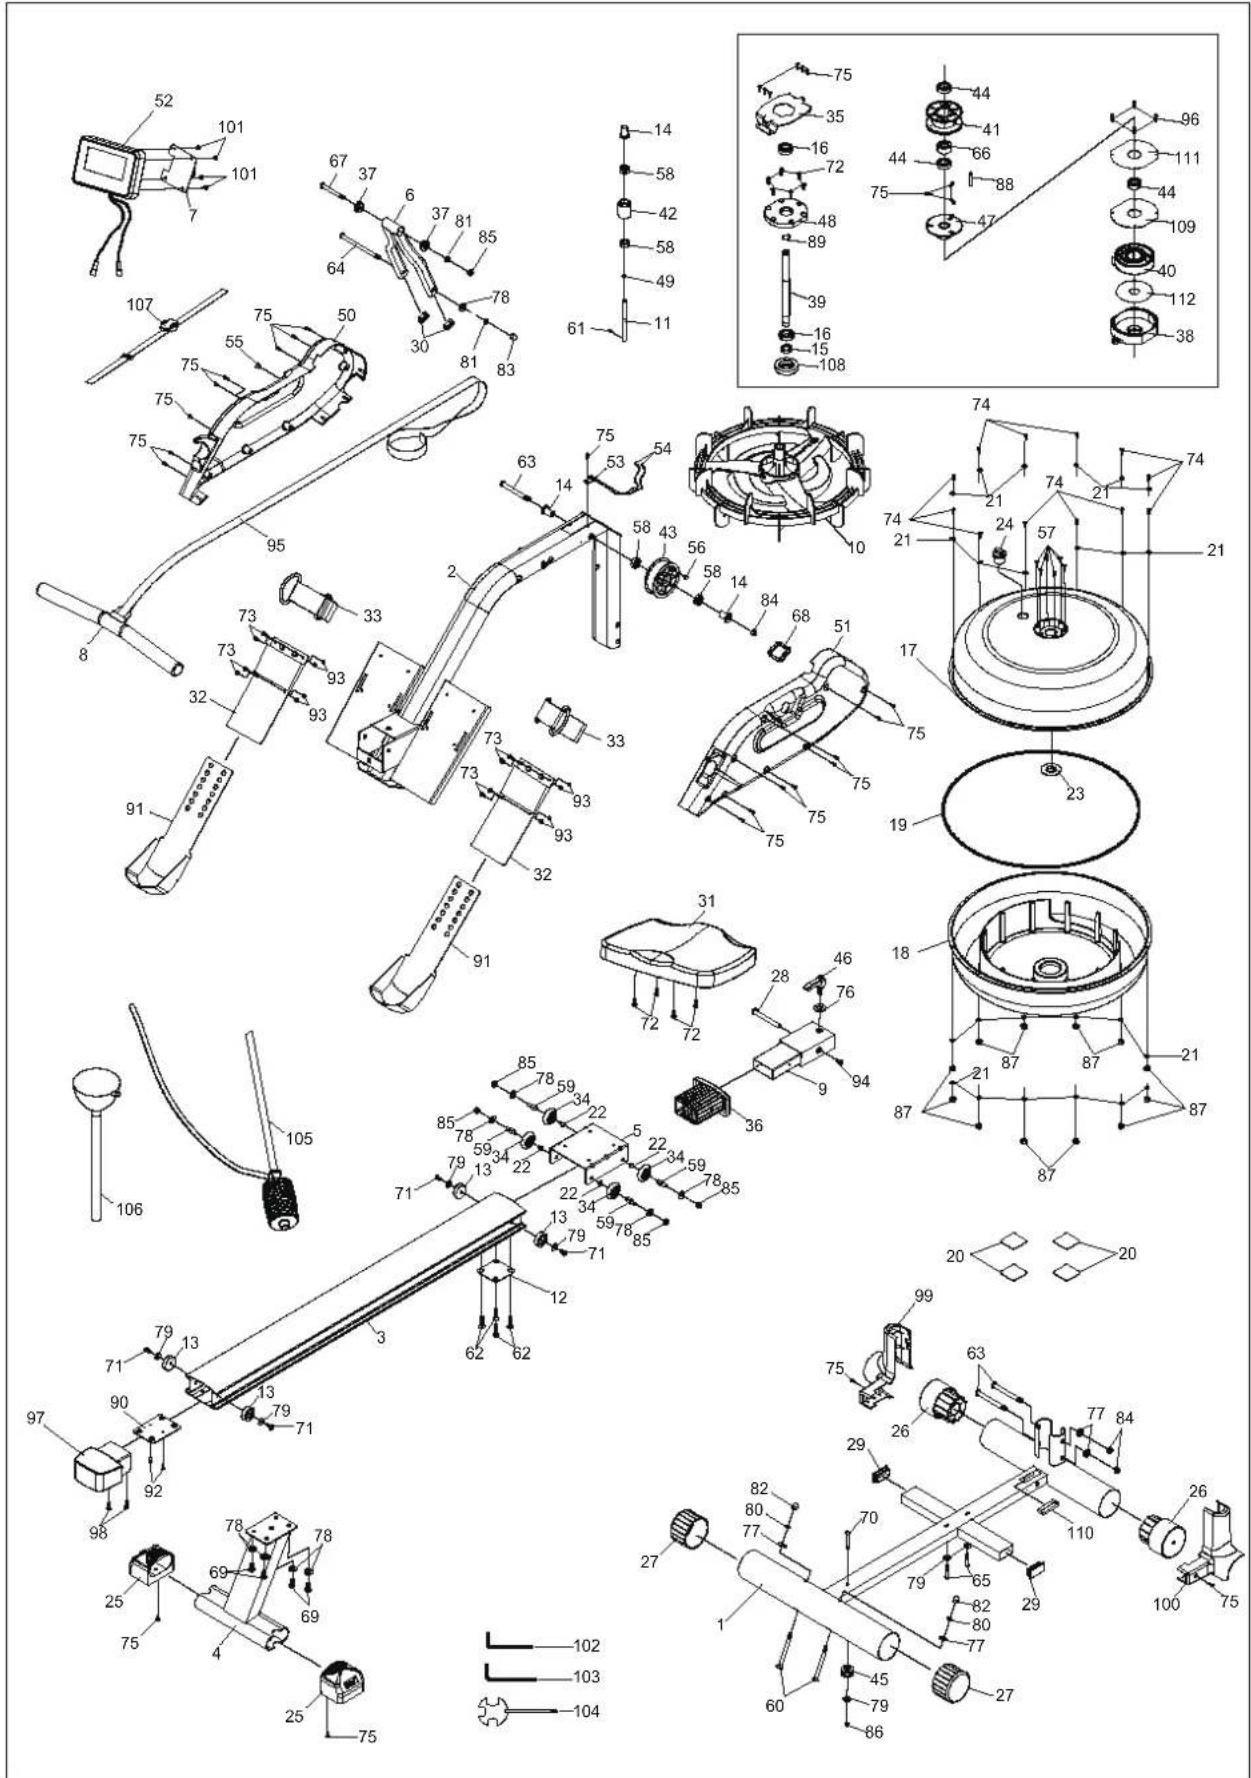
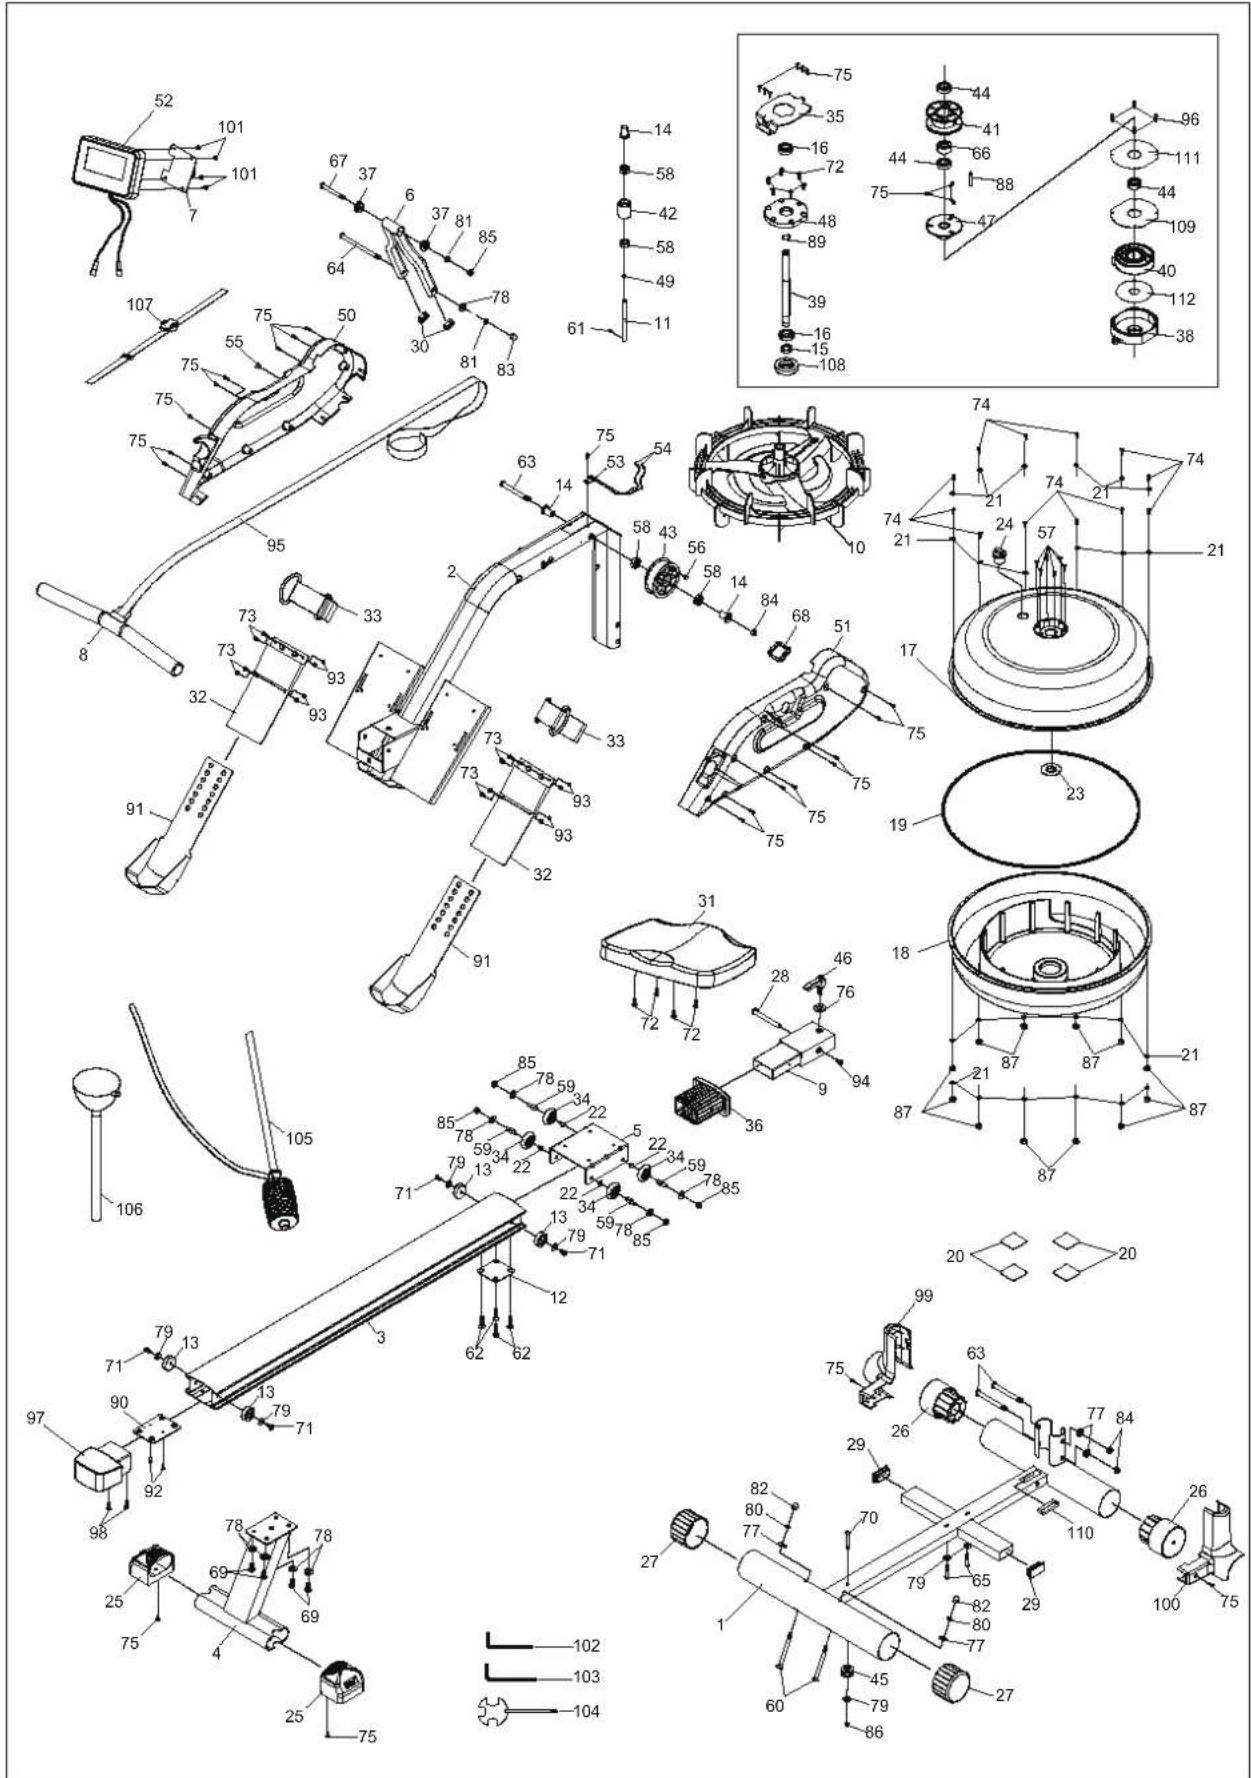
| No. | Description | Qty. | No. | Description | Qty. |
| 1 | Base frame | 1 | 39 | Axis of one way bearing | 1 |
| 2 | Main frame | 1 | 40 | Scroll coil spring | 1 |
| 3 | Sliding rail | 1 | 41 | Pulley | 1 |
| 4 | Rear support | 1 | 42 | Idle roller | 1 |
| 5 | Seat support | 1 | 43 | Strap pulley | 1 |
| 6 | Console support | 1 | 44 | Bearing | 3 |
| 7 | Support plate | 1 | 45 | Small bungee pulley | 1 |
| 8 | Handlebar | 1 | 46 | Fixing lever | 1 |
| 9 | Rail connector | 1 | 47 | Axis of spring pulley | 1 |
| 10 | Impeller | 1 | 48 | Plate of bearing | 1 |
| 11 | Idle shaft | 1 | 49 | E-ring | 1 |
| 12 | Rail support | 1 | 50 | Left cover | 1 |
| 13 | Stopper | 4 | 51 | Right cover | 1 |
| 14 | Strap pulley bushing | 3 | 52 | Console | 1 |
| 15 | Axis seal | 1 | 53 | Sensor holder | 1 |
| 16 | Bearing | 2 | 54 | Sensor wire | 2 |
| 17 | Upper tank | 1 | 55 | Grommet | 1 |
| 18 | Lower tank | 1 | 56 | Magnet | 1 |
| 19 | Rubber ring seal | 1 | 57 | Self-tapping screw | 6 |
| 20 | Lower pad | 4 | 58 | Bearing | 4 |
| 21 | Stainless washer | 24 | 59 | Roller shaft | 4 |
| 22 | Bolt(M5x8) | 4 | 60 | Carriage bolt (M10*85) | 2 |
| 23 | Impeller shaft seal | 1 | 61 | Set screw (M5*8) | 1 |
| 24 | Fill plug | 1 | 62 | Bolt (8*30) | 4 |
| 25 | Adjustable end cap | 2 | 63 | Bolt (M10*95) | 3 |
| 26 | Wheel end cap | 2 | 64 | Bolt (M8*135) | 1 |
| 27 | Round end cap | 2 | 65 | Bolt (M6*35) | 2 |
| 28 | Barrel nut (M10) | 1 | 66 | One-way bearing | 1 |
| 29 | Rectangular plug | 2 | 67 | Bolt (M8*65) | 1 |
| 30 | Oval plug | 2 | 68 | Rubber ring | 1 |
| 31 | Seat | 1 | 69 | Bolt (M8*15) | 4 |
| 32 | Pedal support | 2 | 70 | Bolt (M6*50) | 1 |
| 33 | Pedal strap | 2 | 71 | Bolt (M6*20) | 4 |
| 34 | Roller | 4 | 72 | Bolt (M6*15) | 10 |
| 35 | Connection plate of spring holder | 1 | 73 | Bolt (M5*12) | 8 |
| 36 | Front end cap | 1 | 74 | Stainless screw (M3*24) | 12 |
| 37 | Platic bushing | 2 | 75 | Screw (M4*16) | 30 |
| 38 | Spring holder | 1 | 76 | Washer (ø 10) | 1 |
| 77 | Arc washer (ø 10) | 4 95 | Strap | 1 | |
| 78 | Washer (ø 8) | 9 96 | Self-tapping screw | 4 | |
| 79 | Washer (ø 6) | 7 97 | Rear end cap | 1 | |
| 80 | Lock washer (ø 10) | 2 98 | Bolt (M5*10) | 2 | |
| 81 | Lock washer (ø 8) | 2 99 | Left front cover | 1 | |
| 82 | Acorn nut (M10) | 2 100 | Right front cover | 1 | |
| 83 | Acorn nut (M8) | 2 101 | Screw (M5*12) | 4 | |
| 84 | Nylock nut (M10) | 3 102 | Allen wrench (5mm) | 1 | |
| 85 | Nylock nut (M8) | 5 103 | Allen wrench (6mm) | 1 | |
| 86 | Nylock nut (M6) | 2 104 | Combinational wrench | 1 | |
| 87 | Stainless nylock nut (M3) | 12 | 105 | $yphon pump | 1 |
| 88 | Bolt (M5*35) | 1 106 | Funnel | 1 | |
| 89 | C Clip | 1 107 | Chest blet | 1 | |
| 90 | Plate | 1 | 108 | Plate of bearing | 1 |
| 91 | Pedal cap | 2 109 | Sound insulation plate-small | 1 | |
| 92 | Bolt (M4*12) | 2 | 110 | End cap of front cover | 1 |
| 93 | Nylock nut (M5) | 8 | 111 | Plate of spring holder | 1 |
| 94 | Big Head Bolt (M6*15) | 1 | 112 | Sound insulation plate-big | 1 |
ASSEMBLY INSTRUCTION
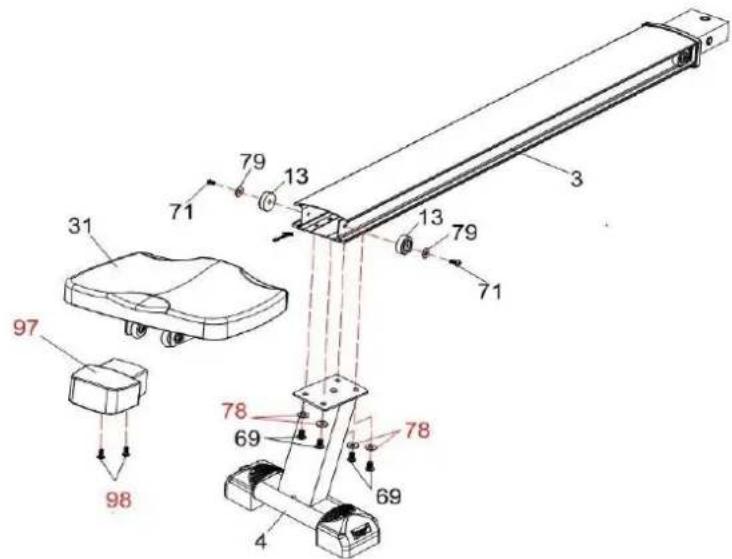
Step 1: Slide the seat (31) into the rail (3). Insert rear end cap (97) into the rail (3) and secure with two screws (98).
Step 2: Secure the two stoppers (13) onto the rail (3) with two bolts (71) and wsahers 6 (79).
pump (107) Step 3: Attach the rear stand (4) to the rail (3) with four bolts M8*15 (69) and washers ∅8 (78).
Step 4:
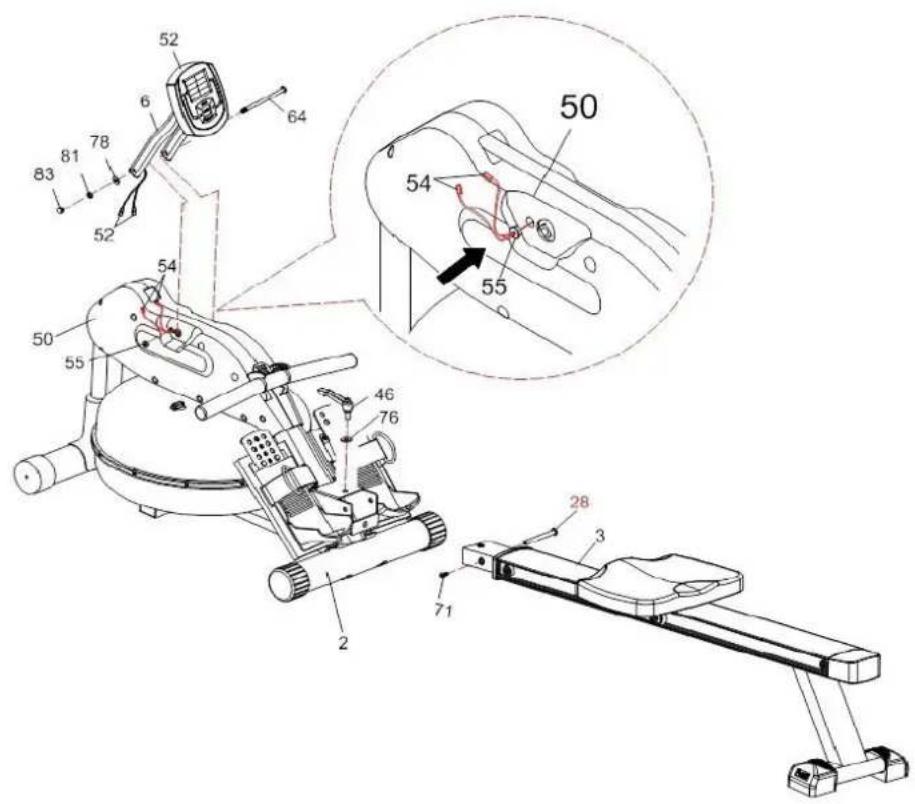
- Attach the rail (3) to the main frame (2) with one bolt M6*15 (71) and one barrel nut M10 (28). Lock the rail (3) in unfolded position using a fixing lever (46) and one washer 10 (76).
NOTE: After tightening the fixing lever (46), the rear stabilizer of the base frame (1) might be raised off the floor slightly. It is normal state. It will lean the floor after the user sits on.
Step 5: Insert batteries into the meter (52). Attach the meter post (6) to the main frame (2) using one bolt M8*130 (64), one washer ∅8 (78), one lock washer ∅8 (81) and acorn nut M8 (83).
Step 6: Clip the grommet (55) onto both sensor wires (54). Then press the grommet (55) into the left cover (50). Connect the sensor wire (54) to the connection wire of the meter (52). Push the excess wires back into the left cover (50).
HOW TO FILL AND EMPTY THE TANK
- Remove the fill plug (24) from the upper tank (17).
- Refer to the A illustration to fill it with water. Insert the funnel (108) into the tank. Use a water cup or the syphon pump (107) and bucket to fill the tank. Use a water level gauge on the side of the tank to measure desired water level (volume) in the tank.
- Refer to the picture B to empty the tank. Place a bucket next to the rower. Use the syphon pump (107) to pump out the water from the tank into the bucket.
- Once completed insert the fill plug (24) into the upper tank (17). Wipe excess water out from the frame after filling.
NOTE:
- Fill the tank only with municipal water and don't use water from a well. If municipal water is not available, use distilled water and add water-purification tablet. Never use pool chlorine or chlorine bleach. More information in the maintenance section.
- Water from the tank is not suitable for human or animal consumption. Dispose the water after pumping it out from the tank.
| Water level gauge 107 108 24 Water cup 17 | 24 107 17 16 |
| Fig. A | Fig. B |
WATER LEVEL
- Look at the fig. A. The water level gauge is situated on the tank side. The max. Filling level is 10. Never fill it over this limit.
NOTICE:
Not observing it should void the warranty. The standard calibration level is 9.
- The resistance depends on the water amount in the tank. For example, water level 3 offers a light resistance. Level 9 then means the highest resistance.
EXERCISE METER INSTRUCTION
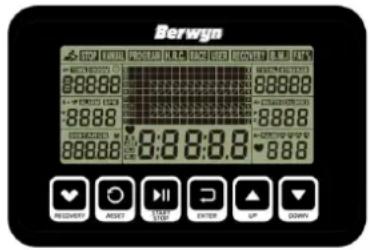
Meterized display console on the Water Rower allows the user to tailor a personalized workout by monitoring their progress. During a workout, the display console will alternately and repeatedly display the Time, Time/500M, SPM, Distance, Strokes, Total Strokes, Calories Burned and Pulse.
FUNCTION BUTTONS
| UP ▲/DOWN ▲ | Press these two buttons to scroll through available selections. To adjust the the function value upward and downward. |
| ENTER | To confirm your selection. During trening, press the button to scan each display function. |
| START/STOP | To start and stop your selected workout program |
| RESET | To return the meter back to the main menu. Press and hold to reset values. |
| RECOVERY | To activate the recovery program tah will automatically evaluate your fitness immediately after your workout. |
FUNCTIONS
| TIME | Set target time by pressing UP and DOWN buttons (1 min~99 min) in 1 minute increments |
| TIME/500M | Your average 500M time is automatically displayed. |
| SPM | Strokes per minutes |
| DISTANCE | Preset target value by pressing UP and DOWN buttons (0~99900 meters), 100 meters increments |
| STROKES | Set target value by pressing UP and DOWN buttons (0~9990 strokes). 10 strokes increments |
| TOTAL STROKES | Accumulates total strokes from 0 up to 9999 |
| CALORIES | Set target calories by pressing UP and DOWN buttons (10Cal~9990Cal), 10 al. Increments |
| PULSE* | In Manual Mode Set target value by pressing UP/DOWN mode from 30 to 240, 1 BPM increments,pulse will display on the top of computer at the same time |
* Option pulse with receiver built-in (which will work with extra chest belts)
When reach target value, computer will beep until change to other mode or take off chest belt, also the pulse will blink the pulse measurement function is only used by chest strap system.
| CALENDAR | The meter will display year, month, and when meter is in sleep mode |
| TEMPERATURE | The meter will display current room temperature when the meter is in sleep mode |
| CLOCK | The meter will display current clock when the meter is in sleep mode |
OPERATION
- Install 2PCS AA batteries (included) and meter will beep for 2 seconds (Fig. 1). The, the meter enters into the clock a& calendar mode mode (Fig. 2).
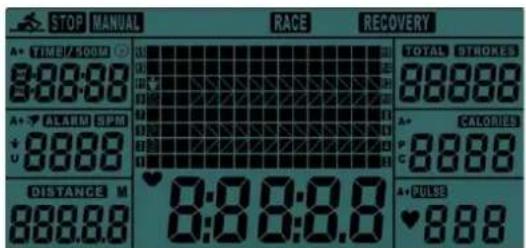
Fig. 1 Fig. 2
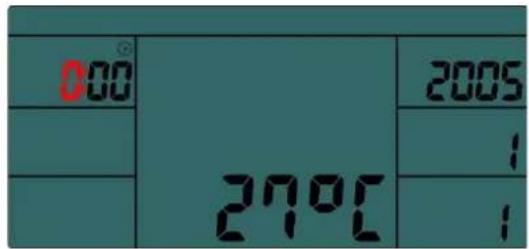
- The clock will flash. Press up to set the hour. Press ENTER to confirm. Press up to set the minutes. Press ENTER to confirm. Continue to set up year (in the strokes window); month (in the calories window); day (in the pulse window) by pressing UP and DOWN. Each time, press ENTER to confirm. After you confirm it, ALARM will blink. To skip setting up an alarm, press ENTER. To set up an ALARM, press UP KEY to turn on ALARM. An arrow will appear next to ALARM. Press ENTER. Clock window will flash. Press UP or DOWN to set the ALARM time. Press ENTER to confirm. Meter will go into the SPORT screen (Fig. 3).
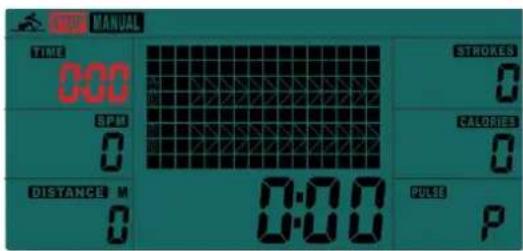
- When you enter into the SPORT screen, MANUAL and RACE will blink. Press UP or DOWN to select MANUAL or RACE. Press ENTER to confirm your selection.
There are 2 options in MANUAL mode:
- The meter can be set to countdown. When you select MANUAL, the value of TIME will start to flash. Press UP to set the value of time to countdown. Press ENTER to confirm it. If you do not want to set the value of time to countdown, press ENTER to go to the next function. You can set the values for DISTANCE, STROKES, COLORIES or PULSE (You can only set the value for one function to countdown. For example, if you have set the target value for TIME, then DISTANCE can't be set).
Press START button to start. The STOP icon will disappear.
When the function you have selected counts down to zero or you press STOP button, the meter will stop and display the average value. - The meter count the value of your workout. Press START to start.
| TIME 0:00 | STROKES 0 | |
| SPM 0 | CALORIES 0 | |
| DISTANCE M 0 | RUISE P |
Fig. 3 Fig. 4
RACE (Fig. 5)
Select RACE mode and L9 will flash. The TIME/500M will display 4:00. Then, press UP or DOWN to select L1\~L15. Press ENTER to confirm. Then, you can set the distance of the race (500M\~10000M) while the value of DISTANCE is blinking. Press ENTER and the picture of the race will display on the screen.
| L1 | L2 | L3 | L4 | L5 | L6 | L7 | L8 | L9 | L10 | L11 | L12 | L13 | L14 | L15 |
| 08:00 | 07:30 | 07:00 | 06:30 | 06:00 | 05:30 | 05:00 | 04:30 | 04:00 | 03:30 | 03:00 | 02:30 | 02:00 | 01:30 | 01:00 |
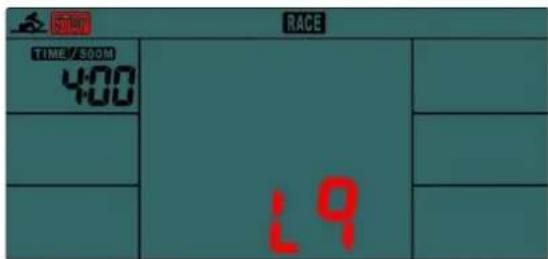
Fig. 5 Fig. 6
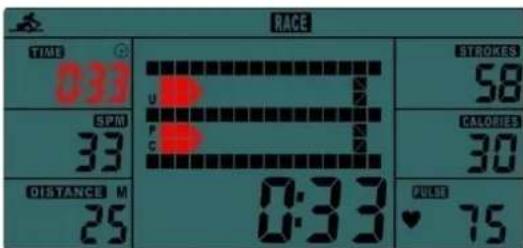
- Press START button to start and STOP will disappear. USER and PC will display in the matrix (Fig. 6). The meter will stop when either user or meter has reached the race distance that was set. Then the matrix displays „PC WIN” or „USER WIN” (Fig. 7).
- When the race is overyou can press START to start a race once again. Press RESET to leave the RACE screen.
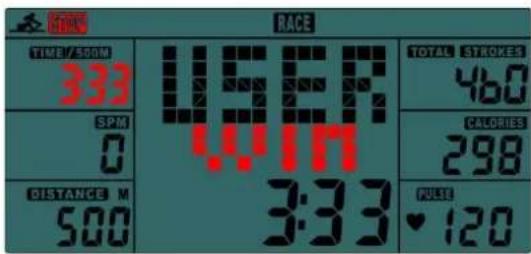
Fig. 7
RECOVERY (if use chest belt)
- This meter work with a 5.3 KHz chest strap heart rate monitor. After exercising for a period of time, keep wearing chest strap monitor and press RECOVERY button. All function displays will stop except TIME starts counting down from 00:60 to 00:00.
- Screen will display your heart rate recovery status with the F1, F2... to F6.
- F1 is outstanding. F6 is poor. User may keep exercising to improve the heart rate recovery status (Press the RECOVERY button again to return the main display).
ALARM
Alarm only works while the meter is in sleep mode. Alarm will not sound during exercise. Press and hold RESET to go to clock screen to set up ALARM.
SLEEP MODE
The meter will go into sleep mode after about 4 minutes of inactivity.
BATTERY
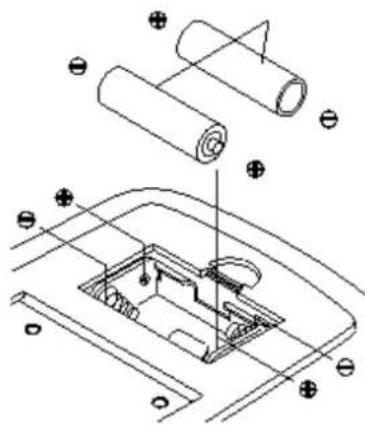
This meter uses 2 AA batteries, which are included. Changing the batteries will reset all values. If there is a problem with the display, try changing the batteries first. When changing the batteries, change both of them. Do not mix battery types. Do not mix new and old batteries.
CHEST BELT INSTRUCTIONS
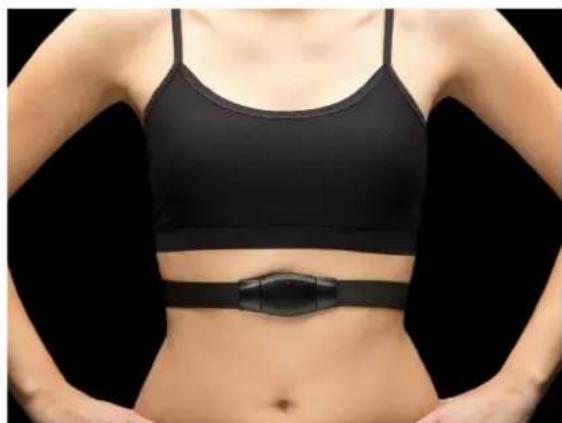
The transmitter chest belt will detect your heart rate and will transfer the information to the computer (or compatible device e.g. pulse watch), by wireless signal. The receiving appliance can then display your heart rate frequency.
The measurement procedure with this chest belt is very accurate and resistant to disturbances. The wireless signal is transmitted via low frequency technique. The chest belt is sufficiently protected against your sweat during exercise.
Features:
• transmission frequency 5.3 kHz
• Compatible with Pulse Watches
• transmission range 130 cm
• 1 pc. CR2032 battery – if used 1 hour per day the energy will be sufficient for 10 months of use
How to wear the chest belt
You may adjust the belt to a comfortable length.
However, the electrodes must have contact with your skin in order to measure your heart rate correctly. It may last up to one minute before a correct display can be seen.
Moisten the electrodes slightly before wearing the belt. This increases the contact sensibility and enables a better wireless signal transmitting.
Tip
The battery compartment lid should face the outside.
natural_image
Person wearing a black athletic top and holding a black fitness tracker on the abdomen (no text or symbols visible)Battery replacement
If the signal transmission is insufficient, you may need to replace the battery. Use a screwdriver to open the battery compartment cover. Replace the old battery by a fitting new one (CR2032). Make sure, the battery is inserted the right way around ("+" side facing up). Put the battery compartment
cover back and fix it with the screws.
REMARKS
- If your skin is too dry, the chest belt may not be able to measure your pulse rate correctly. Moisten your skin and the electrodes slightly and try again.
- If your chest hair is too dense, the chest belt may not be able to measure your pulse rate correctly. Please only use the belt if your chest hair is not too dense.
STORAGE
-
Store it in a clean and dry place.
-
If you store it for one year and longer, remove batterie.
-
To move it, use moving wheel end cap (26) on the front of the base frame (1). Catch the rear stand (4) to transport it. Never use the seat (31) to transport it. The seat could slide and its carriage could crush your fingers.
-
If you store it for longer than one month, empty the water tank.
-
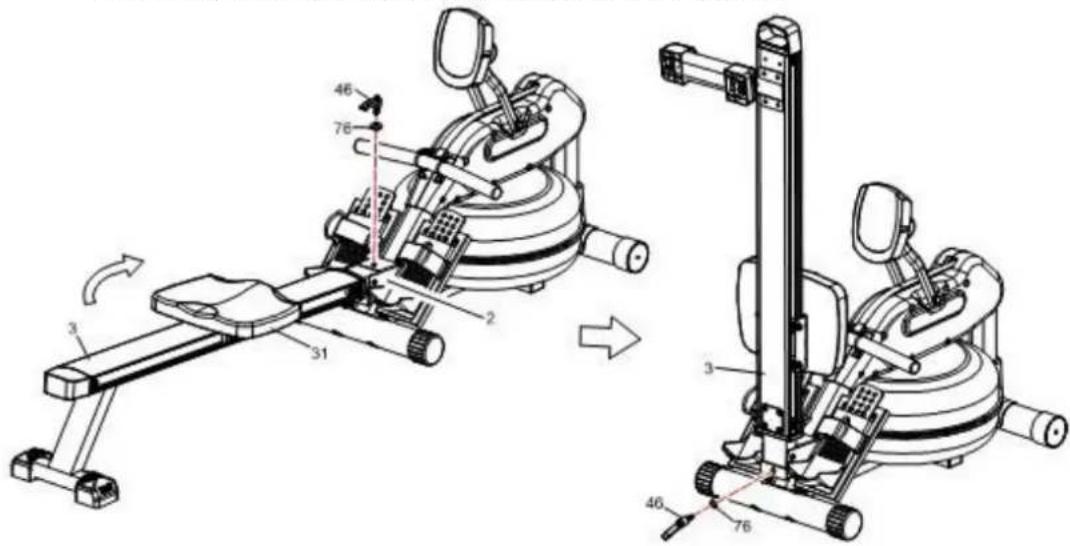
Fold it as shown in pictures below:
- Remove the fixing lever (46) and washer (76) from the main frame (2).
- Fold the rail (3) and lock in the folded position using the fixing lever (46) and washer (76). Make sure the rail (3) is properly secured and doesn't drop down.
MAINTENANCE
This machine can assure user safety only if it is without fault or wearing. Maintain it regularly to assure your safety. Check it regularly for damage and wearing. Never use damaged or worn product.
- Sit on the seat (31) and pull on the handlebar (8) to make sure the water system offers adequate resistance and the seat moves smoothly and steadily.
- Periodically maintain water in the tank. Refresh it periodically by adding a water purification tablet, such as sodium dichlor (56% chlorine) every 4-6 months. WARNING! Never use pool chlorine (Trichlor 90% chlorine) or a chlorine bleach. It could damage this product and void the warranty.
- Clean the roller track on the rail (3) with an absorbent cloth.
- Clean the tank periodically. Never use methylated spirits, chlorates, bleach or ammonia based cleaners. It could damage this product and void the warranty.
• User/owner is responsible for proper maintaining.
- Damaged or worn parts should be replaced immediately. To repair it, contact a service.
• Only supplied and original spare parts should be used for repairing or maintenance.
• After each usage wipe it using an absorbent cloth.
EXERCISE GUIDE
Rowing is an extremely effective form of exercising. It strengthens your heart and improves blood circulation as well. There are involved all major muscle groups of back, waist, arms, shoulders, hips and legs.
1. Basic rowing stroke
Sit on the saddle and fasten your feet to the pedals using Velcro straps. Then take hold of the rowing bar. Take the start position, lean forward with your arms straight and knees bent as shown in Fig. 1. Push your body backwards while simultaneously straightening your back and legs (Fig. 2). Continue this movement until you are leaning slightly backwards. Bring your arms out of the side during this phase (Fig. 3). Thereafter return to the second position and repeat it as shown below.
Rowing is a strenuous training style. Because of it, is better to start with a short and easy program and continue to a longer and intensive workout. Start rowing for about 5 minutes and increase the workout length gradually to improve your fitness. Finally, you should be able to row for 15-20 mins. Don't try to do it too quickly. Try to train on alternate days, 3 times a week. Take a recovery time between workouts.
3. Rowing style alternation
ONLY ARM ROWING: This workout should tone your arm, shoulder, back and abdominal muscles. Sit on the machine as shown in Fig. 4. Straight your legs, lean forward and grasp the handles. Control your moving and gradually lean back to just past the upright position (Fig. 5) and continue to pull the handles towards your chest (Fig. 6). Return to the starting position and repeat.
ONLY LEG ROWING: This workout helps toning your leg and back muscles. Keep your back straight and arms outstretched, bend your legs until you will grasp the rowing handles in the starting position (Fig. 7). Use your legs to push your body back (Fig. 8) while keeping your arms and back straight as shown in Fig. 9.
4. Exercise instructions
Using this device provides you with several benefits such as better physical fitness, toned muscles and, in combination with controlled diet, weight loss.
I. WARM-UP PHASE
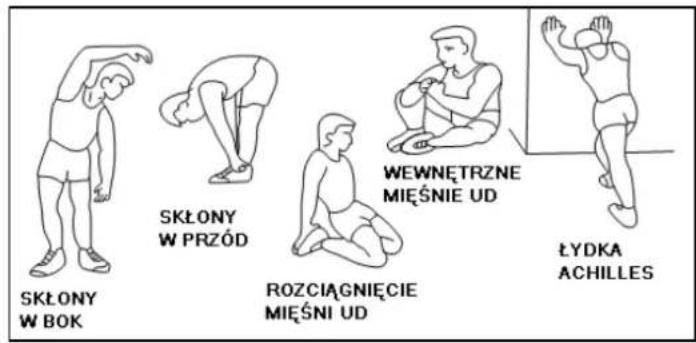
This phase should help improving blood circulation and make your muscles working properly while reducing a cramp risk or injury. It is advisable to do a few stretching exercises as shown below. Each stretching exercise should be taken for approx. 30 seconds. Don't overstretch and don't jerk your muscles. If you feel pain, stop immediately.
II. EXERCISE PHASE
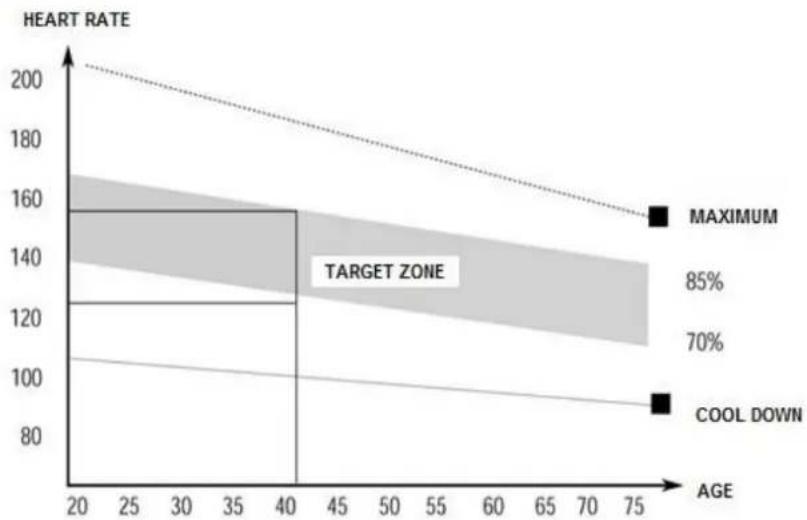
It is a phase, during which you should put in your effort. After regular workout, your leg muscles should get more flexible. Keep steady tempo throughout your exercising. The workout intensity should be sufficient to raise your heartbeat into the target zone as shown below.
NOTE: This stage should last for at least 12 mins. Thus, most people start at approx. 15-20 mins.
line
| AGE | HEART RATE | | --- | --- | | 20 | 200 | | 40 | 160 | | 75 | 90 |III. COOL-DOWN PHASE
In this stage, your cardio-vascular system and muscles should get calm. Repeat the warm-up
exercises, reduce your tempo and continue for approx. 5 mins. Repeat the stretching exercises, but don't overstretch or jerk your muscles. As you get fitter, you can exercise longer and harder. It is advisable to train at least three times a week and, if possible, to space your workouts evenly throughout a week.
BEZPEČNOSTNÍ POKYNY
NÁKRES
Krok 4:
JAK NAPUSTIT A VYPUSTIT NÁDRŽ
NÁVOD POUŽÍVÁNÍ TELEMETRICKÉHO PÁSU
natural_image
Person wearing a black athletic top and full-body body, with a black fitness tracker on the chest (no text or symbols visible)Výměna baterií
line
| AGE | HEART RATE | | --- | --- | | 20 | 160 | | 40 | 160 | | 75 | 90 |III. FÁZE PROTAHOVÁNÍ PO TRÉNINKU
Schritt 4:
ALARM
natural_image
Person wearing a black athletic top and black fitness tracker, viewed from behind (no text or symbols visible)KONSERVIERUNG
natural_image
Illustration of a human figure in a seated posture with two arrows pointing upward (no text or symbols)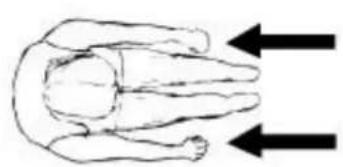
natural_image
Simple line drawing of a human body with two arrows pointing outward (no text or symbols)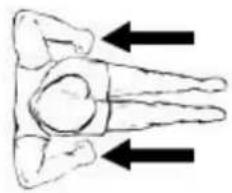
natural_image
Illustration of a human figure with two arrows pointing upward (no text or symbols)Rys 1 Rys 2 Rys 3
2.TREININGSZEIT
natural_image
Line drawing of a person performing a seated exercise with one leg raised (no text or symbols)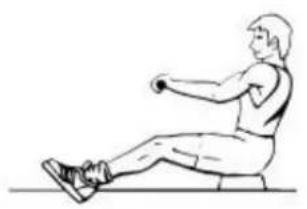
natural_image
Line drawing of a person performing a seated exercise with arms extended (no text or symbols)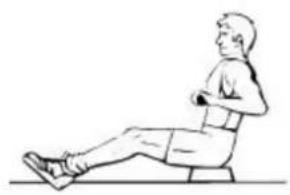
natural_image
Line drawing of a person performing a seated leg raise exercise (no text or symbols)Rys 4 Rys 5 Rys 6
natural_image
Line drawing of a person performing a seated exercise with one arm extended (no text or symbols)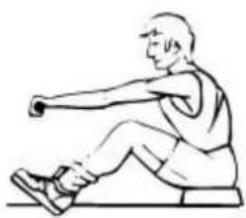
natural_image
Line drawing of a person performing a seated exercise with a barbell (no text or symbols)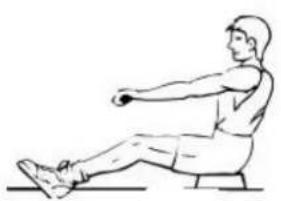
natural_image
Line drawing of a person performing a seated leg raise exercise (no text or symbols)Rys 7 Rys 8 Rys 9
EN: Marking the equipment with a symbol of a crossed-out waste container informs about prohibition of placing used electrical and electronic equipment with other household waste. According to the WEEE Directive on used electrical and electronic waste management, separate disposal methods must be applied for this type of equipment. A user, who intends to dispose this product, is required to deliver it to a collection point for used electrical and electronic equipment in order to contribute to reuse, recycling, or recovery and consequently, to protect the environment. To do this, contact the point where the device was purchased or local government officials. Hazardous components contained in the electronic equipment can cause long-lasting adverse changes in the environment, as well as have a harmful effect on human health.
EN: Information on the Proper Return of Waste Batteries and Accumulators
In accordance with the Battery Act (BattG) in Germany, we as Abisal Sp. z o.o. are obliged to inform our customers about the proper handling of used lithium batteries and rechargeable battery packs of all electrochemical systems. Below are detailed instructions on how to return and secure used batteries:
1. Return of Used Batteries:
Used lithium batteries and rechargeable battery packs may only be returned to collection points when fully discharged. The state of "completely discharged" means that the end of use has been reached, e.g. the device is switched off when no voltage is reached or a functional disturbance occurs due to insufficient charge of the battery or rechargeable battery.
2 Short-circuit protection:
If the batteries are not completely discharged, they must be adequately protected against short-circuiting. It is recommended that the battery terminals are insulated with adhesive strips. This is important to avoid potential short circuit hazards.
Additional information
1 Separate Recycling of 'Old Appliances:
Electrical and electronic appliances that have become waste must be recycled and registered separately from municipal solid waste. Old appliances must not end up in household rubbish. They must be collected in special collection and recycling systems.
2 Batteries and Accumulators:
If possible, electrical and electronic equipment must be disposed of separately from built-in batteries and/or accumulators.
- Disposability of 'Old Appliances':
Owners of old appliances from private households can dispose of them at public waste disposal facilities or take them to disposal sites linked to the manufacturer or seller. Disposal sites can be found on the Internet: https://www.ear-system.de/ear-verzeichnis/sammel-und-ruecknahmestellen.jsf.
4 Privacy information:
Old devices often contain private data, especially data processing and communication devices such as smartphones or hard drives. Please remove all personal and private data from the disposed equipment in your own interest.
Thank you for following the above guidelines and contributing to environmental protection.
-
The Seller provides guarantee on behalf of the Guarantor within the territory of the Republic of Poland for the period of 24 months from the date of sale: electric power assisted booster 24 months, charger 6 months.
-
The Guarantee will be recognised by the shop or service centre after the client provides:
- clearly and correctly filled-in guarantee card with the sale stamp and the seller's signature
- valid purchase confirmation for the equipment including the date of sale / bill, complained product.
-
Possible defects and damages revealed during the guarantee period shall be remedied free of charge within not more than 21 days from the delivery of the product to the shop or service.
-
Should it be necessary to import some components, the guarantee term can be extended by the period required to import such part, however such period shall not be longer than 90 days.
-
The guarantee does not cover:
- mechanical damages and subsequent defects,
- damages and defects resulting from incorrect storage and usage of the equipment against its purpose,
- incorrect assembly and maintenance,
- damages and consumption of such elements as: cables, straps, rubber parts, pedals, sponge grips, wheels, bearings, etc.
- The guarantee expires in the event of:
- expiry of the validity term,
- self-repairs,
- failure to follow the rules of correct operation.
-
The product handed over for repair should be complete and clean. If some parts are missing, the service is entitled to refuse to accept the product for repair. The service may refuse to accept a dirty product or clean in on the client's expense after the client's written permit.
-
The guarantee does not cover activities related to assembly, maintenance, which, according to the instruction, the user is obliged to perform themselves.
-
The Guarantor also informs that they offer post-guarantee service.
-
The product should be provided in its original packaging and should be secured for shipment.
-
To exercise the guarantee follow the procedure posted on the website: https://serwis.abisal.pl/
In case of non-conformity of the sold thing with the contract, the buyer is entitled by law to legal remedies from and at the expense of the seller. The guarantee does not affect such remedies.
THE EQUIPMENT IS NOT INTENDED FOR REHABILITATION AND THERAPY
NOTES ON THE COURSE OF REPAIRS
| Item | Date of notificacion | Date of provision | Course of repairs | Signature of the recipient (shop, owner) |
GARANTIEKARTE
Artikelname:
EAN-Code:
HMS-FITNESS.COM

IMPORTER: ABISAL SP. Z O.O., ul. Pyskowicka 17, 41-807 Zabrze, Polska
DISTRIBUTOR: ABISTORE SPORT S.R.O, U Cihelny 230/3, 74801 Hlučín, Česká Republika
abisal@abisal.pl www.abisal.pl



- Instrukcja montażu
- Krok 4:
- INSTRUKCJA KORZYSTANIA Z PASA TELEMETRYCZNEGO
- Wymiana baterii
- KONSERWACJA
- ASSEMBLY INSTRUCTION
- Step 4:
- HOW TO FILL AND EMPTY THE TANK
- NOTE:
- WATER LEVEL
- NOTICE:
- EXERCISE METER INSTRUCTION
- OPERATION
- There are 2 options in MANUAL mode:
- RACE (Fig. 5)
- RECOVERY (if use chest belt)
- ALARM
- SLEEP MODE
- BATTERY
- CHEST BELT INSTRUCTIONS
- Features:
- How to wear the chest belt
- Tip
- Battery replacement
- REMARKS
- STORAGE
- MAINTENANCE
- EXERCISE GUIDE
- Basic rowing stroke
- Rowing style alternation
- Exercise instructions
- WARM-UP PHASE
- EXERCISE PHASE
- COOL-DOWN PHASE
- BEZPEČNOSTNÍ POKYNY
- JAK NAPUSTIT A VYPUSTIT NÁDRŽ
- NÁVOD POUŽÍVÁNÍ TELEMETRICKÉHO PÁSU
- Výměna baterií
- FÁZE PROTAHOVÁNÍ PO TRÉNINKU
- Schritt 4:
- KONSERVIERUNG
- 2.TREININGSZEIT
- EN: Information on the Proper Return of Waste Batteries and Accumulators
- Return of Used Batteries:
- Short-circuit protection:
- Additional information
- THE EQUIPMENT IS NOT INTENDED FOR REHABILITATION AND THERAPY
- GARANTIEKARTE
Brand : HMS Premium
Model : ZW1600
Category : Rowing Machine