
PHVS 3030 - Vacuum Sealer Philco - Free user manual and instructions
Find the device manual for free PHVS 3030 Philco in PDF.


| Product Type | Vacuum Sealer |
| Brand | Philco |
| Model | PHVS 3030 |
| Dimensions (L x W x H) | 400 x 100 x 200 mm |
| Weight | 1.5 kg |
| Power Supply | 120-240 V, 50-60 Hz |
| Power Consumption | 120 W |
| Vacuum Pump Type | Single nozzle |
| Sealing Strip Width | 30 cm |
| Functions | Vacuum sealing, pulse function, marinating mode |
| Operation | Manual pull-down lever |
| Materials | ABS plastic, stainless steel sealing bar |
| Drip Tray | Removable, dishwasher safe |
| Compatible Bags | Any standard vacuum sealer bags or rolls |
| Bag Cutter | Built-in cutter with ruler |
| Safety Features | Overheat protection, automatic shut-off |
| Cleaning and Maintenance | Wipe exterior with damp cloth; clean drip tray and sealing strip regularly |
| Spare Parts | Replacement sealing strip and foam gasket available |
| Reparability | User-replaceable sealing strip; professional service recommended for pump issues |
| Warranty | 2 years |
Frequently Asked Questions - PHVS 3030 Philco
User questions about PHVS 3030 Philco
0 question about this device. Answer the ones you know or ask your own.
Ask a new question about this device
Download the instructions for your Vacuum Sealer in PDF format for free! Find your manual PHVS 3030 - Philco and take your electronic device back in hand. On this page are published all the documents necessary for the use of your device. PHVS 3030 by Philco.
USER MANUAL PHVS 3030 Philco
Famous for Quality the World Over
VACUUM SEALER
VAUKOVÁ SVÁŘEČKA
VÁKUOVÁ ZVÁRAČKA
ZGRZEWARKA PRÓŻNIOWA
VÁKUUM HEGESZTÓ

PHVS 3030
User's Manual
Návod k obsluze
Návod na obsluhu
Instrukcja obsługi
Használati utasítás
CONTENTS
- IMPORTANT SAFEGUARDS .... 3
- FOOD STORAGE GUIDE ....4
- FEATURES AND FUNCTIONS .... 5
PRODUCT PICTURE: 6 - OPERATING INSTRUCTIONS .... 7
VACUUM PACKAGING USING BAGS....7
SEALING PACKAGING USING BAGS....7
VACUUMING PACKAGING USING ACCESSORY CANISTERS OR CONTAINERS 8
OPEN ACCESSORY CANISTERS OR CONTAINERS 8 - CLEANING AND MAINTENANCE......8
- TROUBLE SHOOTING 9
- TECHNICAL SPECIFICATIONS ...... 9
1. IMPORTANT SAFEGUARDS
- Always unlock the lid when the appliance is plugged in or unplugged from the power outlet and when not in use or before cleaning.
- This appliance is not a toy. Children should be supervised to ensure they are not close to the appliance when it is in use. Keep this appliance out of reach of children when not in use.
- Use of embossed vacuum bags is recommended. Do not use appliance for other than intended purpose.
- Do not use appliance if the power cord is damaged and it must be replaced by a recommended qualified technician.
- Do not make skin contact with the hot sealing strip located on the edge of the top lid of this appliance. It is hot and may result in burns.
- It is forbidden to repair this appliance without permission. If repair is needed, please send it to Service Center.
- Do not use appliance if it has been or may be damaged.
- Avoid the following operations: Pull the power cord when moving the appliance; hold the power cord as a handle; make the power cord stuck inside the crack; wrap the power cord around the sharp edges of an object; use appliance when the power cord or power outlet is wet.
- Do not place the appliance near hot gas, heated ovens, electric burners or any heated area. Do not use appliance in a wet or humid environment.
- In case of a power outage, to avoid accidents, please do not pull on the cord to remove the plug from the power outlet.
- Do not handle or operate the appliance with wet hands.
- Always operate the appliance on a stable surface and keep it away from moving objects to avoid damaging it.
- Do not oil or lubricate this appliance.
-
Do not immerse cord, plug or any other parts of this appliance in any liquid.
-
FOOD STORAGE GUIDE
| Storage Method Food | Classification Temperature | Normal Storage Life | Storage Life with Vacuum Sealer | |
| Refrigerated Fresh Raw M | Meat 5 ± 3 °C 2-3 days 8-9 days | |||
| Fresh Fish/Seafood 5 ± 3 °C 1-3 days 4-5 days | ||||
| Cooked Meat 5 ± 3 °C 4-6 days 10-14 days | ||||
| Vegetables 5 ± 3 °C 3-5 days 7-10 days | ||||
| Fruit 5 ± 3 °C 5-7 days 14-20 days | ||||
| Eggs | 5 ± 3 °C | 10-15 days | 30-50 days | |
| Frozen | Meat | -16 --20 °C | 3-5 months | >1 year |
| Fish | -16 --20 °C | 3-5 months | >1 year | |
| Sea Food | -16 --20 °C | 3-5 months | >1 year | |
| Pantry | Bread | 25 ± 2 °C | 1-2 days | 6-8 days |
| Biscuit | 25 ± 2 °C | 4-6 months | >1 year | |
| Rice/Flour | 25 ± 2 °C | 3-5 months | >1 year | |
| Peanut/Legume | 25 ± 2 °C | 3-6 months | >1 year | |
| Medicine | 25 ± 2 °C | 3-6 months | >1 year | |
| Tea | 25 ± 2 °C | 5-6 months | >1 year | |
| Rated Voltage | 220-240V, |
| Rated Power | 150 W |
3. FEATURES AND FUNCTIONS

- VAC SEAL
- SEAL
- MANU
- FOOD (Dry / Wet)
1. VAC SEAL BUTTON
This button has 2 functions:
- Press the button and the indicator will be on. Then appliance starts to work--automatically seals the bag after vacuuming. After that, the light will be off and the appliance will stop automatically.
- Press the button to pause vacuum process at any time
2. SEAL BUTTON
This button has 1 function:
- Press the button and the indicator will be on. The appliance starts to work--seals the bag and stops automatically with the light off after completion.
3. MANUAL SEAL BUTTON
- Press the button till the indicator is on. Then the appliance will start the vacuum process. Release the button and the indicator is off. The appliance will stop the vacuum process. You can manually control the vacuum process; after achieving the desired effect, press the Seal Button to complete the work. In this way, the pressure within the bag could be controlled to prevent fine and soft food from being crushed.
- Long press Manual Seal Button and reach the minimum negative pressure, the appliance will stop the vacuum process.
4. FOOD BUTTON
This button has 2 functions: Please choose the preferred function based on the information given by the indicator.
• Dry: dry items and dry bags, provides a shorter heat sealing time.
• Wet: wetter items and bags, provides a longer heat sealing time.
- Press the button to select the preferred heat sealing time to suit your needs. The default setting is for dry items.
PRODUCT PICTURE:

5. SEALING STRIP
The bag to be sealed is placed over this strip.
6. LOCKING TAB
Locks the upper and lower lids.
7. UPPER GASKET
Creates the vacuum chamber along with Lower Gasket. Be careful not to damage it when removes or installs it in a clean and dry condition.
8. VACUUM CHAMBER
Position the open end of the bag inside the chamber and ensure the whole open end of the bag is in the vacuum chamber during the vacuum process.
9. FIXED AXIS
Connects the upper and lower lids.
10. LOWERGASKET
Creates the vacuum chamber along with Upper Gasket. Be careful not to damage it when removes or installs it in a clean and dry condition.
11.VACUUMCHAMBER
Position the open end of the bag inside the chamber and ensure the whole open end of the bag is in the vacuum chamber during the vacuum process.
12.ANTI-SCALDSWITCH
The switch is to avoid scalding caused by faulty operations.
The appliance will heat up only when the upper and lower lids are closed together.
13.AIRINTAKE
Connects Vacuum Chamber with the pump. Do not cover the intake when placing bags for Vacuum Seal operations.
14.SEALINGHEATER
Seals the bag with the heating element.
15. LID RELEASE BUTTON
Press 2 buttons simultaneously and then the upper lid will be released. The vacuum pressure in the Vacuum Chamber will be released.
4. OPERATING INSTRUCTIONS
VACUUM PACKAGING USING BAGS
-
Plug the power cord into a power outlet (as shown in Figure 1);
-
Place items into a specific vacuum bag;
-
Ensure the vacuum bag is in a tidy condition and the open end of the bag is free of dust or wrinkles;
-
Open the upper lid, put the open end of the bag into the Vacuum Chamber of the appliance (usually 3-5mm beyond the Vacuum Chamber wall) to ensure that the bag is airtight and both sides of the open end of the bag align (as shown in Figure 2);
-
Push the lid down and click to lock the lid;
-
Press the Food Button to select either Dry or Wet setting to suit your needs (as shown in Figure 3);
-
Press Vacuum Seal Button and the appliance will complete the process automatically (as shown in Figure 4);
-
After completing the process of Vacuum Seal, press both of the Lid Release Buttons to open then upper lid and take out the sealed bag (as shown in Figure 5).

Figure 1

natural_image
Line drawing of a printer with paper and a circular print pattern (no text or symbols)Figure 2 Figure 3

natural_image
Line drawing of a hand pressing down on a paper with a decorative circular pattern (no text or symbols)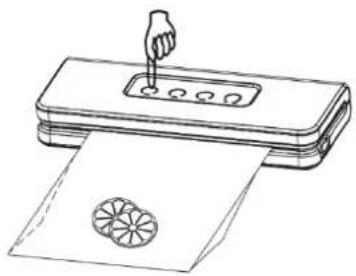
natural_image
Line drawing of a hand using a tool to press or print a paper with a circular pattern (no text or symbols)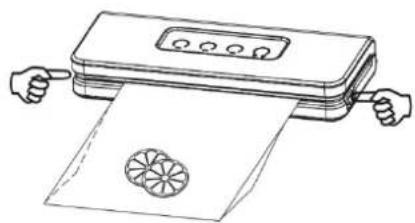
natural_image
Line drawing of a printer with paper and a decorative flower icon, no text or symbols presentFigure 4 Figure 5
SEALING PACKAGING USING BAGS
- Open the upper lid, put the open end of the bag in the yellow heated strip of the appliance, and ensure that the bag is airtight and both sides of the open end of the bag align (as shown in Figure 6);
- Push the lid down and click to lock the lid;
- Press the Seal Button (as shown in Figure 7), and the appliance will complete the process automatically;
- After completing the Vacuum Seal process, press both of the Lid Release Buttons to open the upper lid and take out the sealed bag.

natural_image
Technical line drawing of a mechanical device with a circular component on the page (no text or symbols)
natural_image
Line drawing of a hand inserting into a paper with a decorative circular pattern below (no text or symbols)Figure 6 Figure 7
VACUUMING PACKAGING USING ACCESSORY CANISTERS OR CONTAINERS
- Wipe the accessory canister or container and their lids to ensure they are clean and dry;
- Fill the accessory canister or container, but do not fill up too full.
Put the lid on the canister or container and lock it;
- Insert one end of the hose into the air intake and another end of the hose into the center hole of the container lid. The container needs to have a tight seal (as shown in Figure 8);
- Press the MANU Button to start vacuuming. The appliance will stop automatically when enough vacuum pressure is achieved (as shown in Figure 9);
- Remove the hose immediately after completing the vacuum process.

natural_image
Line drawing of a portable kitchen appliance with a cylindrical tank and connecting tubing (no text or symbols)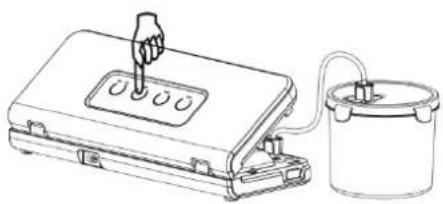
natural_image
Line drawing of a hand inserting a button into a device with a container nearby (no text or symbols)Figure 8 Figure 9
OPEN ACCESSORY CANISTERS OR CONTAINERS
Press the Release Button on the lid to open accessory canisters or containers (methods to open different canisters and containers are varied)
Note:
- In order to seal bags or containers better, it would be better to cool the appliance for 1 minute after completing each packaging process. And wipe away the liquid or food in Vacuum Chamber before the next sealing process.
- To avoid overheating of the sealing heater during continuous sealing process sometimes the appliance will not work when pressing the Seal Button and it will return to normal after 15 seconds.
• It would be better to use specific vacuum bags when using the Vacuum Seal function. - When using functions of Seal or Vacuum Seal, there will be residual heat in the Sealing Heater. Please do not touch the Sealing Heater to avoid burns.
5. CLEANING AND MAINTENANCE
- Always unplug the appliance before cleaning.
- Do not immerse the appliance in water or any other liquid.
- Avoid using abrasive products or material to clean the appliance for they will scratch the surface or damage important components of the appliance.
- Use a mild soap and a soft cloth to wipe away food residue on or around components.
- Ensure the appliance is dry thoroughly before using it again.
Note:
- In order to avoid bacterial contamination, do not re-use bags after storing raw meat, raw fish or greasy food. Do not re-use bags that have been microwaved or boiled.
- After completing your vacuum packaging, always leave the lid down, but not locked into place. This will keep the foam gaskets in good condition to ensure vacuum packaging effectiveness.
6. TROUBLE SHOOTING
Nothing happens when I try to vacuum seal:
- Check the power cord to see if it is firmly plugged into a power outlet.
- Check the power cord to make sure it is set to the correct mode. Refer to the above operating instructions.
- If the appliance has several modes, check the settings to make sure it is set to the correct mode. Refer to the above operating instructions.
Air is not removed from the bag completely
-
To seal properly, the open end of bag should be resting entirely inside Vacuum Chamber area.
-
Check the sealing strip and foam gaskets for debris and positioning.
Make sure there is no breakage or distortion on both foam seal gaskets. Wipe clean and secure them back into place.
-
The vacuum bag may have a leak. To test for a leak, seal the bag with some air in it, submerge in water, and apply pressure. Bubbles indicate a leak. If there is a leak, re-seal or use another bag.
-
Use only the specific vacuum bags provided by dealers.
-
There may be leaks along the seal caused by wrinkles, debris crumbs, grease or liquids. Open the bag, wipe the sealing area of the bag and smooth it out along the sealing strip before re-sealing.
The appliance does not start to seal after vacuuming
- There is a vacuum pressure sensor in the appliance. The appliance will not begin to seal automatically if the vacuum pressure inside the bag is not able to reach to the predetermined vacuum pressure. Check the sealing strip and the foam gaskets for debris and correct positioning. Wipe clean and secure them back into place, and try again.
- Check there is no breakage or distortion on both foam seal gaskets.
- The vacuum bag may have a leak. To test for a leak, seal the bag with some air in it, submerge in water, and apply pressure. Bubbles indicate a leak. If there is a leak, re-seal or use another bag.
- There may be leaks along the seal caused by wrinkles or damage or caused by debris crumbs or liquids at the open end of the bag. Open the bag, wipe the sealing area of the bag and smooth it out. Make sure there is no winkles or damage before re-sealing.
Air has entered into the bag after being sealed
- There may be leaks along the seal caused by wrinkles or damage or caused by debris crumbs or liquids at the open end of the bag. Open the bag, wipe the sealing area of the bag and smooth it out. Make sure there is no winkles or damage before re-sealing.
- Fermentation from food may occur if there is air in the bag. Open the bag, if the food has begun to spoil, please discard the food. Lack of refrigeration or fluctuating temperatures in the refrigerator can cause food to spoil.
- Check the bag for a puncture or hole. Do not vacuum and seal hard items with sharp points such as bones and nut shells. If necessary, cushion sharp edges with paper towel to avoid damaging the vacuum bag.
The bag melts
Should the sealing strip or sealing element overheat and melt the bag, it may be necessary to lift the lid and allow sealing strip and element to cool for a few minutes.
- TECHNICAL SPECIFICATIONS
| Model PHVS 3030 | |
| Sealing Time 8-10 seconds | |
| Vacuuming/Sealing Time | ≤30 seconds (Time will increase when the volume or size of the bags or containers increases.) |
| Maximum Vacuum Pressure -60KPa | |
| Noise ≤50 dB | |
| Maximum Sealing Width ≤300mm | |
| Size 370mm x 150mm x 59mm | |
| Net Weight | 1.03kg |
Our company reserves the ultimate rights of explanation of this Instruction Manual.
INSTRUCTIONS AND INFORMATION REGARDING THE DISPOSAL OF USED PACKAGING MATERIALS
Dispose of packaging material at a public waste disposal site.
DISPOSAL OF USED ELECTRICAL AND ELECTRONIC APPLIANCES

The meaning of the symbol on the product, its accessory or packaging indicates that this product shall not be treated as household waste. Please, dispose of this product at your applicable collection point for the recycling of electrical & electronic equipment waste. Alternatively in some states of the European Union or other European states you may return your products to your local retailer when buying an equivalent new product. The correct disposal of this product will help save valuable natural resources and help in preventing the potential negative impact on the environment and human health, which could be caused as a result of improper liquidation of waste. Please ask your local authorities or the nearest waste collection centre for further details. The improper disposal of this type of waste may fall subject to national regulations for fines.
For business entities in the European Union
If you wish to dispose of an electrical or electronic device, request the necessary information from your seller or supplier.
Disposal in other countries outside the European Union
If you wish to dispose of this product, request the necessary information about the correct disposal method from local government departments or from your seller.

This product meets all the basic EU regulation requirements that relate to it.
Changes to the text, design and technical specifications may occur without prior notice and we reserve the right to make these changes.
OBSAH
- DŮLEŽITÁ BEZPEČNOSTNÍ UPOZORNĚNÍ ...... 3
- PRŮVODCE SKLADOVÁNÍM POTRAVIN....4
- VYBAVENÍ A FUNKCE .... 5
POPIS JEDNOTLIVÝCH ČÁSTÍ SPOTŘEBIČE: 6 - PROVOZNÍ POKYNY 7
VAKUOVÉ BALENÍ S POUŽITÍM SÁČKŮ 7
UTĚSNĚNÉ BALENÍ S POUŽITÍM SÁČKŮ 7
VAKUOVÉ BALENÍ S POUŽITÍM TĚSNICÍCH NÁDOB 8
OTEVŘENÍ TĚSNICÍ NÁDOBY 8 - ČIŠTĚNÍ A ÚDRŽBA....8
- ODSTRAŇOVÁNÍ MOŽNÝCH PROBLÉMŮ 9
- TECHNICKÉ ÚDAJE 9
1. DŮLEŽITÁ BEZPEČNOSTNÍ UPOZORNĚNÍ
natural_image
Technical line drawing of a mechanical device with a circular component on the page (no text or symbols)
natural_image
Line drawing of a hand inserting into a paper into a machine, with a small circular object on the paper nearby (no text or symbols)obrázek 6 obrázek 7
VAKUOVÉ BALENÍ S POUŽITÍM TĚSNICÍCH NÁDOB
natural_image
Line drawing of a portable kitchen appliance with a cylindrical tank connected to a rack (no text or symbols)
natural_image
Line drawing of a hand inserting a button into a device with a container nearby (no text or symbols)obrázek 8 obrázek 9
OTEVŘENÍ TĚSNICÍ NÁDOBY
natural_image
Technical line drawing of a mechanical device with a circular component on the page (no text or symbols)
natural_image
Line drawing of a hand using a power tool to press or print a paper with a circular pattern (no text or symbols)obrázok 6 obrázok 7
VÁKUOVÉ BALENIE S POUŽITÍM TESNIACICH NÁDOB
natural_image
Line drawing of a portable device connected to a cylindrical container (no text or symbols)
natural_image
Line drawing of a handheld device with a hand inserting a button into a box, next to a cylindrical container (no text or symbols)obrázok 8 obrázok 9
OTVORENIE TESNIACEJ NÁDOBY
3. WYPOSAŻENIE I FUNKCJE

- Przycisk VAC SEAL
- Przycisk SEAL
- Przycisk MANU
- Przycisk FOOD (Dry/Wet)
1. PRZYCISK VAC SEAL
natural_image
Technical line drawing of a mechanical device with a circular component on the page (no text or symbols)
natural_image
Line drawing of a hand using a power tool to press or print a paper with a circular pattern (no text or symbols)rysunek 6 rysunek 7
PAKOWANIE PRÓŻNIOWE Z WYKORZYSTANIEM POJEMNIKÓW USZCZELNIAJĄCYCH
natural_image
Line drawing of a portable kitchen appliance with a cylindrical tank and connecting tubing (no text or symbols)
natural_image
Line drawing of a hand inserting a button into a device with a bucket nearby (no text or symbols)rysunek 8 rysunek 9
OTWARCIE POJEMNIKA USZCZELNIAJĄCEGO
- VAC SEAL gomb
- SEAL gomb
- MANU gomb
- FOOD (Dry/Wet) gomb
1. VAC SEAL GOMB
natural_image
Technical line drawing of a mechanical device with a paper sheet and a circular component (no text or symbols)
natural_image
Line drawing of a hand inserting into a paper into a machine, with a small circular object on the paper nearby (no text or symbols)- ábra 7. ábra
VÁKUUMCSOMAGOLÁS LÉGTELENÍTŐ EDÉNYEKKEL
natural_image
Line drawing of a portable kitchen appliance with a cylindrical tank and connecting tubing (no text or symbols)
natural_image
Line drawing of a hand inserting a button into a device with a container nearby (no text or symbols)- ábra 9. ábra
A LÉGMENTESEN LEZÁRT TARTÁLY KINYITÁSA
- VACUUM SEALER
- VAUKOVÁ SVÁŘEČKA
- VÁKUOVÁ ZVÁRAČKA
- ZGRZEWARKA PRÓŻNIOWA
- VÁKUUM HEGESZTÓ
- CONTENTS
- IMPORTANT SAFEGUARDS
- FEATURES AND FUNCTIONS
- VAC SEAL BUTTON
- SEAL BUTTON
- MANUAL SEAL BUTTON
- FOOD BUTTON
- PRODUCT PICTURE:
- SEALING STRIP
- LOCKING TAB
- UPPER GASKET
- VACUUM CHAMBER
- FIXED AXIS
- LOWERGASKET
- 11.VACUUMCHAMBER
- 12.ANTI-SCALDSWITCH
- 13.AIRINTAKE
- 14.SEALINGHEATER
- LID RELEASE BUTTON
- OPERATING INSTRUCTIONS
- VACUUM PACKAGING USING BAGS
- SEALING PACKAGING USING BAGS
- VACUUMING PACKAGING USING ACCESSORY CANISTERS OR CONTAINERS
- OPEN ACCESSORY CANISTERS OR CONTAINERS
- Note:
- CLEANING AND MAINTENANCE
- TROUBLE SHOOTING
- Nothing happens when I try to vacuum seal:
- Air is not removed from the bag completely
- The appliance does not start to seal after vacuuming
- Air has entered into the bag after being sealed
- The bag melts
- INSTRUCTIONS AND INFORMATION REGARDING THE DISPOSAL OF USED PACKAGING MATERIALS
- DISPOSAL OF USED ELECTRICAL AND ELECTRONIC APPLIANCES
- For business entities in the European Union
- Disposal in other countries outside the European Union
- OBSAH
- DŮLEŽITÁ BEZPEČNOSTNÍ UPOZORNĚNÍ
- VAKUOVÉ BALENÍ S POUŽITÍM TĚSNICÍCH NÁDOB
- OTEVŘENÍ TĚSNICÍ NÁDOBY
- VÁKUOVÉ BALENIE S POUŽITÍM TESNIACICH NÁDOB
- OTVORENIE TESNIACEJ NÁDOBY
- WYPOSAŻENIE I FUNKCJE
- PRZYCISK VAC SEAL
- PAKOWANIE PRÓŻNIOWE Z WYKORZYSTANIEM POJEMNIKÓW USZCZELNIAJĄCYCH
- OTWARCIE POJEMNIKA USZCZELNIAJĄCEGO
- VAC SEAL GOMB
- VÁKUUMCSOMAGOLÁS LÉGTELENÍTŐ EDÉNYEKKEL
- A LÉGMENTESEN LEZÁRT TARTÁLY KINYITÁSA
Brand : Philco
Model : PHVS 3030
Category : Vacuum Sealer