
Aroma NU20 - Humidifier Eldom - Free user manual and instructions
Find the device manual for free Aroma NU20 Eldom in PDF.


| Product Type | Ultrasonic Humidifier |
| Model | Eldom Aroma NU20 |
| Power Supply | 230V ~ 50Hz, 28W |
| Water Tank Capacity | 6 L |
| Humidification Output | 350 ml/h |
| Coverage Area | Up to 35 m² |
| Continuous Operation Time | Approx. 17 hours per full tank |
| Humidity Control | Adjustable 45–80% in 5% increments |
| Timer Settings | 1, 2, 4, or 8 hours |
| Mist Levels | 3 stages |
| Sleep Mode | Dims display for quiet operation |
| Aroma Oil Tank | Separate compartment for essential oils |
| Water Level Indicator | Display with no-water warning and auto shut-off |
| Control Type | Touch panel with audio confirmation |
| Remote Control | Included (1 x CR2025 battery) |
| Assembly Options | 3 configurations (with or without extension pipes) |
| Filter | Water filter included; replaceable |
| Air Filter | With cover, removable for cleaning |
| Cleaning | Use 30% distilled vinegar for descaling; do not immerse in water |
| Placement | Hard, stable surface; at least 1 m above floor level |
| Safety Features | Auto shut-off on empty tank; overheat protection; child lock not mentioned |
| Warranty | Domestic use only; improper use voids warranty |
| Environmental | Recyclable materials; dispose at WEEE collection points |
Frequently Asked Questions - Aroma NU20 Eldom
User questions about Aroma NU20 Eldom
0 question about this device. Answer the ones you know or ask your own.
Ask a new question about this device
Download the instructions for your Humidifier in PDF format for free! Find your manual Aroma NU20 - Eldom and take your electronic device back in hand. On this page are published all the documents necessary for the use of your device. Aroma NU20 by Eldom.
USER MANUAL Aroma NU20 Eldom
natural_image
White water purifier with a conical tip and digital display (no visible text or symbols)
WSKAZÓWKI BEZPIECZEŃSTWA
rys.1 rys.2
flowchart
graph TD
    A["Power"] --> B["Mode"]
    C["Constant Humidity"] --> D["Mode"]
    E["Timer"] --> F["Mode"]
    style A fill:#f9f,stroke:#333
    style C fill:#f9f,stroke:#333
    style E fill:#f9f,stroke:#333
    style B fill:#ccf,stroke:#333
    style D fill:#ccf,stroke:#333
    style F fill:#ccf,stroke:#333
PRZEZNACZENIE
Before first use, please thoroughly read the entire manual.
- Connect the connection cable only to mains whose electrical parameters are compatible with the parameters on the nameplate.
- Pay attention not to add too many receivers to one power circuit.
- For domestic use only.
- Place the appliance on a flat and dry surface.
- Do not put your fingers or any objects into the inlet or outlet opening.
- Do not place the appliance on curtains.
- Always keep the operating appliance within sight, particularly in the vicinity of children.
- Never leave the operating appliance unattended.
- The appliance can be used by children aged 8 and older, by persons with limited physical and mental capabilities, and by persons who have no experience nor knowledge of the equipment, only under supervision or if instructed on the safe use of the appliance in way that guarantees that the associated risks are understood. Children should not play with the appliance. Children should not clean nor maintain the appliance unattended.
- Do not spray insecticides or similar products in the vicinity of the operating appliance.
- Do not use the appliance in high temperatures (above 40oC), in places with high humidity (e.g. bathrooms), or in explosive areas.
- Use only clean, cold tap water or water with low mineral content at a temperature not exceeding 40^ C.
- Do not use in the open air.
- Do not carry or lift during operation.
- Do not touch the ultrasonic converter during operation.
-
Place the appliance away from heat sources (radiators, stoves, etc.).
-
Do not start the humidification feature if the water container is not installed in the appliance.
- Do not place the appliance near vents or electrical devices.
- Do not insert any objects into the humidifier nozzle.
- Keep hands, face, and other parts of the body away from the nozzle when the appliance is switched on.
- Do not cover the humidifier nozzle when the appliance is switched on.
- Disconnect the appliance from the mains, before emptying the container or moving the appliance.
- Before switching the appliance on, make sure that all its parts have been properly installed. Do not switch the appliance on if it is not completely assembled.
- Do not hang clothes or other objects on the appliance.
- Do not use the appliance if the connecting cable is damaged. To avoid any risks, replace the damaged cable at an authorised Manufacturer's Servicing Point.
- The appliance can be repaired only at an authorised servicing centre. Any upgrades or the use of non-original spare parts or components is forbidden and poses a hazard for the user.
- Eldom Sp. z o. o. is not liable for any damage resulting from improper use of the appliance.
SPECIAL INSTRUCTIONS
- Place the appliance on a hard and stable surface. It is recommended to place the humidifier at least 1 m above the floor level.
- Do not place the appliance on a carpet, wood flooring or on any surface that may be damaged by water or moisture.
- When placing the appliance, make sure that the power plug is always accessible.
- The appliance should always be placed upright.
- Do not cover the air outlet and inlet.
GENERAL DESCRIPTION
- Nozzle
- Pipe - upper part
- Pipe - bottom part
- Decorative base
- Handle
- Water tank
- Water level gauge
- Nut
- Water filter
- Oil tank
- Control panel
- Base
- Air filter
- Air filter cover
- Remote control (1 x CR2025)
TECHNICAL DATA
- power: 28 W
- supply voltage: 230V \~ 50Hz
- capacity: 61
- output: 350 ml/h
- humidifier output for a 35m ^2 room
- humidifier operation time for a full container: approx. 17 hours
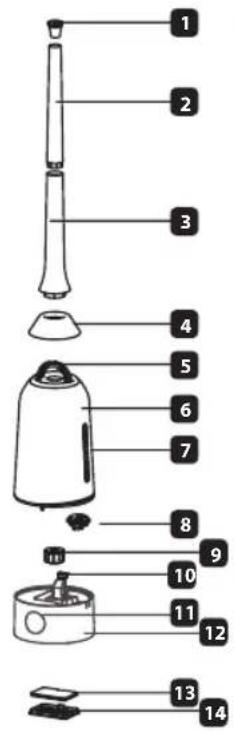
Fig.1 Fig.2
INTENDED USE
The NU20 ultrasound humidifier is intended to improve quality of air in residential premises.
USE
- Assemble the humidifier before use.
- Do not place the device on a carpet, lining, parquet or surfaces which may be damaged by water or moisture.
- It is recommended to place the humidifier at a minimum height of 1 m from the floor.
- Fragrant water additives (oils, etc.) for humidifiers can be used with the device. The oils may only be poured into the special tank (10) located in the base (12) Fig.6
Fig.3
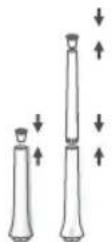
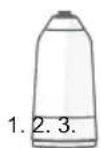
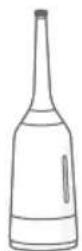
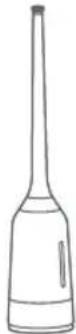
CAUTION. Pouring the oil directly into the tank (6) or into the base (12) can damage the humidifier. This type of damage is not subject to warranty repair.
ASSEMBLY
- Place the base (12) on a hard, stable surface.
- Place the filter (9) in the base (12) - Fig. 4
- Place the tank (6) on the base (12) in accordance with the markings - Fig. 5
- Mount the base (4), the pipes (3, 2) – optionally – and the nozzle (1) successively on the tank (6).
- The humidifier can be assembled in 3 ways - Fig. 3
FILLING THE TANK
- Make sure the device is disconnected from the power supply.
- Remove the base (4) and the pipe (2, 3) from the tank (6).
- Remove the tank (6) by grasping the handle (5) and the base (12).
- Turn the tank (6), unscrew the nut (8) and fill the tank with water.
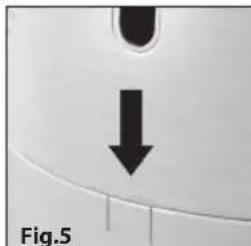
natural_image
Close-up of a curved surface with a black arrow pointing downward, labeled Fig.5 (no other text or symbols)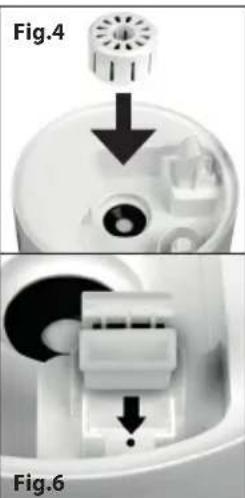
natural_image
Two-panel diagram showing a device with internal components and directional arrows, labeled Fig.4 and Fig.6 (no text or symbols on the diagram itself)Secure the nut by tightening it firmly.
- Place the tank (6) on the base (12).
OPERATION
All changes in the settings are confirmed with an audio signal.
- Connect the device to the power supply compatible with the parameters stated above. The appliance will enter the stand-by mode. No function is active, and the display is switched off.
SWITCHING ON / SWITCHING OFF
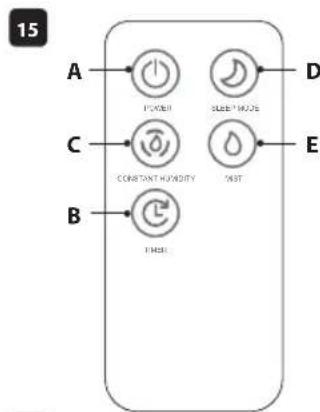
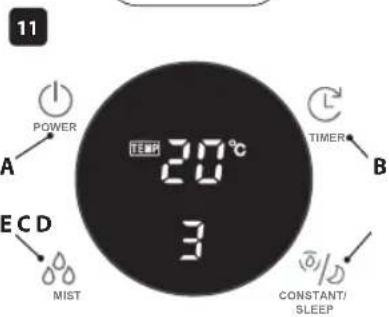
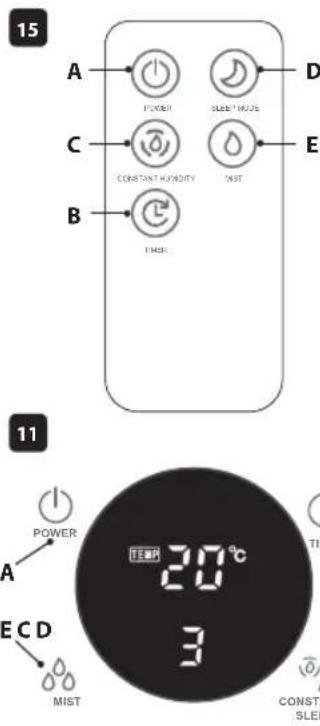
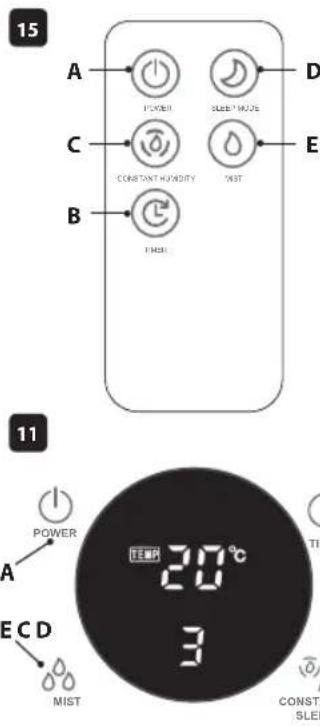
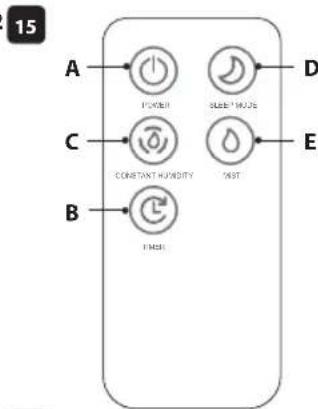
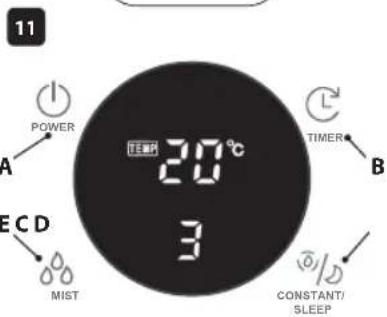
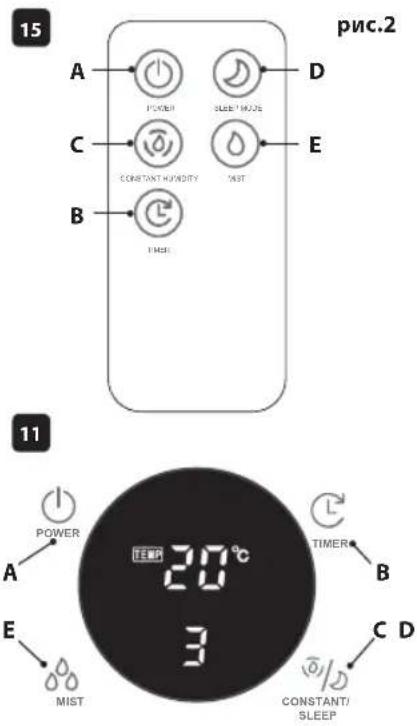
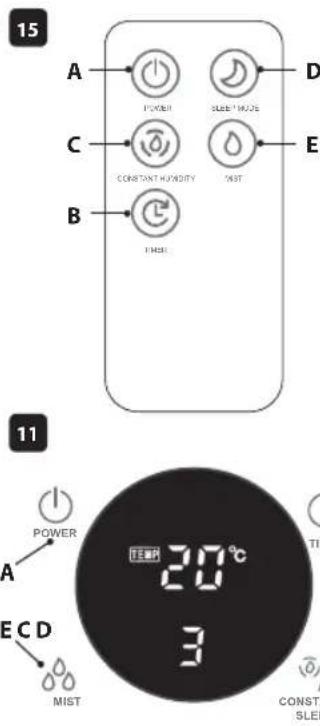
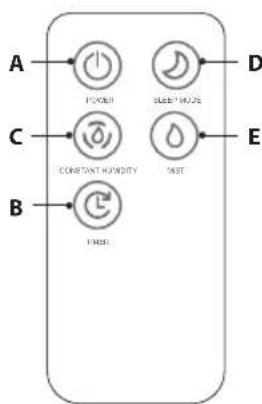
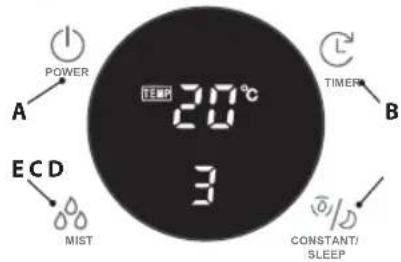
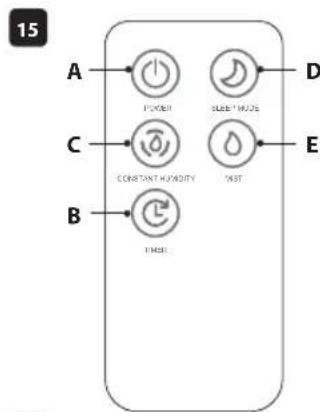
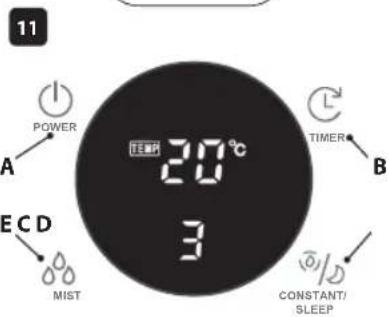
Pressing the button (A) will cause the display to activate. The humidifier will start running at the lowest level of humidification, with the fan motor running. The humidity level is displayed. Pressing the button (A) again will switch off the unit and make it enter the stand-by mode.
MIST
The appliance is fitted with a three-stage control of humidification. The level of humidification is changed with the button (E).
HYGROMETER
The function is activated with the button (C). This function allows to set the level of humidity from 45–80% in 5% steps. The appliance will start after about 3 seconds of entering the settings. It will switch off when the current humidity is higher than the set level. The function will activate when the current relative humidity is at least 2% lower than the set value. Due to external conditions, an error may occur between the actual and the displayed values of humidity of up to about 5%
CLOCK
This function allows to set the time after which the appliance will automatically switch off. This function may be started only when the appliance is on. You can only set: 1, 2, 4 or 8 hours.
The function is activated with the button (B). Activation of the function is indicated with the icon „TIME“ on the display. The appliance does not show the passing time. Every consecutive pressing of the button (B) will extend the time.
SLEEP
The night mode is activated with the button (D). The display is dimmed down in this mode. The mode is deactivated by pressing any button.
NO WATER
This symbol ⚠️ will be displayed when water is not present in the container. The appliance will switch off automatically.
CLEANING AND MAINTENANCE
- Before cleaning, unplug the appliance.
- It is recommended to clean the water tank and body regular.
- Do not immerse the humidifier in water or other liquid substance.
- Do not use any aggressive cleaning agents.
- It happens that in the base or in the ultrasound converter a scale is formed which can be removed by pouring 30% distilled vinegar on the elements and leaving it there for 30 minutes.
PRACTICAL ADVICE
- Do not direct the nozzle towards a wall. The moisture coming out of it may cause damage of the paperwall, etc.
- Excessive moisture in the room may cause condensation of water on window panes and furniture. If this is the case, turn off the humidifier.
- Do not use the humidifier in the rooms where the moisture level exceeds 80%.
- Use tap water to fill the tank, however in case of hard tap water, distilled water is recommended.
- When the humidifier is not used for a long time, its washing and drying is recommended. Keep in a dry place.
- It is recommended to place the humidifier at least one meter above a floor.
ENVIRONMENTAL PROTECTION
- The appliance is made of materials which can be recycled.
- It should be handed over to the applicable collection point for the recycling of electrical and electronic equipment.
WARRANTY
- This appliance is designed for domestic use only.
- It cannot be used for professional purposes or for other than the intended use.
- Improper use will nullify the guarantee.
BEZPEČNOSTNÍ DOPORUČENÍ
obr.1 obr.2
URČENÍ
Abb.1 Abb.2
flowchart
graph TD
    A["Power"] --> B["Constant Humidity"]
    C["Sweet Mode"] --> D["Noise"]
    E["Electric"] --> F["THBS"]
BESTIMMUNG
рис.1
НАЗНАЧЕНИЕ
obr.1 obr.2
URČENIE
- rajz 2
rajz 15
11
RENDELTETÉS
natural_image
Close-up of a mechanical component with a downward arrow and label '6. rajz' (no readable text or symbols beyond label)TARTÁLY FELTÖLTÉSE
fig.1 fig.2
flowchart
graph TD
    A["Power"] --> B["Sleep"]
    C["Constant Humidity"] --> D["Sleep"]
    E["Heat"] --> F["Sleep"]
    style A fill:#f9f,stroke:#333
    style B fill:#f9f,stroke:#333
    style C fill:#f9f,stroke:#333
    style D fill:#f9f,stroke:#333
    style E fill:#f9f,stroke:#333
    style F fill:#f9f,stroke:#333
USO DEL APARATO
natural_image
Close-up of a mechanical component with a downward arrow and circular features (no text or symbols)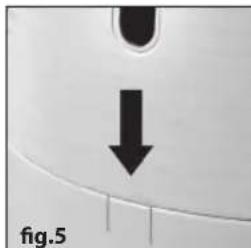
natural_image
Close-up of a curved surface with a black arrow pointing downward, labeled 'fig.5' at bottom left (no other text or symbols)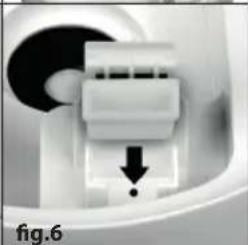
natural_image
Close-up of a mechanical component with a downward arrow and dot, labeled 'fig.6' (no readable text or symbols)LLENADO DEL DEPÓSITO


- WSKAZÓWKI BEZPIECZEŃSTWA
- PRZEZNACZENIE
- SPECIAL INSTRUCTIONS
- GENERAL DESCRIPTION
- TECHNICAL DATA
- INTENDED USE
- USE
- ASSEMBLY
- FILLING THE TANK
- OPERATION
- All changes in the settings are confirmed with an audio signal.
- SWITCHING ON / SWITCHING OFF
- MIST
- HYGROMETER
- CLOCK
- SLEEP
- NO WATER
- CLEANING AND MAINTENANCE
- PRACTICAL ADVICE
- ENVIRONMENTAL PROTECTION
- WARRANTY
- BEZPEČNOSTNÍ DOPORUČENÍ
- URČENÍ
- BESTIMMUNG
- НАЗНАЧЕНИЕ
- URČENIE
- RENDELTETÉS
- TARTÁLY FELTÖLTÉSE
- USO DEL APARATO
- LLENADO DEL DEPÓSITO
Brand : Eldom
Model : Aroma NU20
Category : Humidifier