
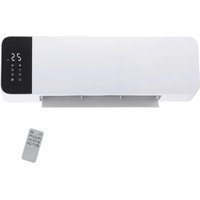
IRH-122174 - Heating Emerio - Free user manual and instructions
Find the device manual for free IRH-122174 Emerio in PDF.


| Product Type | Infrared Panel Heater |
| Model | IRH-122174 |
| Power Consumption | 550 W |
| Operating Voltage | 220–240 V ~ 50/60 Hz |
| Heat Output (Nominal) | 0.55 kW |
| Standby Power | 0.00096 kW |
| Mounting Options | Freestanding (with feet) or Wall-mounted |
| Control Type | Electronic with LCD display |
| Display | LCD screen showing temperature, time, day, and modes |
| Modes | Normal mode (continuous) and Weekly mode (programmable timer) |
| Temperature Setting Range | Up to 37 °C |
| Timer Settings | Start and stop times for each day of the week |
| Open Window Detection | Yes (auto standby when temperature drops >3°C) |
| Safety Features | Overheat auto shut-off, child lock (implied by safety instructions), DO NOT COVER warning |
| Cleaning | Wipe with damp cloth, do not use detergents or abrasives |
| Storage | Store in clean, dry place when not in use |
| Warranty | 2 years |
| Intended Use | Indoor, well‑insulated spaces only; not for bathrooms or outdoors |
| Minimum Distance to Flammable Materials | 100 cm |
Frequently Asked Questions - IRH-122174 Emerio
User questions about IRH-122174 Emerio
0 question about this device. Answer the ones you know or ask your own.
Ask a new question about this device
Download the instructions for your Heating in PDF format for free! Find your manual IRH-122174 - Emerio and take your electronic device back in hand. On this page are published all the documents necessary for the use of your device. IRH-122174 by Emerio.
USER MANUAL IRH-122174 Emerio
natural_image
White rectangular electronic device with a digital display and mounting base (no visible text or symbols)Infrared heater (EN)
Instruction manual – English ...... - 12 -
natural_image
Simple line drawing of a pen inserted into a corner, no text or symbols present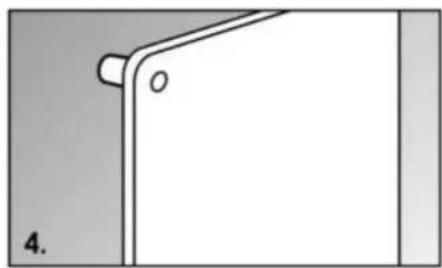
natural_image
Simple line drawing of a door handle with a circular opening and label '4.' (no text or symbols on the diagram itself)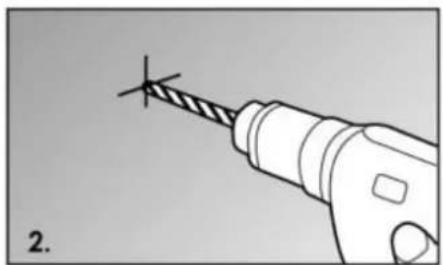
natural_image
Line drawing of a tool tip with a star-shaped tip, no text or symbols present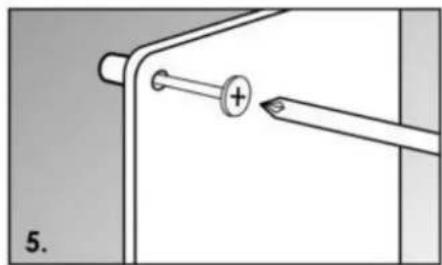
natural_image
Simple line drawing of a mechanical component with a plus sign and a tool, no text or symbols present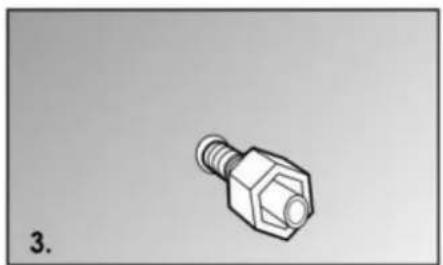
natural_image
3D rendered image of a hexagonal bolt with threaded shaft (no text or symbols)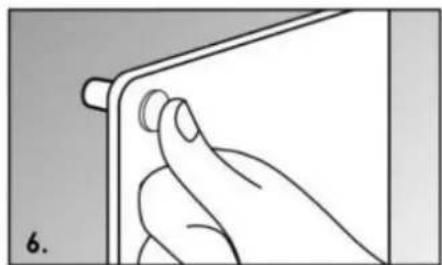
natural_image
Hand holding a tablet device with a scroll wheel (no text or symbols visible)IM BETRIEB
Hinweis:
Important: read this instruction fully before using the heater; retain these instructions for future reference.
This product is only suitable for well insulated spaces or occasional use.
SAFETY INSTRUCTIONS (READ BEFORE OPERATING THE HEATER)
-
Read and save these instructions. Attention: pictures in the IM are for reference only.
-
This appliance can be used by children aged from 8 years and above and persons with reduced physical, sensory or mental capabilities or lack of experience and knowledge if they have been given supervision or instruction concerning use of the appliance in a safe way and understand the hazards involved.
-
Children shall not play with the appliance.
-
Cleaning and user maintenance shall not be made by children without supervision.
-
Children of less than 3 years should be kept away unless continuously supervised.
-
Children aged from 3 years and less than 8 years shall only switch on/off the appliance provided that it has been placed or installed in its intended normal operating position and they have been given supervision or instruction concerning use of the appliance in a safe way and understand the hazards involved. Children aged from 3 years and less than 8 years shall not plug in, regulate and clean the appliance or perform user maintenance.
-
CAUTION — Some parts of this product can become very hot and cause burns. Particular attention has to be given where children and vulnerable people are present.
-
If the supply cord is damaged, it must be replaced by the manufacturer, its service agent or similarly qualified persons in order to avoid a hazard.
- This appliance is intended to be used in household and similar applications.
- WARNING: This heater is not equipped with a device to control the room temperature. Do not use this heater in small rooms when they are occupied by persons not capable of leaving the room on their own, unless constant supervision is provided.
- The heater is not intended for use in bathrooms, laundry areas or similar indoor locations. Never place the heater where it may fall into a bathtub or any other water container.
- Do not use outdoors. Do not use to dry clothes or any fabric.
- Do not place the heater on carpets with a very deep pile.
- The heater must not be located immediately below a socket outlet.
- Do not use the heater in areas where flammable liquids are stored or where flammable fumes may be present.
- Always unplug the heater when moving it from one location to another.
- Do not use the heater if the power cord is damaged.
- Do not use this heater in the immediate surroundings of a bath, a shower or a swimming pool.
- WARNING: In order to avoid overheating, do not cover the heater.
- The appliance should not be operated by means of an external timer-switch or by means of a separate system with remote control not originally belonging to this appliance.
-
WARNING: The heater must not be used if the plaster panels are damaged.
-
This heating device is not suitable for assembling in vehicles and machines.

-
Means "DO NOT COVER".
-
Regarding the information for FEET ASSEMBLY, please refer to the below paragraph of the manual.
-
Do not leave the heater switched on when leaving your home or going to sleep. Do not leave unattended when plug in to the mains supply.
-
Always use the heater in an upright position. Keep combustible material such as furniture, cushions, bedding, paper, clothes, curtains etc. at least 100cm away from the heater.
-
This heater has hot and arcing or sparking parts inside. Do not use it in the areas where gasoline, paint, or flammable liquids are used or stored.
-
To prevent overloading a circuit, do not plug the heater into a circuit that already has other appliances working. Do not install the heater under the wall socket.
-
Always unplug the appliance when not in use.
-
The appliance is hot when in use. To avoid burned, do not let bare skin touch hot surfaces.
PARTS DESCRIPTION
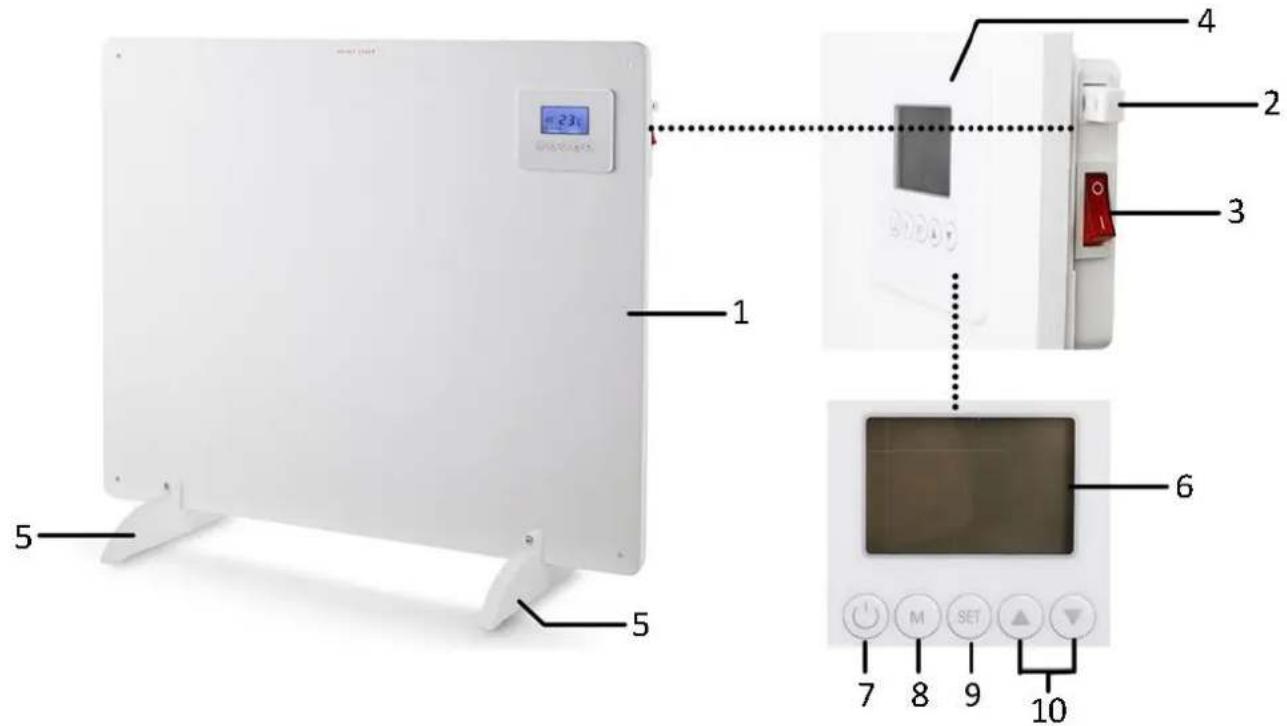
- Heater body
- Temperature sensor
- Mechanical power switch
- Control panel
- Feet
- LCD display
- On/off button
- Mode button
- Temperature / time / timer setting button
- Value increase and decrease buttons
FEET ASSEMBLY (FREE STANDING)
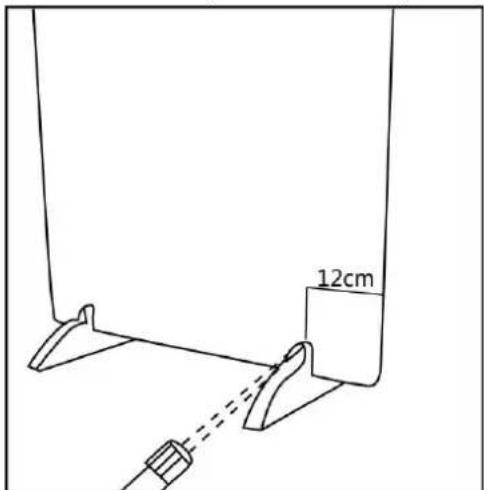
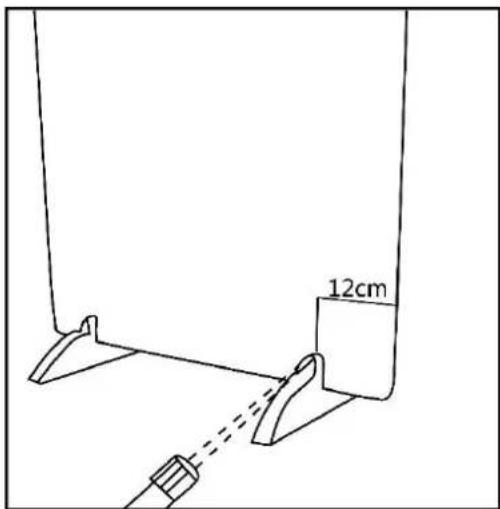
- Place the free standing feet on the ground. Insert the appliance into the slots of the feet.
- Keep a distance of 12cm between the feet and the sides of the appliance. Screw firmly with the two bolts.
WALL MOUNTING
There is a pack of accessories provided with the appliance. Please use it for wall mounting according to below illustrations.
Accessories pack 1 set:
- 1 x drill bit (8mm)
- 4 x rail fittings
- 4 x screw bolts
- 4 x caps for bolts
natural_image
Simple line drawing of a pencil inside a corner, no text or symbols present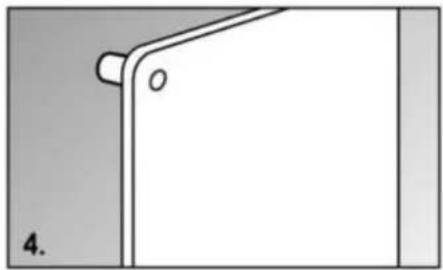
natural_image
Simple line drawing of a door handle with a circular opening and label '4.' (no text or symbols on the diagram itself)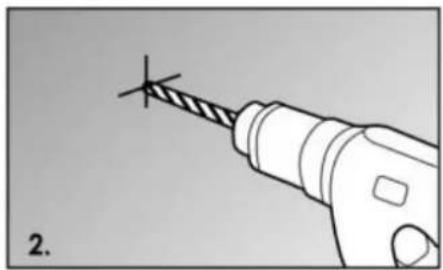
natural_image
Illustration of a drill bit with a pointed tip, labeled '2.' (no text or symbols on the diagram itself)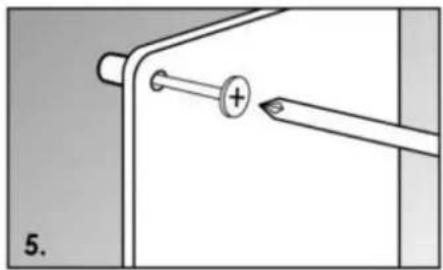
natural_image
Simple line drawing of a door handle with a plus sign and a diagonal rod inserted (no text or symbols)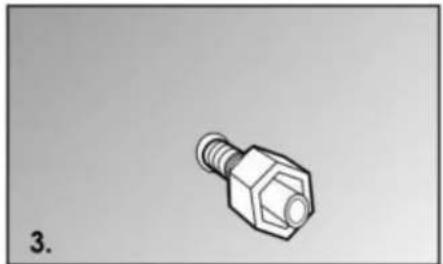
natural_image
Simple line drawing of a hexagonal bolt with threaded shaft (no text or symbols)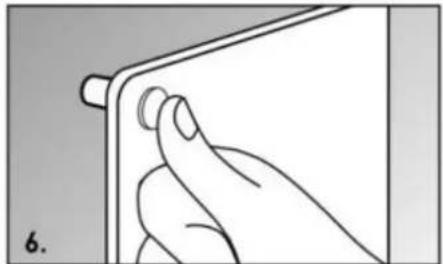
natural_image
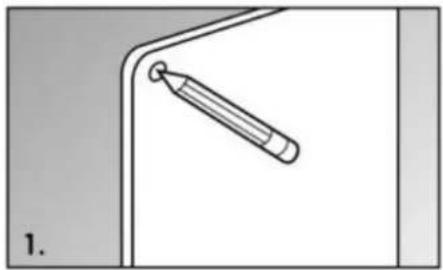
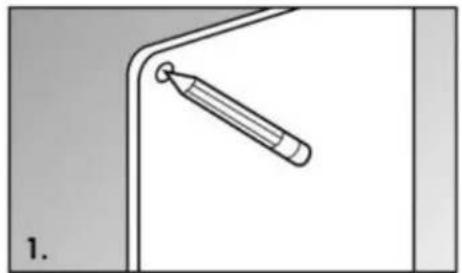
Line drawing of a hand holding a tablet device with a scroll wheel (no text or symbols)- Mark the positions of the four holes to be drilled on the wall. (Better install the appliance in a height of 20cm – 100cm from the floor to get the best performance.)
- Drill the holes with the drill bit.
- Insert the plastic rail fittings into the holes.
- Attach the appliance onto the four rail fittings through the four holes in the appliance.
- Screw the four bolts into the plastic rail fittings.
- Cover the bolts with the caps. It is recommended to use some glue to make the caps stick onto the bolts firmly.
NOTE: make sure the distance between the bottom of the appliance and the floor is no less than 20cm when the appliance is installed.
OPERATION
Plug the appliance into an appropriate electrical outlet. Turn on the appliance by pressing the power switch to position "I". The power switch will be illuminated and a beep sound will be heard. The appliance is standby. Press the on/off button to run your appliance.
- Set the current time for the appliance before initial use:
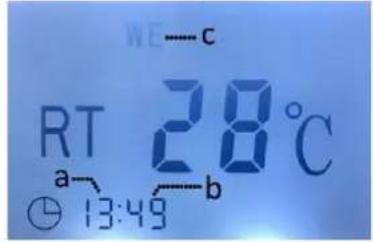
1) Press the button "SET" for 3 seconds; the hour value (a) on the LCD display will flash. Press the button "△" or "▽" to set the hour from 00-23.
2) Press the button "SET" again; the minute value (b) will flash. Press the button "△" or "▽" to set the minute from 00-59.
3) Continue to press the button "SET"; the day value (c) will flash. Press the button "△" or "▽" to set the day from MO-SU (Monday – Sunday). Press the button "SET" to save the settings.
2. Switch the appliance between normal mode and weekly mode.
1) Set the temperature under normal mode:
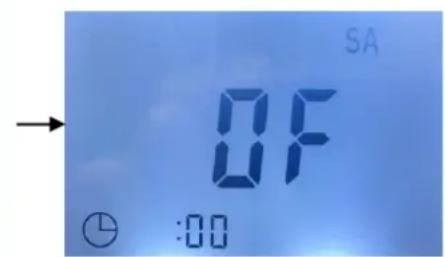
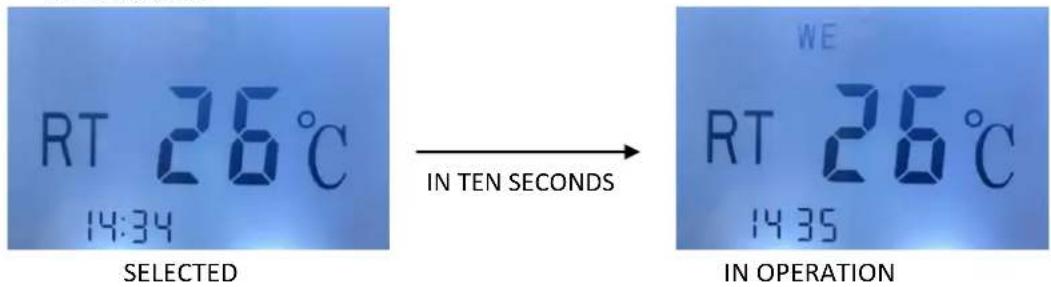
- Continue to press the button "M" several times till the normal mode is selected. No weekly mode icon "L" is shown in the left bottom. Then wait for 10 seconds the normal mode will be in operation. (The LCD display will show as below.)
- Press the button "SET" and then the button "△" or "▽" to set your desired temperature (up to 37°C). Press the button "SET" again to save the setting. The appliance will work with no time limit under normal mode.
2) Set the temperature and timer under weekly mode:
- Press the button "M" to switch into weekly mode. The weekly mode icon "☐" is shown in the left bottom. The day value (MO-SU) will be displayed on top. Select the day you plan to have a timer.
- Continue to press the button "SET", "Δ" and "∇" to set your desired temperature as well as timer (starting time and shutdown time). Press the button "SET" to save the settings.
Note: during timer setting for the starting time, the temperature value and letters "on" (on) will flash alternately. During timer setting for the shutdown time, the temperature value and letters "of" (off) will flash alternately.

Note:
- The timer can only be activated when the appliance is turned on and working under weekly mode. Once the timer is set it will be in valid every week.
- For temperature setting, the set temperature must be higher than the current room temperature.
- For timer setting, the shutdown time must be later than the starting time. Otherwise, the timer function will not work.
- You can press the button "M" to check your settings. The LCD display will automatically turn back to show the current time and room temperature in 10 seconds with no more operations.
- The temperature / timer function will be conserved before shut down and the appliance will work with the same set temperature / timer after turned on again.
Room temperature control with open window detection:
This appliance is equipped with a function of open window detection. That means in order to save heating power the appliance will automatically shut down into standby once the room temperature is declined for more than 3^ C after the doors, windows or ventilation systems are opened. If you need to let the appliance resume work close the doors, windows or ventilation systems. Press the on/off button to restart the appliance. To turn on this function long press the button “ ” for 5 seconds. To turn off this function long press the button “ ” for 5 seconds. The icon “☐” will be on and off accordingly in the right bottom of the LCD display.
If your heater fails to operate, please follow these instructions:
- Ensure that your circuit breaker or fuse is working properly.
- Be sure the heater is plugged in and that the electrical outlet is working properly.
• If the power switch is not illuminated, send it to a service center for reparation directly.
SAFETY SYSTEM
The appliance has a safety system which automatically switches the unit off when overheated.
CLEANING THE HEATER
Always un-plug the heater from the wall socket and allow it to cool down completely before cleaning. Clean the outside of the heater by wiping with a damp cloth and with a dry cloth. Do not use any detergents or abrasives and do not allow any water to penetrate the heater.
To release the appliance from the wall, just open the screw bolt caps and unscrew the bolts to take off from the wall.
STORING THE HEATER
When the heater is not used for long time it should be protected from dust and stored in a clean dry place.
TECHNICAL DATA:
Operating voltage: 220-240V \~ 50-60Hz
Power consumption: 550W
GUARANTEE AND CUSTOMER SERVICE
Before delivery our devices are subjected to rigorous quality control. If, despite all care, damage has occurred during production or transportation, please return the device to your dealer. In addition to statutory legal rights, the purchaser has an option to claim under the terms of the following guarantee:
For the purchased device we provide 2 years guarantee, commencing from the day of sale. If you have a defective product, you can directly go back to the point of purchase.
Defects which arise due to improper handling of the device and malfunctions due to interventions and repairs by third parties or the fitting of non-original parts are not covered by this guarantee. Always keep your receipt,
without the receipt you can't claim any form of warranty. Damage caused by not following the instruction manual, will lead to a void of warranty, if this results in consequential damages then we will not be liable. Neither can we hold responsible for material damage or personal injury caused by improper use if the instruction manual is not properly executed. Damage to accessories does not mean free replacement of the whole appliance. In such case please contact our service department. Broken glass or breakage of plastic parts is always subject to a charge. Defects to consumables or parts subjected to wearing, as well as cleaning, maintenance or the replacement of said parts are not covered by the warranty and are to be paid.
ENVIRONMENT FRIENDLY DISPOSAL
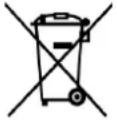
Recycling – European Directive 2012/19/EU
This marking indicates that this product should not be disposed with other household wastes. To prevent possible harm to the environment or human health from uncontrolled waste disposal, recycle it responsibly to promote the sustainable reuse of material resources. To return your used
device, please use the return and collection systems or contact the retailer where the product was purchased. They can take this product for environmental safe recycling.
Emerio Deutschland GmbH (no service address)
Lerchenweg 3
40789 Monheim am Rhein
Deutschland
Customer service:
T: +49 (0) 3222 1097 600
E: info.de@emerio.eu
ERP information (EN)
Declare that the product detailed below:
Information requirements for electric local space heaters
| Model identifier(s): | |||||
| Item | Symbol | Value | Unit | Item | Unit |
| Heat output | Type of heat input, for electric storage local space heaters only (select one) | ||||
| Nominal heat output | P_nom | 0,55 | kW | manual heat charge control, with integrated thermostat | No |
| Minimum heat output (indicative) | P_min | 0 | kW | manual heat charge control with room and/or outdoor temperature feedback | No |
| Maximum continuous heat output | P_max,c | 0,55 | kW | electronic heat charge control with room and/or outdoor temperature feedback | No |
| Auxiliary electricity consumption | fan assisted heat output | No | |||
| At nominal heat output | el_max | -- | kW | Type of heat output/room temperature control (select one) | |
| At minimum heat output | el_min | -- | kW | single stage heat output and no room temperature control | No |
| In standby mode | el_SB | 0,000960 | kW | Two or more manual stages, no room temperature control | No |
| with mechanic thermostat room temperature control | No | ||||
| with electronic room temperature control | No | ||||
| electronic room temperature control plus day timer | No | ||||
| electronic room temperature control plus week timer | Yes | ||||
| Other control options (multiple selections possible) | |||||
| room temperature control, with presence detection | No | ||||
| room temperature control, with open window detection | Yes | ||||
| with distance control option | No | ||||
| with adaptive start control | No | ||||
| with working time limitation | Yes | ||||
| with black bulb sensor | No | ||||
| Contact details | Emerio Deutschland GmbHLerchenweg 340789 Monheim am RheinDeutschland | ||||
Satisfies the requirement of the Council Directives:
COMMISSION REGULATION (EU) No 2015/1188 of 28 April 2015 and Amending COMMISSION REGULATION (EU) 2016/2282 implementing Directive 2009/125/EC of the European Parliament and of the Council with regard to ecodesign requirements for local space heaters
Regarding information for consumers on how to install, use and maintain the product, WEEE information, please check the instruction manual provided with packaging.
- Grelna naprava
- Temperaturni senzor
- Mehansko glavno stikalo
- Upravljalno polje
- Noge
- LCD-zaslon
- Tipka za vklop/izklop
- Tipka za preklop načina delovanja
- Tipka za nastavitev temperature/časa/časomer (timer)
- Tipki plus in minus
MONTAŽA NOG (PROSTO STOJEČE)
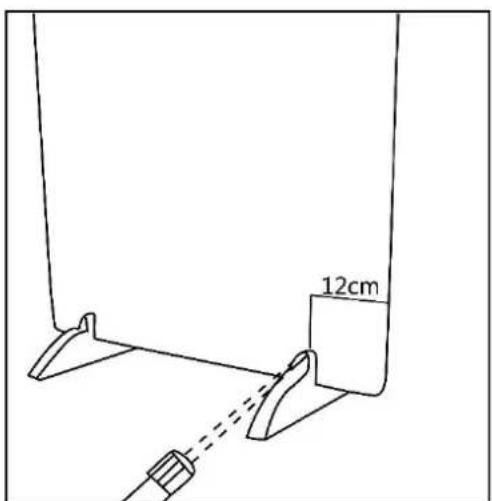
- Postavite noge na tla. Vstavite napravo v reže pri nogah.
- Razmik med nogami in stranmi naprave naj bo 12 cm. Trdno privijte z obema vijakoma.
MONTAŽA NA STENO
natural_image
Simple line drawing of a pencil inside a corner, no text or symbols present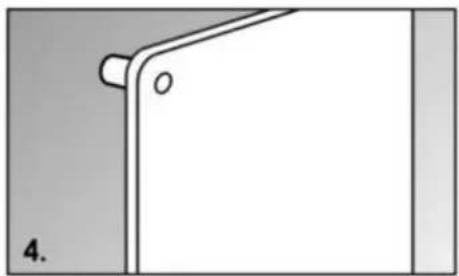
natural_image
Simple line drawing of a door handle with a circular opening and label '4.' (no text or symbols on the diagram itself)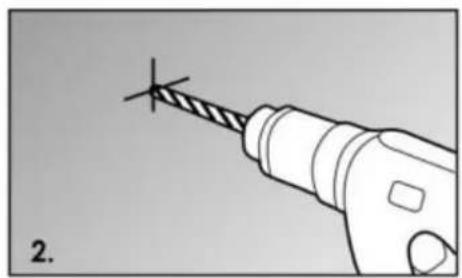
natural_image
Line drawing of a drill bit with a screwdriver tip (no text or symbols)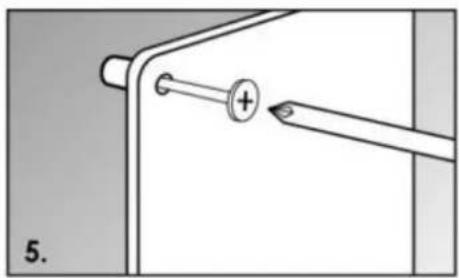
natural_image
Simple line drawing of a mechanical component with a plus button and a rod, no text or symbols present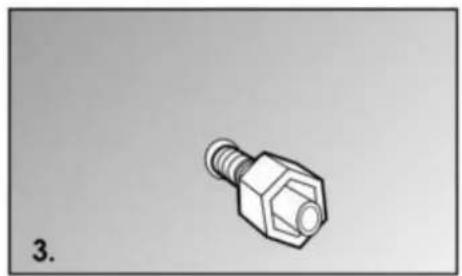
natural_image
3D rendered image of a hexagonal bolt with threaded end (no text or symbols)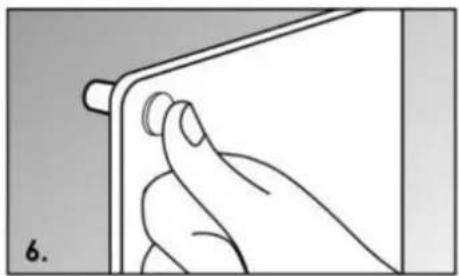
natural_image
Line drawing of a hand pressing a button on a device (no text or symbols)Opozorilo:
natural_image
Simple line drawing of a pen inserted into a corner, no text or symbols present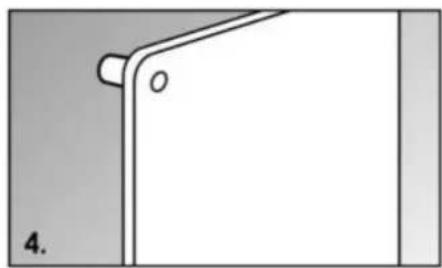
natural_image
Simple line drawing of a door handle with a circular opening and label '4.' (no text or symbols on the diagram itself)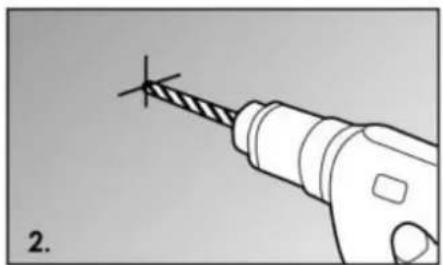
natural_image
Line drawing of a tool tip with a star-shaped tip, no text or symbols present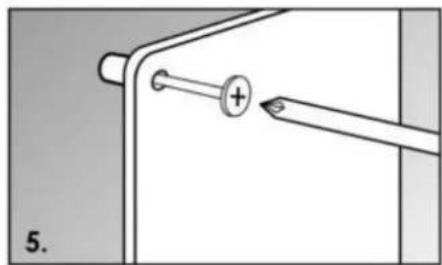
natural_image
Simple line drawing of a mechanical component with a plus sign and a tool, no text or symbols present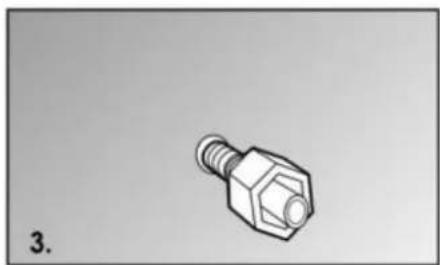
natural_image
3D rendered image of a hexagonal bolt with threaded shaft (no text or symbols)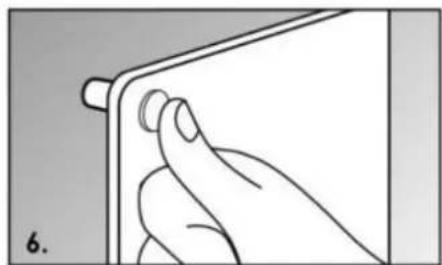
natural_image
Hand holding a tablet device with a scroll wheel (no text or symbols visible)natural_image
Simple line drawing of a pen inserted into a corner, no text or symbols present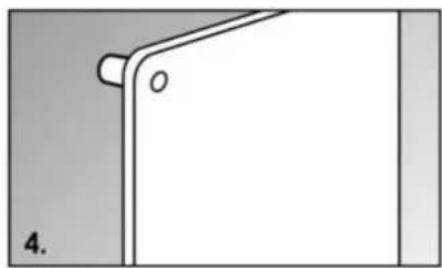
natural_image
Simple line drawing of a door handle with a circular opening and label '4.' (no text or symbols on the diagram itself)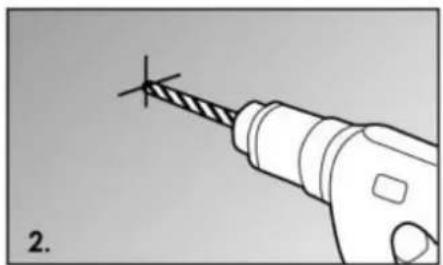
natural_image
Line drawing of a tool tip with a star-shaped tip, no text or symbols present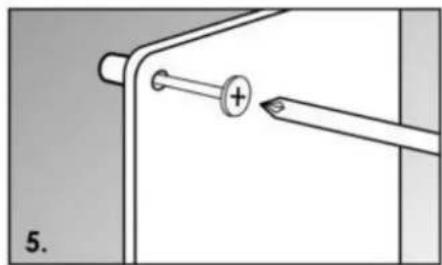
natural_image
Simple line drawing of a mechanical component with a plus sign and a tool, no text or symbols present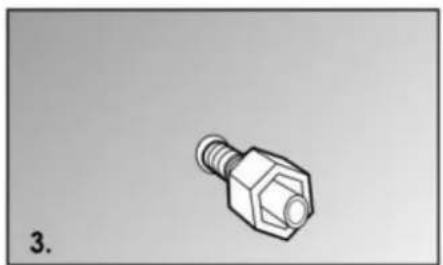
natural_image
3D rendered image of a hexagonal bolt with threaded shaft (no text or symbols)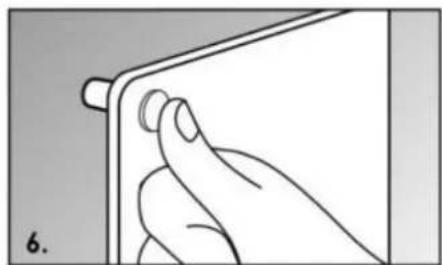
natural_image
Hand holding a tablet device with a scroll wheel (no text or symbols visible)natural_image
Simple line drawing of a pencil inserted into a corner, no text or symbols present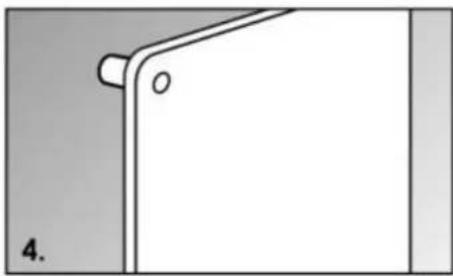
natural_image
Simple line drawing of a door handle with a small circular mark and label '4.' (no text or symbols on the diagram itself)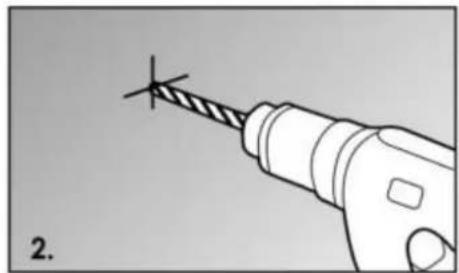
natural_image
Line drawing of a drill bit with a screwdriver tip, labeled '2.' (no text or symbols on the diagram itself)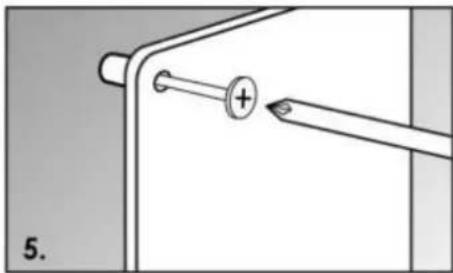
natural_image
Simple line drawing of a mechanical component with a plus button and a rod, no text or symbols present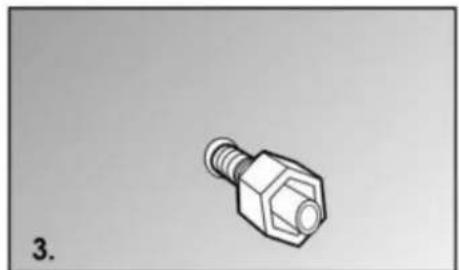
natural_image
3D rendered image of a hexagonal bolt with threaded end (no text or symbols)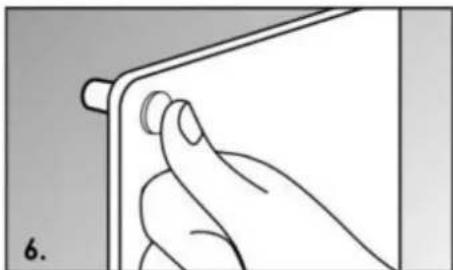
natural_image
Line drawing of a hand pressing a button on a tablet device (no text or symbols)Upozornění:
- Radijator
- Senzor za temperaturu
- Mehanički glavni prekidač
- Upravljačko polje
- Nogice
- LCD-zaslon
- Tipka za uklj./isklj.
- Prekidač
- Tipka za postavku temperature/vremena/brojača
- Plus i minus gumbi
MONTAŽA NOGICA (SLOBODNO)
- Spustite noge na pod. Umetnite uređaj u utore za nogice.
- Držite razmak od 12 cm između nogica i strana stroja. Čvrsto pritegnite dva vijka.
MONTAŽA NA ZIDU
Uređaj se isporučuje s priborom za montažu. Koristite sljedeće ilustracije za montažu uređaja s priborom na zid.
Skup pribora 1:
- 1 x svrdlo (8 mm)
- 4 x razmaknice
- 4 x vijka
- 4 x navojne kapice
natural_image
Simple line drawing of a pencil inserted into a corner, no text or symbols present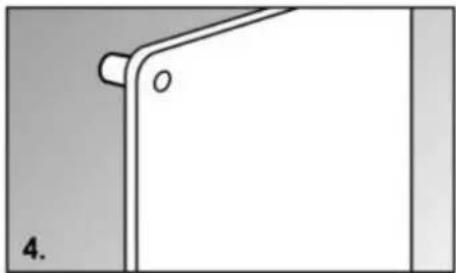
natural_image
Simple line drawing of a door handle with a circular opening and label '4.' (no text or symbols on the diagram itself)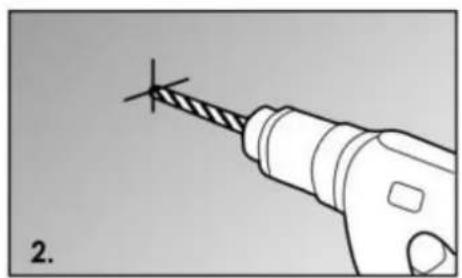
natural_image
Illustration of a drill bit with a screwdriver tip, labeled '2.' (no text or symbols on the diagram itself)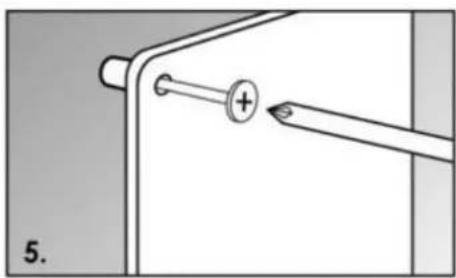
natural_image
Simple line drawing of a mechanical component with a plus symbol and a rod, no text or symbols present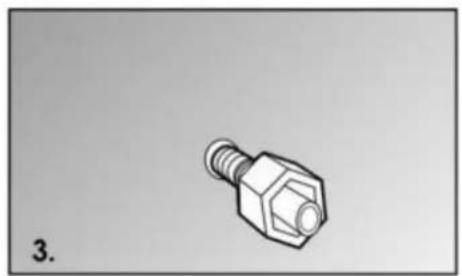
natural_image
Illustration of a hexagonal bolt with threaded shaft (no text or symbols)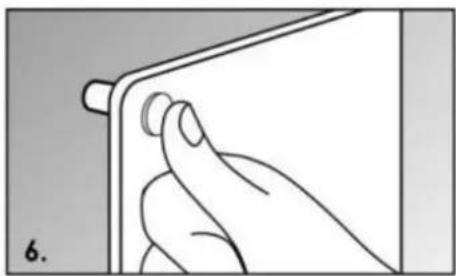
natural_image
Illustration of a hand pressing a button on a tablet device (no text or symbols visible)- Označite četiri rupe na zidu. (Za optimalan učinak grijanja, uređaj treba postaviti na visinu od 20 - 100 cm iznad tla.)
- Izbušite rupe bušilicom.
- Umetnite plastične čahure u rupe.
- Umetnite pričvrsne vijke kroz otvore uređaja u čahuri.
- Pritegnite vijke u plastičnim čahurama.
- Pokrijte glave vijaka kapicama. Da biste kapice držali čvrsto u glavama vijaka, nanesite malo ljepila. NAPOMENA: Provjerite je li udaljenost između dna jedinice i poda manja od 20 cm nakon ugradnje uređaja.
RAD
Spojite uređaj na odgovarajuću utičnicu. Za uključivanje, postavite prekidač napajanja u položaj "I". Prekidač je osvijetljen i emitira se zvučni signal. Uređaj se prebacuje u stanje čekanja. Da biste pokrenuli uređaj, pritisnite prekidač za uključivanje / isključivanje.
- Prije prve uporabe uređaja na uređaju postavite trenutno vrijeme:
1) Držite tipku "SET" 3 sekunde. Vrijednost na satu (a) treperi na LCD zaslonu. Koristite gumbe "△" I "▽" da biste postavili sat (00-23).
2) Ponovno pritisnite tipku "SET". Broj minuta (b) trepće. Pomoću gumba "△" I "▽" postavite minute (00-59).
U RAD
natural_image
Simple line drawing of a pen inserted into a corner, no text or symbols present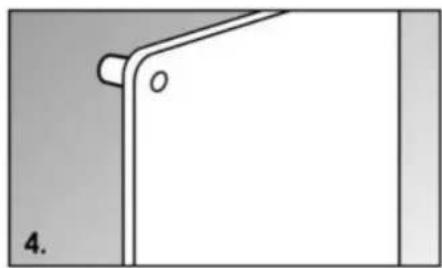
natural_image
Simple line drawing of a door handle with a circular opening and label '4.' (no text or symbols on the diagram itself)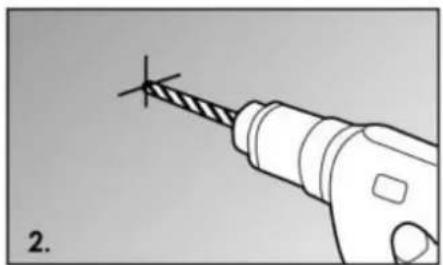
natural_image
Line drawing of a tool tip with a star-shaped tip, no text or symbols present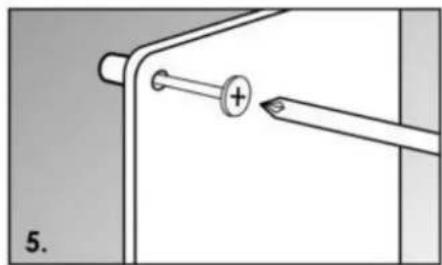
natural_image
Simple line drawing of a mechanical component with a plus sign and a tool, no text or symbols present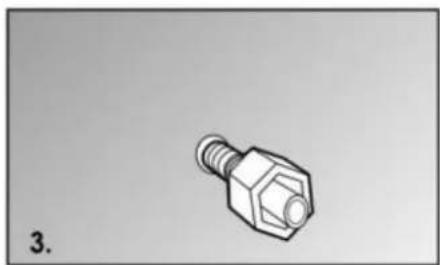
natural_image
3D rendered image of a hexagonal bolt with threaded shaft (no text or symbols)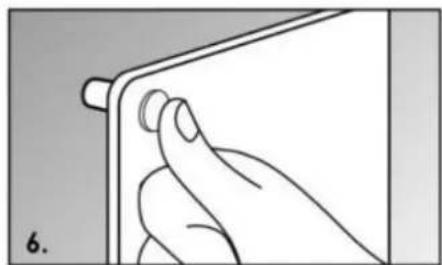
natural_image
Hand holding a tablet device with a scroll wheel (no text or symbols visible)natural_image
Simple line drawing of a pencil inside a corner, no text or symbols present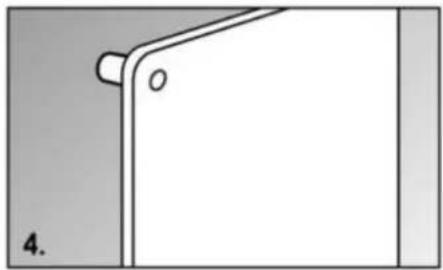
natural_image
Simple line drawing of a door handle with a circular opening and label '4.' (no text or symbols on the diagram itself)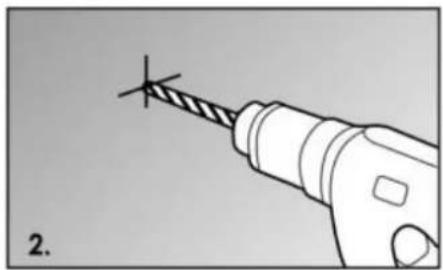
natural_image
Illustration of a drill bit with a pointed tip, labeled '2.' (no text or symbols on the diagram itself)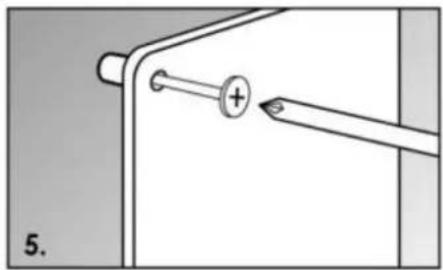
natural_image
Simple line drawing of a door handle with a plus sign and a diagonal rod inserted (no text or symbols)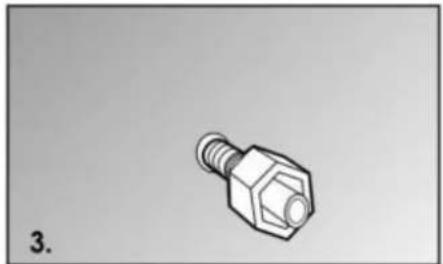
natural_image
Simple line drawing of a hexagonal bolt with threaded end (no text or symbols)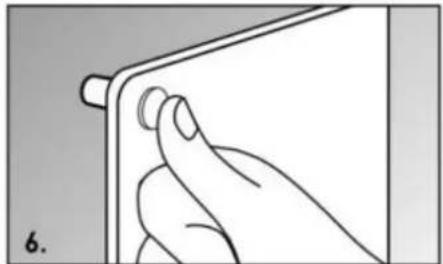
natural_image
Illustration of a hand holding a tablet device with a pen inserted (no text or symbols)PRACA W TRYBIE
Wskazówka:
- Hinweis:
- SAFETY INSTRUCTIONS (READ BEFORE OPERATING THE HEATER)
- PARTS DESCRIPTION
- FEET ASSEMBLY (FREE STANDING)
- WALL MOUNTING
- Accessories pack 1 set:
- OPERATION
- Switch the appliance between normal mode and weekly mode.
- Note:
- Room temperature control with open window detection:
- If your heater fails to operate, please follow these instructions:
- SAFETY SYSTEM
- CLEANING THE HEATER
- STORING THE HEATER
- TECHNICAL DATA:
- GUARANTEE AND CUSTOMER SERVICE
- ENVIRONMENT FRIENDLY DISPOSAL
- Customer service:
- ERP information (EN)
- MONTAŽA NA STENO
- Opozorilo:
- Upozornění:
- MONTAŽA NA ZIDU
- Skup pribora 1:
- RAD
- Wskazówka:
Brand : Emerio
Model : IRH-122174
Category : Heating