
TMX3000 - Multicooker TESLA - Free user manual and instructions
Find the device manual for free TMX3000 TESLA in PDF.


| Product Type | Multicooker |
| Brand | TESLA |
| Model | TMX3000 |
| Maximum Working Volume | 1.7 litres |
| Cooking Pot Material | Stainless steel |
| Blade Type | Chopping blade (sharp) |
| Speed Settings | 6 levels (1-6) + Pulse (P) |
| Timer Range | 30 seconds to 99 minutes |
| Automatic Programs | 12: Soup (P1-P3), Dessert (P1-P4), Cook (P1-P4), Dough (P1) |
| Heating Temperature Range | Up to 120°C (based on automatic programs) |
| Operating Modes | 4 modes: Mode 1 (mixing/stirring), Mode 2 (heating), Mode 3 (heating+stirring), Mode 4 (steaming) |
| Safety Features | Safety lock on lid, boil-dry protection, motor overheat protection, automatic shut-off after 5 min inactivity |
| Included Accessories | Measuring cup, glass lid, sealing ring, steaming basket, chopping blade, mixing paddle, silicone spatula, dough paddle |
| Cleaning Instructions | Hand wash cooking pot; do not immerse or use dishwasher; wipe body with damp cloth; blade is sharp, handle with care |
| Warranty | Contact dealer; excludes misuse, normal wear, unauthorized repair |
Frequently Asked Questions - TMX3000 TESLA
User questions about TMX3000 TESLA
0 question about this device. Answer the ones you know or ask your own.
Ask a new question about this device
Download the instructions for your Multicooker in PDF format for free! Find your manual TMX3000 - TESLA and take your electronic device back in hand. On this page are published all the documents necessary for the use of your device. TMX3000 by TESLA.
USER MANUAL TMX3000 TESLA
natural_image
Technical line drawing of a mechanical component with a circular top and a base (no text or symbols)5 INDIKÁTOR TEPLOTY OHŘEVU
flowchart
graph TD
    A["Single Blade"] --> B["Downward Rotation"]
    B --> C["Arrow to Panel"]
    C --> D["Side-Back Pitching"]
natural_image
Technical line drawing of a mechanical component with a circular top and a base (no text or symbols)5 INDIKÁTOR TEPLOTY OHREVU
- Naberte do varnej nádoby minimálne pol litra vody. Tento objem je možné využiť na naparovanie približne na 30 minút prevádzky.
- Prikryte naparovaciu nádobu pokrievkou bez odmerky.
- Nasadte naparovaciu nádobu vrátane pokrievky
- Zvolte režim „2“, nastavte požadovanú teplotu 100°C a dobu varenia. Stlačte tlačidlo ZAP/VYP, aby spotrebič začal pracovať.
- Spotrebič po dokončení varenia „zapípa“ a automaticky sa zastaví.
- Vyberte spracované jedlo z varnej nádoby.
AUTOMATICKÉ PROGRAMY
flowchart
graph TD
    A["Single Blade"] --> B["Downward Rotation"]
    B --> C["Arrow to Panel"]
    C --> D["Side-Back Pitching"]
natural_image
Technical line drawing of a mechanical component with a circular top and a circular base (no text or symbols)natural_image
Technical line drawing of a mechanical component with a circular top and a flanged base (no text or symbols)flowchart
graph TD
    A["Single Blade"] --> B["Downward Rotation"]
    B --> C["Arrow to Panel"]
    C --> D["Side-Back Pitching"]
Zaklep rezila namestite na dno kuhalne posode in ga obrnite v nasprotni smeri urnega kazalca, da pritrdite rezilo.
Ko odstranjujete rezilo iz sklede, ga primite in obrnite v smeri urnega kazalca, da rezilo sprostite iz sklede. Rezilo je zelo ostro. Postopajte previdno!
natural_image
Technical line drawing of a mechanical component with a circular top and a circular base, showing internal structure (no text or symbols)VAŽNA SIGURNOSNA UPOZORENJA
OVAJ PROIZVOD NAMIJENJEN JE SAMO ZA UPORABU U KUĆANSTVU.
Pročitajte sve upute s razumijevanjem. Nepridržavanje niže navedenih uputa može dovesti do električnog udara, požara ili teških ozljeda. Upozorenja i upute navedene u ovom priručniku ne mogu pokriti sve okolnosti i situacije koje mogu nastati. Osoba koja rukuje aparatom mora shvatiti da su zdrav razum i oprez čimbenici koji se ne mogu ugraditi u proizvod već se za njih mora pobrinuti onaj tko aparatom rukuje.
1 Mjerna čašica
2 Poklopac posude za kuhanje
3 Brtva poklopca posude
za kuhanje
4 Ručka posude za kuhanje
5 Posuda za kuhanje od nehrđajućeg čelika
6 Regulator brzine vrtnje
7 Tijelo aparata
8 Poklopac posude za kuhanje na pari
9 Posuda za kuhanje na
pari
10 Nož za sjeckanje
11 Lopatica za miješanje
12 Silikonska lopatica
13 Lopatica za miješanje tijesta
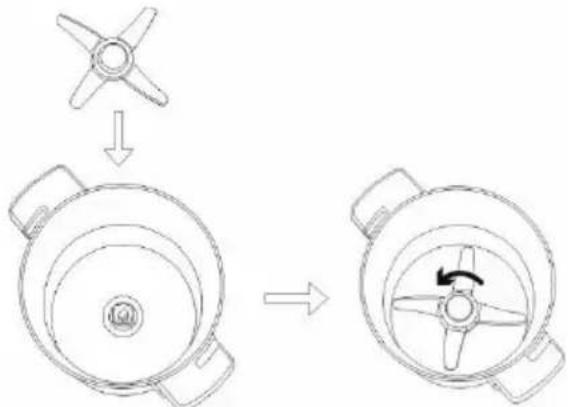
Nož za sjeckanje
flowchart
graph TD
    A["Single Blade"] --> B["Downward Rotation"]
    B --> C["Multi-Blade Panel"]
    C --> D["Rotating Rotation"]
natural_image
Technical line drawing of a mechanical component with a circular top and a circular base, showing internal structure (no text or symbols)Sastavljanje/rastavljanje posude za kuhanje
flowchart
graph LR
    A["Top blender"] --> B["Step 1: Top, Bottom"]
    B --> C["Step 2: Top, Bottom"]
    C --> D["Step 3: Top, Bottom"]
    D --> E["Step 4: Top, Bottom"]
    E --> F["Step 5: Top, Bottom"]
- Ulijte najmanje pola litre vode u posudu za kuhanje. Ta količina se može upotrijebiti za približno 30 minuta kuhanja na pari.
- Pokrijte posudu za kuhanje na pari poklopcem bez mjerne čašice.
- Učvrstite posudu za kuhanje na pari, uključujući poklopac.
- Odaberite način rada „2“, namjestite željenu temperaturu na 100 °C i vrijeme kuhanja. Pritisnite gumb UKLJUČI/ISKLJUČI da bi aparat počeo raditi.
- Aparat će „zapištati“ i automatski se zaustaviti po završetku kuhanja.
- Izvadite pripremljeno jelo iz posude za kuhanje na pari.
RJEŠENJE PROBLEMA
| Kvar | Opis | Rješenje |
| E01 | Nije postavljena posuda za kuhanje | Ponovno postavite posudu za kuhanje |
| E02 | Mehanički kvar | Kontaktirajte servis za marku TESLA |
| E03 | Poklopac posude za kuhanje nije ispravno postavljen | Isključite aparat i ponovo postavite poklopac posude za kuhanje |
| E04 | Motor se pregrijao | Ostavite motor da se hladi od 10 do 30 minuta |
| E05 | Zaštita od suhog vrenja | Isključite aparat i ostavite ga da se potpuno ohladi |
UPUTE ZA ČIŠĆENJE
flowchart
graph TD
    A["Single Blade"] --> B["Downward Rotation"]
    B --> C["Arrow to Panel"]
    C --> D["Side-Back Pitching"]
natural_image
Technical line drawing of a mechanical component with a circular top and a flanged base (no text or symbols)Thank you for choosing the TESLA ThermoCook TMX3000.
Please read the rules of safe use carefully before using the appliance and follow all usual safety rules.
- Keep this user manual for future reference.
- Correct use of the appliance will greatly extend its service life.
- Observe the rules specified in this manual to reduce the risk of damaging the appliance or injuring yourself.
IMPORTANT SAFETY WARNING
THIS PRODUCT IS DESIGNED FOR HOUSEHOLD USE ONLY.
Read all of the instructions and make sure you understand them. Failure to follow the instructions provided below may result in electric shock, fire or serious injury. The warnings, notices and instructions discussed in this manual cannot cover all possible conditions and situations which may arise. The operator must understand that common sense and caution are a factor which cannot be built into this product, but must be provided by the operator.
This appliance is a complex electromechanical device, please note the following instructions:
- Never immerse the main appliance in water or other liquids or rinse it under running water. Use only a damp cloth to clean the appliance.
- Never use the cooking function if the pot is empty.
- Do not suddenly increase the speed if the temperature rises to more than 60°C.
- Do not touch the pot or start pulse mode while processing hot foods (at temperatures of more than 60°C).
- Keep clear of the steam, in particular when removing the lid of the cooking pot.
- Do not place the appliance on the edge of the table during operation. Make sure the surface is level, clean, free of water and other obstructions.
- Do not use outside or in an excessively warm, dusty or humid environment.
- Do not use this appliance for any other than its intended use.
- It is not recommended that children use the appliance on their own without adult supervision.
- Do not allow the appliance to operate unsupervised.
• Exercise caution when using the appliance near children.
• After cooking, switch off the appliance, unplug it and let it cool down. - Connect the appliance to a grounded socket only. Always make sure that the plug is correctly inserted into the socket.
- Check that the voltage indicated on the appliance corresponds to the local rated voltage before connecting the appliance to the mains.
- Do not use an extension lead, keep the power cord away from hot surfaces and do not unplug the appliance by pulling on the cord.
• Before cleaning, unplug the power cord and allow the appliance to cool down.
• The appliance is not designed for use with an external timer or separate remote control. -
If the power cord is damaged, it must be replaced by a TESLA authorised service centre or similarly qualified person to prevent injury.
-
Only use original TESLA accessories designed for this model.
- Do not repair the appliance as this may result in electric shock and loss of warranty.
- Keep out of the reach of flammable and volatile substances.
- If the appliance is used incorrectly, for professional or semi-professional purposes, or if it is not used in line with the instructions in the user manual, the warranty will become void.
- The manufacturer and the importer to the European Union is not liable for any damage caused by operation of the appliance such as injury, scalding, fire or damage to other items, etc.
NOTE: The plastic bags used to package this appliance can be dangerous. Keep these bags out of the reach of children to avoid the risk of suffocation. These bags are not toys.
IMPORTANT INFORMATION ABOUT THE POWER CORD
In order to reduce the risk of electric shock, do not attempt to modify the cord connector in any way.
The length of the power cord reduces the risk of entanglement or tripping over the power cord.
PREPARATION BEFORE FIRST USE
-
Remove all packaging, stickers, and labels.
-
Wash the cooking pot and glass lid with warm soapy water. Then rinse with clean water and dry thoroughly.
Description
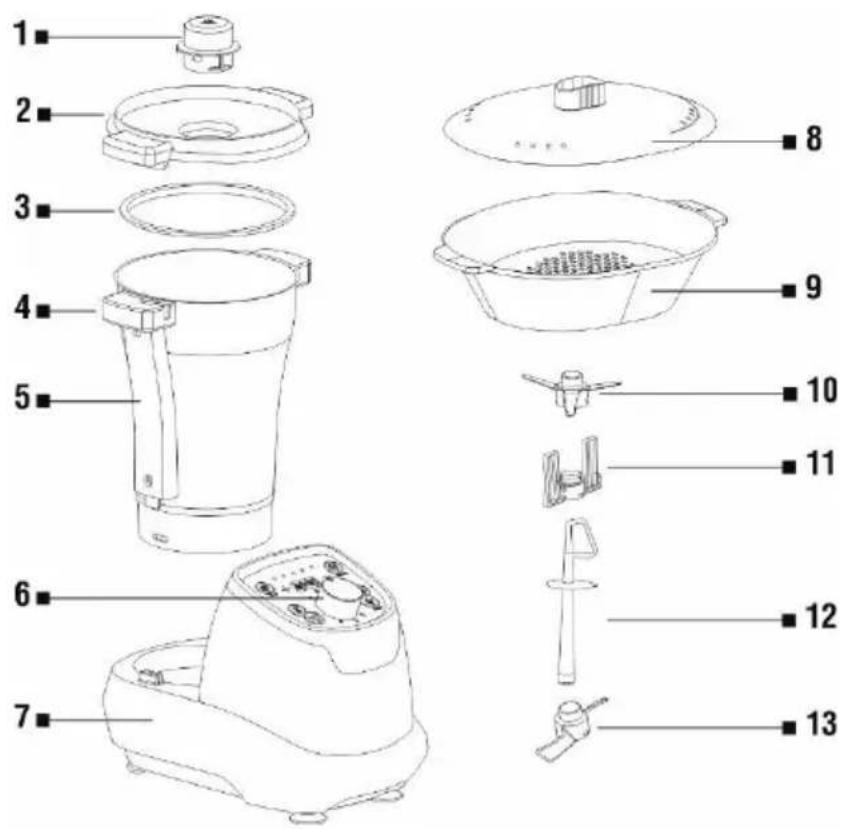
1 Measuring cup
2 Lid of cooking pot
3 Sealing ring for lid of cookin pot
4 Handle of cooking pot
5 Stainless steel cooking pot
6 Speed switch
7 Appliance body
8 Lid of steaming basket
9 Steaming basket
10 Chopping blade
11 Mixing paddle
12 Silicone spatula
13 Mixing paddle for dough
Chopping blade
flowchart
graph TD
    A["Single Blade"] --> B["Downward Rotation"]
    B --> C["Multi-Blade Panel"]
    C --> D["Rotating Rotation"]
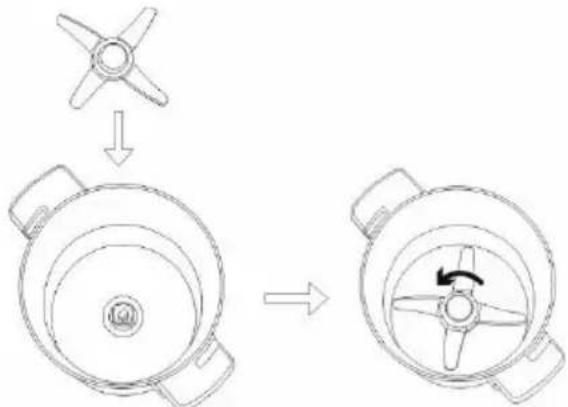
Fit the blade lock to the base of the cooking pot and turn in an anti-clockwise direction to lock the blade in place.
When removing the blade from the bowl, hold the top of the blade and turn in a clockwise direction to release the blade from the bowl. The blade is very sharp. Please be careful!
When filling the cooking pot with liquid, never exceed the MAX. marking for the maximum working volume of 1.7 litres.
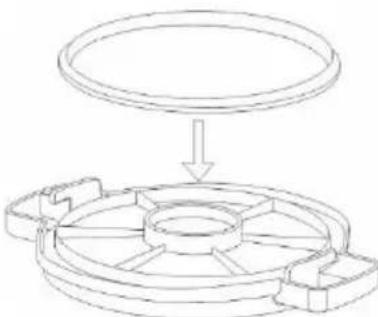
Installation of the sealing ring for the cooking pot
natural_image
Technical line drawing of a mechanical component with a circular top and a base (no text or symbols)Assembly/disassembly of the cooking pot
flowchart
graph LR
    A["Top Product"] --> B["Step 1"]
    B --> C["Step 2"]
    C --> D["Step 3"]
    D --> E["Step 4"]
    E --> F["Step 5"]
    F --> G["Step 6"]
    G --> H["Step 7"]
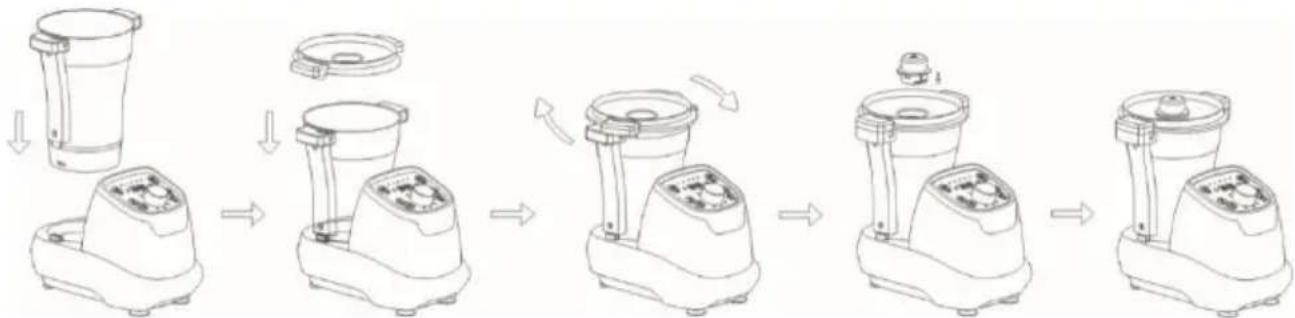
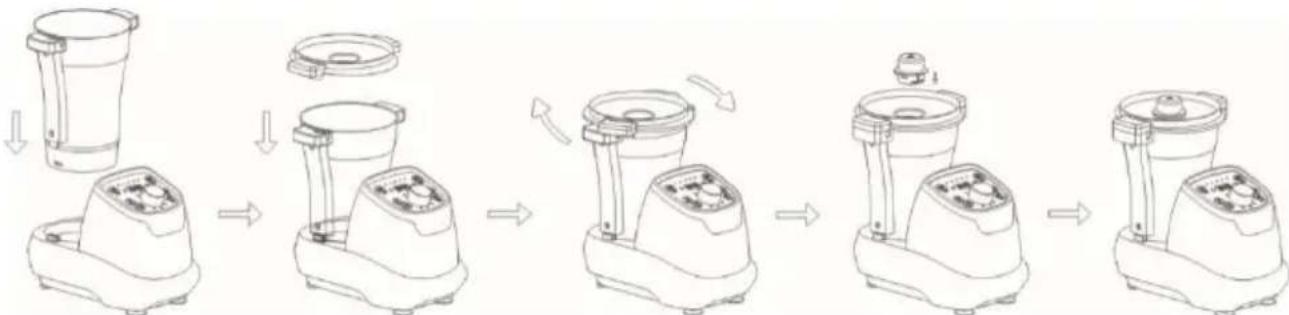
Align and insert the cooking pot into the body of the appliance, turn the lid of the cooking pot in a clockwise direction to secure it and fit the measuring cup. If you want to disassemble the appliance, switch it off and follow the above-mentioned steps in reverse order.
WARNING!
The appliance is fitted with a safety lock between the pot and the body of the appliance. The appliance will not work until the lid of the cooking pot is correctly closed.
Never try to forcibly open the lid of the cooking pot. Do not open the lid of the cooking pot until mixing of the food you are preparing has ended.
Control panel
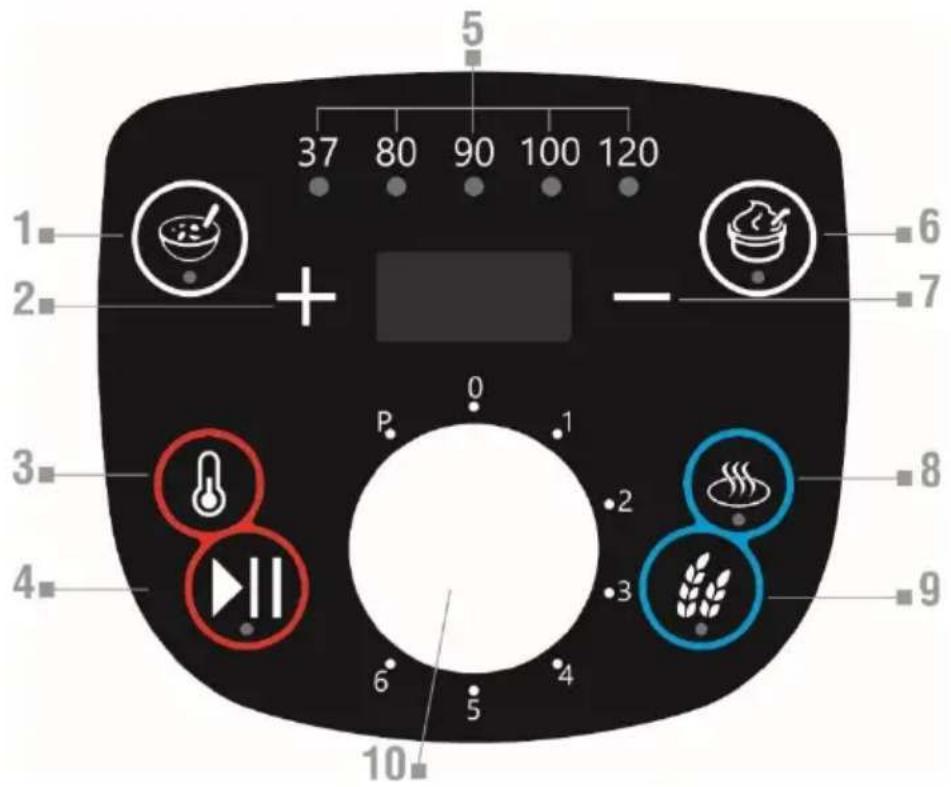
1 SOUP (automatic mode)
Press the "Soup" button in standby mode. Once the indicator has lit up, press the Start/Pause button. To RESET, press and hold down the button for 2 seconds. Contains 3 automatic programmes.
2 BUTTON FOR INCREASING PROGRAMME TIME
3 TEMPERATURE - press to switch between temperatures, cycling through them in turn. The sixth press sets the temperature to 0°C.
4 START/PAUSE - When AUTO or a manual programme is set, press the button to start or pause the programme (apart from speed regulator). Hold down the Start/Pause button for 2 seconds to perform a reset. During operation, the Start/Pause indicator will be lit permanently. If you pause the programme, the Start/Pause indicator will flash. Press the Start/Pause button again to continue the programme.
5 HEATING TEMPERATURE INDICATOR
6 DESSERT (automatic mode)
Press the "Dessert" button manually in standby mode. Once the indicator has lit up, press the Start/Pause button.
7 BUTTON FOR DECREASING PROGRAMME TIME
8 COOK (automatic mode)
Press the "Cook" button manually in standby mode. Once the indicator has lit up, press the Start/Pause button.
9 DOUGH (automatic mode)
Press the "Dough" button manually in standby mode. Once the indicator has lit up, press the Start/Pause button.
10 SPEED SWITCH - turn in a clockwise direction to increase the speed.
The speed range is 1, 2, 3, 4, 5, 6 and P, where "P" (Pulse) is manual operation.
If the content of the cooking pan reaches a temperature of more than 60^ C, the "P" function will not work. Pulse mode only works if no programme or heating has been activated (the Start/Pause button is flashing). If the actual temperature is equal to or greater than 60^ C and the speed is equal to or greater than level 3, the appliance will gradually reach the target speed and stop heating.
Operating mode level 1: mixing for 10 seconds and stop for 3 seconds in cycle.
TIMER
Timer range: 30 seconds - 99 minutes for the manual programme, set in steps of 30 seconds. Press the "+" button to increase the time set on the timer, or "-" to decrease it. If you set a programme time or select one of the automatic programmes, the appliance timer will count down (... 5 4 3 2 1), until the set time is reached and the appliance automatically stops. If you do not set the time, the appliance timer will count up (1 2 3 4 5...) until the appliance automatically stops. When setting only speed, the time is limited to 5 minutes. Times are pre-set for automatic programmes which you can adjust according to requirement.
DISPLAY
This displays the current programme time, see section on TIMER. In the event of inactivity for a period of more than 5 minutes, the appliance will switch off automatically.
OPERATING MODE
Mode 1: for general preparation of food, stirring and mixing
When processing hard ingredients such as coffee beans or almonds, do not chop the ingredients for more than 40 seconds. Allow the appliance to cool down and repeat the process. The maximum recommended amount of dough for kneading is 250 grams.
- Plug in the appliance/switch it on from standby mode by pressing the on button.
- Set the required time (the maximum timer is 5 minutes) and select the speed. The appliance will automatically start to prepare your food once the speed has been set.
- The appliance will "beep" and automatically stop once preparation has finished.
- Remove the cooking pot from the body of the appliance.
- Remove the processed food from the cooking pot.
Mode 2: for heating food
Suitable for for preparing foods such as risotto or vegetable soup, etc.
- Plug in the appliance/switch it on from standby mode.
- Set the required time and temperature. Press the ON/OFF button to start the appliance.
- The appliance will "beep" and automatically stop once cooking has finished.
- Remove the cooking pot from the body of the appliance.
- Remove the processed food from the cooking pot.
Do not touch the metal parts of the body of the cooking pot or the chopping blades while these parts are hot. Never heat the cooking pot without any ingredients in it. Do not heat more than 500 ml of milk.
Mode 3: for heating, stirring and mixing food
Suitable for for preparing foods such as risotto, jam, soup or goulash, etc.
- Plug in the appliance/switch it on from standby mode.
- Fit the appropriate accessories – the mixer blade or mixing paddle
- The appliance will "beep" and automatically stop once cooking has finished.
- Remove the cooking pot from the body of the appliance.
-
Remove the processed food from the cooking pot.
-
Set the required time and temperature and select the speed. The appliance will automatically start to prepare your food once the speed has been set.
Do not touch the metal parts of the body of the cooking pot or the chopping blades while these parts are hot. Never heat the cooking pot without any ingredients in it. Do not heat more than 500 ml of milk. If heating temperature reaches 60°C or more, only speeds "1" to "3" will be available.
Mode 4: steam
Suitable for preparation of vegetables, hot dog sausages or fish, etc.
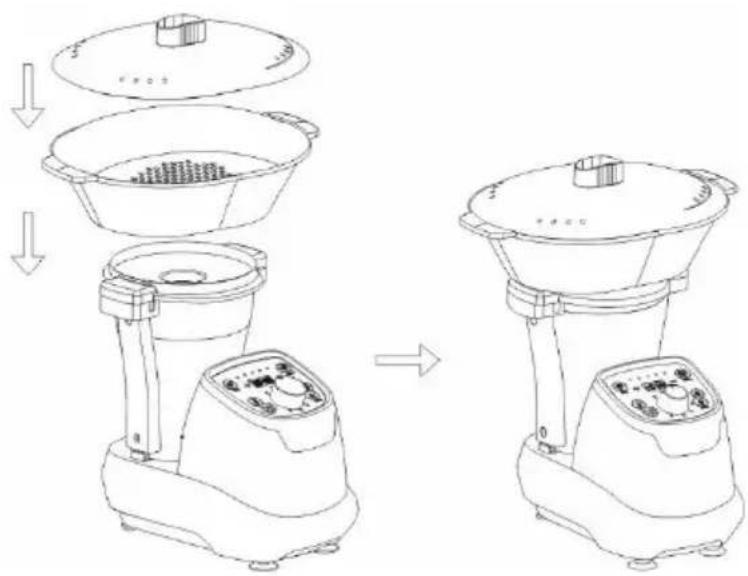
- Pour at least half a litre of water into the cooking pot. This volume can be used to steam for approximately 30 minutes.
- Cover the steaming basket with the lid without the measuring cup attached.
- Fit the steaming basket including the lid.
- Select mode "2", set the required temperature to 100°C and the cooking time. Press the ON/OFF button to start the appliance.
- The appliance will "beep" and automatically stop once cooking has finished.
- Remove the processed food from the steaming basket.
AUTOMATIC PROGRAMS
| Režim | Symbol | Speed (unchangeable) | Time (changeable) | Temperature (unchangeable) | Keep warm | Food |
| Soup P1 |  | None | 30 minutes (15 minutes to 1 hour) | 120°C | No | Stewed broccoli |
| Soup P2 |  | No speed during heating to 80°C, then heating ends, stirring for 20 seconds at speed 4, then heating to 100°C at intervals of 4 seconds on and 2 seconds off, last stirring for 2 minutes at speed 6 | 35 minutes (15 minutes to 1 hour) | 100°C | No | Creamy zucchini soup |
| Soup P3 |  | No speed during heating up to 80°C, constant heating to 100°C at intervals of 4 seconds on and 2 seconds off, slow stirring for 15 seconds at speed 4 | 40 minutes (15 minutes to 1 hour) | 100°C | No | Mashed carrots/ potatoes |
| Dessert P1 |  | Quickly and intermittently, then continuously | 35 seconds (35 seconds to 1 minute) | None | No | Sponge cake |
| Dessert P2 |  | Slowly and intermittently | 10 minutes (5 minutes to 30 minutes) | 55°C | No | Melted chocolate |
| Dessert P3 |  | Slowly and intermittently, then continuously | 20 minutes (15 minutes to 1 hour) | 90°C | No | Rice pudding |
| Dessert P4 |  | None, then slowly and intermittently during cooking | 15 minutes (10 minutes to 1 hour) | 100°C | No | Apple compote |
| Cook P1 |  | Slowly | 20 minutes (5 minutes to 30 minutes) | 120°C | No | Onion rings |
| Cook P2 |  | Slowly and intermittently, then continuously | 20 minutes (20 minutes to 99 minutes) | 80°C | No | Tomato sauce |
| Cook P3 |  | Slowly and intermittently | 30 minutes (20 minutes to 99 minutes) | 100°C | No | Risotto |
| Cook P4 |  | None | 40 minutes (20 minutes to 99 minutes) | 100°C | No | Stewed fish with saffron |
| Dough P1 |  | Speed 1 for 30 seconds, then rolling for 2 minutes and 30 seconds at speed 2 | 3 minutes (1 minute to 3 minutes) | None | No | Dough |
Making dough
| Error | Description | Solution |
| E01 | Cooking pot not installed | Install the cooking pot again |
| E02 | Mechanical error | Contact TESLA service dept. |
| E03 | Lid of cooking pot not correctly installed | Switch the appliance off and install the lid of the cooking pot again |
| E04 | Motor overheated | Allow the motor to cool down for 10 to 30 minutes |
| E05 | Boil-dry protection | Switch off the appliance and allow it to cool down completely |
CLEANING INSTRUCTIONS
• Before cleaning, switch off the appliance and unplug the power cord.
- Do not immerse the cooking pot in water when cleaning.
- After it has cooled down, remove the blade from the cooking pot. Clean the inside and outside of the cooking pot. Always keep the contact pins on the base of the pot clean and dry. Only wipe the contact pins with a damp cloth!
- Do not wash the cooking pot in a dishwasher!
- Never use pointed or sharp implements to clean the appliance as they may damage the functional parts or impair the safety of the appliance.
- The blade is very sharp! Handle it with care!
• We recommend that you lubricate the blade with vegetable oil.
- Only wipe the body of the appliance with a soft damp cloth!
- If the cooking pot and blade are difficult to clean, add hot soapy water and run the appliance at speed 1 for a few seconds.
WARRANTY REPAIR
For warranty repair, contact the dealer where you purchased the TESLA product.
The warranty DOES NOT APPLY to:
• use the device for other purposes
- normal wear
- failure to observe the "Important Safety Instructions" in the user manual
• electromechanical or mechanical damage caused by improper use
• damage caused by natural elements such as water, fire, static electricity, overvoltage, etc.
• damage caused by unauthorized repair
- unreadable serial number of the device
DECLARATION OF CONFORMITY
We, INTER-SAT LTD, org. složka, declare that this device complies with the essential requirements and other relevant provisions of the standards and regulations relevant to the type of equipment.

This product meets the European Union requirements.

When this crossed-out wheeled bin symbol is attached to a product it means that the product is covered by the European Directive 2002/96/EC. Please inform yourself about the local separate collection system for electrical and electronic products. Please act according to your local rules and do not dispose of your old products with your normal household waste. Correct disposal of your old product helps to prevent potential negative consequences for the environment and human health.
Due to the fact that the product is being developed and improved, we reserve the right to edit the user manual. The latest version of the this user manual can always be found at www.tesla-electronics.eu.
Design and specifications are subject to change without notice, print errors reserved.

- INDIKÁTOR TEPLOTY OHŘEVU
- INDIKÁTOR TEPLOTY OHREVU
- VAŽNA SIGURNOSNA UPOZORENJA
- Nož za sjeckanje
- Sastavljanje/rastavljanje posude za kuhanje
- RJEŠENJE PROBLEMA
- UPUTE ZA ČIŠĆENJE
- IMPORTANT SAFETY WARNING
- IMPORTANT INFORMATION ABOUT THE POWER CORD
- PREPARATION BEFORE FIRST USE
- Description
- Chopping blade
- Installation of the sealing ring for the cooking pot
- Assembly/disassembly of the cooking pot
- WARNING!
- Control panel
- SOUP (automatic mode)
- BUTTON FOR INCREASING PROGRAMME TIME
- HEATING TEMPERATURE INDICATOR
- DESSERT (automatic mode)
- BUTTON FOR DECREASING PROGRAMME TIME
- COOK (automatic mode)
- DOUGH (automatic mode)
- SPEED SWITCH - turn in a clockwise direction to increase the speed.
- TIMER
- DISPLAY
- OPERATING MODE
- Mode 1: for general preparation of food, stirring and mixing
- Mode 2: for heating food
- Mode 3: for heating, stirring and mixing food
- Mode 4: steam
- Making dough
- CLEANING INSTRUCTIONS
- WARRANTY REPAIR
- The warranty DOES NOT APPLY to:
- DECLARATION OF CONFORMITY
Brand : TESLA
Model : TMX3000
Category : Multicooker