
39Z014 - Beard trimmer Zelmer - Free user manual and instructions
Find the device manual for free 39Z014 Zelmer in PDF.

| Product Type | Beard Trimmer |
| Brand | Zelmer |
| Model | 39Z014 |
| Dimensions (HxWxD) | Approx. 5.0 x 2.5 x 1.5 inches |
| Weight | Approx. 200 g (7 oz) |
| Power Source | Rechargeable battery (Ni-MH) or corded operation |
| Input Voltage | 100-240 V AC, 50/60 Hz |
| Charging Time | Approx. 8 hours |
| Battery Usage Time | Approx. 30 minutes (cordless) |
| Blade Material | Stainless steel |
| Cutting Length Range | 0.5 mm to 10 mm |
| Number of Length Settings | 10 (with adjustable guide combs) |
| Waterproof | Yes, washable under running water |
| Included Accessories | 3 guide combs, cleaning brush, charging adapter, storage pouch |
| Warranty | 2 years |
| Color | Black/Silver |
| Blade Type | Self-sharpening, removable for cleaning |
| Maintenance | Clean blades with brush after each use; oil periodically |
| Safety Features | Auto shut-off after 5 minutes, safety lock for travel |
| Repairability | Replaceable blades and battery; spare parts available |
| User Manual Languages | BG, CS, EN, HU, PL, RO, RU, SK, UK |
Frequently Asked Questions - 39Z014 Zelmer
User questions about 39Z014 Zelmer
0 question about this device. Answer the ones you know or ask your own.
Ask a new question about this device
Download the instructions for your Beard trimmer in PDF format for free! Find your manual 39Z014 - Zelmer and take your electronic device back in hand. On this page are published all the documents necessary for the use of your device. 39Z014 by Zelmer.
USER MANUAL 39Z014 Zelmer
natural_image
3D rendered mechanical component with ribbed texture and a small circular feature labeled 'S1-2' (no text or symbols on the component itself)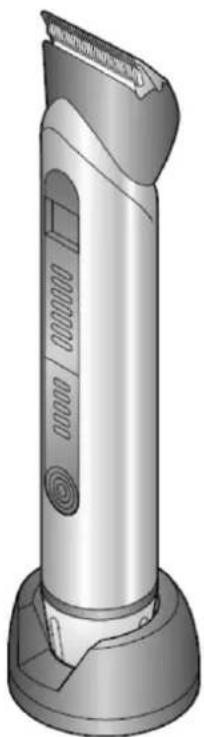
natural_image
3D rendering of a handheld electric toothbrush with no visible text or symbols
2-7
natural_image
3D rendered mechanical component with a cylindrical housing and a tool, no visible text or symbolsnatural_image
Close-up of a hairdryer tool with no visible text or symbolsnatural_image
Three technical diagrams showing a tool tip, internal structure, and a cutaway view of the tool (no text or labels present)natural_image
3D rendered mechanical component with a cylindrical housing and a separate screwdriver (no text or symbols visible)natural_image
Close-up of a hairdryer tool with multiple blades and a central blade (no text or symbols visible)natural_image
Technical illustration of a mechanical tool with three views: top, side, and bottom (no text or symbols)natural_image
3D rendered mechanical component with a cylindrical housing and a tool, no visible text or symbolsnatural_image
Close-up of a hairdryer tool with multiple blades and a black button (no text or symbols visible)natural_image
Technical illustration of a mechanical tool with directional arrows indicating movement or assembly (no text or symbols present)I. Hajnyíró.
natural_image
3D rendered mechanical component with a cylindrical housing and a tool, no visible text or symbolsnatural_image
Close-up of a hairdryer tool with multiple blades and a central blade (no text or symbols visible)natural_image
Three technical diagrams showing mechanical components with arrows indicating direction of movement (no text or symbols present)
natural_image
3D rendered mechanical component with a cylindrical housing and a tool, no visible text or symbolsnatural_image
Close-up of a hairdryer tool with multiple blades and a central blade (no text or symbols visible)natural_image
Technical illustration of a mechanical tool with three views: top, side, and bottom (no text or symbols)natural_image
Close-up of a hairdryer tool with multiple blades and a central blade (no text or symbols visible)natural_image
Technical illustration of a mechanical tool or drill bit assembly (no text or symbols visible)natural_image
3D rendered mechanical component with a screwdriver and cylindrical housing (no text or symbols visible)natural_image
Close-up of a hairdryer tool with multiple teeth and a black inner chamber (no text or symbols visible)natural_image
Three-step diagram showing a mechanical component with arrows indicating direction, no text or symbols present.
UA
Зміст
natural_image
Close-up of a hairless electric shaver with multiple blades and a black clip (no text or symbols visible)natural_image
Three-step diagram showing a tool tip, internal structure, and a folded tool (no text or symbols)Safety instructions and recommendations 44
Specifications 45
Outline and parts of the hair clipper 46
Handling and operation of hair clipper 46
Cleaning and maintenance 48
Ecology – Environment protection ....48
Dear Customers!
The hair clipper with two easy replaceable comb attachments provides possibility of obtaining different lengths of cutting and clipping hairline. Additionally, the feature of thinning is available.
The cutting set consists of titanium coated ceramic blades. The material provides optimum and exact clipping and is especially gentile for skin.
Please read these instructions carefully. Pay your special attention to important safety instructions. Keep this "Instructions for use" for future reference.
Safety instructions and recommendations
Herewith information concerns your health and safety. It is obligatory to learn about all instructions for use and safety information before first usage of the clipper.
— The hair clipper is intended for domestic use. In case it is used for commercial use, the guarantee conditions change.
Connect the power supply adaptor to AC mains supply 230 V.
– Disconnect the power supply adaptor from the mains supply outlet when not in use or before cleaning.
Do not unplug pulling by the cord. —
- The supplying cord should not hang over the edge of a table or desktop, nor touch hot surface.
If the non-detachable part of the cord is damaged, it should be replaced by the producer or at a proper service point or by a qualified person in order to avoid any hazards.
- This device is intended for cutting natural hair, only. It is allowed to use it only for human hair; it can not be used for cutting artificial or animal hair. Using the product for other than intended purposes shall cause nullifying the guarantee.
- Do not touch the power supply adaptor with wet hands, especially when plugging or unplugging it from the mains supply outlet.
- For the operation with mains use only the adaptor supplied with the hair clipper.
Connect only to easily accessible mains supply outlet. —
- Do not cover the adaptor; it can lead to dangerous temperature increase.
- Always At first connect the plug into the socket in the clipper or loading base. When it is done, you can connect it to the mains supply outlet.
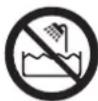
-Do not use during bath. -
Never immerse the device and cord in water or other liquids.
-
Do not place the hair clipper on wet surface or cloth during operation.
— Do not place or store the device in the area where it can fall into water. - Do not use the device with damaged comb attachment. It can cause injuries hazard.
- Never try to remove the foreign bodies out of the clipper using sharp objects (i.e. comb).
Always clean after using. –
- This appliance is not intended for use by persons (including children) with reduced physical, sensory or mental capabilities, or lack of experience and knowledge, unless they have been given supervision or instruction concerning use of the appliance by a person responsible for their safety.
– Children should be supervised to ensure that they do not play with the appliance.
Do not apply not recommended attachments.
The hair clipper can be used both as a mains and cordless device. -
The cut hair should be clean, dry and combed. —
- Put the towel around the neck to avoid getting the cut hair under the collar.
- Use the hair clipper only as intended according to the herewith instructions.
ATTENTION: In order to provide additional protection, it is recommended to install the residual current device (RCD) with nominal residua Power not exceeding 30 mA. You should contact the professional electrician in this concern.
WARNING: Do not use the device near water, over the bath tube, pool or other water basin.
WARNING: Observe the above mentioned rules in order to avoid burning, electric shock or fire hazard.
Make sure you understood the a/m instructions.
Specifications
The product technical parameters are included at the name plate.
The device is built in II class isolation, it does not require grounding.
ZELMER hair clippers meet the requirements of effective standards.
The device meets the requirements of the following directives:
-Low Voltage Device (LVD) - 2006/95/EC
– Electro- Magnetic Compatibility (EMC) – 2004/108/EC.
– Noise generated by the appliance: 68 dB/A.
The product is marked with CE symbol on the name plate.
Outline and parts of the hair clipper
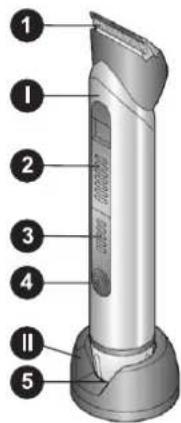
I. Hair clipper.
-
Cutting head.
-
Cutting length adjustment knob.
-
Indicator of accumulators loading level.
-
On/OFF switch.
-
Loading socket.
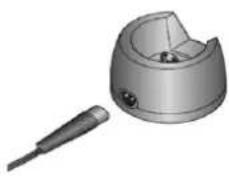
II. Loading base.
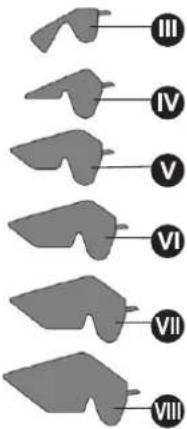
III. Hair thinning attachment.
IV. Attachment 4 – 6 mm.
V. Attachment 10 – 12 mm.
VI. Attachment 16 – 18 mm.
VII. Attachment 22 – 24 mm.
VIII. Attachment 28 - 30 mm.
The hair clipper accessories additionally comprise cleaning brush and power supply adaptor.
Handling and operation of hair clipper
The hair clipper can be used both as a mains supplied or cordless device.
1. Operation with power supply adaptor
At first insert the adaptor plug into the device and then insert the adapter plug into the mains supply outlet (230 V). In mains supplied mode the device is ready for use.
2. Loading accumulators and cordless operation
TIP: Load the device minimum 16h before first usage and when 2–3 next loadings.
Make sure the appliance is switched off before charging. –
- Place the device on the loading base (II).
- Connect the loading base (II) to the adapter cord.
- Insert the adapter plug into appropriate mains supply outlet (230 V). Accumulators loading level indicator (3) demonstrates the loading process progress and current level of loading. Fully loaded accumulator enables operation for approx. 50 minutes.
natural_image
3D rendered mechanical component with a cylindrical housing and a tool, no visible text or symbols- When the accumulators are fully loaded, 5 diodes glow. Whereas, one diode glows, it means that the accumulator should be unloaded soon.
- The hair clipper accumulator obtains optimum power after three cycles of loading and unloading. Ten hours is enough for next loading. In order to provide long life of accumulators, they should be completely unloaded before loading.
3. Using the clipper for hair cutting and thinning
TIP: Cut the hair for demanded length in stages, start form bigger length.
Insert an appropriate attachment (III, IV, V, VI, VII, and VIII).
- Set the desired length of hair/beard cutting with cutting length adjustment knob (2).
- Start up the hair clipper pressing in ON/OFF button (4).
Cut only small areas.
Move the clipper slowly along hair. -
Hold the device so, that the comb attachment is laid flat. -
— Always start the cutting from the neck upwards or from the forehead and temples upwards to the top of head.
In order to thin hair insert the thinning attachment (III) on cutting head.
You can reduce the hair volume with this feature. It provides a modern, changed look without the change of hair length.
4. Cutting hair without attachment
WARNING: The cutting head (1) is very sharp. Injury hazard!
You can cut the hair in uniform length of 1–2 mm without comb attachment.
For clipping the hairline of bristle and whiskers, neck shaving:
Move the hair clipper slowly along hair. -
– Turn the device so, that the back part was directed upwards.
— Place the edge of the cutting head (1) without comb attachment on desired length of bristle hairline.
-Move down the clipper in operation.
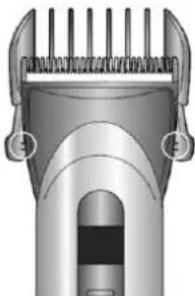
5. Comb attachments inserting/replacing
You can select one of six attachments (See: Outline and parts of hair clipper):
- Select the attachment according to the length of cutting.
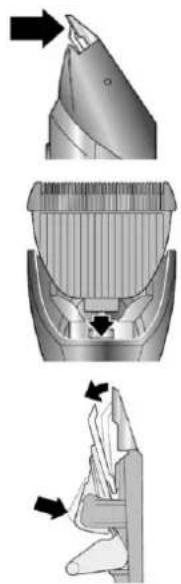
- Insert appropriate attachment into the sides of the device. The protrusions shall be locked inside small holes (see the figure beside) on left and right sides.
- Replace one attachment removing it and inserting another as described above.
- In order to remove an attachment bent one side of assembled attachment gently and then move it up.
- Move the cutting length adjustment knob (2), to increase/reduce the hair cutting length. The possible hair cutting length is indicated on each attachment (i.e. 4–6 mm).
natural_image
Close-up of a hairdryer tool with comb and handle (no text or symbols visible)Cleaning and maintenance
- Do not hold the adaptor with wet hands while plugging and unplugging form mains supply outlet.
The adaptor and supplying cord should be always dry. - It is forbidden to immerse the hair clipper in water or other liquids for cleaning, as the device is not waterproof. It can damage the live parts (accumulators).
- Start the device pressing in ON/OFF button (4).
- Always switch off the hair clipper and unplug the adaptor from the mains supply outlet before cleaning and maintenance.
Remove the comb attachment from the hair clipper. - In order to remove cutting head press the cutting head blade (1) forward with your thumb, in order to release it from the frame.
- If necessary, rinse the plastic comb attachments under running water, and then dry them thoroughly.
- Remove the remains of hair from the cutting head (1) with attached cleaning brush (VII).
- Insert the protrusion of cutting head (1) back into the locking hole in the frame of cutting head.
- Press gently the cutting head (1) in, until you hear a clicking sound of locking.
TIP: If you use your hair clipper regularly, it is necessary to oil the cutting head from time to time. In order to do it, use only acidless oil, such as oil for sewing machine. - Remove an attachment and cutting head from the hair clipper.
- Press the cutting blade in directions indicated by the arrows (see the big arrows on the photo) and insert one up to two oil drops between the cutting blades.
— Replace the cutting head and start up the hair clipper for a while, in order to distribute the oil.
-Remove the exceeding oil with cloth.
Ecology – Environment protection
Each user can contribute to protect the environment. It is neither difficult nor expensive. In order to do so:
Return cardboard packages to recycling points.
Throw polyethylene (PE) bags into appropriate containers.
Batteries contain substances harmful to the natural environment. Do not throw them away with other household waste. Return used batteries to recycling points. Before disposing of or returning the appliance to a recycling point make sure to remove the batteries from the battery compartment.
Return a worn out appliance to an appropriate collecting point as the components of the appliance may pose a threat to the environment.
Do not dispose into the domestic waste disposal!!!
The manufacturer/importer does not accept any liability for any damages resulting from unintended use or improper handling.
The manufacturer/importer reserves his rights to modify the product any time in order to adjust it to law regulations, norms, directives, or due to construction, trade, aesthetic or other reasons, without notifying in advance.
natural_image
Three-step diagram showing a tool tip, internal structure, and final view of a mechanical component (no text or symbols)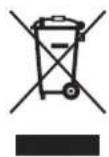
GW39-005


- UA
- Зміст
- Dear Customers!
- Safety instructions and recommendations
- Specifications
- Outline and parts of the hair clipper
- Handling and operation of hair clipper
- Operation with power supply adaptor
- Loading accumulators and cordless operation
- Using the clipper for hair cutting and thinning
- Cutting hair without attachment
- WARNING: The cutting head (1) is very sharp. Injury hazard!
- Comb attachments inserting/replacing
- Cleaning and maintenance
- Ecology – Environment protection
- Do not dispose into the domestic waste disposal!!!
Brand : Zelmer
Model : 39Z014
Category : Beard trimmer