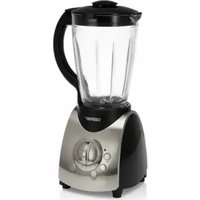
ZHB1230B - Blender Zelmer - Free user manual and instructions
Find the device manual for free ZHB1230B Zelmer in PDF.

| Product Type | Hand Blender with Multiple Attachments |
| Model | ZHB1230B |
| Brand | Zelmer |
| Power Supply | AC voltage per rating plate (typically 220-240 V, 50/60 Hz) |
| Speed Settings | Variable speed from 1 to 15, plus Turbo function |
| Attachments Included | Mixing shaft, whisk, mini food processor, ice crusher, food processor (slicing/shredding/pureeing discs) |
| Blending Capacity (Beaker) | Up to MAX level indicated on beaker |
| Mini Food Processor Capacity | Up to MAX level (approx. 500 ml) |
| Ice Crusher Capacity | Up to MAX level (450 ml) |
| Food Processor Capacity | Up to MAX level (container size not specified) |
| Noise Level (LWA) | Blending: 89 dB/A, Whisk: 70 dB/A, Mini FP: 80 dB/A, Food Processor: 87 dB/A, Ice Crusher: 74 dB/A |
| Overheat Protection | Yes, automatic shut-off; allow 10 min cool-down |
| Safety Features | Sharp blade warnings, child safety (not for use by children), auto shut-off when released |
| Cleaning | Hand wash attachments; wipe motor unit with damp cloth; do not immerse motor unit or dishwasher for metal parts |
| Maintenance | Dry after washing; store in dry place; use original Zelmer accessories |
| Certifications | CE mark, complies with LVD 2006/95/EC and EMC 2004/108/EC, Class II insulation (no grounding required) |
| Intended Use | Indoor domestic use only |
Frequently Asked Questions - ZHB1230B Zelmer
User questions about ZHB1230B Zelmer
0 question about this device. Answer the ones you know or ask your own.
Ask a new question about this device
Download the instructions for your Blender in PDF format for free! Find your manual ZHB1230B - Zelmer and take your electronic device back in hand. On this page are published all the documents necessary for the use of your device. ZHB1230B by Zelmer.
USER MANUAL ZHB1230B Zelmer
LUCRU CU MINIMALAXOR

Congratulations on your choice of our appliance, and welcome among the users of Zelmer products.
In order to achieve best possible results we recommend using exclusively original Zelmer accessories. They have been specially designed for this product.
Please read this instruction manual carefully. Pay special attention to important safety instructions. Keep this instruction manual for future reference.
Important safety instructions
Read this entire manual carefully before using the appliance.
Make sure that you understand the below safety precautions.

Danger! / Warning! Health hazard
Do not use the appliance if the power cord is damaged or the appliance has apparent damage.
the non-detachable part of the cord is damaged, it should be replaced by the producer or at a proper service point or by a qualified person in order to avoid any hazards.
Repairs may only be undertaken by qualified staff. Repairs not properly carried out may result in serious injuries to the user. In case of malfunction, contact specialized service centre.
The appliance is intended for indoor use only.
Do not take any elements out while the blender is in motion.
Do not touch the parts of the accessories which are in motion – especially pay attention to the discs of the food processor, blade discs of the ice processor, and mini food processor and mixing attachment blades. They are extremely sharp! Careless usage can result in injuries.
When operating the food processor make sure that its lid is closed.
Appliances can be used by persons with reduced physical, sensory or mental capabilities or lack of
● experience and knowledge if they have been given supervision or instruction concerning use of the appliance in a safe way and understand the hazards involved.
Children shall not play with the appliance.
● switch off and unplug the appliance before you exchange the accessories or approach the parts moving during operation.
You should be careful during cleaning, emptying the container and manipulating with cutting blades. Careless usage can result in injuries.
This product is not intended for use by children. Keep the appliance and the power cable out of reach of children.
Always unplug the appliance from the electrical outlet when it is left unattended and before assembling, disassembling and cleaning.

Caution!
Not observance can result in damage to possessions
The appliance may only be plugged to an electrical socket (alternating current only) with a voltage in conformity with the one given on the rating plate of the appliance.
Do not unplug the appliance by pulling the power cord.
Do not expose the blender to temperatures above 60^ C – it may get damaged.
Do not immerse the blender motor, whisk gear unit, the lid of mini food processor including gearbox or the base of the food processor in water, do not wash them under running water.
Do not overload the appliance with excessive amount of the product, or too strong pushing.
Unplug the appliance before cleaning.
Do not use aggressive detergents such as emulsion, milk, paste, etc. They can remove some applied information graphic symbols such as: scales, markings, warning signs, etc.
Do not wash metal elements in a dishwasher. Aggressive cleaning detergents used in such appliances cause tarnishing and dulling to metal elements. Wash them in hands, using traditional dish detergents.
Do not use plastic shaft if it is not immersed in foodstuffs; in case there is liquid, its height should not exceed half of the plastic shaft height.
Be careful, not to flood the inside of the casing of mixing attachment.
Do not exceed the filing quantities or processing times given in the tables.
Do not process continuously more than one portion. Before the next use, wait until the appliance has cooled itself down to room temperature.
Do not press two buttons at a time ((2)/TURBO).
The appliance is equipped with overheat protection, which will switch the appliance off if continuous operation time is exceeded or the appliance is overloaded. In this case unplug the appliance from the power source. Remove the plug from the power socket and allow for at least 10 minutes for the appliance to cool down. If the overheat protection activates too often, contact Zelmer authorized service point.

Suggestion
Information on the product and suggestions for its use
The appliance is intended for domestic use. In case it is used for food business purposes, the warranty conditions shall change.
● Manufacturer shall be not responsible for the damages caused by unintended usage or improper handling blender and its accessories.
Appliance description

1 Drive
1a Patch cable
1b Cable clip
2 Button switch on/switch off
③ "turbo" button
4 Speed selector
MIXING ATTACHMENT SET
5 Plastic shaft
5a Rubber lid
6 Beaker for mixing with scale and hermetic lid
WHISK SET
7 Whisk gear
8 Whisk
MINI FOOD PROCESSOR SET
9 Mini food processor cover with transmission
10 Mini food processor blade
11 Cover
12 Mini food processor container
12a Anti-skidding lid– mat
ICE CRUSHER SET
13 The ice crusher container
14 Double-sided disc of ice crusher for first level granulation I (smaller size A) and second level granulation "II" (bigger size B)
15 Spindle
FOOD PROCESSOR SET
16 Food processor lid
17 Pusher
18 Base of the food processor
19 Food processor compartment
20 Permanent guard
21 Disc driver
22 Double sided disc for thick and thin slices
23 Double-sided disc for chipping and purée
Technical data
Technical parameters are quoted at product nameplate.
Appliance noise with the (LWA):
blending attachment 89 dB/A – beaters 70 dB/A – mini food processor 80 dB/A – food processor 87 dB/A – ice crusher 74 dB/–A
Blenders are manufactured in II insulation class, they do not require grounding ☐
ZELMER blenders comply with all current norms.
The appliance complies with current directives:
Low Voltage Directive (LVD) - 2006/95/EC. -
Electro-magnetic compatibility (EMC) - 2004/108/EC.
The appliance is marked with CE symbol on its data plate.
Appliance specifications

√ basic blender accessories
○ additional equipment, which you can buy in shops.
Starting and setting the required speed
With the proper blade installed, plug the power cord into the power supply outlet and get the appliance started by pushing button (2). The blades can be smoothly set to rotate at different speeds, which is easily set by turning the speed selector in the range from 1–15. The highest rotation is obtained by pushing the button "turbo", no matter which rotation is set on the speed selector.

The appliance is in operation only when the switch (2) or „turbo” is pressed. Releasing of any switch shall cause the blender drive is instantly off.
Preparing the blender to use

Before first use, wash all parts of the appliance that come in contact with food in warm soapy water.
USING PLASTIC SHAFT

ZELMER hand blender with the plastic shaft can be used for home cooking, preparing foodstuffs for children and drinks. It is especially recommended for pureeing cooked and raw vegetables, soft fruit (with no stones), mixing up different beverages or preparing dips, sauces, soups or other soft-textured foods.

Before assembling on and removing the attachment, make sure, that the plug of the supplying cord is disconnected from the mains supply outlet.
① Fill up the beaker, no more than the MAX level.
② Take the rubber lid off and place the mixing attachment onto the drive in an open position following the instructions on the drive and lid's case. Then twist the drive shaft clockwise (the direction is shown by the arrow) until you hear that it has clicked (the indicator on the coupling should be in a closed position.
③ Plug the power cord to the power supply socket.
④ Plunge the coupling in the products to be mixed.
⑤ Then start – up the appliance pressing the (2) switch and set the required gear as necessary.
The appliance operates only with the "power" or "turbo" button pressed.
When finished, turn the appliance off and unplug it by disconnecting the cable cord from the power outlet.
Operational guidelines
To detach the plastic shaft, just follow the attaching procedure in reverse order.
Wash the plastic shaft by swishing it in clean, warm water.
any fluid gets inside the blender attachment, turn it and put with the blade up until it is dry.
When the mixing attachment is dry (5) put the rubber lid on (5a) to keep the attachment safe.
Included in the set you will find a special beaker with a handle for mixing, which is easy and helpful to operate with. Other jars may be used as well.
USING WHISK ATTACHMENT

ZELMER hand blender with the whisk attachment purees soups, whips up your favourite smoothies, mayonnaise or creams and toppings for waffles and desserts, as well as rubs egg yoke with sugar or prepares dough for pancakes.
Before assembling on and removing the whisk, make sure, that the plug of the supplying cord is disconnected from the socket.
① Before operation insert the whisk into the gearbox.
② Such assembled attachment attach to the drive shaft, align them in the position according to the indicators on the cover of the drive shaft and the whisk attachment. Then twist the drive shaft clockwise (the direction is shown by the arrow) until you hear that it has clicked (the indicator on the coupling should be in a closed position).
③ Plug the power cord to the power supply socket.
④ Plunge the end of the whisk inside the beaker into products.
⑤ Then start – up the appliance pressing the switch (2) and set the required gear as necessary.
The appliance operates only with the "power" or "turbo" button pressed.
When finished, turn the appliance off and unplug it by disconnecting the cable cord from the power outlet.
Operational guidelines
To detach the whisk attachment, just follow the attaching procedure in reverse order.
For best results operate the appliance at high gear – 15th speed setting.
When finished, turn the appliance off and unplug it by disconnecting the cable cord from the power outlet.
You can also use the mixing container included with the blender.
To obtain better results lean the whisk is a small angle and make round movements with it inside the bowl.
The level of products placed in a bowl should not exceed the height of the workspace of the beater (L).

OPERATING THE MINI FOOD PROCESSOR

ZELMER hand blender is equipped with a mini food processor used to chop meat, cheese, nuts, onions, garlic, carrots, and prunes.
Before assembling on and removing the blender drive out of the mini food processor, make sure that the plug of the supplying cord is disconnected from the mains supply outlet.
Operate the blender so, that the closed/open marking located on the appliance are well visible.
Before each usage of the mini food processor knife, remove the cover out of the blades.
① Before use put the rubber anti-skidding lid – mat (12a) at the bottom of the housing base. Then, place the blade into the work bowl so that its hole matches the tang inside.
② Put the food to be processed into the container. Fill in the container. Do not exceed the marked MAX level.
③ Put the cover-transmission on the container. Make sure the protrusions fit the openings in the container and turn the lid clockwise until stop.
④ Place the blender motor in open position △ on such assembled mini food processor, in accordance with the indicator on the motor casing and the lid of the mini food processor including gearbox.
⑤ Turn the motor clockwise relative to the transmission (according to the direction of the arrow) until you hear a click (the indicator on the transmission should be in the closed
position △).
⑥ Plug in the appliance. Switch on the appliance pressing the switch (2).
⑦ Set the required gear as necessary.
When finished, turn the appliance off and unplug it by disconnecting the cable cord from the power outlet.
The dismantling process should be done in reverse order to assembly.
⑧ You can keep food in the work bowl (12). To do so, place the lid– mat (12a) onto the work bowl to protect the processed food.

mini food processor blades are very sharp. Be very careful during assembling, disassembling or during cleaning. Store the knife inside the cover for safety reasons.

It is not allowed to grind too hard products, such as: coffee beans, nutmeg, ice cubes.

Before shredding big pieces of the products cut them into smaller ones - approximately 1 cm cubes.

r disassemble the lid from the container before the disc stops rotating.

ot start – up the motor without accessories.
Operational guidelines
the products stick to the blade or the walls of the container:
Switch off the appliance. -
Remove the drive with the lid and container of ice or — other products crusher.
Remove the products out of the mini food processor — walls.
Re-assemble the appliance – as defined above, – Continue the operation.
Approximate time for processing of selected products for the recommended gear
| Product | Recommended speed | Processing time | |
| cheese | 200 g(500 ml) | TURBO 20-30 secs | |
| meat | 250-300 g(400-500 ml) | TURBO 25-30 secs | |
| onions | 250 g(500 ml) | 8-10 | 15 secs |
| almonds | 300 g(500 ml) | 15/TURBO | 40 secs+ 5 secs |
| garlic | 300 g | 15 | 10 secs |
| walnuts | 200 g(500 ml) | 15/TURBO | 15 secs+ 5 secs |
| herbs | 20 g(500 ml) | TURBO | 30 secs |
You can shorten the processing time as you wish, then you obtain other granulation of grinded products.
OPERATING THE FOOD PROCESSOR
The appliance characteristics
ZELMER Hand blender is equipped with a food processor which is used for chopping, liquidizing, slicing, and grating fruits and vegetables.
The application of the food processor accessories
Double - sided slicing disc - is used to slice fruit and vegetable (raw, boiled) into thin or thick slices. The slicing disc is round, with double -sided blades (one side for thin slices, the other side for thick slices).
Double – sided chipping and puree disc – is used for chipping and pureeing fruit and vegetables. Chipping and puree disc is round, with double-sided blades (one side for chipping i.e. carrots, celery boiled beetroots, the other side for pureeing – i.e. for potato pancakes, beetroot salad).
Disc driver - is used for assembling discs (for slicing, chipping and pureeing).
Pusher – is used for pushing product grinded with all discs and closing the lid feed chute.

permanent guard for all shields of the food processor.
Preparing the food processor to use

Before assembling on and removing the blender drive out of the food processor, make sure that the plug of the supplying cord is disconnected from the mains supply outlet.
Operate the blender so, that the closed/open markings located on the appliance are well visible.
Operating the food processor

① Place the base of the food processor on firm, flat and dry surface. Insert the food processor container into the base fasteners.
② Lock the container.
Operation with food processor (slicing disc, chipping and puree disc)

① Place the selected disc on the disc driver (double-sided discs) so that the blades provided for operation are on the top.
② Insert the accessory inside the container, so that it is connected with the drive shaft.
③ Insert the permanent guard. The guard can be assembled inside the food processor container in one position only, so that the protrusion of the permanent guard is locked inside the handle of the food processor container.
④ Insert the lid of the food processor into the fasteners of the container (take care that the lid is fastened with all the fasteners).
⑤ Lock the lid.
⑥ Insert the blender drive (assembling of the drive is possible only when the container lid is closed). Then lock it.
⑦ Set the desired gear using the speed control knob.
⑧ Insert processed products into the lid chute.
⑨ Hold the pusher to the chute, so that it does not press the product before start – up of the appliance (push the next portions of products when the blender drive is in operation / the disc is rotating).
⑩ Connect the plug into the mains supply outlet. Then start – up the appliance pressing the switch (2) of the blender drive.
After finishing operating the food processor

① Release the button (2) (or TURBO in case of using this gear).
② Remove the plug of the supply cord from the mains supply outlet.
③ Unlock and remove the blender drive (after the appliance stops completely).
④ Remove the pusher from the lid chute (in order to open the lid it is necessary at first to remove/lift the pusher out of the chute).
⑤ Unlock and open the lid.
⑥ Remove the permanent guard.
⑦ Remove the disc.
⑧ Unlock the container.
⑨ Remove the container from the base.
⑩ Empty the container removing the products.
Operating instructions
Chipping and puree disc
During operation with chipping and puree disc it is recommended to apply the blender drive speed 15 or TURBO.
Insert the processed product into the feed chute, hold the pusher (do not press), switch on the blender drive. When the appliance is in operation press the pusher with a bit of power.
When the container is filled up to MAX level, stop the operation, empty it and collect the scrap accumulated on the disc.
Slicing disc
During operation with slicing disc it is recommended to apply the blender drive speed 15 or TURBO.
- is recommended to insert the products onto the feed chute in vertical position so that they fill in complete space of the chute.
Insert the processed product into the feed chute, hold the pusher (do not press), switch on the blender drive. When the appliance is in operation press the pusher with a bit of power.
When the container is filled up to MAX level, stop the operation, empty it and collect the scrap accumulated on the disc.
Approximate processing times of selected food products at the recommended speed
| Product Recommended speed Processing time | ||||
| slicing disc | cucumbers | 350 g 15 | 25 – 30 secs | |
| carrots 30 – 35 secs | ||||
| onions 10 – 15 secs | ||||
| potatoes 10 – 15 secs | ||||
| double disc – shredding | celery | 350 g 15 | 15 – 20 secs | |
| apples 10 – 15 secs | ||||
| onions 20 – 25 secs | ||||
| carrots 20 – 25 secs | ||||
| beetroots 10 – 15 secs | ||||
| double disc – pureeing | potatoes | 350 g 15 | 10 – 15 secs | |
| apples 10 – 15 secs | ||||
| onions 10 – 15 secs | ||||
| carrots 20 – 25 secs | ||||
| beetroots 10 – 15 secs | ||||
The appliance characteristics
Zelmer hand blender is equipped with ice crusher which is used for crushing ice and i.e. frozen fruits.

can use the crusher only with the container and lid of mini food processor!
Application of the accessories
Double-sided disc – is used for crushing, grinding ice and frozen products. The disc is round, the blades are double-sided. One side, which we recognize by the applied plastic fifteen- pointed star, fig. 14a is used for first level grinding „I" (smaller particles of grinded product), the other side is used for second level grinding „II" (bigger particles of grinded product) and it is marked with seven-pointed star fig 14b.
Spindle – is used for fixing the disc.
Preparation of the ice-crusher

are assembling and disassembling blender motor drive On the ice crusher, make sure if the supply cord plug is disconnected from the mains supply outlet.
Wash the parts in contact with processed product before first usage.
Operate the blender so, that the closed/open markings located on the appliance are well visible.
Operation with ice crusher

① Place the container of the mini food processor on firm, flat and dry surface.
② Place the disc for ice on the spindle (double-sided disc), so that the blades provided for operation are on the top.
③ Place the disc with the spindle inside the mini food processor container so that the pivot protruding from the container is inserted into the spindle orifice.
④ Insert the ice crusher container on the fasteners of the mini food processor. Then lock the crusher container, turning it until you can feel it is blocked.
⑤ Place the processed products inside the container not exceeding MAX level.
When you fill up the crusher container (13) with appropriate amount of processed product (do not exceed MAX level) center the spindle (15) (put in the middle) to enable its proper coupling with the mini food processor lid (9).
⑥ Insert the mini food processor lid including the gearbox into the fasteners of the ice crusher container. Then lock the lid turning it until you feel it is blocked.
⑦ Insert the blender drive on such assembled ice crusher △.
⑧ Lock the blender drive △.
⑨ Connect the plug into the mains supply outlet. Start-up the appliance pressing TURBO switch of the blender motor drive.
After operation, switch off the appliance and unplug it from the socket.
Disassembling the ice crusher, proceed reverse to its assembling.
⑩ You can keep food in the work bowl (12). To do so, place the lid-mat (12a) onto the work bowl to protect the processed food.

ice crusher blades are very sharp. Be very careful during assembling, disassembling or during cleaning.

Never exceed the maximum level of the ice crusher input.

er disassemble the lid from the container before the disc stops rotating.
During operation of the drive of the blender with the ice crusher use TURBO function.
Operational tips
Maximum level of input of the ice crusher container corresponds with the capacity of 450 ml.
Chake the appliance in case the products are clogged over the disc.
case the products get stuck to the inner wall of the mini food processor container hindering or blocking ejection of grinded product out of the upper container of the ice crusher:
Switch off the appliance. -
Remove the drive with the lid and container of ice or - other products crusher.
Remove the products out of the mini food processor – walls.
Re-assemble the appliance – as defined above, – Continue the operation.
Possible usage of the appliance
You can use products (i.e. fruit) grinded with the ice crusher to prepare ice-cream, yoghurts, desserts.
Recommended granulation level for given product
| Product* | Recommended speed | Granulation | Processing time | |
| ice cubes | 250 ml | TURBO | I-II | 45-60 secs |
| frozen fruits | 250 ml | TURBO | I | 45-60 secs |
* The maximum level of input to the ice crusher container corresponds with the capacity of 450 ml.
Cleaning and maintenance
After each use of the blender drive wash carefully the parts in contact with processed product.
●lean the drive of the blender, the whisk gear, the mini food processor cover with transmission, and the base of the food processor with a damp cloth with the addition of a dishwashing liquid. Do not immerse in water or wash in dishwasher, as it can result in damage of the appliance!
Wash the mixing attachment mixing clean warm water. Wash manually the metal parts with water with dish washing liquid, then rinse well.
Do not wash the mixing attachment or other metal parts in dishwasher.
Remove the dirt in gaps or corners with brush for dishwashing.
respect of long-term usage the elements made of plastic can be discoloured. Do not treat it as a defect.
You can easily remove the carrot juice stains with cloth immersed in edible oil.
After washing the blender accessories dry them and store in dry place.
Ecology – Environment protection
Each user can protect the natural environment. It is neither difficult nor expensive.
In order to do it: put the cardboard packing into recycling paper container; put the polyethylene (PE) bags into container for plastic.

When worn out, dispose the appliance to particular disposal centre, because of the dangerous elements of this appliance, which can be hazardous for natural environment.
Do not dispose into the domestic waste disposal!!!
The manufacturer does not accept any liability for any damages resulting from unintended use or inappropriate handling.
The manufacturer reserves his rights for modifying the product any time in order to adjust it to law regulations, norms, directives, or due to construction, trade aesthetic or other reasons, without notifying it in advance.