
PM 3151 - Steam cleaner ECG - Free user manual and instructions
Find the device manual for free PM 3151 ECG in PDF.


| Product Type | Steam mop |
| Brand | ECG |
| Model | PM 3151 |
| Water Tank Capacity | 450 ml |
| Steam Output | Up to 40 g/min |
| Heat-Up Time | Approximately 20 seconds |
| Operating Time | Up to 25 minutes |
| Power Supply | 220–240 V~ 50 Hz |
| Power Consumption | 1500 W |
| Weight | 2.6 kg |
| Height | 1116 mm |
| Power Cord Length | 7 m |
| Swivel Head | 180° swivel |
| Handle Type | Foldable handle |
| Included Accessories | 2× microfibre cleaning pads, 1× carpet attachment, 1× measuring cup (250 ml), 1× locking screw |
| Floor Types Compatible | Ceramic tiles, marble, stone, sealed wooden floors, laminate (low steam), PVC (low steam), linoleum (low steam), carpets (with attachment) |
| Steam Settings | Adjustable via power knob |
| Safety Features | Overheat protection (do not use empty), auto shut-off when unplugged |
| Cleaning Pad Care | Machine washable, no bleach or fabric softener |
| Storage | Wrap cord around hooks; handle folds for compact storage |
Frequently Asked Questions - PM 3151 ECG
User questions about PM 3151 ECG
0 question about this device. Answer the ones you know or ask your own.
Ask a new question about this device
Download the instructions for your Steam cleaner in PDF format for free! Find your manual PM 3151 - ECG and take your electronic device back in hand. On this page are published all the documents necessary for the use of your device. PM 3151 by ECG.
USER MANUAL PM 3151 ECG
natural_image
Black electric vacuum cleaner with extended arm and base (no visible text or symbols)PM 3151
PARNÍ MOP
NÁVOD K OBSLUZE
PARNÝ MOP
NÁVOD NA OBSLUHU
MOP PAROWY
INSTRUKCJA OBSŁUGI
GÖZMOP
HASZNÁLATI ÚTMUTATÓ
DAMPFMOP
BEDIENUNGSANLEITUNG
STEAM MOP
INSTRUCTION MANUAL
ČISTAČ NA PARU
UPUTE ZA UPORABU
PARNI ČISTILEC MOP
NAVODILA ZA UPORABO
CZ
SK
PL
HU
DE
GB
HR
SI
Seznam součástí
natural_image
Technical illustration of a mechanical assembly with two views (A and B) showing a component being inserted, no text or symbols present.POUŽÍVÁNÍ SPOTŘEBIČE
natural_image
Line drawing of a hand washing machine with labeled component 'C' (no text or symbols on the device itself)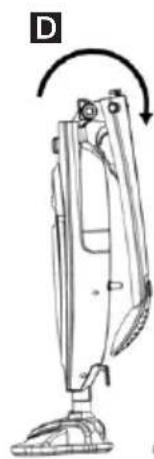
natural_image
Line drawing of a vacuum cleaner with a rotating arm (no text or symbols)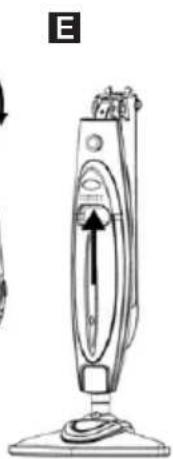
natural_image
Line drawing of a vacuum cleaner with a vertical arrow indicating airflow direction (no text or symbols)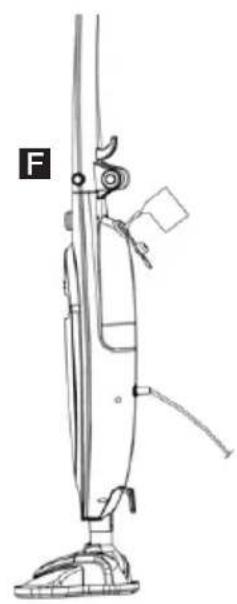
natural_image
Line drawing of a vacuum cleaner with attached clasp and base mount (no text or symbols)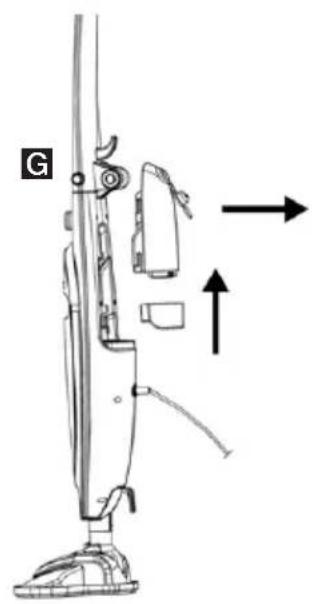
natural_image
Line drawing of a vacuum cleaner with directional arrows indicating motion (no text or symbols)Sklopení rukojeti
Zoznam súčastí
natural_image
Technical line drawing of a mechanical component with an arrow indicating downward motion (no text or symbols)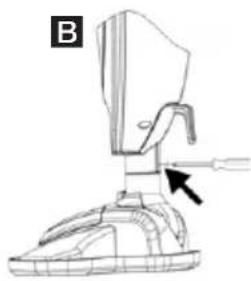
natural_image
Technical line drawing of a mechanical assembly with a tool and arrow indicator (no text or symbols)POUŽÍVANIE SPOTREBIČA
natural_image
Line drawing of a hand washing machine with labeled component 'C' (no text or symbols on the device itself)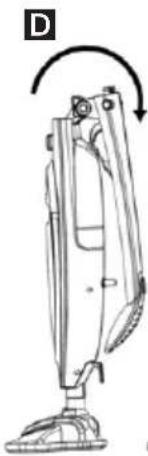
natural_image
Line drawing of a vacuum cleaner with a curved arrow indicating rotation (no text or symbols)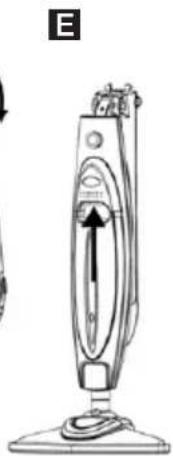
natural_image
Line drawing of a vacuum cleaner device with a central valve and indicator lights (no text or symbols)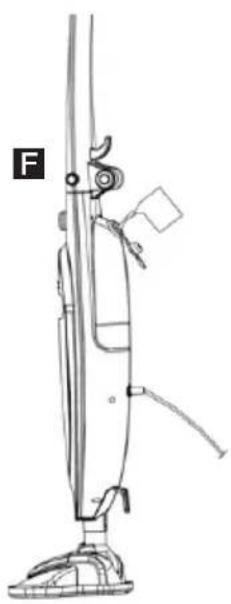
natural_image
Line drawing of a vacuum cleaner with labeled component 'F' (no text or symbols on the device itself)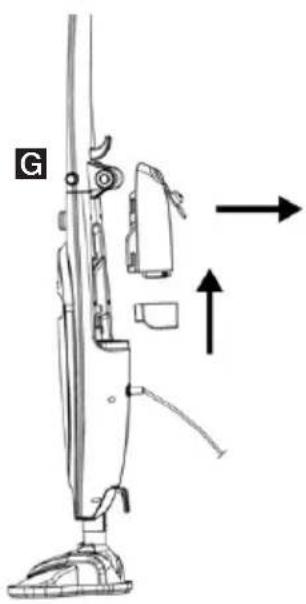
natural_image
Line drawing of a vacuum cleaner with directional arrows indicating movement (no text or symbols)Sklopenie rukoväti
Vyklopte rukovat' nahor a zaistite ju na mieste. Ked' chcete rukovat' opat' sklopiť, stlačte dve poistné tlačidlá [C] a sklopte rukovat' dole [D]. Na zdvíhanie a prenášanie spotrebiča používajte držadlo [E].
Lista elementów
natural_image
Technical illustration of a mechanical assembly with labeled parts A and B, showing a downward force and a tool inserted (no text or symbols present)KORZYSTANIE Z URZĄDZENIA
natural_image
Line drawing of a vacuum cleaner with labeled component 'C' (no text or symbols on the device itself)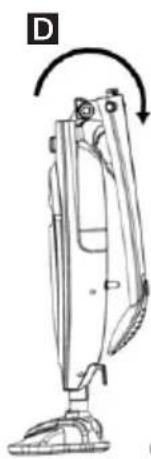
natural_image
Line drawing of a vacuum cleaner with a circular arrow indicating rotation (no text or symbols)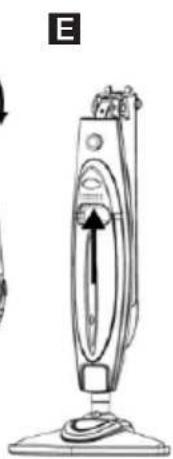
natural_image
Line drawing of a vacuum cleaner with a central valve and indicator lights (no text or symbols)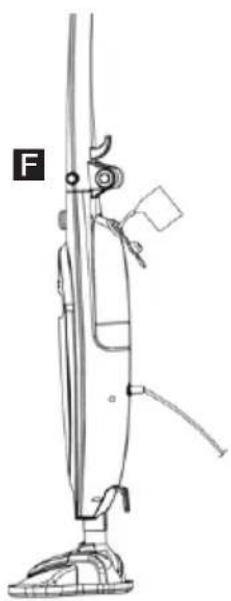
natural_image
Line drawing of a vacuum cleaner with labeled component 'F' (no text or symbols on the device itself)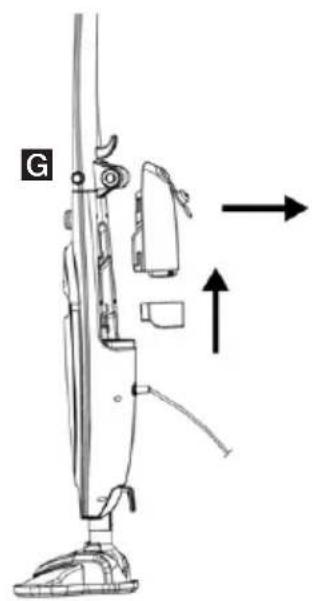
natural_image
Line drawing of a vacuum cleaner with directional arrows indicating movement (no text or symbols)Składanie uchwytu
natural_image
Technical line drawing of a mechanical assembly with two views (A and B) showing a component being inserted or assembled, no text or symbols present.A KÉSZÜLÉK HASZNÁLATA
natural_image
Line drawing of a vacuum cleaner with labeled component 'C' (no text or symbols on the device itself)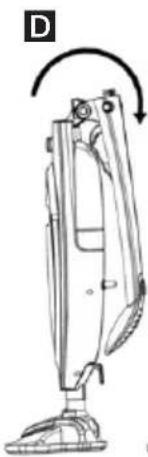
natural_image
Line drawing of a vacuum cleaner with a curved arrow indicating rotation (no text or symbols)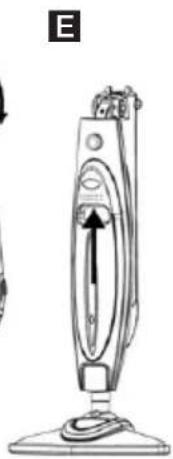
natural_image
Line drawing of a vacuum cleaner with a vertical arrow indicating airflow direction (no text or symbols)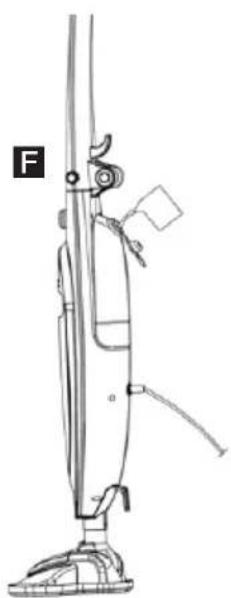
natural_image
Line drawing of a vacuum cleaner with labeled component 'F' (no text or symbols on the device itself)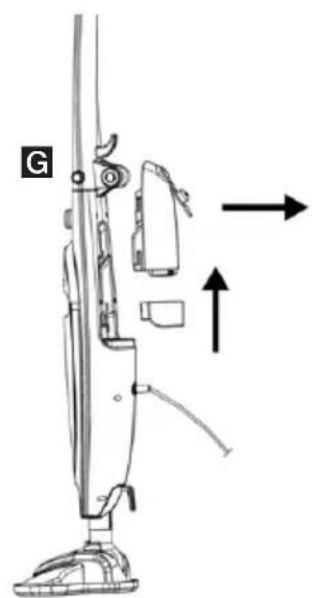
natural_image
Line drawing of a vacuum cleaner with directional arrows indicating movement (no text or symbols)Teileverzeichnis
natural_image
Technical illustration of a mechanical device with two views (A and B) showing a component being inserted or assembled, no text or symbols present.natural_image
Line drawing of a vacuum cleaner with labeled component 'C' (no text or symbols on the device itself)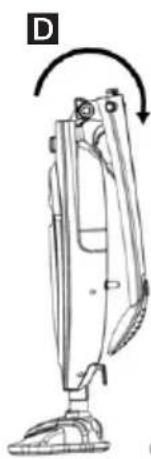
natural_image
Line drawing of a vacuum cleaner with a curved arrow indicating rotation (no text or symbols)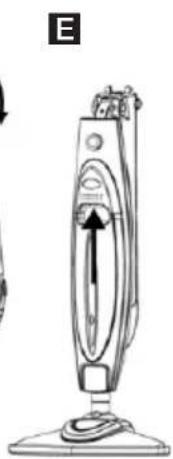
natural_image
Line drawing of a vacuum cleaner with a directional arrow indicating airflow or movement (no text or symbols)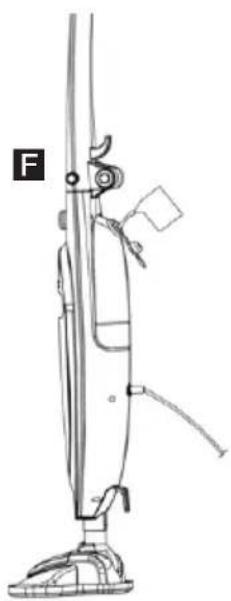
natural_image
Line drawing of a vacuum cleaner with labeled component 'F' (no text or symbols on the device itself)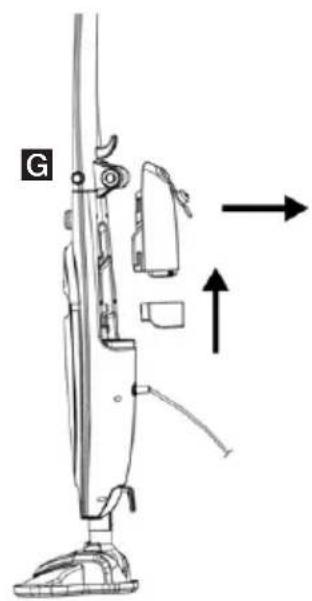
natural_image
Line drawing of a vacuum cleaner with directional arrows indicating motion (no text or symbols)Read carefully and save for future use!
Warning: The safety measures and instructions, contained in this manual, do not include all conditions and situations possible. The user must understand that common sense, caution and care are factors that cannot be integrated into any product. Therefore, these factors shall be ensured by the user/s using and operating this appliance. We are not liable for damage caused during transportation, improper use, voltage fluctuation or any change or modification of any part of the appliance.
To protect against a risk of fire or electric shock, basic precautions shall be taken while using electrical appliances, including the following:
- Read all instructions before using the appliance.
- Make sure the voltage in your outlet corresponds to the voltage provided on the appliance label and that the socket is properly grounded. The outlet must be installed according to valid safety instructions.
- Never use the appliance when the power cord is damaged. All repairs including cord replacements shall be performed by a professional service centre! Do not remove protective covers of the appliance, risk of electric shock!
- Protect the steam mop from direct contact with water and other liquids, do not place on it containers with liquids to prevent electric shock.
- Protect the appliance from heat sources (oven, heaters) to prevent deformation of plastic parts and affecting the functioning of the appliance.
- Do not leave the appliance with the power cable plugged in unattended. Unplug the power cable from the wall outlet prior to maintenance or refilling of water in the tank. When unplugging, grasp the plug, never pull the power cord.
- Do not use the appliance outside or in a wet environment. Risk of electric shock.
- Do not allow children to play with the appliance. The appliance is not a toy. Pay attention when you use the appliance near children.
- Use only attachments and accessories approved by the manufacturer.
- If the appliance is not working properly, if the appliance fell (e.g. in water), if it is damaged or if it was forgotten outside, have it inspected professionally in an authorized service center.
- Do not carry the appliance by the power cable. To carry it, always use the handle intended for this purpose. Make sure that the power cord is not broken or bent over sharp objects and edges. Do not run over the power cable with the appliance when working. Keep the power cord away from heat sources.
- Do not touch the power cord or the appliance with wet hands.
- Do not insert any objects in the openings of the appliance.
- Use extra care when cleaning stairs.
- Use this appliance only in accordance with the instructions in this manual. This appliance is designed for domestic use only. The manufacturer is not liable for damages caused by the improper use of this appliance.
- This appliance can be used by persons with reduced physical, sensory or mental capabilities or lack of experience and knowledge if they are supervised or have been instructed to use the appliance in a safe way and understand the potential dangers. Children shall not play with the appliance.
DESCRIPTION OF THE APPLIANCE
This efficient steam mop is an excellent tool to remove dirt and grease without using powerful chemicals or detergents. This slim and lightweight appliance releases steam when mopping the floor and leaves the floor clean and disinfected without effort and mess associated with washing with regular mop.
Steam mop cleans and disinfects not only marble, ceramic tile, stone, linoleum, sealed wooden floors and parquet, but also carpets and mats, saving you time and energy.
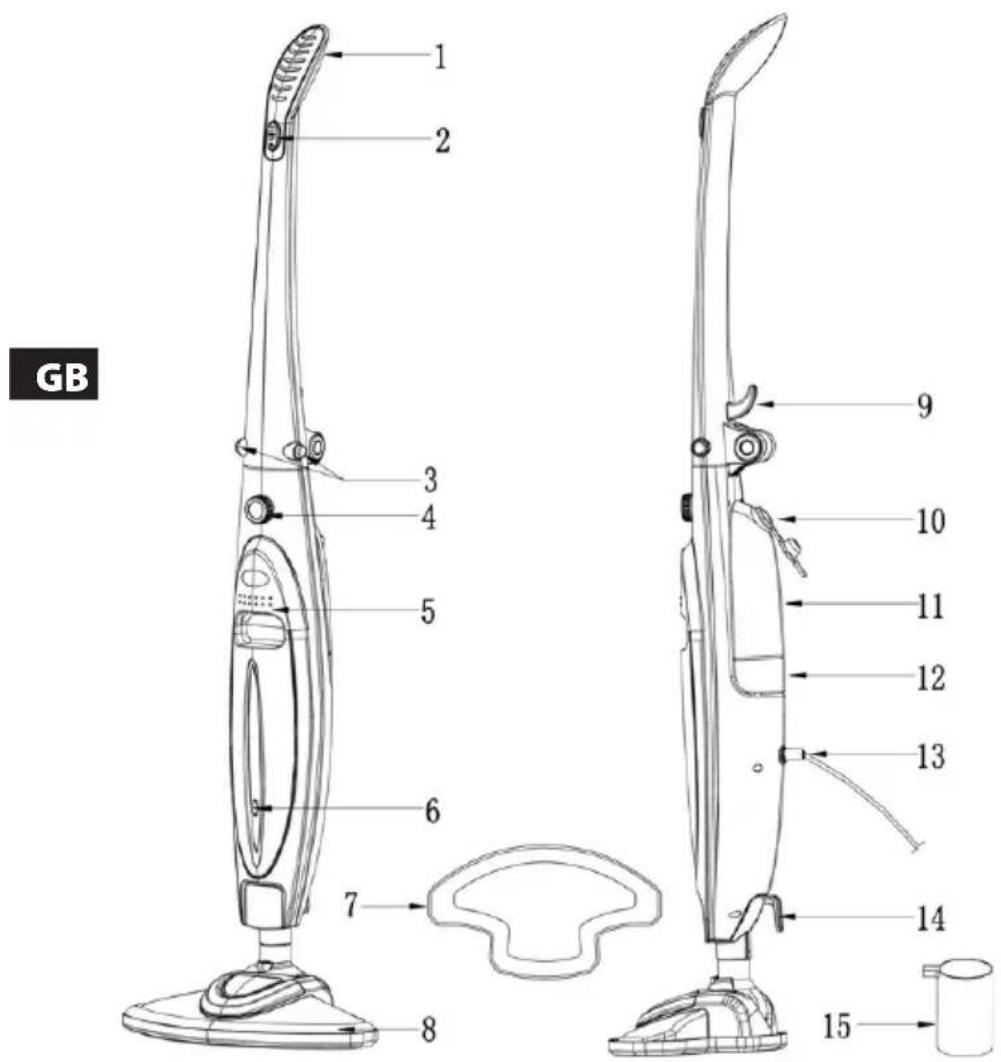
List of parts
- Handle
- On/Off switch
- Handle lock button
- Power control
- Carrying handle
- ON indicator light
- Carpet attachment
- Mop head
- Top hook for wrapping power cable
- Water tank plug
- Water container
- Tank base
- Power cord
- Bottom hook for wrapping power cable
- Water measure cup
Package contents
1× Steam mop
1× Instruction manual
1× Carpet attachment
2× Cleaning pad
1× Locking screw
ASSEMBLING THE APPLIANCE
- After unpacking, check if the package is complete. Ensure safe disposal of plastic bags and other packaging material that could pose a risk to small children.
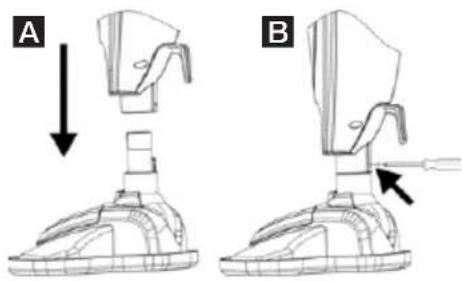
- Insert the body in the head of the mop [A], insert the locking screw and tighten it [B].
natural_image
Technical illustration of a mechanical assembly with two views (A and B) showing a component being inserted or assembled, no text or symbols present.USING THE APPLIANCE
- Never use the appliance without the attached cleaning pads.
- Never use the appliance with empty water tank.
- Do not overfi ll the water tank to prevent an undesirable increase in pressure.
- Do not point the appliance at other people, animals or electrical and electronic devices.
- Do not use on leather, waxed and polished furniture, non-impregnated wood, synthetic fabrics, velvet or other delicate steam-sensitive materials.
- Do not use on non-impregnated wooden floors or floors made of cork tiles, because the heat and steam may damage these surfaces. Be cautious when using on laminate floors and use the lowest steam setting.
- Test it always on a small area of the floor before using it on the whole area.
- Never apply the steam too long on one place. The surface of the floor may be damaged.
- Be especially careful when applying it to PVC floors, linoleum or any other heat sensitive materials. Too much heat could melt the adhesive of the flooring.
- Do not use on the carpets without inserted carpet attachment.
- Never pour hot water in the water tank or any other liquids, for example aromas or preparations containing alcohol or detergents. The operation in such a case would not be safe and could cause damage to the appliance.
natural_image
Line drawing of a vacuum cleaner with labeled component 'C' (no text or symbols on the device itself)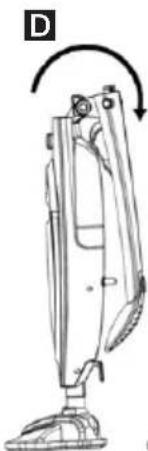
natural_image
Line drawing of a vacuum cleaner with a curved arrow indicating rotation (no text or symbols)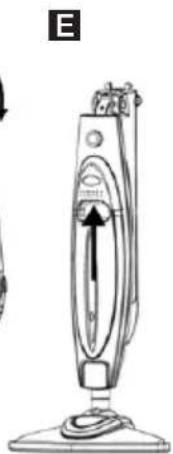
natural_image
Line drawing of a vacuum cleaner device with a vertical arrow indicating airflow direction (no text or symbols)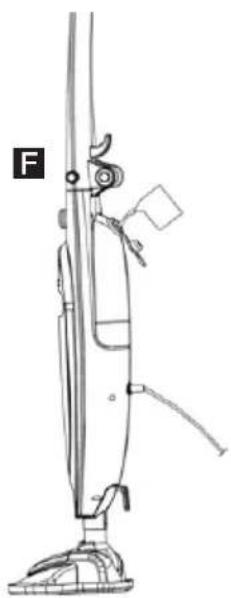
natural_image
Line drawing of a vacuum cleaner with labeled component 'F' (no text or symbols on the device itself)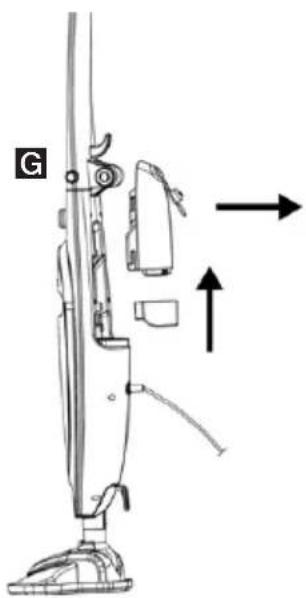
natural_image
Line drawing of a vacuum cleaner with directional arrows indicating motion (no text or symbols)Lowering the handle
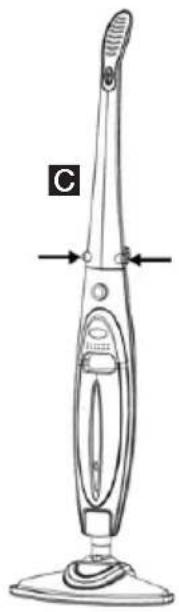
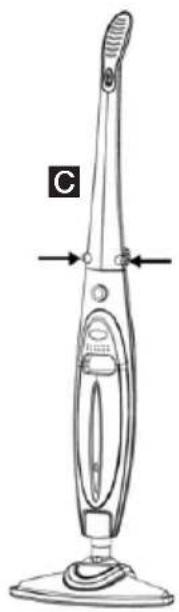
Lift the handle up and lock it in place. When you want to lower the handle again, press two locking buttons [C] and push the handle down [D]. Use the handle [E] to lift and carry the appliance.
Filling the water tank
Before filling with water, make sure the mop is disconnected from the power supply. Remove the tank plug and using the measuring cup fill the water tank with clean, cold water and replace the plug [F].
Note: The water tank is completely removable in case that you prefer filling the removed tank. See following instructions.
Water tank removal
Make sure that the mop is disconnected from the power supply prior to removal or installing the water tank. Remove the water tank by pulling upward. Remove the water tank and its base [G], fill the tank or empty it and return it in place.
Using steam mop on hard floors
The steam mop is designed to clean hard floors, like ceramic tiles, marble, stone floors and sealed wooden floors. In case of PVC flooring and laminate floors use the lowest power level with minimal steam output. The steam mop is not designed to clean waxed floors or non-impregnated wooden floors. For best results, try the mop first on some less prominent part of the floor and read the instructions for the maintenance of the floor supplied by the manufacturer of your floor.
- Remove dust and dirt from the floor by vacuuming or sweeping.
- Attach the cleaning pad on the head of the mop and secure it with two velcros. Tighten the pad around the head of the mop using drawstring in the pad.
- Make sure that the steam mop is disconnected from the power supply and fill the tank with water.
- Then plug the mop in a suitable electrical wall outlet and using the switch turn it on.
- Allow the steam mop to warm up. The steam starts to be released from the bottom of the mop head after about 20 seconds.
- You can regulate the amount of steam by turning the power knob.
- Start in the farthest corner of the room and work your way backwards. You will avoid stepping on the floor which you just cleaned.
- For disinfecting an area of the floor, leave the steam mop over the place for about 10 seconds.
- If you are done or if you are running out of water in the tank, switch the power button off and unplug it from the outlet.
- The cleaning pads are machine washable. Do not use bleach or fabric softener.
Using steam mop on carpets
The steam mop can be used to boost colours and to remove odours from carpets and mats. Use the steam mop with the head inserted in the carpet attachment. Do not use the steam mop to remove spots and stains and do not apply it on one place longer than 20 seconds.
- First, remove from the floor dust and dirt by vacuuming.
- Attach the cleaning pad to the head of the mop. Tighten the pad around the mop head using drawstring in the pad.
- Make sure that the steam mop is disconnected from the power supply and fill the tank with water.
- Then plug the mop in a suitable electrical outlet and switch it on using power button.
- Allow the steam mop to warm up. The steam starts to be released from the bottom of the mop head after about 20 seconds.
- You can regulate the amount of steam by turning the power knob.
- Put the head of the steam mop with the cleaning pad in the carpet attachment. Use the carpet attachment only for carpets and mats. Using the attachment on other types of flooring may leave wet stripes on the floor and the surface can be scratched.
- Start in the farthest corner of the room and work your way backwards. You will avoid stepping on the floor which you just cleaned.
- If you are done or if you are running out of water in the tank, switch the power button off and unplug it from the outlet.
- The cleaning pads are machine washable. Do not use bleach or fabric softener.
Note: This appliance does not serve as a carpet cleaning device, only as a booster and remover of odours.
After use
• Always unplug the appliance from the outlet if not in use.
- Remove the cleaning pad from the head of the mop. Be careful, the cleaning pad and the bottom part of the steam mop may still be hot.
- The cleaning pad may be washed with hot water by hand or in washing machine. Do not use bleach or fabric softener. Allow to air dry for optimal results.
- Empty and rinse the water tank after each use. Do not forget to replace the lid of the tank. Do not leave the rest of the water in the tank of the appliance when not in use.
MAINTENANCE AND CLEANING
Cleaning
Clean the external surface of the appliance with moist soft cloth and then wipe it dry.
Attention: Do not use aggressive solvents, abrasive cleaners or scouring powders for cleaning, they could damage the surface finish.
Checking the appliance
Always ensure that the appliance is in good working order and that all removable parts are securely locked in place. Check the power cord and the power cord plug regularly for damage.
Appliance storage
When the appliance is not in use, store it together with the accessories and the instruction manual in a safe and dry place. Wrap the power cord around the top and bottom hooks on the back of the appliance. The upper part of the appliance with the handle can be folded down for easier storage.
TECHNICAL SPECIFICATIONS:
The capacity of the water tank: 450 ml
Height: 1116 mm
Fast steam preparation – about 20 s
Folding handle
Swivel head 180°
Power cord 7 m
Steam output up to 40 g/min
Operating time up to 25 min
Accessories:
Microfi ber cleaning pad 2×*
Carpet attachment 1×
Water measuring cup 250 ml
Nominal voltage: 220–240 V\~ 50 Hz
Nominal input power: 1500 W
Weight 2.6 kg
* Replacement microfiber pads can be bought under the designation PM 3151 microfibre pads
USE AND DISPOSAL OF WASTE
Wrapping paper and corrugated paperboard – deliver to scrapyard. Packing foil, PE bags, plastic elements – throw into plastic recycling containers.
DISPOSAL OF PRODUCTS AT THE END OF LIFETIME
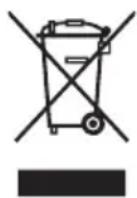
Disposal of electric and electronic equipment (valid in EU member countries and other European countries with an implemented recycling system)
The represented symbol on the product or package means the product shall not be treated as domestic waste. Hand over the product to the specified location for recycling electric and electronic equipment. Prevent negative impacts on human health and the environment by properly recycling your product.
Recycling contributes to preserving natural resources. For more information on the recycling of this product, refer to your local authority, domestic waste processing organization or store, where you purchased the product.
This product complies with EU directive requirements on electromagnetic compatibility and electrical safety.
The instruction manual is available at website www.ecg.cz.
Changes in text and technical parameters reserved.
08/05
SIGURNOSNE UPUTE
Popis dijelova
- Ručka
- Prekidač (POWER)
- Tipka za zaključavanje rukohvata
- Regulacija snage
- Ručka za nošenje
- Kontrolna žaruljica
- Nastavak za tepihe
- Nastavak s resama
- Gornja kukica za namatanje kabela
- Čep spremnika za vodu
- Spremnik za vodu
- Dno spremnika
- Kabel za napajanje
- Donja kukica za namatanje kabela
- Mjerica za vodu
Sadržaj pakiranja
natural_image
Technical line drawing of a mechanical component with an arrow indicating assembly or transformation (no text or symbols present)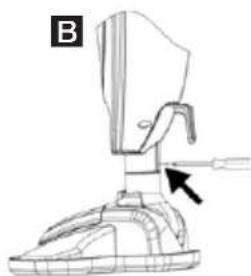
natural_image
Line drawing of a mechanical device with a lever and base, no text or symbols presentKORIŠTENJE UREĐAJA
- Nikada ne koristite uređaj bez montiranih jastučića za čišćenje.
- Uređaj nikada ne koristite s praznim spremnikom za vodu.
- Nemojte prepuniti spremnik za vodu kako ne biste prouzročili neželjeno povećanje tlaka.
- Ne usmjeravajte uređaj prema drugim osobama, životinjama ili električnoj i elektroničkoj opremi.
- Nemojte koristiti za čišćenje kožnog, voskom impregniranog i poliranog namještaja, impregniranog drva, sintetičke tkanine, baršuna ili drugih materijala osjetljivih na paru.
- Nemojte koristiti na prirodnim drvenim površinama ili na pločicama od pluta zbog toga što bi toplina i para mogle oštetiti takve materijale. Kad koristite na laminatnim površinama, posvetite posebnu pozornost i uređaj koristite s najmanjim količinama pare.
- Prije nego uređaj upotrijebite na cijeloj površini, uvijek ga ispitajte na maloj površini poda.
- Nikada ne primjenjujete čišćenje parom previše dugo na jednom mjestu. To bi moglo dovesti do oštećenja površine poda.
- S posebnom pozornošću čistite PVC podove, linoleum ili druge materijale koji su osjetljivi na toplinu. Prekomjerna toplina može dovesti do taljenja ljepila kojim su pričvršćene podne obloge.
- Nemojte koristiti za čišćenje tepiha bez korištenja nastavka za tepihe.
- U spremnike za vodu nikada nemojte ulijevati vruću vodu, kao ni bilo koje druge tekućine, kao što su aromatična ulja ili sredstva koja sadrže alkohol ili deterdžente. Time bi korištenje uređaja bilo nesigurno i moglo bi doći do oštećenja uređaja.
HR
natural_image
Line drawing of a vacuum cleaner with labeled component 'C' (no text or symbols on the device itself)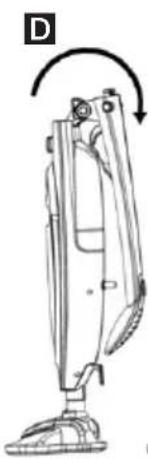
natural_image
Line drawing of a vacuum cleaner with a curved arrow indicating rotation (no text or symbols)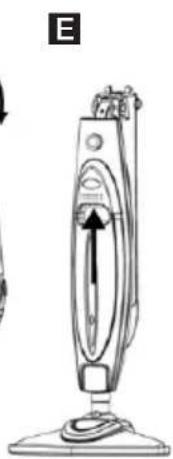
natural_image
Line drawing of a vacuum cleaner device with a central valve and base mount (no text or symbols)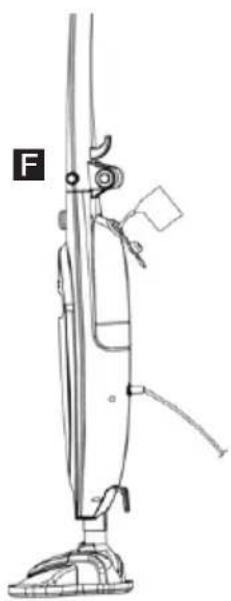
natural_image
Line drawing of a vacuum cleaner with labeled component 'F' (no text or symbols on the device itself)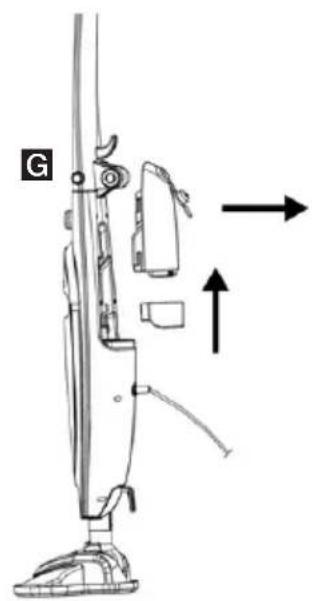
natural_image
Line drawing of a vacuum cleaner with directional arrows indicating movement (no text or symbols)Sklapanje ručke
natural_image
Technical line drawing of a mechanical assembly (A and B) showing a component being inserted into a base, with no visible text or symbols.UPORABA APARATA
PEČAT I POTPIS PRODAVATELJA
K+B Progres
PROIZVAJALEC ali DAJALEC GARANCIJE:
K+B Progres, a.s.; MBS: 61860123
- PM 3151
- PARNÍ MOP
- PARNÝ MOP
- MOP PAROWY
- GÖZMOP
- DAMPFMOP
- STEAM MOP
- ČISTAČ NA PARU
- PARNI ČISTILEC MOP
- Seznam součástí
- POUŽÍVÁNÍ SPOTŘEBIČE
- Sklopení rukojeti
- Zoznam súčastí
- POUŽÍVANIE SPOTREBIČA
- Sklopenie rukoväti
- Lista elementów
- KORZYSTANIE Z URZĄDZENIA
- Składanie uchwytu
- A KÉSZÜLÉK HASZNÁLATA
- Teileverzeichnis
- Read carefully and save for future use!
- DESCRIPTION OF THE APPLIANCE
- List of parts
- Package contents
- ASSEMBLING THE APPLIANCE
- USING THE APPLIANCE
- Lowering the handle
- Filling the water tank
- Water tank removal
- Using steam mop on hard floors
- Using steam mop on carpets
- After use
- MAINTENANCE AND CLEANING
- Cleaning
- Checking the appliance
- Appliance storage
- TECHNICAL SPECIFICATIONS:
- USE AND DISPOSAL OF WASTE
- DISPOSAL OF PRODUCTS AT THE END OF LIFETIME
- SIGURNOSNE UPUTE
- Popis dijelova
- Sadržaj pakiranja
- KORIŠTENJE UREĐAJA
- HR
- Sklapanje ručke
- UPORABA APARATA
- K+B Progres
Brand : ECG
Model : PM 3151
Category : Steam cleaner