
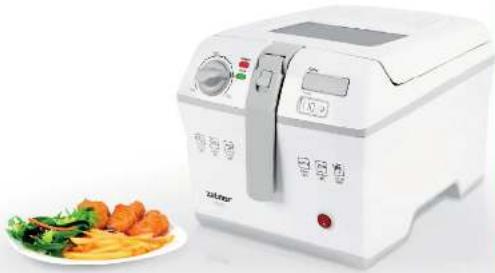
04Z012 - Deep fryer Zelmer - Free user manual and instructions
Find the device manual for free 04Z012 Zelmer in PDF.

| Product Type | Deep Fryer |
| Brand | Zelmer |
| Model | 04Z012 |
| Dimensions (W x D x H) | 30 x 25 x 20 cm |
| Weight | 2.5 kg |
| Power Supply | 220-240 V ~ 50/60 Hz |
| Rated Power | 1800 W |
| Oil Capacity | 2.0 L |
| Temperature Range | 150°C - 190°C |
| Adjustable Thermostat | Yes |
| Frying Basket | Removable, with handle |
| Viewing Window | Yes |
| Cool-Touch Handles | Yes |
| Non-Stick Coating | Yes (inner pot) |
| Safety Features | Overheat protection, cool-touch exterior |
| Filter Type | Permanent odor filter |
| Drainage Valve | No |
| Cord Storage | Integrated cord wrap |
| Cleaning | Removable pot and basket dishwasher safe; wipe exterior with damp cloth |
| Spare Parts Availability | Basket, pot, filter, thermostat available |
| Warranty | 2 years |
| Manual Languages | EN, PL, HU, CS, SK, RO, RU, BG, UK |
Frequently Asked Questions - 04Z012 Zelmer
User questions about 04Z012 Zelmer
0 question about this device. Answer the ones you know or ask your own.
Ask a new question about this device
Download the instructions for your Deep fryer in PDF format for free! Find your manual 04Z012 - Zelmer and take your electronic device back in hand. On this page are published all the documents necessary for the use of your device. 04Z012 by Zelmer.
USER MANUAL 04Z012 Zelmer
The image is too blurry to recognize any text content.

natural_image
White kitchen electric oven with control panel and food plate nearby (no visible text or symbols)| PRAVOSA M. JUETTOKANDRA FRYKOKONNICA Typ 02/21/1, 04/2012 | 1-8 | H3D - ANATL AT UTUSITAS OLASISG 02/21/1, 02/2012 Typa | 19-23 | H6D - HUTRIN DE SA NTUPTERA PRATORHIL Typ 02/21/1, 04/2012 | 30-36 |
| MAYO K ROLDEN FATEZA Typ 02/21/1, 04/2012 | 19-15 | H4D - ARTUSTRUCERA DE UTUSATE FRITEZA Typ 02/21/1, 04/2012 | 20-28 | H7D - HUTRYORIS SICNACTHYANT PRATORHIL Typ 02/21/1, 04/2012 | 40-44 |
| MAYO MA OBLADHA FRITEZA Typ 02/21/1, 04/2012 | 19-15 | H6D - HUTRYORILFO SCHEPATALAV PRATORHIL Typ 02/21/1, 04/2012 | 28-35 | H8D - UBERANAL DEEP FAT FRYER Typ 02/21/1, 04/2012 | 40-49 |
04Z011 04Z012
Frytkownica
The image is too blurry to recognize any text content.
1704008
m = 311
[Unreadable]
2014
2017年
Letter
[Unreadable]
zelmer
www.admter.nl
www.zeimer.com
A
B
PL
Szanowni Klienci
the unicramal typhoon of, salt
| Problem | Possible cause | Solution |
| During flying, the oil or fat spills over the edge of the flyer. | There is too much oil or fat in the flyer. | Makes us, as the oil or fat in the flyer does not exceed the maximum level. |
| The food contains too much liquid | Dry the food through slightly before you start flying and by the food and according with those instructions for use. | |
| There is too much liquid in the flying based. | Do not by more fuel so that time than the recommended quantities and contained in those instructions for use. | |
| The oil or fat forms too much during trying. | The food contains too much liquid | Dry the food through before flying it. |
| The type of oil or fat used is unavailable for deep-fiving food. | Never make two different types of oil or fat and use oil or liquid fuel containers and foam again. | |
| The inner pot has not been cleaned properly. | After the shift has cooled down, enjoy the minor pot and clean it as described in those instructions for use. |
Ecology - Environment protection
Each user can protect the natural environment. It is no other difficult nor expensive.
In order to do it put the cardboard packing into recycling paper to label, put the 50 vehicles (PE) bags into container for plastic.
When worn out, disces the appliance to particular disposal centre, because of the dangerous elements of this appliance, which can be hazardous for natural environment.
Do not dispose into the domestic waste disposal!!!

The manufacturer/pressor does not accept any liability for any losses arising from additional use or otherwise.
The manufacturer/Company reserves an equal body of the product any time is slow or slightly slower than a longer time, described as due to construction, trade, research or other reasons without making in charge.
GNDHE 101
Congratulations on your choice of our appliance, and welcome among the users of Zelmer products.
In order to achieve best possible results we recommend using exclusively original Zelmer accessories. They have been specially designed for this product.
Please read these instructions carefully. A special attention should be drawn to the indications concerning safety in order to prevent accidents and/or avoid destroying of the appliance during the use of the deep fat fryer. We recommend you keep this Use & Care Manual so that you could refer to it at a later time of using the fryer.
Safety and proper use
Please read these instructions completely before operating the fryer.
The fryer should always be connected to an electrical socket (of only alternating current) equipped with a protection bolt and of voltage corresponding to that indicated on a data plate of the appliance.
The fryer is intended for household use. If used for purposes of gastronomic activities, the terms of guarantee change.
Always put the appliance on a horizontal and even surface.
Never pull out a plug out of a socket by pulling a cable.
Never start the fryer if:
a power supply cord or a plug are damaged, the fryer is damaged in any way,
an inner pot has not been filled with oil or if it is not up to the level between indication marks of MIN and MAX, the fryer is not in a normal position of operations.
the non-detachable part of the cord is damaged, it should be replaced by the producer or at a proper service point or by a qualified person in order to avoid any hazards.
Only trained persons may repair the appliance. An incorrectly made repair may cause a serious hazard for the user. In the case of any defects, we advise you to turn to a specialist service centre.
ATTENTION! Remember that a level of oil in a pot should always be between indication marks of MIN and MAX on an inner part of a pot. Then, frying will be correct.
a level of oil is higher than a MAX level, it may result in splashing of hot oil and burning oneself.
a level of oil is lower than a MIN level, a thermal fuse may switch off the appliance. In such a case, leave an immer-sion heater to cool and next fill a pot with oil up to a relevant level and follow the instructions of the Use & Care Manual (the chapter "Operation and use").
ATTENTION! The use of the fryer with a too little amount of oil (below a MIN level) may result in overheating of heating elements of the appliance and, in consequence, its damage.
a thermal fuse switches off the appliance despite a proper level of oil in a pot, it is a sign of a failure of the fryer. In such an event, turn to a specialist service centre.
The fryer is intended for frying food only.
Before using the appliance check whether the voltage indicated on a data plate corresponds to that of electrical power supply.
Do not place the appliance close to or on the places being a source of heat (a heating plate etc.).
Remember that oil and certain parts of the fryer heat up during frying to very high temperatures. Because of that it is recommended to avoid touching them. For operation of the appliance use buttons and handles.
During frying do not move or carry the fryer. After frying the appliance may be moved or carried only after oil in a pot has cooled.
Do not plunge in water heating elements or parts containing heating elements, i.e. the casing of the fryer.
Take sure the oil basin is properly installed in the housing according to the marks in the upper left corner of the housing ▲ and on the oil basin ▼. If the basin is placed in a different position, the lid will not close.
Keep the appliance out of the reach of children when you use it. Do not let the power supply cord touch hot surfaces as well as hang over the edge of the table or worktop on which the fryer is standing. In this way you will avoid an acci-dental pulling and, in consequence, an uncontrolled movement of the appliance.
This appliance is not intended for use by persons (including children) with reduced physical, sensory or mental capabilities, or lack of experience and knowledge, unless they have been given supervision or instruction concerning use of the appliance by a person responsible for their safety.
●children should be supervised to ensure that they do not play with the appliance.
The appliance is not intended to be operated by means of an external timer or separate remote-control system.
After you have used the fryer, set the temperature control to the lowest setting (turn it completely to the left). Remove the plug from the wall socket and let the oil or fat cool down.
Never leave water in the pot for oil. Also there cannot be any water in a pot when it is filled with oil because it may re-sult in splashing of oil or even a small explosion.
Do not hang over oil the pot with frozen food if oil is not sufficiently heated (min. 130°C). It may result in a dangerous splashing of oil.
Excessive ice should be removed from frozen food in order to prevent splashing of oil.
It should be made sure that the above instructions have been understood.
Specifications
Technical parameters are indicated on the data plate of the appliance.
Capacity of the pot:
- 04Z011: min. 2,2 l, max 2,5 l.
- 04Z012: min. 1,5 l, max 1,7 l.
The fryer is the appliance of Class I, equipped with a power supply cord with protection wire and a plug with a protection bolt.
The fryer complies with the requirements of the binding norms.
The appliance complies with the requirements of the directives:
Electrical low voltage appliance (LVD) - 2006/95/EC.
Electromagnetic compatibility (EMC) - 2004/108/EC.
The appliance is marked with an indication CE on the data plate.
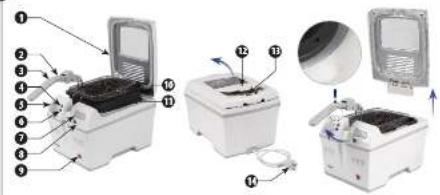
Parts Map (Fig. A)
1 Cover lid
2 Frying basket release button
3 Handle
4 "POWER" lamp
5 Temperature control
6 "TEMP." lamp
7 Cover lid opening button
8 "TIMER" button – timer
9 ON/OFF button
10 Frying basket
11 Pot
12 Filter cover
13 Filter
14 Power supply cord and plug
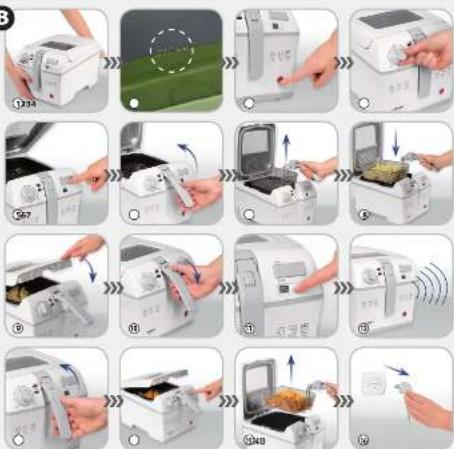
Operation and use (Fig. B)
① Put the appliance on a horizontal, even and stable surface out of the reach of children.
② Fill the fryer with oil, liquid fat or melted solid fat up to the level between indication marks of MIN and MAX on the inner part of the pot (11) based on figures presented in the below table:
| Capacity | 04Z011 04Z012 | |||||
| Liquid oil [l] | Solid Fat [kg] | Amount of chips [kg] | Liquid oil [l] | Solid Fat [kg] | Amount of chips [kg] | |
| MIN | 2.2 2. | 1 - 1.5 1 | 4 - | |||
| MAX | 2.5 2. | 3 1 1.7 1 | .6 0.4 | |||
We advise you to use frying oil or other liquid fat. If you want to use new blocks of fat, melt them slowly over a low heat in a normal pan to prevent spattering or overheating of the fat. It is possible to use solid fat, but in that case extra precautions are necessary to prevent the fat from spattering.
ATTENTION! Never mix two different kinds of oil or fat.
③ Close the lid (1) and put the plug in the wall socket. Push the power ON/OFF button, the red "POWER" (4) indicator signalling connection of the appliance to the electric power sup-ply becomes bright simultaneously as well as the green
"TEMP." (6) indicator signalling that the appliance is in heating up process.
④ Set the temperature control (5) to the correct temperature. For information about which temperature to select, check the chapter "Preparation times and temperature settings" in this Use & Care Manual. The oil or fat will be heated to the right temperature in 10 to 15 minutes.
While the fryer is working, the green indicator light (6) will go on and off a number of times as a result of reaching the set temperature. This is a normal state. When the appliance is ready for frying (the set temperature has been reached), the green indicator light will go off.
The same procedure applies if you want to fry a number of batches in a row. Therefore, wait until the green indicator light has gone off before you start frying the next batch.
⑤ Open the lid (1) pressing the release button (7).
⑥ Lift the handle.
⑦ Take the basket out of the fryer. Put the food to be fried in the bas-ket. For the best frying results, we advise you to use the recommended quantities of food as indicated in the chapter “Preparation times and temperature settings” of this Use & Care Manual.
ATTENTION! During frying, hot steamed is released through the fil-ter (13). Remember to keep your hands and face at a safe distance from the filter. You should also be careful of the hot steam when you open the lid (1).
⑧ Carefully insert the basket (10) in the fryer and make sure it is properly installed.
⑨ Next, close the lid (1).
⑩ Move the handle (3) up gently, move the release switch on it (2) and fold the handle.
⑪ In order to set the required frying time (in minutes), press the button „TIMER” (8) of a timer.
Method of using the timer button
- Keep pressing the timer button „TIMER” (8) for 1 second. The display of the timer will show a figure <00>. The display will turn off 5 seconds after the last pressing.
- Keep pressing the button „TIMER” (8) In order to set the required time. The figure on the display increases by 1 minute from <00> to <30>. When the time setting reaches the Max. figure, further pressing of the button „TIMER” (8) will again cause an increase of the figure on the display from the beginning, i.e. from <00> to <30> minutes.
- 2 seconds after setting the time, the display will begin to flash and count down the time. During counting down the dis-play show the figure indicating the remaining time of frying. The last minute of frying is indicated in seconds.
- Keeping pressing the button „TIMER” (8) for over 2 seconds during counting down the time results in stopping of counting down. The display will show a figure <00>. Then, the timer may be set again. The display will
turn off and the appliance will switch over to stand-by after about 5 seconds from the last pressing.
When time count down has finished, the display will indicate a figure <00> and the appliance will beep 5 times and after a while will beep again. 45 seconds later the appliance will automatically switch over to stand-by and the display will turn off.
⑫ When both time count down and frying has finished, you will hear being 5 times.
⑬ After frying, lift the handle (3).
⑭ Next open the lid (1) pressing the release button (7). Be aware of the hot steam.
⑮ Carefully remove the basket (10) from the fryer by means of a handle (3). If necessary, shake the basket (10) over the fryer to remove excessive oil or fat. Put the fried food in a bowl or colander containing grease-absorbing paper, e.g. kitchen paper.
⑯ Unplug the appliance after use.
If you do not use the fryer regularly, we advise you to store the oil or liquid fat in well-closed bottles, preferably in the refrigerator or in a cool place, after it has cooled down. Fill the bottles by pouring the oil or fat though a fine sieve to remove food particles.
Frying parameters setting
In the table below we show preparation times and temperature settings for certain dishes. If the instructions on the package of the food to be prepared differ from those in the table, always follow the instructions on the package.
FRESH OR DEFROSTED FOOD
| Temp. Type of food Recommended quantity Frying time | |||
| 160°C Fresh fish 450 g 5 – 7 min | |||
| 170°C | Chicken (drumsticks) 3 – 5 pieces 12 – 15 min | ||
| Mushrooms | 6 – 8 pieces | 2 – 3 min | |
| Vegetable fritters (i.e. cauliflower) | 8 – 10 pieces | 2 – 3 min | |
| 180°C | Chinese “spring rolls” | 8 – 10 pieces | 6 – 7 min |
| Chicken nuggets | 8 – 10 pieces | 3 – 4 min | |
| Mini snacks | 8 – 10 pieces | 3 – 4 min | |
| Fish (pieces) in batter | 8 – 10 pieces | 3 – 4 min | |
| Prawns | 8 – 10 pieces | 3 – 4 min | |
| Apple fritters | 5 pieces | 3 – 4 min | |
| 190°C | Home-made French fries | 650 – 1000 g | 8 – 9 min |
| Crisps (very thin potato slices) 600 g 3 – 4 min | |||
| Aubergine (slices) | 600 g 3 – 4 min | ||
| Meat/fish croquettes | 5 pieces | 4 – 5 min | |
FROZEN FOOD
| Temp. Type of food Recommended quantity Frying time | |||
| 170°C | Chicken (drumsticks) 3 – 4 pieces 15 – | 20 min | |
| Mini potato pancakes | 4 pieces | 3 – 4 min | |
| 180°C | Chinese “spring rolls” | 2 – 3 pieces 10 – 12 | min |
| Chicken medallions in a ready-made coating | 6 pieces | 9 min | |
| Mini snacks | 8 – 10 pieces | 4 – 5 min | |
| Fish (pieces) in batter | 8 – 10 pieces | 9 min | |
| Prawns | 8 – 10 pieces | 4 – 5 min | |
| Frozen straight/corrugated French fries | 650 – 1000 g | 9 min | |
| Meat/fish croquettes | 4 pieces | 6 – 7 min | |
Cleaning and maintenance
Before cleaning, the fryer should be unplugged.
After each using the fryer, clean it carefully.
Do not put into water the fryer's casing, electrical devices and parts containing heating elements.
The fryer's casing should be cleaned with wet soapy cloth.
Do not use aggressive detergents such as emulsion, cleaning milk, polish, etc. to wash the fryer's casing. They may among others remove the informative graphical symbols.
The lid (1), the frying basket (10), the inner pot (11), the filter (13) and the filter's lid (12) should be cleaned in hot soapy water. In model 04Z012 the bowl (11) can be cleaned with a damp cloth and detergent. Don't immerse it in water.
Never clean metal parts in a dishwasher. Aggressive cleaning agents used in these appliances make the above-mentioned parts darken. The fryer should be cleaned by hand with dishwashing liquid.
To start cleaning the fryer, wait until oil or fat has cooled down sufficiently.
The fryer has a replaceable fishnet filter (13) placed under the filter's lid (12) which should be systematically cleaned in soapy water.
After the filter (13) has dried, place it under the lid (12).
Change of oil or fat
As the oil or fat loses its favorable properties rather quickly, you should change the oil or fat regularly. To do so, follow the instructions below:
you mainly use the fryer to prepare French fries and if you sieve the oil or fat after use, you can re-use the oil or fat 10 to 12 times before it needs to be changed.
you use the fryer to prepare food that is rich in proteins (such as meat or fish), you should change the oil or fat more often.
Ever use the same oil longer than 6 months and always follow the instructions on the package.
Never add fresh oil or fat to the old one.
always change the oil or fat if it starts foaming when it is heated, when it starts to have a strong smell or taste or when it turns dark and syrupy.
Solution of problems
If the fryer does not function properly or if the frying quality is insufficient consult the table below. There you will find the most frequent problems and their possible causes as well as ways of solving such problems.
| Problem Possible cause Solution | ||
| The fried food does not have a golden brown color and/or is not crispy | The selected temperature is too low and/or the food has not been fried long enough. | Check on the package of the food or in the table in these instructions for use whether the temperature and/or preparation time you have selected is/are correct. Set the temperature control to the correct temperature. If necessary, increase frying time. |
| There is too much food in the basket. | Do not fry more food at one time than the recommended quantities indicated in these instructions for use. | |
| The oil or fat does not get hot enough. | The fuse of temperature control may have blown. Return the appliance to authorized service centre for repairing or checking up. | |
| The fryer gives off a strong unpleasant smell. | The filter is saturated. | Remove the lid and clean the lid and filter in hot soapy water. |
| The oil of fat is not fresh anymore. | Change the oil or fat. Regularly sieve the oil or fat to keep it fresh longer. | |
| The types of oil or fat used are not suitable for deep-frying food. | Use frying oil or liquid frying fat of good quality. Never mix two different types of oil or fat. | |
| Steam escapes from other places than the filter. | The lid has not been closed properly. | Check whether the lid has been closed properly. |
| The filter is saturated. Change the filter. | ||
| The sealing ring around the metal inside of the lid is dirty or worn. | If the ring is dirty, clean the lid in hot soapy water. If the lid is worn, turn to authorized service centre for replacement. | |


- PL
- Szanowni Klienci
- Ecology - Environment protection
- Safety and proper use
- ATTENTION! Remember that a level of oil in a pot should always be between indication marks of MIN and MAX on an inner part of a pot. Then, frying will be correct.
- ATTENTION! The use of the fryer with a too little amount of oil (below a MIN level) may result in overheating of heating elements of the appliance and, in consequence, its damage.
- It should be made sure that the above instructions have been understood.
- Specifications
- Parts Map (Fig. A)
- Operation and use (Fig. B)
- ATTENTION! Never mix two different kinds of oil or fat.
- Method of using the timer button
- Frying parameters setting
- Cleaning and maintenance
- Change of oil or fat
- Solution of problems
Brand : Zelmer
Model : 04Z012
Category : Deep fryer