
RTCC 636 SURIP - Hi-Fi System HYUNDAI - Free user manual and instructions
Find the device manual for free RTCC 636 SURIP HYUNDAI in PDF.

| Product Type | Hi-Fi System |
| Brand | Hyundai |
| Model | RTCC 636 SURIP |
| Power Supply | AC 230V ~ 50Hz |
| Power Consumption | Approx. 60W |
| Radio Tuner | FM Stereo with RDS, 30 presets |
| CD Player | 3-disc changer, supports CD, CD-R, MP3 CD |
| Cassette Deck | 2 decks, auto stop, high speed dubbing |
| Turntable | Phono, 33/45 RPM, auto stop |
| USB/SD Playback | MP3 files from USB flash drive or SD/MMC card |
| Encoding | CD, cassette, phono to MP3 on USB/SD, 128 kbps |
| Equalizer | 5 presets: Flat, Pop, Jazz, Rock, Classic |
| Sleep Timer | Yes, up to 90 minutes |
| Alarm Clock | Yes, wake to CD/Tuner/USB/SD |
| Remote Control | Yes, with 2xAAA batteries (not included) |
| Speakers | Wired, 2 speakers (included) |
| Display | LCD with backlight |
| Headphone Jack | 3.5mm |
| Dimensions (Main Unit) | Approx. 430 x 320 x 150 mm |
| Weight | Approx. 5 kg |
| Safety Features | Overload protection, class I laser |
Frequently Asked Questions - RTCC 636 SURIP HYUNDAI
User questions about RTCC 636 SURIP HYUNDAI
0 question about this device. Answer the ones you know or ask your own.
Ask a new question about this device
Download the instructions for your Hi-Fi System in PDF format for free! Find your manual RTCC 636 SURIP - HYUNDAI and take your electronic device back in hand. On this page are published all the documents necessary for the use of your device. RTCC 636 SURIP by HYUNDAI.
USER MANUAL RTCC 636 SURIP HYUNDAI
natural_image
Black Hyundai portable audio recording device with two speakers and a digital display (no visible text or symbols on main body)NÁVOD K POUŽITÍ / NÁVOD NA POUŽITIE INSTRUKCJA OBSŁUGI / INSTRUCTION MANUAL HASZNÁLATI UTASÍTÁS
natural_image
Diagram of a battery pack with an arrow indicating a component or insertion, showing no text or symbols.BEZPEČNOSTNÍ UPOZORNĚNÍ PRO BATERIE


natural_image
Illustration of a hand holding a thin bundle with an arrow indicating direction (no text or symbols)DÔLEŽITÉ BEZPEČNOSTNÉ POKYNY:
natural_image
Diagram of a battery pack with an arrow indicating a process or insertion, showing no text or symbols.BEZPEČNOSTNÉ UPOZORNENIE PRE BATÉRIE
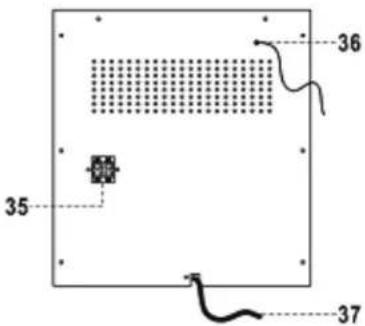
PRÍJEM FM A FM STEREO (DIAL'KOVÝM OVLÁDAČOM)
TIP PRE NAJLEPŠÍ PRIJEM:
natural_image
Illustration of a hand holding a thin bundle with an arrow indicating direction (no text or symbols)natural_image
Diagram of a battery pack with an arrow indicating direction, showing internal components and battery casing (no text or symbols)
KLASYFIKACJA PROGRAMÓW:
natural_image
Illustration of a hand holding a thin bundle with an arrow indicating force or movement (no text or symbols)B. NAGRYWANIE Z RADIA
C. NAGRYWANIE Z CD/USB/SD
Producent: Hyundai Corporation, Seoul, Korea
Importer: DIGISON Polska sp. z o.o., ul. Krzemieniecka 46, Wrocław 54 613 Poland

The lighting flash and arrow head within the triangle is warning sign alerting you of dangerous voltage inside the product
CAUTION
RISK OF ELECTRIC SHOCK DO NOT OPEN
CAUTION : TO REDUCE THE RISK OF ELECTRIC SHOCK DO NOT REMOVE COVER (OR BACK). NO USER SERVICIABLE PARTS INSIDE. REFER SERVICING TO QUALIFIED SERVICE PERSONNEL.

The exclamation point within the triangle is a warning sign alerting you of important instructions accompanying the product
I IMPORTANT SAFETY INSTRUCTIONS:
- Read the instructions. All uses guidelines must be read before start device.
- Keep the instructions for future use.
- Attention, use and security guidelines must be respected.
- The device must not be used near water or be put in contact with moisture.
- Make sure has no liquid is spilled on device and device openings.
- Move device carefully, avoid shocks.
- Do not block the breakdown of the device outputs.
- Do not place the device near from a heat source (e.g. radiator). Do not expose it to the Sun.
- Plug the device as indicate on this information form.
- This device has a connection with overload protection (security device) decision-making. If the replacement of decision-making is required, please you send has an experienced or the device manufacturer technician.
- For cleaning the device, please follow the recommendations of the notice.
- The sector cord should be unplugged a long period of use.
- Device shall be repaired by a qualified person when:
a. the power cord is damaged,
b. objects have fallen into the apparatus or a liquid has been spilled into device,
c. device was exposes to the rain,
d. device does not work correctly without notable exterior change,
e. device is broken. - The user shall not try to maintain device beyond that which is described in this information form. The guarantee would negate.
- The apparatus shall not be exposed to dripping or splashing and that no objects filled with liquids, such as vases, shall be placed on apparatus.
- To be completely disconnect the power input, the mains plug of apparatus shall be disconnected from the mains." as the disconnect devices is the mains plug of apparatus.
- The mains plug of apparatus should not be obstructed OR should be easily accessed during intended use.
- Battery shall not be exposed to excessive heat such as sunshine, fire or the like.
- Excessive sound pressure form earphones and headphones can cause hearing loss.
- Minimum distance (150-180mm) around the apparatus for sufficient ventilations;
- The ventilation should not be impeded by covering the ventilation opening with items such as newspaper, table-cloths, curtain etc;
- No naked flame sources such as lighted candles should be placed on the apparatus;
- Attention should be drawn to the environmental aspects of battery disposal;
- The use of apparatus in moderate climates

CLASS I LASER PRODUCT
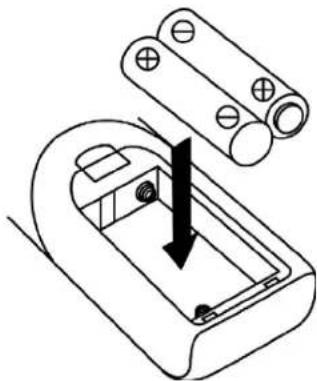
BATTERY INSTALLATION
- The battery compartment is located on the back of the remote control.
- Remove the battery compartment door by pressing in on the tab and lifting it off.
- Insert two (2) AAA size batteries (not included) into the battery compartment following the polarity markings inside the battery compartment.
- Replace the battery compartment door.
natural_image
Diagram of a battery pack with an arrow indicating a component, no text or symbols presentBATTERY PRECAUTIONS
- Replacement of batteries must be done by an adult.
- Do not mix old and new batteries.
- Do not mix alkaline, standard (carbon-zinc) or rechargeable (nickel-cadmium) batteries.
• The supply terminals are not to be short-circuited.
• Non-rechargeable batteries are not to be recharged.
• Exhausted batteries are to be removed. - Only batteries of the equivalent type are to be used.
- Batteries are to be inserted with the correct polarity.
- Dispose of batteries properly. Do not dispose of batteries in fire. The batteries may explode or leak.
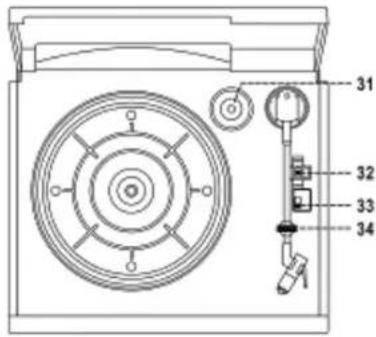
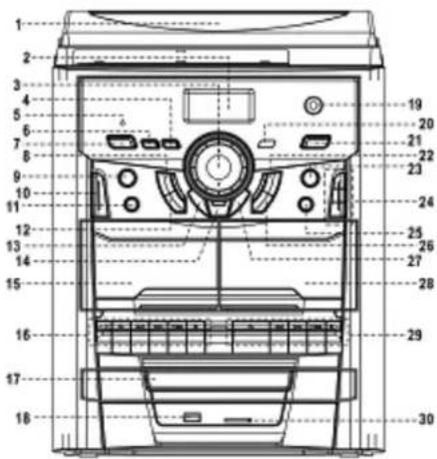
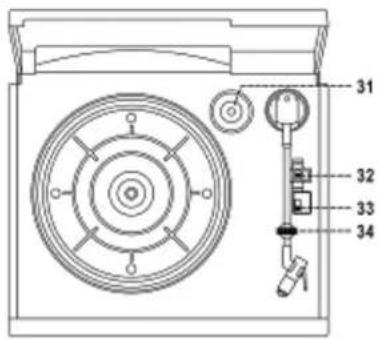
LOCATION OF CONTROLS
-
Dust cover 17. CD door
-
LCD display 18. USB socket
-
Volume up/down button 19. 3.5mm headphone jack
-
Timer/clock-adjust button 20. Remote sensor
-
Standby LED indicator 21. Pre-set EQ button
-
High speed dubbing button 22. Play/pause button
-
On/standby button 23. Disc skip button
-
Stop ■ button 24. Disc 1, 2, 3 button
-
Memory button 25. CD door open button
-
Function select button 26. Skip / tuning up
-
Repeat/Random button 27. MP3 folder / pre-up button
-
Skip / Tuning down ◀button 28. Cassette door (2)
-
MP3 folder/ pre-dn ▼ button 29. Deck 2 control keys
-
USB/SD recording button 30. SD/MMC card slot
-
Cassette door (1) 31. Spindle adaptor
-
Deck (1) buttons 32. Turntable speed selector
- Record key 33. Auto stop switch
▶ Playback key 34. Pick-up holder
◀ Rewind key 35. Speaker wire terminal
▶ Fast forward key 36. FM wire antenna
■▲ Stop/eject key 37. AC line cord
|| Pause key
Caution:
Usage of controls or adjustments or performance of procedures other than those specified herein may result in hazardous radiation exposure.
This unit should not be adjusted or repaired by anyone except qualified service personnel.
Important:
Since movement of the cd mechanism and the sensitive circuitry may cause interference to the radio tuner nearby, switch this unit off while operating other radio devices.
Due to the complexity of MCU control, please un-plug the main power supply of the unit if found the unit hang up during operation!
This is not a malfunction of the system!
PRECAUTIONS FOR USE
INSTALLATION
- Unpack all parts and remove protective material.
- Do not connect the unit to the mains before checking the main voltage and before all other connections have been made.
- Do not cover any vents and make sure that there is a space of several centimeters around the unit for ventilation.
CONNECTION
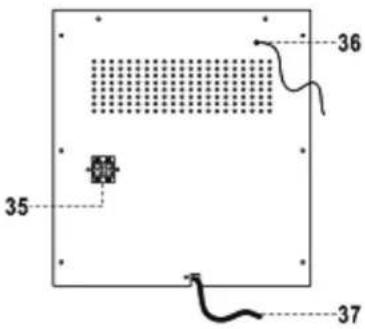
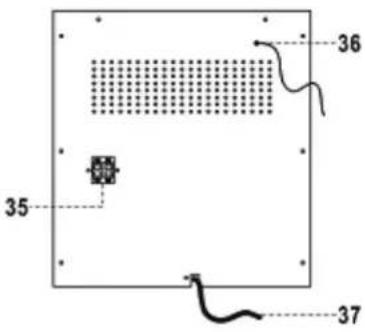
- Connect the power cord (37) to AC outlet.
- When you first plug the unit into the mains, the unit will go into standby mode.
- Connect the speaker wire to the speaker terminal (35) located on the rear side of the unit.
- Turn on the unit by pressing "On/Standby" button (7). If the LCD display (2) is on with backlighting, it means the power supply is normal. Now the system is ready to play the music.
SETTING THE CLOCK
- Set unit in standby mode.
- Press the "Timer/clk-adj" button (4), the display will show "12h" or "24h", then press the Pre-up▲(27) or Pre-down ▼13) button to select the appropriated hour format (12 hour or 24 hour). Press the "Timer/clk-adj" button (4) to confirm.
- Press Pre-up (27) or Pre-down (13) button to set the correct hour.
- Press the Skip down (12) or Skip up (20) button to set the correct minutes.
- Press "Timer/clk-adj" button (4) to store the correct hour.
- The pre-set time will be re-set completely if dis-connecting the main power supply. You are recommended to switch the system into standby mode for convenience usage.
LISTENING TO RADIO
MANUAL TUNING
- Turn on the unit by pressing "On/Standby" button (7) and press Function button (10) to select "tuner" mode
- Tune to the required station by pressing the "Skip / tuning up ▶(26) or down (12) button.
- Adjust Volume up/down controls (3) to the desired volume level.
AUTO TUNING
- Press function button (10) to select "tuner" mode
- Press and hold the “Skip / tuning up ▶▶1 (26) or down ◀◀2) button for 1-2 seconds and then release
- The unit will start seeking automatically and stop until a radio station is reached.
- Repeat step 2 until the desired radio station is being reached.
- Adjust Volume up/down controls (3) to the desired volume level.
PRESET STATIONS
- You can store up to total of 30 radio stations (30 FM) in the memory.
- Set to "Tuner" mode
- Turn to the desired radio station by "manual" or "auto" tuning method.
- Press "Memory" button (9) to enable program state.
- Press "Pre-up (27) or Pre-down (▼3) button to select the desired station memory for storage.
- Press "Memory" button (9) again to confirm the setting.
- Repeat step 2 to 5 to store other stations.
- Press "Pre-up (27) or Pre-down (▼3) button to recall the preset stations in order.
- To return normal tuner mode, leave keys free.
- The pre-set memories will be cancelled completely if switching off the main power button on system. You are recommended to switch the system into standby mode for convenience usage.
- There are 5 seconds for program state, after 5 sec. This state would release to normal tuner mode automatically.
- You can overwrite a present station by storing another frequency in its place.
RADIO DATA SYSTEM (RDS)
This is the features to display the information which released from the radio broadcast:-
RDS mode : Press and hold to active the RDS function and the program service station name (PS) is being displayed.
RDS search : press to select the program type you want to listen, then press the tuning +/- button to start RDS searching and the unit can automatically detect a suitable station, which is currently broadcasting with program type identification (PTY) signal.
Remark : no “PS” nor “PTY” appears if no signal is sent.
Programs are classified as follows:
News, affairs (current affairs), info (information), sport educate (education), drama, culture, science,
Varied, pop m (pop music), rock m (rock music), mor m (middle of the road music), light m (light classical),
Classics (serious classical), other m (other music).
Notes
Program service station name (PS)
This is a name consisting of less than 8 alphanumeric characters, which is displayed in order to inform listeners about the program service being broadcast by the radio station. Example: bbc 1
Program type identification (PTY)
PTY allows selection by one of the program types rather than by a station.
Radio text (text)
Information such as the cast list of a play or the title of a song is shown on the display.
Clock-timer (CT)
CT function provides an accurate clock signal.
If the clock of the system is not adjusted after plug in, when a RDS clock is received, the system
will automatically update the system clock to the received RDS clock time. The system clock is now adjusted.
FM & FM-STEREO RECEPTION (BY REMOTE HANDSET)
- Press the “FM-st/mono” button at remote handset repeatedly, the FM programs are receiving in mono and stereo mode repeatedly. In particular when stereo signals are weak. It is preferable to receive the program in mono.
- If stereo signal is being received, the "ST" indicator " (ST)" will appear on LCD (2) to show FM stereo program is now receiving.
Hints for best reception:-
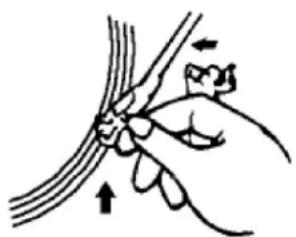
- FM : The receiver has a build-in FM wire antenna (36) hanging at the rear cabinet. This wire should be totally unraveled and extended for the best reception.
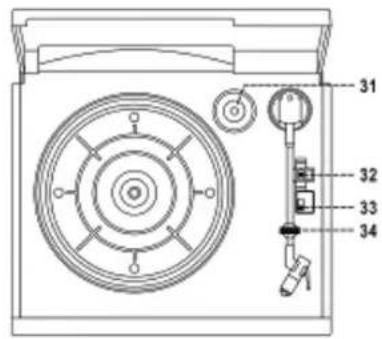
PHONO
noted:
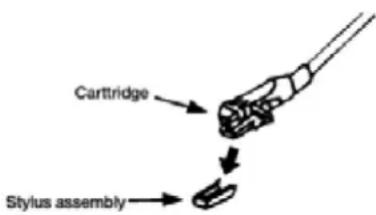
- Remove the stylus protector. - Be sure that the tone arm is being detached from the tone arm rest before operating and re-secured again afterwards.
- Select to "Phono" mode from function selector (10)
- Set the speed selector (32) to the proper position depending on the type of record to be played.
- place the record on the platter (use the spindle adaptor (31) if required).
- Lift the tone arm from the rest (34) and slowly move it to the record side. The platter will start to rotate.
- Place the tone arm to the desired position of the record.
- Adjust the Volume up/down button (3) to the desired level.
- At the end of record, the platter will automatically stop rotating. Lift the tone arm from the record and return it to the rest position (34).
- To stop manually, lift up the tone arm from the record and return it to the rest (34).
natural_image
Illustration of a hand holding a thin bundle with an arrow indicating force direction (no text or symbols)Remark : As some kind of record the auto-stop area was out of the unit setting, so it will stop before the last track finish. In this case, select the auto-stop switch (33) to " off " position, then it will run to the end of the record but will not stop automatically (turn off the unit by power button or switch back the auto-stop switch (33) to " on " position to stop the platter rotate). Then put back the tone arm to the rest position (33).
PLAYING COMPACT DISC
- Getting start
- Select "CD" mode from Function selector (10)
- Press "Open/close" button (25) to open the CD door.
- Place a CD with the printed side facing up inside the tray.
- Press the “DISC SKIP” button (23) to turning the CD tray, and loading out the other disc compartment.
- Press the "Open/close" button (25) to close the cd door after placing all discs inside.
- CD search is performing, the LCD display (2) will show the total number of disc, number of tracks & playing time of disc.
Noted : CD searching will be performed every time when switching to CD mode or closing the CD door. All CD functions will be response only after the CD reading is completed.
- Play / pause mode
- System will start playback automatically or press the "Play/pause ▶II" button (22) to start playback, the first track of the first disc will be played and the playback information will appear on the LCD display (2).
- Or press either the “disc 1”, “disc 2”, “disc 3” button (24), unit will play the disc inside the desire tray directly.
- To interrupt, press the "Play/pause ▶" button (22) once and the information on LCD display (2) will start flashing. Press again to release & resume normal playback.
Remark : The CD tray will open if press “CD door” open button (25) during playback. This allow to change/take out the other two CDs without interrupt the music playback.
- Stop mode
If "Stop ■" button (8) is pressed during play or pause mode, system will go to stop mode.
- Skip mode (skip up /skip down)
- During play or pause mode, if "Skip up ▶▶" button (26) is pressed it will go to next track and display the track no. and then remain the play or pause mode.
- During play or pause mode, if "Skip down" button (12) is pressed. It will go back to the beginning of the track, original track no. is display and remain the play or pause mode.
- After step 2, press "Skip down I button (12) again, it will go to the previous track and remain the play or pause mode.
- Search mode (search up /search down)
- During play mode, if "Skip up ➤button (26) is pressed & hold for few seconds, it will start searching forward.
- During play mode, if "Skip down ◀◀" button (12) is pressed & hold for few seconds. It will star searching backwards.
- For MP3 disc
- After focus search is performing, the total number of track and folder will be shown on the LCD display (2).
- Press "Pre-up ▲(27) or "pre-down ▼(13) button to select the folder number.
- Press "Skip up ▶▶" (26) or skip down ◀◀12) button to select the track number.
- When the desired track and folder is being selected, press the "Play/pause ▶II" button (22) to start playback.
ID3 (TRACK TITLE/ALBUM/ARTIST) FUNCTION (BY REMOTE HANDSET)
Press the “Display” button repeatedly during playback of MP3 disc, the song title / album name / artist name is being displayed in order. The LCD display (2) will resume to normal playback information if leave key free.
Remark:-
- in that case of no name had been assigned for the track, “no title” or “no album” or “no artist” is being displayed” on display (2).
- No title/album name can be recognized if the input format on the disc/memory card is not supporting by the system
- The system support only English and Arabic number for ID3 function
MP3 track format requirement:-
- Bit rate : 32 kbps\~320kbps, sampling rate : 32kHz, 44.1kHz and 48 kHz decodable
- The performance of playing MP3 disc is various from the quality of recording disc and the method of recording. Furthermore, the searching lead-time for MP3-CD is longer than normal CD due to difference format.
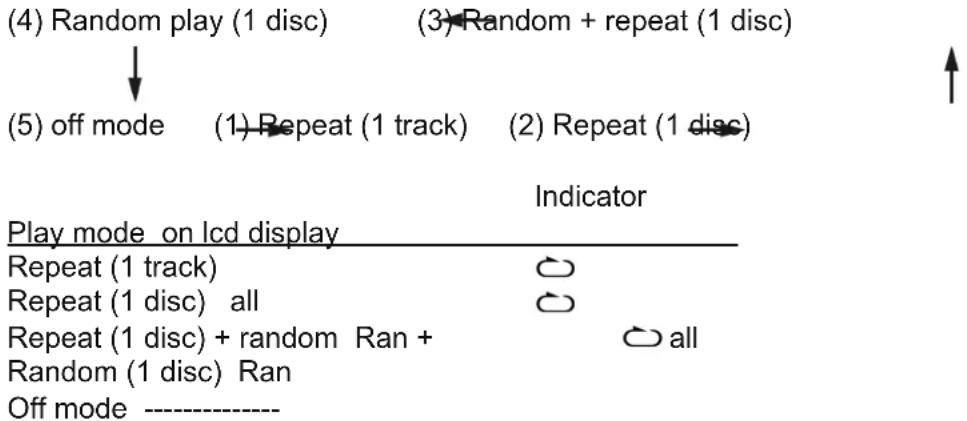
- Repeat/random mode
Press the repeat/random button before or during playback, a single track, single disc or all the tracks can be played in difference mode as follow:-
FOR CD/MP3 DISC
flowchart
graph TD
    A["(4) Random play (1 disc)"] --> B["(5) off mode"]
    C["(3) Random + repeat (1 disc)"] --> D["(1) Repeat (1 track)"]
    E["(2) Repeat (1 disc)"] --> F["Indicator"]
    G["Play mode on lcd display"] --> H["Repeat (1 track)"]
    G --> I["Repeat (1 disc) all"]
    G --> J["Repeat (1 disc) + random Ran + Random (1 disc) Ran"]
    G --> K["Off mode ----"]
- Repeat play
You can listen the desired tracks or folder repeatedly by this function.
- Random play
You can listen all the tracks or folder in a random order by this function
CD/MP3 DISC PROGRAMMING
Up to 40 tacks can be programmed for disc play in any order. Before use, be sure to press the "stop ■" button (8)
- Set in CD mode & stop the CD playback.
- Press the “Memory button (9),” MEM “will appear on LCD display (2) & flashing. Moreover, it will indicate program no. and digits for track no. to be programmed.
- Select a desired track by pressing skip up▶▶ or down ◀◀ buttons (26,12).
- (for MP3 disc, press" pre-up ▲" (27) or "pre-down ▼" (13) button to select the desire folder)
- Press the "Memory" button (9) to store the trace into memory.
- Repeat steps 3 and 4 to enter additional tracks into the memory if necessary.
- When all the desired tracks have been programmed, press "Play/pause ▶II" button (22) to play the disc in assigned order.
-
Press “Stop ■” button (8) to terminate program play. Press again “stop ■” button (8) to clear all memory & the indicator “MEM” disappear from LCD display (2)
-
After program complete, press “Skip up▶▶ or down ◀◀ buttons (26,12) to review the tracks being programmed. Press “CD stop” button (20) to exit review mode.
- The programming function allows to program 1 disc only.
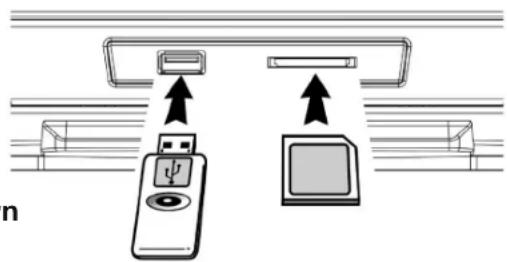
PLAYBACK OF MP3 SONG VIA USB STORAGE MEDIA OR MEMORY CARD
CONNECTING
The system is able to decode and playback all MP3 file which stored in the memory media with USB connecting port, multi-media card (MMC) or secure digital (SD) memory card
- Press function button (10) repeatedly to select "USB" or "SD card" mode.
- Plug-in the USB pen-drive with the face up & make sure it going into completely or insert the memory card in the direction of the symbol which next to the SD card slot. Insert straight without bending.
- Connecting the USB / memory card upside down or backwards could damage the audio system or the storage media (USB / memory card). Check to be sure the direction is correct before connection.
- The system will start reading the storage media automatically after connecting, and LCD display (2) will show the total number of MP3 files and total number of album being detected.
- Repeat the same playback procedure as playing CD/MP3 disc as above
Remark
- The system can detect and read the file under MP3 format only though the USB port/memory card slot.
- If connect the system to MP3 player via the USB socket, due to variances in MP3 encoding format, some MP3 player may not be able to play via the USB socket. This is not the malfunction of the system.
- USB port does not support connection with USB extension cable and is not designed for communication with computer directly.
ENCODING OF CD FILE INTO MP3 FILE
The system is able to encode normal cd/phone/tape to MP3 format and recording at memory media with USB connecting port, multi-media card (mmc) or secure digital (SD) memory card.
A) CD ENCODING
I) Encoding 1 track or entire disc
- Perform normal playback of the CD track you want to encode & record,
- Press “●Rec” button (14) during the playback of the desire track, unit will display “USB” or “card” & flashing. (if both source are ready during recording). Then press “skip up▶” or “down◀◀” buttons (26,12) to select and then press “●Rec” button (14) to confirm.
- The system will show "USB" or "card" & "REG and flashing. Encoding is performing now.
- Press “●Rec” button (14) to select record 1 track or all track during encode mode, display will show “REC ONE” or “REC ALL” respectively.
- Press "Stop ■" button (8) to terminate the recording.
Remark:-
- The recording speed is 1:1 and according to the actual plying time of the cd track
- The system will create a "audio" folder and then store the encoding track in it.
- The recording format is preset at – MP3 bit rate : 128 kbps, sampling rate : 44.1khz
- No song title/album name/artist name will be recorded during encoding mode
- To interrupt the recording, press the "Stop ■" button (8) during record mode.
- Always insert either one type of memory media “USB pen-drive” or “SD/MMC card” for encoding.
- Recording will be completed only entire song being encoded, if terminate the encoding process intermediately, there is no track being recorded nor stored to the USB or SD/MMC card
II) COPYING OF MP3 FILE
If putting a MP3 disc instead of a cd-disc, the system will copy the files to the USB or SD/MMC card if press the “Rec” button (14). The operation procedures is same as cd encoding as stipulate on above, and the system will switch to copying mode only if MP3 file being read.
Remark:
- The system will create a "fcopy" folder and then store all copied track in it.
- If press the “●Rec” button (14) during playback of USB or SD source, the file will copy from USB to SD or SD to USB
- Copying will be completed only entire song being copy, if terminate the copy process intermediately, there is no track being recorded nor stored to the USB or SD/MMC card
B) CASSETTE ENCODING
- Select to "Tape" mode from function selector (10) and then press the "Rec" button (14) directly.
- The LCD display (2) with show the word "USB" or "card" and "REC" & flashing, press "● Rec" button (14) again to confirm and the system is starting the encoding mode.
- Start playback of the cassette tape which the track you prepare to record.
- After finish of recoding, press the "Stop ■" button (8) until the text on LCD (2) stop flashing and return to "Tape" mode.
C) PHONO ENCODING
- Press the Function button (10) to "Phono" mode and then press the "Rec" button (14) directly.
- The LCD display with show the word "USB" or "SD" and then flashing, and then display " & "REQhd flashing after few seconds, press "Re●" button (14) again to confirm and the system is starting the encoding mode.
- Start playback at Phono for the track which you want to recording..
- After finish of recoding, press the "Stop ■" button (8) until the LCD stop flashing and return to "Phono" mode.
TRACK SEPARATION (BY REMOTE HANDSET)
You can divide the recording music from phono or tape to USB/sd track by trace during encoding. Every time when press the “T track separation) button once at remote handset during encoding from phono or tape to USB/SD, the system will generate a new track and continuous the recording. The text “phono” or “tape” at LCD display (2) will flashing one time, it mean the unit is creating a new track successfully.
FILE DELETE AT USB / SD CARD (BY REMOTE CONTROL)
The system is able to erase the file stored inside the USB pen drive or SD card by following:-
SINGLE FILE DELETE (BY REMOTE CONTROL)
- Press "Skip up ▶▶" or "down ◀buttons (26,12) to select the file going to delete
- Press "Delete" button on remote and the LCD display (2) will show (delete track---001)
- Press the "Delete" button again to confirm the deletion.
Remark : press "Stop ■" button (8) to exit delete mode anytime
REMOVING OF USB / MEMORY CARD
To remove the USB / memory card, turn off the power or switch the function mode to either CD, or tuner first. For USB port – un-plug it by pulling out the USB socket directly, for memory card – pull out the SD/MMC card straightly without bending.
LISTING TO TAPE
GENERAL OPERATION
Stop / eject key press to stop all deck operation. Press again to open the cassette door.
Fast forward key & press to start rapid tape winding in either forward or revers Fast rewind key direction. Press stop / fast rewind key eject keys when the cassette spools stop turning.
Play key press to start playing tape.
Pause key press to stop tape operation temporarily. Press again to resume play.
Record key press together with play key to start tape recording. (deck 1 only)
PLAYBACK
- Select "Tape" mode from Function selector (10)
- Put in the cassette tape.
- Press play key to active playback
- Adjust the Volume up/down control (3) to the desired level.
- Use pause key when you want to stop playback temporarily.
- Press stop / eject key when finished.
Notes:
It is possible to play a cassette in both cassette players, one after the other. If you press the "play" button at deck 2 and then press "pause" and "play" buttons together at deck 1. the tape in deck 1 will start player automatically after the tape in deck 2 has finished playing.
RECORDING
A. Recording from tape (deck 2 to deck 1)
This unit enables you to duplicate a pre-recorded tape to another tape. It is performed only one way from deck 2 ( playback) to deck 1 (recording).
Dubbing at normal speed
- Select “Tape” mode from Function selector (10) and then set the dubbing button (6) at “nor.” “position
- Inset a pre-recorded cassette into deck 2 and a blank cassette tape into deck 1.
- Press the “Pause” key and then press the “Record ●” and “Play ▶ key at deck 1.
- Press the “Play ▶” key to start playback at deck 2 & then release “Pause Ⅲ” key at deck 1 to start dubbing.
- Press “Pause” key at deck 1 & “stop” key at deck 2 when finish.
Dubbing at high speed
This unit is quipped with a high speed dubbing system which can save the time for dubbing by 2/3 when compare to normal speed.
- Press the Dubbing button (6) to “☐” position and then follow the same procedures as stipulated in “dubbing at normal speed”.
- When dubbing a pre-recorded cassette tape at high speed, a chattering sound is being heard. To avoid this, set the volume control to a minimum level.
- Do no press o select the “Dubbing” button (6) to hi or nor. Position during dubbing, this will vary the speed of recording and may be damage the cassette tape.
B. Recording from radio
- Select “Tuner” mode from Function selector (10)
- Tune to the desired station and insert a blank cassette tape in deck 1.
- Press "Record" & "play" key to start recording.
- Press “Pause” keys and then “stop/ejente” key when finish.
C. Recording from CD/USB/SD
- Select "SD/USB/SD" mode from Function selector (10).
- Insert a black cassette tape in deck 1 which suitable for recording.
- Press “Pause” key first and then “Record” & “Play ▶key at cassette. Recording function is now on stand by.
- Start playback of either CD/USB/SD mode, and then press "Pause key Ⅲ" at cassette to start recording.
- To stop recording, press "Stop ■" button (8) on CD/USB/SD mode first, then press the "pause■" key and then "stop/eject ■key on cassette tape deck.
D. Recording from turntable
- Select "Phono" mode From function selector (10).
- Insert a blank cassette tape in deck 1.
- Press "Record & " Play ▶ key to start recording.
- Select the desire record and start playback
- Press “Pause” keys and then “stop/eject■”▲key when finish.
MORE FEATURES
A. SLEEP SETTING (BY REMOTE CONTROL)
- The sleep function enables the system switch to standby mode automatically at a present time.
- Press "sleep/timer" button and sleep indicator "zzz" shown on the lcd display (2).
- Keep pressing the button to adjust the sleep timer in the order of slp 90 > 75 > 60 > 45 > 30 > 15 minutes.
- System will stop and go to standby mode automatically after the selected timing.
- To cancel the sleep mode, press "timer/sleep" button until "off" is displayed on LCD (2) & the "zzz" indicator disappear.
B. ALARM CLOCK SETTING
This function allows the system to turn on automatically and wake you up by mode of CD, tuner, or USB/SD.
7
Set the system at standby mode, then press and hold the “Timer/clk-adj” button (4) to enter the program mode:-
- wake up mode :
press the skip down ◀◀ (12) or skip up ▶(26) button to select CD/USB/SD or tuner mode respectively, but make sure the music source has been prepared (CD – load with disc / tuner – turn to the desired radio station / USB/SD – connect a USB mass storage device or SD/MMC card with music file inside). Then press “Timer/clk-adj” button (4) to confirm the wake up source
- wake up time :
press pre-up▲(27) or pre-down ▼13) button to set the correct hour. And Skip down (112) or skip up ▶(26) button to set the correct minutes
- Press "Timer/clk-adj" button (4) to store the setting and the system will start playing when reach the preset time.
Remark
If there is no disc inside the selected CD tray, the system will select the next available disc. If there is no music source being detected when the preset time is reached, system will select tuner mode automatically.
• Active/de-active timer function (by remote control)
- To active timer function, press the "Sleep/timer" button on remote handset until the timer indicator "💡" is appear on LCD display (2).
- To cancel timer function, press again "Sleep/timer" button until the timer indicator " disappear.
C. PRE-SET EQ FUNCTION
This unit provides 5 differences sound mode to enhance your listening experience. You can select the desired effect by pressing the “preset EQ” button (21) repeatedly at following sequence:-

flowchart
graph LR
    A["Flat"] --> B["pop"]
    B --> C["jazz"] --> D["rock"]
    D --> E["classic"] --> F["→"]
    G["↑"] --> H["End"]
REMOTE CONTROL TRANSMITTER
Control functions
Battery installation (battery not provided)
The infra-red transmitter require 2 pcs "AAA" battery for operation
Button description
CD/SD/USB Press to select function of CD/SD/USB respectively
On/standby Press to switch system on or goes to standby mode
Tape Press to select tape function
Tuner Press to select radio function
Phono Press to select turntable function
Number key (0 - 9) Press to select the number of CD/USB/SD track directly
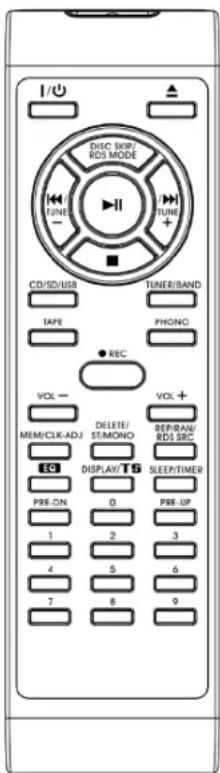
Pre-dn In MP3/USB/SD mode : press to skip down the folder In tuner mode : press to call out the preset memory in order In timer/clk-adj mode : press to select hour goes down
Pre-up In MP3/USB/SD mode : press to skip up the folder In tuner mode : press to call out the preset memory in order In timer/clk-adj mode : press to select hour goes up
Volume -/+ Control volume up or down
Play/pause▶In CD/USB/SD mode, press once to start playback. Press once again to enter pause mode
Stop■Press to terminate CD/USB/SD playback or clear all preset memory
8
Skip up/down In CD mode : to select previous / next cd track In tuner mode : press to step up/down of frequency In timer/clk-adj mode : press to select minutes go up or down
Open/close In CD mode : press to open or close the cd door tray
●Rec Press to active encoding or mp3 fi le copy function
FM-st/mono / delete In tuner mode : press to select FM stereo or FM mono mode In USB/SD mode : press to active fi le delete function
Memory/clk-adj In standby mode : press to active clock adjust / press & hold to active timer (alarm) setting In CD/USB/CD : press to active program function
Disc skip/RDS mode in CD mode : press to select disc 1,2,3 respectively in tuner mode : press to select RDS mode & information on LCD
Rep/ran / RDS src In cd mode : press to active repeat / random function In tuner mode : press to select the RDS program type for searching
EQ Press to select difference EQ mode for enjoyment
Display / track separation Playback mode : press to display difference information of the system Phone/tape encoding mode : press to divide the recording track at turntable or tape one by one during encoding
Sleep / timer Playback mode : press to active sleep function during music playback Standby mode : press to active or de active the alarm wake up function

WARNING: Do not use this product near water, in wet areas to avoid fire or injury of electric current. Always turn off the product when you don't use it or before a revision. There aren't any parts in this appliance which are reparable by consumer. Always appeal to a qualified authorized service. The product is under a dangerous tention.
Old electrical appliances, used batteries and accumulators disposal

This symbol appearing on the product, on the product accessories or on the product packing means that the product must not be disposed as household waste. When the product/ battery durability is over, please, deliver the product or battery (if it is enclosed) to the respective collection point, where the electrical appliances or batteries will be recycled. The places, where the used electrical appliances are collected, exist in the European Union and in other European countries as well. By proper disposal of the product you can prevent possible negative impact on environment and human health, which might otherwise occur as a consequence of improper manipulation with the product or battery/ accumulator. Recycling of materials contributes to protection of natural resources. Therefore, please, do not throw the old electrical appliances and batteries/ accumulators in the household waste. Information, where it is possible to leave the old electrical appliances for free, is provided at your local authority, at the store where you have bought the product. Information, where you can leave the batteries and accumulators for free, is provided to you at the store, at your local authority.
We reserve the right to change technical specifications.
A TÜZ ÉS ÁRAMÜTÉS ELKERÜLÉSE ÉRDEKÉBEN NE TEGYE KI A KÉSZÜLÉKET VÍZNEK, VAGY NEDVESSEGNEK!

natural_image
Diagram of a battery pack with an arrow indicating a component or operation, no text or symbols present.AZ ELEMEKKEL KAPCSOLATOS ÓVINTÉZKEDÉSEK
natural_image
Illustration of a hand holding a thin bundle with an arrow indicating direction (no text or symbols)Licensed by Hyundai Corporation, Korea


- NÁVOD K POUŽITÍ / NÁVOD NA POUŽITIE INSTRUKCJA OBSŁUGI / INSTRUCTION MANUAL HASZNÁLATI UTASÍTÁS
- BEZPEČNOSTNÍ UPOZORNĚNÍ PRO BATERIE
- DÔLEŽITÉ BEZPEČNOSTNÉ POKYNY:
- BEZPEČNOSTNÉ UPOZORNENIE PRE BATÉRIE
- PRÍJEM FM A FM STEREO (DIAL'KOVÝM OVLÁDAČOM)
- TIP PRE NAJLEPŠÍ PRIJEM:
- KLASYFIKACJA PROGRAMÓW:
- NAGRYWANIE Z RADIA
- NAGRYWANIE Z CD/USB/SD
- CAUTION
- RISK OF ELECTRIC SHOCK DO NOT OPEN
- I IMPORTANT SAFETY INSTRUCTIONS:
- BATTERY INSTALLATION
- BATTERY PRECAUTIONS
- LOCATION OF CONTROLS
- Caution:
- Important:
- PRECAUTIONS FOR USE
- INSTALLATION
- CONNECTION
- SETTING THE CLOCK
- LISTENING TO RADIO
- MANUAL TUNING
- AUTO TUNING
- PRESET STATIONS
- RADIO DATA SYSTEM (RDS)
- Programs are classified as follows:
- Notes
- Program service station name (PS)
- Program type identification (PTY)
- Radio text (text)
- Clock-timer (CT)
- FM & FM-STEREO RECEPTION (BY REMOTE HANDSET)
- Hints for best reception:-
- PHONO
- noted:
- PLAYING COMPACT DISC
- - Getting start
- - Play / pause mode
- - Stop mode
- - Skip mode (skip up /skip down)
- - Search mode (search up /search down)
- - For MP3 disc
- ID3 (TRACK TITLE/ALBUM/ARTIST) FUNCTION (BY REMOTE HANDSET)
- Remark:-
- - Repeat/random mode
- FOR CD/MP3 DISC
- - Repeat play
- - Random play
- CD/MP3 DISC PROGRAMMING
- PLAYBACK OF MP3 SONG VIA USB STORAGE MEDIA OR MEMORY CARD
- CONNECTING
- Remark
- ENCODING OF CD FILE INTO MP3 FILE
- A) CD ENCODING
- I) Encoding 1 track or entire disc
- II) COPYING OF MP3 FILE
- Remark:
- B) CASSETTE ENCODING
- C) PHONO ENCODING
- TRACK SEPARATION (BY REMOTE HANDSET)
- FILE DELETE AT USB / SD CARD (BY REMOTE CONTROL)
- SINGLE FILE DELETE (BY REMOTE CONTROL)
- REMOVING OF USB / MEMORY CARD
- LISTING TO TAPE
- GENERAL OPERATION
- PLAYBACK
- Notes:
- RECORDING
- Recording from tape (deck 2 to deck 1)
- Dubbing at normal speed
- Dubbing at high speed
- Recording from radio
- Recording from CD/USB/SD
- Recording from turntable
- MORE FEATURES
- SLEEP SETTING (BY REMOTE CONTROL)
- ALARM CLOCK SETTING
- • Active/de-active timer function (by remote control)
- PRE-SET EQ FUNCTION
- REMOTE CONTROL TRANSMITTER
- Control functions
- Button description
- Old electrical appliances, used batteries and accumulators disposal
- A TÜZ ÉS ÁRAMÜTÉS ELKERÜLÉSE ÉRDEKÉBEN NE TEGYE KI A KÉSZÜLÉKET VÍZNEK, VAGY NEDVESSEGNEK!
- AZ ELEMEKKEL KAPCSOLATOS ÓVINTÉZKEDÉSEK
Brand : HYUNDAI
Model : RTCC 636 SURIP
Category : Hi-Fi System