
VT-8010 - Heating Concept - Free user manual and instructions
Find the device manual for free VT-8010 Concept in PDF.


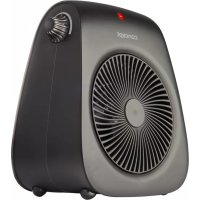
| Product Type | Electric fan heater with digital display and oscillation |
| Brand | Concept |
| Model | VT-8010 |
| Power Supply | 220–240 V ~ 50 Hz |
| Power Input | 2000 W |
| Heating Modes | Heating 1 (min power), Heating 2 (max power), ECO, Ventilation, Anti-freeze |
| Temperature Control | Adjustable thermostat with ECO automatic power regulation |
| Display | LED digital display showing temperature (°F/°C), settings, and timer |
| Oscillation | Yes, left-right oscillation (controlled via OSC button) |
| Timer | 24-hour digital timer for delayed switch-on and switch-off |
| Remote Control | Yes, includes CR2032 battery |
| Safety Features | Overheat protection, tip-over switch, thermal overload protector, audible high-temperature alarm |
| Noise Level | 49 dB(A) |
| Filter | Removable filter (H) for air intake – clean regularly |
| Cleaning Instructions | Wipe with damp cloth; vacuum grilles; do not use solvents or immerse in water |
| Service | Authorized service centre for repairs; do not open or repair yourself |
| Warranty | 24 months from date of purchase |
| Included Accessories | Remote control, instruction manual |
| Usage Restrictions | Indoor use only; not near water (bath, shower, pool); not on soft surfaces |
Frequently Asked Questions - VT-8010 Concept
User questions about VT-8010 Concept
0 question about this device. Answer the ones you know or ask your own.
Ask a new question about this device
Download the instructions for your Heating in PDF format for free! Find your manual VT-8010 - Concept and take your electronic device back in hand. On this page are published all the documents necessary for the use of your device. VT-8010 by Concept.
USER MANUAL VT-8010 Concept
natural_image
Concept electric heater with digital display and heat sink, labeled VT 8010 (no text on device body)CZ SK PL LVEN DE

natural_image
Three plain gray rectangular shapes arranged horizontally (no text or symbols)PODĚKOVÁNÍ
natural_image
Technical line drawing of a vertical stand with internal components, showing cross-section and labeled parts (H, I) without any readable text or symbols.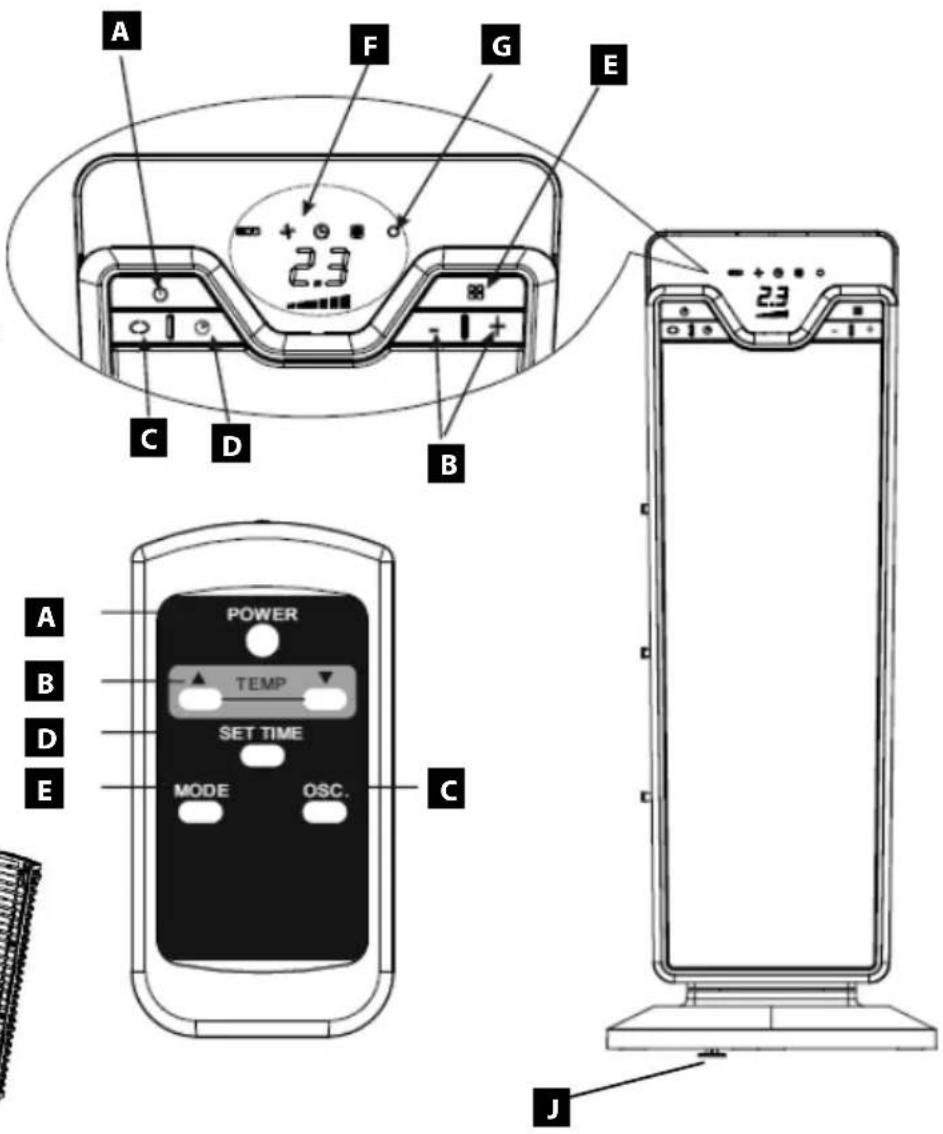
NÁVOD K OBSLUZE
natural_image
Technical line drawing of a vertical stand with internal components, showing cross-sectional views (no text or symbols)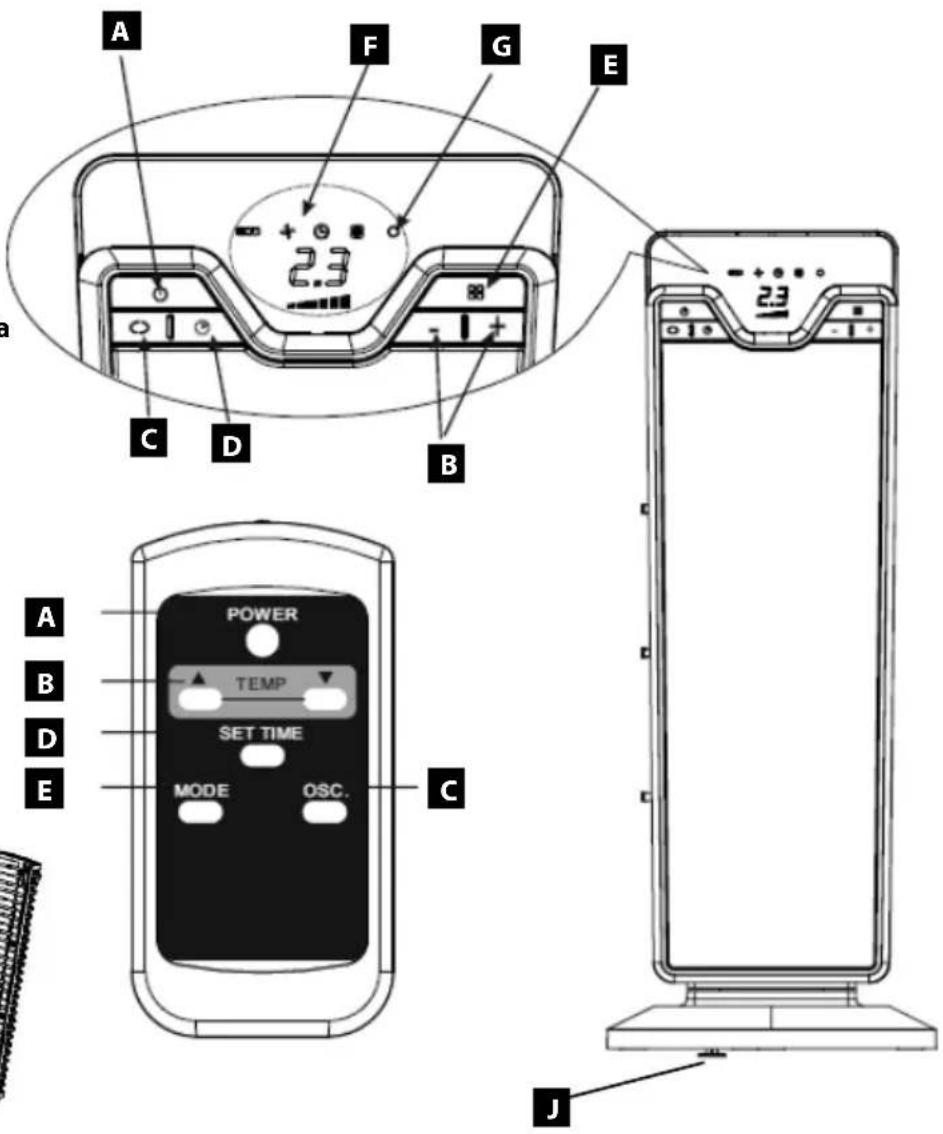
NÁVOD NA OBSLUHU
natural_image
Technical line drawing of a vertical stand with internal components, showing cross-sectional views (no text or symbols)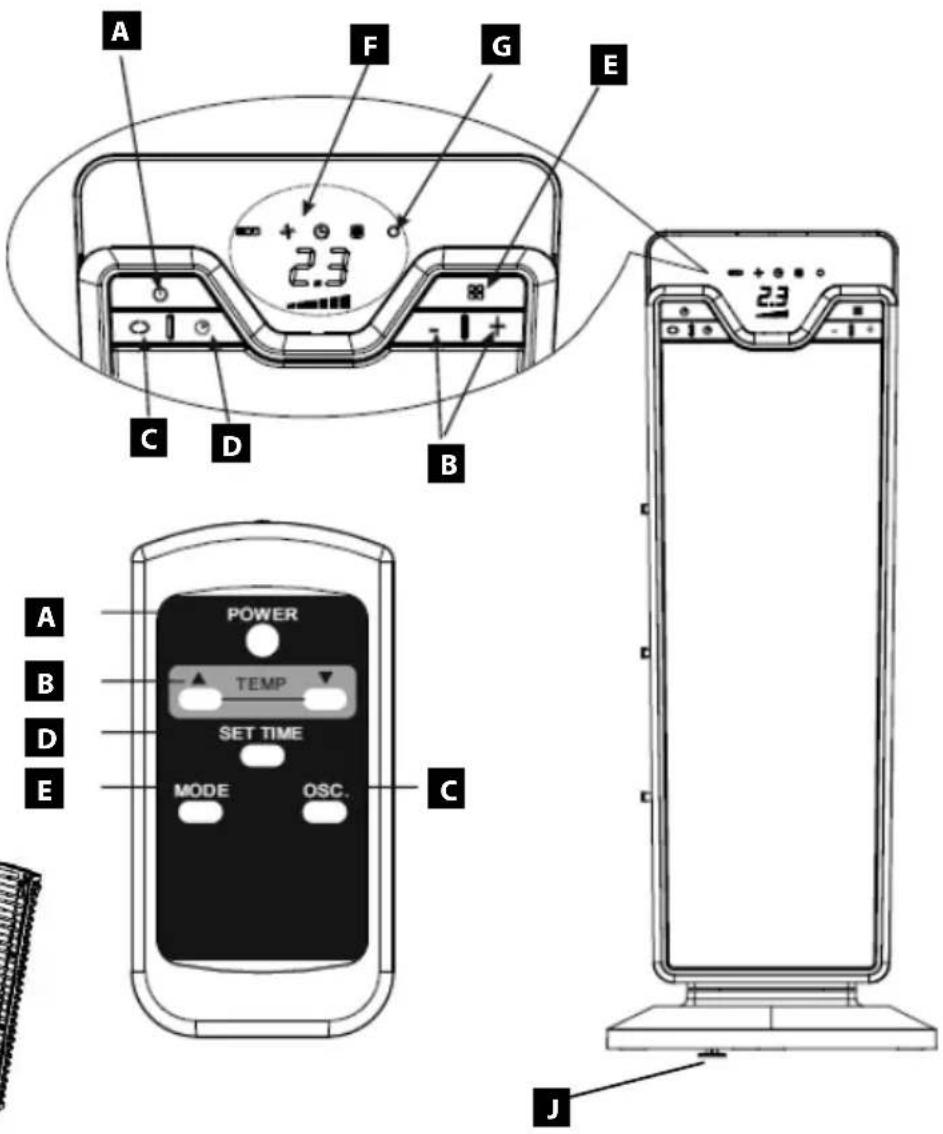
INSTRUKCJA OBSŁUGI
natural_image
Technical line drawing of a vertical stand with internal components, showing cross-sectional views (no text or symbols)EKSPLUATĀCIJAS NORĀDĪJUMI
Thank you for purchasing a Concept product. We hope you will be satisfied with our product throughout its service life.
Please study the entire Operating Manual carefully before you start using the product. Keep the manual in a safe place for future reference. Make sure other people using the product are familiar with these instructions.
| Technical parameters | |
| Voltage 220 - 240 V ~ 50 Hz | |
| Input | 2000 W |
| Noise level 49 dB(A) | |
IMPORTANT SAFETY INSTRUCTIONS:
• Use the unit only as described in this operating manual.
- Remove all the covering and marketing materials from the unit before the first use.
- Make sure the mains voltage corresponds to the values stated on the product's rating plate. Do not connect the unit to adapter plugs or extension cables.
- Do not use this unit with any programmable device, timer, or any other product turning the unit on automatically; if the unit is covered or installed improperly, a fire may occur.
• Make sure to place the unit on a stable heat-resistant surface, out of the reach of other heat sources.
- Close supervision is necessary when the unit is on or plugged into the socket.
- Before unplugging the unit from the wall outlet, move the mode selector to the "O" position and then remove the plug from the wall outlet.
- Never pull the cord to disconnect the plug from the socket; hold the plug instead.
- Do not install the unit directly under the wall outlet.
- Keep the minimum safe distance of at least 100 cm between the unit and any flammable materials, such as furniture, curtains, lace, blankets, paper, clothing, and so on.
- Keep the air inlet grille and air outlet grille unobstructed (at least 100 cm in front of and 50 cm behind the unit). Warning! The outlet grille achieves an operational temperature of more than 80°C. Do not touch it; there is a danger of being burned!
- Do not allow children or unskilled people to handle the unit. Use the unit out of the reach of these individuals.
- Persons with limited movement capacity, reduced sensory perception, insufficient mental capacity or those who are unaware of the proper handling should use the product only under the supervision of a responsible person who is aware of these instructions.
• Pay the utmost attention when using the unit near children.
- Do not cover the unit. There is a risk of overheating. Do not use the unit for drying cloth.
- Do not hang anything above or in front of the unit.
• Use the unit only as described in this operating manual.
• The unit shall be installed in such a way that the plug remains accessible at all times.
• The unit may be operated in the upright position only.
• Do not use the unit near a shower, bathtub, sink, or swimming pool.
- Do not use the unit in an environment with explosive gases or flammable substances (solvents, varnishes, adhesives, etc.).
- Turn the unit off, disconnect the power cord from the wall outlet, and allow the unit to cool before cleaning.
- Keep the unit clean; prevent foreign bodies from entering the grille openings. This could cause a short circuit, damage to the unit, or fire.
- Do not use abrasive or chemically aggressive substances to clean the unit.
- Never use the appliance if the supply cord or plug is damaged. Immediately refer to an authorised service centre for repair.
- Do not use the unit if it does not operate properly, if it has been dropped, damaged or exposed to any liquids. Take the unit to an authorized service centre for testing and repair.
• The unit is not designed for outdoor use.
• The appliance is intended for domestic use only, not for commercial use.
• Never operate the appliance with wet hands. - Do not immerse the power cord, plug, or appliance in water or any other liquid.
- The unit is designed as an auxiliary heater, not for the purpose of overall heating of an interior.
• The unit shall not be mounted on the wall.
• The unit shall not be used in any means of transport.
• Do not repair the appliance yourself. Refer to an authorized service centre instead. - To prevent a possible fire, do not block air intakes or exhaust in any manner.
- Do not place heater on soft surfaces, like a bed, where openings may become blocked.
- Do not use this heater in the immediate surroundings of a bath, a shower or a swimming pool.
Failure to follow the manufacturer's instructions may lead to refusal of warranty repair.
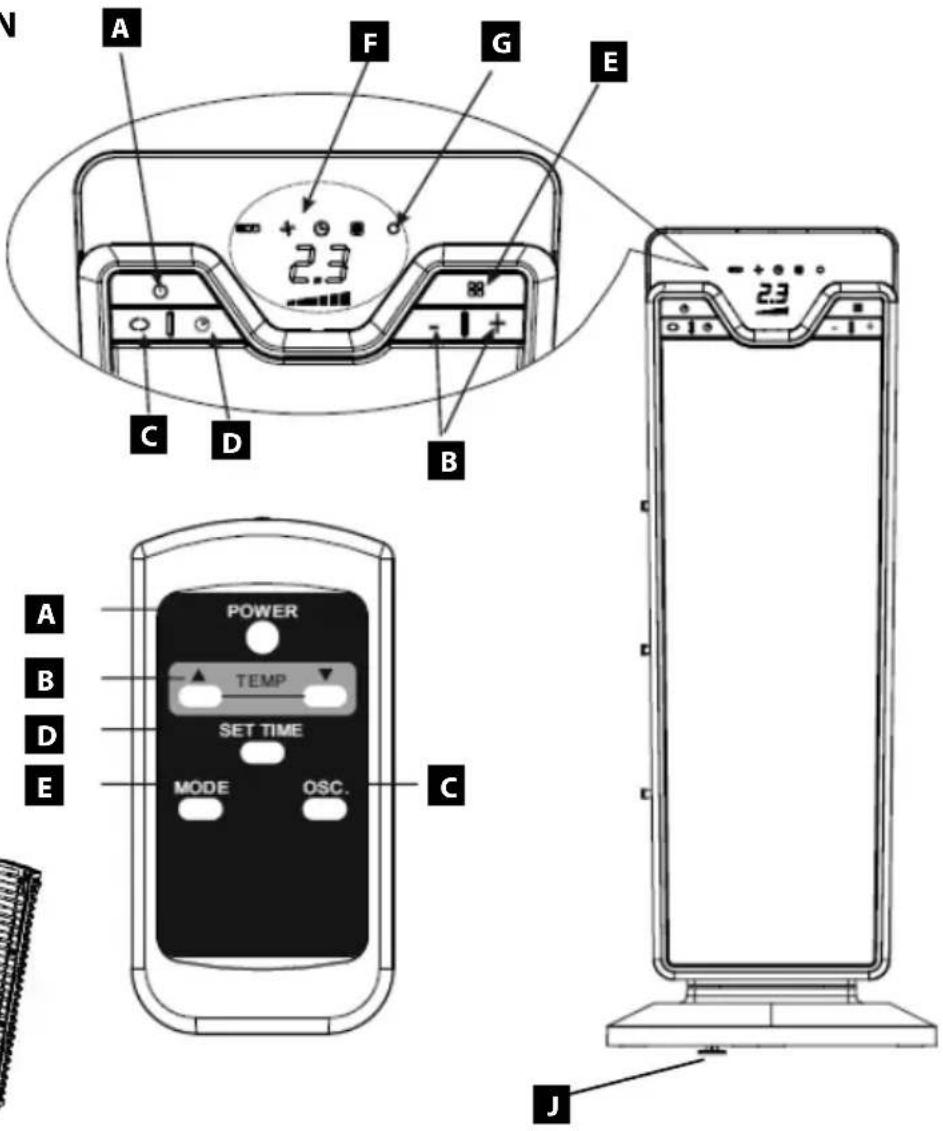
PRODUCT DESCRIPTION
A) Power on/off button
B) +/- Adjustment buttons
C) OSC. on/off buttons
D) Timer Setting button
E) Mode Setting buton
F) LED Display
G) Power indicator
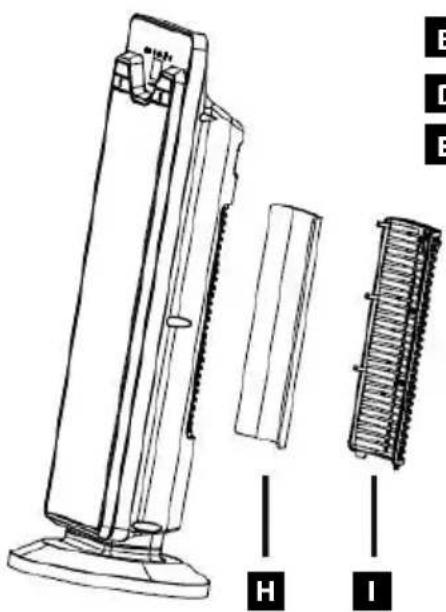
H) Filter
I) Back cover
J) Safety switch against over-turning
natural_image
Technical line drawing of a vertical stand with internal components, showing cross-sectional views (no text or symbols)OPERATION AND USE
- Place the unit on a stable surface or floor to prevent it from tipping over.
- Connect the appliance to the power outlet.
- The appliance emits a beep and the power indicator light (G) comes on and remains on as long as the appliance is powered.
- The appliance goes into OFF. If the display shows a blinking dot, it means that the tip over switch has been activated.
- Press the ON/OFF button (A) to turn on the appliance. It will begin to heat with the predefined settings.
Press the MODE button (E) to select one of the following functions available: Heating 1 ..., Heating 2 ..., ECO, Ventilation ( ), Anti-freeze ( ).
6.1 Ventilation (*) In this operating mode only the fan operates, so the appliance does not heat the room.
6.2 Anti-freeze (AB) in this operating mode the appliance keeps the room at a temperature of 45^ F ( 7^ C) to prevent freezing temperatures.
6.3 Heating 1 and Heating 2
Heating 1 (Min power)
The appliance operates at the minimum power, reducing noise and energy consumption to the minimum. Heating 2. (MIL power)
The appliance operates at the maximum power for rapid heating of the room.
6.4 The ECO function is available in Heating 1 and 2.
When this function is active, the appliance automatically sets the most appropriate power level to guarantee optimum comfort while reducing energy consumption.
While the "ECO" function is active, the appliance may switch automatically to a lower heating power than the one displayed.
- If you want the appliance to distribute the airflow over a larger area, press the oscillation button (C)(☐). The appliance will then oscillate right and left. To stop the oscillation in the desired position, just press oscillation button (C) again.
- To turn off the appliance press button ON/OFF (A). The display will show a countdown for about 6 seconds.
THERMOSTAT INSTRUCTIONS
- Press the MODE button (E) until the Mode indicator lights in ECO mode.
- To adjust set temperature, Press the button + to increase the desired temperature and the button - to decrease the desired temperature.
- When the air temperature reaches the set temperature, the heater will stop to heat at once and stop to blow after 25 seconds.
- When the air temperature is below the set temperature, the heater will come back on.
NOTE:
The display can show the temperature in both °F and °C. To change the temperature scale, press and hold the + key for a few seconds, then release.
Please be aware that as this display is for information purposes only and not a precision device. The displayed temperature may slightly vary from the actual temperature.
It is normal for the heater to cycle ON and OFF as it maintains the set temperature.
When adjusting temperature, the set temperature on display will flicker for 5 seconds. In 5 seconds, if no changes are made, LED lights will stop flickering, display room temperature again.
24-HOUR DIGITAL TIMER
This function can be activated from any operating mode.
Delayed switch-on: with the appliance in the OFF position, press the timer button (D)
The display shows the symbol and the time remaining before switch-on.
To set the timer, use + and - adjustment buttons (B), then wait a few seconds for the programming to be set. The display shows the symbol ⏻ to indicate you have set the timer. When the programmed time has been reached, the appliance turns on with the same settings it had during the previous operation.
Delayed shut-off: with the appliance on, press the timer button (D) ⏻. The display shows the symbol ⏻ and the time remaining before shut-off.
To set the timer, use + and – adjustment buttons (B), then wait a few seconds for the programming to be set. The display returns to show the current settings and the symbol to indicate you have set the timer. When the programmed time has been reached the appliance shuts off automatically.
If you want to go back to operation without the timer, press the timer button (D) twice. The timer symbol disappears from the display.
USING THE REMOTE CONTROL
The remote control functions are identical to those on the control panel. See the section "Operation" on the previous page for a description of the functions.
INSERTING OR REPLACING BATTERIES
- Remove the cover on the rear of the remote control;
- Insert the button battery (model CR/2032/3V) into remote control with the positive pole (smooth side) facing up.
- Replace the cover.
- Old batteries must be removed and disposed of in accordance with current legislation as they are harmful to the environment.
Safety Features
- This heater includes an audible alarm to warn that parts of the heater are getting excessively hot. If the alarm sounds, immediately turn the heater off and inspect for any objects on or adjacent to the heater that may cause high temperature.
DO NOT OPERATE THE HEATER WITH THE ALARM SOUNDING.
- A thermal overload protector is built-in to prevent overheating.
- When an overheat temperature is reached, the heater will be automatically shut off. It can only resume operation when the user resets the unit. (See RESET INSTRUCTIONS below)
Reset instructions
- Unplug the heater and wait 20 minutes for the unit to cool down.
- After the 20 minutes, plug the unit in again and operate normally.
Troubleshooting tips
If your heater shuts off unexpectedly or fails to operate, one of the above-mentioned safety features may have activated to prevent overheating.
- Be sure the power cord is plugged into a working electrical outlet.
- Check your thermostat setting. The heater may be off because it has reached the desired temperature setting.
MAINTENANCE AND CLEANING
Warning!
Before cleaning the unit, always disconnect the power cord from the wall outlet!
Prior to handling, make sure the unit has cooled down!
The surface of the unit may only be cleaned using a wet cloth. Do not use any detergents or hard objects, as they may damage the unit's surface!
The air inlet and outlet grilles should be cleaned frequently to ensure proper operation of the unit and to avoid overheating.
Dust accumulated in the unit may be blown out or removed by a vacuum cleaner.
Never clean the unit under running water, do not rinse it, and do not submerge it in water!
CAUTION: Do not use gasoline, benzene, thinner, harsh cleaners, etc. as they will damage the heater. NEVER USE ALCOHOL OR SOLVENTS.
TROUBLESHOOTING
The unit is equipped with a safety fuse that cuts off the power supply to the heater, and restores it after it cools down. If this happens in the course of ordinary operation, check the cleanliness of the inlet and outlet grilles, or change location of the unit to improve the air circulation in and around the unit.
SERVICING
Any extensive maintenance or repair that requires access to the inner parts of the product must be performed by an expert service centre.
ENVIRONMENTAL PROTECTION
- Packaging materials and obsolete appliances should be recycled.
- The transport box may be disposed of as sorted waste.
- Polyethylene bags shall be handed over for recycling.
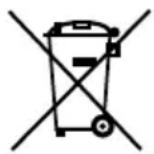

Appliance recycling at the end of its service life:
A symbol on the product or its packaging indicates that this product should not go into household waste.
It must be taken to the collection point of an electric and electronic equipment recycling facility. By making sure this product is disposed of properly, you will help prevent the negative effects on the environment and human health that would otherwise result from inappropriate disposal of this product.
You can learn more about recycling this product from your local authorities, a household waste disposal service or in the shop where you bought this product.
natural_image
Technical line drawing of a vertical stand with internal components, showing cross-sectional views (no text or symbols)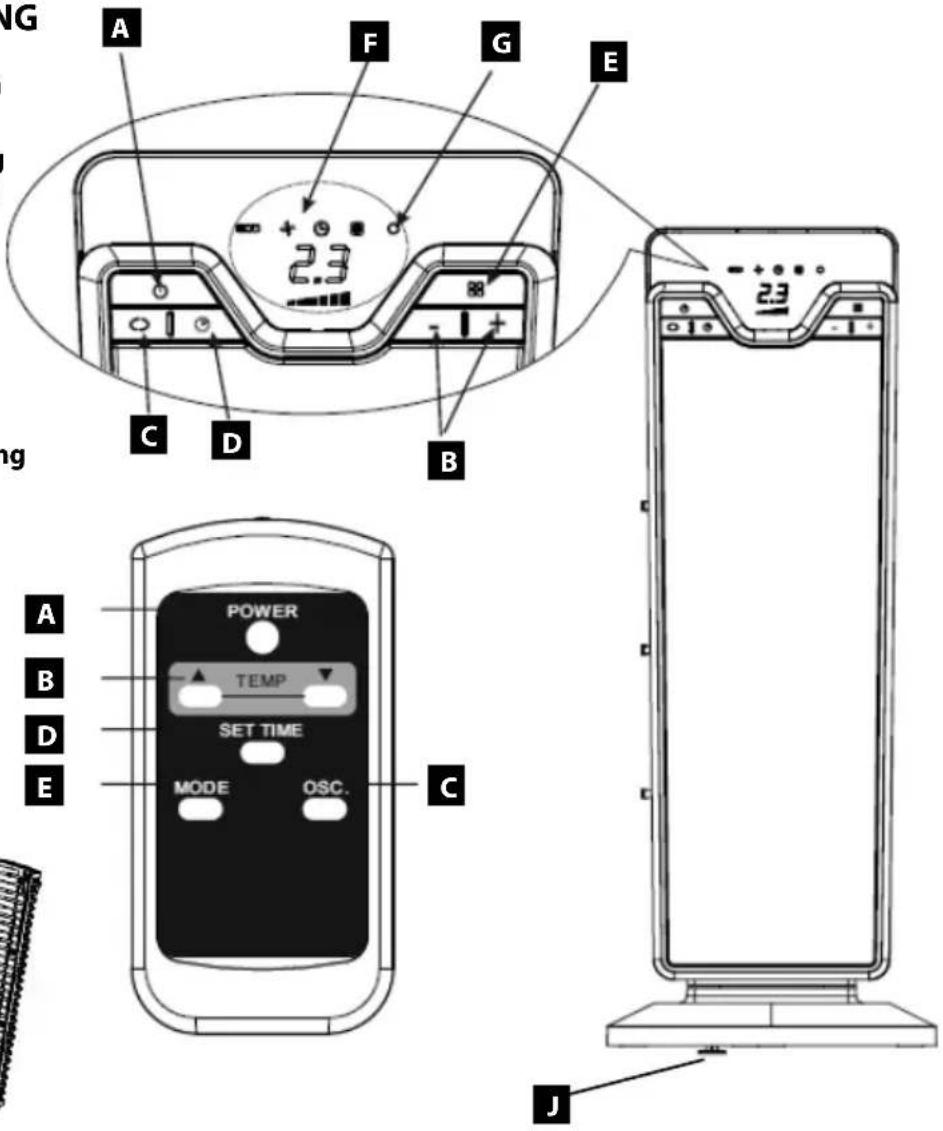
BEDIENUNGSANLEITUNG
Warranty Certificate
CZ
ZÁRUČNÍ PODMÍNKY
| Model: | |
| Production number: | |
| Date of purchase: | Seal and signature of vendor: |
The vendor is obliged to inform the consumer of the features and parameters of the product and fill in the Warranty Certificate fully and legibly on the day of purchase.
The Certificate is not valid without all the prescribed data correctly filled in!
The manufacturer (or importer) is responsible for the features of the product under the applicable technical standards and conditions for the warranty period.
The warranty period is 24 months from the date of purchase, unless stated otherwise by the manufacturer (or importer).
Under the warranty the consumer is entitled to the free, timely and duly executed remedy of faults (see below), or to receive a replacement of the defective part of the product, provided it is not disproportionate with regards to the nature of the fault. The right to replacement of the product or termination of the purchase contract can be exercised only if all the legal preconditions have been met, on the condition that the product was not excessively worn or damaged.
The validity of the guarantee is subject to:
- Observance of the instructions mentioned in the Operating Manual;
- A document proving payment including all the prerequisites, or a valid Warranty Certificate;
Any claims with regards to product liability shall be exercised by the consumer with the vendor where the product was purchased.
The right to repair can be exercised at the location where you purchased the product or at an authorized service centre; a list of the centres is included in the product package or you may find it on the website www.my-concept.com.
Notice for consumers
The consumer is obliged to keep the Warranty Certificate and cash voucher to demonstrate payment for the product. When exercising a claim on a product, it has to be cleaned and packed in order to prevent any damage during transport to an authorized centre. The manufacturer (or importer) reserves the right not to accept a product which is not cleaned duly. Additional cleaning of the product will be charged.
The manufacturer (or importer) reserves the right not to pay the cost of false claims and to require that the claiming party cover all the necessary costs related to the examination of the qualification and solution of the claim.
The right to free repair of the product, or refund, shall not be exercised in the following cases:
- The conditions of the installation, operation and handling of the product, mentioned in the Operating Manual, were not observed;
- The fault occurred due to mechanical, thermal or chemical damage, short circuit or overvoltage;
- The fault is due to the unauthorized intervention of a third party;
- The fault is due to force majeure;
- The fault is due to insufficient or undue maintenance in conflict with the Operating Manual, including faults caused by limescale and other sediments;
- Wear and tear of the product, or its part, caused by regular use;
- Change of the colour of heating surfaces, or scratched surfaces due to regular use;
- Changes of appearance and function due to sunshine, thermal radiation, or limescale and other sediments;
- Expired service life of some parts of the product, e.g. accumulators, bulbs etc.
The nature of the fault can be determined only by the manufacturer, importer, authorized centre, or authorized expert, not by the vendor or consumer.
The consumer shall have no claim to faulty spare parts replaced within a warranty repair.
In the case of termination of the purchase contract, the consumer is obliged to return the complete product, including the accessories and documents supplied.
There is no warranty related to promotional items supplied with the product, the price of which was not charged to the consumer.
The consumer has all the minimum rights under the applicable laws.
Note: Claims regarding products damaged during transport shall be governed by the complaint procedure of the freight forwarder.
Manufacturer:
Jindřich Valenta - ELKO Valenta, Vysokomýtská 1800, 565 01 Choceň, Czech Republic,
tel: +420 465 471 433, fax: +420 465 473 304, email: servis@my-concept.cz, www.my-concept.com
Importer:
Jindřich Valenta - ELKO Valenta Czech Republic, Vysokomýtská 1800,
565 01 Choceň, Tel. +420 465 471 400, Fax: 465 473 304, www.my-concept.com
concept
CZ SEZNAM SERVISNÍCH MÍST
SK ZOZNAM SERVISNÝCH STREDISIEK
PL WYKAZ PUNKTÓW SERVISOVYCH
www.my-concept.com
concept
Česká republika
Jindřich Valenta – ELKO Valenta Czech Republic
Vysokomýtská 1800,565 01 Choceň
Tel. +420 465 322 895, Fax: +420 465 473 304
www.my-concept.cz
ELKO Valenta – Slovakia, s.r.o.
Hurbanova 1563/23, 911 01 Trenčín
Tel.: +421 326 583 465, Fax: +421 326 583 466
www.my-concept.sk
Elko Valenta Polska Sp. Z. o. o.


- PODĚKOVÁNÍ
- NÁVOD K OBSLUZE
- NÁVOD NA OBSLUHU
- INSTRUKCJA OBSŁUGI
- EKSPLUATĀCIJAS NORĀDĪJUMI
- IMPORTANT SAFETY INSTRUCTIONS:
- PRODUCT DESCRIPTION
- OPERATION AND USE
- THERMOSTAT INSTRUCTIONS
- NOTE:
- 24-HOUR DIGITAL TIMER
- USING THE REMOTE CONTROL
- INSERTING OR REPLACING BATTERIES
- Safety Features
- DO NOT OPERATE THE HEATER WITH THE ALARM SOUNDING.
- Reset instructions
- Troubleshooting tips
- MAINTENANCE AND CLEANING
- Warning!
- TROUBLESHOOTING
- SERVICING
- ENVIRONMENTAL PROTECTION
- Appliance recycling at the end of its service life:
- BEDIENUNGSANLEITUNG
- CZ
- ZÁRUČNÍ PODMÍNKY
- The Certificate is not valid without all the prescribed data correctly filled in!
- Notice for consumers
- Manufacturer:
- Importer:
- concept
Brand : Concept
Model : VT-8010
Category : Heating