Parowar 37Z011 - Steamer Zelmer - Free user manual and instructions
Find the device manual for free Parowar 37Z011 Zelmer in PDF.

| Product Type | Electric Food Steamer |
| Brand | Zelmer |
| Model | Parowar 37Z011 |
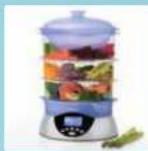
| Capacity | 3 steaming bowls (top 3.4 L, middle 2.6 L, bottom 2.5 L), plus rice bowl |
| Water Tank Capacity | 1.2 L (max) |
| Voltage | 220-240 V ~ 50/60 Hz |
| Power | Approximately 800-1000 W (based on typical steamer) |
| Display | LCD digital display |
| Preset Programs | 9 modes: Eggs, Fish, Vegetables, Meat, Chicken, Rice, Keep Warm, Program 1, Program 2 |
| Timer | Adjustable cooking time, delayed start up to 23h55min |
| Keep Warm Function | Automatic 20-minute keep warm after cooking |
| Material | Plastic housing, stainless steel heating element, BPA-free plastic bowls |
| Dishwasher Safe Parts | Lid, bowls, drip tray, steam diffuser (top rack, short cycle) |
| Safety Features | Auto shut-off, overheat protection, boil-dry protection, cool-touch handles |
| Accessories | 3 steaming bowls, rice bowl, drip tray, flavor scenter screen, steam diffuser, lid |
| Dimensions (approx.) | Height: 40 cm, Width: 30 cm, Depth: 30 cm (with three bowls) |
| Weight (approx.) | 3.5 kg (complete with all bowls) |
| Warranty | Standard manufacturer warranty (check retailer) |
Frequently Asked Questions - Parowar 37Z011 Zelmer
User questions about Parowar 37Z011 Zelmer
0 question about this device. Answer the ones you know or ask your own.
Ask a new question about this device
Download the instructions for your Steamer in PDF format for free! Find your manual Parowar 37Z011 - Zelmer and take your electronic device back in hand. On this page are published all the documents necessary for the use of your device. Parowar 37Z011 by Zelmer.
USER MANUAL Parowar 37Z011 Zelmer
natural_image
Modern kitchen steamer with multi-tiered vegetable arrangement and digital display (no visible text or labels)| PL | INSTORICIA LEYTKOANNA PARONAR Typ 372911 | 4-9 |
| C2 | MAYOO K POUJI PARNI HRNEC Typ 372911 | 10-14 |
| S3 | MAYOO KA OBSUJNU PARNY HRNEC Typ 372911 | 15-20 |
| T4 | HASZAVLAT UAS TAS ETELPAROLO 372911 Tipos | 21-26 |
| ISO | KSHUCI JUN CL U 0244-APARAT DE GÄTIT CU ABUN | |
| Tm 372011 | 27-32 | |
| ISO | MCHYUKURD O 361025/ALNIP NAPOBAPKA | |
| Tm 372011 | 33-39 | |
| ISO | MCHYUKURD NA 371015/NA NAPOBAPKA | |
| Tm 372011 | 40-45 | |
| USA | C. DIPUKJ K 30100 C USANIA NAPOBAPKA | |
| Tm 372011 | 48-61 | |
| AT | ZAKIKUMO PESTUKKIA GARU PUODAS | |
| Tlos 372011 | 52-57 | |
| LILIOKAWA ASIRUKKIA TVAIKA KATLS | ||
| Tlos 372011 | 50-50 | |
| KASU USULYNO AURUKKEETJA Tulp 372011 | 54-50 | |
| USLEKANJAL STEAM COOKER Typo 372011 | 50-73 | |
37Z011
Parowar
Steam cooker
B
©

natural_image
Four-step photo sequence showing hands using a digital kitchen appliance to clean water, no text or symbols visible
Szanowni Kliendi
In case the company's business
cbuckwa lub uchwyl sa w spesb widocany udzolacne.
Mugaly, only 1000 mmol/mol in 25°C and 30°C. In addition, the volume of carbon emissions (MB) is 100%. With proposed
Frozen fish can be cured without the need of defrosting if they are divided before cooking and the cooking time is
prolonged
| Product | Type | Weight/number of pieces | Suggested spices | Cooling time [min.] |
| Cruciscor | Fresh | 400 g | Meyeran, Lemon boat | 8-10 |
| Shrimp | Fresh | 300 g | Lemon laiba, Galica | 8 |
| Cans | Fresh | 400 g | Lemon boat, Torix | 8-10 |
| Lemon salt | Frozen | 2 pieces 400 g each? | Horseradish, Carls | 25-22 |
| Fish bite | Fresh/loom | 250 g | Nucrass ice, Alacca | 6-9-12 |
Rice
Use the river bow [2]. Four a sufficient amount of water with the rice.
| Product | Type | Amount/Amount of water | Cooling time (min.) | Tips |
| Roo | Airbag | 200 p/200 ml | 35.42 | Tao senihs |
cleaning and maintenance
{Fig. C}
NOTE: Do not immerse the base, cord and ping into water. ① Undug and allow the aspirance to cool before cleaning. ② Remove the steaming bowl, dropping tray, empty then and empty the water tank, clean the tank with camp cloth. ③ Wash all the parts of the aspirance (pert of the water tank with the coating unit with warm water and warm-up liquids). The parts mentioned above can be also starched in the upper level of the dishwasher, sell a short washing cycle. However, washing these parts regularly in the dishwash may result in the use of saline on their outside surfaces and their rinsching.
④ Dry each element
REMARK: Do not wash under running water or increase to water the water tank with the heating unit. Do not use aggressive celerents such as erosion, cleaning milk, clearing pastes, etc. They can remove the graphic information symbols, such as scales, marking, warning signs etc.
Removing lime scale from the water container After 2-3 months of constant use chemical compounds may occur in the water container with the heading assembly (9). This is a normal situation. The amount of lime scale depends on the water head was. It is necessary to regularly remove lime scale in order to provide an equal amount of generated steam and to extend the lifespan of the appliance.
Bill the water container (19) with white vinegar (not dark, vinegar) up to the maximum level.
CAIS7-006
CAUTION: Do not use lime scale removing chemical substances or lime scale removers available on the market. ● Log the appliance. During this process the drip tray (6), cleansing bulbs (5), 40, (6) and the lid (1) should be retained in proper places. ● Let the cooling time for 25 minutes. NOTICE: If the vinegar starts to boil over and spill on the base, switch off the timer and unlag the appliance. Reduce the amount of vinegar. When you hear a stop, unplug the appliance, allow to cook and put out the finger. Minze the water container with the heating assembly several times with cold water and dry.
Ecology - environment protection
Each user can protect the natural environment. It is neither difficult nor expensive.
In order to do it put the cardboard packing into recycling paper containers, put the polyethylene (PE) bags into container for plastic.
When worn out, dispose the appliance to particular disposal control, because of the dangerous elements of this appliance, which can be hazardous for natural environment.
Do not dispose into the domestic waste disposal!!!
The manufacture power does not accept any liability for any damage or loss arising from the material use or other means. The manufacture power reserves its ability to ready the product. Any fire is cause it often in the situation, some abnormal or due to convergence, reason, purpose or other reasons, where anything is possible
Program 1 i Program 2
Program 1 a Program 2
Program 1 a Program 2
Otlacte a pridržte tlačidlo MENU (14) po dobu cca. 3 sekúnd, začne blikat' ikonka P 100.
Program 1 i Program 2
Congratulations on your choice of our appliance, and welcome among the users of Zelmer products.
In order to achieve best possible results we recommend using exclusively original Zelmer accessories. They have been specially designed for this product.
Please read these instructions carefully. Pay special attention to important safety instructions in order to prevent accidents and/or avoid damage. Keep this User's Guide for future reference.
Important safety instructions
Please read these instructions for use completely before using the food steamer.
The food steamer is intended for household use only. The warranty conditions change if the appliance is used for commercial purposes.
Plug the food steamer only to a grounded 220-240 V electrical outlet of a voltage in accordance with the voltage provided on the rating label.
Always place the appliance on a flat and even surface.
Unplug the food steamer when not in use and before cleaning.
Do not unplug by pulling on cord.
Take sure the cord does not hang over the table or counter and does not touch any hot surface.
Do not operate the appliance if the cord, the housing or the handle is visibly damaged. In such a case, return the appliance to a service center.
If the non-detachable part of the cord is damaged, it should be replaced by the producer or at a proper service point or by a qualified person in order to avoid any hazards.
The appliance can only be repaired by qualified service personnel. Improper servicing may cause a serious hazard to the user. In case of defects please contact a qualified service center.
Allow the appliance to cool before dissembling.
Extreme caution must be used when moving an appliance containing hot food, water or other hot liquids. Avoid reaching over the steamer while operating.
- Dress ⏻ to switch on the appliance.
Carefully lift and remove lid in order to avoid burns. Allow water to drip into steamer.
Make sure the water level is always between MIN and MAX. This will ensure a proper cooking process.
Operating the food steamer with an insufficient amount of water (below the MIN level) may result in overheating of the appliance's heating elements and lead to its damage.
Do not wash the appliance under running water. Do not immerse the heating assembly in water.
Do not use abrasive detergents such as emulsions, cream
cleaners, polishes, etc. to clean the heating assembly housing. They may remove the graphic information symbols such as: as scales, marks, warning signs etc.
Do not touch hot surfaces. Always use pot holders when handling hot materials.
Do not place hands, face or other parts of the body over the appliance, as it generates steam. Slowly lift the lid. Use utensils with long handgrips to check the food.
Do not place the appliance on hot gas or electric rings, in microwave ovens, in hot ovens or directly under cupboards.
Do not operate the food steamer in the presence of flammable and/or explosive fumes.
The use of accessory attachments not recommended by the appliance manufacturer may cause injuries.
This appliance can be used by children aged from 8 years and above and persons with reduced physical, sensory or mental capabilities or lack of experience and knowledge if they have been given supervision or instruction concerning use of the appliance in a safe way and understand the hazards involved. Children shall not play with the appliance. Cleaning and user maintenance shall not be made by children unless they are aged from 8 years and above and supervised.
The appliance is not intended to be operated by means of an external timer or separate remote-control system.
Make sure you have understood the above instructions.
Technical parameters
The technical parameters are indicated on the rating label.
The food steamer is a class I appliance equipped with a cord having a grounding wire and a grounding plug.
The food steamer fulfills the requirements of the existing norms.
The appliance is in conformity with the requirements of the directives:
Low voltage appliance (LVD) - 2006/95/EG.
– Electromagnetic compatibility (EMC) – 2004/108/EC.
The appliance was marked by the CE sign on the rating label.
Product features
(Fig. A)
1 Lid with steam openings
2 Food bowl e.g. for rice, soup
3 Upper steaming bowl (marked with the symbol 3 on the carrying handles)
4 Middle steaming bowl (marked with the symbol 2 on the carrying handles)
5 Lower steaming bowl (marked with the symbol 1 on the carrying handles)
6 Drip tray
7 Flavor scenter screen
8 Steam diffuser
9 Water container with heating assembly
10 LCD display
11 Preparation time adjustment button "+"
12 Preparation time adjustment button “-”
13 Start/stop button
14 Mode selection button MENU
15 On/Off button
16 Automatic timer button
Preparing the food steamer for operation
Unpack the appliance and all accessories.
Remove all self-adhesive labels.
Wash the lid (1), steaming bowls (3), (4), (5), drip tray (6), and steam diffuser (8) in warm water with dishwashing liquid.
Rinse the above-mentioned parts thoroughly and dry.
Wipe the inside of the water container (9) with a damp cloth.
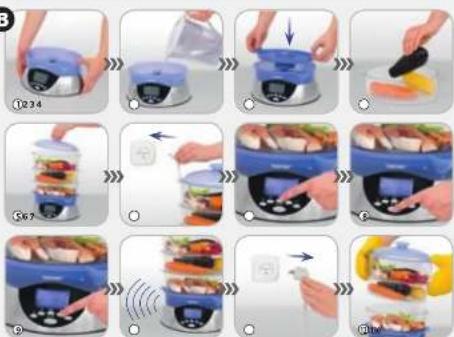
How to use (Fig. B)
① Place the appliance on a stable, even surface away from objects that may be damaged by hot steam such as walls or cupboards.
② Pour water directly to the water container (9) up to the level between the marks MIN – MAX (do not exceed the maximum level of 1.2 liter). Add water during cooking by pouring it through the water inlet.
③ Place the drip tray (6) on the water container (9) and check if it lays flat on the container.
Add fresh or dried herbs to the flavor scenter screen (7) on the drip tray (6) in order to spice up healthy foods. Thyme, coriander, basil, dill, curry and tarragon are just a few herbs along with garlic, caraway or horseradish that enhance the flavor of the dish with no salt needed.
You may use the drip tray (6) without adding herbs to the flavor scenter if you prefer.
④ Place the food in the bowls. We recommend putting the largest food portions that require longer cooking to the lower bowl (5).
Volume of containers:
Top steam bowl - 3.4 l
Middle steam bowl - 2.6 l
Bottom steam bowl - 2.5 l
CAUTION: Clean and place the food for steaming loosely in the steaming bowls so that the airflow in the steaming bowl sieves is not completely blocked.
Do not add salt, pepper, spices, herbs, stock and any other liquids apart from tap water to the water container.
⑤ Place the bowl/bowls on the water container (9) and cover the appliance with the lid (1).
The food steamer can be used with 1, 2 or 3 steaming bowls depending on the amount of food to be steamed.
The steaming bowls (3), (4), (5) can be combined according to the figure in chapter "Product features" (while using two bowls remove the upper steaming bowl (3); while using one steaming bowl remove the upper steaming bowl (3) and the middle steaming bowl (4) from the appliance).
The appliance can be used for rice boiling. Put the rice in, pour the water into the rice bowl, in proportions according to the STEAMING TIME TABLE, next place the rice bowl inside the steaming bowl.
The appliance can be also used for boiling eggs.
CAUTION: Never touch the housing of the water container with the heating assembly (9), steaming bowls (3), (4), (5) and the lid (1) during operation as they are very hot.
⑥ Plug the supply cord to the mains supply outlet.
⑦ Choose the cooking mode by press in the MENU (14) button. The appliance is programmed to cook various food products. Select one of the cooking modes below:
| Eggs | Fish | Vegetables | Meat | Chicken | Rice | Keep warm | Program 1 | Program 2 | |
| P 1:00 | P2:00 | ||||||||
| Recommended time [min.] | 12 | 15 | 20 | 30 | 35 | 40 | 10 | The possibility to set the cooking time | The possibility to set the cooking time |
After pressing the MENU button (14) you will hear a beep, the icon attributed to the type of the food product and the programmed time remaining until the end of the cooking time will be shown on the display (10).
⑧ Press the start/stop button (13), the selected mode will be switched on and the appliance will operate for the set time.
CAUTION: Do not put hands into the appliance during cooking. Use kitchen utensils with long handgrips to check or stir the food.
Press the start/stop button (13) to stop the cooking process.
Press the start/stop button (13) to restart the cooking process.
⑨ Press the cooking time adjustment button “+” or “-” to change the cooking time setting. The time settings can be changed even during the automatic cooking mode.
order to change the cooking mode settings during operation press the start/stop (13) button and then change the cooking mode using the MENU (14) button. After selecting the cooking mode press the start/stop (13) button.
The symbol 🐎 will flash on the display (10) during the cooking process.
order to switch off the appliance press the start/stop (13) and next press the button.
Program 1 and Program 2 have to be individually set and saved. The instruction of setting P1 and P2 is described below.
⑩ After the selected cooking time is up you will hear a double beep and the appliance will automatically switch to the keep warm mode. The 🐘 icon will start to flash.
After 20 minutes of keeping the temperature you will hear five beeps and the appliance will automatically switch off.
⑪ After steaming unplug the supplying cord from the mains supply outlet.
⑫ Remove the lid using its handle, then remove all the bowls from the water tank.
CAUTION: Pay special attention while removing the drip tray (6) as water in the water container (9) and the liquid on the drip tray may still be very hot, although other parts of the appliance are already cool.
Program 1 and Program 2
Dress and hold the MENU button (14) for about 3 seconds. The icon will begin to flash.
To select P2, press the MENU button (14) again. The icon will begin to flash.
Get the desired cooking time by pressing the cooking time adjustment button “+” or “−”. You will hear a beep each time you press the button.
Press the start/stop button (13) o save the set time. The digits on the display will stop flashing.
NOTE: You can use P1 and P2 to save the most commonly used cooking times. For example if you cook meat in the food steamer for 55 minutes, set the cooking time for P1 or P2 for 55 minutes.
It is possible to adjust the time while using P1 and P2.
Setting the automatic timer
Press the automatic timer button ⏰.
- et the time, after which the cooking process is to start by pressing the cooking time adjustment button “+” or “−”.
The time setting will increase in the following intervals 0 min, 5 min, 10 min, 15 min, ..., ..., 23.55 min, 0 min (reverse order after pressing the “-” button).
- Dress the start/stop button (13). The available cooking
modes and the icon ⏻ will be shown on the display.
- choose the cooking mode by pressing the MENU button (14).
you need to set the cooking time, press the cooking time adjustment button “+” or “−”.
Press the start/stop button (13).
The time after which the cooking process is to start will decrease in one minute intervals and the icon 📋will show on the display.
The cooking process will start when the timer reaches 0.
After the end of the cooking process, you will hear two beeps and the appliance will automatically switch to the
keep warm mode. The icon 📄 will begin to flash.
After 20 minutes of keeping the temperature, you will hear two beeps and the appliance will automatically switch off.
Keeping the temperature
Steam cooked food is healthiest and most aromatic immediately after preparation. However, if it is necessary to keep the food warm for a short time, use the keep warm function by pressing the MENU (14) button and, if necessary, set the time with the appropriate cooking time adjustment button “+” or “-”.
Automatic temperature keeping
The appliance automatically switches to the keep warm mode for 20 minutes after the selected cooking time is over.
You will hear five beeps after the keep warm mode is over. The appliance will switch off automatically.
NOTE: The icon will flash on the display when the appliance is operating in the keep warm mode.
Adding water during cooking
In case of dishes that require long cooking:
You will hear a continuous beep and the symbol 📊 will start to flash if the water level drops below the MIN level.
- check the water level.
the water level drops below the MIN level, add water through the water inlet.
The beep sound will stop and the symbol 📋 will stop flashing when the water level reaches above the MIN level. Press the start/stop button (13) to restart the appliance.
Automatic switch off
The appliance switches off automatically if it is plugged in and left unattended.
The food steamer switches off automatically after one minute, you will hear a double beep in the following situations:
When the programmed operation has ended.
the selected program is not confirmed after the keep warm mode is automatically switched on.
Press to switch the appliance on once again.
Useful tips
Cooking in the upper steaming bowl (3) may require a longer cooking time due to the fact that the steam temperature is lower in the upper part of the food steamer.
We recommend cooking food portions of similar sizes. Always place small food pieces on top if the portions are of various sizes and it is necessary to arrange them in levels.
Food in the steaming bowls (3), (4), (5) or food bowl (2) should not be tightly arranged. Provide spaces between the food portions to allow a maximum steam flow.
When cooking large food portions lift the lid (1) in the middle of the cooking time and stir the food using a utensil with long handgrips. Use kitchen grips to protect hands from steam.
add salt and spices to the steaming bowls (3), (4), (5)
when cooking is finished. Thanks to this the heating element inside the water container (9) will not be damaged.
The liquid that gathers on the drip tray (6) can be stored and used to prepare soups and sauces.
Do not cook frozen meat, poultry and seafood in the appliance. Defrost these products thoroughly before cooking.
Cooking time table
CAUTION: The cooking times indicated in the tables and recipes are approximate. The cooking time may vary depending on the size of the portion, its arrangement in the steaming bowl, the foods' freshness and individual preferences. You can change the cooking times after familiarizing yourself with the appliance.
Vegetables
Cook green leaf vegetables for as short as possible, as they quickly lose color.
Do not defrost frozen vegetables before cooking.
| Vegetable Type | Weight/number of pieces | Suggested spices | Cooking time [min.] Tips | ||
| Artichokes Fresh | 3 medium Garlic, Tarragon, Dill | 45-50 | |||
| Asparagus | Fresh/Frozen (green) | 400 g | Lemon balm,Bay leaves, Thyme | 13-15/16-18 | Crisscross the stalks to make it easier for the steam to infiltrate. |
| Broccoli | Fresh/Frozen | 400 g | Garlic, Crushed pepper, Tarragon | 16-18/15-18 | |
| Sliced carrots | Fresh | 400 g | Anise, Mint, Dill | 20-22 | Stir in the middle of the cooking time. |
| Cauliflower | Fresh/Frozen | 400 g | Rosemary, Basil,Tarragon | 16-18/18-20 | Stir in the middle of the cooking time. |
| Spinach | Fresh/Frozen | 250 g | Chervil, Thyme,Garlic | 8-10/18-20 | Stir in the middle of the cooking time. |
| Beans | Fresh | 400 g | Caraway,Dill seeds, Savory | 18-20 | Stir in the middle of the cooking time. |
| Peas | Fresh/Frozen(shelled) | 400 g | Basil, Marjoram, Mint | 10-12/15-18 | Stir in the middle of the cooking time. |
| Potatoes (halves) | Fresh | 400 g | Chervil, Chives, Dill | 20-22 |
Meat and poultry
Steam cooking has the advantage that all of the fat drips out of the meat. The cooking temperature is not too high, therefore choose soft, lean meat and trim fat from meat. Meat that is appropriate for grilling is also excellent for steaming.
Add fresh herbs during cooking to give the dish a stronger aroma.
| Product | Type | Weight/number of pieces | Suggested spices | Cooking time [min.] Tips | |
| Chicken. | Boneless filet roast meat | 250 g (4 pieces) 450 g | Curry, Rosemary, Thyme | 12-15 30-35 | Carefully trim fat. |
| Pork | Sirloin, loin, steaks or pork chops | 400 g 4 (pieces) | Curry, Lemon balm, Thyme | 5-10 | Carefully trim fat. |
| Beef | Rump steaks, sirloin steaks or steaks | 250 g | Curry, Paprika, Thyme | 8-10 | Carefully trim fat. |