
RM-4421 - Food processor Concept - Free user manual and instructions
Find the device manual for free RM-4421 Concept in PDF.


| Product Type | Food Processor |
| Brand | Concept |
| Model | RM-4421 |
| Power Supply | 220-240V, 50/60Hz |
| Power Consumption | 800 W |
| Bowl Capacity | 2.0 L |
| Dimensions (L x W x H) | 30 x 22 x 38 cm |
| Weight | 4.2 kg |
| Speed Settings | 2 speeds + pulse |
| Materials | Stainless steel blades, plastic housing, glass bowl |
| Main Functions | Chopping, slicing, shredding, mixing, kneading, blending |
| Accessories Included | S-shaped blade, slicing disc, shredding disc, dough hook, spatula |
| Safety Features | Safety lock on bowl and lid, non-slip feet, overheat protection |
| Cleaning | Detachable parts dishwasher safe (except motor unit) |
| Warranty | 2 years |
Frequently Asked Questions - RM-4421 Concept
User questions about RM-4421 Concept
0 question about this device. Answer the ones you know or ask your own.
Ask a new question about this device
Download the instructions for your Food processor in PDF format for free! Find your manual RM-4421 - Concept and take your electronic device back in hand. On this page are published all the documents necessary for the use of your device. RM-4421 by Concept.
USER MANUAL RM-4421 Concept
natural_image
Black-and-white photo of a modern kitchen blender with a blender and fruit bowl, surrounded by fresh ingredients (no text or symbols visible)RM 4420 RM 4421
CZ SK PL LVEN DE

natural_image
Three identical gray rectangular shapes arranged horizontally (no text or symbols)PODĚKOVÁNÍ
POPIS VÝROBKU
natural_image
Line drawing of a kitchen mixer with control knob and handle (no text or symbols)obr. 1
obr. 2
obr. 3
natural_image
Line drawing of a kitchen mixer with a blender and side bowl (no text or symbols)obr. 4
natural_image
Line drawing of a kitchen mixer with a blender and bowl (no text or symbols)obr. 5
obr. 6
Mlynek
DŮLEŽITÉ
natural_image
Line drawing of a kitchen mixer with directional arrows indicating motion (no text or symbols)obr. 1
natural_image
Technical line drawing of a mechanical device with a valve and base, showing no text or symbolsobr. 2
natural_image
Line drawing of a microscope and a bowl (no text or symbols)obr. 3
natural_image
Technical line drawing of a kitchen knife with directional arrows indicating movement (no text or symbols)obr. 4
natural_image
Line drawing of a kitchen mixer with handle and control knob (no text or symbols)obr. 5
ČIŠTĚNÍ A ÚDRŽBA
natural_image
Line drawing of a kitchen mixer with control knob and handle (no text or symbols)obr. 1
obr. 2
obr. 3
natural_image
Line drawing of a kitchen mixer with a blender and fan (no text or symbols)obr. 4
natural_image
Line drawing of a kitchen mixer with a side bowl and blender (no text or symbols)obr. 5
obr. 6
Mlynček
DÔLEŽITÉ:
natural_image
Line drawing of a kitchen mixer with an upward arrow indicating motion (no text or symbols)obr. 1
natural_image
Technical line drawing of a mechanical device with no visible text or symbolsobr. 2
natural_image
Line drawing of a microscope and a bowl (no text or symbols)obr. 3
natural_image
Line drawing of a kitchen knife with handle and faucet (no text or symbols)obr. 4
natural_image
Line drawing of a kitchen mixer with handle and control knob (no text or symbols)obr. 5
ČISTENIE A ÚDRŽBA
natural_image
Line drawing of a kitchen mixer with control knob and handle (no text or symbols)rys. 1
rys. 2
rys. 3
natural_image
Line drawing of a kitchen mixer with a side bowl and fan, showing no text or symbolsrys. 4
natural_image
Line drawing of a kitchen mixer with a blender and fan (no text or symbols)rys. 5
rys. 6
natural_image
Line drawing of a kitchen mixer with an upward arrow indicating motion (no text or symbols)rys. 1
natural_image
Technical line drawing of a mechanical device with no visible text or symbolsrys. 2
natural_image
Line drawing of a microscope with a bowl and tripod stand (no text or symbols)rys. 3
natural_image
Technical line drawing of a mechanical device with directional arrows indicating movement (no text or symbols)rys. 4
natural_image
Line drawing of a kitchen mixer with a downward arrow indicating motion (no text or symbols)rys. 5
CZYSZCZENIE I KONSERWACJA
natural_image
Line drawing of a kitchen mixer with control knob and handle (no text or symbols)- att
2. att
- att
natural_image
Line drawing of a kitchen mixer with a blender and fan (no text or symbols)- att
natural_image
Line drawing of a kitchen mixer with a side bowl and blender, no text or symbols present- att
6. att
Galas mašina
SVARİGA INFORMÄCIJA!
natural_image
Line drawing of a kitchen mixer with an upward arrow indicating motion (no text or symbols)- att
natural_image
Technical line drawing of a mechanical device with no visible text or symbols- att
natural_image
Line drawing of a microscope and a bowl (no text or symbols)- att
natural_image
Technical line drawing of a mechanical device with directional arrows indicating movement (no text or symbols)- att
natural_image
Line drawing of a kitchen mixer with handle and control knob (no text or symbols)- att
TİRİŞANA UN APKOPE
Thank you for purchasing a Concept product. We hope you will be satisfied with our product throughout its service life.
Please study the entire Operating Manual carefully before you start using the product. Keep the manual in a safe place for future reference. Make sure other people using the product are familiar with these instructions.
| Technical parameters | |
| Voltage 220-240 V ~ 50-60Hz | |
| Input 650 W | |
| Noise level 85 dB(A) | |
| Maximum operating time Kneaders: KB 6min. | |
| Mincer: KB 6min. | |
| Beater: KB 6min. | |
| Blender: KB 2min. | |
IMPORTANT SAFETY INSTRUCTIONS
- Do not use this appliance in a way that differs from the instructions in this manual.
- Remove all packaging and marketing materials from the appliance before you use it for the first time.
- Make sure that the connecting voltage corresponds to the values on the appliance type label.
- Do not leave the appliance unattended when turned on or plugged into the electric socket.
- When the appliance is not being used, disconnect the appliance from the electrical socket.
- Never pull the supply cable when disconnecting the appliance from the electrical socket; pull the plug instead.
- Do not allow children or irresponsible people to handle the appliance. Use the appliance out of the reach of these people
- People with limited movement capacity, reduced sensory perception, insufficient mental capacity or those who are unaware of the proper handling should use the product only under the supervision of a responsible person acquainted with these instructions.
- Pay the utmost attention when using the unit close to children.
- Do not let anyone use the appliance as a toy.
• To prevent children from reaching the power cord, make sure it does not hang over the edge of the working area.
- Do not use the appliance outdoors or on wet surfaces as there is a threat of electric shock in these places.
- Do not use any other accessories except those recommended by the manufacturer.
- Never use the appliance if the supply cable or plug has been damaged; have the defect repaired immediately by an authorised service centre.
- Never pull the supply power cord or use it to carry the appliance.
- Keep the appliance away from heat sources (such as radiators, ovens, etc.). Protect the appliance from direct sunlight and moisture.
- Do not touch the appliance with moist or wet hands.
- Before fixing any accessories, cleaning or in the case of a defect, turn off the appliance and pull the plug out of the electrical socket.
- The appliance is intended for household use only (not for commercial use).
- Do not immerse the supply cable, the plug or the appliance itself into water or any other liquid.
- Regularly check the appliance and the supply cable for any damage. Never turn the appliance on if it is damaged.
- Do not touch the moving parts of the appliance during operation.
- Keep your hair, fingers and clothing out of reach of the moving parts during operation.
- Be careful when handling the extensions, as the blades are very sharp and may cause injury.
- The accessories shall not be used in a microwave oven.
- Some parts may keep moving for a while immediately after the motor has been switched off and the power cord has been disconnected from the socket. Wait until the movement stops completely.
- Use the unit solely for food processing.
- The maximum allowed temperature of the processed food is 80^ . Do not use the beater for very hot food!
- Never repair the appliance by yourself. Contact an authorised service centre.
- Only operate this machine under supervision.
- Do not interfere with any safety switches.
- Do not insert anything into the rotating hooks while the machine is working.
- Place the machine on a smooth, flat and stable working surface.
- Do not insert the mains plug of the machine into the power socket without having installed all the necessary accessories.
Failure to follow the manufacturer's instructions may lead to refusal of warranty repair.
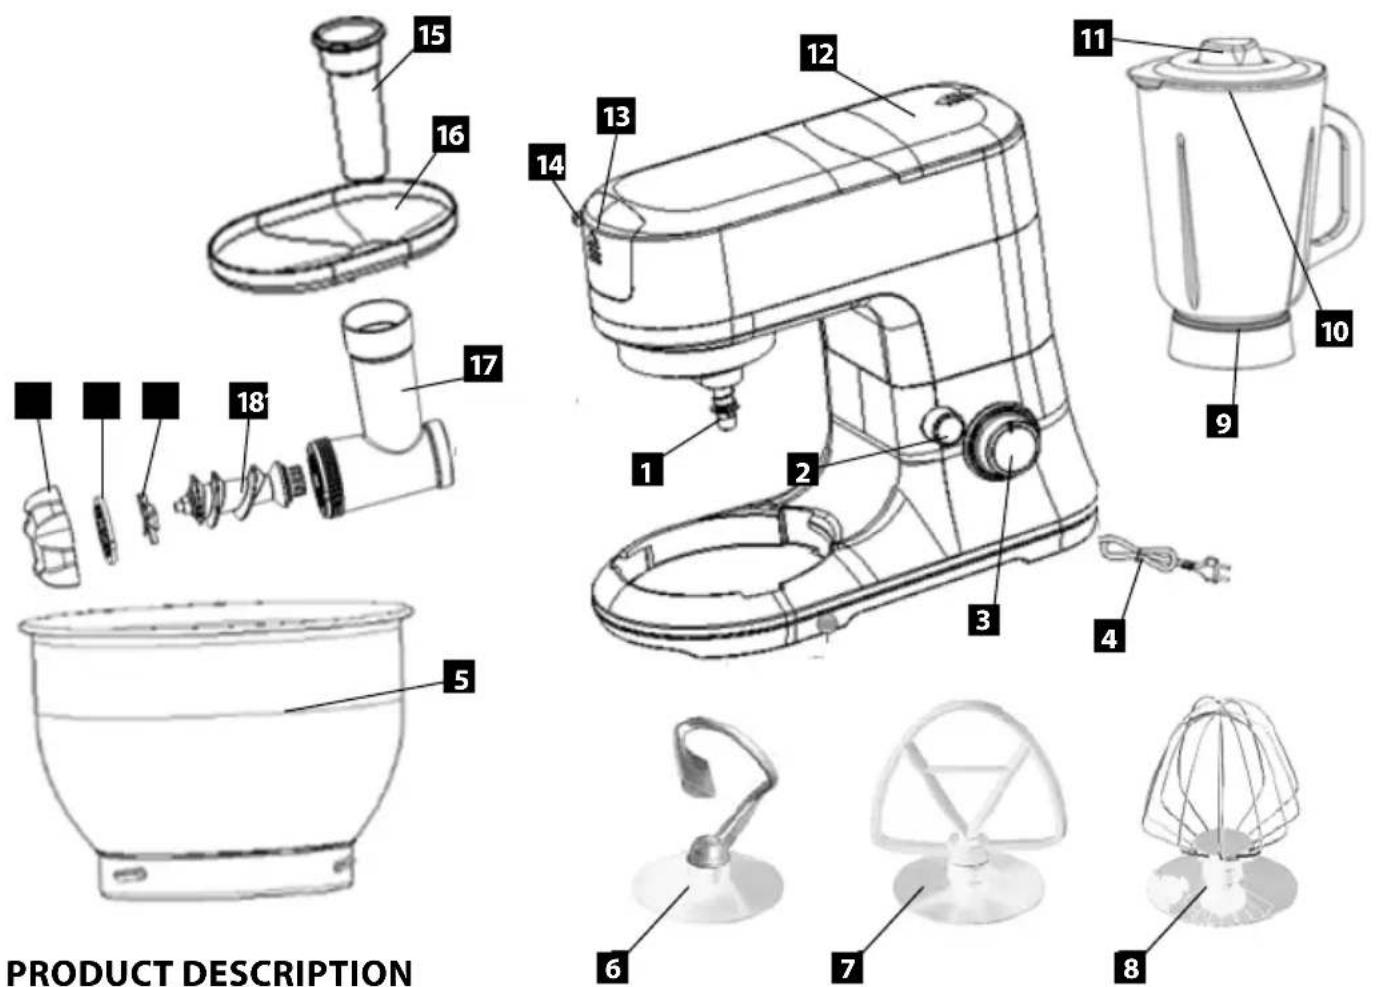
1 Output shaft
2 Rise button
3 Speed knob
4 Power Cord
5 Mixing bowl
6 Dough hook
7 Beater
8 Whisk
9 Blender Jar(1.5L Max)
10 Blender Lid
11 Measuring cup
12 Back cover
13 Front cover
14 Mincer locking button
15 Food pusher
16 Tray
17 Chute
18 Mincing screw
19 Mincing blade
20 Mincing discs (fine, medium and coarse)
21 Fastening dial
OPERATING INSTRUCTIONS
MIXER
Important
- IF YOU USE THIS APPLIANCE WITHOUT THE BLENDER, THE APPLIANCE WILL NOT FUNCTION IF THE BACK COVER HAS NOT BEEN LOCKD IN PLACE.
-
DO NOT TRY TO ATTEMP TO USE THIS FUNCTION TOGETHER WITH MINCING OR BLENDING.
-
Place the mixing bowl into its holding device and turn the bowl until it locks into place.
- In order to lift the arm, push the rise button (2) down. The arm will now move upwards.
- Mount the desired mixing accessories in place by inserting and turning it into the output shaft.
- Mount the mixing bowl in place by turning in direction with the arrow.
- Now fill in your ingredients.
Do not overfi ll the machine - the maximum quantity of ingredients is 1.1 kg.
- Lower the arm pushing the rise button (2).
- Insert the mains plug into a safe power socket properly installed at 220-240V 50-60Hz.
- Switch on the machine at a desired speed between 1 and 6 (corresponding to the mixture) by turning the speed knob.
- For "Pulse" setting (kneading at short intervals), turn the speed knob to the "Pulse" position. The appliance works only at the speed knob has to be held in this position, when the knob is released, it returns automatically to the "0" position.
- After kneading/stirring, turn the speed knob (3) back to the "0" position to switch off the appliance as soon as the mixture is completed or has formed a ball. Then remove the mains plug.
- Push the rise button (2) downwards and the arm will be raised.
- The mixture can now be released with the help of a spatula and removed from the mixing bowl.
- The mixing bowl can now be removed.
Adjusting the Levels and Using the Hook for not more than 1.1 kg of Mixture.
| Levels Use Type of Mixture | |
| 1-4 Dough hook Heavy mixtures(e.g. bread, pizza or sourdough pastry) | |
| 3-4 Beater Medium-heavy mixtures(e.g. crepes or sponge mixture) | |
| 5-6 Whisk Light mixtures (e.g. cream, egg white, blancmange) | |
| Pulse Whisk/blender Interval (e.g. for mixing under sponge) | |
NOTE:
Operation time: With heavy mixtures, do not operate the machine for more than 6 minutes, and then allow it to cool down for a further 20 minutes.
Blender
Important:
• DO NOT TRY TO ATTEMP TO USE THIS FUNCTION TOGETHER WITH MINCING OR MIXING.
- Before use: do not plug in until you have attached the blender jar in position.
- After use: unplug the appliance before you remove the blender jar from the housing.
- Do not fill the blender jar with hot ingredients more than 80°C.
- To prevent spilling, do not put more than 1.5 liters of liquid in the blender jar.
- Never remove the lid while the blender is running.
- Do not operate the blender over 2 minutes.
Function
The blender can be used for pureeing very finely and for blending. it can be used for e.g. soups, sauces, milk shakes, baby food, vegetable, fruit the batter, puree, etc. if necessary cut solid ingredients into smaller pieces before you put them in the blender.
How to use the blender:
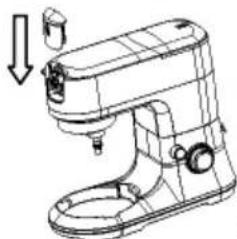
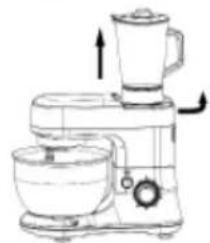
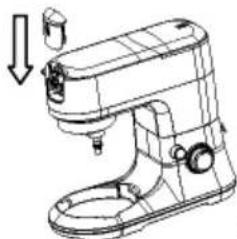
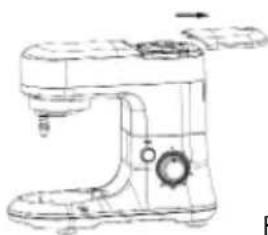
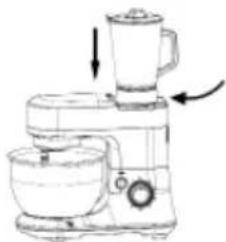
- Remove the back cover,(Fig 1)
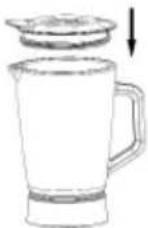
- Place the foodstuff you wish to process into the jar
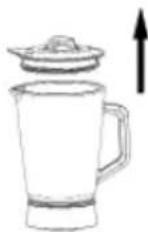
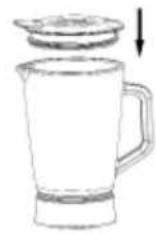
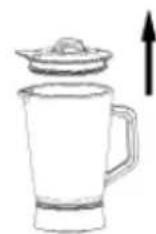
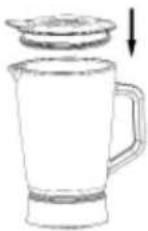
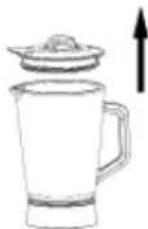
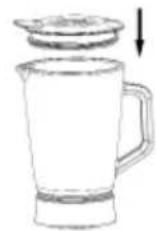
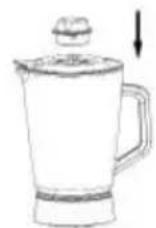
- Press the lid into place and it is firmly fixed, (Fig 2)
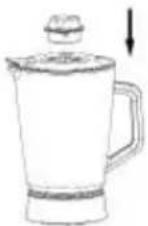
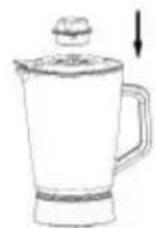
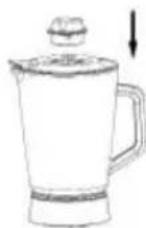
- Place the measuring cup into the opening of the lid and turn clockwise to lock (Fig3)
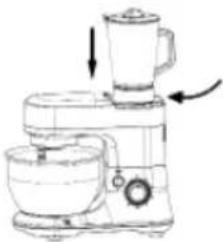
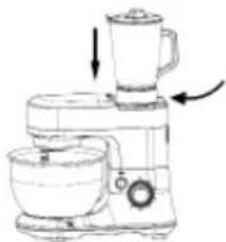
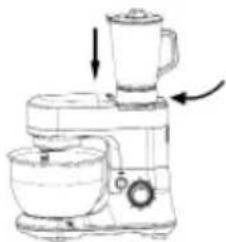
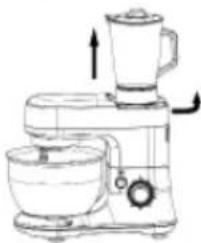
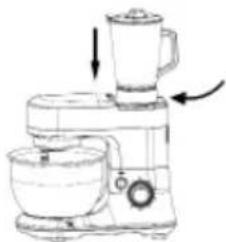
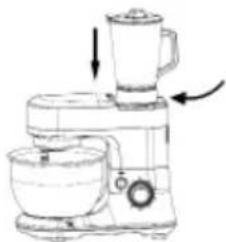
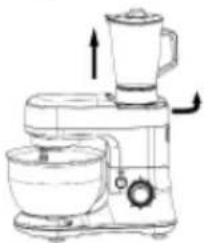
- Mount the blender jar onto the attaching hole and turn it clockwise until it is firmly fixed.(Fig4)
- Set the speed control to position 6.
Tips:
- The opening of the lid can be used to add ingredients, while the appliance is running. Please remove the measuring cup from the lid to do so.
-
It may be necessary to switch off the appliance from time to time to remove pieces food sticking to the inside of the blender jar
-
Switch off the appliance and unplug it.
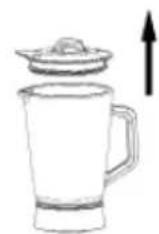
- Remove the measuring cup and the lid
- Remove pieces sticking to the inside of the blender jar with a soft spatula.
- Keep the spatula at a safe distance from the knives
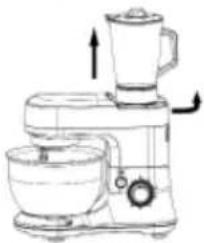
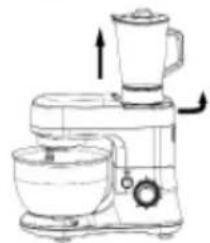
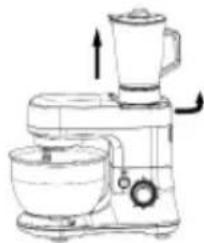
- Turn the blender jar anti-clockwise. Take out the blender jar (Fig 5)
- Turn anti-clockwise to remove the measuring cup (Fig6)
natural_image
Line drawing of a kitchen mixer with handle and control knob (no text or symbols)Fig. 1
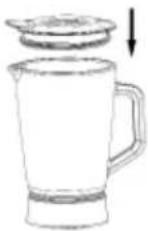
Fig. 2
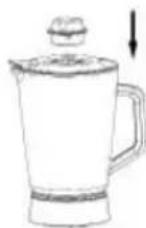
Fig. 3
natural_image
Line drawing of a kitchen mixer with a kettle and bowl, showing directional arrows (no text or symbols)Fig. 4
natural_image
Line drawing of a kitchen mixer with a blender and fan (no text or symbols)of
Fig. 5
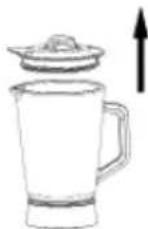
Fig. 6
Mincer
Important:
• DO NOT TRY TO ATTEMP TO USE THIS FUNCTION TOGETHER WITH BLENDING OR MIXING.
- Cut all foods into pieces (Sinewless, boneless and fatless beef or pork is recommended, approximately size :20 mm x 20 mm x 60 mm) so that they fit easily into the hopper opening.
The ingredients would avoid bone or hard stuff with it, hard stuff or bone would cause the motor seized. If the engine is seized, please stop the unit and disassemble the mincer assembly to take out the bone or hard stuff, if the motor is stopped automatically, after the motor is cooled down, the function would restore.
- Assemble the mincer as below description, turn on the unit at speed 6;
- Feed foods into the tray (16). Use for it only the food pusher (15).
- After using, turn the switch (3) to "0" and unplug it from the power supply.
- Use less than 6 minutes continuously at a time.
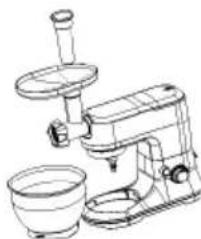
How to assemble the mince
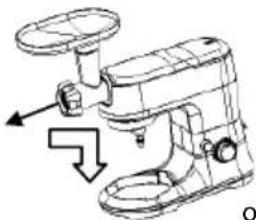
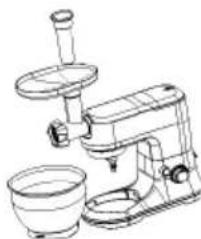
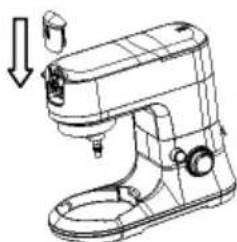
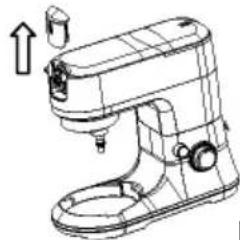
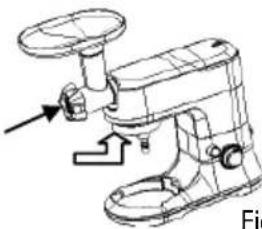
- Remove the front cover. (Fig 1)
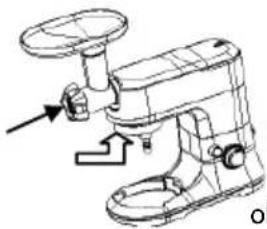
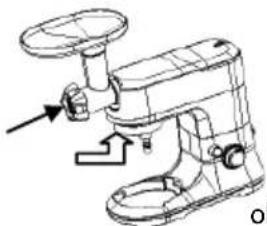
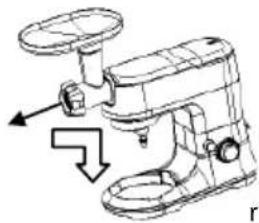
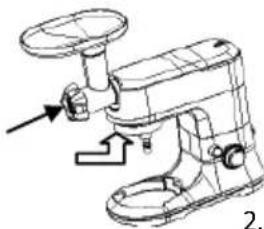
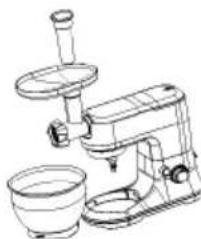
- align and turn the chute in anti-clockwise direction, until the mincing tube is in place firmly. (Fig 2)
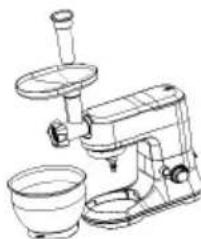
- Put a meat container below the chute.
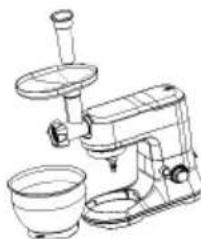
- Set the speed control to position 6. Then place the desired foodstuff into the tray and use the pusher to push the food into chute. (Fig3)
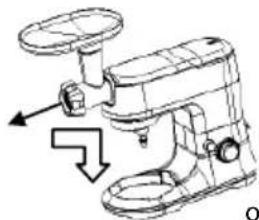
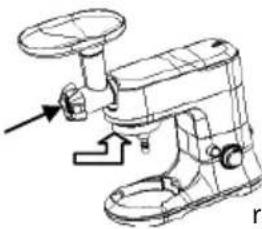
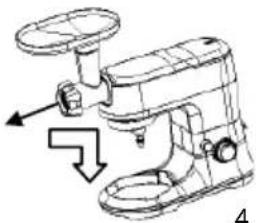
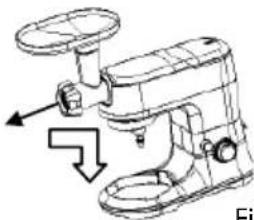
• After use, switch off the appliance and unplug it. - Press the mincer locking button, turn the mincer clockwise and remove the mincer assembly. (Fig4)
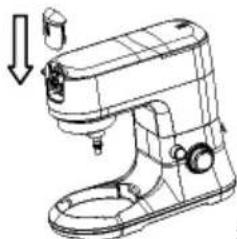
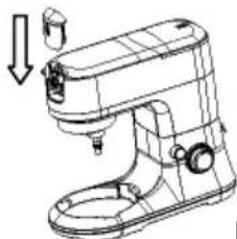
• Cover the front cover. (Fig5)
natural_image
Line drawing of a kitchen mixer with an upward arrow indicating motion (no text or symbols)Fig. 1
natural_image
Technical line drawing of a mechanical device with no visible text or symbolsFig. 2
natural_image
Line drawing of a microscope with a bowl and tripod stand (no text or symbols)Fig. 3
natural_image
Line drawing of a kitchen knife with handle and faucet (no text or symbols)Fig. 4
natural_image
Line drawing of a kitchen mixer with handle and control knob (no text or symbols)Fig. 5
CLEANING
• Before cleaning remove the plug.
- Never immerse the housing with motor in water!
- Do not use any sharp or abrasive detergents.
- Only a damp rinsing cloth should be used to clean the outside of the housing.
Bowl and Equipment
CAUTION
- Whisk and bowl can be washed in the dishwasher.
- Other parts are not suitable for washing in a dishwasher.
- Components that have come into contact with food can be cleaned in soapy water.
- Allow the parts to dry thoroughly before reassembling the device.
- Apply a small quantity of vegetable oil likely to the screens after they have dried.
SERVICING
Any extensive maintenance or repair that requires access to the inner parts of the product must be performed by an expert service centre.
ENVIRONMENTAL PROTECTION
- Packaging materials and obsolete appliances should be recycled.
- The transport box may be disposed of as sorted waste.
• Polyethylene bags shall be handed over for recycling.
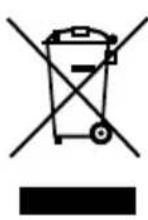
Appliance recycling at the end of its service life:
A symbol on the product or its packaging indicates that this product should not go into household waste.
It must be taken to the collection point of an electric and electronic equipment recycling facility. By making sure this product is disposed of properly, you will help prevent the negative effects on the environment and human health that would otherwise result from inappropriate disposal of this product. You can learn more about recycling this product from your local authorities, a household waste disposal service or in the shop where you bought this product.
natural_image
Line drawing of a kitchen mixer with control knob and handle (no text or symbols)Bild 1
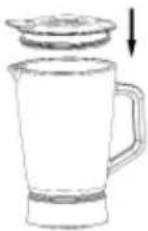
Bild 2
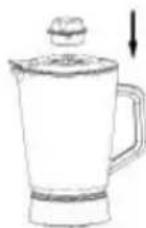
Bild 3
natural_image
Line drawing of a kitchen mixer with a blender and side bowl (no text or symbols)Bild 4
natural_image
Line drawing of a kitchen mixer with a blender and side bowl (no text or symbols)Bild 5
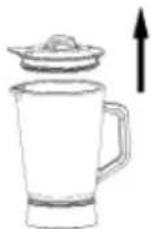
Bild 6
Fleischwolf
WICHTIG:
Warranty Certificate
CZ ZÁRUČNÍ PODMÍNKY
Záruka
PODROBNOSTI O PRODUKTU
PODROBNOSTI O PRODUKTE
| Model: | |
| Production number: | |
| Date of purchase: Seal and signature of vendor: | |
The vendor is obliged to inform the consumer of the features and parameters of the product and fill in the Warranty Certificate fully and legibly on the day of purchase.
The Certificate is not valid without all the prescribed data correctly filled in!
The manufacturer (or importer) is responsible for the features of the product under the applicable technical standards and conditions for the warranty period.
The warranty period is 24 months from the date of purchase, unless stated otherwise by the manufacturer (or importer).
Under the warranty the consumer is entitled to the free, timely and duly executed remedy of faults (see below), or to receive a replacement of the defective part of the product, provided it is not disproportionate with regards to the nature of the fault. The right to replacement of the product or termination of the purchase contract can be exercised only if all the legal preconditions have been met, on the condition that the product was not excessively worn or damaged.
The validity of the guarantee is subject to:
- Observance of the instructions mentioned in the Operating Manual;
- A document proving payment including all the prerequisites, or a valid Warranty Certificate;
Any claims with regards to product liability shall be exercised by the consumer with the vendor where the product was purchased.
The right to repair can be exercised at the location where you purchased the product or at an authorized service centre; a list of the centres is included in the product package or you may find it on the website www.my-concept.com.
Notice for consumers
The consumer is obliged to keep the Warranty Certificate and cash voucher to demonstrate payment for the product. When exercising a claim on a product, it has to be cleaned and packed in order to prevent any damage during transport to an authorized centre. The manufacturer (or importer) reserves the right not to accept a product which is not cleaned duly. Additional cleaning of the product will be charged.
The manufacturer (or importer) reserves the right not to pay the cost of false claims and to require that the claiming party cover all the necessary costs related to the examination of the qualification and solution of the claim.
The right to free repair of the product, or refund, shall not be exercised in the following cases:
- The conditions of the installation, operation and handling of the product, mentioned in the Operating Manual, were not observed;
- The fault occurred due to mechanical, thermal or chemical damage, short circuit or overvoltage;
- The fault is due to the unauthorized intervention of a third party;
- The fault is due to force majeure;
- The fault is due to insufficient or undue maintenance in conflict with the Operating Manual, including faults caused by limescale and other sediments;
- Wear and tear of the product, or its part, caused by regular use;
- Change of the colour of heating surfaces, or scratched surfaces due to regular use;
- Changes of appearance and function due to sunshine, thermal radiation, or limescale and other sediments;
- Expired service life of some parts of the product, e.g. accumulators, bulbs etc.
The nature of the fault can be determined only by the manufacturer, importer, authorized centre, or authorized expert, not by the vendor or consumer.
The consumer shall have no claim to faulty spare parts replaced within a warranty repair.
In the case of termination of the purchase contract, the consumer is obliged to return the complete product, including the accessories and documents supplied.
There is no warranty related to promotional items supplied with the product, the price of which was not charged to the consumer.
The consumer has all the minimum rights under the applicable laws.
Note: Claims regarding products damaged during transport shall be governed by the complaint procedure of the freight forwarder.
Manufacturer:
Jindřich Valenta - ELKO Valenta, Vysokomýtská 1800, 565 01 Chocen, Czech Republic,
tel: +420 465 471 433, fax: +420 465 473 304, email: servis@my-concept.cz, www.my-concept.com
Importer:
Jindřich Valenta - ELKO Valenta Czech Republic, Vysokomýtská 1800,
565 01 Choceň, Tel. +420 465 471 400, Fax: 465 473 304, www.my-concept.com
concept
CZ SEZNAM SERVISNÍCH MÍST
SK ZOZNAM SERVISNÝCH STREDISIEK
PL WYKAZ PUNKTÓW SERVISOVYCH
Česká republika
Jindřich Valenta – ELKO Valenta Czech Republic
Vysokomýtská 1800,565 01 Choceň
Tel. +420 465 322 895, Fax: +420 465 473 304
www.my-concept.cz
ELKO Valenta – Slovakia, s.r.o.
Hurbanova 1563/23, 911 01 Trenčín
Tel.: +421 326 583 465, Fax: +421 326 583 466
www.my-concept.sk
Elko Valenta Polska Sp. Z. o. o.

- PODĚKOVÁNÍ
- POPIS VÝROBKU
- Mlynek
- DŮLEŽITÉ
- ČIŠTĚNÍ A ÚDRŽBA
- Mlynček
- DÔLEŽITÉ:
- ČISTENIE A ÚDRŽBA
- CZYSZCZENIE I KONSERWACJA
- Galas mašina
- SVARİGA INFORMÄCIJA!
- TİRİŞANA UN APKOPE
- IMPORTANT SAFETY INSTRUCTIONS
- OPERATING INSTRUCTIONS
- MIXER
- Important
- NOTE:
- Blender
- Important:
- Function
- How to use the blender:
- Tips:
- Mincer
- How to assemble the mince
- CLEANING
- Bowl and Equipment
- CAUTION
- SERVICING
- ENVIRONMENTAL PROTECTION
- Appliance recycling at the end of its service life:
- Fleischwolf
- WICHTIG:
- CZ ZÁRUČNÍ PODMÍNKY
- Záruka
- The Certificate is not valid without all the prescribed data correctly filled in!
- Notice for consumers
- Manufacturer:
- Importer:
- concept
Brand : Concept
Model : RM-4421
Category : Food processor