
RTCC 513 RIP - CD Player HYUNDAI - Free user manual and instructions
Find the device manual for free RTCC 513 RIP HYUNDAI in PDF.

| Product Type | Multi-function Audio System with CD, Cassette, Turntable, FM/AM Radio, USB |
| Brand | Hyundai |
| Model | RTCC 513 RIP |
| Power Supply | AC 230 V, 50 Hz |
| Power Consumption | Max 19 W |
| Standby Power Consumption | 0 W |
| Output Power | 2 x 2.5 W |
| Weight (Net) | 7.5 kg |
| Turntable Speeds | 33, 45, 78 RPM |
| Turntable Record Sizes | 17.5 cm, 25 cm, 30 cm |
| Radio Bands | AM (530-1600 kHz), FM (88-108 MHz) |
| CD Compatibility | CD, CD-R, CD-RW, MP3 |
| USB Playback | MP3 files |
| Cassette Player | Accepts C60-C90 cassettes (C120 not recommended) |
| Aux Input | Rear panel AUX IN jack (L/R) |
| Headphone Output | Front panel 3.5 mm jack |
| USB Recording | From turntable, cassette, or CD to USB |
| Remote Control | Included (functions for CD/MP3 and USB) |
| Antenna | FM wire antenna on back; AM internal antenna |
| Safety Features | Transit screw for turntable protection; automatic turntable stop and return |
| Care Instructions | Clean with dry cloth; avoid heat/moisture; unplug during storms |
Frequently Asked Questions - RTCC 513 RIP HYUNDAI
User questions about RTCC 513 RIP HYUNDAI
0 question about this device. Answer the ones you know or ask your own.
Ask a new question about this device
Download the instructions for your CD Player in PDF format for free! Find your manual RTCC 513 RIP - HYUNDAI and take your electronic device back in hand. On this page are published all the documents necessary for the use of your device. RTCC 513 RIP by HYUNDAI.
USER MANUAL RTCC 513 RIP HYUNDAI
natural_image
Exterior view of a Hyundai radio console with control knobs and a digital display (no visible text or symbols on main body)NÁVOD K POUŽITÍ / NÁVOD NA POUŽITIE INSTRUKCJA OBSŁUGI / INSTRUCTION MANUAL HASZNÁLATÍ ÚTMUTATÓ
UPOZORNĚNÍ
Z DŮVODU ZAMEZENÍ RIZIKA POŽÁRU NEBO ZRANĚNÍ ELEKTRICKÝM PROUDEM, NEPOUŽÍVEJTE TUTO ZÁSTRČKU S PRODLUŽOVACÍMI KABELY, ZÁSUVKAMI A JINÝMI KONCOVÝMI ZAŘÍZENÍMI, POKUD DO NICH ZÁSTRČKU NELZE ZCELA ZASUNOUT TAK, ABY VIDLICE NEBYLY ODKRYTÉ. Z DŮVODU ZAMEZENÍ RIZIKA POŽÁRU NEBO ZRANĚNÍ ELEKTRICKÝM PROUDEM NEVYSTAVUJTE TOTO ZAŘÍZENÍ DEŠTI ANI VLHKOSTI.

natural_image
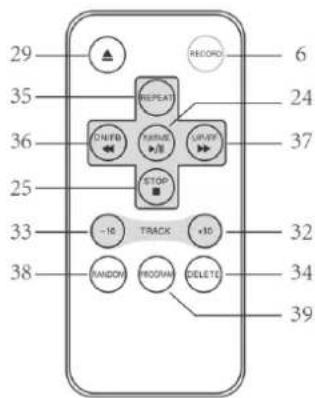
Diagram of a laboratory setup with a hand holding a tool, a control panel, and a ruler (no text or labels visible)UMÍSTĚNÍ OVLÁDACÍCH PRVKŮ A KONTROLEK
ČELNÍ PANEL

natural_image
Line drawing of a portable electronic device with bidirectional arrows indicating signal flow (no text or symbols)natural_image
Isometric line drawing of a mechanical device with a pencil and screw (no text or symbols)Obr. 2
natural_image
Illustration of a hand pressing a circular component with an upward arrow (no text or symbols)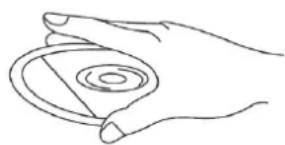
natural_image
Line drawing of a hand holding a circular object with concentric rings (no text or symbols)natural_image
Line drawing of two hands holding a circular object (no text or symbols)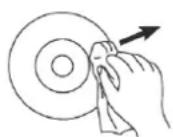

DÔLEŽITÉ BEZPEČNOSTNÉ POKYNY
natural_image
Illustration of a hand using a tool to interact with a grid-patterned device inside a rectangular frame (no text or symbols visible)UMIESTNENIE OVLÁDACÍCH PRVKOV A KONTROLIEK
ČELNÝ PANEL

- Veko gramofónu
- Opierka veka gramofónu
- Reproduktory
- USB vstup
- Hlavný vypínač POWER
- Tlačidlo RECORD (Nahrávanie)
- Tlačidlo FUNCTION (Vol'ba funkcií)
- Ovládač hlasitosti VOLUME
- Podsvietenie tuneru
- LCD displej
- Senzor dial'kového ovládania
- Indikátor POWER (Napájanie)
- Indikátor FM STEREO
- Stupnica ladenia FM
- Stupnica Iadenia AM
- Ukazovatel' ladenia
- Tlačidlo AM
- Tlačidlo FM
- Tlačidlo CD/USB
- Tlačidlo TAPE (Magnetofón)
-
Tlačidlo PHONE/AUX IN (Gramofón/Vstup externého zariadenia)
-
Zásuvka CD
- Ovládanie ladenia
- Tlačidlo PREHRÁVANIA/PAUZA (▶ II)
- Tlačidlo STOP (■)
- Tlačidlo DOLŮ/RYCHLE VZAD (◀◀)
- Tlačidlo NAHORU/RYCHLE VPRED (▶)
- Tlačidlo REŽIMU PREHRÁVANIE ( )
- Tlačidlo OP/CL (▲) (Tlačidlo Otvorenie/Zavretie CD)
- Tlačidlo EJ/F.F (Tlačidlo vysunutia kazety/Rýchleho prevíjania vpred)
- Otvor kazetového magnetofónu
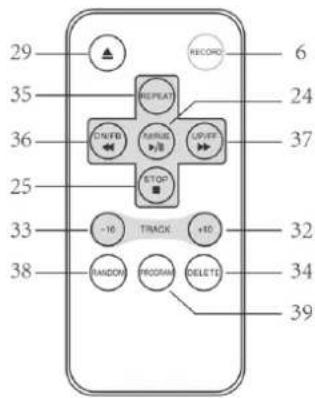
- O 10 STÔP DOPREDU
- O 10 STÔP DOZADU
- VYMAZAT
- OPAKOVAŤ
- DN (Dole)/FB (PRESKOČIŤ vzad).
- UP (Nahor)/FF (PRESKOČIT vpred).
- NÁHODNE
- PROGRAM
natural_image
Line drawing of a vintage radio device with two curved arrows indicating rotation or signal flow (no text or symbols)natural_image
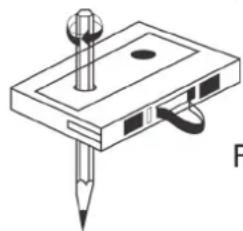
Two technical diagrams showing mechanical assembly or tool positioning, with no visible text or symbols.- K OCHRANE GRAMOFÓNU PRED POŠKODENÍM V PRIEBEHU DOPRAVY JE VPRAVO HORE OD TANIERA GRAMOFÓNU STRIEBRNÝ PREPRAVNÁ SKRUTKA.
- PRED PREHRÁVANÍM POMOCOU SKRUTKOVAČA CELKOM ZASKRUTKUJTE PREPRAVNÚ SKRUTKU V SMERE HODINOVÝCH RUČIČIEK (SKRUTKA KLESÁ). TÝM ODOMKNETE TANIER GRAMOFÓNU.
- POKIAL' CHCETE GRAMOFÓN OPAŤ ZAMKNÚŤ ZA ÚČELOM PREPRAVY, VYSKRUTKUJTE SKRUTKU PROTI SMERU HODINOVÝCH RUČIČIEK.
POUŽÍVÁNIE VSTUPU AUX IN
Pripojte zvukový systém ku konektorom AUX IN na zadnom panely a stisnete tlačidlo PHONO/AUX IN. Spustte prehrávanie zvukového systému. Nastavte hlasitost'.
POUŽÍVANIE STEREOFÓNNYCH SLÚCHADIEL (NIE SÚ SÚČASŤOU)
STAROSTLIVOSŤ A ÚDRŽBA
STAROSTLIVOSŤ O KAZETY
natural_image
Simple line drawing of a device with a pencil and screwdriver (no text or symbols)Obr. 2
natural_image
Hand holding a mechanical component with an upward arrow indicating motion (no text or symbols)
natural_image
Line drawing of a hand holding a circular object with concentric rings (no text or symbols)natural_image
Line drawing of two hands holding a circular object (no text or symbols)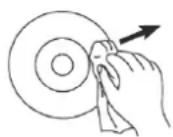

UMIESZCZENIE ELEMENTÓW STERUJĄCYCH I KONTROLEK PANEL CZOŁOWY

natural_image
Line drawing of a vintage air conditioner unit with bidirectional arrows indicating signal flow (no text or symbols)natural_image
Hand holding a mechanical component with an upward arrow indicating motion (no text or symbols)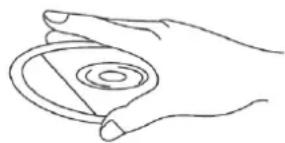
natural_image
Line drawing of a hand holding a circular object with concentric rings (no text or symbols)natural_image
Line drawing of two hands holding a circular object (no text or symbols)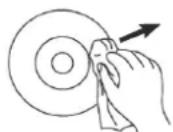
TO PREVENT FIRE OR SHOCK HAZARD, DO NOT USE THIS PLUG WITH AN EXTENSION CORD, RECEPTACLE OR OTHER OUTLET UNLESS THE BLADES CAN BE FULLY INSERTED TO PREVENT BLADE EXPOSURE. TO PREVENT FIRE OR SHOCK HAZARD, DO NOT EXPOSE THIS APPLIANCE TO RAIN OR MOISTURE.

The LIGHTNING FLASH with arrowhead symbol, within an equilateral triangle is intended to alert the user to the presence of uninsulated 'dangerous voltage' within the product's enclosure that may be of sufficient magnitude to constitute a risk of electric shock to persons.

WARNING : TO REDUCE THE RISK OF ELECTRIC SHOCK DO NOT REMOVE COVER (OR BACK), NO USER SERVICEABLE PARTS INSIDE REFER SERVICING TO QUALIFIED SERVICE PERSONNEL

The exclamation point within an equilateral triangle is in-tended to alert the user to the presence of important operating and maintenance (servicing) instructions in the literature accompanying the appliance.
IMPORTANT SAFETY INSTRUCTIONS
- Read, keep and follow all these instructions in this manual.
- Clean only with dry cloth.
- Do not block any ventilation openings. Install in accordance with the manufacturer's instructions.
- Do not install near any heat sources such as radiators, heat registers, stoves, or other apparatus(including amplifiers) that produce heat.
- Protect the power cord from being walked on or pinched particularly at plugs, convenience receptacles, and point where they exit from the apparatus.
- Unplug this apparatus during lightning storms or when unused for long periods of time.
- Refer all servicing to qualified service personnel. Servicing is required when the apparatus has been damaged in any way, such as power-supply cord or plug is damaged, liquid has been spilled or objects have fallen into the apparatus, the apparatus has been exposed to rain or moisture, does not operate normally, or has been dropped.
- This appliance shall not be exposed to dripping or splashing water and no object filled with liquids such as vases shall be placed on the apparatus.
- Do not overload wall outlet.
- Operate controls and buttons as described in the manual.
- Store your CDs, cassettes in a cool area to avoid damage from heat.
- When moving the set, be sure to first disconnect the power cord.
PREPARATION FOR USE
- Carefully remove the unit from the display carton and remove all packing material from the unit.
- Unwind the AC power cord and extend it to its full length.
- Unwind the FM Antenna wire and extend it to its full length.
- Place the unit on a stable, level surface, convenient to an AC 230 V, 50 HZ outlet out of a strong magnetic field.
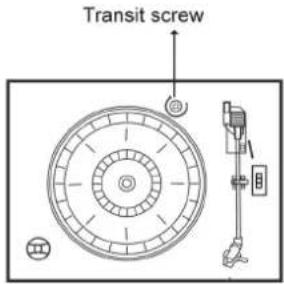
- Raise the lid to expose the phonograph. The phonograph has been secured for shipment with a transit screw. Use a coin or screwdriver to turn the transit screw clockwise. This will allow the turntable to "float".
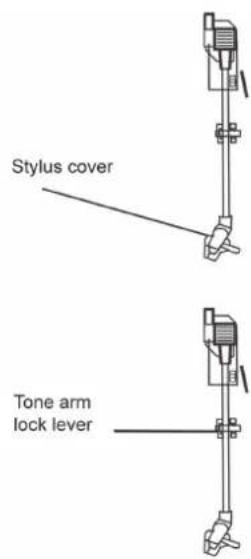
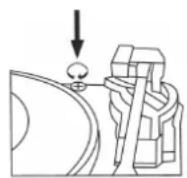
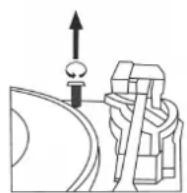
- Remove the opaque white plastic stylus cover from the phonograph stylus by sliding it in the direction of the arrow.
- During this operation pay attention to the stylus, because the stylus damage is not covered by guarantee.
- Remove the twist-tie that was used to secure the tone arm during shipment.
- Release the tone arm lock lever.
- Connect the plug to your AC 230V,50HZ outlet.
POWER SOURCE
This system is designed to operate on normal 230 V 50 Hz AC only. Attempting to operate from any other power source may cause damage to the system, and such damage is not covered by your warranty.
IMPORTANT: Raising And Lowering The Phonograph Lid
To open the lid, raise it as far as it will go until the lid support bracket ,locks' in the open position. To close the lid, Pull forward the lid support bracket to release and then gently lower the lid.
TO AVOID DAMAGING THE CABINET OR THE LID, NEVER FORCE THE LID CLOSED. ALWAYS RAISE THE LID TO RELEASE THE LID SUPPORT BRACKET.
IMPORTANT!
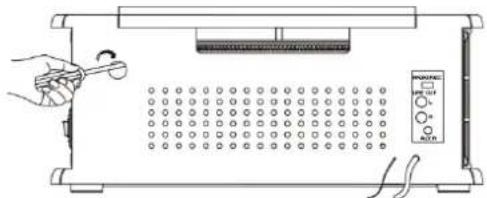
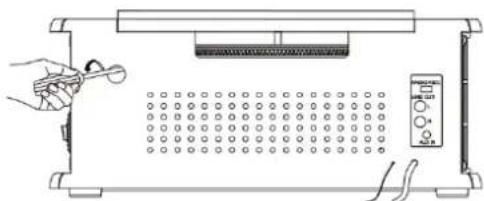
To make sure the turntable can play the record with different standard completely, a hole with 'NO OPEN' pvc plate located at the back of the unit to adjust the screw inside the turntable.
When the turntable stop early and auto-return, pls. use a screw driver to turn the screw inside the hole about 45 degree in clockwise direction. If the record still can not be played completely, stop play and re-turn the screw 45 degree in clockwise direction again, till the turntable can play the record completely and then auto-return.
When the turntable cann't stop and auto-return, but keep turning after playing the record completely, pls. use a screw driver to turn the screw inside the hole about 45 degree in couter-clockwise direction. If the turntable still cann't stop and auto-return, stop play and re-turn the screw 45 degree in couter-clockwise direction again, till the turntable can stop and auto-return after playing the record completely.
natural_image
Diagram of a simple electrical setup with a hand holding a tool, a grid-patterned panel, and a multimeter (no text or symbols)LOCATION OF CONTROLS AND INDICATORS
FRONT PANEL

-
Phonograph Lid
-
Phonograph Lid Support Bracket
-
Speakers
-
USB Socket
-
POWER button
-
RECORD Button
-
FUNCTION Button
-
VOLUME Control
-
Tuner Backlight
-
LCD Display
-
Remote Control Sensor
-
POWER Indicator
-
FM ST./REC. Indicator
-
FM Dial Scale
-
AM Dial Scale
-
Tuning Pointer
-
AM Button
-
FM Button
-
CD/USB Button
-
TAPE Button
-
PHONO/AUX IN Button
-
CD Drawer
-
Tuning Control
-
PLAY/PAUSE Button (▶ II)
-
STOP Button (■)
-
DN/F.R Button (◀)
-
UP/F.F Button (▶)
-
PLAY MODE Button ( )
-
OP/CL Button (▲) (CD Open/Close Button)
-
Cassette EJ/F.F Button (Eject/Fast Forward)
-
Cassette Player Slot
-
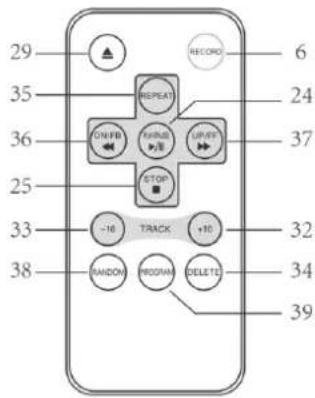
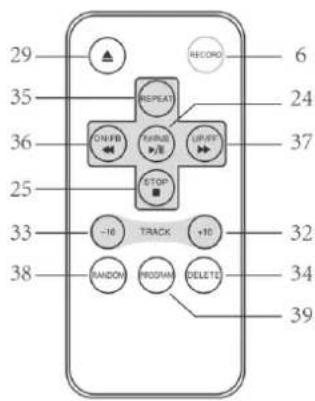
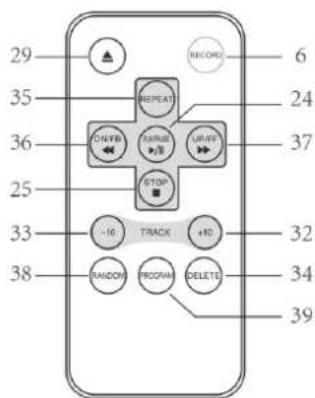
TRACK+10
-
TRACK-10
-
DELETE
-
REPEAT.
-
DN/FB(SKIP REV.).
-
UP/FF(SKIP Forward.).
-
RANDOM
-
PROGRAM
NOTE 1: All of the buttons on the remote control have the same function as these buttons in the unit. This remote control just used for CD/MP3 and USB mode.
NOTE 2: Long pressing PLAY/PAUSE on Remote Control for 2 seconds will effect FUNCTION, to change the playing mode between CD and USB.
NOTE 3: Long pressing DELETE on Remote Control for 2 seconds, Deleting will be effected.
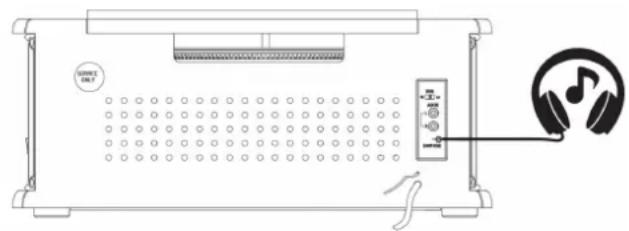
BACK PANEL
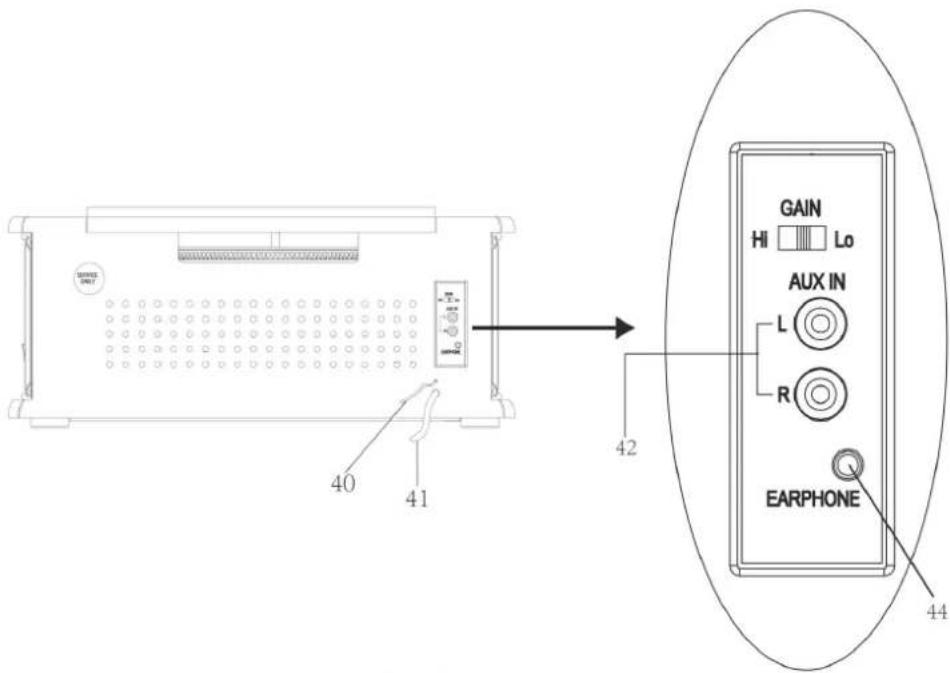
- FM Antenna
- AC Power Cord
- Aux In Jack (L/R)
- Gain Switch
- Earphone Jack
GRAMOFON
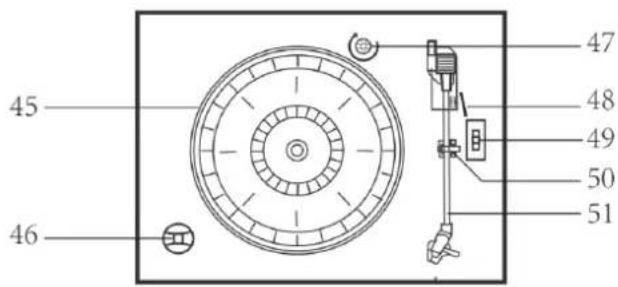
- Turntable
- 45 rpm Adapter
- Transit Screw
- Cue Lever
- Speed Selector(33/45/78 rpm)
- Tone Arm Lock
- Tone Arm with Stylus
OPERATING INSTRUCTIONS
POWER ON
- Press POWER to turn the system on. The power indicator lights up.
- Press the function selector buttons (AM/FM / CD/USB / TAPE / PHONO/AUX IN) to select your desired function.
- Start to adjust the volume by using the VOLUME control.
- When you have finished your listening, press POWER again to turn the system off. The power indicator goes ,off'
CD OPERATION
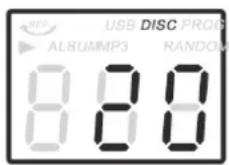
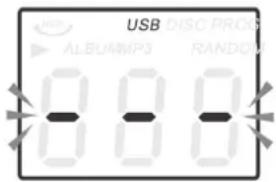
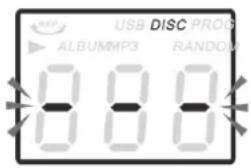
- Press the CD/USB button to enter CD mode, the '-' and 'DISC' icon will be shown on the screen. The unit can play CD, CD-R and CD-RW.
- Press the OP/CL ▲ button to open the CD drawer.
- Place your disc (MP3 is compatible) in the CD drawer with the label side facing up.
- Press the OP/CL ▲ button again to close the CD drawer. Playback will automatically start from first track.
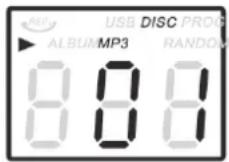
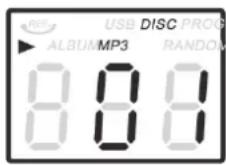
- MP3 icon will be shown while MP3 is detected. No icon will be shown when no MP3 file is detected in the disc.
USB OPERATION
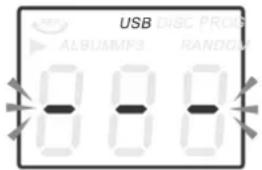
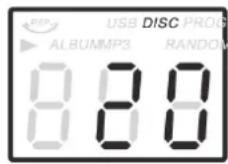
- Press the CD/USB button first and the FUNCTION button second to enter USB mode, the '- - -' and ,USB' icon will be shown.
- Insert a USB device into the USB socket.
- PLAY/PAUSE, DN/UP and STOP functions are the same as CD functions.
- The USB input is compatible with the data flesh memory key, it is not guaranteed the compatibility with proprietary software MP3 players..
NOTE: You may press the FUNCTION button on panel or long press PLAY/PAUSE button on Remote control for 2 seconds to change the playing mode between CD and USB.
PLAYING IN MP3 MODE(UNDER CD/USB OPERATION)
- Press PLAY/RAUSE button (▶ II) to start or pause playback of the selected track in the CD/USB mode.
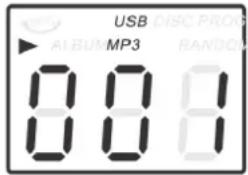
- While playing the song, the song number and folder number of your selected track will be shown on the screen. MP3 icon and '▶' icon will be shown.
- You can stop the playback at any time by pressing the STOP button (■).
TRACK SKIP AND HIGH SPEED TRACK SEARCH IN CD/USB MODE
During CD/USB playback, press UP/F.F (◀◀) or DN/F.R (▶▶) button on the Unit panel or on the remote control repeatedly will skip to higher or lower tracks. Release the button when your desired track number is shown. To rapidly search forward or backward within a track and locate a specific passage of it, depress and hold UP/F.F (◀◀) or DN/F.R (▶▶) button. The player will search forward or backward at a high speed. Release the button when you hear your desired passage and the playback will resume normal from that point. To skip 10 tracks backwards/afterwards, press TRACK+10/TRACK-10 button on remote control.
REPEAT/RANDOM FUNCTION IN MP3 MODE(UNDER CD/USB
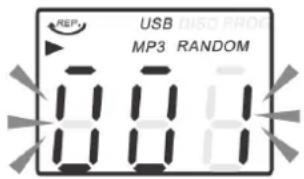
Press the PLAY. MODE button on the panel or REPEAT button on the Remote control will will repeat the currently playing track and the 'REP', icon will be shown on the track number display. Press this button for the REP second time, will repeat all tracks on the MP3 disc from the first track and the will be shown. Press this button for the third time to repeat all files in the album. Press this button for the fourth time on panel will cancel both the repeat and random playback function. Press this button for the fifth time on panel will cancel random function. If press REPEAT button on Remote Control for the fourth time, will cancel the repeat playback function; if press RANDOM button on Remote Control for the first time, will begin to Random function, press RANDOM button secondly on Remote Control, will cancel the random function. Press the STOP (■) button to stop playing.
NOTE: There is no folder in the disc if no MP3 is detected.
USB RECORDING
RECORDING FROM A GRAMOPHONE OR CASSETTE
- Insert the USB disk into the USB socket during cassette or turntable playback.
-
Press the RECORD button, the "rEC" icon appears on display. The "rEC" icon will start flashing after 5-10 seconds (according to the USB disk), and the USB icon will appear on display. The recording will begin.
-
Press the STOP button to stop recording.
NOTE: If you remove the USB disk during recording, the display will show "Err" and the recording will fail. Recorded files are stored in the REC folder.
RECORDING FROM CD
NOTE: You can record one track or all tracks of a CD.
- Insert the USB disk into the USB socket.
- Perform playback of the track you want to record.
- Press the RECORD button once, the "rEC" and the USB icon appear on display. Recording of the selected track will start from the beginning. The „ONE“ icon will appear on the display.
- If you want to record all the tracks of the CD, press the RECORD button again, the display will show „ALL“.
- The recording will end automatically.
NOTE: To stop recording at any time during recording, press the STOP button. If you remove the USB disk during recording, the display will show "Err" and the recording will fail. Recorded files are stored in the RIP folder.
FAST RECORDING FROM CD-MP3
NOTE: The quick recording function only works when recording a CD-MP3 disc.
- To record, proceed in the same steps as described above in the article RECORDING FROM A CD.
- During recording, the display shows the numbers 1 \~ 98. When the number 98 is reached, it means the track has been recorded. Press the STOP button to stop recording.
NOTE: Recorded files are stored in the FROMCD folder.
RADIO OPERATION
- Press POWER to turn the system on The tuner backlight comes 'on'.
- Rotate the TUNING control to tune the desired radio station. If you tune to an FM stereo station, the FM ST./REC. Indicator will light and reception will be in stereo.
- When you have finished your listening, press POWER again to turn the system off. The POWER indicator and the tuner backlight go 'off'.
- If noises during AM/FM reception, put GAIN control on LO positon.
INFORMATION
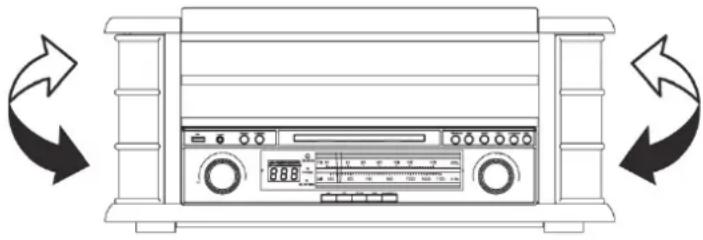
The AM antenna is inside the cabinet. If AM reception is unsatisfactory try repositioning the cabinet slightly until the internal antenna is picking up the strongest signal.
natural_image
Line drawing of a front-mounted air conditioner unit with bidirectional arrows indicating rotation (no text or symbols)The FM wire antenna is located on the back cabinet. If necessary adjust the position and direction of this antenna until you find the position that provides the best reception.
CASSETTE OPERATION
NOTE: Before inserting a tape in the player be sure that there is no excess slack in the cassette that could become jammed in the mechanism. Refer to the CARE AND MAINTENANCE section for instructions on removing excess slack from the cassette.
- Press POWER to turn the system on. The POWER indicator comes 'on'.
- Press the TAPE button to enter the TAPE mode.
- Insert your cassette into the slot located on right side cabinet, as shown in the illustration, with the side you wish to play facing ,up' and the open end on the right side.

- Cassette playback begins as soon as the tape is inserted.
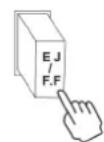
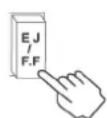
Adjust the VOLUME control to the desired level. - To advance the tape rapidly, depress the EJ/F.F (Eject/Fast Forward) button approximately half way. The tape will move forward rapidly as long as the button is depressed. Normal playback will resume when the button is released.
- When the tape ends, the player stops automatically. Depress the EJ/F.F (Eject/Fast Forward) button completely to remove the cassette from the player. You may press the EJ/FF (Eject/Fast Forward) button to stop playback and remove the cassette at any time.
- Press POWER again to turn the system off. The POWER indicator goes 'off'.
PLAYING RECORDS
This system includes a full-size, 3-speed, belt-drive turntable.
You can play 33, 45 and 78 rpm records.
- Press POWER to turn the system on.
- Press the PHONO button to enter the PHONO mode.
- Make sure that you have removed the stylus cover from the stylus and have released the tone arm lock that secured the tone arm to the tone arm rest.
- Set the turntable speed selector to the appropriate speed 33, 45 or 78 rpm. If you are playing 45 rpm 'singles', place the 45 rpm adapter on the centre spindle.
- Place your record on the centre spindle.
- Raise the cue lever to lift the tone arm off its rest. Move the tone arm to the edge of the record. The turntable starts automatically. Use the cue lever to gently lower the tone arm onto the record.
- Adjust the VOLUME control to the desired level.
- When the tone arm reaches the end of the record it automatically returns to the tone arm rest and the record player stops.
- Press POWER again to turn the system off. The POWER indicator goes ,off'.
NOTE: Do not turn or stop the turntable manually. Moving or jarring the turntable without securing the tone arm clamp could result in damage to the tone arm.
IMPORTANT!!
• TO PROTECT THE TURNTABLE FROM DAMAGE DURING TRANSPORTATION, A SILVER TRANSIT SCREW IS LOCATED AT THE UPPER RIGHT OF THE TURNTABLE PLATFORM.
- BEFORE PLAYING, PLEASE USE A SCREWDRIVER TO TURN THE TRANSIT SCREW IN CLOCKWISE DIRECTION (SCREW GOING DOWN) COMPLETELY TO UNLOCK THE TURNTABLE.
- TO LOCK THE TURNTABLE AGAIN FOR TRANSPORTATION, PLEASE TURN THE SCREW IN COUNTER-CLOCKWISE DIRECTION.
AUXIN OPERATION
Connect the Audio system into the AUX IN Jack on the rear panel, Press the PHONO/AUX IN button. Play your Audio system. Adjust the volume.
USING STEREO HEADPHONES (NOT INCLUDED)
Connect a set of stereo headphones with a 3.5mm mini-plug to the PHONES jack on the front panel. Before putting on the headphones always set the VOLUME control to a low level. Then put the headphones on and gradually increase the volume to a comfortable listening level.
The built-in speakers automatically shut off when headphones are connected to the PHONES jack.
CARE AND MAINTENANCE
CASSETTE CARE
Two common causes of trouble experienced when using cassettes are:
- Tape jamming - Leading to uneven speed in playback, and
- Tape tangling - Where the tape wraps itself around vital parts of the mechanism.
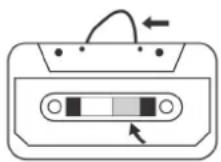
Fig. 1
natural_image
Isometric line drawing of a mechanical device with a pencil and screw (no text or symbols)Fig. 2
To reduce the likelihood of these problems occurring, the following precautions should be observed:
- Check that there are no loose layers of tape visible through the cassette centre window (see Fig.1). Take up any loose layers, using a pencil or hexagonal barrelled ballpoint pen, before inserting the cassette into the machine (see Fig.2).
- If the cassette feels „tight“ while performing operation shown (see Fig.2), the tape may be jamming due to „ridges“ formed in the winding of the tape (visible through the centre window). These may be removed, in most cases, by fast winding of the cassette from one end to the other and back again.
- Use only well-known brands of tape. Avoid use of C-120 cassettes.
Furthermore, do not expose cassettes to direct sunlight, dust or oil, and do not touch the tape surfaces.
COMPACT DISC CARE
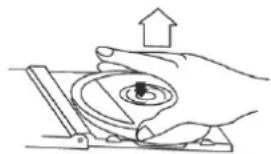
- To remove a disc from its storage case, press down on the centre of the case and lift the disc out, holding it carefully by the edges.
natural_image
Illustration of a hand pressing a circular component with an upward arrow (no text or symbols)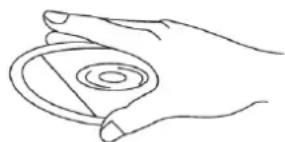
natural_image
Line drawing of a hand holding a circular object with concentric rings (no text or symbols)- Fingerprints and dust should be carefully wiped off the discs recorded surface with a soft cloth. Unlike conventional records, compact discs have no grooves to collect dust and microscopic debris, so gently wiping with a soft cloth should remove most particles. Wipe in a straight line from the inside to the outside of the disc.
natural_image
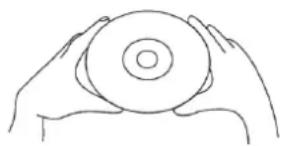
Line drawing of two hands holding a circular object (no text or symbols)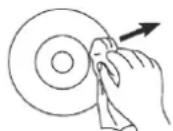

- Clean the disc periodically with a soft, lint-free, dry cloth.
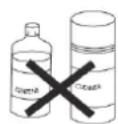
Never use detergents or abrasive cleaners to clean the disc. - Never write on or affix labels to the surface of compact discs.
CARE OF THE CABINETS
You should care for the cabinet as you would care for any piece of the furniture.
When the cabinet becomes dusty wipe it with a soft, non-abrasive dust cloth. If the cabinet becomes smudged with fingerprints you may use any good quality commercial dusting and polishing spray cleaner, however avoid spraying the plastic or metal parts of this system. We recommend that you spray the cleaner on your dust cloth, not directly on the cabinet, to avoid getting any of the spray on the plastic or metal parts.
TECHNICAL SPECIFICATION
- RADIO
AM: 530 – 1600 kHz
FM: 88 – 108 MHz
- TURNTABLE SPEED: 33/45/78 RPM CAN PLAY DISC SIZE: 17,5/25/30 cm
- CD CAN PLAY CD/CD-R/CD-RW/MP3
- USB CONNECTOR PLAY MP3
- C60 – C90 CASSETTE PLAYER (C120 cassette is not recommended)
- MAX CONSUMPTION POWER: 19 W
- POWER CONSUMPTION OFF MODE: 0 W
- OUTPUT POWER: 2 x 2.5W
- WEIGHT (NETTO): 7,5 kg
WE RESERVE THE RIGHT TO CHANGE TECHNICAL SPECIFICATIONS.

WARNING: DO NOT USE THIS PRODUCT NEAR WATER, IN WET AREAS TO AVOID FIRE OR INJURY OF ELECTRIC CURRENT. ALWAYS TURN OFF THE PRODUCT WHEN YOU DON'T USE IT OR BEFORE A REVISION. THERE AREN'T ANY PARTS IN THIS APPLIANCE WHICH ARE REPARABLE BY CONSUMER.
ALWAYS APPEAL TO A QUALIFIED AUTHORIZED SERVICE. THE PRODUCT IS UNDER A DANGEROUS TENTION.

TO AVOID DANGER OF SUFFOCATION, KEEP THIS PLASTIC BAG AWAY FROM BABIES AND CHILDREN. DO NOT USE THIS BAG IN CRIBS, BEDS, CARRIAGES OR PLAYPENS. THIS BAG IS NOT A TOY.
Disposal of old Electrical & Electronic Equipment (Applicable in the European Union and other European countries with separate collection systems).
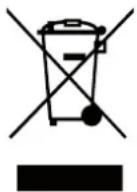
This symbol on the product or on its packaging indicates that this product shall not be treated as household waste. Instead it shall be handed over to the applicable collection point for the recycling of electrical and electronic equipment. By ensuring this product is disposed of correctly, you will help prevent potential negative consequences for the environment and human health, which could otherwise be caused by inappropriate waste handling of this product. The recycling of materials will
help to conserve natural resources. For more detailed information about recycling of this product, please contact your local Civic Office, your household waste disposal service or the shop where you purchased the product.
Hereby, ETA a.s. declares that the radio equipment type RTCC513RIP is in compliance with Directive 2014/53/EU. The full text of the EU declaration of conformity is available at the following internet address: http://www.hyundai-electronics.cz/declaration_of_conformi
FIGYELMEZTETÉS
A TÜZ ÉS ÁRAMÜTÉS KOCKÁZATÁNAK ELKERÜLÉSE ÉRDEKÉBEN NE HASZNÁLJA A HÁLÓZATI CSATLAKOZÓ DUGÓT HOSSZABÍTÓKÁBELLEL VAGY MÁS KONNEKTORRAL, HA CSATLAKOZTATÁS UTÁN A DUGÓ VILLÁI KILÁTSZANAK. A TÜZ ÉS ÁRAMÜTÉS KOCKÁZATÁNAK ELKERÜLÉSE ÉRDEKÉBEN NE TEGYE KI A KÉSZÜLÉKET ESÖNEK VAGY NEDVESSÉGNEK.

A TERMÉK BELSEJÉBEN ÁRAMÜTÉS KOCKÁZATÁT HORDOZÓ, SZIGETELETLEN FESZÜLTSÉG VAN JELEN.
FIGYELEM
ÁRAMÜTÉSVESZÉLY – NE NYISSA KI
FIGYELEM: AZ ÁRAMÜTÉS KOCKÁZATÁNAK ELKERÜLÉSE ÉRDEKÉBEN NE VEGYE LE A KÉSZÜLÉK BORÍTÁSÁT (A HÁTSÓ PANEL SEM). A KÉSZÜLÉK BELSEJÉBEN NINCSENEK A FELHASZNÁLÓ ÁLTAL KEZELENDŐ ALKATRÉSZEK. A JAVÍTÁST BÍZZA SZAKEMBERRE!

VEZÉRLŐELEMEK ÉS KIJELZŐK ELHELYEZKEDÉSE ELÜLSŐ PANEL

natural_image
Line drawing of a front-mounted electronic device with two circular arrows indicating rotational or bidirectional motion (no text or symbols)natural_image
Illustration of a hand operating a mechanical device with an upward arrow (no text or symbols)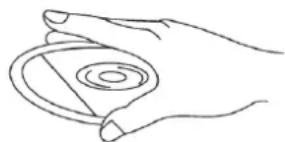
natural_image
Line drawing of a hand holding a circular object with concentric rings (no text or symbols)natural_image
Line drawing of two hands holding a circular object (no text or symbols)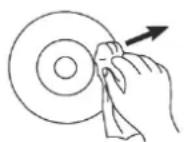

Licensed by Hyundai Corporation Holdings, Korea