
Slab HC500C - Heating Eldom - Free user manual and instructions
Find the device manual for free Slab HC500C Eldom in PDF.


| Product Type | Convector heater |
| Brand | Eldom |
| Model | Slab HC500C |
| Power Supply Voltage | 220-240 V ~ 50 Hz |
| Power Output | 1300-1500 W |
| Recommended Room Area | Up to 20 m² |
| Temperature Control Range | 10-49 °C |
| Timer | 1-24 hours |
| Operating Modes | Day (full power), Night (half power), Anti-frost (5-9°C) |
| Special Functions | Window function, Key lock, Delayed start |
| Weekly Programming | Up to 6 periods per day, 7 days |
| Controls | Touch control panel, remote control, smartphone app (Wi-Fi) |
| Safety Features | Overheat protection, tip-over switch (assumed), child lock |
| Installation | Free-standing with castor wheels or wall-mounted (min 15 cm from floor, 50 cm from ceiling) |
| Cleaning and Maintenance | Wipe with a moist cloth; do not immerse in water |
| Spare Parts and Repairability | Only authorized service providers; use original parts |
| Warranty | Personal household use only |
| Disposal | WEEE compliant; do not dispose as household waste |
| Dimensions | Not specified in manual |
| Weight | Not specified in manual |
Frequently Asked Questions - Slab HC500C Eldom
User questions about Slab HC500C Eldom
0 question about this device. Answer the ones you know or ask your own.
Ask a new question about this device
Download the instructions for your Heating in PDF format for free! Find your manual Slab HC500C - Eldom and take your electronic device back in hand. On this page are published all the documents necessary for the use of your device. Slab HC500C by Eldom.
USER MANUAL Slab HC500C Eldom
/EN/ The disposal of used electrical and electronic equipment (applies to European Union countries and other European countries with separate waste-collection systems). This symbol on the product or its packaging indicates that it should not be classified as household waste. It should be handed over to an appropriate company dealing with the collection and recycling of electrical and electronic equipment. The correct disposal of the product will prevent potential negative consequences for the environment and human health resulting from hazardous substances present in the product. Electrical devices must be handed over to restrict their re-use and further treatment. If the device contains batteries, remove them, and hand them over to a storage point separately. DO NOT THROW EQUIPMENT INTO THE MUNICIPAL WASTE BIN. Material recycling helps to preserve natural resources. For detailed information on how to recycle this product, please contact your local authority, the recycling company, or the shop where you bought it.
/ EN / This product is only suitable for well insulated spaces or occasional use.

OBSŁUGA URZĄDZENIA
Panel sterowania (1) / Pilot (7)
Please read all these instructions carefully before using this appliance.
- The device should be plugged in the socket with the working parameters described on the shell.
- The device should be unplugged before cleaning and maintenance and in case of improper working or after using the device.
- The device should be unplugged by pulling the plug not the cable.
- It is forbidden to extend the power cord or use it on a mobile socket.
- Do not use close to shower, bath, washbasin, pool, etc.
- Do not use close to combustible materials such as furniture, bedding, paper, clothes, curtains, carpets, etc.
- Do not operate in with high risk of gas explosion or when flammable solvents, lacquers or adhesives are used.
- Do not use outdoors.
- Do not touch with wet or moistened hands or feet.
- Do not immerse in water or sprinkle.
- Do not let children or animals to have access to the device. While operating the device the surface temperature may be high.
- Do not use for drying clothes.
- Do not cover outlets while operating the device.
-
The device can be used by children aged 8 and older and by persons with limited physical, sensory or mental capabilities, or persons without sufficient experience and knowledge only under supervision or if previously instructed on the safe use of the appliance and the possible risks. Children shall not play with the appliance. Cleaning and maintenance that are the responsibility of the user shall not be carried out by children without supervision. Protect the appliance and the power cord against children under 8 years old.
-
Do not direct the cord over the heater and outlets, to avoid an accident due to electric shock.
- Do not leave working device without supervision.
- Let heater cool down before putting it to a hide.
- Check regularly whether the device or the cord have any damages. Do not operate if any damages are noticed.
- Do not use if the cord is damaged, when the device fell over or was otherwise damaged. Any mending of the device should be let to authorized service providers. List of service providers can be found in the annex or on website www.eldom.eu.
- If the cord is damaged, to avoid danger, exchange it by authorized service providers.
- Any mending of the device should be held by authorized service providers. Any modernizations or using spare parts or other elements other than original is forbidden and dangerous.
- Eldom sp. z o.o. shall not be responsible for any damages occurring as a result of improper usage.
SIMPLIFIED EU DECLARATION OF CONFORMITY
Hereby, Eldom Sp. z o.o., ul. Pawła Chromika 5a, 40-238 Katowice declares that the radio equipment type CONVECTOR HEATER HC500C is in compliance with Directive 2014/53/EU. The full text of the EU declaration of conformity is available at the following internet address:
Fig. 1
GENERAL DESCRIPTION
- Control panel
- Front cover
- Feet with castor wheels
- Wall mount handles
- Mains switch
- Rear cover
- Remote control
TECHNICAL DATA
- power output: 1300-1500W
- power supply voltage: 220-240V \~ 50Hz
- timer: 1-24 godziny
- temperature control: 10-49°C
- recommended room area: up to 20 m 2
INTENDED USE
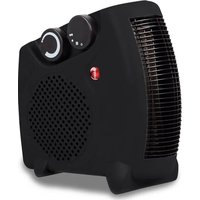
The HC500C convector heater is designed to heat rooms by both radiation and convection. This allows the heater to quickly increase the temperature in the room and the appliance is super quiet, safe, effective and energy efficient.
GETTING STARTED
After unpacking the appliance, make sure that it has not been damaged during transport. In case of any doubts, do not use the appliance until the service centre has been contacted.
PRECAUTIONS
- The heater may only be connected to a grounded electrical outlet.
- The heater must not be placed directly under an outlet.
- It is forbidden to turn the appliance on or off by directly connecting or disconnecting the power cord.
-
When using the heater, place it on a stable surface and do not tip or tilt the unit during use.
-
It is forbidden to use the heater where hanging objects can easily fall.
- It is forbidden to use the heater in an unstable or shock-prone location.
- If the heater is wall-mounted, make sure that the fixing is secure and there is no danger of the heater being torn off the wall.
- Do not use the heater around a pool.
- When using the heater, the power cord must be placed in the back of the body, placing it in front of the body will cause overheating or damage, and could be dangerous.
- Do not connect other high power electrical appliances to the same outlet.
INSTALLATION
Before starting the assembly, make sure the appliance is switched off and disconnected from the power source.
Installing the feet with castor wheels (Fig. 2)
- Turn the heater body upside down, remove the screws and feet supplied with the unit.
- Align the screw holes in the feet with the mounting holes on the bottom of the rear housing, then insert the screws through the round holes in the feet and tighten the them.
• After completing the assembly, turn the body over and place the unit on a flat, stable and heat-resistant surface, and connect it to the power source.
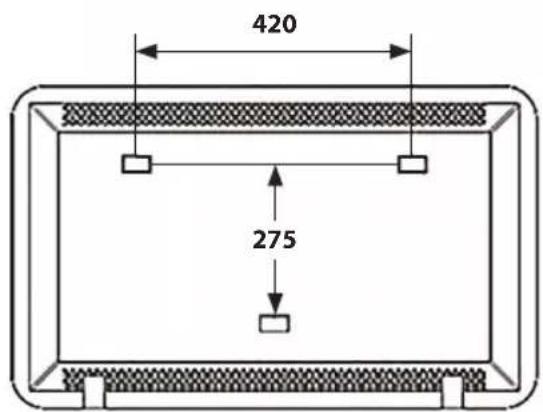
Wall mounting (Fig. 3)
CAUTION. The heater must be installed at least 15 cm from the floor and 50 cm from the ceiling. Before drilling, make sure that there are no hidden electrical wires or pipe in the drilling area.
- Drill two holes, 8 mm diameter and 40 mm depth, as shown in figure 3.
- Insert the supplied rawl plugs into the holes and then screw in the screws - the screws must protrude by 6 mm from the wall, finally hang the product using the hook holes at the back.
- Connect to the power supply.
Fig. 2 Fig. 3


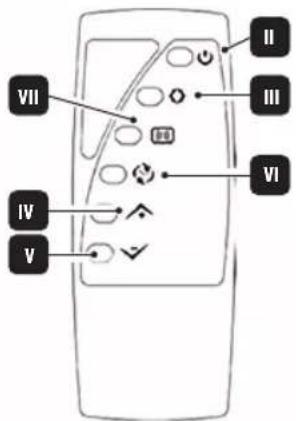
Control panel (1) / Remote controller (7)
I. Display
II. Mains switch
III. Changing the operating mode
IV. “+”
V. “-”
VI. Timer
VII. Programming
VIII. The "window" function
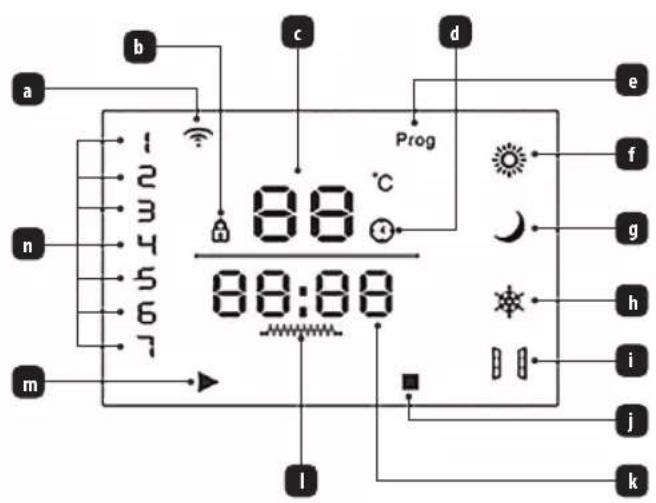
Display (I)
a) Wi-Fi indicator light
b) Key lock indicator light
c) Temperature indicator
d) Timer indicator light
e) Operating mode indicator light
f) Day mode indicator light
g) Night mode indicator light
h) Anti-frost mode indicator light
i) "Window" function indicator light
j) "Operation end" indicator light
k) Time
I) Heating indicator light
m) "Operation start" indicator light
n) Day of the week indicator lights
Fig. 4


Fig. 5
The heater can also be controlled by a smartphone with an installed app.
Detailed instructions can be downloaded from www.eldom.eu
All setting changes are signalled with a sound.
Before the first use, install the feet or hang the heater on the wall (see INSTALLATION).
Start-up
When used for the first time, the heating elements and insulation can emit characteristic smell. It is a normal phenomenon.
- Before connecting the appliance to the mains, check that the mains current parameters (voltage) correspond to the parameters indicated on the device and the switch (5) is set at "0".
- Connect the heater to the mains and then move the switch (5) to the "1" position - the display will flash and turn off.
- Press button (II) on the control panel (1) or on the remote control (7) to turn on the
heater.
- The display (l) will turn on, showing the current temperature (c), time (k) and day of the week (n).
• Each time the heater is connected to the mains, the time and day of the week must be set. - The default heater settings are: time - "12:30", day of the week - "7" (Sunday), temperature - "20°C".
Setting the time and day of the week (setting is possible only using the control panel (1))
- Turn on the heater.
- Press and hold the (VI) button on the control panel for approx. 3s - the hour field on the display (I) will start flashing.
- Press the (+) or (-) buttons to set the hours.
- Press and hold the (VI) button for approx. 3s again - the minute field starts flashing.
- Press the (+) or (-) to set the minutes.
- Press and hold the (VI) button for approx. 3s again - the day of the week indicator (n) will start flashing.
- Set the day of the week using the (+) and (-) buttons. Digits "1" - "7" in field (n) indicate days of the week, from Monday to Sunday.
- Wait approx. 5s until the day of the week indicator (n) stops flashing.
Temperature setting (using the control panel (1) and the remote control (7))
- When the heater is switched on, the default set temperature is 20°C .
- The temperature can be changed using the (+) and (-) buttons.
• Air temperature can be set in the range of 10-49°C; - Once the temperature is selected, digits in the (c) field will flash and the current ambient temperature will be displayed after a moment.
Operating modes
The device can operate in three modes:
• (f) daytime – the appliance operates at full power
• (g) night – the appliance operates at half power
- (h) anti-frost - the unit turns the heating on when an ambient temperature lower than 5°C is detected, then the heater will automatically turn the heating on at half power and continue to run until the room is heated to 9°C , then the heater is turned off.
Setting the operating mode (using the control panel (1) and the remote control (7))
• After switching the heater on, select the operating mode using the (II) button.
- To do this, press the (III) button until the corresponding indicator light on the display (I) is illuminated.
"Window" function (using the control panel (1) and the remote control (7))
- When this function is activated and if the ambient temperature drops 5 degrees over 10 minutes, the user is considered to have opened a window and the heater will stop heating and enter standby mode.
- Press the (VIII) button on the remote control to activate the function.
• The function activation is indicated by the indicator light (b) on the display (1). - To deactivate the function, press the (VIII) button on the remote control.
Timer (set using the control panel (1) and the remote control (7))
- Turn on the unit, select the operating mode and set the temperature.
- Press the (VI) button - the time digits (k) will start flashing on the display (I).
- Press the (VI) button again until the time is set to between 1 and 24 hours.
- After selecting the time, wait until the digits (K) stop flashing - the display will now show the time.
- The function activation is indicated by an indicator light (d) on the display.
- To see how much time is left until the heater switches off, press the (VI) button once - the time left until the heater switches off will be displayed in the (k) field for a few seconds.
- When the TIMER function is active, temperature settings and the operating mode can be changed.
• To deactivate the function press the (VI) button and set "00:00".
Delayed start (setting available only via control panel (1))
• The appliance must be connected to the mains and the (5) switch set to "I".
- Press and hold the "VI" button on the control panel (1) - the time digits (k) will start blinking on the display (I).
- Press the "VI" button again, until a time in the range between 1 and 24 hours has been set.
• After selecting the time, wait until the digits (k) stop blinking.
- The function activation is indicated by the indicator light (d) on the display and by the countdown.
- Once switched on, the heater will operate according to the pre-programmed settings.
- To deactivate the function, press the "II" button on the control panel (1) or on the remote control (7) twice.
Key lock (can only be set using the control panel (1))
- To lock the keys, press the (+) and (-) buttons simultaneously.
• The function activation is indicated by the indicator light (b) on the display (1).
All operations described above are available with the weekly heating schedule disabled.
WEEKLY HEATING SCHEDULE
- The user can set an operating schedule for each day of the week in the unit.
- The user can set 6 work periods for each day - a total of 42 work periods can be set for 7 days.
- Before programming an operation schedule, the time and day of the week should be set (see Setting the time and day of the week).
- The schedule will remain active until it is switched off or the device is disconnected from the mains.
Programming a weekly schedule (setting available only from the control panel (1))
- To start programming the schedule, press and hold the (VII) button, the (e) icon will appear on the display.
- Then press the (VI) button - the "1" digit will blink on the display, in the (n) field.
- Using the (+) and (-) buttons select the day of the week. Digits "1" - "7" in the (n) field on the display indicate days of the week, from Monday to Sunday.
- Press the (VI) button again - a number indicating the work period number during the given day will begin flashing in the (c) field. A maximum of 6 periods can be defined per day.
- Use the (+) and (-) buttons to select the appropriate period.
- Press the (VI) button again - the numbers in the (k) field on the display start flashing and the (M) indicator light is illuminated.
- Use the (+) and (-) buttons to select the operation start hour.
- Press the (VI) button.
- Use the (+) and (-) buttons to select the operation start minute.
- Press the (VI) button. In the (k) field on the display, the numbers will start flashing and the (j) light will illuminate.
- Use the (+) and (-) buttons to select the operation end hour.
- Press the (VI) button.
- Use the (+) and (-) buttons to select the operation end minute.
- Press the (VI) button. A number will flash in the (c) field on the display.
- Use the (+) and (-) buttons to select the appropriate temperature.
- Repeat the operations described above for each period, for each day of the week.
CLEANING AND MAINTENANCE
- Before cleaning remove the power cable from the socket.
- The appliance cannot be submersed in water.
- Do not use any cleansing agents which are strong and damage the surface.
- Wipe the housing with a moistened cloth.
PROTECTION
- The appliance is made of materials which can be recovered or recycled.
- The appliance should be handed over to the appropriate center of collection and recycling of electrical and electronic equipment.
WARRANTY
- the appliance is intended for personal use at a household,
- it is not intended for professional purposes,
- in case of misuse, the warranty is rendered null and void.
| Table | Model identifier for electric local space heaters | |||
| Model number: | HC500C | |||
| Item | Symbol | Value | Unit | |
| Heat output | ||||
| Nominal heat output | Pnom | 2 | kW | |
| Minimum heatoutput (indicative) | Pmin | 1 | kW | |
| Maximum continuous heat output | Pmax,c | 1 | kW | |
| Auxiliary electricity consumption | ||||
| At nominal heatoutput | elmax | 2,0 | kW | |
| At minimum heatoutput | elmin | 1,0 | kW | |
| In standby mode | elSB | 0,001 | kW | |
| Type of heat input, for electric storage local space heaters only (single select) | ||||
| manual heat charge control, with integrated thermostat | □ Yes □ No | |||
| manual heat charge control with room and/or outdoor temperature feedback | □ Yes □ No | |||
| electronic heat charge control with room and/or outdoor temperature feedback | □ Yes □ No | |||
| fan assisted heat output | □ Yes □ No | |||
| Type of heat output/room temperature control (single select) | ||||
| single stage heat output and no room temperature control | □ Yes □ No | |||
| Two or more manual stages, no room temperature control | □ Yes □ No | |||
| with mechanic thermostat room temperature control | □ Yes □ No | |||
| with electronic room temperature control | □ Yes □ No | |||
| electronic room temperature control plus day timer | □ Yes □ No | |||
| electronic room temperature control plus week timer | □ Yes □ No | |||
| Other control options (multiple selections possible) | ||||
| room temperature control, with presence detection | □ Yes □ No | |||
| room temperature control, with open window detection | □ Yes □ No | |||
| with distance control option | □ Yes □ No | |||
| with adaptive start control | □ Yes □ No | |||
| with working time limitation | □ Yes □ No | |||
| with black bulb sensor | □ Yes □ No | |||
| Contact details | Eldom Sp. z o.o. Pawła Chromika 5a, 40-238 Katowice, POLANDtel: +48 32 2553340 , fax: +48 32 2530412 | |||

Дисплей (I)

- OBSŁUGA URZĄDZENIA
- PANEL STEROWANIA (1) / PILOT (7)
- PLEASE READ ALL THESE INSTRUCTIONS CAREFULLY BEFORE USING THIS APPLIANCE
- SIMPLIFIED EU DECLARATION OF CONFORMITY
- GENERAL DESCRIPTION
- TECHNICAL DATA
- INTENDED USE
- GETTING STARTED
- PRECAUTIONS
- INSTALLATION
- INSTALLING THE FEET WITH CASTOR WHEELS (FIG. 2)
- WALL MOUNTING (FIG. 3)
- CONTROL PANEL (1) / REMOTE CONTROLLER (7)
- DISPLAY (I)
- THE HEATER CAN ALSO BE CONTROLLED BY A SMARTPHONE WITH AN INSTALLED APP
- START-UP
- SETTING THE TIME AND DAY OF THE WEEK (SETTING IS POSSIBLE ONLY USING THE CONTROL PANEL (1))
- TEMPERATURE SETTING (USING THE CONTROL PANEL (1) AND THE REMOTE CONTROL (7))
- OPERATING MODES
- SETTING THE OPERATING MODE (USING THE CONTROL PANEL (1) AND THE REMOTE CONTROL (7))
- WINDOW" FUNCTION (USING THE CONTROL PANEL (1) AND THE REMOTE CONTROL (7))
- TIMER (SET USING THE CONTROL PANEL (1) AND THE REMOTE CONTROL (7))
- DELAYED START (SETTING AVAILABLE ONLY VIA CONTROL PANEL (1))
- KEY LOCK (CAN ONLY BE SET USING THE CONTROL PANEL (1))
- ALL OPERATIONS DESCRIBED ABOVE ARE AVAILABLE WITH THE WEEKLY HEATING SCHEDULE DISABLED
- WEEKLY HEATING SCHEDULE
- PROGRAMMING A WEEKLY SCHEDULE (SETTING AVAILABLE ONLY FROM THE CONTROL PANEL (1))
- CLEANING AND MAINTENANCE
- PROTECTION
- WARRANTY
- ДИСПЛЕЙ (I)
Brand : Eldom
Model : Slab HC500C
Category : Heating