MX-25306 - Multimeter Maxwell - Free user manual and instructions
Find the device manual for free MX-25306 Maxwell in PDF.


| Product Type | Digital Multimeter |
| Brand | Maxwell |
| Model | MX-25306 |
| Display | LCD, 2000 counts |
| AC Voltage Range | 0–600V |
| DC Voltage Range | 0–600V |
| AC Current Range | 0–10A |
| DC Current Range | 0–10A |
| Resistance Range | 0–20MΩ |
| Capacitance Range | 0–200µF |
| Diode Test | Yes |
| Continuity Buzzer | Yes |
| Data Hold | Yes |
| Backlight | Yes |
| Auto Ranging | Manual |
| Power Supply | 9V battery (included) |
| Dimensions (L×W×H) | 150 × 70 × 30 mm |
| Weight | 200 g |
| Safety Rating | CAT II 600V |
| Accessories Included | Test leads, manual, 9V battery |
| Maintenance | Clean with dry cloth; avoid moisture and extreme temperatures |
| Spare Parts Availability | Replacement test leads available |
Frequently Asked Questions - MX-25306 Maxwell
User questions about MX-25306 Maxwell
0 question about this device. Answer the ones you know or ask your own.
Ask a new question about this device
Download the instructions for your Multimeter in PDF format for free! Find your manual MX-25306 - Maxwell and take your electronic device back in hand. On this page are published all the documents necessary for the use of your device. MX-25306 by Maxwell.
USER MANUAL MX-25306 Maxwell
Product code / Produkt code / Termékkód / Cod produs / Kód produkta:
25306
SAFETY INFORMATION
This device was designed according to the IEC1010 standard (safety standard by the International Electrotechnical Commission). Please read the following safety information before use:
values than 1000V DC or 750V AC.
the grounding, connection and insulation before measuring above 36V DC or 25V AC to avoid electric shock.
selecting the function or measuring range.
but you need to be cautious as well for your own safety.
current.
GENERAL CHARACTERISTICS
| DisplayLCD | |
| 1999 (3 1⁄2) digit, automatic polarity display | |
| dual integral A/D conversion | |
| rate | appr. 3 /second |
| value | indicated by the highest number:,, OL" |
| environment | (0 ~ 40) °C, relative humidity: <80% |
| Dimensions189mm x 97mm x 35mm | |
| Weightappr. 400g | |
| Accuracy±(% x read data + number) | |
| temperature | (23 ± 5) °C, relative humidity: <75% |
TECHNICAL INDEX
DCV
| RangeAccuracyResolution | ||
| 200mV ±(0,5%+3) 100μV | ||
| 2V ±(0,5%+3) 1mV | ||
| 20V ±(0,5%+3) 10mV | ||
| 200V | ±(0,5%+3) 100mV | |
| 1000V | ±(1,0%+5) | 1V |
| protection | 250V DC or AC peak value200mV1000V DC or AC peak value |
ACV
| RangeAccuracyResolution | ||
| 200mV ±(1,2%+3) 100μV | ||
| 2V ±(0,8%+5) 1mV | ||
| 20V ±(0,8%+5) 10mV | ||
| 200V | ±(0,8%+5) 100mV | |
| 750V | ±(1,2%+5) | 1V |
| protection | 250V DC or AC peak value200mV1000V DC or AC peak value |
| range | 40~400Hz under the 200V range, 40~100Hz in the 750V range |
DCA
| RangeAccuracy | Resolution | |
| 2mA | ±(0,8%+3) | 1μA |
| 20mA ±(0,8%+3) | 10μA | |
| 200mA ±(1,2%+4) | 100μA | |
| 20A | ±(2,0%+5) | 10A |
| 20A (for no longer than 10 seconds) | |
| protection | 0.2A / 250V fuse for under 200mA range 12A / 250V fuse for the 20A range |
| range | 40~200 Hz |
Resistance
| RangeAccuracyResolution | ||
| 200 Ω ±(0,8%+5) 0.1 Ω | ||
| 2k Ω ±(0,8%+3) 1 Ω | ||
| 20k Ω ±(0,8%+3) 10 Ω | ||
| 200k Ω ±(0,8%+3) 100 Ω | ||
| 2M Ω ±(0,8%+3) 1k Ω | ||
| 20M Ω ±(1,0%+15) 10k Ω | ||
| 200M Ω | ±[1,0%(reading-10)+20] | 1M Ω |
| value |
Note:
Capacity
| RangeAccuracyResolution | |
| 20nF | ±(2,5%+20) 10pF |
| 200nF | ±(2,5%+20) 100pF |
| 2μF | ±(2,5%+20) 1nF |
| 20μF | ±(2,5%+20) 10nF |
| 200μF | ±(5,0%+5) 100nF |
| 3kV DC or AC peak value |
| RangeAccuracyResolution | ||
| 2mH ±(2,5%+20) | 1uH | |
| 20mH ±(2,5%+20) | 10uH | |
| 200mH | ±(2,5%+20) | 100uH |
| 2H ±(2,5%+20) 1mH | ||
| 20H ±(2,5%+20) 10mH | ||
| 3kV DC or AC peak value |
| Range | AccuracyResolution | |
| (-40 ~ 1000) °C | ±(1,0%+4)<400 °C±(1,5%+15)>=400 °C | 1 °C |
Frequency
| sensitivity | >3,5 V |
| protection | 250V DC or AC peak value (for less than 10 seconds) |
| RangeDisplay | |
| hFE NPN or PNP 0 ~ 1000 | |
CONTROLS
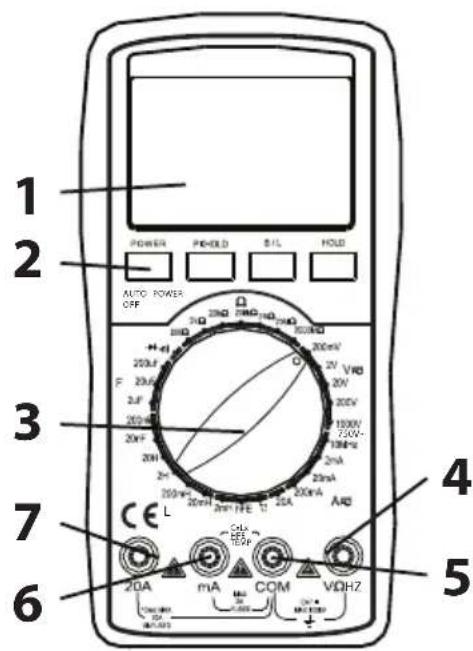
measuring the measured value gets held on the screen after the measuring. To return to normal mode press the button again and the PK HOLD sign disappears.
turns on which turns off automatically after 5 seconds.
Note:
and the red one to the V/Hz connector.
the measured voltage is unknown, select the highest available range and move backwards from that until you get the most accurate result.
for DCV and ACV measuring.
touch the wires to the measured spots.
and the red one to the „mA” or „20A” connector.
the range of the current is unknown, select the highest available range and move backwards from that until you get the most accurate result.
position for measuring DC or AC in A mode.
LCD will show the measured result.
Note:
and the red one to the V/Hz/Ω connector.
position and touch the wires to the two end points of the resistor.
Note:
connector of the probe to the „mA” connector on the device, and the red one to the „COM” connector. Touch the probe to the surface of the object you want to measure. The measured value is displayed on the screen, the unit is degrees celsius.
Note:
connect the measuring wires to the „mA” and „COM” connectors.
capacitor. Pay attention to the polarity: „COM“: negative (black), and „mA“: positive (red)
Note:
connectors.
position and connect the wires to the signal source.
Note:
connect the wires to the „mA“ and „COM“ connectors.
the coil.
Note:
and „COM“ connectors. Note the polarity: „COM“ is negative, „mA“ is positive.
PNP) and connect the base, emitter, collector pins to the proper connector.
and the red one to the V/Ω/Hz connector (the red will be the anode).
→ position. Connect
the wires parallelly to the diode, the red to the anode and the black to the cathode. The displayed value is the approximate opening voltage of the diode.
of the circuit, if you hear a beep, the the resistance between the two points is lower than 70 ( ±20 )
measuring temperature and connect the black
appear on the screen, press it again to turn this function off.
it will power off automatically and go into standby mode. Press the „POWER” button twice to turn the device on again.
Backlight
After 5 seconds it will turn off automatically. Note:
MAINTENANCE
resistance of the device.
extreme temperatures, flammability or strong magnetic fields.
detergent, it is forbidden to use strong solvents like alcohol.
period please remove the battery to avoid leakage.
icon
appears on the screen, replace the battery.
container lid and take out the battery holder.
new one. It is recommended to use alkaline batteries for long-term use, but all kinds of 9V batteries can be used.
on.
necessary.
TROUBLESHOOTING
If the device is not working properly you can attempt to solve the problems using the below information. If these are not sufficient, contact a certified service station.
| Statelnstructions | |
| Nothing appears on the screen | to the proper state |
| No power or temperature measurement | |
SICHERHEITSHINWEISE
Brand : Maxwell
Model : MX-25306
Category : Multimeter