
KDC-120RY - Car stereo KENWOOD - Free user manual and instructions
Find the device manual for free KDC-120RY KENWOOD in PDF.

User questions about KDC-120RY KENWOOD
0 question about this device. Answer the ones you know or ask your own.
Ask a new question about this device
Download the instructions for your Car stereo in PDF format for free! Find your manual KDC-120RY - KENWOOD and take your electronic device back in hand. On this page are published all the documents necessary for the use of your device. KDC-120RY by KENWOOD.
USER MANUAL KDC-120RY KENWOOD
Information on Disposal of Old Electrical and Electronic Equipment and Batteries (applicable for EU countries that have adopted separate waste collection systems)
Products and batteries with the symbol (crossed-out wheeled bin) cannot be disposed as household waste.
Old electrical and electronic equipment and batteries should be recycled at a facility capable of handling these items and their waste byproducts.
Contact your local authority for details in locating a recycle facility nearest to you. Proper recycling and waste disposal will help conserve resources whilst preventing detrimental effects on our health and the environment.
Notice: The sign "Pb" below the symbol for batteries indicates that this battery contains lead.
Declaration of Conformity with regard to the EMC Directive 2004/108/EC Declaration of Conformity with regard to the RoHS Directive 2011/65/EU Manufacturer:
JVC KENWOOD Corporation
3-12, Moriya-cho, Kanagawa-ku, Yokohama-shi, Kanagawa, 221-0022, Japan
EU Representative:
JVCKENWOOD NEDERLAND B.V.
Amsterdamseweg 37, 1422 AC UITHOORN, The Netherlands
The marking of products using lasers
The label is attached to the chassis/case and says that the component uses laser beams that have been classified as Class 1. It means that the unit is utilizing laser beams that are of a weaker class. There is no danger of hazardous radiation outside the unit.
EAC Data n3roTOBJIeHnA (MeCau/roJ) haxoDHTcra Ha 3TuKETke yctpoiCTBa.
PnI PpaBnHbOM c6bnIOeHNn Bcex yCNOBn 3KcnNyaTaunn nTexHueckKnx Tpe6oBAHn, yka3aHbXn B daHNo IHCTpykUn, cPOK cnYk6bI kynneHoro Bam n3dennia coCTabnaet 7 net. IapaHTnHbC pOK 3KcnNyaTaunn n3dennia COOTBeTByET cPOKy, yka3aHnMoY B rapaHTnHOM TaIOnOE. B nepoD cPoka cnYk6bI 3KcnNyaTaunn n XpahEnHe n3dennia He MOJET npEcdTabnTo onacHOCTB JnlaBaaen Xm3Hn, 3doOpBba, npuHHaTb BpeD BaWemy mNyUeCTBy nIN OKpykaIoJe CpeE.
Deknapaia npo BiDnodinidHb BmOram TexuHORo PernAmeHTy 06MeKHeHHa BkOpNCtAHHa DeKaNX He63neuHx PeUOBn H eKeTpMHOy Ta eKeTPOHOMY 06NaHAnHi (3atBePdXeHOrO Np1057 KaBiHcy MinChiTpB YkpaiH)
Bupi6 BiDnObiae BmOram TexHniHoro PernAmEnTy 06MexKeHHa BnKOpNCTaHHa DeaKnx He63neuHx PeuOBn H enEeKTPnHOMy Ta enEeKTPoHOMy o6NaIahHHi (TP OBHP).
Bmict He63neuHx peOvBNy BnnaKax, He o6ymoBLeHNx BdoaTky N2 TP OBHP:
- CBnHeB(Pb) - He nepeBmUe 0.1% BaHn peOvOBHH a6o B KOHcEHTpaui Do 1000 qactNH ha MjblH;
- KaДмий (Cd)- He nepeВицу€ 0.01 % BaIGN peчOBин aбо B KOнцentpaц di 100Частпн ha Mілььон;
- pytyb(Hg) - He nepeBnUy€ 0.1% BarIn peOBOHN a60 B KOHcHTpaui Do 1000 cactHH ha MinbnoH;
- 戒CTINBAENTHNxPOM(Cr6+) - He nepeBnue 0.1% BaRn peOBNH a6o B KOHcHTpaII do 1000 qACTINH Ha mInbIoh;
- noni6pom6iΦeHOM (PBB) - He npeBmUcE 0.1% BaI rpeObHn a6o B KOnuEHTpaui Do 1000 qactMH ha mibioH;
- nonibpomdephienilobi eepir (PBDE)- He nepeBnue € 0.1 % Barn peoBHH a6o BV KOHcHTpauii do 1000 qactmHa mInbH.
CONTENTS
| BEFORE USE | 2 |
| BASICS | 3 |
| GETTING STARTED | 4 |
| RADIO | 5 |
| CD / USB / iPod | 6 |
| AUX | 8 |
| AUDIO SETTINGS | 9 |
| DISPLAY SETTINGS | 10 |
| MORE INFORMATION | 10 |
| TROUBLESHOOTING | 11 |
| INSTALLATION / CONNECTION | 12 |
| SPECIFICATIONS | 15 |
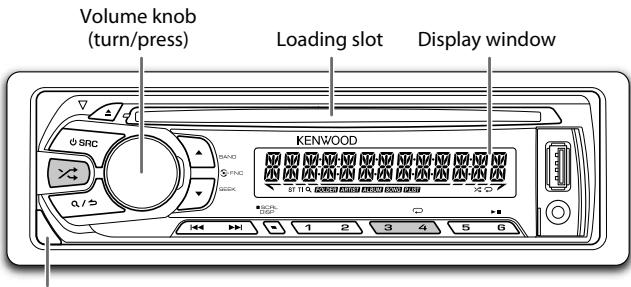
How to read this manual
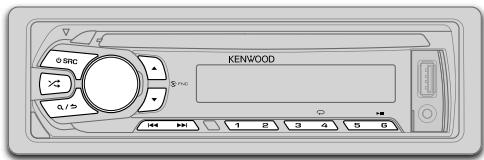
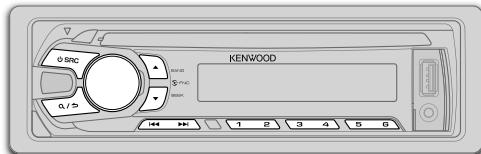
- Operations are explained mainly using buttons on the faceplate.
- [XX] indicates the selected items.
- ( XX) indicates references are available on the stated page.
BEFORE USE
Warning
Do not operate any function that takes your attention away from safe driving.
Caution
Volume setting:
- Adjust the volume so that you can hear sounds outside the car to prevent accidents.
- Lower the volume before playing digital sources to avoid damaging the speakers by the sudden increase of the output level.
General:
- Avoid using the USB device or iPod/iPhone if it might hinder safe driving.
- Make sure all important data has been backed up. We shall bear no responsibility for any loss of recorded data.
- Never put or leave any metallic objects (such as coins or metal tools) inside the unit, to prevent a short circuit.
- If a disc error occurs due to condensation on the laser lens, eject the disc and wait for the moisture to evaporate.
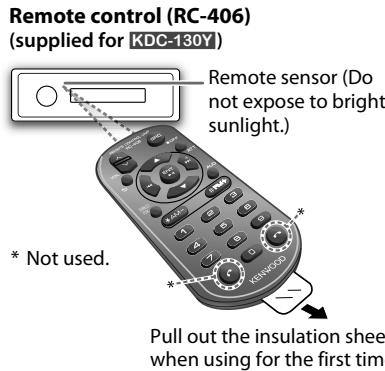
Remote control (RC-406):
- Do not leave the remote control in hot places such as on the dashboard.
- The Lithium battery is in danger of explosion if replaced incorrectly. Replace it only with the same or equivalent type.
- The battery pack or batteries shall not be exposed to excessive heat such as sunshine, fire or the like.
- Keep the battery out of reach of children and in its original packaging when not in used. Dispose of used batteries promptly. If swallowed, contact a physician immediately.
Maintenance
Cleaning the unit: Wipe off dirt on the faceplate with a dry silicone or soft cloth.
Cleaning the connector: Detach the faceplate and clean the connector gently with a cotton swab, being careful not to damage the connector.
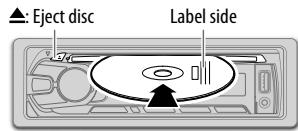
Handling discs:
- Do not touch the recording surface of the disc.
- Do not stick tape etc. on the disc, or use a disc with tape stuck on it.
- Do not use any accessories for the disc.
- Clean from the center of the disc and move outward.
- Clean the disc with a dry silicone or soft cloth. Do not use any solvents.
- When removing discs from this unit, pull them out horizontally.
- Remove burrs from the center hole and disc edge before inserting a disc.

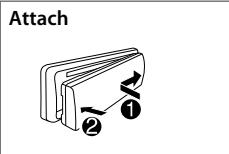
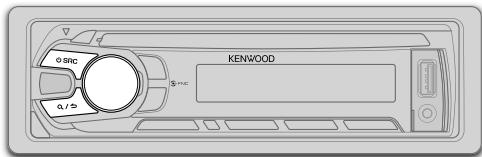
Connector (on the reverse side of the faceplate)
Faceplate
Detach button

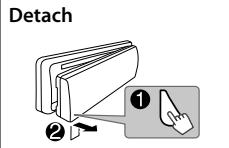
Your preset adjustments will also be erased.
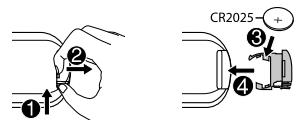
How to replace the battery
| To | Do this (on the faceplate) | Do this (on the remote control) |
| Turn on the power | Press SRC. • Press and hold to turn off the power. | Press and hold SRC to turn off the power. (Pressing SRC does not turn on the power.) |
| Adjust the volume | Turn the volume knob. | Press VOL ▲ or VOL ∨. |
| Press ATT during playback to attenuate the sound. • Press again to cancel. | ||
| Select a source | Press SRC repeatedly. | Press SRC repeatedly. |
| Change the display information | Press DISP SCRL repeatedly. • Press and hold to scroll the current display information. | (not available) |

Select the display language and cancel the demonstration
When you turn on the power (or after you reset the unit), the display shows: "SEL LANGUAGE" "PRESS" "VOLUME KNOB"
1 Turn the volume knob to select [ENG] (English) or [RUS] (Russian), then press the knob. [ENG] is selected for the initial setup. Then, the display shows: "CANCEL DEMO" "PRESS" "VOLUME KNOB"
2 Press the volume knob. [YES] is selected for the initial setup.
3 Press the volume knob again. "DEMO OFF" appears.

Set the clock
1 Press the volume knob to enter [FUNCTION].
2 Turn the volume knob to select [CLOCK], then press the knob.
3 Turn the volume knob to select [CLOCK ADJUST], then press the knob.
4 Turn the volume knob to make the settings, then press the knob. Day Hour Minute
5 Turn the volume knob to select [CLOCK FORMAT], then press the knob.
6 Turn the volume knob to select [12H] or [24H], then press the knob.
7 Press and hold Q to exit.
(or)
1 Press and hold DISP SCRL to enter clock adjustment mode directly while in clock display screen.
2 Turn the volume knob to make the settings, then press the knob.
Day Hour Minute
To return to the previous setting item or hierarchy, press / .
3
Set the initial settings
1 Press SRC to enter STANDBY.
2 Press the volume knob to enter [FUNCTION].
3 Turn the volume knob to make a selection (see the following table), then press the knob.
4 Press and hold Q to exit.
To return to the previous setting item or hierarchy, press / .
Default: XX
| AUDIO CONTROL | |
| SWITCH PREOUT | (Except for [KDC-100Q]) REAR/ SUB-W: Selects whether rear speakers or a subwoofer are connected to the line out terminals on the rear (through an external amplifier). |
| SP SELECT | OFF/ 5/4/6 × 9/6/ OEM: Selects according to the speaker size (5 inches or 4 inches, 6×9 inches or 6 inches) or OEM speakers for optimum performance. |
| DISPLAY | |
| EASY MENU | (For KDC-361U/ KDC-130Y) ON: Both display and button illumination change to white color when entering [FUNCTION].; OFF: Both display and button illumination remain as [COLOR SELECT] color. (⇒ 10) |
| TUNER SETTING | |
| PRESET TYPE | NORMAL: Memorizes one station for each preset button in each band (FM1/ FM2/ FM3/ MW/ LW).; MIX: Memorizes one station for each preset button, regardless of the selected band. |
SYSTEM
KEY BEEP ON: Activates the keypress tone.; OFF: Deactivates.
SOURCE SELECT
BUILT-IN AUX ON: Enables AUX in source selection.; OFF: Disables. ( 8)
RUSSIAN SET Selects the display language for [FUNCTION] menu and Tag information (folder name, file name, song title, artist name, album name) if applicable. RUSSIAN OFF: Display language is English.; PUCKIM BKJI: Display language is Russian.
P-OFF WAIT Applicable only when the demonstration mode is turned off. Sets the duration when the unit will automatically turns off (while in standby mode) to save the battery. 20M: 20 minutes; 40M: 40 minutes; 60M: 60 minutes; OFF ---: Cancels
CD READ 1: Automatically distinguishes between audio file disc and music CD;2: Forces to play as an music CD.No sound can be heard if an audio file disc is played.
F/W UPDATE
UPDATE SYSTEM
F/W UP xx.xx
YES: Starts upgrading the firmware. ; NO: Cancels (upgrading is not activated). For details on how to update the firmware, see: www.kenwood.com/ cs/ce/

Search for a station
1 Press SRC to select TUNER.
2 Press BAND repeatedly (or press *AM-/# FM+ on RC-406) to select FM1/ FM2/ FM3/ MW/LW.
3 Press | / ▲or press | / 1 (+) on RC-406) to search for a station.
To change the searching method for | / |: Press SEEK repeatedly.
AUTO1: Automatically search for a station.
AUTO2: Automatically search for a preset station.
MANUAL: Manually search for a station.
- To store a station: Press and hold one of the number buttons (1 to 6).
- To select a stored station: Press one of the number buttons (1 to 6) (or press one of the number buttons (1 to 6) on RC-406).
Direct Access Tuning (using RC-406) (for KDC-130Y)
1 Press DIRECT to enter Direct Access Tuning.
"--- · -· " (for FM) or "--- - - " (for MW/ LW) appears on the display.
2 Press the number buttons to enter a frequency.
3 Press ENT to search for a station.
- To cancel, press or DIRECT.
- If no operation is done for 10 seconds after step 2, Direct Access Tuning is automatically canceled.
Other settings
1 Press the volume knob to enter [FUNCTION].
2 Turn the volume knob to make a selection (see the following table), then press the knob.
3 Press and hold Q to exit.
To return to the previous setting item or hierarchy, press Q/
Default: XX
TUNER SETTING
| LOCAL SEEK | ON: Searches only FM stations with good reception. ; OFF: Cancels. |
| AUTO MEMORY | YES: Automatically starts memorizing 6 stations with good reception. ; NO: Cancels. (Selectable only if [NORMAL] is selected for [PRESET TYPE].) (⇒ 4) |
| MONO SET | ON: Improves the FM reception, but the stereo effect may be lost. ; OFF: Cancels. |
| NEWS SET | ON: The unit will temporarily switch to News Programme if available. ; OFF: Cancels. |
| REGIONAL | ON: Switches to another station only in the specific region using the "AF" control. ; OFF: Cancels. |
| AF SET | ON: Automatically searches for another station broadcasting the same program in the same Radio Data System network with better reception when the current reception is poor. ; OFF: Cancels. |
| TI | ON: Allows the unit to temporarily switch to Traffic Information. ; OFF: Cancels. |
| PTY SEARCH | Press the volume knob to enter PTY language selection. Turn the volume knob to select the PTY language (ENGLISH/FRENCH/German), then press the knob. Selects the available Program Type (see the following), then, press !▶/▶ to start. |
| CLOCK | |
| TIME SYNC | ON: Synchronizes the unit's time to the Radio Data System station time. ; OFF: Cancels. |
Except for [KDC-100Q]: [LOCAL SEEK]/[MONO SET]/[NEWS SET]/[REGIONAL]/[AF SET]/[TI]/[PTY SEARCH] is selectable only when the band is FM1/ FM2/ FM3.
- For KDC-100Q:
[LOCAL SEEK]/ [MONO SET]/ [NEWS SET]/ [REGIONAL]/ [AF SET]/ [TI]/ [PTY SEARCH] is selectable only when the band is FM1/ FM2.
When the band is FM3, [LOCAL SEEK] can only be selected.
Available Program Type: SPEECH: NEWS, AFFAIRS, INFO (information), SPORT, EDUCATE, DRAMA, CULTURE, SCIENCE, VARIORED, WEATHER, FINANCE, CHILDREN, SOCIAL, RELIGION, PHONE IN, TRAVEL, LEISURE, DOCUMENT MUSIC: POP M (music), ROCK M (music), EASY M (music), LIGHT M (music), CLASSICS, OTHER M (music), JAZZ, COUNTRY, NATION M (music), OLDIES, FOLK M (music) The unit will search for the Program Type categorized under [SPEECH] or [MUSIC] if selected.
- If the volume is adjusted during reception of traffic information, alarm or news bulletin, the adjusted volume is memorized automatically. It will be applied the next time traffic information, alarm or news bulletin function is turned on.
Start playback
The source changes automatically and playback starts.
CD
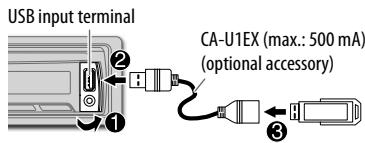
USB
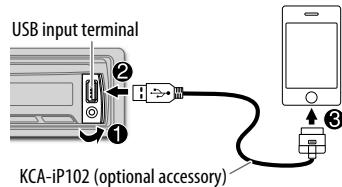
iPod/iPhone (for KDC-361U / KDC-261UB/ KDC-261UR)
Press and hold iPod to select the control mode while in iPod source.
MODE ON: From the iPod. ( 7, *1)
MODE OFF: From the unit.

| To | Do this |
| Pause or resume playback | Press 6▶III (or press ENT▶II on RC-406). |
| Select a track/file | Press |←/→| (or press |←/→| (+) on RC-406). |
| Select a folder *2 | Press ▲/▼ (or press *AM- / #FM+ on RC-406). |
| Reverse/ Fast-forward | Press and hold |←/→| (or press and hold |←/→| (+) on RC-406). |
| Repeat play *3 | Press 4 repeatedly. • Audio CD: TRACK REPEAT, REPEAT OFF • MP3/WMA/WAV file or iPod: FILE REPEAT, FOLDER REPEAT, REPEAT OFF • KENWOOD Music Editor Light (KME Light)/ KENWOOD Music Control (KMC) file (→10): FILE REPEAT, REPEAT OFF |
| Random play *3 | Press 3 ×← or ×← repeatedly. • Audio CD: DISC RANDOM, RANDOM OFF • MP3/WMA/WAV file or iPod or KME Light/KMC file: FOLDER RANDOM, RANDOM OFF |
| Press and hold 3 ×← or ×← to select "ALL RANDOM".*4 |
1 You can still play/pause, file search, fast-forward or reverse files from the unit.
2 Only for MP3/WMA/WAV files. This does not work for iPod.
3 For iPod: Applicable only when [MODE OFF] is selected.
4 For CD: Only for MP3/WMA files.
If you connect the iPod/iPhone to the USB input terminal of the unit (while listening to Tuneln, Tuneln Radio Pro or Aupeo), the unit will output the sound from these apps.
Select a track/file from a list
For iPod: Applicable only when [MODE OFF] is selected. ( 6)
1 Press Q/
2 Turn the volume knob to make a selection, then press the knob.
- MP3/WMA/WAV file: Select the desired folder, then a file.
-
iPod or KME Light/ KMC file: Select the desired file from the list (PLAYLISTS, ARTISTS, ALBUMS, SONGS, PODCASTS, GENRES, COMPOSERS).
-
Only for iPod.
-
To return to the root folder (or first file), press number button 5.
- To return to the previous setting item or hierarchy, press Q/
- To cancel, press and hold Q/∑.
If you have many files....
You can search through them quickly (on step 2 above) at a preset skip search ratio by pressing 1 / .
See also "Set the skip search ratio." ( 8)
- Pressing and holding 1 ≤slant i ≤slant 1 skip songs at the maximum ratio (10%) regardless of the setting made.
- For USB: Only for files registered in the database created with KME Light/KMC.
- Not applicable for audio CD.
Direct Music Search (using RC-406)
(for KDC-130Y)
1 Press DIRECT.
2 Press the number buttons to enter a track/ file number.
3 Press ENT to search for music.
To cancel, press
- Not available if Random Play is selected.
- Not applicable for iPod, KME Light/ KMC file.
Select a song by name
While listening to iPod...
1 Press Q/
2 Turn the volume knob to select a category, then press the knob.
3 Turn the volume knob quickly to enter character search.
4 Turn the volume knob to select the character to be searched for.
5 Press / to move to the entry position.
You can enter up to 3 characters.
6 Press the volume knob to start searching.
7 Turn the volume knob to make a selection, then press the knob.
Repeat step 7 until the desired item is selected.
To search for a character other than A to Z and 0 to 9, enter only *
To return to the previous hierarchy, press Q/5.
- To return to the top menu, press number button 5.
To cancel, press and hold Q / 山
Set the skip search ratio
While listening to iPod or KME Light/ KMC file...
1 Press the volume knob to enter [FUNCTION].
2 Turn the volume knob to select [USB], then press the knob.
3 Turn the volume knob to select [SKIP SEARCH], then press the knob.
4 Turn the volume knob to make a selection, then press the knob.
0.5% (default)/ 1%/ 5%/ 10%: Skip search ratio over the total files.
5 Press and hold Q to exit.
Change the USB drive
When a smartphone (Mass Storage Class) is connected to the USB input terminal, you can select its internal memory or external memory (such as an SD card) to playback the stored songs. You can also select the desired drive to playback when a multiple drives device is connected.
Press number button 5 repeatedly to select the desired drive.
(or)
1 Press the volume knob to enter [FUNCTION].
2 Turn the volume knob to select [USB], then press the knob.
3 Turn the volume knob to select [MUSIC DRIVE], then press the knob.
4 Press the volume knob to select [DRIVE CHANGE].
The next drive is selected automatically.
Repeat steps 1 to 4 to select the following drives.
Selectable items: [DRIVE 1] to [DRIVE 5]
Preparation:
Select [ON] for [BUILT-IN AUX]. ( 5)
Start listening
1 Connect a portable audio player (commercially available).

2 Press SRC to select AUX.
3 Turn on the portable audio player and start playback.
Set the AUX name
While listening to a portable audio player connected to the unit...
1 Press the volume knob to enter [FUNCTION].
2 Turn the volume knob to select [SYSTEM], then press the knob.
3 Turn the volume knob to select [AUX NAME SET], then press the knob.
4 Turn the volume knob to make a selection, then press the knob. AUX(default)/DVD/PORTABLE/GAME/VIDEO/TV
5 Press and hold / to exit.
AUDIO SETTINGS
While listening to any source...
1 Press the volume knob to enter [FUNCTION].
2 Turn the volume knob to select [AUDIO CONTROL], then press the knob.
3 Turn the volume knob to make a selection (see the following table), then press the knob.
Repeat step 3 until the desired item is selected or activated.
4 Press and hold / to exit.
(or using RC-406)
1 Press AUD to enter [AUDIO CONTROL].
2 Press / to make a selection, then press ENT
To return to the previous setting item or hierarchy, press Q/
Default: XX
| SUB-W LEVEL* | -15 to +15 (0): | Adjusts the subwoofer output level. |
| BASS LEVEL | -8 to +8 (+6): | Adjusts the level to memorize for each source. (Before making an adjustment, select the source you want to adjust.) |
| MID LEVEL | -8 to +8 (+5): | |
| TRE LEVEL | -8 to +8 (0): | |
| EQ PRO | ||
| BASS ADJUST | BASS CTR FRQ | 60/ 80/ 100/ 200: Selects the center frequency. |
| BASS LEVEL | -8 to +8 (+6): Adjusts the level. | |
| BASS Q FACTOR | 1.00/ 1.25/ 1.50/ 2.00: Adjusts the quality factor. | |
| BASS EXTEND | ON: Turns on the extended bass.; OFF: Cancels. | |
| MID ADJUST | MID CTR FRQ | 0.5/ 1.0/ 1.5/ 2.5K: Selects the center frequency. |
| MID LEVEL | -8 to +8 (+5): Adjusts the level. | |
| MID Q FACTOR | 0.75/ 1.00/ 1.25: Adjusts the quality factor. | |
| TRE ADJUST | TRE CTR FRQ | 10.0/ 12.5/ 15.0/ 17.5K: Selects the center frequency. |
| TRE LEVEL | -8 to +8 (0): Adjusts the level. | |
| PRESET EQ | DRIVE EQ/ TOP40/ POWERFUL/ ROCK/ POPS/ EASY/ JAZZ/NATURAL/ USER: Selects a preset equalizer suitable to the music genre. (Select [USER] to use the customized bass, middle, and treble settings.)[DRIVE EQ] is a preset equalizer that reduces noise from the road. |
| BASS BOOST | LV1/ LV2/ LV3: Selects your preferred bass boost level. ;OFF: Cancels. |
| LOUDNESS | LV1/ LV2: Selects your preferred low and high frequencies boost to produce a well-balanced sound at a low volume level. ;OFF: Cancels. |
| SUBWOOFER SET* | ON: Turns on the subwoofer output. ;OFF: Cancels. |
| LPF SUBWOOFER* | THROUGH: All signals are sent to the subwoofer. ;85HZ/ 120HZ/160HZ: Audio signals with frequencies lower than 85 Hz/ 120 Hz/160 Hz are sent to the subwoofer. |
| SUB-W PHASE* | REVERSE (180°)/ NORMAL (0°): Selects the phase of the subwoofer output to be in line with the speaker output for optimum performance. (Selectable only if a setting other than [THROUGH] is selected for [LPF SUBWOOFER].) |
| FADER | R15 to F15 (0): Adjusts the rear and front speaker output balance. |
| BALANCE | L15 to R15 (0): Adjusts the left and right speaker output balance. |
| VOLUME OFFSET(Default: 0) | -8 to +8 (for AUX) ; -8 to 0 (for other sources): Presets the volume adjustment level of each source. (Before adjustment, select the source you want to adjust.) |
| SOUND RECNSTR(Sound reconstruction) | ON: Creates realistic sound by compensating the high-frequency components and restoring the rise-time of the waveform that are lost in audio data compression. ; OFF: Cancels. |
- [SUB-W LEVEL]/[SUBWOOFER SET]/[LPF SUBWOOFER]/[SUB-W PHASE] is selectable only if [SWITCH PREOUT] is set to [SUB-W]. ( 4)
- [SUB-W LEVEL]/[LPF SUBWOOFER]/[SUB-W PHASE] is selectable only if [SUBWOOFER SET] is set to [ON].
- Except for KDC-100Q.
DISPLAY SETTINGS
1 Press the volume knob to enter [FUNCTION].
2 Turn the volume knob to select [DISPLAY], then press the knob.
3 Turn the volume knob to make a selection (see the following table), then press the knob. Repeat step 3 until the desired item is selected or activated.
4 Press and hold Q to exit.
To return to the previous setting item or hierarchy, press /
Default: XX
| COLOR SELECT* | VARIABLE SCAN/ COLOR 01 — COLOR 24/ USER: Selects your preferred button illumination color. |
| You can create your own color (when [COLOR 01] — [COLOR 24] or [USER] is selected). The color you have created can be selected when you select [USER]. 1 Press and hold the volume knob to enter the detailed color adjustment. 2 Press ↓←/ ▷→to select the color (R/G/ B) to adjust. 3 Turn the volume knob to adjust the level (0 — 9), then press the knob. | |
| DIMMER | ON: Dims the display illumination (and button illumination*). ; OFF: Illuminates according to the [BRIGHTNESS] settings. |
| BRIGHTNESS | LVL 0 — LVL 31: Selects your preferred brightness level for display illumination (and button illumination*) |
| TEXT SCROLL | AUTO/ ONCE: Selects whether to scroll the display information automatically, or scroll only once. ; OFF: Cancels. |
- For KDC-361U/ KDC-130Y.
MORE INFORMATION
General
- This unit can only play the following CDs:


- Detailed information and notes about the playable audio files are stated in an online manual on the following web site: www.kenwood.com/cs/ce/audiofile/
Playable files
- Playable audio file: MP3 (.mp3), WMA (.wma)
- Playable disc media: CD-R/CD-RW/CD-ROM
- Playable disc file format: ISO 9660 Level 1/2, Joliet, Long file name.
- Playable USB device file system: FAT12, FAT16, FAT32 Even when audio files comply with the standards listed above, playback may be impossible depending on the types or conditions of media or device.
Unplayable discs
- Discs that are not round.
- Discs with coloring on the recording surface or discs that are dirty.
- Recordable/ReWritable discs that have not been finalized.
- 8 cm CD. Attempting to insert using an adapter may cause malfunction.
About USB devices
- This unit can play MP3/WMA/WAV files stored on a USB mass storage class device.
- You cannot connect a USB device via a USB hub.
- Connecting a cable whose total length is longer than 5m may result in abnormal playback.
- This unit cannot recognize a USB device whose rating is other than 5 V and exceeds 1 A.
About KENWOOD Music Editor Light and KENWOOD Music Control
- This unit supports the PC application KENWOOD Music Editor Light and Android™ application KENWOOD Music Control.
- When you play audio files with song data added using the KENWOOD Music Editor Light or KENWOOD Music Control, you can search for audio files by Genres, Artists, Albums, Playlists, and Songs.
- KENWOOD Music Editor Light and KENWOOD Music Control are available on the following web site: www.kenwood.com/cs/ce/
About iPod/iPhone
Made for
- iPod touch (1st, 2nd, 3rd, 4th, and 5th generation)
- iPod classic
- iPod nano (3rd, 4th, 5th, 6th, and 7th generation)
- iPhone, iPhone 3G, 3GS, 4, 4S, 5
- For the latest compatible list and software versions of iPhone/iPod, see: www.kenwood.com/cs/ce/ipod
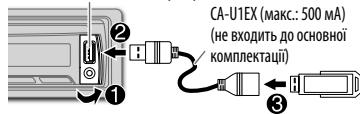
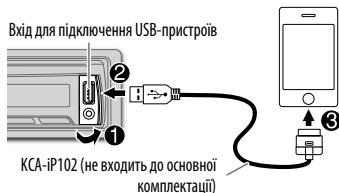
- To connect devices featuring Lightning connector, both KCA-iP102 (optional accessory) and Apple Lightning to 30-pin Adapter (accessory of the iPod/iPhone) are required. Do not leave the Apple Lightning to 30-pin Adapter inside the car to prevent damages caused by the hot temperature.
- You cannot operate iPod if "KENWOOD" or "√" is displayed on iPod.
TROUBLESHOOTING
| Symptom | Remedy |
| Sound cannot be heard. | ·Adjust the volume to the optimum level. ·Check the cords and connections. |
| "PROTECT" appears and no operations can be done. | Check to be sure the terminals of the speaker wires are insulated properly, then reset the unit. If this does not solve the problem, consult your nearest service center. |
| ·Sound cannot be heard. ·The unit does not turn on. ·Information shown on the display is incorrect. | Clean the connectors. (⇒ 2) |
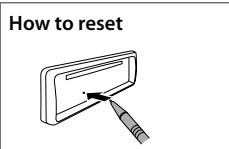
| The unit does not work at all. | Reset the unit. (⇒ 3) |
| ·Radio reception is poor. ·Static noise while listening to the radio. | ·Connect the antenna firmly. ·Pull the antenna out all the way. |
| "NA FILE" appears. | Make sure the disc contains supported audio files. (⇒ 10) |
| "NO DISC" appears. | Insert a playable disc into the loading slot. |
| "TOC ERROR" appears. | Make sure the disc is clean and inserted properly. |
| "PLEASE EJECT" appears. | Reset the unit. If this does not solve the problem, consult your nearest service center. |
| Disc cannot be ejected. | Press and hold ▲to forcibly eject the disc. Be careful not to drop the disc when it is ejected. If this does not solve the problem, reset the unit. (⇒ 3) |
| "READ ERROR" appears. | Copy the files and folders onto the USB device again. If this does not solve the problem, reset the USB device or use another USB device. |
| "NO DEVICE" appears. | Connect a USB device, and change the source to USB again. |
| "COPY PRO" appears. | A copy-protected file is played. |
| Symptom | Remedy |
| “NA DEVICE” appears. | Connect a supported USB device, and check the connections. |
| “NO MUSIC” appears. | Connect a USB device that contains playable audio files. |
| “IPod ERROR” appears. | • Reconnect the iPod. • Reset the iPod. |
| Noise is generated. | Skip to another track or change the disc. |
| Tracks do not play back as you intended them to play. | Playback order is determined when files are recorded. |
| “READING” keeps flashing. | Do not use too many hierarchical levels or folders. |
| Elapsed playing time is not correct. | This is caused by how the tracks are recorded. |
| Correct characters are not displayed (e.g. album name). | This unit can only display uppercase letters, numbers, and a limited number of symbols. Uppercase Cyrillic letters can also be displayed if [RUSSIAN SET] is set to [PYCCKIM BKV]. (→5) |
Muting upon the reception of a phone call
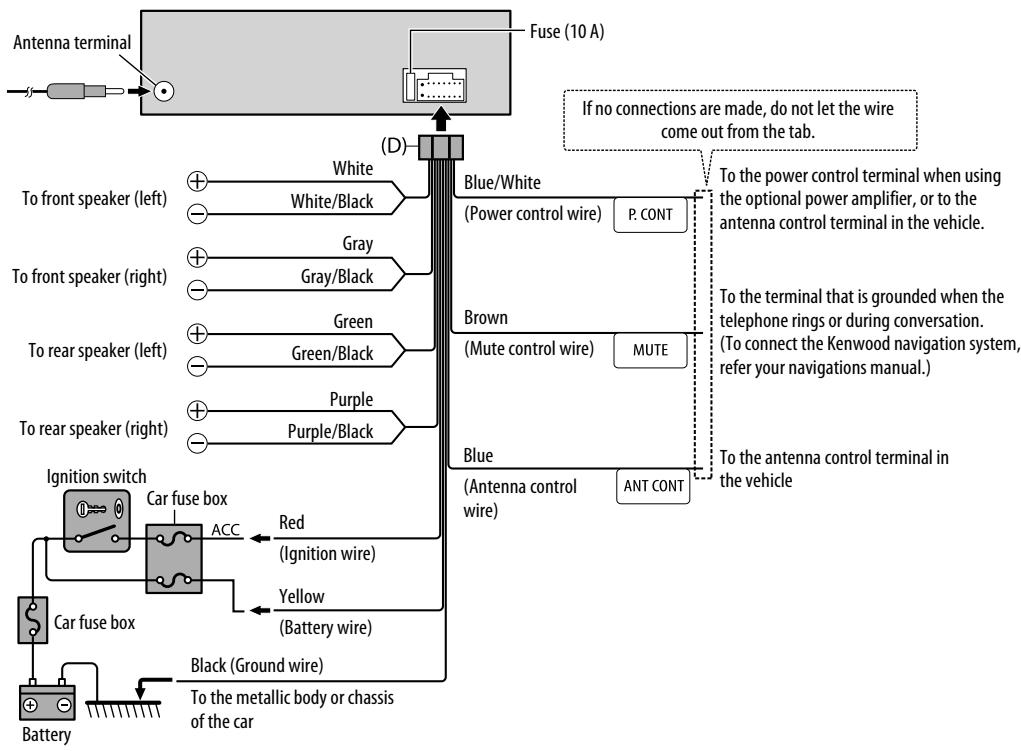
Connect the MUTE wire to your telephone using a commercial telephone accessory. ( 13,14)
When a call comes in, "CALL" appears. (The audio system pauses.)
- To continue listening to the audio system during a call, press SRC.
- "CALL" disappears and the audio system resumes.
When the call ends, "CALL" disappears. (The audio system resumes.)
Warning
- The unit can only be used with a 12VDC power supply, negative ground.
- Disconnect the battery's negative terminal before wiring and mounting.
- Do not connect Battery wire (yellow) and Ignition wire (red) to the car chassis or Ground wire (black) to prevent a short circuit.
- Insulate unconnected wires with vinyl tape to prevent a short circuit.
- Be sure to ground this unit to the car's chassis again after installation.
Caution
- For safety's sake, leave wiring and mounting to professionals. Consult the car audio dealer.
- Install this unit in the console of your vehicle. Do not touch the metal parts of this unit during and shortly after use of the unit. Metal parts such as the heat sink and enclosure become hot.
- Do not connect the wires of speakers to the car chassis or Ground wire (black), or connect them in parallel.
- Mount the unit at an angle of less than 30^ .
- If your vehicle wiring harness does not have the ignition terminal, connect Ignition wire (red) to the terminal on the vehicle's fuse box which provides 12 V DC power supply and is turned on and off by the ignition key.
- After the unit is installed, check whether the brake lamps, blinkers, wipers, etc. on the car are working properly.
- If the fuse blows, first make sure the wires are not touching car's chassis, then replace the old fuse with one that has the same rating.
Basic procedure
1 Remove the key from the ignition switch, then disconnect the terminal of the car battery.
2 Connect the wires properly. See Wiring connection. ( 13
3 Install the unit to your car. See Installing the unit (in-dash mounting).
4 Connect the terminal of the car battery.
5 Reset the unit. ( 3)
Installing the unit (in-dash mounting)

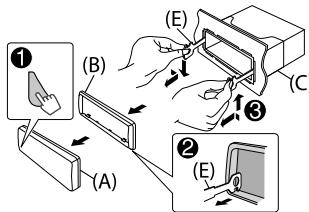
How to remove the unit
1 Detach the faceplate.
2 Fit the catch pin on the extraction keys into the holes on both sides of the trim plate, then pull it out.
3 Insert the extraction keys deeply into the slots on each side, then follow the arrows as shown on the right.
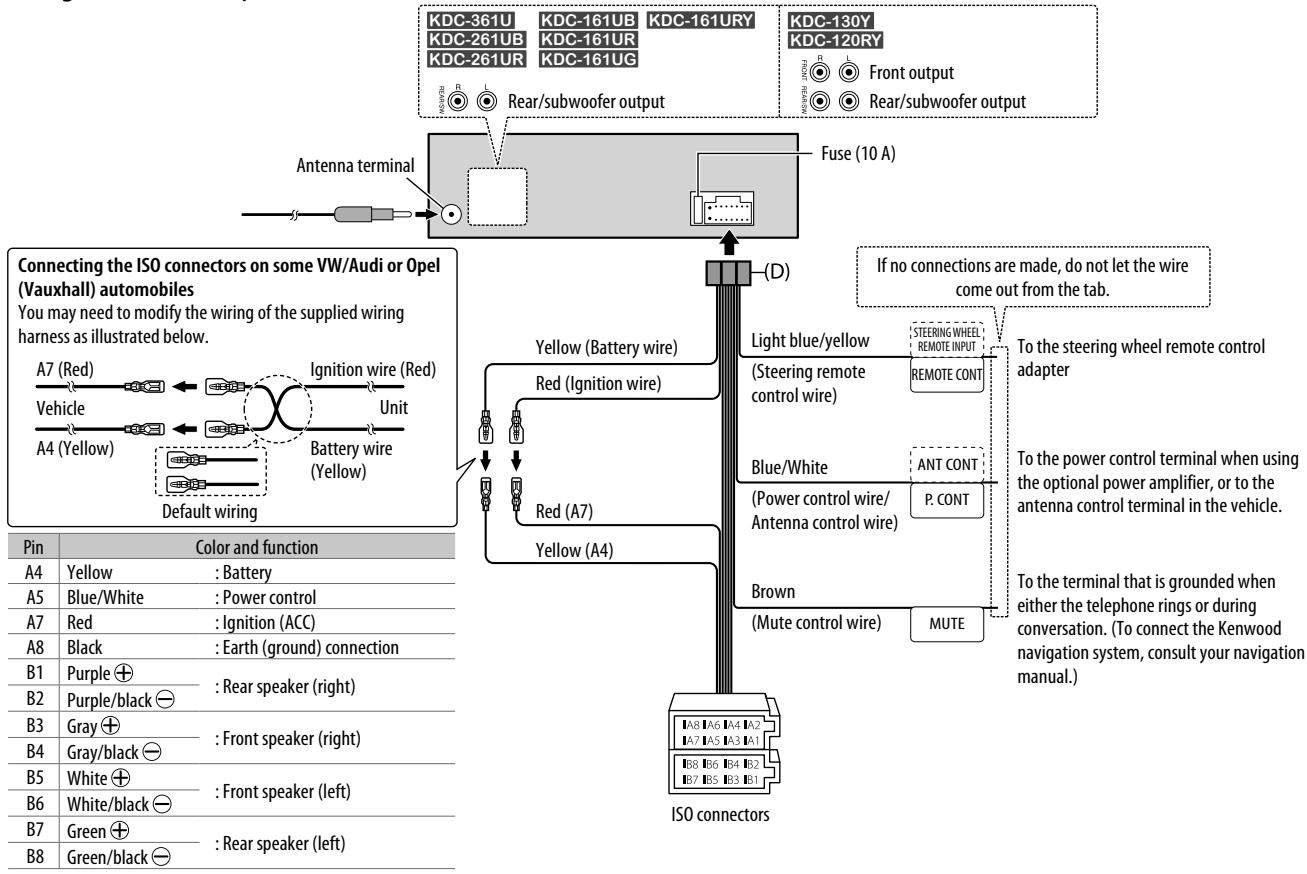
Wiring connection (except for KDC-100Q)
Wiring connection (for KDC-100Q)
Part list for installation

(A) Faceplate
(×1)

(B) Trim plate
(×1)

(C) Mounting sleeve
(×1)
(D) Wiring harness (except for KDC-100Q)
(for KDC-100Q)

(E) Extraction key
SPECIFICATIONS
| Tuner | FM Frequency Range | Except for KDC-100Q: FM1/FM2/FM3: 87.5 MHz — 108.0 MHz (50 kHz space) For KDC-100Q: FM1/FM2: 87.5 MHz to 108.0 MHz (50 kHz space) FM3: 65.00 MHz to 74.00 MHz (30 kHz space) |
| Usable Sensitivity (S/N = 26 dB) | 0.71 μV/75 Ω | |
| Quieting Sensitivity (DIN S/N = 46 dB) | 2.0 μV/75 Ω | |
| Frequency Response (±3 dB) | 30 Hz — 15 kHz | |
| Signal-to-Noise Ratio (MONO) | 64 dB | |
| Stereo Separation (1 kHz) | 40 dB | |
| MW | Frequency Range | 531 kHz — 1 611 kHz (9 kHz space) |
| Usable Sensitivity (S/N = 20 dB) | 28.2 μV | |
| LW | Frequency Range | 153 kHz — 279 kHz (9 kHz space) |
| Usable Sensitivity (S/N = 20 dB) | 50 μV | |
| CD player | Laser Diode | GaAlAs |
| Digital Filter (D/A) | 8 times over sampling | |
| Spindle Speed | 500 rpm — 200 rpm (CLV) | |
| Wow & Flutter | Below measurable limit | |
| Frequency Response (±1 dB) | 20 Hz — 20 kHz | |
| Total Harmonic Distortion (1 kHz) | 0.01 % | |
| Signal-to-Noise Ratio (1 kHz) | 105 dB | |
| Dynamic Range | 90 dB | |
| Channel Separation | 85 dB | |
| MP3 Decode | Compliant with MPEG-1/2 Audio Layer-3 | |
| WMA Decode | Compliant with Windows Media Audio |
| USB | USB Standard | USB 1.1, USB 2.0 (Full speed) | |
| Maximum Supply Current | DC 5 V----1 A | ||
| File System | FAT12/16/32 | ||
| MP3 Decode | Compliant with MPEG-1/2 Audio Layer-3 | ||
| WMA Decode | Compliant with Windows Media Audio | ||
| WAV Decode | Linear-PCM | ||
| Audio | Maximum Output Power | 50 W × 4 | |
| Output Power(DIN 45324, +B = 14.4 V) | 30 W × 4 | ||
| Speaker Impedance | 4 Ω - 8 Ω | ||
| Tone Action | Bass | 200 Hz ±8 dB | |
| Middle | 2.5 kHz ±8 dB | ||
| Treble | 12.5 kHz ±8 dB | ||
| Preout Level/Load (CD) | Except for [KDC-100Q]:2 500 mV/10 kΩ | ||
| Preout Impedance | ≤ 600 Ω | ||
| Auxiliary | Frequency Response (±3 dB) | 20 Hz - 20 kHz | |
| Input Maximum Voltage | 1 200 mV | ||
| Input Impedance | 30 kΩ | ||
| General | Operating Voltage | 14.4 V (10.5 V - 16 V allowable) | |
| Maximum Current Consumption | 10 A | ||
| Operational Temperature Range | 0°C - +40°C | ||
| Installation Size (W × H × D) | 182 mm × 53 mm × 159 mm | ||
| Weight | 1.2 kg | ||
Subject to change without notice.
INHALT
SPEECH: NEWS, AFFAIRS, INFO (Information), SPORT, EDUCATE, DRAMA, CULTURE, SCIENCE, VARIORED, WEATHER, FINANCE, CHILDREN, SOCIAL, RELIGION, PHONE IN, TRAVEL, LEISURE, DOCUMENT
Bocnpoun3BoDmblc foaibl
Bocpon3bOdmmb 3BykoBof qam: MP3 (.mp3), WMA (.wma)
Bocpon3bOdombte nckn:CD-R/CD-RW/CD-ROM
Bocnpn3bOIMMpborFomatpAaNbHcKaX:IO 9660, yopbeh1/2,Jollet,IanHHneMeHaMbaIpaib.
- Bocnp03B0Dmmaa faaiNbaa cncTeMa aYcTPOCTB USB: FAT12, FAT16, FAT32
Jaekce aen yauofoaibntcoBtETBYOTpeuHcENHBM Btue 3ctaHApTn, pIm KeNtOtoxh TINAXH mHm CToCTAHM HOCHTeNeB BOCTPOB3BEHMe MOKET OK33aTbCBAEHO3MOKHeH.
ДиCKN, KOToPbIe HEnb3Я
BocnpoN3BeCTNuHaDaHHOMyCTpoNCTBe
-ДиСКИнЕкPyrIоNФОмMbI.
-ДИСК,ЗларCSHANNA NOBEXHOCTb KOTOPbX OkpaSHA, ИМД ДИСК co cIeAaM 附ZAPR3EHnEN.
3aNcBbAeMbIe DNCKN, KOToPbIE He 6bJIHn HINHaUNImNoBaHbI.
- KomnakT-DHKN DAHQMPTOM 8.Мнтбда Вставди КДСКС сnomоюв
aandetape MOKET pRNBCTH K HENCPBACHOBTY UTOPICTA.
06 yctpoiCTbax USB
- Dahnaney oocyteCTBO MOKET BO CNOTB30DHTO qFbaIb MP3/WMA/WAV, coxapAHenne b an HAOMHAAUMOCT yHcTBE 8B GONBLOEKMOTC.
- 3anpeaetcnoioknloatb USB-Hocntelb uee3 USB-KonuhtpaTop.
- Плковские Иньке, облесда пькотору релевшата 5 M, можек ринецк К нековский Всисретдемп.
乙 10cyptroBTOHnPcno3AeTgCTOBu7UBC HMOHbHM HAPANKEHUM,OTNHUM5O B,HMOHBMKTOKUMBcBUEIaE
О пленные KENWOOD Music Editor Light u KENWOOD Music Control
Даньим Yсторов Востм подержныразс рпложенке KENWOOD Music Editor Light за пИ и рпложенке KENWOOD Music Control за Android"
- Ecnu c nmoosbKOENWOOD Music Editor Light nN KENWOOD Music Control b AynOphiain bbln doabBeneHn daHnbe o Komno3uHm, 3OT0 aydmoaon MOnxho HauTn IIO XaHpy, hCnPONHTeINo, aIb6bMy, cnCKy BOCIPNOB3EBeHNi kOMNo3Hm.
- Pprodokhenya KENWOOD Music Editor Light at KENWOOD Music Control
DocytynbI dlya 3aqrzki Na cnejuoziem Be6-caitee: www.kenwood.com/c5/cce/
06 iPod/Phone
Made for
- iPod touch (1st, 2nd, 3rd, 4th u 5th generation)
- iPod classic
- iPod nano (3rd, 4th, 5th, 6th, 7th generation)
- iPhone, iPhone 3G, 3GS, 4, 4S, 5
CbeHnO aNoceHbEM cTnCKe OBcMEtMnOCTn IN BepCHNr nporpAmHoro oBecneJeHnE iPhe /iPod cm. no apcy: www.kenwood.com/cs/ce/iPod - TvoB6 noKpKnOuHbT yCtpoCTBa c p3aBemOM Lightning, tpe6yOToCA KCA-Ip102 (DONINHITbHbIh AkeccCyap) n nepeoxDHnK MeKdy pa3eBemOM Apple Lightning n 30-KoHTaTHbIM p3aBemOM (akceccyap yctpoCTBa iPod/iPhone).
He octabrytne nepexdoHHM KEmdy pa3bemOM Apple Lightning n30-KoHTaKTHMb p3aBemOM B ATOBMOBe BO H36BeJHAnO npBekENHy, B3bBaHbNb HbCkOm TEMNepatypy.
UynapeneH iPod HEBOM3MOXHO,ecnH HA hem OTobpkaetcT KETC “KENWOOD” niv.
YCTPAHEHNE IPOBJIEM
TEXHnueCKNE XAPAKTEPNUCTNKN
3ACTOCB8YbCNIIMUE, KONI BHMKHENOPEKMIM DEMOHCTaJI.
BCTaHOBIOI npOMIKOK acy, Ype3 ekmY
abomarHITOla B peKIMU oikyBaHHRA (STANDBY),
ABOMATMHNO BVMKHEbC, 106 He BnTpaTHn
eheprIO kAKMHTIopra.
20M:20xWBmIH;40M:40xWBmIH;60M:60xWBmIH;OFF-:-:BIDMaHE
CD READ
1: AXTBYYBcBA FyHKHb ABTOMATNUHORO p03n3AHNA TmTI 3aMNC HA KOMAKT-DKCHY; ayiojdoJIANSI a60 My3HNu KOMAKT-DKCHK.
2.ПИМУСВО BМКИТСВЕРМДБТВОPLEHRA MYMCHNAGO KOMNAKT-DИСКА. ПИР NOPGRABAHI KIMCSY 13 yadjiФIDOM HEMAE 38yK.
F/W UPDATE
UPDATE SYSTEM
F/W UP xx.xx
YES:OHOBIOE B6yOBAHE Π3; NO:CKacyBANHA (OHOBHNEA EKTMOBBAE)
Detahniluyi hónpaomiu quo doo hnoblenyI3
dubw: www.kenwood.com/cs/c/
Nowyk ctaHcji
1 HaTnCKaOuH KhONKy SRC, o6epiB pexm pao (TUNER").
2 HatachitB ▲ BAND kibka pa3iB (a6o hatachitb *AM-/ #FM+ Ha RC-406), 06 o6patn FM1/2FM2/MW/LW
3 HaTncHtB I 一 / 一 / a6oHaTncHtB I 一 / 1 (+) Ha RC-406), o6o po3noaTu nouK ctaHui.
-ДяTORO,и63mHnTn cnoci6 nowkyI▶HaTncHITb SEEK deKinbpa3iB.
AUTO1: ABtOMaTnUHm NOnuSyk paIIOCTaHJIi.
AUTO2: ABTomatuHn noUyK o6paHOi paioctaHui.
MANUAL: Piowyk paioctaunii Bpyuhy.
36epexeHHra TaHcii:HaTNCiHb iYtpmMyTe Ondy 3uΦpOBnK HONOK (1-6).
- Bn6ip 36epexeHoi cTanii:HaTncHtB Ondy 3 uNΦpOBnx KHOtOK (1 - 6) (a6o HaTncHtB Ondy 3 uNΦpOBnx KHOtOK (1 - 6) Ha RC-406).
HanaaHTyBaHHn npramoro doctyny (3a donomoroIO RC-406) (dJIa KDC-130Y)
1 οιδό περητιν B pεχιμ "Hanaштувань постуу" (Direct Access Tuning), haTnchitb Khoŋky DIRECT.
Ha ekpani 3'Явлельса -- - - - (Дя FM) a6o -- - - - (Дя MW/LW).
2 106 BBecTN 3NaueHn YaCTOTn, HATNCiTb nΦpOBI KONKn.
3ДлnowkypadioctauiiHaTncHtB KhonkyENTI
- Ⅲo6 cKacyBATn NOwYK, HATNCHITb a6o DIRECT.
JIAO zoJDA ONEPAUIHE BIKHOYETCBNPOTFRGM 10 cKYNID NcIe KPOK2, pEKIM HANaHTyBAHNN npMORO DOCTNY CKAOSBETCBA ABOTMATHUHO.
Hnhi HanaaHTyBaHHa
1 Hatncitb peryIaTOp ryHocTi, akTnByeTbcra peXm HanaTuBaHH naPametpiB fYHKuii [FUNCTION].
2 NopbHeprpeyIaTOp ruyHocTi, 0o63po6nTu Bn6ip (INB. HacTyHny Ta6nIoo), a NotIM HATNCtB peyIaTOp.
3 IINBHXOHy HATNCHTb Ta YtpMMyTe Q/
IooBnepeHbOeKpaHy aOHaJauBaHb,HaTCHiB Q/
- Doctyni dny Bn6opy Tnn nporpaM:
SPEECH: NEWS, AFFAIRS, INFO (iHΦopmaúri), SPORT, EDUCATE, DRAMA, CULTURE, SCIENCE, VARIORED, WEATHER, FINANCE, CHILDREN, SOCIAL, RELIGION, PHONE IN, TRAVEL, LEISURE, DOCUMENT
MUSIC: POP M (My3nka), ROCK M (My3nka), EASY M (My3nka), LIGHT M (My3nka), CLASSICS, OTHER M (My3nka), JAZZ, COUNTRY, NATION M (My3nka), OLDIES, FOLK M (My3nka)
AbTomarHITOna 6Bye uKaTn Tyn npOrpAm, kAki nipndae n iKateropio [SPEECH] a60 [MUSIC], kAIO BOHA o6pana.
J KUO yuHnic6 byaHa nauoTobaha niq nac npnHHTI hOpmaui npoDopXHcTuayiu, nonepdHexb aO boHOBN, BOHA 3eepiraTbcB cABTomaTHIO. LcE pIBen bYuHocTi bye DCTAHOBHEIN npi HaCyTNHI akTUBaui II yHNUKII npnHHTI hOpmaui npoCtuyAio H daOp03i, nonepdHexb aO HOBN.
PoznohitbBiTbOpenhra
Jxepeno BMNkaeTbca ABOTMaTuH0 Ta NOnHaeTbCra BiTDBOpEHn 3aInCy.

CD
USB
BxdnpiiklnouenHNA-npntroob
iPod/iPhone (ДЯ KDC-361U / KDC-261UB/ KDC-261UR)
HaTncHtTa yTprnmyTe iPod, 0o6
0bpatnu pexn m ynpablinn, kOn n dxpepo
BctanOBHeNo ha iPod.
MODE ON:3iPod. ( 7 , 1) MODE OFF:3 npicTroio.


Mozhna Bn6paTn: [DRIVE 1] - [DRIVE 5]
Плготовka:
06epitb[ON]nB[AuLTI-BUILT-IN AUX]. ( 5)
NoaTOK npocnyxObyBaHH
1Пдклоченн noptatmbho aydionporpabaya (haBHorO y npdoaxy).

2 HaTnCHiB SRC nra Bn6Opy AUX.
3 YbIMKnHt npoTaBHHy aayionporpBaT aonHtBuBTBOpEHn
BctaHObitb im'AUX
Пд ус псocnyOBУВаннay audio npepy,aknii pdkluoyeno do npicrtpo...
1 HataichiIbI peryIaTOp ryuHocI, aktiByeIbcIpeXIM HanaIaStyBaHnHa napaMeTpB yHKui[FUNCTION].
2 NIOBOPOTOM peryIaTOpa ryUHocTi Bn6epiTb [SYSTEM] i HATNCHTb peryIaTOp.
3 NIOBOPOTOM peryIaTOpa ryUHocI t Bn6epiB [AUX NAME SET] i HATNCHITb peryIaTOp.
4 ITOBOPOTOM perynTota ryuHocTi apo6itb Bn6ip, a notIM HATNCi7b peryIaTOp. AUX (3a 3aMOBvBaHHrM)/DVD/PORTABLE/GAME VIDEO/TV
5 IInBnXoHy HAtncHt b TaYtpmMyTe Q/
HACTPOIKN 3BYKU
Пд ус послуховьань 6уь-якого джерета...
1 HaTnCHiB terpyIaTOp rUyHocTi, aKTHByETbCra pEKM hAnawTyBaHHa napametpiB yHKui [FUNCTION].
2 Поворотом ренилого русостi виберить [AUDIO CONTROL] i начсithь ренил elect.
3 NopBepHtbperynTOp rUynOCTi, u06 3po6nTN Bn6ip (nIB. HAcTyNHy Ta6nIOu), a notim HAtcnHtbperynTOp. TObpOriTp kKoP 3, u06 o6paTn a6oakTbByaTn b6aKaHNpyNKT.
4ДлЯВиХОунЧИТБаУтРИМУTeQ/

DIGITAL AUDIO
B. N_1 = 1
- "Made for iPod," and "Made for iPhone" mean that an electronic accessory has been designed to connect specifically to iPod, or iPhone, respectively, and has been certified by the developer to meet Apple performance standards. Apple is not responsible for the operation of this device or its compliance with safety and regulatory standards. Please note that the use of this accessory with iPod or iPhone may affect wireless performance.
- iPhone, iPod, iPod classic, iPod nano, and iPod touch are trademarks of Apple Inc., registered in the U.S. and other countries.
Lightning is a trademark of Apple Inc.
Android is trademark of Google Inc.