
FT0203 - Weather Station Cotech - Free user manual and instructions
Find the device manual for free FT0203 Cotech in PDF.


| Product Type | Wireless Weather Station with USB |
| Brand | Cotech |
| Model | FT0203 |
| Indoor Unit Dimensions | 157 × 210 × 26 mm |
| Thermometer/Hygrometer Dimensions | 45 × 110 × 21 mm |
| Rain Gauge Dimensions | 170 × 140 × 207 mm |
| Anemometer Dimensions | 200 × 128 × 205 mm |
| Indoor Unit Power | Mains adapter (100-240 V AC, 50/60 Hz, output 5.9 V, 500 mA) or 3 × AAA batteries |
| Sensor Power | Thermometer/hygrometer: 2 × AAA; Rain gauge: 4 × AAA; Anemometer: 4 × AAA |
| Wireless Frequency | 433 MHz |
| Wireless Range | Up to 100 m (open field) |
| Measured Parameters | Indoor/outdoor temperature, indoor/outdoor humidity, wind speed and direction, rainfall, air pressure, dew point, feels like temperature |
| Additional Features | Weather forecast, moon phase, histograms (24h/72h), alarms, background lighting with color based on temperature, USB connection for PC software (WeatherHome) |
| Temperature Range (Indoor) | 0 to 60 °C |
| Temperature Range (Outdoor) | -40 to 60 °C |
| Humidity Range | 10 to 99 % |
| Wind Speed Range | 0 to 50 m/s |
| Air Pressure Range | 300 to 1100 hPa |
| Rainfall Range | 0 to 9999 mm |
| Calibration Options | Temperature, humidity, wind speed, rainfall, air pressure (absolute/relative) |
| Care and Maintenance | Clean with damp cloth and mild detergent; check rain gauge every 3 months; remove batteries if not used for long time |
| Safety Notes | Indoor unit not for outdoor use; use alkaline batteries; do not mix old/new batteries; disconnect adapter during thunderstorms |
Frequently Asked Questions - FT0203 Cotech
User questions about FT0203 Cotech
0 question about this device. Answer the ones you know or ask your own.
Ask a new question about this device
Download the instructions for your Weather Station in PDF format for free! Find your manual FT0203 - Cotech and take your electronic device back in hand. On this page are published all the documents necessary for the use of your device. FT0203 by Cotech.
USER MANUAL FT0203 Cotech
Wireless Weather Station with USB
natural_image
Product photo of a white outdoor air condition meter with control panel and digital display (no visible text or symbols)Important:
Read the entire instruction manual carefully and make sure that you fully understand it before you use the equipment. Keep the manual for future reference.
Viktig information:
Original instructions
Bruksanvisning i original
Originalbruksanvisning
Wireless Weather Station with USB
Art.no 18-3676 Model FT0203
36-7334
FT0203
Please read the entire instruction manual before use and save it for future reference. We reserve the right for any errors in text or images and for making any necessary technical changes to this document. If you should have any questions concerning technical problems please contact our Customer Services.
Table of Contents
Safety 4
Contents 5
Assembly kit....6
Keys and functions....6
Installation....8
Inserting batteries....8
Anemometer....8
Rain gauge 9
Thermometer/hygrometer 9
Indoor unit....11
Searching for sensors and checking the sensors' functionality .....12
Anemometer....12
Rain gauge....12
Thermometer/hygrometer 13
Indoor unit....14
Display/key of symbols 14
Settings/adjustments 16
Toggle between external temperature/hygrometer sensors....19
Max/Min....19
Reset measurement values....19
Histograms, weather forecast and moon phases 20
Background lighting 21
Alarm....22
Calibration....24
Final mounting....25
Choice of location 25
Software (WeatherHome) 29
System requirements....29
Installation....29
Instructions for use 30
Care and maintenance 33
Troubleshooting guide....34
Responsible disposal....35
Specifications....35
Sensor data....35
Wireless transfer....35
Update interval 35
Batteries....36
Mains adapter....36
Dimensions....36
Safety
- The unit for indoor use must not be exposed to rain or moisture.
- The product must not be dismantled or modified in any way.
- The product is not intended to be used as a reference in any way, and Clas Ohlson will not be held liable for any damage or injury that may result from inaccurate readings.
- Only use high quality alkaline batteries. Never mix old and new batteries. Change all batteries at the same time. Never combine rechargeable batteries with non-rechargeable batteries.
- When changing batteries in the indoor unit, all recorded data (histograms) and stored maximum and minimum readings will be deleted.
- Do not expose the product to shocks or impacts of any kind.
- Appropriate safety equipment must be used if the mounting of the sensors requires working on a roof.
- Do not spend any time on the roof when there is a risk of thunderstorms.
Contents
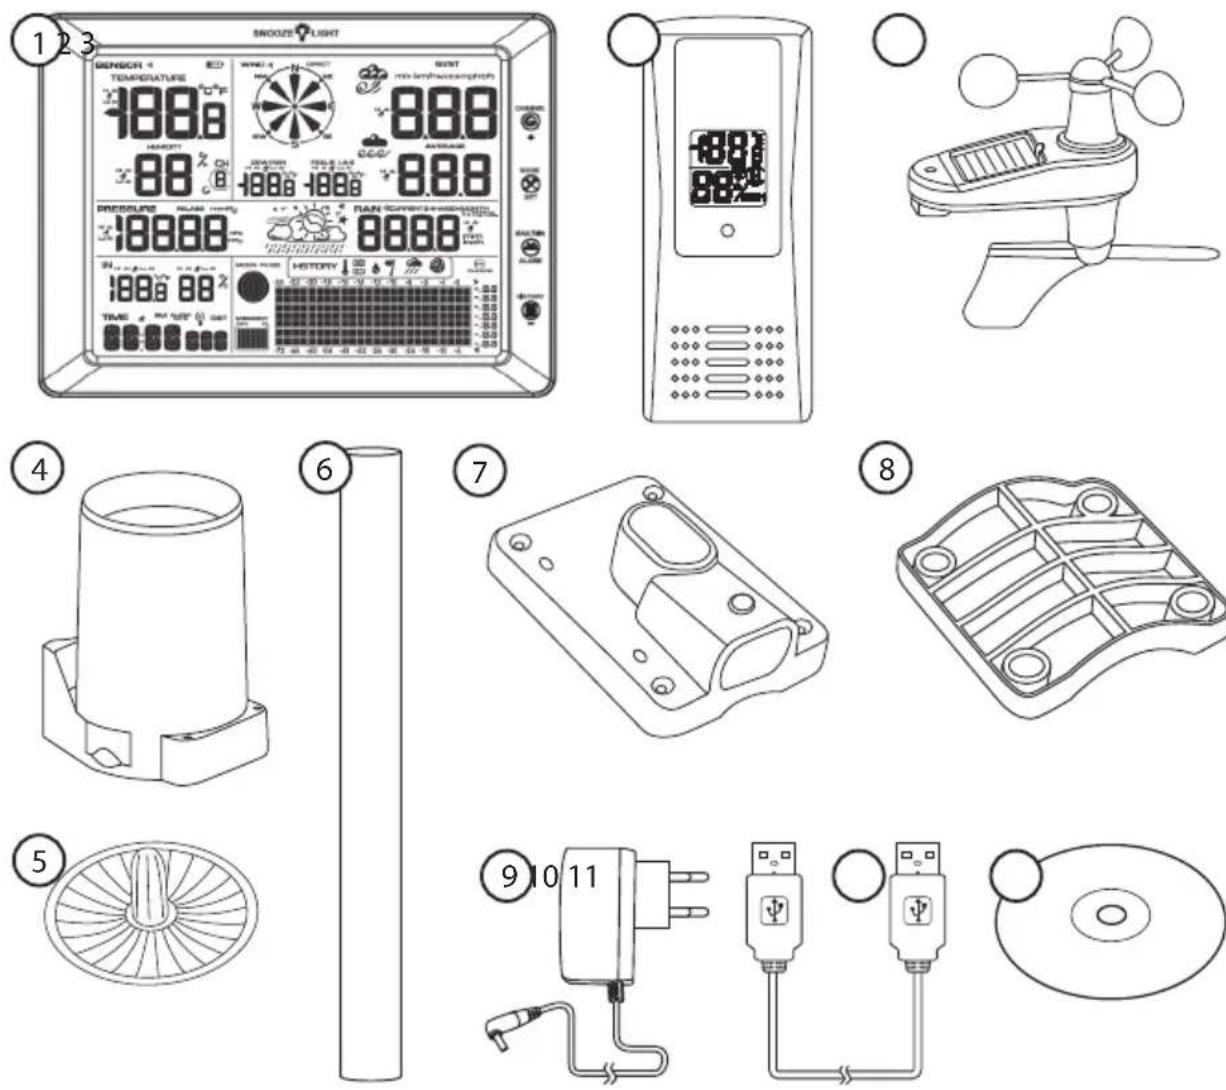
- Indoor unit
- Temperature and humidity sensor (thermometer/hygrometer)
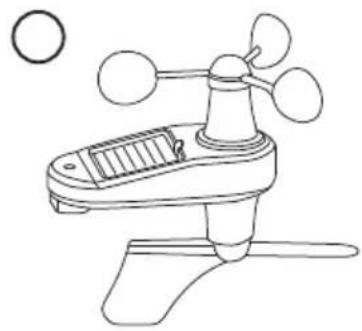
- Sensor for wind speed and wind direction (anemometer)
- Rain gauge
- Filter for the rain gauge
- Arm for the anemometer
- Mounting attachment for arm
- Mounting plate for pipe mounting
- Mains adapter
- USB cable
- CD with software (WeatherHome)
Assembly kit
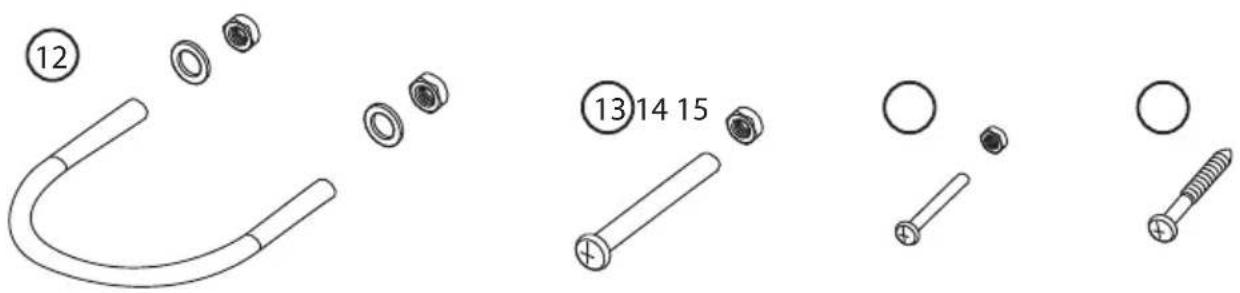
- Pipe clamp, washer and nut (M5) for the rain gauge for pipe mounting
- Screw and nut (M5) for the rain gauge for pipe mounting
- Screw and nut (M3) for the arm for the anemometer
- Wood screw for the wind gauge for wall/roof mounting
Keys and functions
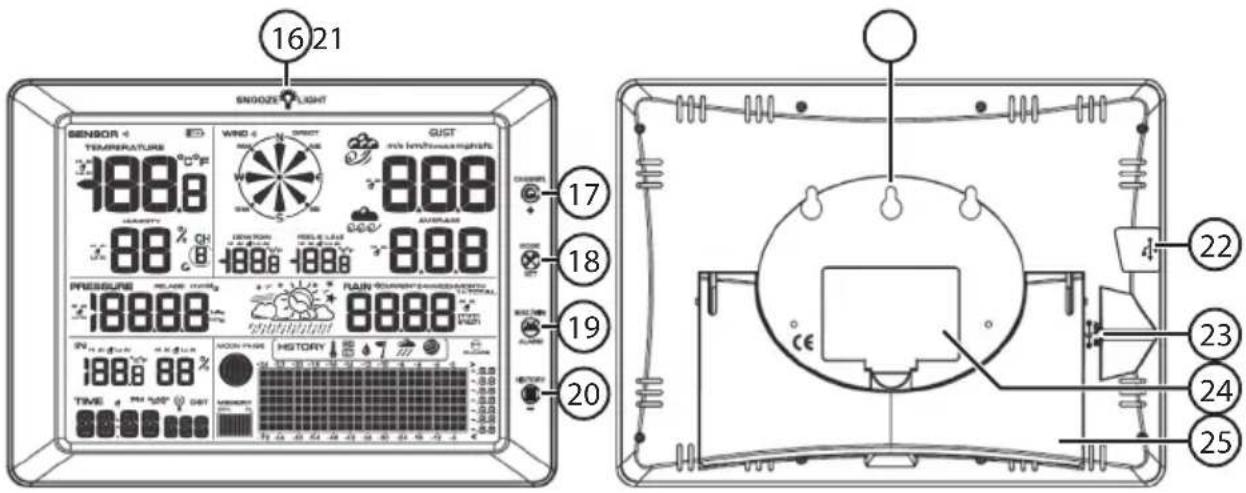
- [SNOOZE/LIGHT] Press to activate the snooze function or to change the brightness of the display. Press and hold to turn the display lighting on or off.
- [CHANNEL/+ ] Press to change channel or to increase a value. Press and hold to manually search for sensors.
- [MODE/SET] Press to change display mode or to confirm selection. Press and hold to access the settings mode.
- [ MAX/MIN/ALARM ] Press to show max/min values. Press and hold to display the preset alarm thresholds.
- [ HISTORY/– ] Press to select histogram. Press and hold to change the sound settings for the alarm and key presses.
- Wall bracket
- USB connection
- DC 6.0 V
- Battery cover
- Table stand
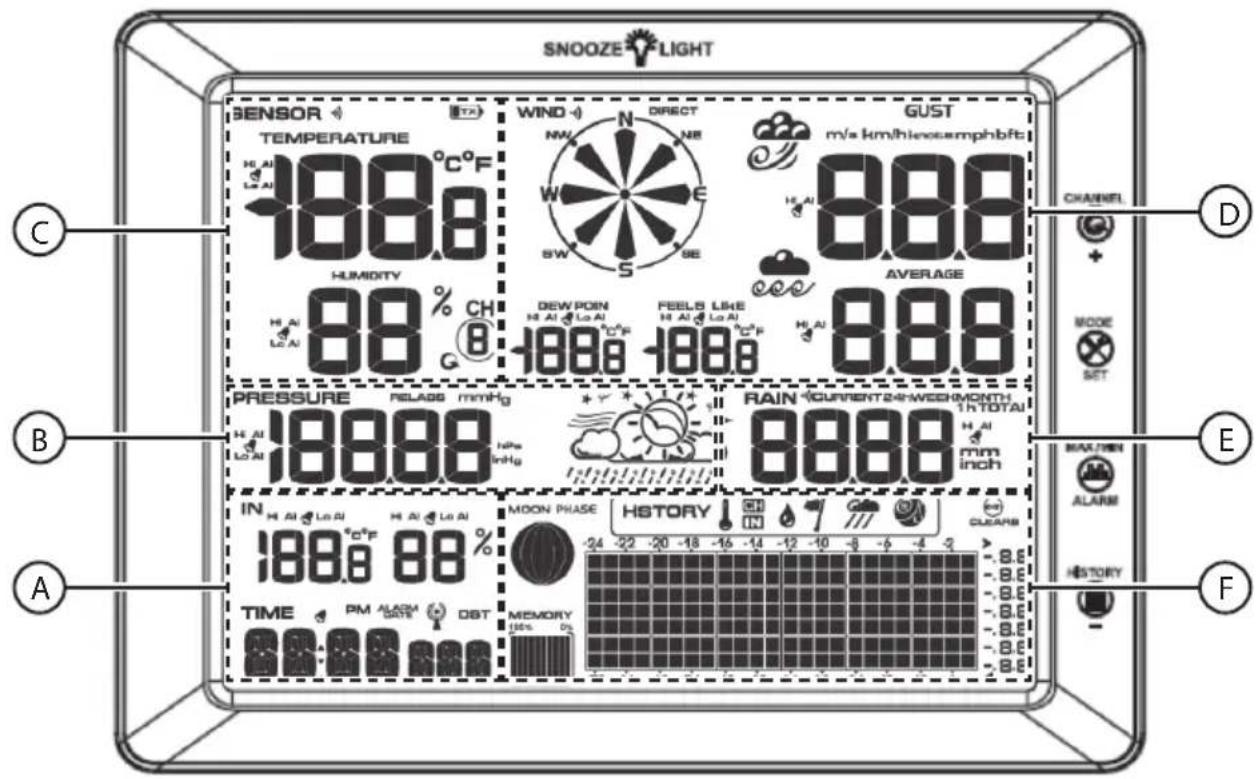
A. IN Indoor temperature and humidity
TIME Time/date/weekday
B. PRESSURE Air pressure and weather forecast
C. TEMPERATURE Temperature, external sensor
HUMIDITY Humidity, external sensor
D. WIND Wind direction
GUST Wind speed
AVERAGE Average value for wind speed
DEW POINT Dew point
FEELS LIKE Perceived temperature
E. RAIN Precipitation
F. HISTORY Graphical history (24 or 72 hour period)
MOON PHASE Phase of the moon
Installation

flowchart
graph LR
    A["Remove the product from the packaging and check that nothing is missing"] --> B["Insert batteries into the sensors (the transmitters)"]
    B --> C["Start the indoor unit (the receiver) and connect the sensors"]
    C --> D["Make the settings for the weather station and check that the sensors are working"]
    D --> E["Mount the sensors in an appropriate location"]
Inserting batteries
Note:
Insert the batteries into all sensors before inserting batteries into the indoor unit. When power is supplied to the indoor unit, an automatic search for nearby sensors will begin.
When inserting the batteries into the units, check the markings in the battery compartment to ensure the correct polarity.
Anemometer

natural_image
Technical line drawings of a mechanical device with two views (top and side), no visible text or symbols- Remove the battery cover on the underside of the anemometer.

-
Insert 4 × AAA/LR03 batteries. The LED indicator will be illuminated for 3 seconds, followed by continued flashing once every 16 seconds to indicate that data is being transmitted from the unit.
-
If the LED indicator does not flash after the batteries have been inserted, reset the sensor by pressing [ RESET ].
-
Replace the battery cover so that it clicks into place.
Rain gauge

- Remove the water collector by turning it in the direction of the arrow and then lifting it upwards.
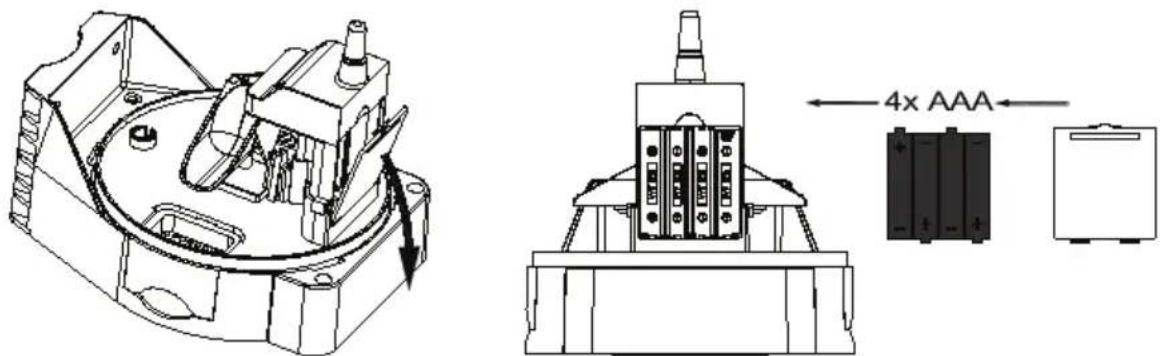
- Remove the battery cover. 3. Insert 4 × AAA/LR03 batteries.
The unit will begin to transmit data once every 60 seconds.
- Replace the battery cover.
Thermometer/hygrometer
Note:
- If you are to connect any additional thermometers (other than that which is supplied), these must be set so that they transmit on different channels. This is done by altering the DIP switches in the battery compartment. A total of 8 thermometers may be connected.
- Ensure that the DIP switches have been set before you insert batteries into the sensor.

-
Unscrew the retaining screw that holds the battery cover in place, and remove the cover.
-
Set the channel on which the sensor is to transmit by changing DIP switches 1–3 (see the table):
| DIP switches* | ||||
| 1 2 3 4 | ||||
| OFF OFF OFF °F / °C Channel 1 | ||||
| OFF OFF ON °F / °C Channel 2 | ||||
| OFF ON OFF °F / °C Channel 3 | ||||
| OFF ON ON °F / °C Channel 4 | ||||
| ON OFF OFF °F / °C Channel 5 | ||||
| ON OFF ON °F / °C Channel 6 | ||||
| ON ON OFF °F / °C Channel 7 | ||||
| ON ON ON °F / °C Channel 8 | ||||
* OFF = down, ON = up, DIP 4 = Down = Farenheit, Up = Centigrade
-
Insert 2 × AAA/LR03 batteries. The LED indicator will be illuminated for 3 seconds, followed by continued flashing once every 60 seconds to indicate that data is being transmitted from the unit.
-
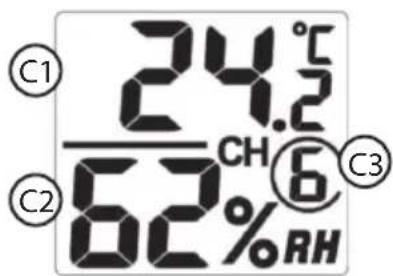
The display shows the current temperature (C1) and the relative humidity (C2). Check that the correct channel number (C3) is displayed.
-
Replace the battery cover, ensuring that the packing fits tightly around the battery compartment, and tighten the retaining screw.
Indoor unit

Note:
- Make sure that the sensors are working before you connect the indoor unit to the power supply.
- Make sure that the sensors are at least 3 m and no more than 30 m from the indoor unit. If the sensors are too close or too far away, it may be difficult for the indoor unit to receive the signals.
- When the indoor unit is turned on, an automatic search for nearby sensors will begin (the ⚪ symbol will be displayed). Do not press any buttons until all sensors have been registered – otherwise, the search process will be discontinued.
The indoor unit can be powered either by batteries or by the mains electricity using the mains adapter provided.
Battery operation

- Press in the catch and remove the battery cover.
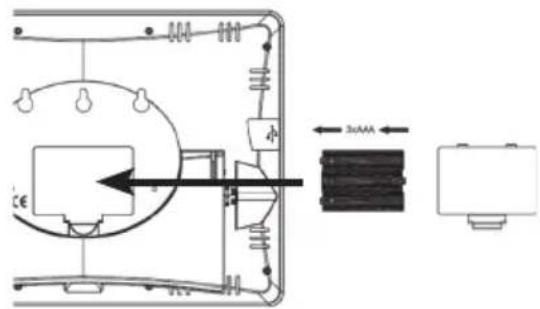
- Insert 3 × AAA/LR03 batteries. Check the polarity markings in the battery compartment to ensure batteries are inserted correctly.
3. Refit the battery cover.
Mains operation
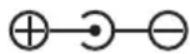
- Connect the mains adapter to the socket marked DC 6.0 V and to a 230 V wall socket. "AC ON" will appear on the display for 3 seconds.
- If the mains adapter is removed, and the weather station reverts to battery power, the display will show "AC OFF."
- The mains adapter must be unplugged during heavy thunderstorms in order to protect the weather station.

natural_image
Line drawing of a car electrical plug and outlet with a switch, no text or symbols presentSearching for sensors and checking the sensors' functionality
When the indoor unit is turned on, an automatic search for nearby sensors will begin. The search is indicated by ☐ If you have more than one thermometer/hygrometer, the display will alternate between these as they are registered. When the symbol disappears, you can test that the sensors are working.
i Information
If, when searching, the weather station is unable to find a sensor, or if it loses contact with a sensor, “---.” is shown on the display. Perform a manual search for a sensor:
- In normal mode, press and hold [ CHANNEL/+ ] for 3 seconds. "REG" appears on the display.
- Press [ CHANNEL/+ ] or [ HISTORY/- ] to select thermometer/hygrometer (CH1-8), anemometer (WIND), rain gauge (RAIN), all sensors (ALL) or, to cancel the search, (NOT). Confirm your selection by pressing [ MODE/SET ].
Anemometer
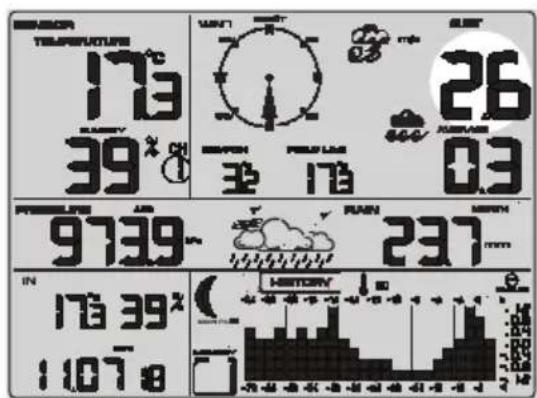
- Test the sensor for wind speed by spinning the cups. Check that the value shown on the display changes.
Rain gauge
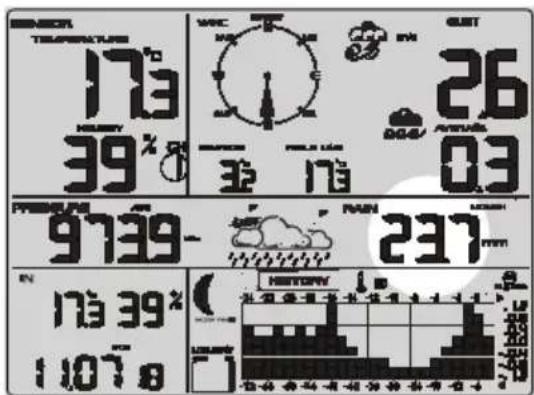
Rock the rain gauge's measuring cup back and forth. Each time the measuring cup tips over represents 0.3 mm of precipitation. Check that the value shown on the display changes.
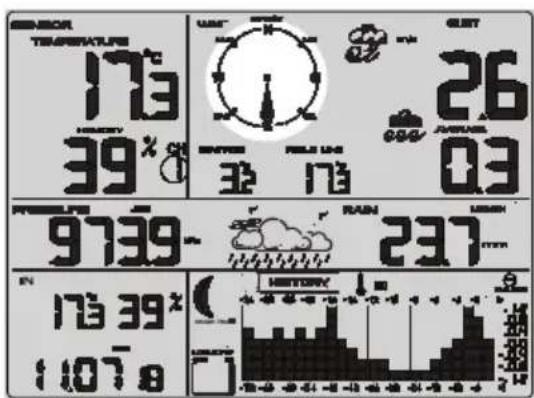
- Test the sensor for wind direction by changing the position of the weather vane. Check that the direction shown on the display changes.
Thermometer/hygrometer
Place the sensor close to the indoor unit, and leave it lying there for approx. 30 minutes so that the temperature stabilises. Read the values for the temperature and humidity, and compare these. The temperature values should be within 1 °C (accuracy ±0.5 °C) and the humidity values should be within 6 % (accuracy ±3 %).
If you have any additional thermometers/hygrometers connected, press [ CHANNEL/+ ] (2) repeatedly to switch between these.

If the values lie outside of these limits, they can be adjusted on the indoor unit. See the Calibration section.
Indoor unit
Display/key of symbols
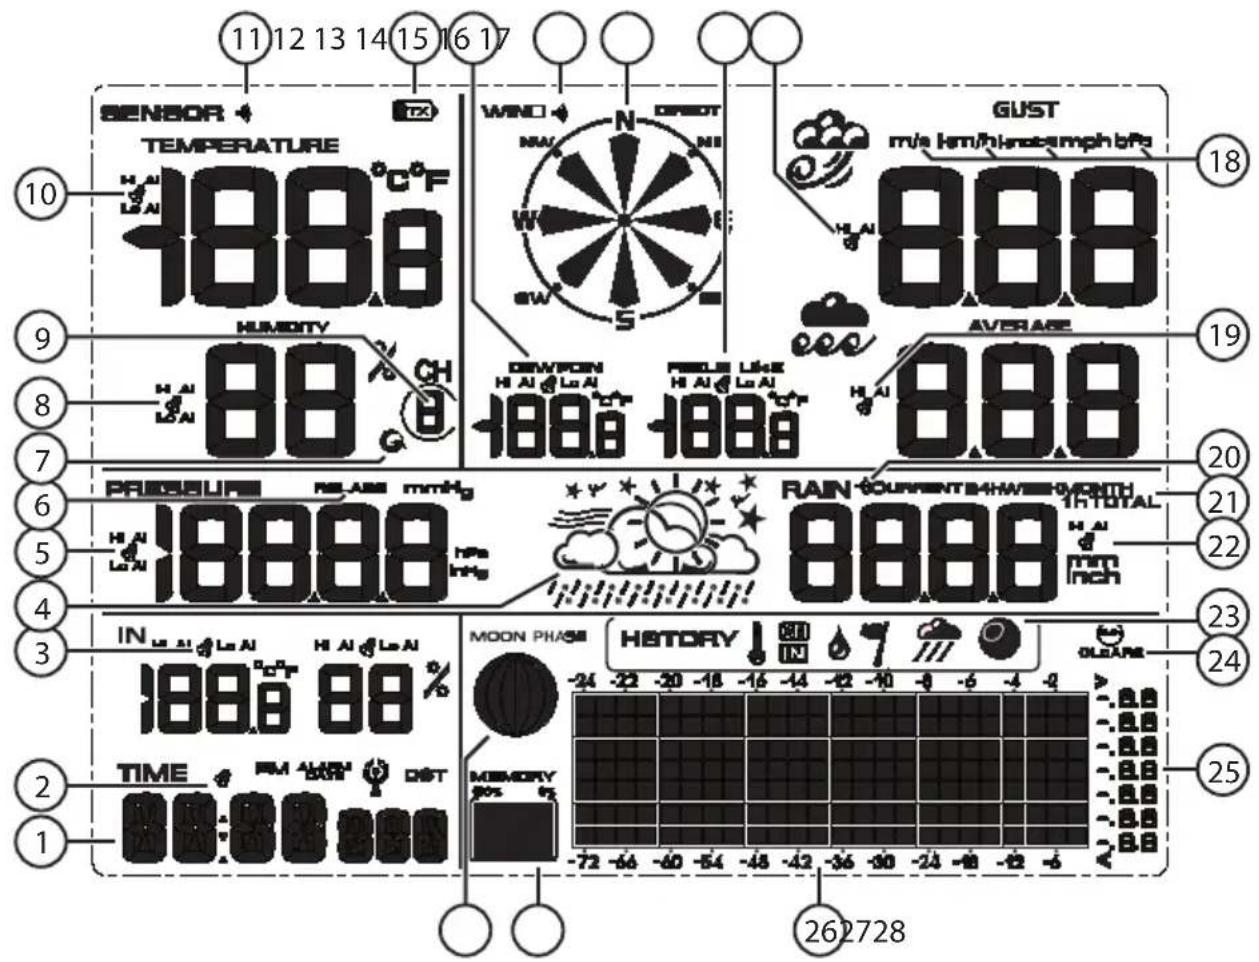
- Time/date/weekday
- Alarm symbol for the clock
- Alarm symbol for indoor temperature and humidity
- Weather forecast, storm warning
- Alarm symbol for air pressure
- Indicates display mode for relative or absolute air pressure
- Indicates rolling display of external thermometers/hygrometers
- Alarm symbol for humidity, external sensor
- Selected channel number, external sensor
- Alarm symbol for temperature, external sensor
- Signal indicator for thermometer/hygrometer. Appears when measurement data is received and when searching for a sensor.
- Low battery level, external sensor
- Alarm symbol for dew point
- Signal indicator for the anemometer. Appears when measurement data is received and when searching for a sensor.
- Wind direction
- Alarm symbol for ‘feels like’ temperature
- Alarm symbol for wind speed
- Unit of measurement, wind speed
- Alarm symbol for average wind speed
- Signal indicator for the rain gauge. Appears when measurement data is received and when searching for a sensor.
- Measurement period, precipitation
- Alarm symbol for precipitation
- Indicator for selected histogram
- Indicator for automatic reset of stored max/min values
- Measurement scale for histogram
- Time axis for histogram (24 or 72 hour period)
- Indicator for memory usage
- Moon phase indicator
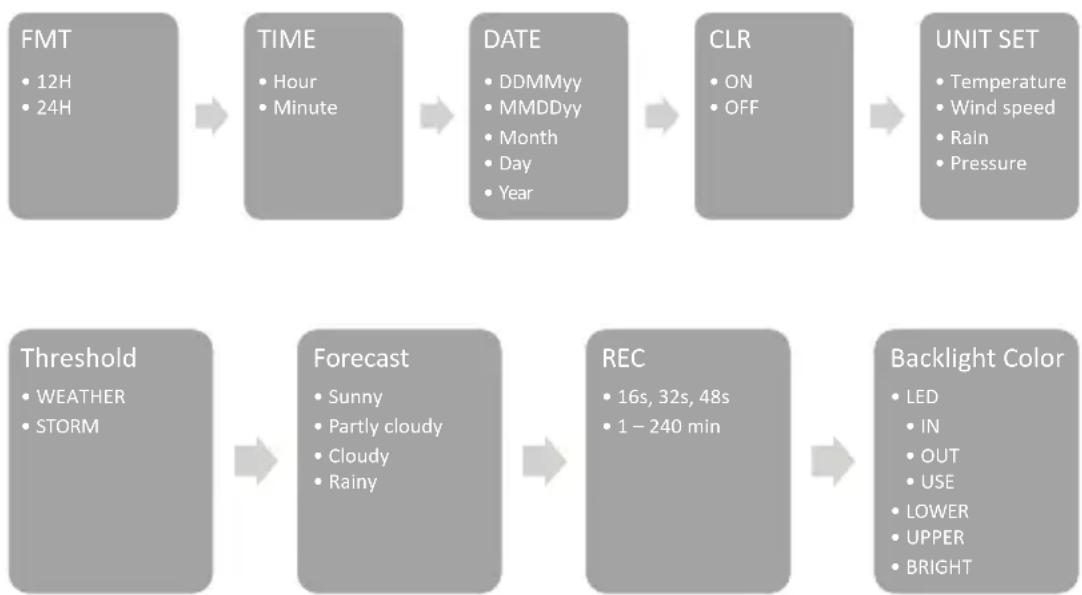
Settings/adjustments
Set the time, date, units of measurement, threshold values and background lighting
- In normal mode, press and hold [MODE/SET] for 3 seconds to enter the settings mode.
- Press or hold [CHANNEL/+ ] or [HISTORY/−] to change the values. Confirm each step with [MODE/SET].
- You can, at any point, return to the normal display by pressing [ SNOOZE/LIGHT ].
flowchart
graph LR
    A["FMT<br>• 12H<br>• 24H"] --> B["TIME<br>• Hour<br>• Minute"]
    B --> C["DATE<br>• DDMMyy<br>• MMDDyy<br>• Month<br>• Day<br>• Year"]
    C --> D["CLR<br>• ON<br>• OFF"]
    D --> E["UNIT SET<br>• Temperature<br>• Wind speed<br>• Rain<br>• Pressure"]
    F["Threshold<br>• WEATHER<br>• STORM"] --> G["Forecast<br>• Sunny<br>• Partly cloudy<br>• Cloudy<br>• Rainy"]
    G --> H["REC<br>• 16s, 32s, 48s<br>• 1 – 240 min"]
    H --> I["Backlight Color<br>• LED<br>• IN<br>• OUT<br>• USE<br>• LOWER<br>• UPPER<br>• BRIGHT"]
- FMT: Select either 12 or 24-hour clock format (default = 24 hour clock)
• TIME: Set the hours and minutes. - DATE:
- Set in which order the day and month are to be displayed: DDMMyy or MMDDyy.
- Set the month.
- Set the day.
- Set the year.
- CLR:
- Select ON if the weather station's max/min values are to be reset automatically at the end of each day (at midnight). "CLEARS 24" is shown on the display.
- Select OFF if they are only to be reset manually. See the Reset values section.
- UNIT SET:
- Temperature: Set the unit of measurement in which temperature is to be displayed: °C or °F
- Wind speed: Set the unit of measurement in which wind speed is to be displayed: m/s, km/h, knots, mph or btf (Beaufort scale)
- Rain: Set the unit of measurement in which precipitation is to be displayed (mm or Inch)
- Pressure: Set the unit of measurement in which air pressure is to be displayed (hPa, inHg or mmHg)
- Threshold:
- WEATHER: Adjust the threshold value for positive and negative changes in pressure: 2–4 mBar/hour (default = 2). A lower value makes the indicator of the weather forecast more sensitive to changes in pressure. In areas subject to major variations in pressure, a higher value is recommended.
- STORM: Adjust the threshold value for a negative change in pressure: 3–9 mbar/hour (default = 4). A lower value makes the indicator of a storm warning more sensitive to changes in pressure. In areas subject to major variations in pressure, a higher value is recommended. The indicator of a storm warning is activated when a constant drop in pressure is registered during 3 consecutive hours (the cloud & rain symbol flashes).
- Forecast: Adjust the weather forecast indicator based upon current weather conditions. Selection options: Sunny, Partly cloudy, Cloudy or Rainy (default = Partly cloudy).
- REC: Set the time interval for recordings: 16, 32, 48 seconds or 1–240 minutes (default = 30 minutes).
- LED: The background lighting on the weather station can change colour to reflect the current outdoor (OUT) or indoor (IN) temperature. Alternatively, you can select to use (USE) a fixed colour (default = OUT). Because the temperature range varies according to global location, the temperature range can be adjusted (see table).
- OUT
- LOWER Set the threshold value for the lowest outdoor temperature (default = -12.2).
- UPPER Set the threshold value for the highest outdoor temperature (default = 37.8).
- IN
- LOWER Set the threshold value for the lowest indoor temperature (default = 14.4).
- UPPER Set the threshold value for the highest indoor temperature (default = 28.9).
- USE Manually set the background colour: Select from a choice of 11 different colours.
| No Colour "OUT" Temp (°C) "IN" Temp (°C) | |||
| 1 White | <(-12.0) | <(14.5) | |
| 2 Pink | (-12.0)..(-6.5) | (14.5)..(16.0) | |
| 3 Purple | (-6.5)..(-1.0) | (16.0)..(17.5) | |
| 4 Blue | (-1.0)..(4.5) | (17.5)..(19.5) | |
| 5 Dark-blue | (4.5)..(10.0) | (19.5)..(21.0) | |
| 6 Dark-green | (10.0)..(15.5) | (21.0)..(23.0) | |
| 7 Green | (15.5)..(21.0) | (23.0)..(24.5) | |
| 8 Yellow | (21.0)..(26.5) | (24.5)..(26.0) | |
| 9 Orange | (26.5)..(32.0) | (26.0)..(27.0) | |
| 10 | Red | (32.0)..(37.5) | (27.0)..(29.0) |
| 11 | Dark-red | >(37.5) | >(29.0) |
• BRIGHT Adjust the brightness of the background lighting, from 1 (min.) to 8 (max.).
Change display mode for time/date and measurement values.
- In normal mode, press [MODE/SET] repeatedly to select Time/Date, Rain, Pressure or History.
- Press [CHANNEL/+ ] or [HISTORY/−] to change display mode.
- You can, at any point, return to the normal display by pressing [SNOOZE/LIGHT].
Time, Date
• Time
• Time & week day
- Date
Rain
• 1h
• 24h
- Week
• Month
• Total
Pressure
- Relative (REL)
- Absolute (ABS)
History
• 24h
• 72h
• TIME Choose to display time, time and weekday, or date.
- RAIN Choose to display per hour, per 24 hour period, per week, per month or total precipitation.
- PRESSURE Choose to display relative (REL) or absolute (ABS) air pressure.
• HISTORY Choose to display for a 24 or 72 hour period.
i Information about air pressure
The weather station can display air pressure in two different ways: ABS – absolute (measured) and REL – relative (adjusted to sea level).
- The relative value is used by meteorologists in order to be able to compare the air pressure in different locations.
- The normal air pressure at the level of the sea's surface varies according to geographical location, but has an average value of 1013.2 hPa. Low pressure is generally considered to be below 990 hPa, and high pressure is above 1020 hPa.
- Because air pressure decreases with altitude, the relative value will generally always be higher than the absolute value.
Sound settings for key presses and alarm
In normal mode, press and hold [ HISTORY/– ] for approx. 3 seconds to turn the sound on or off. “BUZZON” (when turned on) or “BUZZOFF” (when turned off) will be shown on the display.
When the sound is turned off, key presses will be silent and the weather station will only issue silent alarms (flashing alarm symbol).
Toggle between external temperature/hygrometer sensors
- In normal mode, press [ CHANNEL/+ ] repeatedly to switch between connected thermometers/hygrometers. The relevant channel number will be shown on the display.
- For the rolling display of all sensors, press [CHANNEL/+] until G appears on the display. The weather station will now display values from each connected sensor at 5-second intervals.

Max/Min
- In normal mode, press [ MAX/MIN/ALARM ] once. "MAX" will be shown on the display, together with the maximum values for precipitation, wind speed, pressure, temperature and humidity.
- Press [ MAX/MIN/ALARM ] again. "MIN" will be shown on the display, together with the minimum values for pressure, temperature and humidity.
When displaying max/min values, press [ HISTORY/– ] to toggle between the display modes for precipitation and air pressure.
Reset measurement values
Max/Min values
(i) Note:
When resetting maximum/minimum values, the stored values for all sensors will also be reset.
- In normal mode, press [MAX/MIN/ALARM] repeatedly to select MAX or MIN.
- Press and hold [MODE/SET] for 3 seconds (CLR flashes) in order to reset the max or min values respectively.
To reset the max/min values automatically, see the Settings/adjustments section (CLR).
Precipitation
- In normal mode, press [MODE/SET] twice to select the display mode for precipitation.
- Press [CHANNEL/+ ] or [HISTORY/−] repeatedly to select the display mode.
- Press and hold [MODE/SET] for 3 seconds to reset the selected value.
Memory
To clear the weather station's memory, see the Software (WeatherHome) section.
Histograms, weather forecast and moon phases
Histograms
The weather station can display recorded measurement data for the past 24 or 72 hours. See the Change display mode for time/date and measurement values section.
The vertical axis shows the historical changes compared to the current measurement value. The current measurement value (the column furthest to the right) always shows 0.
E.g. when displaying the temperature histogram: If the column shows 0.4, this represents a historical temperature 0.4 degrees higher than the current temperature.

In normal mode, press [ HISTORY/– ] repeatedly to switch between the following histograms:
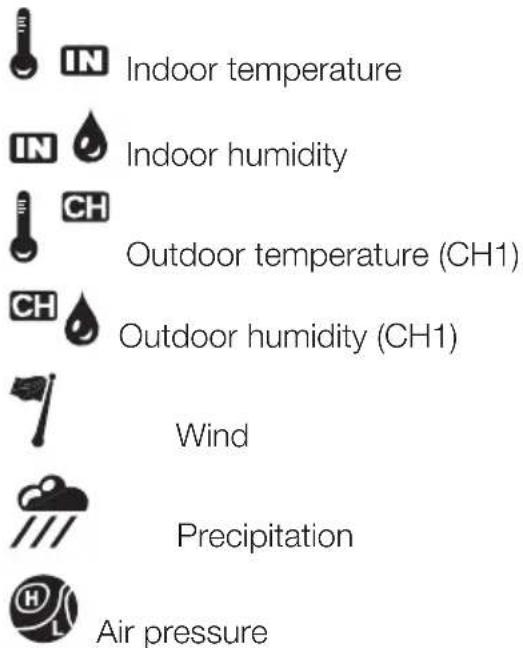
Weather forecast
The weather station measures the air pressure and provides a forecast for the coming 12–24 hours. The following symbols are shown, depending upon the actual change in pressure and the threshold values that have been set (see the Settings/adjustments section):


Sun Stars/moon Partly cloudy Cloudy Rain


At night (between 7 pm and 7 am), the Stars/moon symbol is shown instead of the Sun symbol.
Phases of the moon
Display of the moon's phases is based upon the actual calendar date.
Check that the correct date has been set (see the Settings/adjustments section).

Background lighting
Press [ SNOOZE/LIGHT ] to turn on the background lighting. The background is lit for 5 seconds.
Constant background lighting
- Press and hold the button for 2 seconds. The background lighting will be lit, and "LED ON" will appear on the display.
-
Press and hold the button again to turn off the light. "LED OFF" will be shown on the display.
-
In order to conserve batteries (during battery-powered operation), the background lighting turns off automatically after 30 minutes.
- To reduce the brightness of the background lighting during constant lighting, press [SNOOZE/LIGHT]. "BRIGHT 1" is shown on the display. Press again to revert to the set level.
Adjust the brightness
- Press [SNOOZE/LIGHT] twice. "BRIGHT" appears on the display, and the set brightness value flashes.
- Press [CHANNEL/+ ] or [HISTORY/−] to change the brightness, from 1 (weakest) to 8 (brightest). Confirm your selection by pressing [MODE/SET].
For further settings for the background lighting, see the Settings/adjustments section.
Alarm
The weather station can be set so that an alarm is triggered if the sensors exceed the set threshold values.
When an alarm is activated, the weather station emits a sound and the alarm symbol 📋 flashes next to the value that exceeds the set threshold.
The sound can be permanently disabled so that the weather station only emits a silent alarm. See the Sound settings for key presses and alarm section.
Display current threshold values
- In normal mode, press and hold [ MAX/MIN/ALARM ] for 3 seconds to enter the alarm mode. "HI" is shown, together with the set maximum values.
- Press [ MAX/MIN/ALARM ] to show the set minimum values. "LOW" is shown on the display.
- Press [SNOOZE/LIGHT] or wait for 30 seconds to return to the normal display.
When threshold values are displayed, press [MODE/SET] to toggle the display mode between relative (REL) or absolute (ABS) air pressure, and between 1 hour (1h) or 24 hours (24h) of precipitation.
Set the alarm
- In normal mode, press and hold [ MAX/MIN/ALARM ] for 3 seconds. "HI" is shown on the display.
- Press and hold [MODE/SET] for 3 seconds to reach the settings mode for the alarm.
- Press or hold [CHANNEL/+] or [HISTORY/−] to change the values.
- Turn the alarm on or off by pressing [MAX/MIN/ALARM]. Select ON or OFF. The 🔔 symbol will appear to indicate that the alarm has been activated.
- Confirm each step with [MODE/SET].
- Return to normal display mode by pressing [ SNOOZE/LIGHT ] twice.

flowchart
graph LR
    A["Alarm Clock\n• Hour\n• Minute"] --> B["Rainfall\n• 1h, high\n• 24h, high"]
    B --> C["Wind\n• Gust, high\n• Speed, high"]
    D["Outdoor (CH1)\n• Temp\n• high\n• low\n• Humidity\n• high\n• low\n• Feels like\n• high\n• low\n• Dew point\n• high\n• low"] --> E["Pressure\n• Absolute\n• high\n• low\n• Relative\n• high\n• low"]
    E --> F["Indoor\n• Temp,\n• high\n• low\n• Humidity\n• high\n• low"]
- Alarm Clock: Set the alarm clock (hours and minutes).
- Rainfall: Set the alarm threshold value for precipitation ("1h" or "24h")
- Wind: Set the alarm threshold value for current wind speed (“GUST”) and average wind speed (“AVERAGE”).
- Outdoor: Set the upper ("HI") and lower ("LOW") alarm threshold values for the external thermometer/hygrometer connected to channel 1 (CH1).
- Temperature: Set the alarm thresholds for temperature
- Humidity: Set the alarm thresholds for humidity
- Feels like: Set the alarm thresholds for perceived ('feels like') temperature
- Dew point: Set the alarm threshold for the dew point
- Pressure: Set the upper and lower alarm thresholds for air pressure
- Absolute: Set the alarm thresholds for absolute pressure
- Relative: Set the alarm thresholds for relative pressure
- Indoor: Set the upper and lower alarm thresholds for the indoor unit's temperature and humidity
- Absolute: Set the alarm thresholds for absolute pressure
- Relative: Set the alarm thresholds for relative pressure
Snooze
- When the alarm sounds, press [ SNOOZE/LIGHT ] to temporarily silence the alarm for 5 minutes. The alarm symbol will continue to flash.
- To permanently silence the alarm, press one of the other buttons: [CHANNEL/+], [MODE/SET], [MAX/MIN/ALARM] or [HISTORY/-].
Calibration
- If the connected sensors display inaccurate values, they can be recalibrated. To calibrate the sensors properly, you must have reference values from meters/sensors that you know give accurate readings.
- The calibrated value can only be displayed on the indoor unit. The external thermometers/hygrometers always show the uncalibrated value.
- The range for relative humidity is always between 10 and 99% . It is not possible to adjust the value beyond this range.
- Press [ CHANNEL/+ ] or [ HISTORY/− ] to increase or decrease the selected value. To change the value more quickly, press and hold the button for 3 seconds.
- Press [ MAX/MIN/ALARM ] to reset the adjusted value.
- To complete the calibration and return to the normal display mode, press [SNOOZE/LIGHT] or wait for 30 seconds.
Temperature
- In normal mode, press and hold [MODE/SET] and [CHANNEL/+ ] simultaneously for approx. 5 seconds to enter calibration mode. The value for the indoor unit's temperature will begin to flash.
- Adjust the value to correspond with your reference value. The value can be changed in steps of 0.1 °C .
- Press [MODE/SET] to calibrate the external sensor's value.
- If you have several external sensors connected, press [MODE/SET] repeatedly to scroll through the channels (1–8) and adjust in the same way as in point 2.
Relative humidity
- In normal mode, press and hold [MODE/SET] and [HISTORY/–] simultaneously for approx. 5 seconds to enter calibration mode. The value for the indoor unit's humidity will begin to flash.
- Adjust the value to correspond with your reference value. The value can be changed in steps of 1 %.
- Press [MODE/SET] to calibrate the external sensor's value.
- If you have several external sensors connected, press [MODE/SET] repeatedly to scroll through the channels (1–8) and adjust these in the same way as in point 2.
Wind speed, rain and air pressure
- In normal mode, press and hold [MODE/SET] and [MAX/MIN/ALARM] simultaneously for approx. 5 seconds to enter calibration mode. The value for the wind speed's calibration factor will begin to flash (default = 1).
- Adjust the value between 0.75 and 1.25, where: calibrated wind speed = calibration factor x measured wind speed.
- Press [MODE/SET] again to adjust the value for the amount of rain. The value for the amount of rain's calibration factor will begin to flash (default = 1).
- Adjust the value between 0.75 and 1.25, where: calibrated amount of rain = calibration factor x measured amount of rain.
- Press [MODE/SET] again to adjust the value for absolute air pressure. The value for absolute air pressure will begin to flash.
- Adjust the value to correspond with your reference value. The value can be changed in steps of 0.1 hPa.
- Press [MODE/SET] again to adjust the value for relative air pressure. The value for relative air pressure will begin to flash.
- Adjust the value to correspond with your reference value. The value can be changed in steps of 0.1 hPa.
Final mounting

Information
We recommend that you familiarise yourself with the weather station and its sensors before you mount the devices in their final locations. This gives you the opportunity to easily calibrate the sensors and to test the various functions of the weather station.
Choice of location
Things to consider before you mount the devices:
- The rain gauge should be cleaned once per year, and batteries must be replaced once every two years. Ensure, therefore, that the sensors are mounted in easily accessible locations.
- Ensure that the rain gauge and anemometer are not obstructed by any nearby trees or buildings. The general rule is to mount the sensors at a distance that is at least 4 times the height of nearby obstructions – e.g. if a building is 6 m high, the sensors should be mounted (4 × 6 =) 24 m away.
- Avoid radiated heat from nearby buildings, roofs, etc. Generally speaking, temperature sensors should be mounted in the shade approx. 1.5 m above the ground.
- Test the sensors in their intended locations before mounting them. The range can be affected by the type of obstacles located between the transmitter and the receiver (e.g. a concrete wall will interfere with the signal more than a plasterboard wall).
- Other wireless equipment using the same frequency band (433 MHz) can also have a negative impact on the transmission range.
In the event of transmission range problems, try the following:
- Turn off any other existing wireless equipment to check whether this is the cause of the problem.
- Shorten the distance between the sensors and the indoor unit, and reduce the number of obstacles (walls, items of furniture, etc.) between the devices.
Indoor unit
- The indoor unit has integrated sensors for temperature, humidity and air pressure. Be sure, therefore, to place the unit so that it is not located close to heaters, cookers, or other heat sources.
- Avoid placing the unit next to metal objects (such as metal window frames) as this may interfere with the radio reception.
The weather station can be used with its table stand or mounted on a wall using its eyelet.
Anemometer
- Localise the marking on the underside of the anemometer. Ensure that the S marking is aligned so that it faces south.

natural_image
3D rendered mechanical component with labeled parts, no visible text or symbols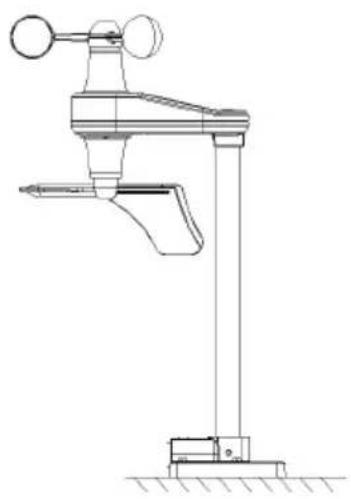
natural_image
Technical line drawing of a weathering instrument with tripod and support structure (no text or symbols)
natural_image
Technical line drawing of a mechanical device with lever and support bracket (no text or symbols)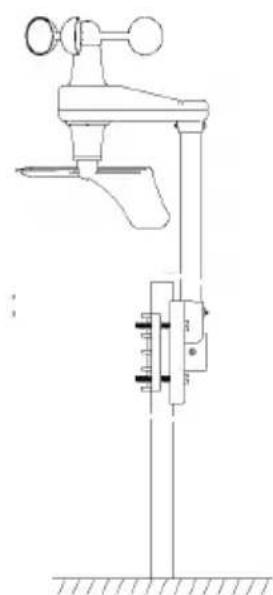
natural_image
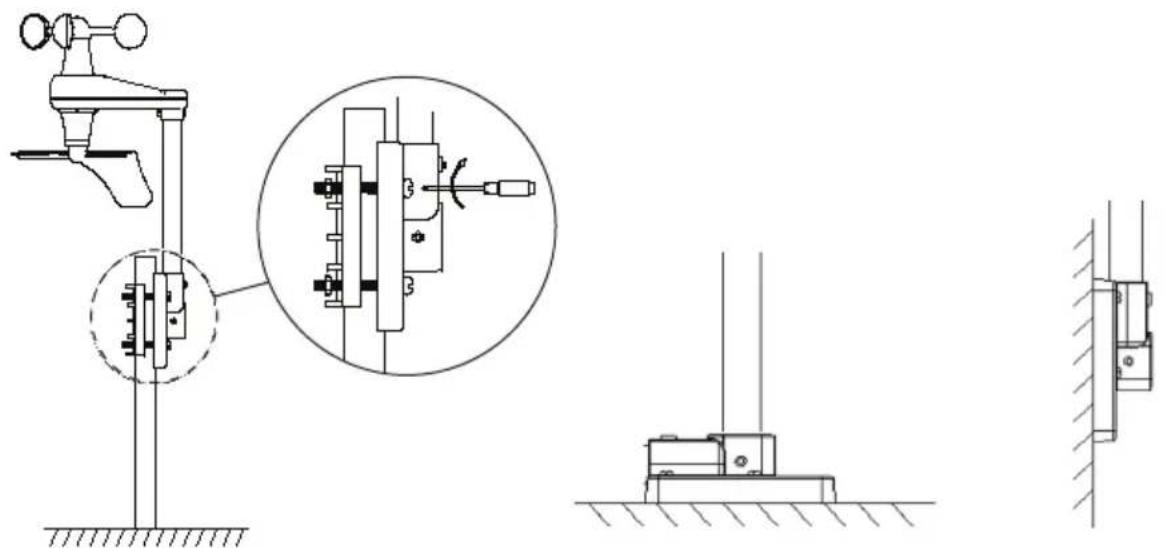
Technical line drawing of a mechanical clamp or support structure with no visible text or symbols- Decide whether you want to mount the anemometer with the mounting attachment horizontally, vertically or onto a mast.
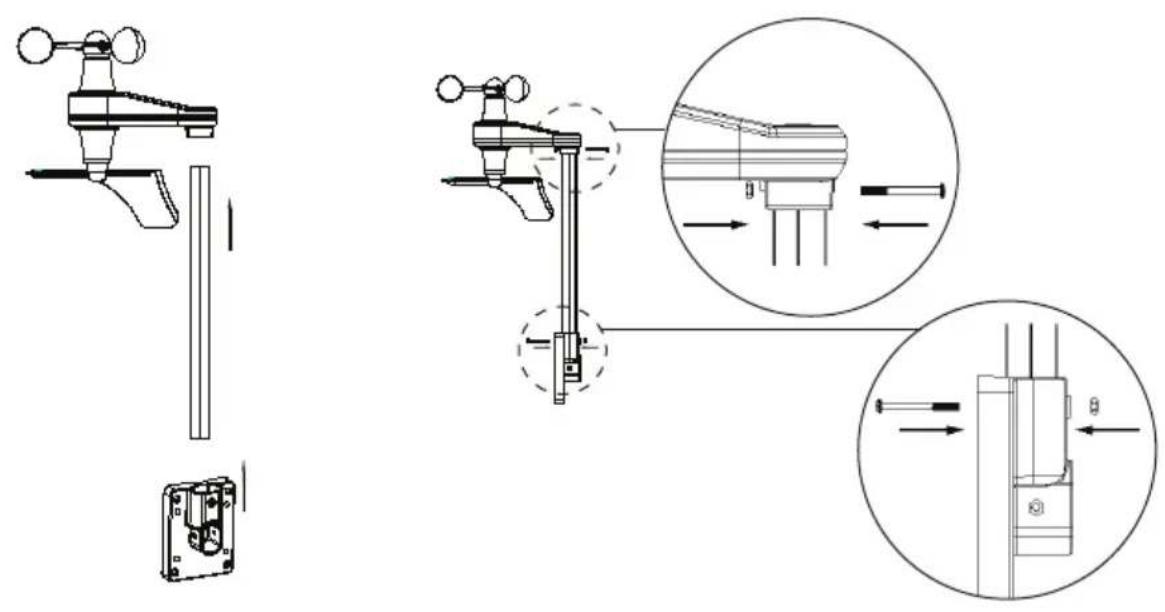
- Push the anemometer, arm and mounting attachment together, and secure them into place using the screw and nut (M3).
natural_image
Technical line drawing of mechanical assembly components including a vertical support, close-up view of a mechanical component, and a mounted base (no text or symbols)- If mounting onto a mast, use screw and nut (M5) to secure the mounting attachment with the mounting plate to the tube of the mast.
For horizontal or vertical mounting, use a method of attachment that is appropriate for the surface in question.
Rain gauge
- Remove the water collector from the rain gauge.

natural_image
Technical line drawing showing hands operating a mechanical component with an upward arrow (no text or symbols)
natural_image
Technical line drawing of a mechanical assembly with no visible text or symbols
natural_image
Technical line drawing of a mechanical assembly or enclosure with no visible text or symbols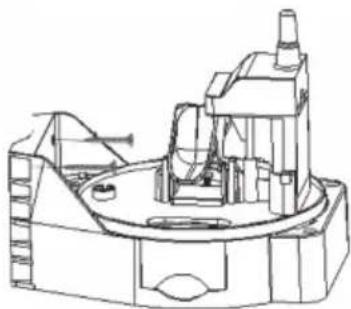
natural_image
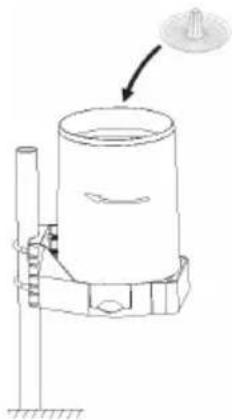
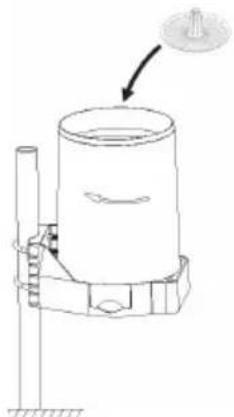
Technical line drawing of a mechanical assembly or enclosure with no visible text or symbols- If mounting onto a mast, use the pipe clamp, washer and nut (M5).
For horizontal or vertical mounting, use a method of attachment that is appropriate for the surface in question.
- Replace the water collector and lock it into place by twisting it in the direction indicated by the arrow. Insert the filter into the water collector.
natural_image
Technical line drawing of a mechanical device with a cylindrical component and a pointer indicating direction (no text or symbols)Thermometer/hygrometer
- Place the sensor in a location that is protected from direct sunlight and rain.
- Mount the sensor at least 1.5 m above the ground.
Fasten a screw to the wall and hang up the sensor using its hanging hole.

natural_image
Diagram showing a device with a left-side arrow pointing to a vertical wall, no text or symbols presentSoftware (WeatherHome)
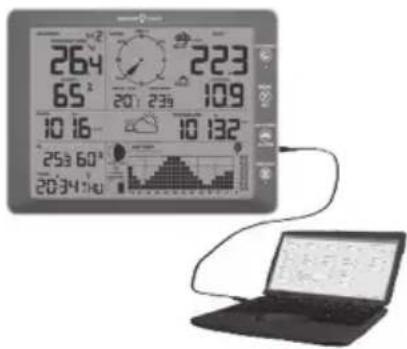
The WeatherHome software allows you to use a computer to (e.g.) view measurement data in real time, adjust settings for the indoor unit, set alarms, and reset max/min values.
System requirements
Computer PC with CD drive and USB port
Operating system Windows NT4 (Service Pack >= 6a), Windows 2000,
Windows XP, Windows Vista, Windows 7–10
Processor Pentium III 500 MHz or higher
Memory at least 128 MB, recommended 256 MB
Installation
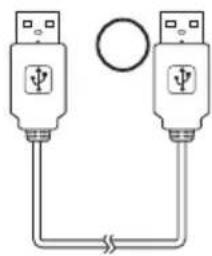
- Use the provided USB cable to connect the computer to the USB port on the indoor unit.
- Make sure that you have administrator rights for your operating system.
- Insert the provided CD into your computer's CD drive. If the installation program does not start automatically: open the file manager (explorer), localise the CD, and run WeatherHome.exe.
- Follow the instructions in the program to install WeatherHome.
Instructions for use
Open the WeatherHome program.
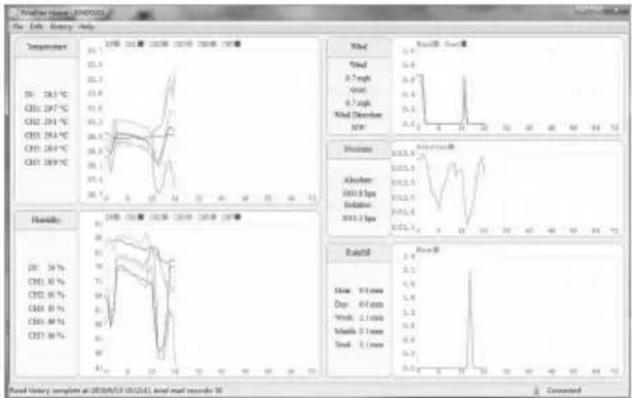
- The main page shows the current measurement values and histograms.
• Show or hide graphs by clicking on the titles above the graphs.
line
Analog Hump Analysis | Metric | Value | | :--- | :--- | | Temperature (°C) | 28.3 | | Humidity (%) | 34 | | Wind Speed (m/s) | 7.6 | | Rainfall (mm) | 0.1 | | Wind Speed (km/h) | 0.5 | | Rainfall (mm) | 0.3 | | Wind Speed (km/h) | 0.7 | | Rainfall (km/h) | 0.2 | | Wind Speed (km/h) | 0.4 | | Rainfall (km/h) | 0.6 | | Wind Speed (km/h) | 0.9 | | Rainfall (km/h) | 0.7 | | Wind Speed (km/h) | 1.1 | | Rainfall (km/h) | 0.8 | | Wind Speed (km/h) | 0.6 | | Rainfall (km/h) | 0.5 | | Wind Speed (km/h) | 0.7 | | Rainfall (km/h) | 0.9 | | Wind Speed (km/h) | 1.0 | | Rainfall (km/h) | 0.8 | | Wind Speed (km/h) | 0.6 | | Rainfall (km/h) | 0.5 | | Wind Speed (km/h) | 0.7 | | Rainfall (km/h) | 0.8 | | Wind Speed (km/h) | 0.9 | | Rainfall (km/h) | 1.0 | | Wind Speed (km/h) | 0.8 | | Rainfall (km/h) | 0.6 | | Wind Speed (km/h) | 0.7 | | Rainfall (km/h) | 0.8 | | Wind Speed (km/h) | 0.9 | | Rainfall (km/h) | 1.0 | | Wind Speed (km/h) | 0.8 | | Rainfall (km/h) | 0.6 | | Wind Speed (km/h) | 0.7 | | Rainfall (km/h) }Menu
File Exit Exit WeatherHome.
Edit Setting Set units of measurement, background lighting, display of measurement data, date format, etc.
Alarm Activate/deactivate the alarm. Set alarm thresholds.
Max/min Read historical maximum/minimum values.
Language Set the language.
History View Analysis and export of recorded measurement data (.csv or .pdf).
History manage Clear the PC database and the memory of the indoor unit.
Help About WeatherHome Show the installed software version.
Settings
This window shows the current settings for the indoor unit. Here you can easily change the settings for how measurement data is to be presented on the weather station's display. Make any desired changes and then click on [Save] to implement the change, or [Cancel] to leave without saving.

Unit Set units of measurement.
Display Display settings for Time and Date, Graphs, Pressure, Rainfall periods, etc., and options for the rolling display of external temperature/humidity sensors (Channel Circle).
Backlight Turn the background lighting on or off (Auto). Set the brightness of the lighting (Bright). Select whether the colour should be fixed or if it should change to reflect the current outdoor/indoor temperature (Color By). Set the colour scale (Color Index, Indoor Temperature/Outdoor Temperature) – see the Settings/adjustments section.
Forecast Adjust the threshold values for weather forecasts and storm warnings (see the Settings/adjustments section).
Record Interval Install the interval for recordings.
Max/Min Select whether the weather station's max/min values are to be reset automatically at the end of each day (Daily) or if they are to be reset manually (History).
Buzzer Select whether the sound (for key presses and alarms) shall be on or off.
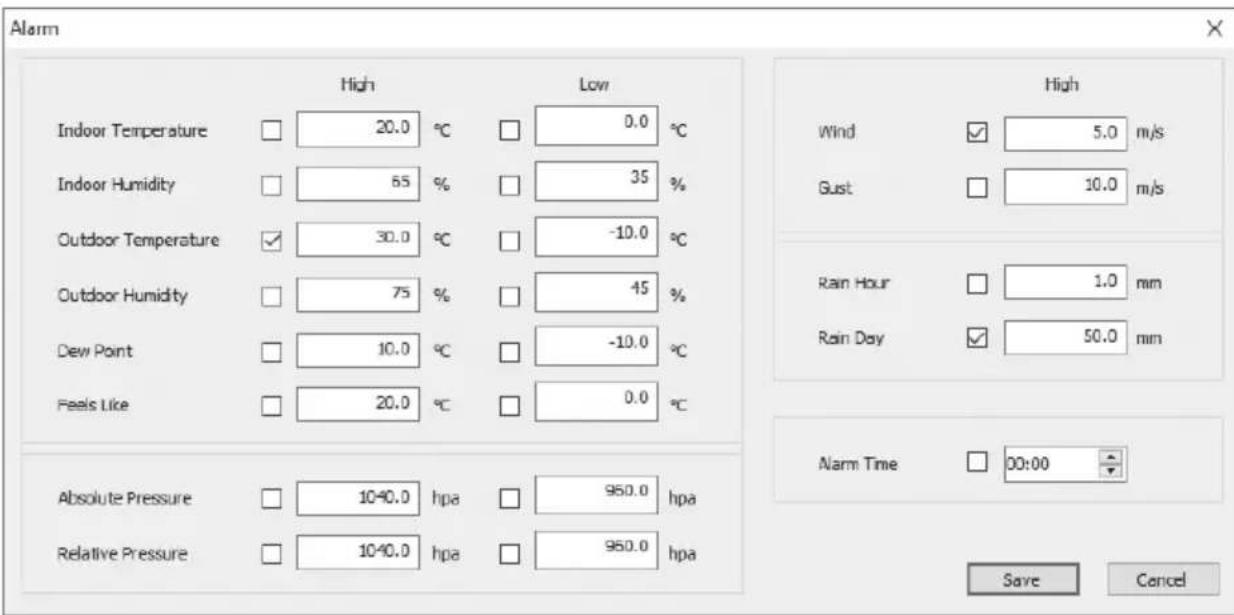
Set the alarm (Alarm)

Set the alarm thresholds and activate/deactivate alarms. Make any desired changes and then click on [ Save ] to implement the change, or [ Cancel ] to leave without saving. In the example shown, the indoor unit will emit an alarm if the outdoor temperature exceeds 30 °C, if the average wind speed exceeds 5 m/s, or if the precipitation during one daily period exceeds 50 mm.
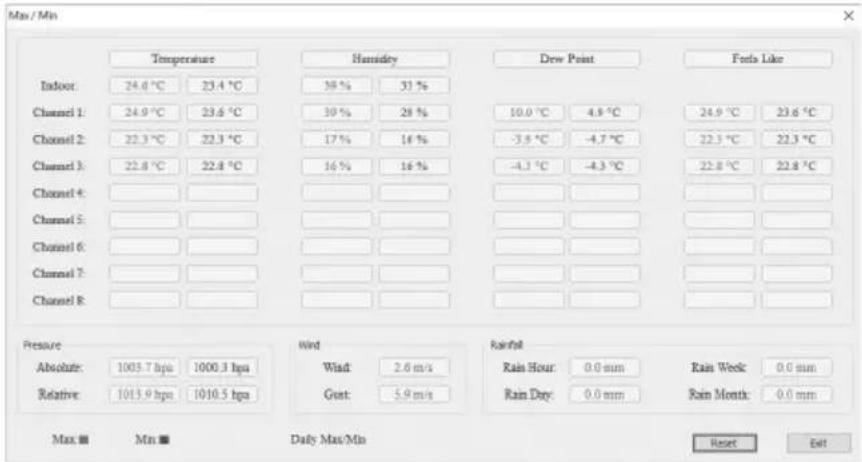
Highest and lowest recorded measurement values (Max/Min)
The highest values are marked in red, and the lowest are marked in blue.
- Click [Reset] to reset the values.
- Click [Exit] to close the window.
(i) Note:
When resetting maximum/minimum values, the stored values for all sensors will also be reset.
Show recorded weather data (View)
When the indoor unit is connected to a computer and WeatherHome is running, the contents of the unit's internal memory is saved in the program's database.

- To view the weather data for a selected period:
- Set the start date and time.
- Set the end date and time.
-
Click [Update] to retrieve the data from the database.
-
In the drop-down menu (Chart), select which type of data is to be displayed: temperature, humidity, air pressure, wind or rain.
• Show/hide graphs by selecting/deselecting the fields for each category. - Choose whether you wish to display the data as graphs and/or lists by selecting [List], [Chart], [List/Chart] or [Chart/List].
- Graph analysis:
- Select the section of the graph to be enlarged by clicking and holding the left-hand mouse button and dragging the selection field diagonally down to the right.
- Scroll through the graph by clicking and holding the right-hand mouse button and moving the mouse sideways.
- Return to the full view by clicking and holding the left-hand mouse button and dragging diagonally up to the left.
- Export the data as a .pdf or.csv (comma-separated values, for viewing in (e.g.) Excel):
- Click [Export].
- Select your preferred file type and designate the location of where the file is to be saved. Click [ Save ].
- Click [ Exit ] to close the window.
Clear the database and the indoor unit's memory (History Manage)
Select History/History Manage from the menu.
If you wish to save the database before it is cleared:
-
Localise the WeatherHome.mdb database (e.g. in Windows 10, it will be found in the folder "C:\ProgramData\WeatherHome").
-
Copy the database to another folder and/or rename it (e.g. as “January 2018.mdb”).

- Clear the database by clicking [ Clear ] under Database.
- Clear the indoor unit's memory by clicking [Clear] under Device.
Care and maintenance
- Clean the product using a damp cloth. Use only mild cleaning agents, never solvents or corrosive chemicals.
- Remove the batteries if the weather station is not to be used for a long time. Old batteries can begin to leak and damage the product.
- Check and clean the rain gauge once every 3 months.
Troubleshooting guide
| The wireless sensors are not transmitting any data to the indoor unit.The display shows “--.-”. | When the indoor unit loses contact with a sensor, either “--.-” or “--” is shown on the display.To search for sensors: Press and hold [ CHANNEL/+ ] for 3 seconds. Press [ CHANNEL/+ ] or [ HISTORY/– ] and select the sensor that is to be reconnected. Confirm your selection by pressing [ MODE/SET ]. The symbol appears while the search is taking place. When the sensor has been found, the symbol disappears and the value appears on the display.Check the distance between the sensors and the indoor unit. This distance should normally be between 1.5 m and 30 m.Try placing the sensors higher up.Check that the sensors’ displays are working/LED indicators are flashing (once every 60 seconds).Insert new batteries into the sensors. In areas with a cold climate, lithium batteries are recommended.Check that the batteries in the indoor unit are not flat. Even if the indoor unit is being powered by mains electricity, flat batteries can also cause problems when it tries to find the sensors.Check that the radio signal is not subject to interference from nearby metal constructions, etc.Move the indoor unit away from other electronic devices, such as routers, computers and televisions. |
| The temperature sensor shows daytime values that are too high. | Check that the thermometer/hygrometer is mounted in a location that is shaded from the sun. If possible, mount the sensor in a north-facing direction. |
| The indoor and outdoor sensors show different values. | Allow the sensors to stabilise for up to 1 hour.The temperature values should be within 1 °C (accuracy ±0.5 °C) and the humidity values should be within 6 % (accuracy ±3 %).Where necessary, adjust the sensors in the indoor unit (see the Calibration section). |
| The contrast of the display is poor. | Replace the batteries in the unit. |
| The background lighting does not change colour as expected. | Check the settings (see the Settings/adjustments section).If the background lighting is to reflect the outdoor temperature, ensure that the outdoor sensor is set to channel 1. |
| The display indicates precipitation although it is not raining. | Make sure the rain gauge is mounted in a stable manner.If the gauge is not properly fitted (e.g. attached to an unsteady mast), the sensor can transmit incorrect values. |
Responsible disposal
This symbol indicates that this product should not be disposed of with general household waste. This applies throughout the entire EU. In order to prevent any harm to the environment or health hazards caused by incorrect waste disposal, the product must be handed in for recycling so that the material can be disposed of in a responsible manner. When recycling the product, take it to your local collection facility or contact the place of purchase. They will ensure that the product is disposed of in an environmentally sound manner.

natural_image
Symbol of a trash bin with no text or labels, crossed by two crossed lines and a solid rectangle below (no text or symbols present)Specifications
Sensor data
| Sensor unit Measuring range | Accuracy Resolution | ||
| Indoor temperature 0–60 °C ±0.5 °C 0.1 °C | |||
| Outdoor temperature –40 to 60 °C ±0.5 °C 0.1 °C | |||
| Indoor humidity 10–99 % ±3 % (between 20-90 %) 1 % | |||
| Outdoor humidity 10–99 % ±3 % (between 20-90 %) 1 % | |||
| Rain 0–9999 mm <15 mm: ±1 mm | 15–9999 mm: ±7 % | <1000 mm (0.3 mm) >1000 mm (1 mm) | |
| Wind direction 0–360° | 8-point compass | 45° | |
| Wind speed | 0–50 m/s | 2–10 m/s: ±3 m/s10–50 m/s: ±10 % | 0.1 m/s |
| Air pressure | 300–1100 hPa | ±3 hPa | 0.1 hPa |
Wireless transfer
Frequency range 433 MHz
Transmission range, open field 100 m
Update interval
Thermometer/hygrometer Every 60 seconds
Rain gauge Every 60 seconds
Anemometer Every 16 seconds
Batteries
Indoor unit: 3 × LR03/AAA
Thermometer/hygrometer: 2 × LR03/AAA
Rain gauge: 4 × LR03/AAA
Anemometer: 4 × LR03/AAA
Operating time – indoor unit Approx. 12 months
Operating time – sensor Approx. 12 months (weather-depending)
Mains adapter
In 100–240 V AC, 50/60 Hz
Out 5.9 V, 500 mA

Dimensions
Indoor unit 157 × 210 × 26 mm
Thermometer/hygrometer 45 × 110 × 21 mm
Rain gauge 170 × 140 × 207 mm
Anemometer 200 × 128 × 205 mm
natural_image
Line drawing of a weather instrument with fan, drum, and tripod (no text or symbols)
natural_image
Technical line drawing of a cylindrical mechanical component with flanges and a base (no text or symbols)
natural_image
Simple line drawing of a vertical cylindrical object with a numbered circle on top (no text or symbols)
natural_image
Technical line drawing of a mechanical housing component (no text or symbols)
natural_image
Technical line drawing of a mechanical component with internal channels and mounting holes (no text or symbols)
natural_image
Simple line drawing of a wheel with spokes and a central shaft, no text or symbols present
natural_image
Pure electrical circuit lines without any symbols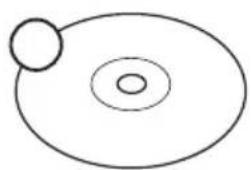
natural_image
Simple diagram with two concentric ovals and a small circle, no text or symbols presentnatural_image
Technical line drawing of a mechanical device with three ports and a central knob (no text or symbols)
natural_image
Technical line drawing of a mechanical device with no visible text or symbolsnatural_image
Line drawing of hands operating a cylindrical device with a curved arrow indicating motion (no text or symbols)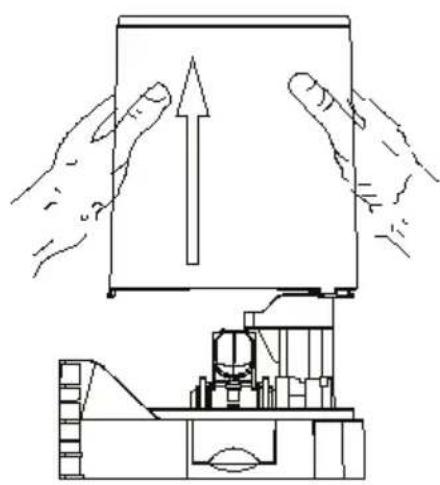
natural_image
Technical line drawing showing hands operating a device with an upward arrow, alongside a mechanical assembly (no text or symbols)natural_image
Technical line drawing of a mechanical assembly with no visible text or symbols
natural_image
Technical diagram of a circular device with a central screen and an arrow pointing to it, surrounded by circuit-like components (no text or symbols)natural_image
Line drawing of a car electrical plug inserted into a wall socket, with no text or symbols present.natural_image
Simple line drawings of sun, moon, clouds, and rain symbols (no text or labels)natural_image
3D rendered mechanical component with labeled parts, no visible text or symbols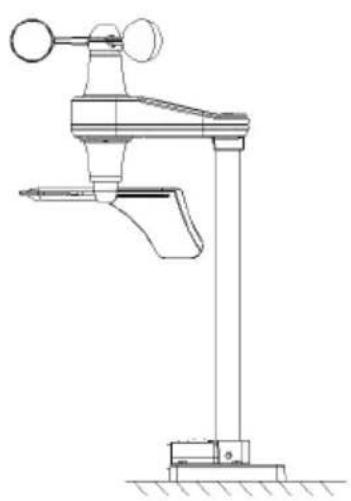
natural_image
Technical line drawing of a mechanical device with lever and base mount (no text or symbols)
natural_image
Technical line drawing of a mechanical lever or support structure with no visible text or symbols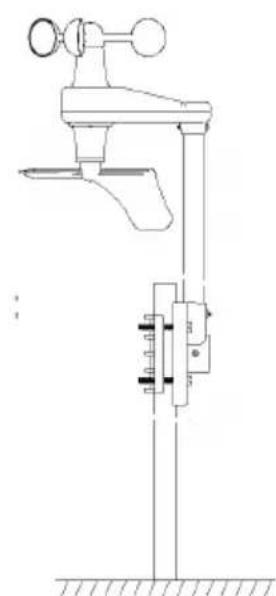
natural_image
Technical line drawing of a mechanical device with no visible text or symbolsnatural_image
Technical line drawing showing hands operating a mechanical component with an upward arrow (no text or symbols)
natural_image
Technical line drawing of a mechanical assembly with no visible text or symbols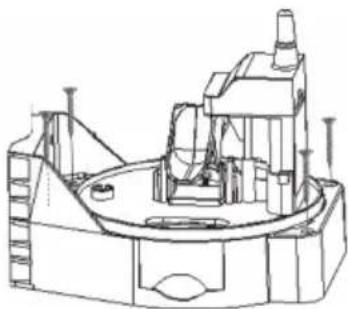
natural_image
Technical line drawing of a mechanical assembly or enclosure with no visible text or symbols
natural_image
Technical line drawing of a mechanical assembly (no text or symbols)natural_image
Technical line drawing of a cylindrical device with an arrow indicating direction (no text or symbols)Termometer/hygrometer
natural_image
Diagram showing a device with a left-side arrow pointing to a vertical wall, no text or symbols presentProgramvara (Weather Home)
line
| Metric | Time (s) | Value | | :--- | :--- | :--- | | Wind Speed | 0.7 mg/h | 3.7 | | Airflow Rate | 0.7 mg/h | 3.7 | | Absorption (100% lpa) | 3.2-3.5 | 3.2-3.5 | | Rainfall | 0.4 mm | 0.4 | | Day: 0.6 min | 0.6 | 0.6 | | Week: 2.1 min | 1.2 | 1.2 | | Week: 2.1 mm | 1.1 | 1.1 | | Week: 0.2 | 0.8 | 0.8 | | Week: 0.2 mm | 0.7 | 0.7 | | Week: 0.2 mm + Week: 0.2 mm + Week: 0.2 mm + Week: 0.2 mm + Week: 0.2 mm + Week: 0.2 mm + Week: 0.2 mm + Week: 0.2 mm + Week: 0.2 mm + Week: 0.2 mm + Week: 0.2 mm + Week: 0.2 mm + Week: 0.2 mm + Week: 1.1 mm + Week: 1.1 mm + Week: 1.1 mm + Week: 1.1 mm + Week: 1.1 mm + Week: 1.1 mm + Week: 1.1 mm + Week: 1.1 mm + Week: 1.1 mm + Week: 1.1 mm + Week: 1.1 mm + Week: 1.1 mm + Week: 1.1 mm + Week : 1.1 mm + Week : 1.1 mm + Week : 1.1 mm + Week : 1.1 mm + Week : 1.1 mm + Week : 1.1 mm + Week : 1.1 mm + Week : 1.1 mm + Week : 1.1 mm + Week : 1.1 mm + Week : 1.1 mm + Week : 1.1 mm + Week : 1.2 mm + Week : 1.2 mm + Week : 1.2 mm + Week : 1.2 mm + Week : 1.2 mm + Week : 1.2 mm + Week : 1.2 mm + Week : 1.2 mm + Week : 1.2 mm + Week : 1.2 mm + Week : 1.2 mm + Week : 1.2 mm + Week : 1.2 mm + Week: 1.2 mm + Week: 1.2 mm + Week: 1.2 mm + Week: 1.2 mm + Week: 1.2 mm + Week: 1.2 mm + Week: 1.2 mm + Week: 1.2 mm + Week: 1.2 mm + Week: 1.2 mm + Week: 1.2 mm + Week: 1.2 mm + Week: 1.3 mm + Week : 1.3 mm + Week : 1.3 mm + Week : 1.3 mm + Week : 1.3 mm + Week : 1.3 mm + Week : 1.3 mm + Week : 1.3 mm + Week : 1.3 mm + Week : 1.3 mm + Week : 1.3 mm + Week : 1.3 mm + Week : 1.3 mm + Week : 1.4 mm + Week : 1.4 mm + Week : 1.4 mm + Week : 1.4 mm + Week : 1.4 mm + Week : 1.4 mm + Week : 1.4 mm + Week : 1.4 mm + Week : 1.4 mm + Week : 1.4 mm + Week : 1.4 mm + Week : 1.4 mm + Week : 1.4 mm + Week: 1.5 mm /Week : -0.8 |Meny
File Exit Avsluta Weather Home.
natural_image
Symbol of a trash bin crossed with a diagonal line, no text or numbers presentSpecifikationer
Givardata
| Givare Mätområde Noggrannhet Upplösning | |||
| Temperatur inomhus 0–60 °C ±0,5 °C 0,1 °C | |||
| Temperatur utomhus –40 till 60 °C ±0,5 °C 0,1 °C | |||
| Luftfuktighet inomhus 10–99 % ±3 % (mellan 20–90 %) 1 % | |||
| Luftfuktighet utomhus 10–99 % ±3 % (mellan 20–90 %) 1 % | |||
| Regn 0–9999 mm <15 mm: ±1 mm | 15–9999 mm: ±7 % | <1000 mm (0,3 mm)>1000 mm (1 mm) | |
| Vindriktning | 0–360 ° | 8-stegs kompass | 45° |
| Vindhastighet | 0–50 m/s | 2–10 m/s: ±3 m/s10–50 m/s: ±10 % | 0,1 m/s |
| Lufttryck | 300–1100 hpa | ±3 hpa | 0,1 hpa |
Trådlös överföring
Frekvensområde 433 MHz
In 100–240 V AC, 50/60 Hz
Ut 5,9 V, 500 mA

Mått
Inomhusenhet 157 × 210 × 26 mm
Termometer/hygrometer 45 × 110 × 21 mm
Regngivare 170 × 140 × 207 mm
Vindgivare 200 × 128 × 205 mm
natural_image
Line drawing of a weather instrument with fan, drum, and tripod (no text or symbols)
natural_image
Technical line drawing of a cylindrical mechanical component with flanges and a base (no text or symbols)
natural_image
Simple line drawing of a vertical cylindrical object with a numbered circle on top (no text or symbols)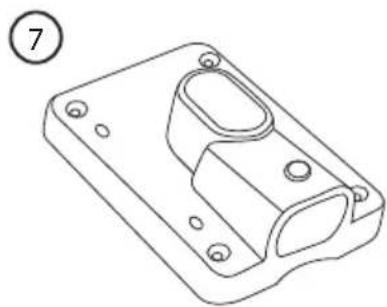
natural_image
Technical line drawing of a mechanical housing component (no text or symbols)
natural_image
Technical line drawing of a mechanical component with internal channels and mounting holes (no text or symbols)
natural_image
Simple line drawing of a wheel with spokes and a central shaft, no text or symbols present

natural_image
Diagram of two USB devices connected in a circuit with a circular connector (no text or symbols)
natural_image
Simple diagram with two concentric ovals and a small circle, no text or symbols presentnatural_image
Technical line drawings of a mechanical device with two views (top and side), no visible text or symbolsnatural_image
Line drawing of hands operating a cylindrical device with a curved arrow indicating motion (no text or symbols)
natural_image
Technical line drawing showing hands operating a device with an upward arrow, alongside a mechanical assembly (no text or symbols)natural_image
Technical line drawing of a mechanical assembly with no visible text or symbols
natural_image
Line drawing of a car electrical plug inserted into a wall socket, with no text or symbols present.m/s, km/h, knots, mph eller btf (Beaufort-gradering)
natural_image
Simple line drawings of five weather and nature symbols: sun, moon, sun, cloud, cloud with rain, and cloud with wind (no text or labels)Sol Stjerner/måne Delvis overskyet Overskyet Regn
Om natten (mellom 19.00 og 07.00) vises Stjerner/måne-symbolet istedenfor Sol.
Månefaser
natural_image
3D rendered mechanical component with labeled parts, no visible text or symbols
natural_image
Technical line drawing of a weathering instrument with tripod and support structure (no text or symbols)
natural_image
Technical line drawing of a mechanical device with lever and support structure (no text or symbols)
natural_image
Technical line drawing of a mechanical clamp or lever assembly (no text or symbols)natural_image
Technical line drawing of mechanical assembly components including a clamp, gear mechanism, and vertical supports (no text or symbols)natural_image
Technical line drawing of a mechanical assembly with a vertical shaft and curved components (no text or symbols)natural_image
Technical line drawing showing hands operating a mechanical component with an upward arrow (no text or symbols)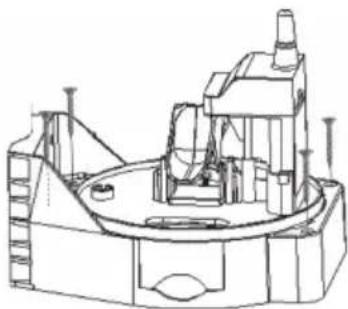
natural_image
Technical line drawing of a mechanical assembly or enclosure with no visible text or symbols
natural_image
Technical line drawing of a mechanical assembly or enclosure (no text or symbols visible)Ved horisontal eller vertikal montering må du bruke egnet festemetode for underlaget.
natural_image
Technical line drawing of a cylindrical device with an arrow pointing to it, no text or symbols present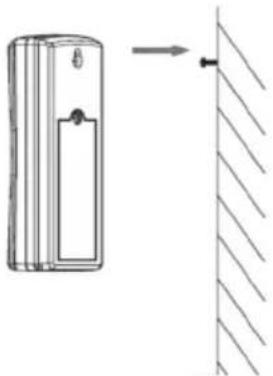
natural_image
Simple line drawing of a door with a handle and an arrow pointing to a vertical wall (no text or symbols)Programvare (Weather Home)
Innstillinger (Settings)
Stille inn alarm (Alarm)
natural_image
Symbol of a trash bin crossed with no visible text or labelsSpesifikasjoner
Sensordata
| Sensor Måleområde Nøyaktighet Oppløsning | |||
| Temperatur innendørs 0-60 °C ±0,5 °C | 0,1 °C | ||
| Temperatur utendørs -40 til 60 °C ±0,5 °C | 0,1 °C | ||
| Luftfuktighet innendørs 10-99 % ±3 % (20-90 %) 1 % | |||
| Luftfuktighet utendørs 10-99 % ±3 % (20-90 %) 1 % | |||
| Regn 0-9999 mm <15 mm: ±1 mm | 15-9999 mm: ±7 % | <1000 mm (0,3 mm)>1000 mm (1 mm) | |
| Vindretning | 0-360° | Åttetrinns kompass 45° | |
| Vindhastighet | 0-50 m/s | 2-10 m/s: ±3 m/s10-50 m/s: ±10 % | 0,1 m/s |
| Lufttrykk | 300-1100 hPa | ±3 hPa | 0,1 hPa |
Trådløs overføring
Frekvensområde 433 MHz
Inne-enhet 3 × LR03/AAA
Termometer/hygrometer 2 × LR03/AAA
Regnsensor 4 × LR03/AAA
Vindsensor 4 × LR03/AAA
Driftstid, inne-enhet Ca. 12 måneder
Driftstid, sensor Ca. 12 måneder (avhengig av været)
Strømadapter
In 100–240 V AC, 50/60 Hz
Ut 5,9 V, 500 mA

Mål
Inne-enhet 157 × 210 × 26 mm
Termometer/hygrometer 45 × 110 × 21 mm
Regnsensor 170 × 140 × 207 mm
Vindsensor 200 × 128 × 205 mm

natural_image
Line drawing of a weather instrument with fan, drum, and tripod (no text or symbols)
natural_image
Technical line drawing of a cylindrical mechanical component with flanges and a base (no text or symbols)
natural_image
Simple line drawing of a vertical cylindrical object with a numbered circle on top (no text or symbols)
natural_image
Technical line drawing of a mechanical housing component (no text or symbols)
natural_image
Technical line drawing of a mechanical component with internal channels and mounting holes (no text or symbols)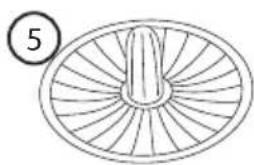
natural_image
Simple line drawing of a wheel with spokes and a central shaft, no text or symbols present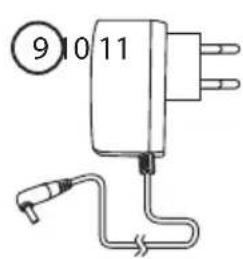

natural_image
Diagram of two USB devices connected in a circuit with a circular connector (no text or symbols)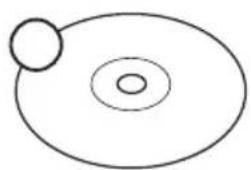
natural_image
Simple diagram with two concentric ovals and a small circle, no text or symbols presentnatural_image
Line drawing of hands operating a cylindrical container with an arrow indicating direction (no text or symbols)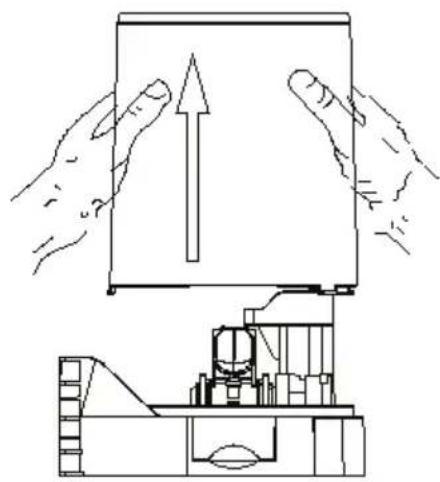
natural_image
Technical line drawing showing hands operating a device with an upward arrow, alongside a mechanical assembly (no text or symbols)natural_image
Technical line drawing of a mechanical assembly with no visible text or symbols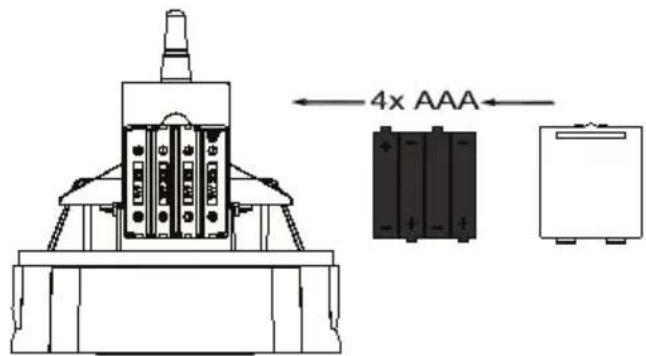
* OFF = alas, ON = ylös, DIP 4 = Alas = Farenheit, Ylös = Centigrade
natural_image
Technical diagram of a mechanical or electrical component with no visible text, numbers, or symbols.natural_image
Line drawing of a car electrical plug and outlet with a directional arrow (no text or symbols)natural_image
3D rendered mechanical component with labeled parts, no visible text or symbols
natural_image
Technical line drawing of a mechanical device with no visible text or symbols
natural_image
Technical line drawing of a mechanical device with lever and base mount (no text or symbols)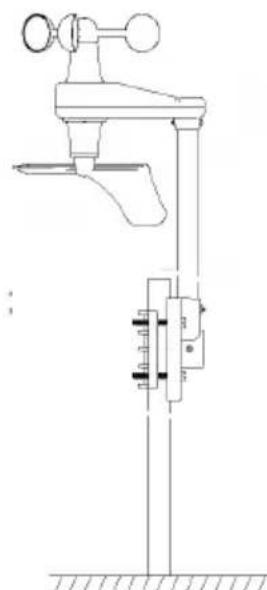
natural_image
Technical line drawing of a mechanical device with no visible text or symbolsnatural_image
Technical line drawing of a mechanical clamp and bracket assembly (no text or symbols)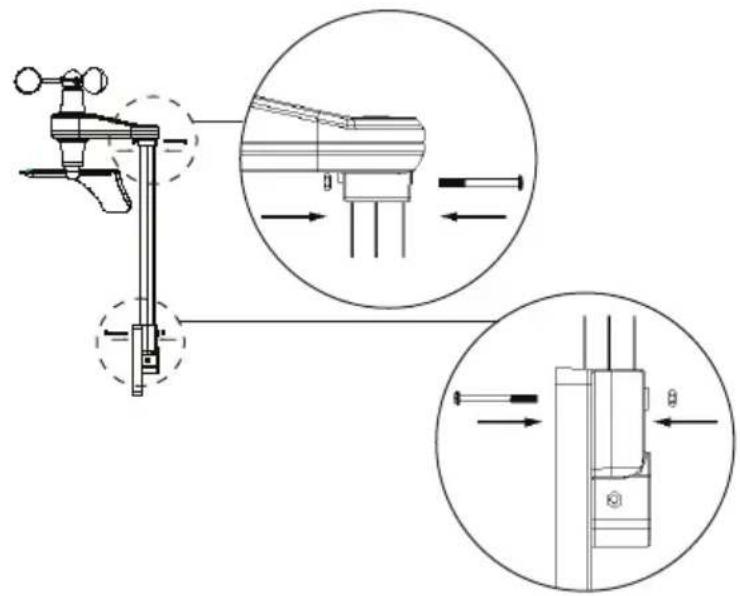
natural_image
Technical diagram of a mechanical clamp and lever assembly with magnified inset showing internal components (no text or labels)
natural_image
Technical line drawing of a mechanical assembly with two views (top and side), no text or symbols present.natural_image
Technical line drawing of a mechanical assembly with a vertical shaft and curved components (no text or symbols)natural_image
Technical line drawing showing hands operating a mechanical component with an upward arrow (no text or symbols)
natural_image
Technical line drawing of a mechanical assembly or enclosure with no visible text or symbols
natural_image
Technical line drawing of a mechanical assembly or enclosure with no visible text or symbolsnatural_image
Technical line drawing of a mechanical device with a cylindrical component and a vertical rod, showing no text or symbols.
natural_image
Diagram showing a device with a left-side arrow pointing to a vertical wall, no text or symbols presentline
Temperature | Temperature (°C) | Wind Speed (m/s) | Absorption (kPa) | Rainfall (mm) | |---|---|---|---| | 28.3 | 0.7 | 3.1 | 0.1 | | 29.7 | 0.6 | 3.1 | 0.1 | | 30.1 | 0.7 | 3.1 | 0.1 | | 30.4 | 0.7 | 3.1 | 0.1 | | 30.7 | 0.7 | 3.1 | 0.1 | | 31.0 | 0.7 | 3.1 | 0.1 | | 31.3 | 0.7 | 3.1 | 0.1 | | 31.6 | 0.7 | 3.1 | 0.1 | | 31.9 | 0.7 | 3.1 | 0.1 | | 32.2 | 0.7 | 3.1 | 0.1 | | 32.5 | 0.7 | 3.1 | 0.1 | | 32.8 | 0.7 | 3.1 | 0.1 | | 33.1 | 0.7 | 3.1 | 0.1 | | 33.4 | 0.7 | 3.1 | 0.1 | | 33.7 | 0.7 | 3.1 | 0.1 | | 34.0 | 0.7 | 3.1 | 0.1 | | 34.3 | 0.7 | 3.1 | 0.1 | | 34.6 | 0.7 | 3.1 | 0.1 | | 34.9 | 0.7 | 3.1 | 0.1 | | 35.2 | 0.7 | 3.1 | 0.1 | | 35.5 | 0.7 | 3.1 | 0.1 | | 35.8 | 0.7 | 3.1 | 0.1 | | 36.1 | 0.7 | 3.1 | 0.1 | | 36.4 | 0.7 | 3.1 | 0.1 | | 36.7 | 0.7 | 3.1 | 0.1 | | 37.0 | 0.7 | 3.1 | 0.1 | | ... (repeated) | ... (repeated) | ... (repeated) | ... (repeated) | The chart displays the seasonal variation of meteorological temperatures and humidity in days over time (from January to December). The temperature values are shown on the left y-axis, while the humidity values are shown on the right y-axis and the rainfall values are shown on the bottom y-axis and the right y-axis.Valikko
File Exit Sammuta Weather Home -sovellus.
natural_image
Symbol of a waste bin with crossed lines indicating no waste, and a solid black rectangle below (no text or labels)Tekniset tiedot
Anturitiedot
In 100–240 V AC, 50/60 Hz
Out 5,9 V, 500 mA
Mitat
natural_image
Line drawing of a weather instrument with fan, drum, and tripod (no text or symbols)
natural_image
Technical line drawing of a cylindrical mechanical component with flanges and a base (no text or symbols)
natural_image
Simple line drawing of a vertical cylindrical object with a numbered circle on top (no text or symbols)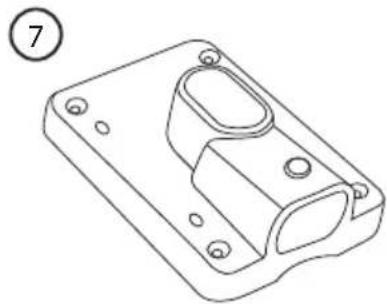
natural_image
Technical line drawing of a mechanical housing component (no text or symbols)
natural_image
Technical line drawing of a mechanical component with internal channels and mounting holes (no text or symbols)
natural_image
Simple line drawing of a wheel with spokes and a central hub, no text or symbols present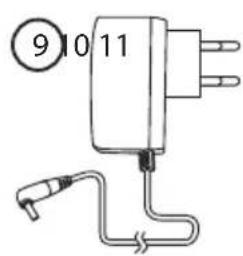

natural_image
Diagram of two USB devices connected in a circuit with a circular connector (no text or symbols)
natural_image
Simple diagram with two concentric ovals and a small circle, no text or symbols presentnatural_image
Technical line drawings of a mechanical device with two views (top and side), no text or symbols present.natural_image
Line drawing of hands operating a cylindrical container with an arrow indicating direction (no text or symbols)
natural_image
Technical line drawing showing hands operating a device with an upward arrow, alongside a mechanical assembly (no text or symbols)natural_image
Technical line drawing of a mechanical assembly with no visible text or symbols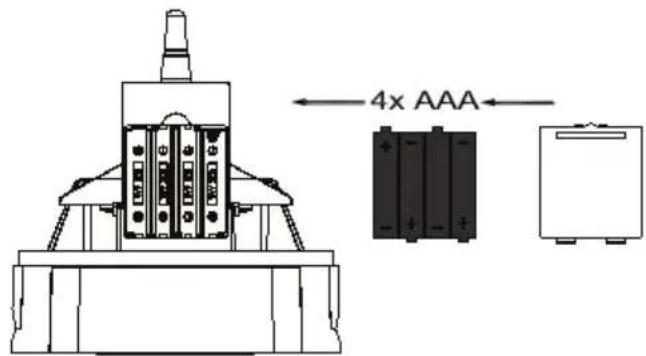
Innengerät

Hinweis:
natural_image
Line drawing of a car electrical plug inserted into a wall socket, with no text or symbols present.natural_image
Simple line drawings of sun, moon, clouds, and rain symbols (no text or labels)natural_image
3D rendered mechanical component with labeled parts, no visible text or symbols
natural_image
Technical line drawing of a weather gauge mounted on a stand (no text or symbols)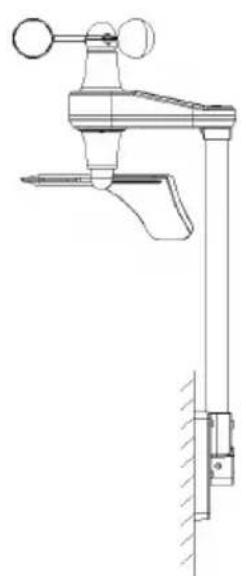
natural_image
Technical line drawing of a mechanical clamp or lever assembly (no text or symbols)
natural_image
Technical line drawing of a mechanical clamp or lever assembly (no text or symbols)natural_image
Technical line drawing of mechanical assembly components including a clamp, gear mechanism, and vertical supports (no text or symbols)natural_image
Technical line drawing showing hands operating a mechanical device with an upward arrow (no text or symbols)
natural_image
Technical line drawing of a mechanical assembly with a vertical shaft and curved components (no text or symbols)
natural_image
Technical line drawing of a mechanical assembly or housing (no text or symbols visible)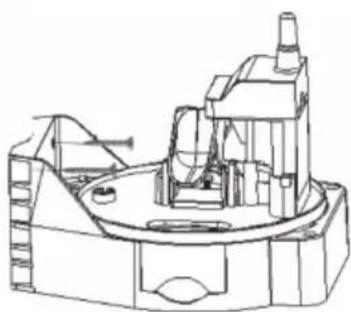
natural_image
Technical line drawing of a mechanical assembly or housing (no text or symbols visible)natural_image
Technical line drawing of a cylindrical device with a vertical rod and arrow indicating direction (no text or symbols)Thermometer/Hygrometer
natural_image
Diagram showing a device with a left-side arrow pointing to a vertical wall, no text or symbols presentSoftware (Weather Home)
line
| Metric | Value | | :--- | :--- | | Wind | 0.7 | | Wind Speed | 0.7 | | Airflow (km/h) | 100.0 | | Indicate (%) | 100.0 | | Rainfall | 0.3 | | Hour | 0.1 | | Day | 0.4 | | Week | 2.1 | | School | 2.1 | | Turnover | 2.1 | | Time | 0.3 | | Peak | 0.3 | | Peak Rate | 0.3 | | Peak Temperature (°C) | 28.5 | | Peak Wind Speed (m/s) | 0.7 | | Peak Wind Speed (s) | 0.7 | | Peak Wind Speed (s) | 0.7 | | Peak Wind Speed (s) | 0.7 | | Peak Wind Speed (s) | 0.7 | | Peak Wind Speed (s) | 0.7 | | Peak Wind Speed (s) | 0.7 | | Peak Wind Speed (s) | 0.7 | | Peak Wind Speed (s) | 0.7 | | Wind Rate (%) | 36 | | Wind Speed (%) | 36 | | Wind Speed (s) | 36 | | Wind Speed (s) | 36 | | Wind Speed (s) | 36 | | Wind Speed (s) | 36 | | Wind Speed (s) | 36 | | Wind Speed (s) | 36 | | Wind Speed (s) | 36 | | Wind Speed (s) | 36 | | Wind Speed (s) | 36 | | Wind Speed (s) > 36 | 36 | | Wind Speed (s) > 36 | 36 | | Wind Speed (s) > 36 | 36 | | Wind Speed (s) > 36 | 36 | | Wind Speed (s) > 36 | 36 | | Wind Speed (s) > 36 | 36 | | Wind Speed (s) > 36 | 36 | | Wind Speed (t/min) | 36 | | Wind Speed (t/min) | 36 | | Wind Speed (t/min) | 36 | | Wind Speed (t/min) | 36 | | Wind Speed (t/min) | 36 | | Wind Speed (t/min) | 36 | | Wind Speed (t/min) | 36 | | Wind Speed (t/min) | 36 | | Wind Speed (t/min) | 30 | | Wind Speed (t/min) | 30 | | Wind Speed (t/min) | 30 | | Wind Speed (t/min) | 30 | | Wind Speed (t/min) | 30 | | Wind Speed (t/min) | 30 | | Wind Speed (t/min) | 30 | | Wind Speed (t/min) | 30 | | Wind Speed (t/min) | 30 | | Wind speed (%) | 36 | | Wind speed (%) | 36 | | Wind speed (%) | 36 | | Wind speed (%) | 36 | | Wind speed (%) | 36 | | Wind speed (%) | 36 | | Wind speed (%) | 36 | | Wind speed (%) | 36 | | Wind speed (%) | 36 | | Wind speed (%) | 30 | | Wind speed (%) | 30 | | Wind speed (%) | 30 | | Wind speed (%) | 30 | | Wind speed (%) | 30 | | Wind speed (%) | 30 | | Wind speed (%) | 30 | | Wind speed (%) | 30 | | Wind speed (%) | 28 | | Wind speed (%) | 28 | | Wind speed (%) | 28 | | Wind speed (%) | 28 | | Wind speed (%) | 28 | | Wind speed (%) | 28 | | Wind speed (%) | 28 | | Wind speed (%) | 28 | | Wind speed (%) | 24 | | Wind speed (%) | 24 | | Wind speed (%) | 24 | | Wind speed (%) | 24 | | Wind speed (%) | 24 | | Wind speed (%) | 24 | | Wind speed (%) | 24 | | Wind speed (%) | 24 | | Wind speed (%) | 20 | | Wind speed (%) | 20 | | Wind speed (%) | 20 | | Wind speed (%) | 20 | | Wind speed (%) | 20 | | Wind speed (%) | 20 | | Wind speed (%) | 20 | | Wind speed (%) | 20 | | Wind speed (%) | 16 | | Wind speed (%) | 16 | | Wind speed (%) | 16 | | Wind speed (%) | 16 | | Wind speed (%) | 16 | | Wind speed (%) | 16 | | Wind speed (%) | 16 | | Wind speed (%) | 12 | | Wind speed (%) | 12 | | Wind speed (%) | 12 | | Wind speed (%) | 12 | | Wind speed (%) | 12 | | Wind speed (%) | 12 | | Wind speed (%) | 12 | | Wind speed (%) | 9 | | Wind speed (%) | 9 | | Wind speed (%) | 9 | | Wind speed (%) | 9 | | Wind speed (%) | 9 | | Wind speed (%) | 9 | | Wind speed (%) | 9 | | Wind speed (%) | 8 | | Wind speed (%) | 8 | | Wind speed (%) | 8 | | Wind speed (%) | 8 | | Wind speed (%) | 8 | | Wind speed (%) | 8 | | Wind speed (%) | 8 | | Wind speed (%) | 7 | | | Wind speed (%) | 7 | | | Wind speed (%) | 7 | | | Wind speed (%) | 7 | | | Wind speed (%) | 7 | | | Wind speed (%) | 7 | | | Wind speed (%) | 7 | | | Wind speed (%) | 6 | | | Wind speed (%) | 6 | | | Wind speed (%): -1% or more Wind: -1% or more Wind: -1% or more Wind: -1% or more Wind: -1% or more Wind: -1% or more Wind: -1% or more Wind: -1% or more Wind: -1% or more Wind: -1% or more Wind: -1% or more Wind: -1% or more Wind: -1% or more Wind: -1% / more Wind: -1% / more Wind: -1% / more Wind: -1% / more Wind: -1% / more Wind: -1% / more Wind: -1% / more Wind: -1% / more Wind: -1% / more Wind: -1% / more Wind: -1% / more Wind: -1% / more Wind: -1% / more Wind : -1% / more Wind : -1% / more Wind : -1% / more Wind : -1% / more Wind : -1% / more Wind : -1% / more Wind : -1% / more Wind : -1% / more Wind : -1% / more Wind : -1% / more Wind : -1% / more Wind : -1% / more Wind : -1%/more Wind : -1% / more Wind : -1% / more Wind : -1% / more Wind : -1% / more Wind : -1% / more Wind : -1% / more Wind : -1% / more Wind : -1% / more Wind : -1% / more Wind : -1% / more Wind : -1% / more Wind : -1% / more Wind :-1% / more Wind :-1% / more Wind :-1% / more Wind :-1% / more Wind :-1% / more Wind :-1% / more Wind :-1% / more Wind :-1% / more Wind :-1% / more Wind :-1% / more Wind :-1% / more Wind :-1% / more Wind :-1% / lessMenü
File Exit Weather Home beenden.
natural_image
Symbol of a trash bin crossed with no visible text or labelsTechnische Daten
Sensordaten
Thermometer/Hygrometer 2 × LR03/AAA
Regensensor 4 × LR03/AAA
Windsensor 4 × LR03/AAA
Declaration of Conformity
This declaration of conformity is issued under the sole responsibility of the manufacturer.
has been manufactured in full compliance with the requirements of the RE-directive 2014/53/EU and relevant harmonized standards
har tillverkats i full överensstämmelse med kraven i 2014/53/EU och relevanta harmoniserade standarder / har blitt produsert i full overensstemmelse med kravene i 2014/53/EU og relevante harmoniserte standarder / on valmistettu noudattaen kokonaisuudessaan koskevan direktiivin 2014/53/EU ja asiaankuuluvat yhdenmukaistetut standardit / hat in voller Übereinstimmung mit den Anforderungen der 2014/53/EU und einschlägigen harmonisierten Normen hergestellt wurde.
Reference to harmonized standards used, or reference to the specifications in which declaration of conformity is declared:
Hänvisning till de harmoniserade standarder som använts eller hänvisningar till de specifikationer som försäkran om överensstämmelse deklareras: / Referere til harmoniserte standarder som brukes, eller henvisninger til spesifikasjonene der samsvarserklæring er erklärt: / Viittaus yhdenmukaistettuihin standardeihin tai viittaus eritelmiin, jossa vaatimustenmukaisuusvakuutus on julistettu: / Referenz verwendet harmonisierten Normen oder Bezugnahme auf die Spezifikationen, in der Konformitätserklärung wird erklärt:
Article 3.1a (Safety): EN 62479:10
Article 3.1b (EMC): EN 301 489-1 v2.2.0 (2017-03)
EN 55032:2015
EN 55024:2010/A1:2015
EN 61000-3-2:2014
EN 61000-3-3:2015
Article 3.2 (Radio): EN 300 220-1 v3.1.1 (2017-02)
EN 300 220-2 v3.1.1 (2017-02)
Signed for and on behalf of:
Henrik Alfredsson
Technical Manager
Insjön, Sweden, 2018-08-02
CLAS OHLSON AB, SE-793 85 INSJÖN, SWEDEN
SVERIGE
KUNDTJÄNST Tel: 0247/445 00
Fax: 0247/445 09
E-post: kundservice@clasohlson.se
INTERNET
www.clasohlson.se
BREV Clas Ohlson AB, 793 85 INSJÖN
NORGE
KUNDESENTER Tlf.: 23 21 40 00
Faks: 23 21 40 80
E-post: kundesenter@clasohlson.no
INTERNETT
www.clasohlson.no
POST Clas Ohlson AS, Postboks 485 Sentrum, 0105 OSLO
SUOMI
ASIAKASPALVELU Puh.: 020 111 2222
POSTAL 10 - 13 Market Place
Kingston upon Thames
Surrey
KT1 1JZ
DEUTSCHLAND
KUNDENSERVICE Hotline: 040 2999 78111
E-Mail: kundenservice@clasohlson.de
HOMEPAGE www.clasohlson.de
POSTANSCHRIFT


- Wireless Weather Station with USB
- Table of Contents
- Safety
- Contents
- Assembly kit
- Keys and functions
- Installation
- Inserting batteries
- Note:
- Anemometer
- Rain gauge
- Thermometer/hygrometer
- Indoor unit
- Battery operation
- Refit the battery cover.
- Mains operation
- Searching for sensors and checking the sensors' functionality
- i Information
- Display/key of symbols
- Settings/adjustments
- Set the time, date, units of measurement, threshold values and background lighting
- - Threshold:
- Change display mode for time/date and measurement values.
- Time, Date
- Rain
- Pressure
- History
- i Information about air pressure
- Sound settings for key presses and alarm
- Toggle between external temperature/hygrometer sensors
- Max/Min
- Reset measurement values
- Max/Min values
- Note:
- Precipitation
- Memory
- Histograms, weather forecast and moon phases
- Histograms
- Weather forecast
- Phases of the moon
- Background lighting
- Constant background lighting
- Adjust the brightness
- Alarm
- Display current threshold values
- Set the alarm
- Snooze
- Calibration
- Temperature
- Relative humidity
- Wind speed, rain and air pressure
- Final mounting
- Information
- Choice of location
- In the event of transmission range problems, try the following:
- Software (WeatherHome)
- System requirements
- Instructions for use
- Menu
- Settings
- Highest and lowest recorded measurement values (Max/Min)
- Show recorded weather data (View)
- Clear the database and the indoor unit's memory (History Manage)
- Care and maintenance
- Troubleshooting guide
- Responsible disposal
- Specifications
- Wireless transfer
- Update interval
- Batteries
- Mains adapter
- Dimensions
- Termometer/hygrometer
- Programvara (Weather Home)
- Meny
- Specifikationer
- Trådlös överföring
- Mått
- Månefaser
- Programvare (Weather Home)
- Innstillinger (Settings)
- Spesifikasjoner
- Trådløs overføring
- Strømadapter
- Mål
- Valikko
- Tekniset tiedot
- Mitat
- Innengerät
- Hinweis:
- Software (Weather Home)
- Menü
- Technische Daten
- Declaration of Conformity
- SVERIGE
- NORGE
- SUOMI
- DEUTSCHLAND
Brand : Cotech
Model : FT0203
Category : Weather Station