
JS-910FA - Paint gun Cotech - Free user manual and instructions
Find the device manual for free JS-910FA Cotech in PDF.


| Type | HVLP Paint Gun |
| Model | JS-910FA |
| Brand | Cotech |
| Power | 500 W |
| Voltage | 230 V, 50 Hz |
| Flow Rate | 200 ml/min |
| Max Viscosity | 40 Din-s |
| Paint Container Capacity | 700 ml |
| Air Hose Length | 2.1 m |
| Weight | 3.0 kg |
| Sound Power Level (LwA) | 81.80 dB(A) (K=3 dB) |
| Sound Pressure Level (LpA) | 70.80 dB(A) (K=3 dB) |
| Vibration Level | 0.462 m/s² (K=1.5 m/s²) |
| Spray Patterns | Horizontal, Vertical, Round (adjustable) |
| Fluid Control | Variable fluid feed control knob |
| Suction Tube | Adjustable (forward for downward spray, backward for upward) |
| Included Accessories | Viscosity cup, 2.1 m air hose, shoulder strap, spray gun holder |
| Suitable Coatings | Water- and solvent-based paints, clear lacquers, wood stains, primers, 2-component paints, impregnating agents, rust inhibitors |
| Unsuitable Coatings | Emulsion paints, alkali-based or acid-based paints, calcimine paints |
| Safety Features | ON/OFF switch, power lead with plug, earthing, guards |
| Maintenance | Clean air filter regularly; clean nozzle and paint needle after use; do not use abrasive cleaners |
Frequently Asked Questions - JS-910FA Cotech
User questions about JS-910FA Cotech
0 question about this device. Answer the ones you know or ask your own.
Ask a new question about this device
Download the instructions for your Paint gun in PDF format for free! Find your manual JS-910FA - Cotech and take your electronic device back in hand. On this page are published all the documents necessary for the use of your device. JS-910FA by Cotech.
USER MANUAL JS-910FA Cotech
Read the entire instruction manual carefully and make sure that you fully understand it before you use the equipment. Keep the manual for future reference.
Viktig information:
natural_image
Illustration of a spray gun with attached hose and handle (no text or symbols)ART.NO
18-3164
40-7945
MODEL
JS-910FA-UK
JS-910FA
Ver. 20130830
Original instructions
Bruksanvisning i original
Please read the entire instruction manual before using the product and save it for future reference. We reserve the right for any errors in text or images and any necessary changes made to technical data. If you have any questions regarding technical problems please contact Customer Services.
1. Safety
Warning! Read all the instructions. Failure to adhere to the following instructions may lead to electric shocks, fires and/or serious injury. The term “power tools” in the warning text below refers to your handheld mains operated or battery operated tool.
1.1 General safety instructions for your safety and the safety of others
- Keep the work area clean and well lit. Cluttered surfaces and benches invite accidents.
- Do not use the machine in a dangerous environment. The machine should not be used on moist or wet surfaces or in rain. Make sure that the work area is well lit. When working in dusty atmospheres, make sure that the air is adequately circulated. Do not operate power tools in explosive atmospheres, such as in the presence of flammable liquids, gases or dust.
- Avoid electric shocks. Avoid body contact with earthed or grounded surfaces such as pipes, radiators, ranges and refrigerators when using power tools.
- Keep children and bystanders away. Keep children and visitors at a safe distance from electrical machinery/tools and electric cables in the workplace.
- Store power tools out of the reach of children. Power tools are dangerous in the hands of untrained users.
- Do not abuse the lead. Do not carry the machine by its mains lead. Do not yank the mains lead to turn the power off, pull the plug out instead. Make sure that the mains lead does not come into contact with heat, oil, or sharp edges.
- Secure the workpiece firmly. Use clamps or vices if possible so that you can use both hands to operate the power tool, it is much safer than holding the workpiece in one hand.
- Do not overreach. Make sure that you stand steady and balanced all times.
- Turn the power off. Pull out the plug and push in the emergency stop button before servicing the tool and before taking a break from work.
- Avoid accidental starting. Do not walk around with your finger on the trigger of a power tool if it is plugged in. Make sure that the on/off switch is set to OFF before plugging in any power tool.
- Using extension leads If you use extension leads outdoors, only use those designed for outdoor use. Only use extension leads with adequate wire core area and roll out the whole lead.
- Use common sense and be careful. Think carefully before carrying out every action, so that it is carried out safely. Never operate machines/power tools when you are tired or under the influence of medicine.
- Inspect the tool for damage. Check the following before turning the tool on:
- that the guards and other parts are undamaged and working properly.
- that moving parts can rotate freely and are correctly aligned.
- that no moving parts can get caught.
- that there is no fault or defect that could affect the performance of the machine.
- A safety guard or any other part that is damaged should be repaired by a tradesman or replaced. Damaged power leads and switches must always be replaced by a tradesman. Never operate a tool if you cannot stop or start the tool comfortably.
- Warning! Use only recommended accessories. The use of non-recommended accessories can cause accidents and personal injury.
- Power tools should only be repaired by a qualified technician. This tool conforms to current safety requirements. Repairs to the tool should only be carried out by a tradesman using original spares; otherwise the tool could cause accidents and personal injury.
1.2 Safety instructions
- The spray gun must not be used in close proximity to sources of ignition such as open fires, smokers, sparks, filaments, hot surfaces, etc.
- Be aware of potential hazards caused by the spray coating. Follow the instructions on the packaging of the spray coating, especially those related to personal safety equipment.
- Use all chemicals in a well-ventilated room suited for the purpose.
- Warning! Never use a spray coating that you are unfamiliar with and do not know how dangerous it is.
- If the power lead is damaged, it must only be replaced by an authorised service centre.
- Warning! Personal danger. Never point the spray gun at yourself, other persons or animals.
- Make sure that no solvent fumes are sucked into the turbine when the spray gun is used indoors.
- Toxic fumes can be produced from working with the spray gun that could be hazardous to your health.
- ALWAYS use suitable safety goggles, gloves, breathing masks, etc. to prevent paint, solvents and poisonous fumes from coming into contact with eyes and skin.
- Pay attention to the wind direction when using the spray gun outdoors.
When working indoors, ensure that there is adequate ventilation.
- Do not point the spray gun at the turbine.
- Never let children use the spray gun.
- Do not disassemble the product and do not try to repair it yourself.
1.3 Safety symbol guide

natural_image
Simple line drawing of a human head with short hair inside a circle (no text or symbols)Wear ear protection.

natural_image
Simple line drawing of a person wearing glasses and a face mask, enclosed in a circle (no text or symbols)Wear safety glasses or visor and a face mask.

natural_image
Icon of a person using a computer (no text or symbols)Read the entire instruction manual before use and save it for future reference.
2. Coatings suitable for use with this spray gun
Water- and solvent-based paints, clear lacquers, wood stains, primers, 2-component paints, impregnating agents, rust inhibitors, etc.
Coatings NOT suitable for use with this spray gun
- This product is not designed for use with emulsion paints, alkali-based or acid-based paints.
• Not for use with calcimine paints such as whitewash or Falu Red.
3. Product description
- Cotech HLVP Spray Gun (High Volume Low Pressure). A turbine delivers a continuous volume of air that atomizes the paint at low pressure, thus minimizing the risk of paint runs and shortening the drying time.
- Variable fluid feed control.
- Produces almost no paint mist, which means that you can paint with minimum paint loss and masking.
- For lacquers, glazes, stains and wood preservative.
• Delivery: 200 ml/min. - Comes with viscosity cup and 2.1 m air hose.
4. Features

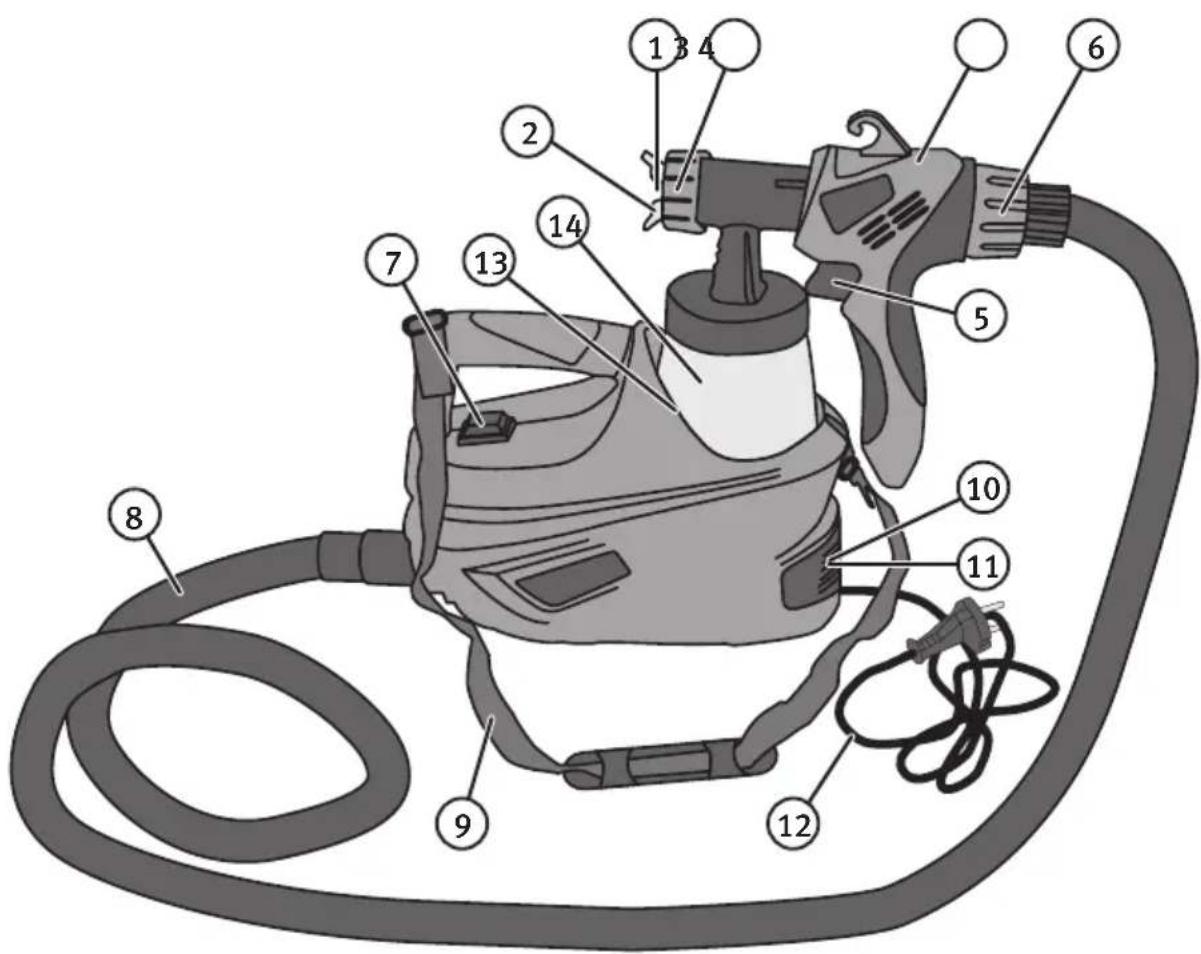
- Spray pattern lever
- Nozzle
- Retaining ring (for nozzle)
- Spray gun
- Trigger
- Fluid control knob
- Power switch ON/OFF
-
Air hose
-
Shoulder strap
-
Air filter
- Air filter cap
- Power lead with plug
- Spray gun holder
- Paint container
- Paintneedle
5. Preparations
5.1 Checking/adjusting the viscosity of the coating
Thoroughly shake the can of coating material before opening it. Spray paint normally needs to be diluted (we suggest that you test the paint before diluting it). Follow the manufacturer's recommendations for diluting the product. Ask your paint retailer for advice if you are unsure but remember to mention that you are using a HVLP spray gun. The thickness of paint is denoted by its viscosity and is measured by letting a certain amount of paint run through a hole of a certain diameter. The longer it takes for the paint to run through the hole, the higher the viscosity. The shorter the time, the lower the viscosity. Viscosity is given in seconds (DIN-seconds).
Warning! Only use spray coating with a flash point above 21 °C.
Measuring the viscosity
- Shake the can containing the spray coating for a long time before measuring.
- Dip the entire viscosity cup into the spray coating so that it fills completely.
- Empty the viscosity cup and measure how long it takes for the fluid to run through the hole.
- Dilute the paint if it is too thick and measure it again.

pie
| Slice | Value | |---|---| | 0 | 0 | | 15 | 15 | | 30 | 30 | | 45 | 45 |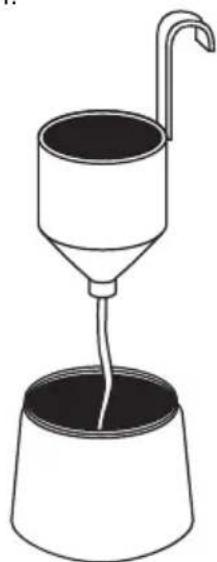
natural_image
Simple line drawing of a funnel pouring liquid into a conical container (no text or symbols)Guidelines for the viscosity of spray coatings
Spray coating Viscosity in DIN-seconds
| Primer containing solvent 25–40 | |
| Varnish containing solvent 15–40 | |
| Water-soluble primer 25–40 | |
| Water-soluble varnish 20–35 | |
| Wood preservative, paint remover, oil Undiluted | |
| Disinfectant, insecticide Undiluted | |
| Vehicle paint/lacquer 20–35 |
5.2 Preparing the spray gun for use
- Attach the shoulder strap (9).
natural_image
Illustration of a saw cutting tool with a flat blade and handle (no text or symbols)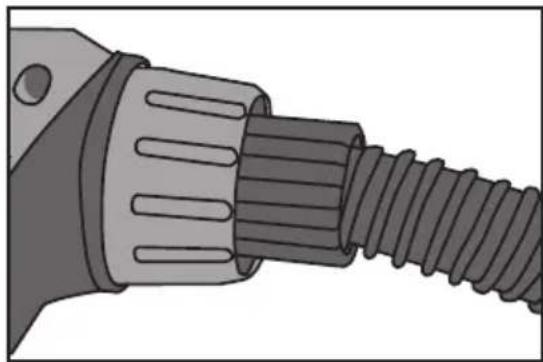
natural_image
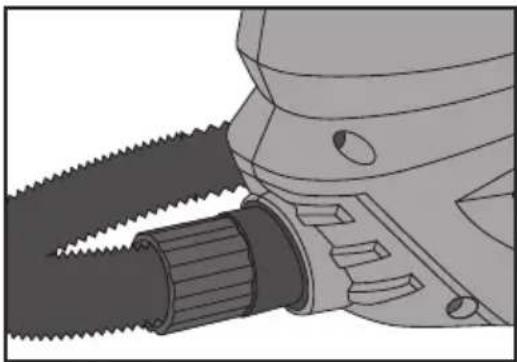
Illustration of a mechanical connector with threaded shaft and housing (no text or symbols)- Connect the air hose (8) to both the turbine and the spray gun.
- Unscrew the paint container (14).
natural_image
Line drawing of a spray gun with labeled component A (no text or symbols on the device itself)
natural_image
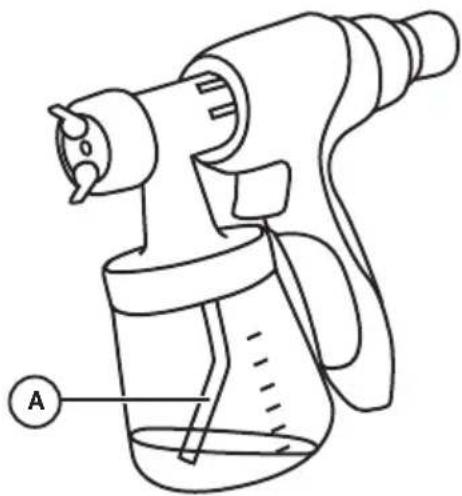
Line drawing of a spray gun with labeled component B (no text or symbols on the device itself)- Adjust the suction tube. Twist it forward to spray downwards (A) and backward to spray upwards (B).
- Place the container on a piece of paper or a cloth. Pour in the spray coating fluid and screw the container onto the spray gun.
- Stand the assembled spray gun on a clean and level floor. Make sure that there is no dust around that could be sucked into the filter.
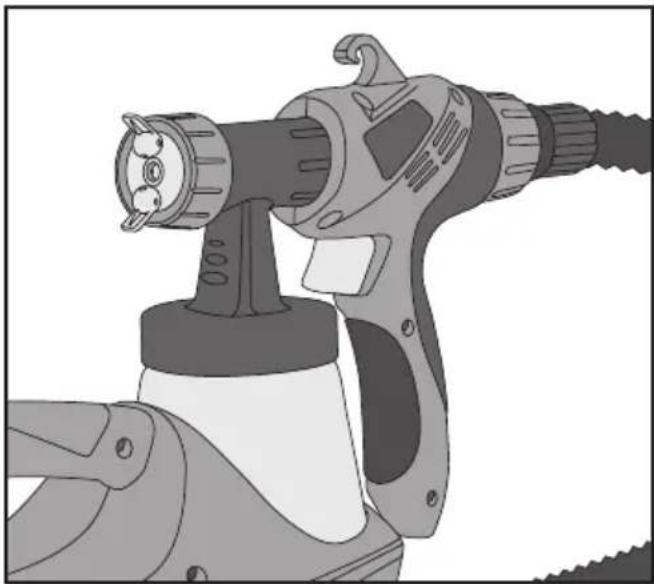
- Hold the spray gun and start the turbine using the power switch (7). Test spray the gun on a piece of waste cardboard or such, and adjust the paint flow and nozzle accordingly.
natural_image
Illustration of a spray gun with nozzle and spray bottle (no text or symbols)5.3 Preparing the object to be sprayed
- The quality of the finish will depend on how clean and smooth the surface is before it is sprayed. Remove any rust or old paint with sandpaper if necessary. Clean the surface of dust before spraying.
- Cover all surfaces that are not to be sprayed with plastic sheets or newspapers. Cover all hinges, screws, etc within the spraying area.
6. Settings
N.B. Ensure that the voltage marked on the product matches the power supply to be used.
- The spray gun can be set to horizontal, vertical or round spray patterns.
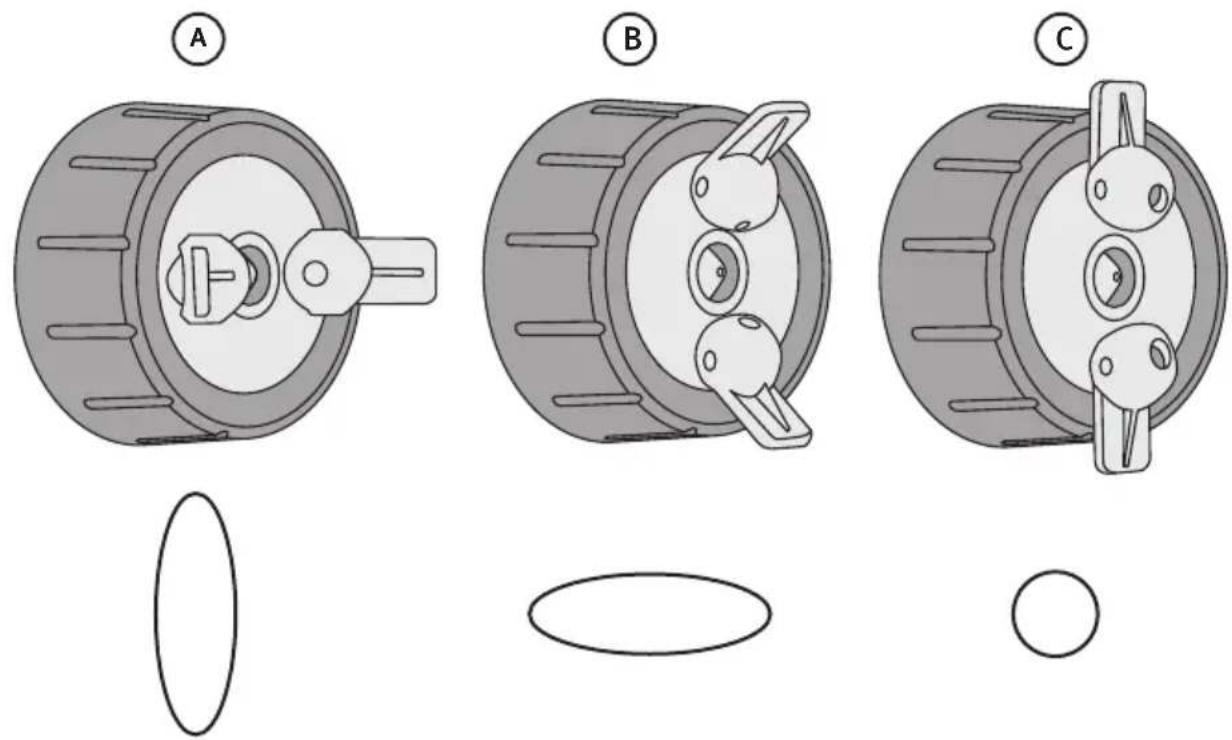
- The spray gun has 3 different spray pattern settings:
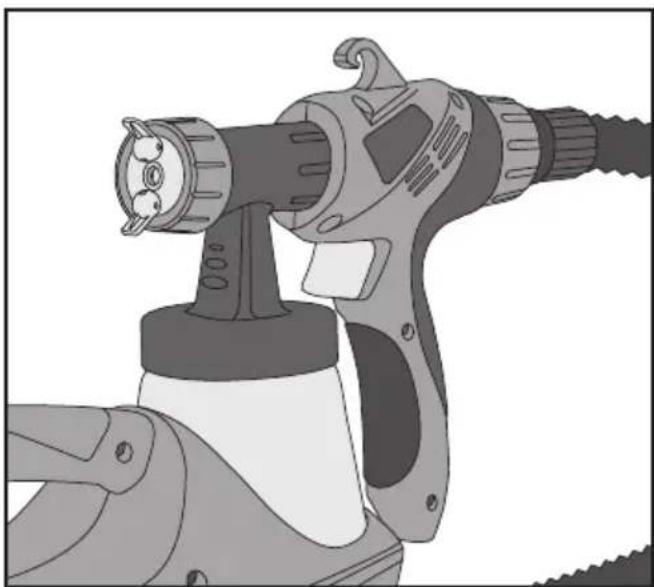
Undo the retaining ring (3) and twist the nozzle to change the setting and then tighten the retaining ring again.
A) Vertical pattern for spraying from side to side.
B) Horizontal pattern for spraying up and down.
C) Round pattern for spraying into corners or hard-to-reach places.
Warning! Do not pull the trigger whilst adjusting the nozzle. This is dangerous and might result in personal injury.
natural_image
Three technical diagrams (A, B, C) showing mechanical components with no visible text or symbolsThe nozzle also has a spray pattern width adjustment lever: Pull the lever (1) back for a round spray pattern (C) or push the lever forward for an oval spray pattern (A) or (B).

natural_image
Technical line drawings of two mechanical components with no visible text or symbolsFluid flow control
Adjust the paint flow using the fluid control knob (6) on the back of the spray gun.
Turn the knob anticlockwise to reduce the paint flow and clockwise to increase the paint flow.

natural_image
Illustration of a hand using a spray gun to adjust or install a paint can (no text or symbols visible)7. Spraying technique
• Always practice on a piece of scrap cardboard or similar before starting your project.
- Hold the spray gun 5–15 cm away from the surface of the object. Test to find a suitable distance before starting.
- Always begin your spray stroke 15–20 cm before the work and finish it 15–20 cm after the work. Move your arm in a wide sweeping motion (Fig. 10a).
- It is important that the spray gun is kept parallel to the surface (Fig. 10a), if not you will end up with more paint in the middle and less at the sides which leads to paint runs and poor finishes (Fig. 10b).

- Regularly check during spraying that there is no paint build up on the nozzle (2), as this prevents the spray gun from working properly. Clean if necessary.
Pausing from work
- Switch the turbine off using the power switch (7).
- Place the spray gun in the holder (13) on the turbine.
After finishing work
- Switch off the turbine. Pull the trigger so that any paint left in the spray gun runs back into the container.
- Unscrew the container and pour any leftover paint back into its can.
- Clean as much paint as possible off the container and suction tube using a soft brush or cloth.
- Pour solvent or water (depending on type of paint used) into the container and screw it back onto the spray gun. Warning! Only use solvent with a flash point above 21 °C.
- Switch on the turbine and spray the solvent/water onto a rag or into a jar.
- Spray a few times until no more paint residue comes out of the nozzle.
- Switch off the turbine.
- Unscrew the container and dry it, making sure that the surface of the joint is clean and free from paint residue.
- Wipe the exterior of the spray gun with a cloth lightly moistened with solvent or water.
- Unscrew the retaining ring (3) (with nozzle and adjuster) and remove the paint nozzle. Wash the loose components and paint needle in solvent or water. Do not use metal tools to clean the spray gun.
- Reassemble the spray gun when it is clean and dry. N.B. The paint nozzle will only fit one way.
8. Care and maintenance
N.B. Unplug the machine from the power supply before cleaning or servicing it.
Cleaning: Clean the machine by wiping it with a soft cloth and maybe even a little mild detergent. Never use abrasive cleaning agents or solvents.
Clean the air filter.
- Remove the cap (11), extract the air filter (10) and clean it.
- Let the air filter dry before replacing it.
Never use the spray gun without the air filter.

9. Specifications
Model JS-910FA
Flow rate 200 ml/min
Power 500 W
Voltage 230 V, 50 Hz
Max. viscosity 40 Din-s
Paint container 700 ml
Hose length 2.1 m
Sound LwA 81.80 dB(A) K: 3 dB
LpA 70.80 dB(A) K: 3 dB
Vibration 0.462 m/s
^2 K: 1.5 m/s ^2
Weight 3.0 kg
Färgspruta
ART.NR 18-3164 MODELL JS-910FA-UK 40-7945 JS-910FA
natural_image
Simple line drawing of a human head inside a circle (no text or symbols)Använd hörselskydd.

natural_image
Simple line drawing of a person wearing glasses and a mask, enclosed in a circle (no text or symbols)natural_image
Icon of a person using a computer (no text or symbols)natural_image
Simple line drawing of a clock and a funnel (no text or symbols)natural_image
Illustration of a mechanical tool with a saw and handle (no text or symbols)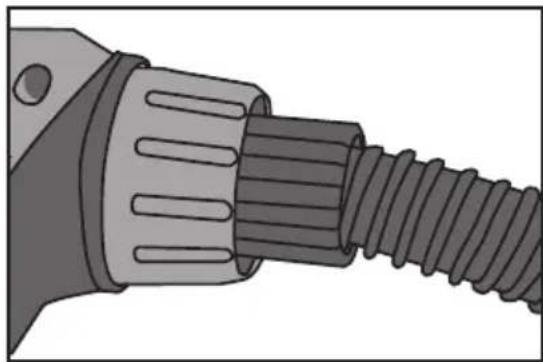
natural_image
Illustration of a mechanical connector with threaded shaft and housing (no text or symbols)natural_image
Line drawing of a spray gun with labeled component A (no text or symbols on the device itself)
natural_image
Line drawing of a spray gun with labeled component B (no text or symbols beyond label)natural_image
Illustration of a spray gun with nozzle and handle (no text or symbols)natural_image
Three technical diagrams (A, B, C) showing mechanical components with no visible text or symbolsnatural_image
Technical line drawings of two mechanical components with circular features and mounting holes (no text or symbols)
natural_image
Illustration of a hand using a spray gun to adjust or install a spray bottle (no text or symbols visible)7. Sprutteknik
natural_image
Simple line drawing of a human head inside a circle (no text or symbols)Bruk hørselsvern.

natural_image
Simple line icon of a person wearing glasses and a mask, enclosed in a circle (no text or symbols)natural_image
Icon of a person using a computer (no text or symbols)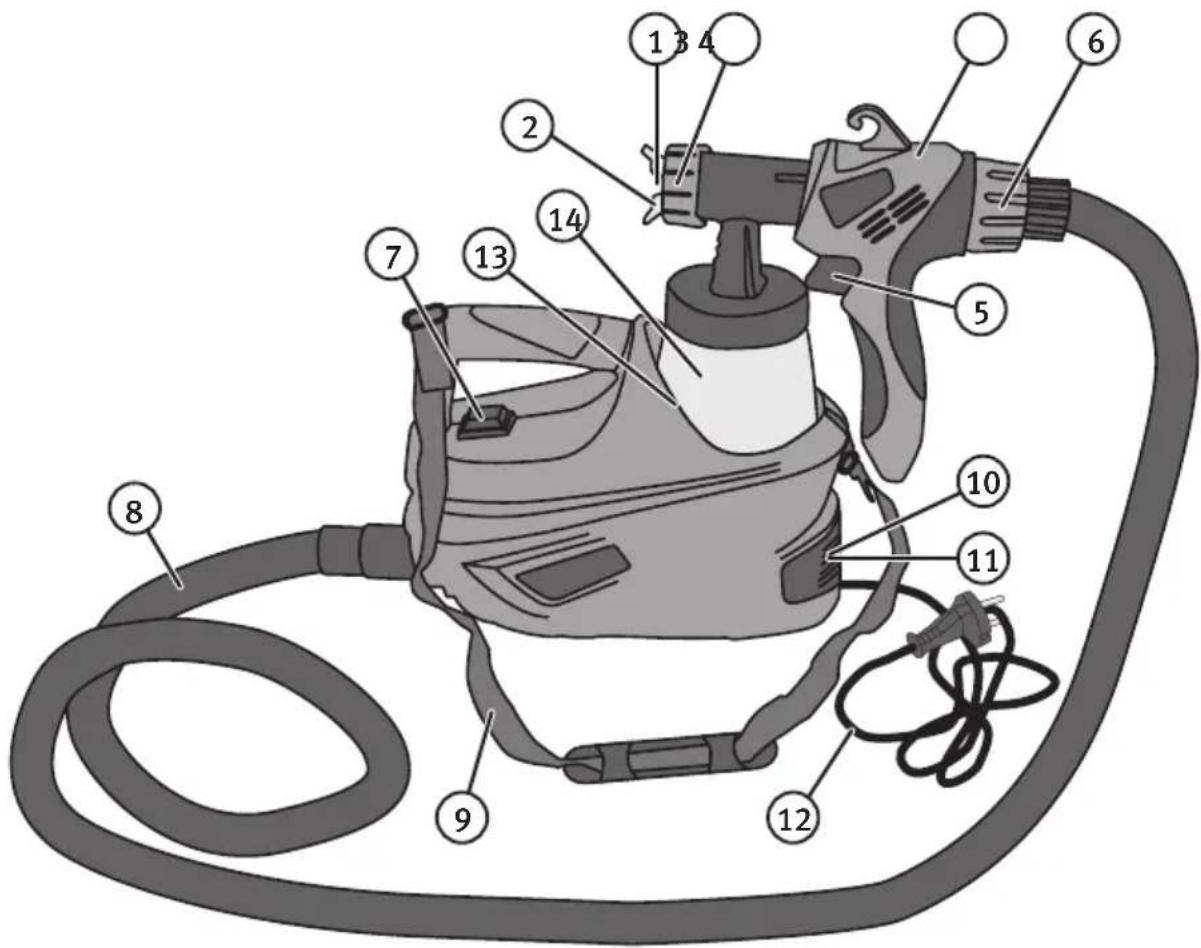
natural_image
Simple line drawing of a funnel pouring liquid into a conical container (no text or symbols)natural_image
Technical illustration of a mechanical tool with a saw and threaded shaft (no text or symbols)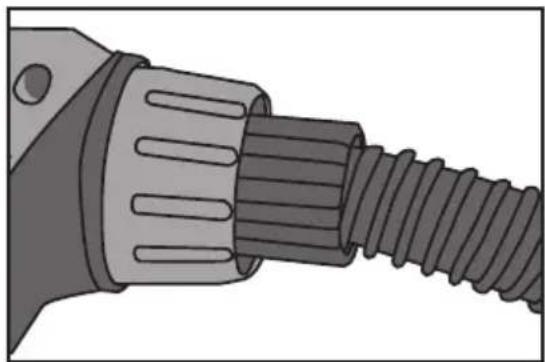
natural_image
Illustration of a mechanical connector with threaded shaft and threaded end (no text or symbols)natural_image
Line drawing of a spray gun with labeled component A (no text or symbols on the device itself)
natural_image
Line drawing of a spray gun with labeled component B (no text or symbols on the device itself)- Juster sugerøret. Drei det framover når du skal sprute nedover (A) og bakover når du skal sprute oppover (B).
- Plasser beholderen på en gammel avis eller liknende og hell i væsken (malingen). Fest så beholderen på sprutepistolen.
- Plasser alt utstyret på et plant, rent gulv. Påse at det ikke er støv omkring utstyret, da dette vil suges inn i filteret.
- Løft opp sprutepistolen og start turbinen med strømbryteren (7). Foreta en prøvesprøyting på et stykke papp el. I. Juster malingsmengden og munnstykke ved behov.
natural_image
Illustration of a spray gun with nozzle and spray bottle (no text or symbols)natural_image
Three technical diagrams (A, B, C) showing exploded views of a mechanical component with no visible text or symbols.natural_image
Technical line drawings of two mechanical components with circular features and mounting holes (no text or symbols)
natural_image
Illustration of a hand using a spray gun to adjust or install a paint can (no text or symbols visible)7. Sprøyteteknikk
natural_image
Simple line drawing of a human head inside a circle (no text or symbols)natural_image
Simple line icon of a person wearing glasses and a face mask, enclosed in a circle (no text or symbols)natural_image
Icon of a person using a computer (no text or symbols)natural_image
Simple line drawing of a clock showing 0 to 30 and a funnel pouring liquid into a container (no text or symbols)natural_image
Illustration of a saw cutting tool with a meshed handle (no text or symbols)
natural_image
Illustration of a mechanical connector with threaded shaft and threaded end (no text or symbols)natural_image
Line drawing of a spray gun with labeled component A (no text or symbols on the device itself)
natural_image
Line drawing of a spray gun with labeled component B (no text or symbols on the device itself)natural_image
Illustration of a spray gun with nozzle and spray bottle (no text or symbols)natural_image
Three technical diagrams (A, B, C) showing mechanical components with no visible text or symbolsnatural_image
Technical line drawings of two mechanical components with no visible text or symbols
natural_image
Illustration of a hand using a spray gun to adjust or install a spray bottle (no text or symbols visible)natural_image
Simple line drawing of a funnel pouring liquid into a conical container (no text or symbols)natural_image
Illustration of a mechanical tool with a saw and threaded shaft (no text or symbols)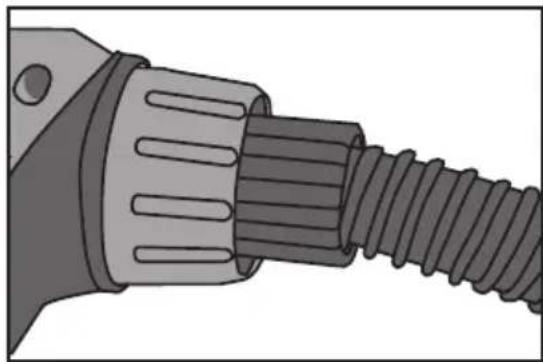
natural_image
Illustration of a mechanical connector with threaded shaft and housing (no text or symbols)natural_image
Line drawing of a spray gun with labeled component A (no text or symbols on the device itself)
natural_image
Line drawing of a spray gun with labeled component B (no text or symbols beyond label)natural_image
Illustration of a spray gun with nozzle and spray bottle (no text or symbols)natural_image
Three technical diagrams (A, B, C) showing mechanical components with no visible text or symbolsnatural_image
Technical line drawings of two mechanical components with circular features and mounting holes (no text or symbols)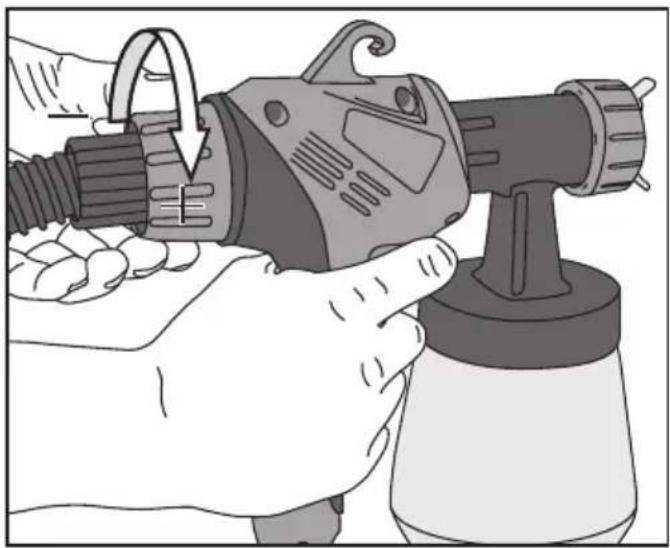
natural_image
Illustration of a hand using a spray gun to adjust or install a paint can (no text or symbols visible)7. Spritztechnik
Declaration of Conformity
Machinery directive 2006/42/EC
EMC directive 2004/108/EC
Low voltage directive 2006/95/EC
EN 60745-1:2009+A11 EN 50580:2012
EN 55014-1:2006 EN 55014-2:1997+A1:2001 EN 61000-3-2:2006 EN 61000-3-3:1995+A1:2001 +A2:2005
EN 62233:2008

Klas Balkow
President
Insjön, Sweden, 2013-03-15
SVERIGE
KUNDTJÄNST Tel: 0247/4 45 00
Fax: 0247/4 45 09
E-post: kundservice@clasohlson.se
INTERNET www.clasohlson.se
BREV Clas Ohlson AB, 793 85 INSJÖN
NORGE
KUNDESENTER Tlf.: 23 21 40 00
Faks: 23 21 40 80
E-post: kundesenter@clasohlson.no
INTERNETT www.clasohlson.no
POST Clas Ohlson AS, Postboks 485 Sentrum, 0105 OSLO
SUOMI
ASIAKASPALVELU Puh.: 020 111 2222
Postal 10 – 13 Market Place
Kingston Upon Thames
Surrey
KT1 1JZ
DEUTSCHLAND
- Viktig information:
- Safety
- General safety instructions for your safety and the safety of others
- Safety instructions
- Safety symbol guide
- Coatings suitable for use with this spray gun
- Coatings NOT suitable for use with this spray gun
- Product description
- Features
- Preparations
- Checking/adjusting the viscosity of the coating
- Measuring the viscosity
- Guidelines for the viscosity of spray coatings
- Preparing the spray gun for use
- Preparing the object to be sprayed
- Settings
- Fluid flow control
- Spraying technique
- Pausing from work
- After finishing work
- Care and maintenance
- Specifications
- Färgspruta
- Sprutteknik
- Sprøyteteknikk
- Spritztechnik
- Declaration of Conformity
- SVERIGE
- NORGE
- SUOMI
- DEUTSCHLAND
Brand : Cotech
Model : JS-910FA
Category : Paint gun