
AR0025 - Lighting Cotech - Free user manual and instructions
Find the device manual for free AR0025 Cotech in PDF.


| Product Type | Wall-mounted LED floodlight with PIR motion sensor |
| Brand | Cotech |
| Model | AR0025 (AR0025-BLACK) |
| Light Source | 14 x 1 W LEDs (non-replaceable), 770 lm, 6500 K |
| Power Consumption | 20 W |
| Supply Voltage | 220–240 V~, 50 Hz |
| Protection Rating | IP44 (suitable for outdoor use) |
| Safety Class | Class I (must be earthed) |
| Detection Method | Passive Infrared (PIR) motion sensor |
| Maximum Detection Range | 8 m |
| Detection Angle | 140° |
| Adjustable Lighting Time | 10 ± 5 seconds to 4 ± 1 minutes |
| Adjustable Light Threshold | Via LUX knob (daylight to darkness) |
| Adjustable Sensitivity | Via SENS knob |
| Mounting Height | 1.8–2.5 m above detection zone |
| Aperture Dimensions | 210 x 130 mm |
| Installation | Wall-mounted with included bracket, requires qualified electrician |
| Cleaning | Wipe PIR sensor cover with damp cloth |
Frequently Asked Questions - AR0025 Cotech
User questions about AR0025 Cotech
0 question about this device. Answer the ones you know or ask your own.
Ask a new question about this device
Download the instructions for your Lighting in PDF format for free! Find your manual AR0025 - Cotech and take your electronic device back in hand. On this page are published all the documents necessary for the use of your device. AR0025 by Cotech.
USER MANUAL AR0025 Cotech
Read the entire instruction manual carefully and make sure that you fully understand it before you use the equipment. Keep the manual for future reference.
Viktig information:
natural_image
3D technical drawing of a mechanical component with no visible text or symbolsART.NO 36-4856
MODEL AR0025-BLACK
Ver. 20131204
Original instructions
Bruksanvisning i original
Please read the entire instruction manual before using the product and save it for future reference. We reserve the right for any errors in text or images and any necessary changes made to technical data. If you have any questions regarding technical problems please contact our Customer Services.
1. Product description
- The wall-mounted floodlight is combined with an infra-red (PIR) detector that scans a settable detection zone. When the detector senses movement inside the detection zone the light automatically comes on. This makes it suitable for stairs, carports, and backyards, for your convenience and security. The light stays on for as long as it detects movement inside the set detection zone.
• IP44 (approved for outdoor use)
• Wall light with 14 bright LEDs (6,500 K), 770 lm
• Detection zone of up to 8 m at an angle of up to 140° - Settable lighting time (from 10 seconds up to 4 minutes)
• Aperture: 210 × 130 mm - 20 W, 230 V
2. Location
Consider the following advice:
- The best height to mount the light is 1.8–2.5 m above the detection zone.
• Do not point the sensor at the sun. - To avoid the light coming on unnecessarily, do not aim the motion sensor towards heat sources such as BBQ's, AC units, other outdoor lighting, car headlights or sources of electromagnetic interference such as transformers.
- Do not aim the motion sensor at reflective surfaces such as white walls or swimming pools.
- The motion sensor's detection zone (max 8 m at 140°) can vary depending on how high and where it is positioned.

- Changes in temperature can affect the range of the motion sensor.
natural_image
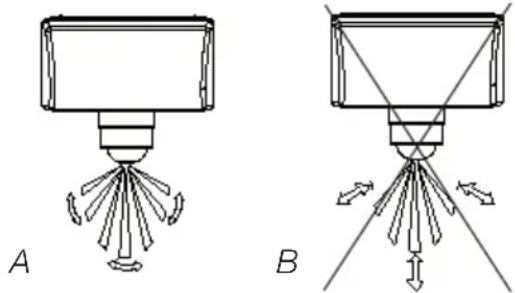
Two technical diagrams labeled A and B showing a mechanical or optical setup with directional arrows indicating motion (no text or symbols present)- Before positioning the floodlight, bear in mind that movement across the detection zone (A) will be detected before motion towards or away from the sensor (B).
3. Installation

- Lamp housing
- Strain relief
- Terminal block
-
Wall mounting screws
-
Wall mount release catch
- Wall mount
- Rubber grommet
- Locking screw
Important: Read the entire instruction manual before installation. The installation should be carried out by a qualified electrician and conform to current regulations.
Warning: Make sure that the power is turned off and that the fuse is removed before beginning any installation, change of light bulb or service.
- Undo the locking screw.
- Depress the release catch with a screwdriver or similar, grasp the ring and pull out the wall mount.
- Mark out the position of the mounting holes on the wall using the wall mount as a template. Drill holes for the mounting screws. Use suitable screws and wall plugs if necessary. The floodlight must be fixed securely.
Note: Mount the light horizontally.
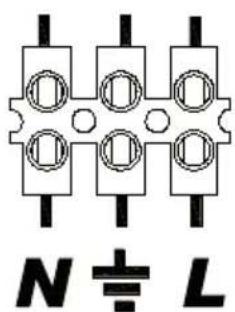
- Undo the cable strain relief, pass the power cable (3G, 0.75) through the rubber grommet. Connect the three wires: L - Live (brown), N - Neutral (blue) and ⏻ - Electrical earth (green/yellow) to the terminal block as marked in the junction box.

- Screw the strain relief back on.
- Screw the wall mount to the wall. Make sure that the power cable is not crushed.
- Depress the release catch and push the lamp housing onto the wall mount. Make sure that the release catch clicks into the hole.
- Undo the locking screw.
- Set the floodlight to the desired angle.
- Replace the fuse.

natural_image
Technical diagram of a mechanical device with directional arrows indicating assembly or movement (no text or symbols present)4. Settings
4.1 Lighting time [ TIME ]
The operating time after activation can be set from 10 ± 5 seconds up to 4 ± 1 minutes, reducing or increasing the time setting using the [TIME] knob. Note: Every new detected movement restarts the operation time.
4.2 Light level required for activation [ LUX ]
The amount of light that activates the floodlight is measured by a photocell which distinguishes between lightness and darkness. The sensitivity can be adjusted by turning the [ LUX ] knob between the Sun and the Moon symbols. The Sun mode will set the light to react under lighter conditions; the Moon mode will set the light to to react under darker condition.
4.3 Motion sensor sensitivity [ SENS ]
The motion sensor sensitivity (distance between sensor and movement) can be adjusted using the [SENS] knob. Turn the knob towards the (+) to increase the distance needed, and the opposite way to lessen the distance needed to activate the light.

4.4 Setting the controls
- Set the [ LUX ] knob to let the sensor stabilise for half a minute, make sure that the [ TIME ] knob is set to minimum (-). The floodlight will now activate for 30 seconds (this will happen within 1 minute).
- Aim the sensor towards the desired detection zone. Point the arrow on the bottom of the PIR sensor towards the detection zone.
- Ask a friend to pass through the detection zone, carefully adjust the angle of the sensor arm until the floodlight is activated by your friend.
- Adjust the operating time as desired, using the [TIME] knob.
- To set the lux level at which the light will activate: Turn the [LUX] knob from towards to have the light come on only at night. If you wish the light to come on at dusk: Wait until the light has dropped to the desired level, and then slowly turn the [LUX] knob towards whilst having someone walk slowly across the detection zone. Stop turning the knob as soon as the light comes on.
Note: This procedure sometimes needs to be repeated before the correct setting is found.
5. Troubleshooting
| Problem Possible cause | Solution | |
| The floodlight is not activated by movement in the detection zone. | No mains voltage, blown fuse, circuit breaker set to off. | Check the connections, fuses, switches. |
| The area is too light. Alter the direction of the sensor, move the sensor. | ||
| Controls set incorrectly. Readjust the sensor angle or sensitivity [SENS]. | ||
| The floodlight comes on for no reason. | Heat sources, lighting or cars are activating the sensor. | Adjust the direction of the sensor. |
| Wild animals/birds, pets activating the sensor. | Redirect the sensor. | |
| Reflections from swimming pool or other reflecting surface. | Redirect the sensor. | |
| The floodlight does not go off. | Continuously falsely triggered. Redirect the sensor. | |
| The [TIME] setting is too long. Reduce the operating time. | ||
| The floodlight comes on during the day. | The [LUX] knob is set on daylight (★). | Adjust the [LUX] knob. |
| When the [LUX] setting is set to daylight (★), the detection distance is shortened. | Interference from sunlight. Re-test at night. | |
6. Cleaning
Wipe the PIR sensor cover with a damp cloth a few times a year, but never remove the cover as this might damage the sensor and the guarantee will be void.
7. Disposal
This product should be disposed of in accordance with local regulations. If you are unsure how to proceed, contact your local authority.
8. Technical data
Max range 8 metres at an angle of 140 degrees
Activation time 10 ± 5 seconds up to 4 ± 1 minutes
Type of sensor PIR motion detector
Mains supply 220–240 V\~, 50 Hz
Power 20 W
Light source 14 × 1 W LED (non-replaceable)
Protection class IP44 (approved for outdoor use)
Safety class Class 1 (this light fitting must be earthed)
natural_image
Two technical diagrams labeled A and B showing a mechanical assembly with rotating blades and directional arrows (no text or symbols beyond labels)natural_image
Technical diagram of a mechanical device with directional arrows indicating assembly or movement (no text or symbols present)4. Inställningar
4.1 Belysningstid [TIME]
- Temperaturendring kan forandre virkeområdet.
![Cotech AR0025 - Belysningstid [TIME] - 1](/content/2026/05/834729/images/c142b3a74d0782d07d74bf834e22fd94c08c89e56c2edd72acd8bd4b0402a1a4.jpg)
natural_image
Simple line drawing of a mechanical component with radiating blades (no text or symbols)![Cotech AR0025 - Belysningstid [TIME] - 2](/content/2026/05/834729/images/b4183ab41243a56dc6f4cbc5fcb21e6b00ce76387b48ee147d507067d3f4ddae.jpg)
natural_image
Diagram of a mechanical or optical setup with arrows indicating direction and labeled point B (no text or symbols present)-
Lampehus
-
Strekkavlastning
-
Koblingsplint
-
Festeskruer til veggfeste
-
Sperre til veggfeste
-
Veggfeste
-
Gummitetning
-
Låseskrue
natural_image
Technical diagram of a mechanical device with directional arrows indicating assembly or movement (no text or symbols present)4. Innstillinger
4.1 Belysningstid [ TIME ]
natural_image
Diagram showing two configurations (A and B) of a mechanical or optical setup with directional arrows indicating motion or force, no text or symbols present.natural_image
Technical diagram of a mechanical device with directional arrows indicating assembly or movement (no text or symbols present)4. Asetukset
4.1 Valaisuaika[TIME]
natural_image
Simple line drawing of a spray gun with multiple blades (no text or symbols)![Cotech AR0025 - Valaisuaika[TIME] - 1](/content/2026/05/834729/images/45bde21f5e68bce6e637efa8dfff9aa18d9ece77327bd20c3260d77d5caf4be1.jpg)
natural_image
Diagram of a mechanical or optical setup with intersecting lines and arrows, no visible text or symbolsnatural_image
Diagram of a device with arrows indicating assembly or connection, showing internal components and directional arrows (no text or symbols)POSTAL 10 – 13 Market Place
Kingston Upon Thames
Surrey
KT1 1JZ
DEUTSCHLAND


- Viktig information:
- Product description
- Location
- Installation
- Settings
- Lighting time [ TIME ]
- Light level required for activation [ LUX ]
- Motion sensor sensitivity [ SENS ]
- Setting the controls
- Troubleshooting
- Cleaning
- Disposal
- Technical data
- Inställningar
- Belysningstid [TIME]
- Innstillinger
- Belysningstid [ TIME ]
- Asetukset
- Valaisuaika[TIME]
- DEUTSCHLAND
Brand : Cotech
Model : AR0025
Category : Lighting