
LS4T - Log splitter Cocraft - Free user manual and instructions
Find the device manual for free LS4T Cocraft in PDF.


| Product Type | Log Splitter |
| Brand | Cocraft |
| Model | LS4T |
| Power | 1500 W |
| Voltage | 230 V AC, 50 Hz |
| Splitting Force | 4 tonnes |
| Log Capacity (Diameter) | 5–25 cm |
| Log Capacity (Length) | 15–37 cm |
| Adjustable Return Stop | 160–370 mm |
| Oil Capacity | 3.5 litres |
| Dimensions (L x W x H) | 840 x 360 x 470 mm |
| Weight | 40 kg |
| IP Rating | IP54 |
| Recommended Operating Temperature | +5 to +40 °C |
| Motor Type | Electric (230V) |
| Safety Features | RCD recommended, emergency stop, control lever guard, safety gloves/footwear/glasses required |
| Maintenance | Hydraulic oil change every 150 hours, wedge sharpening with fine-toothed file |
| Included Accessories | Wheels, handle, fasteners, instruction manual |
Frequently Asked Questions - LS4T Cocraft
User questions about LS4T Cocraft
0 question about this device. Answer the ones you know or ask your own.
Ask a new question about this device
Download the instructions for your Log splitter in PDF format for free! Find your manual LS4T - Cocraft and take your electronic device back in hand. On this page are published all the documents necessary for the use of your device. LS4T by Cocraft.
USER MANUAL LS4T Cocraft
Read the entire instruction manual carefully and make sure that you fully understand it before you use the equipment. Keep the manual for future reference.
Viktig information:
natural_image
Technical line drawing of a mechanical device with no visible text or symbolsArt.no Model
40-9511
LS4T
Ver. 20160210
Original instructions
Bruksanvisning i original
Originalbruksanvisning
Please read the entire instruction manual before using the product and then save it for future reference. We reserve the right for any errors in text or images and any necessary changes made to technical data. If you have any questions concerning technical problems please contact our Customer Services.
Safety
Warning: When using this machine, the included safety instructions should always be followed to avoid risk of fire, electric shock, and personal injury. Read the entire instruction manual before using the machine and keep it for future reference. Always pull the plug out of the wall socket before servicing and adjusting the machine.
General safety instructions for your safety and the safety of others
- Keep the working area tidy.
Cluttered surfaces and benches invite accidents.
- Do not use the machine in dangerous environments.
The machine should not be used on moist or wet surfaces or in rain. Make sure that the work area is well lit. When working in dusty atmospheres, make sure that the air is adequately circulated. Do not operate electric machinery in areas where they can cause a fire or explosion.
- Reduce the risk of electric shocks.
Avoid body contact with earthed or grounded surfaces such as pipes, radiators, ranges and refrigerators when using electric machinery.
- Keep children and bystanders away.
Keep children and visitors at a safe distance from electric machinery and electric cables in the workplace.
- Store electric machinery out of the reach of children.
Store electric machinery/tools locked away in a safe place, away from children.
- Do not force the machine.
The correct feed rate makes the work better and safer.
- Use the correct tool for the job.
Do not force a tool to perform a task that it was not designed for.
- Wear suitable attire.
Do not wear any loose-fitting clothing, gloves, necklaces, bracelets or other jewellery that can get caught in moving parts. Non-slip footwear is recommended. Wear a hairnet or similar if you have long hair.
- Always use safety glasses.
Normal glasses are not tough enough to withstand impacts. Use a dust mask or dust filter when working in dusty environments.
- Connect dust extraction equipment.
If the machine is equipped with dust extraction equipment, ensure that it is connected and used properly. Make sure to empty the dust bag regularly.
- Do not abuse the mains lead.
Do not carry the machine by its mains lead. Do not yank the mains lead to unplug the air compressor, hold the plug when pulling it out of the socket. Make sure that the mains lead does not come into contact with heat, oil, or sharp edges.
- Secure the workpiece firmly.
Where possible, use clamps or a vice. You can then operate the machine using two hands. This is much safer than holding the workpiece in one hand.
- Do not overreach.
Make sure that you stand steady and balanced at all times.
- Look after your tools.
Keep blades sharp and clean for the best and safest performance. Follow the manual's recommendations regarding lubrication and replacement of accessories. Inspect the mains lead regularly. If it is damaged it should be replaced by a qualified service technician. Inspect all leads and cables regularly to check for any damage. Make sure that the machine's handles and controls are clean, dry and free from oil, grease etc.
- Turn the power off.
Pull out the plug and push in the emergency stop button before servicing or changing any blades, drill bits, cutters or sanding discs.
16. Remove all spanners and repair tools.
Make a habit of checking to make sure that the machine is free of all spanners and tools before turning the power on.
17. Avoid accidental starts.
Do not walk around with your finger on the trigger of electric machinery if it is plugged in. Make sure that the ON/OFF switch is set to OFF before plugging in any electric machinery.
18. Use the correct extension leads.
If you use extension leads outdoors, only use those designed for outdoor use. Only use extension leads with adequate wire core area and roll out the whole lead.
19. Use common sense and be careful.
Think carefully before carrying out every action, so that it is carried out safely. Never operate machines when you are tired, under the influence of medicine etc.
20. Inspect the tool for damage.
Before starting the machine, make sure that the guards and other parts are undamaged and working properly, that moving parts can rotate freely and are correctly aligned, that no moving parts can get caught and that there is no fault or defect that could affect the performance of the machine. A safety guard or any other part that is damaged should be repaired by a tradesman or replaced. Damaged power leads and switches must always be replaced by a tradesman. Never operate the machine if you cannot stop or start it comfortably.
21. Use only recommended accessories.
The use of non-recommended accessories can cause accidents or personal injury.
22. Should only be repaired by a qualified technician.
This machine conforms to current safety requirements. Repairs to the machine should only be carried out by a professional using original spares; otherwise the machine could cause accidents or personal injury.
23. Electric machinery should be connected to the mains via a Residual Current Device. This can help minimise the risk of an electric shock in the event of an earth fault or short circuit.
The machine must not be modified or used for any other purpose than that for which it has been designed.
Regularly check that all screws and nuts are securely tightened.
Additional safety rules for log splitters
- Save the instruction manual, make sure that it accompanies the log splitter if it is borrowed.
- Read the warning labels on the log splitter and make sure that they are legible.
- Make sure that the electrical socket you intend to use has the correct voltage (230 V) before connecting the log splitter.
- Never attempt to adjust the force setting yourself. The log splitter is pre-set at the factory for a maximum splitting force of 4 tonnes. Tampering with the pressure settings can lead to diminished performance and damage to the machine and result in serious person injury.
- Wear safety glasses, ear defenders and safety shoes if necessary.
- Always stand in such a way that you can perform all work tasks whilst maintaining good balance and grip the control lever in one hand whilst pushing the power button with the other hand.
- Keep your hands and fingers well away from the pressure plate and use, as always when operating machinery, your common sense and take care whilst working.
- Make sure that there are no bystanders or pets close to the machine, sharp splinters can be ejected with great force.
- Switch off the log splitter and disconnect it from the mains supply whenever you take a break and before starting any maintenance procedures. Make sure that log splitter cannot be started by any children or unauthorised person.
- The log splitter should be connected to the mains via an RCD for extra safety.
- Never use the log splitter in the rain or wet conditions.
- Never use the log splitter if the power switch, plug, mains lead or any other part is damaged. The defective part must be replaced by a qualified repair person.
- Keep the work area clean and tidy, make sure that the cooling of the electric motor is not hindered by debris blocking the air intake.
- Note: Loosen the the bleed screw (7) 3–4 turns, so that there is a noticeable flow of air when the log splitter is in operation, otherwise the gaskets in the hydraulic system could be damaged and render the log splitter inoperable.
- Make sure that the nuts on the ends of the pull rods are tight before operation, otherwise the log splitter could become damaged.
Product safety symbols

Warning: Risk of crushing. Keep hands well away from any moving parts during the entire splitting operation.

Warning: Risk of crushing. Never remove a jammed log with your hands, always use a tool.

Warning: Risk of crushing. Always pay attention to the motion of the pressure plate.
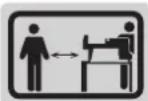
No-one other for than the operator must stand within the danger zone of the log splitter. Keep children, pets and bystanders away from this area.

Switch the machine off and unplug it before all cleaning, maintenance and whenever it is not being used.

Inspect the log splitter for any damage before operating it, pay particular attention to the mains lead, make sure that none of the nuts and bolts are loose and that the hydraulic control lever and its cover work properly.

Read the instruction manual. Read the entire instruction manual and familiarise yourself with the operation of the log splitter before starting to operate it.

Wear eye protection. Protect your eyes from wood chips and splinters. Use protective glasses or a visor.

Wear safety gloves.

Wear safety footwear. Footwear with steel toe caps should be used to protect your feet from falling objects.

Consider the environment, dispose of waste oil in accordance with local regulations.
Product description
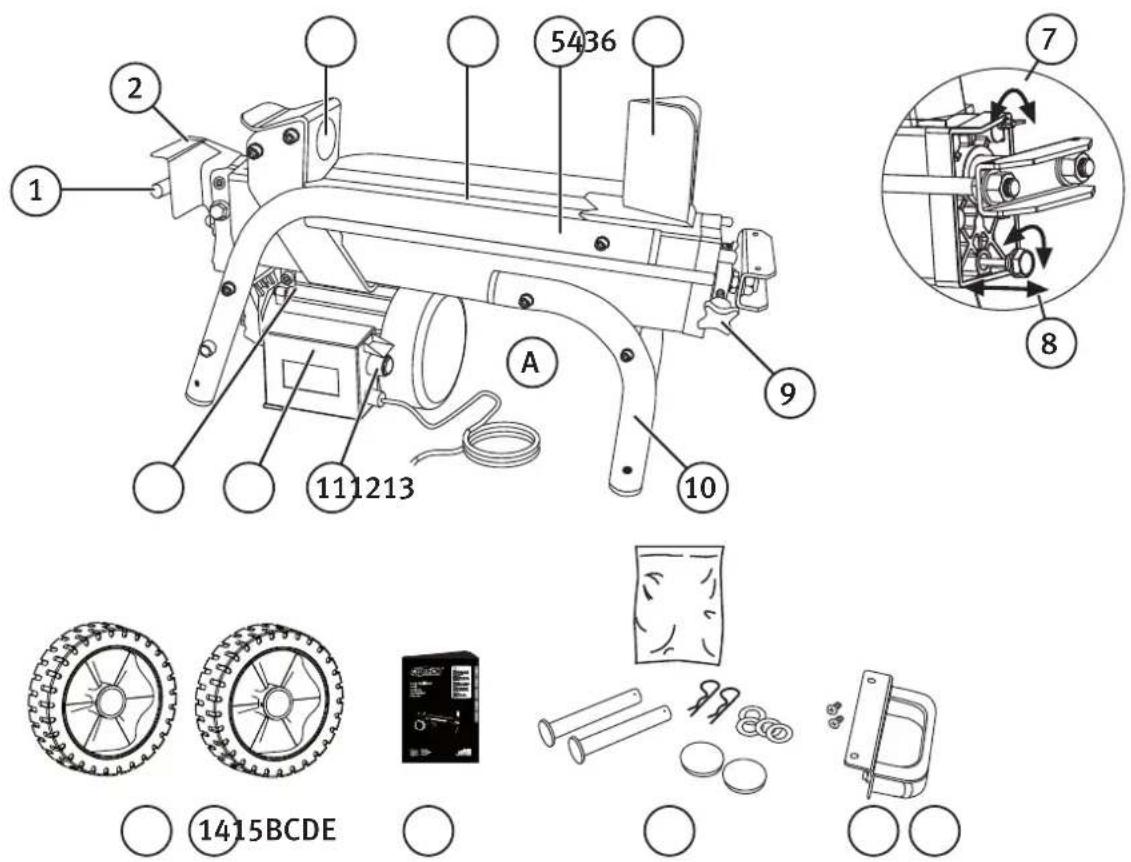
Parts
- Control lever
- Control lever guard
- Pressure plate
- Support table
- Log retaining plate
- Splitting wedge
- Bleed screw
- Oil drain bolt/dipstick
- Return stop
- Support leg
- Power switch
- Electrics box
- Motor housing
- Wheels for short range transport only
- Cup Pull
The package contains
A. Log splitter
B. Wheels
C. Instruction manual
D. Bag of assorted fasteners
E. Handle
Assembly
Attach the wheels using the fastening pieces provided in the bag: washers, axle spindle, and pins.
Preparations
- Place the log splitter on firm, level surface providing a comfortable working height. Ensure that there is adequate lighting for the work to be carried out safely.
- Plug the mains lead into an electrical socket, preferably via an RCD. Take care to position the mains lead where it will not hinder the work or be damaged by the work with the log splitter.
- Unscrew the bleed screw (7) 3 or 4 turns to ensure a detectable flow of air to the oil tank while the log splitter is in operation.
Setting the desired splitting length
The log splitter returns to the set splitting length automatically. The splitting length can be set by using a return stop which prevents the piston from returning all the way.
- Run the piston out without a piece of wood, release the power switch (11) but hold the piston in the extended position using the control lever (1).
- Undo the return stop screw.
- Move the return stop to the desired splitting length and tighten the screw.
Operating the log splitter
- Always place the least knotty end of the log toward the wedge, always split along the grain.
- Position the log in such a way that it is stable, use the log retaining plate to help.
- Start the motor by pressing and holding in the power switch (11).
- Start the hydraulic ram by depressing the control lever (1) (with the power switch pressed in).
- The pressure plate (3) will force the log against the splitting wedge.
- Release the control lever (1) and the power switch (11) to end the splitting operation once the log has been split.
Note: The pressure plate will automatically stop at about 8 cm / 3 inches before it reaches the wedge.
natural_image
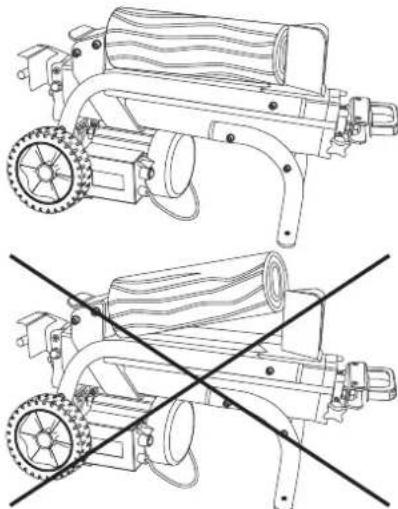
Technical line drawing of two mechanical devices with wheels and a cylindrical component, intersected by a diagonal line (no text or symbols)- Note: If the wood does not start to split after 5 seconds despite full pressure, release the control lever and the power switch and let the pressure plate return to the starting position. Turn the log through 90 degrees and try to split it again.
- Note: Make sure that the bleed screw (7) is closed before the log splitter is moved or put away, otherwise oil could leak out. If the bleed screw is left open when the log splitter is stored away, the oil will absorb moisture from the air. This can cause the hydraulic system to rust from the inside.
- Note: Do not use just the top half of the wedge for splitting, the log splitter can be damaged by unbalanced loading.
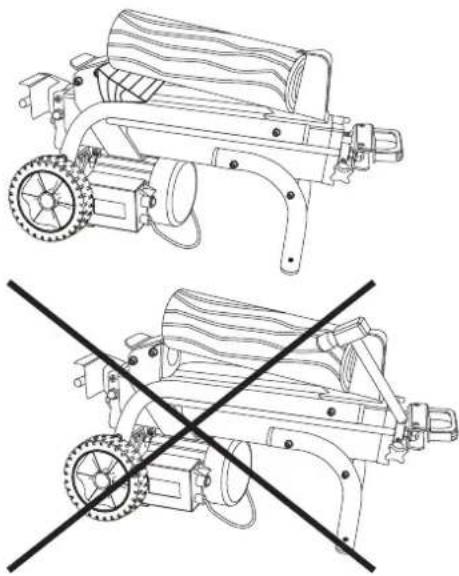
If the log jams
- Stop the log splitter.
- Once the pressure plate (3) has returned to its starting position: place a wooden wedge under the end of the log nearest the pressure plate.
- Start the log splitter and force the wedge under the log using the pressure plate.
- Repeat the procedure with a larger wedge if necessary.
Note: Never try to dislodge a log which is under pressure, it could split and fly off with great force and damage the log splitter or cause an injury.
natural_image
Technical line drawing of two mechanical devices with no visible text or symbolsMaintenance
Changing the hydraulic oil
The hydraulic oil should be changed at regular intervals (about every 150 hours) as follows:
- Make sure that the pressure plate (3) is in its starting position before pulling out the plug.
- Remove the drain bolt (8).
- Tilt the log splitter with the wedge end down over a container capable of holding at least 4 litres of oil and wait until the oil has drained out.
- Tilt the log splitter the other way, so that the motor end is down and pour in about 3.5 litres of good quality new hydraulic oil.
- Wipe the dipstick, dip it into the tank with the log splitter in the vertical position, pull it out and read it. The oil level should be between the two grooves on the dipstick.
- Clean the drain bolt and screw it back in tight.
- Recheck the oil level regularly and top up the oil if necessary.
Sharpening the wedge
The splitting wedge should be kept sharp by filing it regularly with a fine-toothed file.
Other maintenance
• Always unplug the machine before carrying out any adjustments or maintenance.
- Ensure that the mains lead, plug and on/off switch are all in good condition and undamaged.
- Clean all the parts of the log splitter with a brush and dry rags.
- Store the machine in a dry, clean, non-corrosive environment and out of children's reach. Make sure that the temperature of storage area does not fall to below -25^ .
- Make sure that all the nuts and bolts are tightened, especially the nuts on the pull rods (by the handle).
Responsible disposal
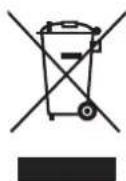
This symbol indicates that this product should not be disposed of with general household waste. This applies throughout the entire EU. In order to prevent any harm to the environment or health hazards caused by incorrect waste disposal, the product must be handed in for recycling so that the material can be disposed of in a responsible manner. When recycling your product, take it to your local collection facility or contact the place of purchase. They will ensure that the product is disposed of in an environmentally sound manner.
Troubleshooting
| Problem Possible cause | Remedy | |
| Fails to split log. Log imp | properly positioned. Turn the log around or rotate it. | |
| The log is too big or too hard. Reduce the size of the log before splitting. | ||
| The wedge is blunt or damaged. Sharpen the wedge (refer to Maintenance). | ||
| Oil leakage. Localise the leak, have a qualified mechanic fix the leak. | ||
| Incorrect pressure limiting screw setting. | Have a qualified mechanic adjust the pressure setting. | |
| Pressure plate moves jerkily, makes strange noises and vibrates heavily. | Lack of oil, air in the system. Check the oil level and refill if necessary. Check for leaks. | |
| Oil leak around piston or other component. | Air trapped in system during operation. | Loosen the bleed screw 3–4 turns before starting work. |
| The bleed screw has not been tightened before the log splitter was moved. | Tighten the bleed screw before moving the log splitter. | |
| The oil drain bolt is not properly tight. Tighten the oil drain bolt. | ||
| The hydraulic valve or gasket is worn. Contact the retailer. | ||
Specifications
Motor 230 V AC, 50 Hz
Power 1500 W
IP rating IP54
Log capacity* ∅ 5–25 cm, length: 15–37cm
Recommended
operating temperature +5 to +40 °C
Splitting pressure 4 tonnes
Oil capacity 3.5 litres
Dimensions Length: 840 mm
Width: 360 mm
Height: 470 mm
Weight 40 kg
Adjustable return stop 160–370 mm
* The stated splitting capacity is indicative and depends on the hardness, diameter and knottiness of the wood. It is usually possible to split far larger diameter logs.
Vedklyv LS4T
natural_image
Technical line drawing of two types of industrial machines with no visible text or symbolsnatural_image
Technical line drawing of two mechanical devices with no visible text or symbolsUnderhåll
Byte av hydraulolja
natural_image
Technical line drawing of a mechanical device with wheels and a cylindrical component, intersected by diagonal lines (no text or symbols)natural_image
Technical line drawing of two mechanical devices with no visible text or symbolsVedlikehold
natural_image
Technical line drawing of a mechanical device with two views: top shows a cylindrical component, bottom shows a cross-shaped tool (no text or symbols)natural_image
Technical line drawing of two mechanical devices with no visible text or symbolsHuoltaminen
natural_image
Technical line drawing of two mechanical devices with wheels and a cylindrical component, intersected by a diagonal line (no text or symbols)natural_image
Technical line drawing of two mechanical devices with no visible text or symbolsWartung
Declaration of Conformity
10 - 13 Market Place
Kingston Upon Thames
Surrey
KT1 1JZ
Deutschland
- Viktig information:
- Safety
- General safety instructions for your safety and the safety of others
- Remove all spanners and repair tools.
- Avoid accidental starts.
- Use the correct extension leads.
- Use common sense and be careful.
- Inspect the tool for damage.
- Use only recommended accessories.
- Should only be repaired by a qualified technician.
- Electric machinery should be connected to the mains via a Residual Current Device. This can help minimise the risk of an electric shock in the event of an earth fault or short circuit.
- Additional safety rules for log splitters
- Product safety symbols
- Product description
- Parts
- The package contains
- Assembly
- Preparations
- Setting the desired splitting length
- Operating the log splitter
- If the log jams
- Maintenance
- Changing the hydraulic oil
- Sharpening the wedge
- Other maintenance
- Responsible disposal
- Specifications
- Vedklyv LS4T
- Underhåll
- Byte av hydraulolja
- Vedlikehold
- Huoltaminen
- Wartung
- Declaration of Conformity
- Deutschland
Brand : Cocraft
Model : LS4T
Category : Log splitter