
HPV 720 - Polisher Cocraft - Free user manual and instructions
Find the device manual for free HPV 720 Cocraft in PDF.


| Brand | Cocraft |
| Model | HPV 720 (R7171 / 18-3597 / 40-9901) |
| Product Type | Random Orbital Polisher |
| Voltage | 220–240 V AC, 50 Hz |
| Power Consumption | 720 W |
| No-Load Speed Range | 2100–5000 rpm (variable) |
| Orbital Motion (Stroke) | 21 mm |
| Backing Pad Diameter | 145 mm (hook-and-loop) |
| Recommended Polishing Sponge Size | 160 mm diameter |
| Weight | 2.8 kg |
| Sound Pressure Level | 85 dB(A), K=3 dB |
| Sound Power Level | 96 dB(A), K=3 dB |
| Vibration Level | 5.56 m/s² |
| Protection Class | II (Double insulated) |
| Included Accessories | Allen key for balancing |
| Intended Use | Dry polishing only |
| Prohibited Operations | Grinding, sanding, wire brushing, cutting-off |
| Speed Control | Variable speed regulator (MIN to 6) |
| Trigger Lock | Yes, for continuous operation |
| Balancing Feature | Adjustable counterweight via Allen key |
| Ventilation | Regular cleaning required |
| Storage | Store with backing pad facing up |
| Spare Parts Availability | Polishing sponges sold separately |
| Safety Gear Required | Ear protection, eye protection, read manual |
Frequently Asked Questions - HPV 720 Cocraft
User questions about HPV 720 Cocraft
0 question about this device. Answer the ones you know or ask your own.
Ask a new question about this device
Download the instructions for your Polisher in PDF format for free! Find your manual HPV 720 - Cocraft and take your electronic device back in hand. On this page are published all the documents necessary for the use of your device. HPV 720 by Cocraft.
USER MANUAL HPV 720 Cocraft
Read the entire instruction manual carefully and make sure that you fully understand it before you use the equipment. Keep the manual for future reference.
Viktig information:
natural_image
Blue Cocralt power tool with black handle and mesh blade, displayed against a textured gray background (no text or symbols visible on the tool itself)Art.no Model
18-3597
R7171
40-9901
R7171
Ver. 20151106
Original instructions
Bruksanvisning i original
Random Orbital Polisher
Art.no 18-3597 Model R7171
40-9901 R7171
Please read the entire instruction manual before using the product and then save it for future reference. We reserve the right for any errors in text or images and any necessary changes made to technical data. In the event of technical problems or other queries, please contact our Customer Services (see address details on the back).
Safety
General safety instructions for power tools
Warning: Read all the instructions.
Failure to adhere to the following instructions may lead to electric shocks, fires and/or serious injury.
SAVE THESE INSTRUCTIONS.
The term “power tool” in the following text refers to your handheld mains operated or battery operated tool.
1) Work area safety
a) Keep the work area clean and well illuminated. Cluttered and poorly lit areas invite accidents.
b) Do not use power tools in explosive environments, such as in the presence of flammable liquids, gases or dust. Power tools create sparks which may ignite dust or fumes.
c) Keep children and other bystanders away from the area where you are using the power tool. Distractions can cause you to lose your concentration and control.
2) Electrical safety
a) The plug of the power tool must fit correctly into the wall socket. Never modify the plug in any way. Never use an adaptor plug together with earthed power tools. Unmodified plugs and matching outlets will reduce the risk of electric shocks.
b) Avoid physical contact with earthed objects such as pipes, radiators, ovens and refrigerators. There is an increased risk of electric shock if your body is earthed.
c) Do not expose the power tool to rain or other wet conditions. Water entering a power tool will increase the risk of electric shock.
d) Do not abuse the mains lead. Never use the lead for carrying, pulling or unplugging the power tool. Keep the lead away from heat, oil, sharp edges and moving parts. Damaged or tangled leads increase the risk of electric shock.
e) When using power tools outdoors, use an extension lead that is suitable for this purpose. The use of an extension lead designed for outdoor use decreases the risk of electric shocks.
f) If the use of the power tool in a wet environment is unavoidable, a wall socket equipped with a portable residual current device (PRCD) should be used. Use of an RCD significantly reduces the risk of electric shock.
3) Personal safety
a) Pay attention to what you are doing and use common sense when using power tools. Never use power tools if you are tired or under the influence of drugs, alcohol or medication. One moment of inattention while using a power tool may result in a serious injury.
b) Wear protective clothing. Always wear safety glasses. Using protective clothing such as dust masks, non-slip safety shoes, helmets and ear defenders decreases the risk of injury.
c) Avoid accidental starts. Make sure that the power switch is set to OFF before plugging the power tool into a wall socket, fitting the battery or picking up/carrying the power tool. Never carry a power tool with your finger on the trigger and never connect the power tool to a wall socket when the switch is set to ON, since it may result in injury.
d) Remove all service tools/keys before switching on the power tool. A service tool left on a rotating part of the power tool may result in personal injury.
e) Do not overreach. Keep proper footing and balance at all times. This enables better control of the power tool in unexpected situations.
f) Wear suitable clothing. Do not wear loose-fitting clothing or jewellery. Keep hair, clothes and gloves away from moving parts. Loose-fitting clothes, jewellery or long hair could become caught in moving parts.
g) If equipment for the extraction and collection of dust is available, make sure it is connected and used properly. Use of dust collection equipment can reduce dust related hazards.
4) Use and maintenance of the power tool
a) Do not force the power tool. Use the correct power tool for your application. The correct power tool will do the job better and safer if used at the rate for which it was designed.
b) Never use the power tool if the power switch does not switch the tool on and off properly. Any power tool that cannot be controlled by the power switch is dangerous and must be repaired.
c) Unplug the lead from the wall socket or remove the battery before making any adjustments, changing accessories or storing the power tool. These precautions reduce the risk of the power tool starting unexpectedly.
d) Store power tools that are not being used out of children's reach. Do not allow people who are unfamiliar with the tool or these instructions to operate the tool. Power tools are dangerous in the hands of untrained users.
e) Properly maintain your power tools. Check for misalignment, binding of moving parts, broken parts or anything else which might affect the operation of the power tool. If any damage is noticed, have the power tool repaired before using. Many accidents are caused by poorly maintained power tools.
f) Keep cutting tools sharp and clean. Properly maintained cutting tools with sharp cutting edges are less likely to bind and are easier to control.
g) Use the power tool, and any accessories in accordance with these instructions, take into consideration the working conditions and the work that is to be performed. Use of the power tool for a purpose other than that for which it is intended could result in a dangerous situation.
5) Service
a) Repairs and service should only be performed by qualified tradesmen, and only with original spare parts. This guarantees that the safety of the power tool is maintained.
Product safety symbols

natural_image
Simple line drawing of a human head inside a circle (no text or symbols)Wear ear protection.

natural_image
Icon of a person reading a book inside a circle (no text or symbols)Read the entire instruction manual.

natural_image
Simple line drawing of a person wearing sunglasses inside a circle (no text or symbols)Wear eye protection.
Specific safety precautions for polishing
- Polishing bonnets with drawstrings are not recommended, but if you are using one: Do not allow the polishing bonnet or its drawstring to hang loose when operating the polisher. Tuck in or trim off any loose ends. Loose and spinning attachment strings can entangle your fingers or snag on the workpiece.
- This angle polisher is only intended for dry polishing.
- Only use the recommended parts and/or accessories.
- The angle polisher must not be used by persons under the age of 16 years.
- The angle polisher must not be used on materials containing asbestos.
a) This power tool is solely intended for the purpose of polishing. Read all safety warnings, instructions, illustrations, and specifications provided with this tool. Failure to adhere to all of the following instructions can result in electric shock, fire and/or serious injury.
b) Operations such as grinding, sanding, wire brushing or cutting-off are not recommended to be performed with this power tool. The use of this power tool to perform tasks for which the tool was not intended, can lead to danger and personal injury.
c) Never use accessories which are not designed for use with this type of tool and which are not recommended by the manufacturer. Even if the accessory can be attached to your power tool, there is no guarantee that it can be used safely.
d) The rated speed of the accessory must at least correspond to the maximum rated speed of the power tool. Accessories which rotate faster than their rated speed can break and shatter.
e) The outer diameter and thickness of the accessory must be within the marked capacity of your electric hand tool. If an accessory is the wrong size, it will not fit the guard and will not be able to be controlled properly.
f) Do not use a defective accessory. Inspect the accessory and make sure there are no splits or cracks in the grinding wheels; cracks or wear and tear on the backing plates, loose or torn bristles on the steel brush wheels. If you drop your power tool or accessory, check for damage. If the accessory is damaged, use a new/undamaged accessory. After inspecting the tool and attaching an accessory, keep yourself and others outside of the power tool's danger zone and let it run at full speed for one minute. Damaged accessories will normally break during this test period.
g) Wear personal protective equipment. Depending on how you use the machine; use a visor/face protection or safety glasses. If necessary use a mask, ear protection, gloves, and apron/work clothing to protect you from small shards of metal or splinters from the work object. The eye protection you use must be able to protect against flying debris produced in different working positions. The breathing protection should be able to filter any particles produced by the work. Prolonged exposure to high levels of noise can result in hearing damage.
h) Keep children at a safe distance from the work area. Everyone at the workplace must wear personal protective equipment. Debris from the workpiece or from a damaged accessory can fly off and injure people outside of the immediate work area.
i) Position the mains lead well away from the rotating accessory. If you lose control, the lead can be sliced through or become entangled and pull your hand or arm into the rotating accessory.
j) Never put the power tool down before the accessory has completely stopped rotating. A rotating accessory can fasten on the work surface causing you to lose control of the tool.
k) Never leave the power tool switched on while carrying it at your side.
Accidental contact with the rotating accessory could snag your clothing, pulling the accessory into your body.
I) Clean the ventilation ports of the motor regularly. The fan of the motor draws dust into the housing. A large build-up of metal dust particles can lead to electrical hazards.
m) Do not use the power tool near flammable material. Sparks can easily ignite flammable material.
n) Do not use accessories, which require liquid coolants. The use of water or other liquid coolants can result in electrocution or shock.
Kickback and related warnings
- Kickback is a sudden reaction to a wedged or stuck wheel, backing plate, brush, or some other accessory. Pinching or snagging causes rapid stalling of the rotating accessory which in turn results in the power tool thrusting violently in the opposite direction of the accessory's rotation at the point of binding.
- Kickbacks are the result of the power tool being used in an incorrect manner, on incorrect objects, or under incorrect conditions and can be avoided by observing the following precautions.
a) Hold the power tool firmly and position your arms and body so that you can resist kickback forces. Always use the auxiliary handle if there is one, for maximum control over kickback or torque reaction during start-up.
The operator can control torque reactions or kickback forces, if proper precautions are taken.
b) Never place your hand near the rotating accessory. The accessory can be thrown back onto your hand.
c) Do not stand in the area, where the power tool is likely to end up if a kickback were to occur. Kickback will propel the tool in the opposite direction to the wheel's rotation at the point of snagging.
Outdoor use
- If the polisher is used outdoors, it is recommended that it is plugged into a socket protected by a residual current device (RCD). The RCD should be rated to trip at a current of 30 mA.
- Only use cables and connectors designed for outdoor use.
Description
The polisher is intended to be used with a 160 mm hook and loop attachment polishing sponge/buffing wheel.
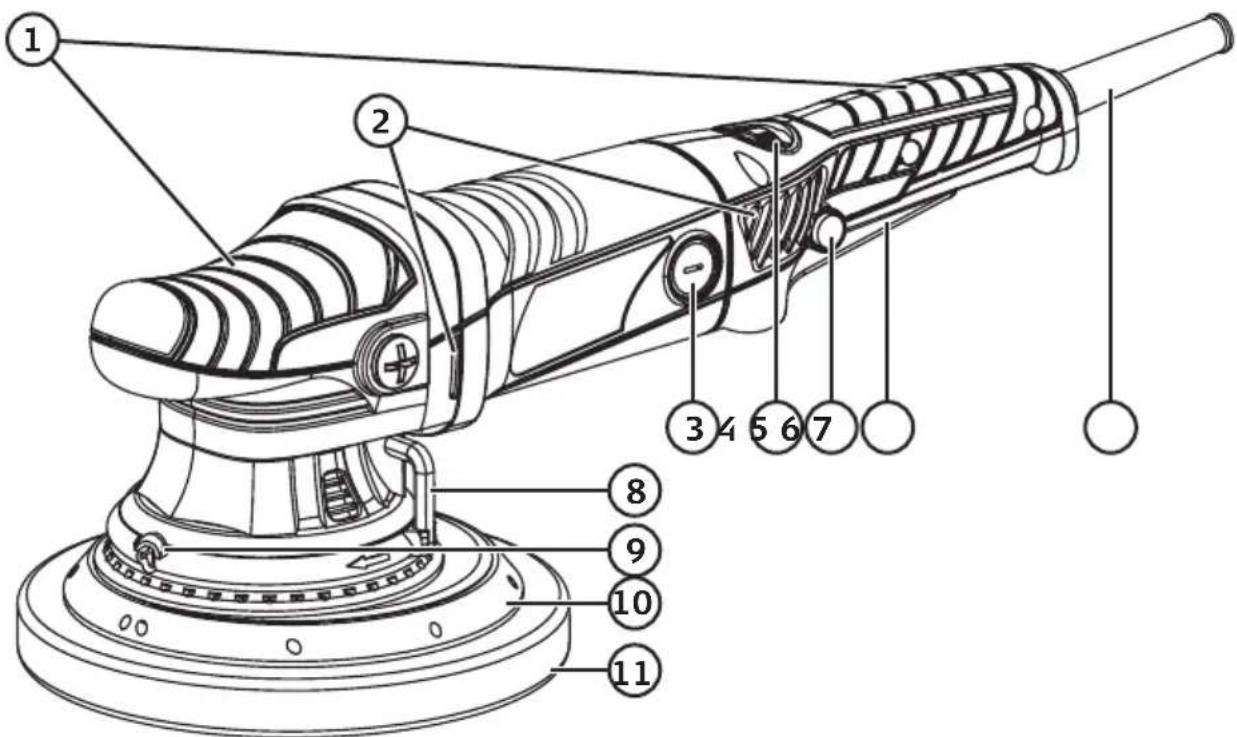
- Front/Rear handle
- Ventilation ports
- Carbon brush cover
- Speed regulator
- Trigger lock button
- Power trigger
- Power lead with plug
- Allen key
- Hole for Allen key used for balancing the spindle
- Backing pad ∅ 145 mm
- Polishing sponge/buffing wheel ∅ 160 mm (sold separately)
Before use
- Make sure that the polishing wheel is securely fastened to the spindle.
- Make sure that the polishing wheel can be turned by hand.
Operating instructions
Starting /Stopping
- Always hold the polisher in both hands and start and stop the polisher only when the polishing sponge is resting on the surface to be polished.
- Always start polishing on the lowest speed by setting the regulator (4) to MIN before pressing the trigger (6). Press in the trigger lock button (5) if you want the polisher to keep running all the time.
- Switch the polisher off by pressing in the front of the power trigger (6) and then releasing it.
Variable speed control
Set the desired speed, from MIN to 6 (max), using the regulator (4). Always begin on the lowest speed (MIN) and increase during operation for the best results. If you are unsure, it is a good idea to test the polisher at different speeds on a test surface before starting work.
Changing polishing sponge/ buffing pad
The various accessories which can be used with the polisher are all referred to as polishing sponge below.
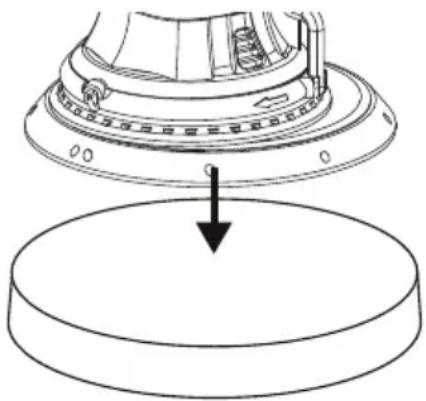
- Unplug the polisher and remove the polishing sponge (11) from the backing pad (10).
- The polishing sponge should be centred on the backing pad. This is easiest to achieve by holding the polishing sponge underneath and pressing the backing pad onto it from above. If the polishing sponge is fitted in this way, it is easy to make sure that it is centred, i.e., that it protrudes equally all the way round the edge of the backing pad.
natural_image
Technical line drawing of a mechanical component with a downward arrow indicating a process or assembly (no text or symbols present)Vibration level
The polisher normally vibrates during use due to its oscillating action. If the polisher vibrates a great deal, check that the polishing sponge is centred on the backing pad. You could also try adjusting the speed until the polisher vibrates less. There is also a way of balancing the backing pad in relation to the weight of the polishing sponge (see the next section).
Balancing the backing pad in case of abnormal vibrations
- The backing pad is factory-balanced for a polishing sponge of the recommended dimensions.
- This factory-balancing is suitable for most polishing sponges with equivalent dimensions and normally no adjustment is necessary.
- However, if abnormally heavy vibrations are experienced when using a polishing sponge of another size, the backing pad can be balanced by moving a counterweight on the spindle.
- The counterbalance can only be used to compensate for weight differences up to 20 g from the recommended polishing sponge weight.
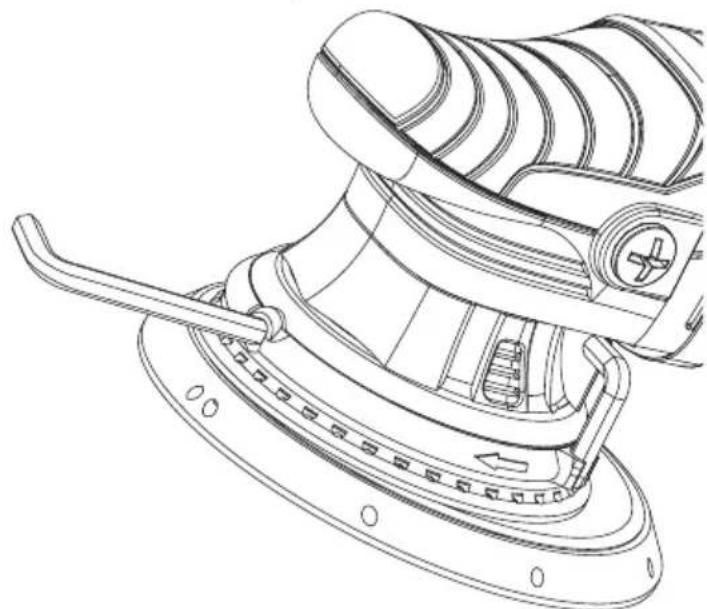
The counterweight is adjusted using the included Allen key.
-
Push the backing pad inwards (towards the power trigger) so that the adjusting screw (12) is lined up with the hole (9).
-
Insert the included Allen key (8) through the hole (9) and into the adjusting screw (12). Turning the adjusting screw, moves a small counterweight (13) in/out to compensate for the change in weight of the polishing sponge used.
- Turn the Allen key clockwise if the new polishing sponge is heavier than the preceding sponge.
- Turn the Allen key anticlockwise if the new polishing sponge is lighter than the preceding sponge.
The picture shows how to balance the backing pad.
-
Adjusting screw for balancing the backing pad.
-
Counterweight for balancing the backing pad.
natural_image
Technical line drawing of a steam ironing machine (no text or symbols present)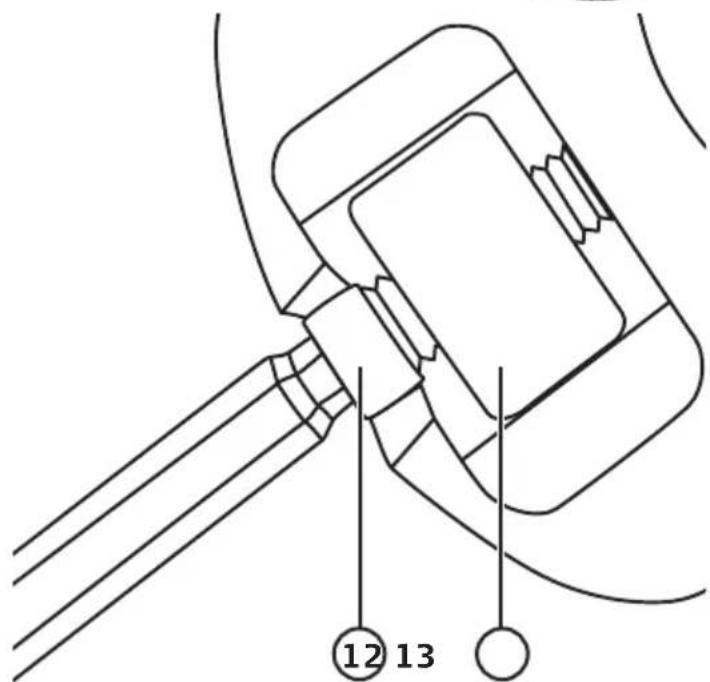
Polishing
The various polishing products such as rubbing compound, finish cleaner, wax, polish are all referred to below as polishing compound.
- There are several types of polishing compound which can be used, but this angle polisher is designed for use with liquid polishing compound.
-
Always read the instructions accompanying the polishing compound to ensure that it is suitable for use with a polishing machine.
-
Unplug the polisher and fit a polishing sponge onto the backing pad. Only use clean and undamaged polishing sponges and change them if you change the type of polishing compound. Most polishing sponges are washable, so all you need to do is have a few of them so you can wash them and reuse them.
-
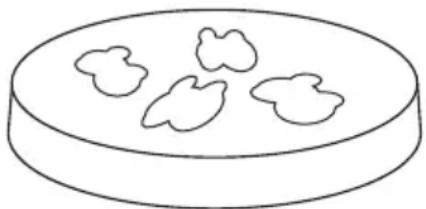
Apply the polishing compound to the polishing sponge. Begin by applying a small amount of polishing compound. Do NOT spread polishing compound onto the surface to be polished.
natural_image
Simple line drawing of a petri dish with four irregularly shaped food items on top (no text or symbols)-
Place the mains lead of the polisher over your shoulder to keep it out of the way whilst polishing. Note: Hold the polisher in both hands so that the polishing sponge rests on the surface to be polished and begin polishing on the lowest speed setting. Move the polisher up and down over the surface to be polished applying a light pressure. Keep the polisher moving all the time as paint finishes can be ruined if polishers are left polishing one spot for too long.
-
Intricate surfaces such as wing mirrors, door handles and grilles should be polished by hand.
- The most common mistake made when polishing is the use of too much polishing compound. Soaking the polishing sponge with polishing compound will make polishing more difficult and increase the polishing time. Using too much polish will shorten the useful life of the polishing sponge/pad.
- If the polishing sponge detaches itself from the backing pad, you have probably used too much polishing compound.
Maintenance
- Disconnect the plug from the power source before making any adjustments or servicing.
• Always store the polisher with the backing pad facing up to prevent it from deforming. - Remove the polishing sponge from the backing pad when you have finished work.
- Wash the polishing sponge by hand and let it air dry.
- Never use abrasive cleaning agents.
-
Clean the exterior of the polisher using a cloth lightly moistened with water and a mild detergent.
-
Do not use the polisher in the rain or if you have wet hands.
- Ensure that the ventilation openings are kept clear to prevent the motor from overheating.
- When working in dusty conditions: First disconnect the polisher from the mains supply and then clear the ventilation openings of any dust.
Responsible disposal
This symbol indicates that this product should not be disposed of with general household waste. This applies throughout the entire EU. In order to prevent any harm to the environment or health hazards caused by incorrect waste disposal, the product must be handed in for recycling so that the material can be disposed of in a responsible manner.
When recycling your product, take it to your local collection facility or contact the place of purchase. They will ensure that the product is disposed of in an environmentally sound manner.
natural_image
Symbol of a trash bin crossed with no visible text or labelsTechnical specifications
Voltage 220–240 V AC, 50 Hz
Wattage 720 W
No-load speed Variable speed control: 2100–5000 rpm (no-load)
Action 21 mm orbital motion
Backing pad ∅ 145 mm hook-and-loop
Polishing sponge Recommended diameter: 160 mm
Sound pressure (LpA) 85 dB(A), K: 3 dB
Sound power (LwA) 96 dB(A), K: 3 dB
Vibration level 5.56 m/s ^4
Weight 2.8 kg
Protection class ||
Polermaskin
Art.nr 18-3597 Modell R7171
40-9901 R7171
natural_image
Simple line drawing of a human head inside a circle (no text or symbols)Använd hörselskydd!

natural_image
Icon of a person reading a book inside a circle (no text or symbols)natural_image
Simple line drawing of a person wearing sunglasses inside a circle (no text or symbols)natural_image
Technical line drawing of a mechanical component with a downward arrow indicating motion or force (no text or symbols present)Vibrationer
natural_image
Technical line drawing of a steam iron with internal components and mounting base (no text or symbols)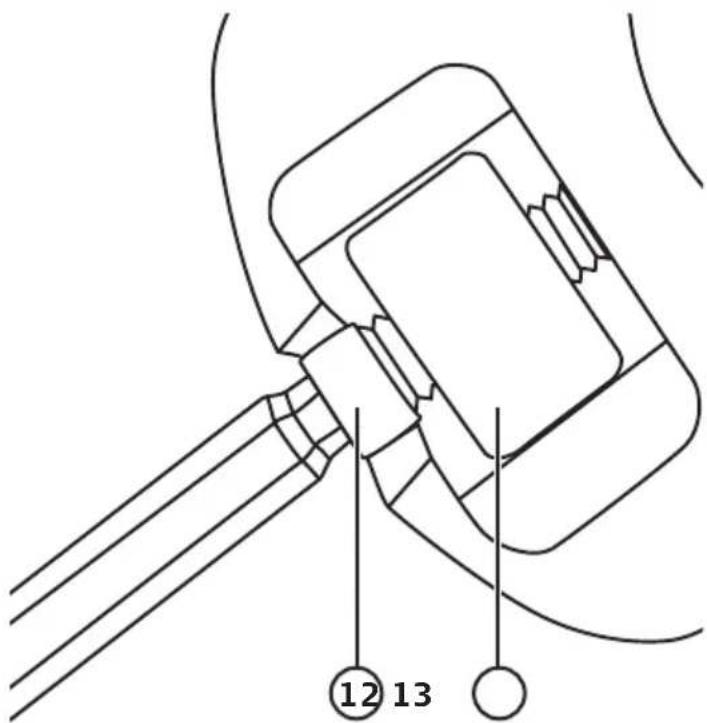
Polering
natural_image
Simple line drawing of a petri dish with four irregularly shaped food items (no text or symbols)natural_image
Symbol of a trash bin crossed with no text or numbers, accompanied by a solid black rectangle below (no text or symbols present)Tekniska specifikationer
Spänning 220–240V AC, 50 Hz
Effekt 720 W
Varvtal Steglös varvtalsreglering 2100–5000 v/min (obelastad)
natural_image
Simple line drawing of a human head inside a circle (no text or symbols)Bruk hørselsvern!

natural_image
Icon of a person reading a book inside a circle (no text or symbols)Les hele bruksanvisningen!

natural_image
Simple line drawing of a person's head wearing sunglasses inside a circle (no text or symbols)Bruk vernebriller!
natural_image
Technical line drawing of a mechanical component with a downward arrow indicating motion or force (no text or symbols present)Vibrasjoner
natural_image
Technical line drawing of a steam iron with internal components and mounting base (no text or symbols)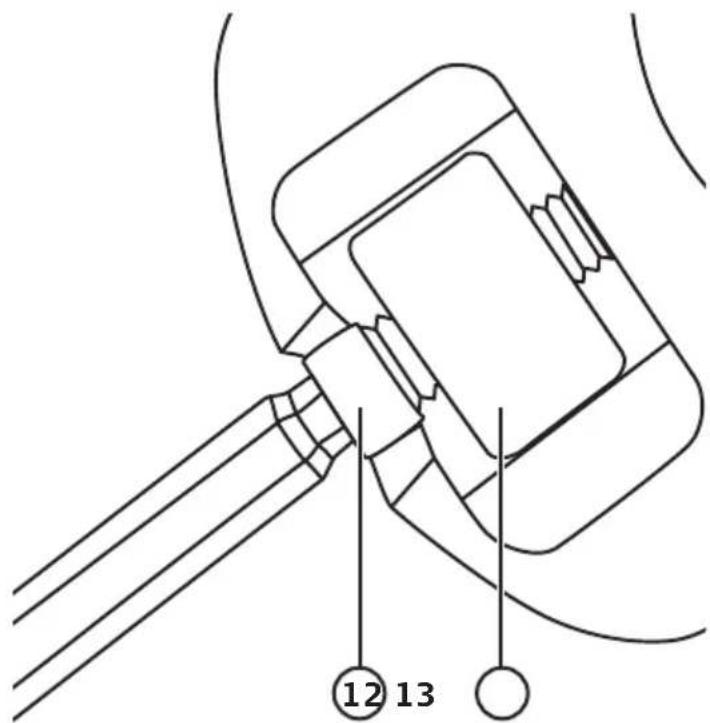
Polering
natural_image
Simple line drawing of a petri dish with four irregularly shaped food items (no text or symbols)-
Legg maskinens ledning over skulderen så den ikke er i veien ved poleringen. Obs! Hold maskinen med begge hendene, så polersvampen hviler på flaten som skal poleres, og start på det laveste turtallet. Før maskinen i vertikale og horisontale bevegelser over flaten som skal poleres med et lett trykk på maskinen. Hold maskinen i bevegelse hele tiden. Lakken kan bli ødelagt hvis den blir stående på ett område.
-
Smådetaljer som speil, dørhåndtak, grill etc. poleres for hånd.
natural_image
Symbol of a trash bin with crossed lines indicating no waste or restriction, and a solid rectangle below (no text or labels)natural_image
Simple line drawing of a human head inside a circle (no text or symbols)natural_image
Icon of a person reading a book inside a circle (no text or symbols)natural_image
Simple line drawing of a person's head wearing sunglasses inside a circle (no text or symbols)Käytä suojalaseja.
natural_image
Technical line drawing of a mechanical component with a downward arrow indicating rotation or assembly (no text or symbols present)Tärinä
natural_image
Technical line drawing of a mechanical assembly with no visible text or symbols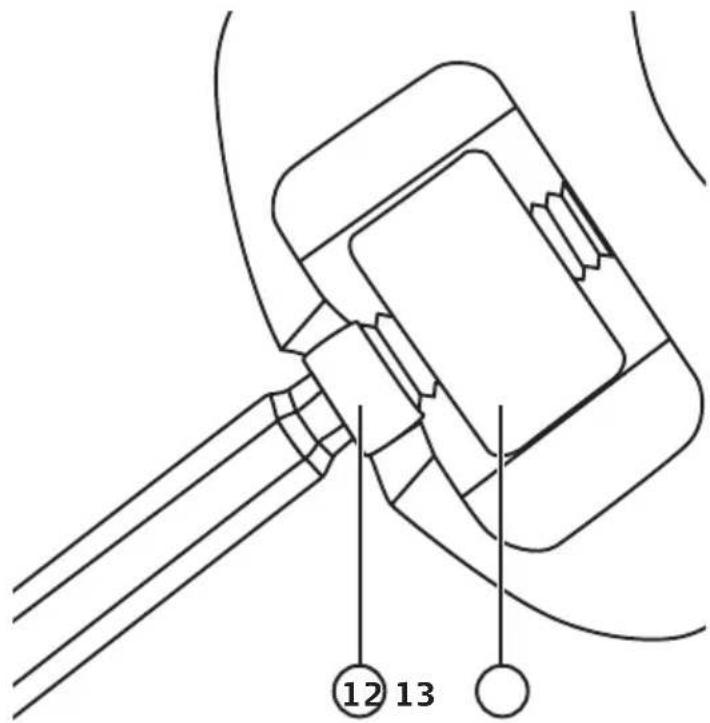
Kiillottaminen
natural_image
Simple line drawing of a petri dish with three irregularly shaped food items on top (no text or symbols)natural_image
Symbol of a trash bin with crossed lines indicating no waste or restriction, and a solid rectangle below (no text or labels)Tekniset tiedot
Jännite 220–240 V AC, 50Hz
Teho 720 W
natural_image
Simple line drawing of a human head inside a circle (no text or symbols)Gehörschutz tragen.

natural_image
Icon of a person reading a book inside a circle (no text or symbols)natural_image
Simple line drawing of a person's head wearing sunglasses inside a circle (no text or symbols)Augenschutz tragen.
natural_image
Technical line drawing of a mechanical component with a downward arrow indicating motion or force (no text or symbols present)Vibrationen
natural_image
Technical line drawing of a mechanical device with a flue and handle (no text or symbols)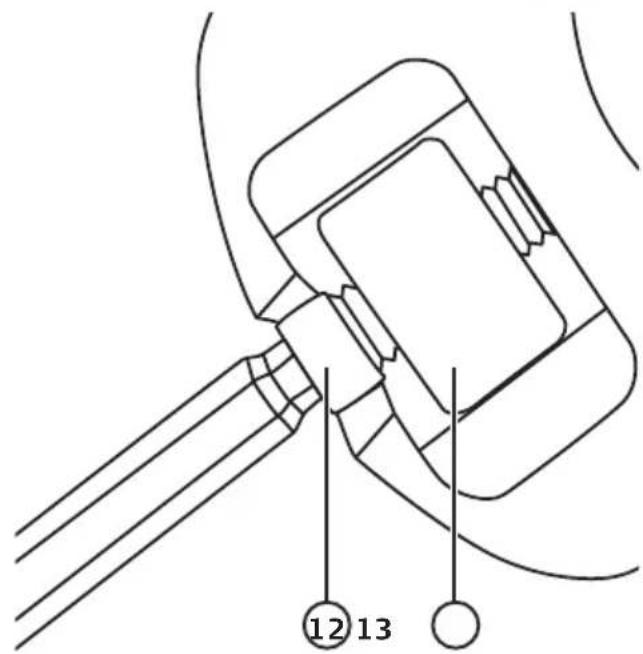
Polieren
natural_image
Simple line drawing of a petri dish with three irregularly shaped food items on top (no text or symbols)natural_image
Symbol of a waste bin with no text or labels, crossed by diagonal lines and a solid rectangle below (no readable text or symbols)Technische Daten
Declaration of Conformity
Declares that this product complies with the requirements of the following directives and standards
RANDOM ORBITAL POLISHER
Cocraft 40-9901 / 18-3597
R7171 / R7171
Machinery directive 2006/42/EC
EMC directive 2004/108/EC
Low voltage directive 2006/95/EC
EN 60745-1:2009
+A11:2010
EN 60745-2-3:2011
+A2:2013+A11:2014
EN 55014-1:2006
+A1:2009+A2:2011
EN 55014-2:1997
+A1:2001+A2:2008
EN 61000-3-2:2014
EN 61000-3-3:2013
Klas Balkow
President
Insjön, Sweden, 2015-10-26
Sverige
Postal 10 - 13 Market Place
Kingston Upon Thames
Surrey
KT1 1JZ
Deutschland
Kundenservice

- Viktig information:
- Random Orbital Polisher
- Safety
- General safety instructions for power tools
- SAVE THESE INSTRUCTIONS.
- 3) Personal safety
- 4) Use and maintenance of the power tool
- 5) Service
- Product safety symbols
- Specific safety precautions for polishing
- Kickback and related warnings
- Outdoor use
- Description
- Before use
- Operating instructions
- Starting /Stopping
- Variable speed control
- Changing polishing sponge/ buffing pad
- Vibration level
- Balancing the backing pad in case of abnormal vibrations
- Polishing
- Maintenance
- Responsible disposal
- Technical specifications
- Polermaskin
- Vibrationer
- Polering
- Tekniska specifikationer
- Vibrasjoner
- Tärinä
- Kiillottaminen
- Tekniset tiedot
- Vibrationen
- Polieren
- Technische Daten
- Declaration of Conformity
- Sverige
- Deutschland
Brand : Cocraft
Model : HPV 720
Category : Polisher