
HP 110 - Polisher Cocraft - Free user manual and instructions
Find the device manual for free HP 110 Cocraft in PDF.


| Product Type | Polisher |
| Brand | Cocraft |
| Model | HP 110 |
| Power Supply | 230 V ~ 50 Hz |
| Power Consumption | 1100 W |
| No-Load Speed | 2500 - 6000 rpm (adjustable) |
| Pad Size | 180 mm (7 inches) |
| Weight | 2.8 kg |
| Dimensions (L x W x H) | 450 x 200 x 170 mm |
| Overload Protection | Automatic reset |
| Soft Start | Yes |
| Variable Speed | 6-step dial |
| Spindle Lock | For pad changes |
| Dust Protection | Bearing dust seal |
| Safety Features | Lock-off switch, double insulation |
| Accessories Included | Wool polishing pad, foam pad, side handle, spanner |
| Maintenance | Clean with dry cloth; check carbon brushes periodically |
| Repairability | Spare parts available via Cocraft service centers |
Frequently Asked Questions - HP 110 Cocraft
User questions about HP 110 Cocraft
0 question about this device. Answer the ones you know or ask your own.
Ask a new question about this device
Download the instructions for your Polisher in PDF format for free! Find your manual HP 110 - Cocraft and take your electronic device back in hand. On this page are published all the documents necessary for the use of your device. HP 110 by Cocraft.
USER MANUAL HP 110 Cocraft
Read the entire instruction manual carefully and make sure that you fully understand it before you use the equipment. Keep the manual for future reference.
Viktig information:
natural_image
Blue Cocraft HP 110 power tool with white brush on a circular base (no text or symbols visible on the device itself)Art.no Model
18-3578
40-9524
Q1L-YJ20-240-UK
Q1L-YJ20-240
Ver. 20160321
Original instructions
Bruksanvisning i original
Originalbruksanvisning
Please read the entire instruction manual before using the product and then save it for future reference. We reserve the right for any errors in text or images and any necessary changes made to technical data. In the event of technical problems or other queries, please contact our Customer Services (see address details on the back).
Safety
General safety instructions for power tools
Warning: Read all the instructions.
Failure to adhere to the following instructions may lead to electric shocks, fires or serious injuries.
SAVE THESE INSTRUCTIONS.
The term “power tool” in the following text refers to your handheld mains operated or battery operated tool.
1) Work area
a) Keep the work area clean and well illuminated. Cluttered and poorly lit areas invite accidents.
b) Do not operate power tools in explosive atmospheres, such as in the presence of flammable liquids, gases or dust. Power tools generate sparks that can easily ignite dust or fumes.
c) Keep children and bystanders away while operating a power tool. Distractions can cause you to lose concentration and control of the tool.
2) Electrical safety
a) The power tool plug must fit correctly into the wall socket. Never modify the plug in any way. Never use an adaptor plug together with earthed power tools. Unmodified plugs and suitable wall sockets minimize the risk of electric shocks.
b) Avoid physical contact with earthed objects such as pipes, radiators, ovens and refrigerators. There is an increased risk of receiving an electrical shock if your body is earthed.
c) Do not expose the power tool to rain or other wet conditions. Water entering a power tool will increase the risk of electric shock.
d) Do not abuse the mains lead. Never use the lead to carry/drag the tool or to jerk the plug from a wall socket. Keep the lead away from heat, oil, sharp edges and moving parts. Damaged or tangled leads increase the risk of electric shock.
e) Use an extension lead that is suitable for outdoor use when using the power tools outdoors. The use of an extension lead designed for outdoor use decreases the risk of electric shocks.
f) If the use of the power tool in a wet environment is unavoidable, a wall socket equipped with a residual current device (RCD) should be used. Use of an RCD significantly reduces the risk of electric shock.
g) The mains lead should be checked regularly. Never use the product if the mains lead or plug is damaged. If the mains lead is damaged in any way it must be replaced by a qualified electrician.
3) Personal safety
a) Stay alert and attentive to the project at hand and use common sense whenever operating a power tool. Never use power tools if you are tired or under the influence of drugs, alcohol or medication. One moment of inattention while using a power tool may result in serious personal injury.
b) Use personal protective equipment. Always wear eye protection. Using protective clothing such as dust masks, non-slip safety shoes, helmets and ear defenders reduces the risk of injury.
c) Prevent unintentional starting. Make sure that the power switch is set to OFF before plugging the power tool into a wall socket, fitting the battery or picking up/carrying the power tool. Carrying a power tool with your finger on the power switch/trigger or connecting the power tool to a wall socket when the power switch is set to ON is inviting an accident.
d) Remove any adjusting key or wrench before switching the power tool on. A service tool left on a rotating part of the power tool may result in personal injury.
e) Do not overreach. Keep proper footing and balance at all times. This enables better control of the power tool in unexpected situations.
f) Wear suitable clothing. Do not wear loose-fitting clothing or jewellery. Keep hair, clothes and gloves away from moving parts. Loose-fitting clothes, jewellery or long hair could become caught in moving parts.
g) If devices are provided for the connection of dust extraction and collection facilities, ensure that these are connected and used properly. Use of dust collection equipment can reduce dust related hazards.
4) Power tool use and care
a) Do not force the power tool. Use the correct power tool for your application. The correct power tool will do the job better and safer if used at the rate for which it was designed.
b) Do not use the power tool if the power switch does not switch the tool on and off properly. Any power tool that cannot be controlled by the power switch is dangerous and must be repaired.
c) Disconnect the plug from the power source and/or the battery pack from the power tool before making any adjustments, changing accessories or storing the power tool. These precautions reduce the risk of the power tool starting unexpectedly.
d) Store power tools that are not being used out of children's reach. Do not allow people who are unfamiliar with the tool or these instructions to operate the tool. Power tools are dangerous in the hands of untrained users.
e) Properly maintain your power tools. Check for misalignment or binding of moving parts, broken parts or anything else which might affect the operation of the power tool. If something is damaged, have the power tool repaired before use. Many accidents are caused by poorly maintained power tools.
f) Keep cutting tools sharp and clean. Properly maintained cutting tools with sharp cutting edges are less likely to bind and are easier to control.
g) Use the power tool and any accessories in accordance with these instructions and taking into account the working conditions and the work to be performed. Using the power tool for a purpose other than that for which it is intended could result in a dangerous situation.
5) Service
a) Repairs and service should only be performed by qualified tradesmen, and only with original spare parts. This guarantees that the safety of the power tool is maintained.
Special safety warnings concerning the use of polishing tools
a) This power tool is solely intended for the purpose of polishing. Read all safety warnings, instructions, illustrations, and specifications provided with this tool. Failure to adhere to all of the following instructions can result in electric shock, fire or serious injury.
b) Operations such as grinding, sanding, wire brushing, polishing or cutting-off are not recommended to be performed with this power tool. The use of this power tool to perform tasks for which the tool was not intended, can lead to danger and personal injury.
c) Do not use accessories which are not specifically designed and recommended by the tool manufacturer. Even if the accessory can be attached to your power tool, there is no guarantee that it can be used safely.
d) The accessory's rated speed must at least correspond to the power tool's maximum rated speed. Accessories which rotate faster than their rated speed can break and shatter.
e) The accessory's outer diameter and size must fall within the rated capacity of your power tool. Using the incorrect size of accessory could render the safety features of the power tool inoperable and cause you to loose control of the power tool.
f) The spindle size of the wheels, flanges, and backing plates or other accessories must fit the spindle on your power tool correctly. Ill-fitting/incorrectly sized accessories will end up out of balance, vibrate violently, and may lead to loss of control over the power tool.
g) Do not use damaged accessories. Inspect the accessory and make sure there are no splits or cracks in the grinding wheels; cracks or wear and tear on the backing plates, or loose or torn bristles on the steel brush wheels. If you drop your power tool or accessory, check for damage. If the accessory is damaged, use a new/undamaged accessory. After inspecting the tool and attaching an accessory, keep yourself and others outside of the power tool's danger zone and let it run at full speed for one minute. Damaged accessories will normally break during this test period.
h) Wear personal protective equipment. Depending on how you use the machine; use a visor/face protection or safety glasses. If necessary use a mask, ear protection, gloves, and apron/work clothing to protect you from small shards of metal or splinters from the work object. The eye protection you use must be able to protect against flying debris produced in different working positions. The breathing protection should be able to filter any particles produced by the work. Prolonged exposure to high levels of noise can result in hearing damage.
i) Keep bystanders at a safe distance from the work area. Everyone who visits the place of work must wear personal protective equipment. Debris from the workpiece or from a damaged accessory can fly off and injure people outside of the immediate work area.
j) Only hold the power tool by its insulated grip when working in positions where the cut-off wheel might possibly cut through hidden cables or its own mains lead. Cut-off wheels which come in contact with an electric cable can electrify metal parts of the power tool and subject the user to an electric shock.
k) Position the mains lead well away from the rotating accessory. If you lose control, the lead can be sliced through or become entangled and pull your hand or arm into the rotating accessory.
I) Never put the power tool down before the accessory has completely stopped rotating. The rotating accessory can become stuck in the material resulting in loss of control.
m) Do not run the power tool when you are carrying it. Unintentional contact with the rotating accessory can cause clothing to become caught and pull the tool towards your body.
n) Regularly clean the motor's ventilation ports. The motor's fan pulls in all types of dust through the outer casing and any build up of collected metal dust can lead to possible electrical hazards.
o) Do not use the power tool near flammable materials. Sparks can easily ignite flammable material.
p) Do not use accessories which require liquid coolants. The use of water or other liquid coolants can result in electric shock or electrocution.
Kickback and related warnings
A kickback is a sudden counteraction to a jammed or stuck disc, backing plate, brush, or some other accessory. A jammed or stuck rotating accessory results in the power tool thrusting violently in the opposite direction of the accessory's rotation at the point of binding.
For example, if a grinding disc gets stuck or is jammed into the workpiece, the edge of the disc can grab onto the workpiece and either dig itself down deeper or kick upwards. The grinding wheel is either thrown towards or away from the user depending on the rotation of the grinding wheel. The grinding wheel can also break under these circumstances. Kickbacks are the result of the power tool being used in an incorrect manner, on incorrect objects, or under incorrect conditions and can be avoided by observing the following precautions.
a) Hold the power tool steady and position your arms and body so that you can adequately handle any kickback. Always use the auxiliary (side) handle if there is one for maximum control during kickback and to be able to control the torque “kick” produced by turning the angle grinder on. Kickbacks or reactions to torque can be controlled by the user if the necessary safety precautions are followed.
b) Never place your hand near the rotating accessory. The accessory can be thrown back onto your hand.
c) Do not stand in the area where the power tool is likely to end up if a kickback were to occur. Kickback will propel the tool in the opposite direction of the grinding wheel's rotation at the point of snagging.
d) Be extra careful when working on corners, sharp edges, etc. Avoid bouncing and getting the accessory stuck. Corners, sharp edges, and bouncing have a tendency to get the rotating accessory stuck and lead to loss of control of the tool.
e) Do not attach a saw chain woodcarving blade or toothed saw blade. Such blades frequently lead to kickbacks and loss of control.
Specific safety precautions for polishing
a) Do not allow any loose portion of the polishing bonnet or its attachment strings to spin freely. Tuck away or trim any loose attachment strings. Loose and spinning attachment strings can entangle your fingers or snag on the workpiece.
Safety symbols

Read through the entire instruction manual and save it for future use.

Wear hearing protection.

Wear respiratory protection.

Wear protective eye-wear.
Product description
- Power switch
- Adjustable handle
- Backing pad
- Microfibre polishing bonnet
- Synthetic wool polishing bonnet
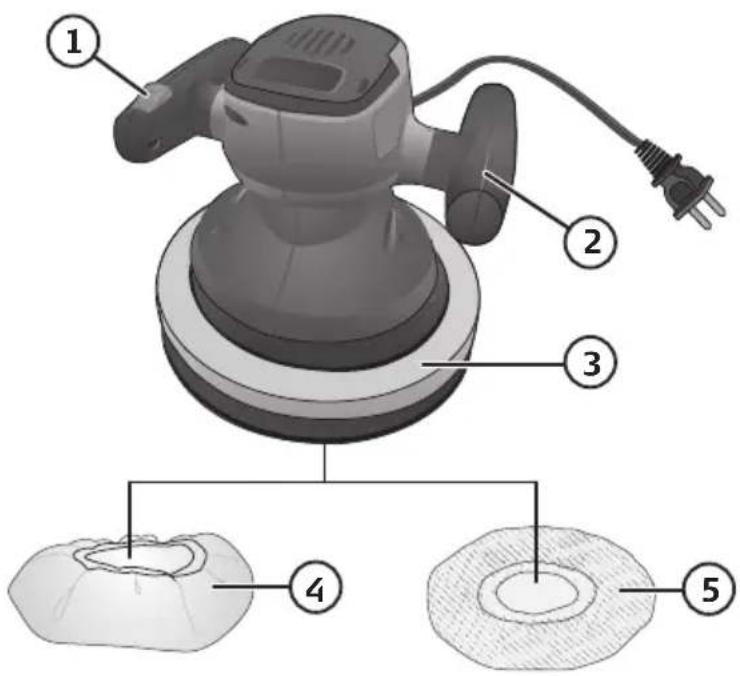
Operating instructions
Note: Read the polishing compound's instructions before beginning work in order to ensure that the compound is appropriate for the surface that you intend to polish.
- Make sure the product is unplugged from the wall socket before mounting the polishing bonnet onto the backing plate.
- Make sure that the polishing bonnet is securely in place by lifting the power tool and turning on the switch.
-
Turn off the machine and apply a thin layer of polishing compound onto the polishing bonnet. DO NOT apply polishing compound directly onto the surface to be polished.
-
Always rest the machine on the surface to be polished whenever you are starting or stopping the polisher.
-
Drape the mains lead over your shoulder and begin by polishing large flat surfaces first e.g. car-bonnets, -boots, -roofs, etc.
-
Let the weight of the machine do the work. Do not apply pressure. Note: Make sure to keep the machine in constant motion. Pausing shortly over a painted area can produce extremely high temperatures that may cause possible damage to the painted surface.
-
Next, work on smaller surfaces such as car doors. Detail and trim surfaces such as wing mirrors, door handles, grilles and other surfaces cannot be accessed effectively by the machine and must therefore be hand polished.
The most common mistake made when polishing is the use of too much wax or polish. Soaking the polishing bonnet with polish will make polishing more difficult and increase polishing time. Using too much polish will shorten the useful life of the polishing bonnet.
Handle adjustment
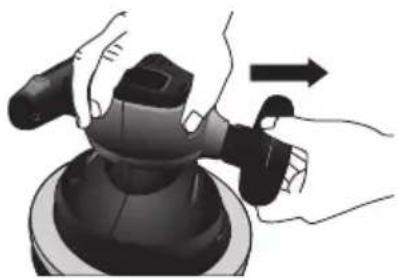
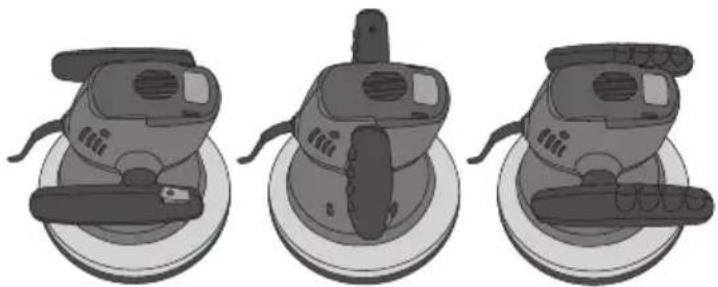
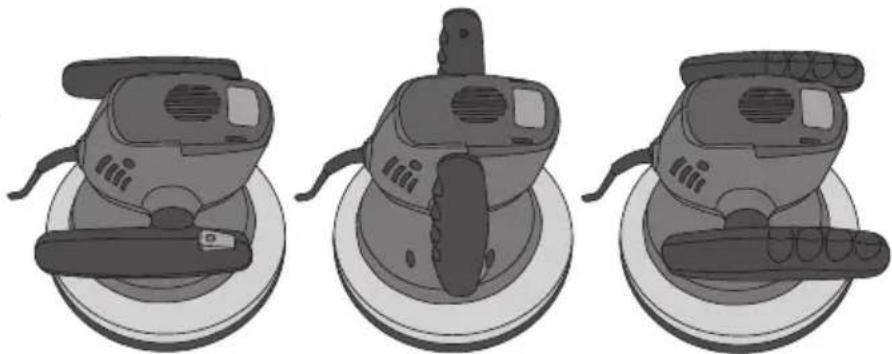
The handle can be set in 3 fixed positions.
- Place the polisher onto a stable flat surface and pull out the handle about 5 mm from the machine.
natural_image
Illustration of hands using a tool to adjust or install a mechanical component (no text or symbols visible)-
Turn the handle until it locks solidly into its new position.
-
Do the same with the other handle. Make sure that the handle is locked completely into position and is pulled back into direct contact with the machine.
natural_image
Three identical illustrations of a flat-screen power tool with a handle, shown from different angles (no text or symbols)Care and maintenance
- Always unplug the power tool from the power point before service, maintenance or when it is not in use.
• Always remove the polishing bonnet from the backing plate and let it dry after use. - Wash the polishing bonnet by hand and let it air dry.
- Clean the machine by using a lightly moistened cloth. Use only mild cleaning agents, never solvents or corrosive chemicals.
- Do not expose the polisher to water, moisture or other liquids. Never use the machine if it is damp or if your hands are wet.
- Always make sure that the machine's ventilation ports are free and clear of obstructions before beginning work.
- Store the thoroughly cleaned machine, in a dry, dust-free environment, out children's reach whenever it is not to be used for any extended period.
Responsible disposal
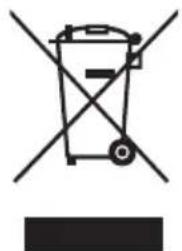
This symbol indicates that this product should not be disposed of with general household waste. This applies throughout the entire EU. In order to prevent any harm to the environment or health hazards caused by incorrect waste disposal, the product must be handed in for recycling so that the material can be disposed of in a responsible manner. When recycling your product, take it to your local collection facility or contact the place of purchase. They will ensure that the product is disposed of in an environmentally sound manner.
natural_image
Symbol of a trash bin crossed with no text or labels, accompanied by a black rectangle below (no readable text or symbols)Specifications
Rated voltage 230 V, 50 Hz
Power 110 W
Orbits 3200/min
Backing plate diameter 240 mm
Weight 2.2 kg
Polermaskin
Art.nr 18-3578
40-9524
Modell Q1L-YJ20-240-UK
Q1L-YJ20-240
Användning
natural_image
Illustration of hands using a power tool to adjust a mechanical component (no text or symbols visible)- Vrid handtaget tills det snäpper fast i den nya positionen.
natural_image
Three identical illustrations of a power saw with a blade, shown from different angles (no text or symbols)natural_image
Symbol of a trash bin crossed with no text or labels, accompanied by a blank rectangular block below (no text or symbols present)Specifikationer
Bruk
natural_image
Illustration of hands using a power tool to adjust or install a mechanical component (no text or symbols visible)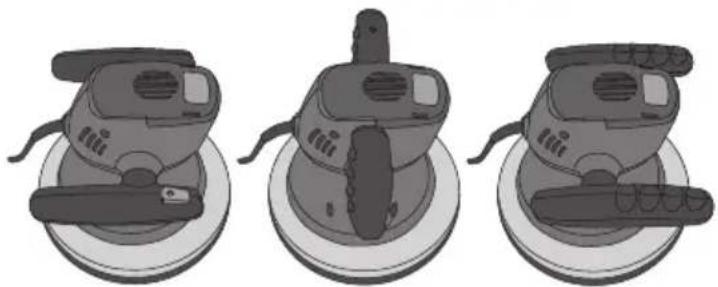
natural_image
Three identical illustrations of a flat-screen power tool with a handle, shown from different angles (no text or symbols)natural_image
Symbol of a trash bin with crossed lines indicating no waste or discharge (no text or labels)Spesifikasjoner
Spenning 230 V, 50 Hz
Effekt 110 W
Svingninger 3200/min
Diameter polerskiven 240 mm
Vekt 2,2 kg
Kiillotuskone
Tuotenro
18-3578
Malli
Q1L-YJ20-240-UK
40-9524
Q1L-YJ20-240
natural_image
Illustration of hands using a power tool to adjust a mechanical component (no text or symbols visible)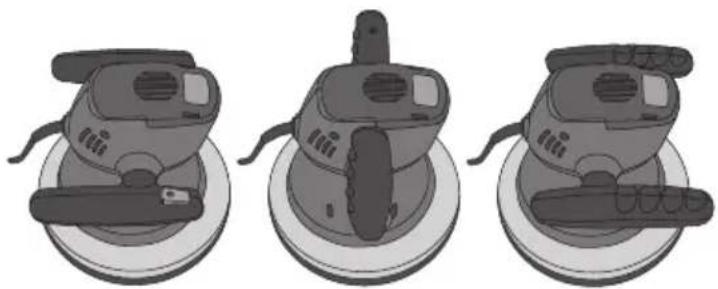
natural_image
Three identical illustrations of a flat-screen electric shaver with a blade, shown from different angles (no text or symbols)natural_image
Symbol of a waste bin with crossed lines indicating no waste, and a solid rectangle below (no text or labels)Tekniset tiedot
Bedienung
natural_image
Illustration of hands using a power tool to adjust a mechanical component (no text or symbols visible)natural_image
Three identical illustrations of a power shaver with a handle, shown from different angles (no text or symbols)natural_image
Symbol of a trash bin crossed with no text or numbers, representing waste sorting or disposal (no text present)Technische Daten
Declaration of Conformity
Declares that this product complies with the requirements of the following directives and standards
Machinery Directive 2006/42/EC
EN 60745-1:2009
+A11:2010
EN 60745-2-4:2009
+A11:2011
EMC Directive 2004/108/EC
EN 55014-1:2006
+A1:2009 +A2:2011
EN 55014-2:1997
+A1:2001 +A2:2008
EN 61000-3-2:2006
+A1:2009 +A2:2009
EN 61000-3-3:2008
Low Voltage Directive 2006/95/EC
Henrik Alfredsson
Manager Technique & Quality
Insjön, Sweden, 2016-02-19
Sverige
Postal 10 - 13 Market Place
Kingston Upon Thames
Surrey
KT1 1JZ
Deutschland
Kundenservice

- Viktig information:
- Safety
- General safety instructions for power tools
- SAVE THESE INSTRUCTIONS.
- 1) Work area
- 2) Electrical safety
- 3) Personal safety
- 4) Power tool use and care
- 5) Service
- Special safety warnings concerning the use of polishing tools
- Kickback and related warnings
- Specific safety precautions for polishing
- Safety symbols
- Product description
- Operating instructions
- Handle adjustment
- Care and maintenance
- Responsible disposal
- Specifications
- Polermaskin
- Användning
- Specifikationer
- Bruk
- Spesifikasjoner
- Kiillotuskone
- Tekniset tiedot
- Bedienung
- Technische Daten
- Declaration of Conformity
- Sverige
- Deutschland
Brand : Cocraft
Model : HP 110
Category : Polisher