ZMF0550 - Milk frother Zelmer - Free user manual and instructions
Find the device manual for free ZMF0550 Zelmer in PDF.

| Brand | Zelmer |
| Model | ZMF0550 |
| Product Type | Electric Milk Frother |
| Functions | Frothing milk for cappuccino, latte, and other hot milk drinks; hot water dispensing |
| Steam Wand | Stainless steel steam wand with froth nozzle, manual steam control knob |
| Milk Frothing Capacity | Recommended jug size: 100-150 ml milk per cappuccino; diameter min. 70±5 mm |
| Power Supply | 220-240 V, 50-60 Hz |
| Power Consumption | Approx. 1350 W |
| Dimensions (approx.) | Not specified; compact countertop design |
| Weight (approx.) | Not specified |
| Materials | Plastic housing, stainless steel steam wand, removable drip tray and cup shelf |
| Safety Features | Auto power-off after 25 minutes of inactivity; thermal protection; steam knob lock; child safety (not for children under 8) |
| Cleaning and Maintenance | Wipe steam wand after each use; descale periodically with household descaler; clean removable parts under running water; not dishwasher safe |
| Spare Parts | Steam nozzle, steam wand sleeve, drip tray, funnel, filters available; contact authorized service |
| Repairability | Do not disassemble; repairs by qualified personnel only; warranty covers 2 years |
| General Information | Included: measuring spoon and tamper; user manual; designed for household use; max altitude 2000 m |
Frequently Asked Questions - ZMF0550 Zelmer
User questions about ZMF0550 Zelmer
0 question about this device. Answer the ones you know or ask your own.
Ask a new question about this device
Download the instructions for your Milk frother in PDF format for free! Find your manual ZMF0550 - Zelmer and take your electronic device back in hand. On this page are published all the documents necessary for the use of your device. ZMF0550 by Zelmer.
USER MANUAL ZMF0550 Zelmer
natural_image
Exterior view of a modern Zelmer coffee machine with control panel and buttons (no visible text or symbols on device body)EN USER MANUAL Espresso coffee machine
DE BENUTZERHANDBUCH Espressomaschine
DZIEKUJEMY ZA WYBÓR MARKI ZELMER. MAMY NADZIEJE, ŻE PRODUKT SPEŁNI PAŃSTWA OCZEKIWANIA.
OSTRZEŻENIE
PRZED ROZPOCZĘCIEM KORZYSTANIA Z PRODUKTU PROSIMY O UWAŻNE PRZECZYTANIE INSTRUKCJI OBSŁUGI I PRZECHOWYWANIE JEJ W BEZPIECZNYM MIEJSCU, ABY MÓC Z NIEJ SKORZYSTAĆ W PRZYSZŁOŚCI.
DESCRIPTION
WE WOULD LIKE TO THANK YOU FOR CHOOSING ZELMER. WE WISH THE PRODUCT PERFORMS TO YOUR SATISFACTION AND PLEASURE.
WARNING
PLEASE READ THE USER MANUAL CAREFULLY PRIOR TO USING THE PRODUCT. STORE IT IN A SAFE PLACE FOR FUTURE REFERENCE.
DESCRIPTION
A Control panel (1 cup button, 2 cup button, Power button, Manual button, Steam button)
A1 1 cup button (For single shot use)
A2 2 cup button (For double shot use)
A3 Power button
A4 Manual button
A5 Steam button
B Steel mesh (one cup filter and two cup filter)
C Metal funnel (Portafilter)
D Funnel handle (Portafilter handle)
E Funnel holder clip (Portafilter holder clip)
F Removable cup shelf
G Float cover (Drip tray full indicator)
H Drip tray
I Steam / hot water control knob
J Water tank handle
K Water tank cover
L Water tank
M Steam wand
N Steam wand handle
O Steam wand cover
P Steam nozzle (Froth nozzle)
Q Measuring spoon and tamper
SAFETY INSTRUCTIONS
If the supply cord is damaged it must be replaced by the manufacturer, its service agent or similarly qualified persons in order to avoid a hazard.
This appliance can be used by children aged from 8 years and above if they have been given supervision or instruction concerning use of the appliance in a safe way and if they understand the hazards involved.
Children shall not play with the appliance.
Cleaning and user maintenance shall not be made by
EN
children unless they are older than 8 and supervised.
Keep the appliance and its cord out of reach of children aged less than 8 years.
Appliances can be used by persons with reduced physical, sensory or mental capabilities or lack of experience and knowledge if they have been given supervision or instruction concerning use of the appliance in a safe way and understand the hazards involved.
This appliance is intended to be used in household. It is not intended to be used in applications such as: staff kitchen areas in shops, offices and other working environments; farm houses; by clients in hotels, motels and other residential type environments; Bed and breakfast type environments.
Proceed according to maintenance and cleaning section of this manual for cleaning.
Never immerse the appliance in water or any other liquid.
During brewing and after use due to residual heat some parts of the machine are hot.
Warning: potential injury from misuse!
This device is designed for use at a maximum altitude of 2000 m above sea level.
IMPORTANT WARNINGS
Any incorrect use or improper handling of the product shall render the warranty null and void.
Prior to plugging in the product, check that your mains voltage is the same as the one indicated on the product label.
The mains connection cable must not be tangled or wrapped around the product during use. Do not use the device, or connect and disconnect to the supply mains with the hands and / or feet wet.
Do not pull on the connection cord in order to unplug it or use it as a handle.
Never use your coffee machine without water in it.
Unplug the product immediately from the mains in the event of any breakdown or damage and contact an official technical support service.
In order to prevent any risk of danger, do not open the device. Only qualified technical personnel from the brand's Official technical support service may carry out repairs or procedures on the device.
B&B TRENDS SL disclaims all liability for damages that may occur to people, animals or objects, for the non-observance of these warnings.
THE FIRST TIME USE AND PREHEATING
To ensure the first cup of coffee tastes excellent, we recommend you should preheat and rinse the machine. Purified water is preferred.
- Open water tank cover, fill water into water tank, water level should not exceed the MAX line. Set up the water tank vertically and align the buckles to the hole on the back of the machine, and press it down to be parallel to the top of the machine.
- Set steel mesh into the metal funnel (without coffee in steel mesh), make sure the tube on funnel aligns with groove in the appliance, then insert the funnel into the appliance from the "UNLOCK" position, and fix them into coffee maker firmly by turn it anticlockwise until it is at the "LOCK" position.
- Place a mug or jug on removable cup shelf, make sure the steam control knob is at the OFF position.
- Plug in the power source or connect the appliance from the mains supply, press power button, power button is illuminated solidly, the 1 cup button, 2 cup button, and manual button will pulse as the machine begins preheating. When the 1 cup button, 2 cup button and manual button illuminate solidly, the preheating is finished.
- Press manual button, the appliance will pump water for about 30s, water will pass through the system, then pour out in the mug and clean them thoroughly. Dispose of the water and repeat the process a further 3 times or more.
Place the steam wand into a mug or jug and slowly turn the steam control knob until water dispenses, keep the steam control knob open for at least 30 seconds and close the steam control knob. Take care performing this process as the hot water will pulse into the receptacle, and it may emit steam.
Now the appliance is ready for making coffee.
Note:
If preheating is not completed yet, press the 1 cup button, 2 cup button, or manual button, the pump does not work.
During water flowing out, before the receptable is full, press the manual button again to stop pumping water immediately.
There may be noise when pumping water for the first time or after a long time not used, it's normal that appliance is releasing the air inside. After about 20s, the noise will disappear.
For manual button, working time is MAX 120s, unit will automatically stop working if no any operation within 120s.
MAKE ESPRESSO COFFEE
- Remove funnel by turning it clockwise. Adding ground coffee into steel mesh with measuring spoon, a spoon of ground coffee power can make about a cup of top-grade espresso coffee, then press ground coffee powder tightly with the tamper.
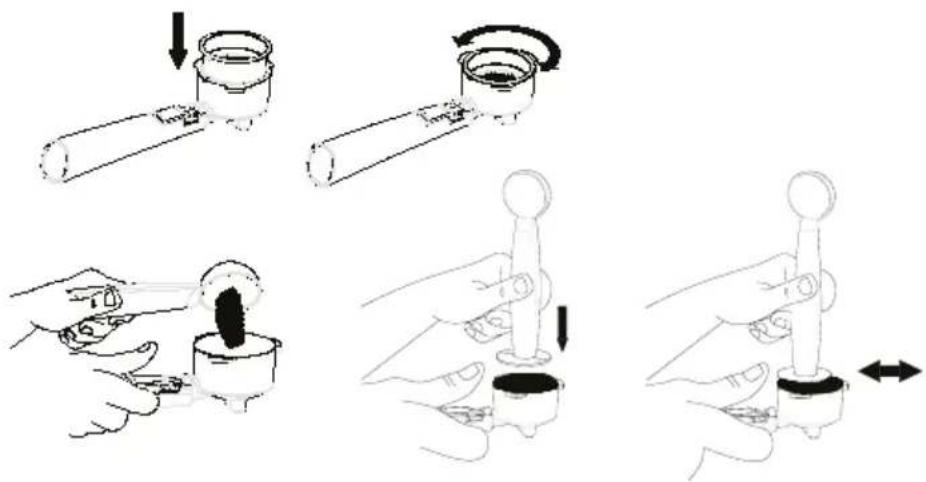
- Set steel mesh into metal funnel, make sure the tube on the funnel aligns with groove in the appliance, then insert the funnel into the appliance from the "UNLOCK" position, and fix them into appliance firmly by turning it anticlockwise until it is at the "LOCK" position.
- Place an espresso cup on removable cup shelf.
- After preheating is finished, press 1 cup or 2 cup button, the product will start brewing, working time is 20 s for 1 cup and 35 s for 2 cup coffee. If you want to get the amount of coffee you like, press manual button, when your desired capacity of coffee is obtained, press this button again to stop. For manual button, working time is MAX 120s, appliance will automatically stop working if no any operation within 120s.
- After finish making coffee, take metal funnel out by turning it clockwise, then pour coffee residue out with steel mesh pressed by funnel holder clip.
- Let them cool down completely, then rinse under running water.
Warning: Do not leave the coffee maker unattended during making coffee, as you need operate manually sometimes!
MAKE HOT WATER
When the preheating is finished, the coffee indicator lights up solidly. Then press 1 cup or 2 cup button, the water pump starts to pump water. Turn the steam control knob to "Hot water", then hot water will flow out from the steam wand.
To stop making hot water, press the 1 cup or 2 cup button again, and turn the steam control knob to OFF position. Hot water is used for warming cup, making tea or cooling down the appliance.
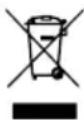
MAKE CAPPUCCINO / FROTHED MILK
You get a cup of cappuccino when you top up a cup of espresso with frothed milk.
Method:
- Prepare espresso first with cup big enough according to the part "MAKE ESPRESSO COFFEE", make sure the steam control knob is at the OFF position.
- Press the steam button, firstly the coffee button will light up solidly, wait for until the steam button indicator lights up solidly.
Note: During working, the indicator of steam button will cycle on and off to maintain to desired temperature.
- Fill a jug with about 100ml\~150ml of milk for each cappuccino to be prepared, you are recommended to use whole milk at refrigerator temperature (not hot!).
Note: In choosing the size jug, it is recommended the diameter is not less than 70+/-5mm, and bear in mind that the milk increase in volume by 2 times, make sure the height of jug is enough.
- Turn the steam control knob slowly anti-clockwise, steam will come out from the frothing device.
Note:
In order to get better milk foam performance, you are recommended to keep steam control knob at the open position for approximate 10s\~15s, to release the water from steam wand, since the early steam contains too much water.
- Insert the steam wand into the milk about 1cm\~2cm, turn the steam control button slowly in anticlockwise, steam will come out from the steam wand, froth milk in the way moving vessel round from up to down.
Note:
Never touch steam outlet during steam jetting and be careful not to burnt.
Never turn the steam control knob rapidly, as the steam will accumulate rapidly in short time which may increase the potential of risk of explosion.
- When the required purpose is achieved, you can turn the steam control knob to OFF position and press the steam button again to exit the steam function.
Note:
Please follow the operation as below to avoid the steam outlet (steam nozzle or froth nozzle) being blocked after frothing milk each time: put an empty jug under the steam wand, then turn on the steam control knob and press manual button, the pump will pump water, after water flowing out for 30s, press manual button again to stop the pump. Clean steam outlet (steam nozzle or froth nozzle) and steam wand sleeve with wet sponge immediately, but care not be hurt!
-
Pour the frothed milk into the espresso prepared, now the cappuccino is ready. Sweeten if desired, sprinkle the froth with a little cocoa powder.
-
Press the power button, and pull out the power plug to the power source. All indicators will be extinguished. Warning:
After steaming, the appliance temperature is too hot and the appliance need to be turned off and cool down at least for 5 minutes before making coffee again, or you can activate the "Hot water" function to cool down the appliance. The coffee will be burnt and there will be overflow at the funnel if the appliance brew coffee directly without being cooled down.
Note: Please follow below operation if the steam outlet (steam nozzle or froth nozzle) is blocked:
Firstly, turn the steam control knob to OFF position and cool down the appliance for about half an hour, then poke the steam outlet (steam nozzle or froth nozzle) for several times with a needle about 1mm in diameter, finally press the steam button and turn on the steam control knob to check if the appliance can produce steam normally when the steam button indicator lights up solidly. Please contact service department if the appliance can't produce steam after above operation.
AUTOMATIC POWER OFF FUNCTION
If there is no any operation within 25 minutes, the unit will power off automatically.
CLEAN AND MAINTENANCE
-
Disconnect the appliance from the mains supply, cut off power source.
-
Make sure the appliance has completely cooled down.
-
Simply wipe the steam wand and exterior with a clean, damp cloth or sponge. Use a pin to clean the nozzle head and air holes in the steam wand sleeve. Do not use any abrasives or metal scourers as this will damage the finish on the unit.
EN
- The metal funnel and water tank should be washed after each use by rinsing them under water. To assist in keeping the metal funnel clean, recommend you periodically run the machine with the metal funnel in place, without coffee, using water only. Should the holes in the steel mesh become blocked with coffee grinds, use a fine bristled brush to help clean. When your coffee maker is not being used, recommend that you do not leave the metal funnel attached to the machine as this will reduce the life of the gasket.
- Remove the removable cup shelf and drip tray from the appliance and remove any spilt coffee and water. Then, clean them with a damp cloth or a damp sponge.
- You must clean the steam wand and steam wand sleeve immediately after each use, after it has cooled down. Place the steam wand in a jug or mug and use the steam setting to clear any remaining milk out of the steam wand and steam wand sleeve. Remove the steam wand sleeve, place under warm running water to remove excess milk. If the steam wand becomes blocked, use a small pin to clean more thoroughly.
WARNING: Steam from the steam wand is extremely hot and can scald.
Note:
Do not clean with alcohol or solvent cleanser. Never immerse the housing in water for cleaning. Never wash your coffee machine accessories in a dishwasher.
CLEANING MINERAL DEPOSITS (DESCALING)
- Disconnect the appliance from the mains supply, cut off power source.
- Make sure the appliance has cooled down completely.
- Remove the water tank and drip tray from the appliance.
- Fill water tank with water and dissolved descaler solution to the MAX level (the proportion of water and descale, refer to the instruction of descaler). Please use "household descaler", instead of industrial descaler.
- Re-fit the water tank and drip tray to the appliance.
- Place an empty container under the brewing head to gather the descaled hot boiled water.
- Connect the appliance to the mains supply.
- Press the power button and wait for the 1 cup button, 2 cup button and manual button, to illuminate solidly.
- Place the steam wand into a mug or jug and slowly turn the steam control knob until water dispenses.
- Keep dispensing to fill the mug or jug, then empty when full.
- Repeat the process until the water tank is empty.
- Immediately refill the water tank with clean water and repeat the process to flush the system.
TROUBLE SHOOTING
| SYMPTOM CAUSE CORRECTIONS | ||
| The metal parts in the tank have rust. | Descaler is not recommended type.It may corrode the metal parts in the tank. | Use the descaler recommended by manufacturer. |
| Water leaks from the bottom of coffee maker. | There is much water in the drip tray. Please clean the drip tray. | |
| The coffee maker is malfunction. Please contact with the authorized service facility for repairing. | ||
| When the water tank is pulled up after use, it is normal that there will be water left on the desk. | As the water outlet at the bottom of the water tank is a movable part and it is Not leaking. | |
| Water leaks out of outer side of filter. | There is some coffee powder on filter edge. | Get rid of them. |
| The funnel is not installed properly or rotated to the right position | Install the funnel properly and ensure the tunnel is in the right position. | |
| Milk foaming is finished just now or the steam is generated just now, or the steam button is not reset due to too high temperature. | Operating after cooling down. | |
| Acid (vinegar) taste exists in Espresso coffee | No clean correctly after cleaning mineral deposits. | Clean coffee maker per the content in “before the first use” for several times. |
| Coffee powder is stored in a hot, wet place for a long time. The coffee powder turns bad. | Please use fresh coffee powder, or store unused coffee powder in a cool, dry place. After opening a package of coffee powder, reseal it tightly and store it in a refrigerator to maintain its freshness. | |
| Coffee maker cannot work anymore. | Power outlet is not plugged well. Plug the power cord into a wall outlet correctly, if the appliance still does not work, please contact with the authorized service facility for repairing. | |
| Steam cannot froth. The container is too | The Milk Frothing indicator is not illuminated. | Only after the Milk Frothing indicator is illuminated, the steam can be used to froth. |
| Big or the shape not fits. | Use high and narrow container. | |
| You have used skimmed milk. Use whole milk or half-skimmed milk. | ||
| There is some dirt inside the steam nozzle. | Clean the steam nozzle immediately after use every time with wet sponge. | |
Do not take apart the appliance by yourself if the cause of failure is not found, contact the qualified servicing center.
PRODUCT DISPOSAL
This product complies with European Directive 2012/19/EU on electrical and electronic devices, known as WEEE (Waste Electrical and Electronic Equipment), provides the legal framework applicable in the European Union for the disposal and reuse of waste electronic and electrical devices. Do not dispose of this product in the bin, instead going to the electrical and electronic waste collection centre closest to your home.
WIR DANKEN IHNEN, DASS SIE SICH FÜR ZELMER ENTSCHIEDEN HABEN. WIR HOFFEN, DASS DAS PRODUKT ZU IHRER ZUFRIEDENHEIT FUNKTIONIERT.
WARNUNG
natural_image
Illustration of a hand holding a mechanical device with multiple steps showing motion (no text or symbols)PŘÍPRAVA CAPPUCCINA / MLÉČNÉ PĚNY
natural_image
Illustration of a hand holding a small object with a black hole, accompanied by four sequential steps showing mechanical or electrical components (no text or symbols present)ELIMINAREA PRODUSULUI
B&B TRENDS, S.L. guarantees compliance of this product for the use for which it is intended for a period of two years. In the case of breakdown during the term of this warranty, users are entitled to repair or else the replacement of the product at no charge if the former is unavailable, unless one of these options proves impossible to fulfill or is disproportionate. In this case, you can then opt for a reduction in price or cancellation of the sale, which must be dealt with directly with the sales vendor. This also covers replacement of spare parts provided that the product has been used according to the recommendations specified in this manual for both cases, and has not been tampered with by any third party that is not authorised by B&B TRENDS, S.L. The warranty will not cover any parts subject to wear and tear. This warranty does not affect your rights as a consumer in accordance with the provisions in Directive 1999/44/EC for member states of the European Union.
USE OF WARRANTY
Customers must contact a B&B TRENDS, S.L. authorised Technical Service for repair of the product. Since any tampering of the same by anyone not authorised by B&B TRENDS, S.L., or the careless or improper use of the same shall render this warranty null and void. The warranty must be fully completed and delivered along with the receipt or delivery docket for the effective exercise of rights under this warranty.
This warranty should be retained by the user as well as the invoice, receipt or the delivery docket to facilitate the exercise of these rights. For technical service and after-sales care outside the Polish territory, please submit your query to the point of sale where you purchased the item or check for further aftersales information at www.zelmer.com