
LM37 - Lawn mower Cocraft - Free user manual and instructions
Find the device manual for free LM37 Cocraft in PDF.


| Product Type | Lawn Mower |
| Brand | Cocraft |
| Model | LM37 |
| Dimensions (L x W x H) | 500 x 400 x 300 mm |
| Weight | 15 kg |
| Power Source | Electric (corded) - 1200 W |
| Cutting Width | 37 cm |
| Cutting Height Adjustment | Central lever, 5 positions (20-70 mm) |
| Grass Collection Bag | 45 L fabric bag with indicator |
| Handle Type | Folding ergonomic plastic handle |
| Drive Type | Push (manual) |
| Engine Type | Brushed electric motor |
| Cutting System | Rotary steel blade |
| Safety Features | Safety switch (two-hand operation), blade brake |
| Maintenance | Sharpen blade annually, clean underside after use, check bolts |
| Spare Parts Available | Blade, belt, wheels, grass bag |
| Noise Level | 84 dB(A) |
| Warranty | 2 years |
| Manual Format | PDF (44 pages, English) |
| Included Items | Mower, grass bag, blade, manual |
Frequently Asked Questions - LM37 Cocraft
User questions about LM37 Cocraft
0 question about this device. Answer the ones you know or ask your own.
Ask a new question about this device
Download the instructions for your Lawn mower in PDF format for free! Find your manual LM37 - Cocraft and take your electronic device back in hand. On this page are published all the documents necessary for the use of your device. LM37 by Cocraft.
USER MANUAL LM37 Cocraft
Read the entire instruction manual carefully and make sure that you fully understand it before you use the equipment. Keep the manual for future reference.
Viktig information:
natural_image
Side profile of a blue lawn mower with black frame, no visible text or symbolsArt.no Model
18-4459-1
31-5298-1
MOR-LR01-370
MOR-LR01-370
Ver. 20151005
Original instructions
Bruksanvisning i original
Please read the entire instruction manual before use and save it for future reference. We reserve the right for any errors in text or images and for making any necessary technical changes to this document. If you should have any questions concerning technical problems please contact our Customer Services.
Safety
Safety symbols

Warning!

Read the instruction manual.

Keep bystanders at a safe distance from the mower to minimise their risk of being injured by flying objects.
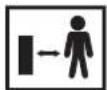
Be especially attentive in keeping children and pets a safe distance away from the mower.
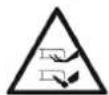
The blade rotates at high speed. Keep hands and feet away!
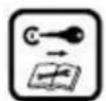
Turn off the mower and remove the safety key before making adjustments, cleaning or whenever leaving it unattended.

Always wait until the mower's rotating parts come to a complete stop before attempting to touch them. The blade will continue to rotate for a time even after the motor has been turned off and can still cause possible injury.

Do not use the mower during rain or leave it outdoors exposed to rain.

The battery charger must only be used indoors.

The battery charger is equipped with a safety transformer.
General safety instructions
- This mower is only constructed to be used on residential domestic lawns. Because of the risk of physical injury to the user or bystanders, the machine may not be used for other purposes than that it was designed for.
- Read carefully through the instructions and thoroughly inform yourself about all the mower's controls and functions and its proper use.
- Never let children or others who do not have adequate knowledge of these instructions use the product. Always check local regulations regarding age restrictions concerning the user.
- Never use the machine in the close vicinity of bystanders and pay special attention to the presence of children and animals.
- Remember that it is the user who is ultimately responsible for accidents occurring to others and to property.
- Never use the product whilst under the influence of drugs, alcohol or medicine. Do not use the product if you are tired or sick.
- Never let children or adults use the lawnmower without first having read the instruction manual. Any other users must have been adequately instructed by someone capable of taking full responsibility for their safety.
General safety instructions
- Make sure that the area being cut is free from loose and foreign objects.
- Never use the mower without the proper clothing. Do not wear loose clothing which can get caught in the mower's rotating parts. Always use appropriate footwear.
- Make sure that the blade and blade bolt are not worn or damaged.
- Make sure to regularly check the collector for possible damage or deformations.
- Adjust the cutting height so that the motor does not struggle or is overloaded.
- Make sure the mains voltage is consistent with the charger's rated voltage.
- Under no circumstances may maintenance and service be performed when the motor is on (unless otherwise instructed by the instruction manual).
- Make sure to keep hands and feet away from rotating parts. Never stand in front of the discharge chute.
- Stop the motor immediately if you have struck a foreign object. Always inspect the product regularly for possible damage. Never attempt to use the product until proper repairs have been made.
- If the mower begins to vibrate abnormally, turn off the motor immediately, remove its battery and investigate the cause. Vibrations are normally a sign of problems.
- The mower's battery must only be charged indoors using the supplied charger.
- Repairs to the mower's electrical parts may only be performed by a qualified service technician.
- Turn off the motor and remove the safety key if:
- The mower is left unattended.
- The rotating blade is blocked.
- Discharge chute is blocked and must be cleared.
- Some foreign object has been mowed over.
- The mower begins to vibrate abnormally.
- Repairs or adjustments must be made.
-
The mower needs to be moved between two mowing areas.
-
Make sure that rotating parts have stopped completely before cleaning, repairing or inspecting.
- Existing safety features must not be disconnected or made inoperative.
- Do not overload the mower by pushing it too fast through high or thick grass.
- Do not tilt the mower when starting, unless absolutely necessary. In such cases do not tilt the mower more than necessary to start the motor and only tilt the section facing away from the user.
- Avoid cutting wet grass.
- Avoid cutting on steep slopes.
- Make sure to have good footing on slopes.
- Walk, never run with the mower.
- Cut along the edge of slopes, never over them.
- Be extra careful when turning and changing directions on slopes.
Safety instructions for charging and handling the battery
- Make sure that the safety key is removed before connecting the battery to the mower.
- The mower's battery must only be charged indoors using the supplied charger.
- The charger is not to be exposed to rain or moisture. Doing so may increase the risk for electric shock.
- Only use the supplied charger and battery. Using a charger and battery that are incompatible poses a fire risk.
- Make sure that the charger and its air vents are clean and unblocked.
- Check before every charge: That the charger, its mains lead and plug are whole and damage-free. Do not use the charger if any defects are discovered. Do not attempt to repair the battery charger yourself. Repairs may only be carried out by a qualified service technician using original parts. A damaged charger or its parts poses a risk for electric shock.
- Do not use the charger in environments where flammable/explosive gases, liquids or objects are present (e.g. paper, fabric, etc.). The charger becomes warm during use and can therefore pose a potential fire hazard.
- The battery's terminals must not be short-circuited. Make sure to keep all metal objects (e.g. nails, coins, keys, etc.) away from the charger when the battery itself is not in the charger. Short circuiting the battery terminals can cause burn injuries or fires.
- Do not try to dismantle the battery. Doing so poses a risk for short-circuiting.
- Do not expose the battery to heat, such as leaving it in direct sunlight or disposing of it in fire. Doing so poses a risk for explosion.
- Mistreatment or a defective battery may cause gases to leak from the battery. Always ensure adequate ventilation. The battery fumes are irritating to the respiratory tract.
- The battery must not be exposed to moisture or water.
- Store the battery in an area where the temperature range is between 0–45 °C. The mower should never be left in a hot, sun-exposed car.
Description
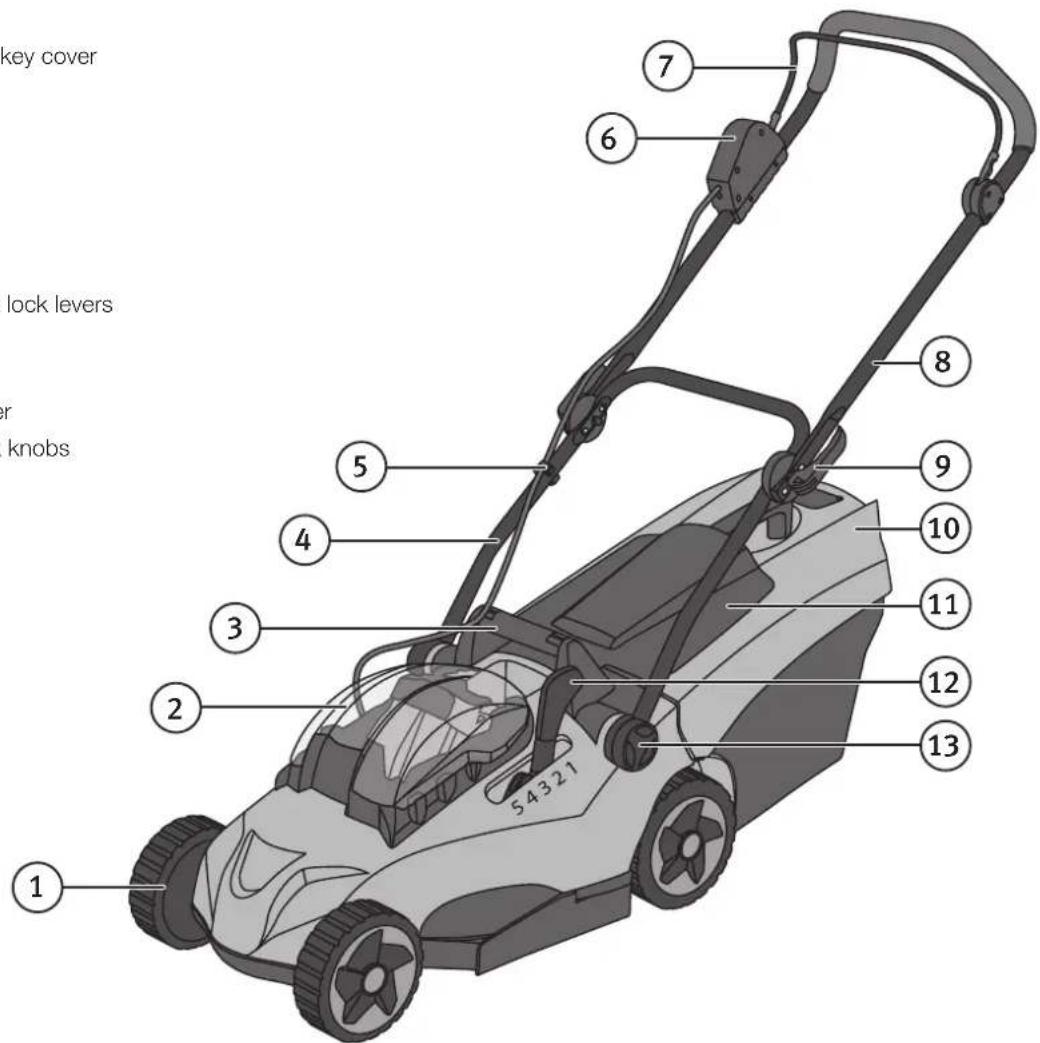
- Wheels
- Battery and safety key cover
- Carrying handle
- Lower handle
- Control cable clip
- Safety button
- Control lever
- Upper handle
- Handle adjustment lock levers
- Grass collector
- Discharge cover
- Cutting height lever
- Lower handle lock knobs
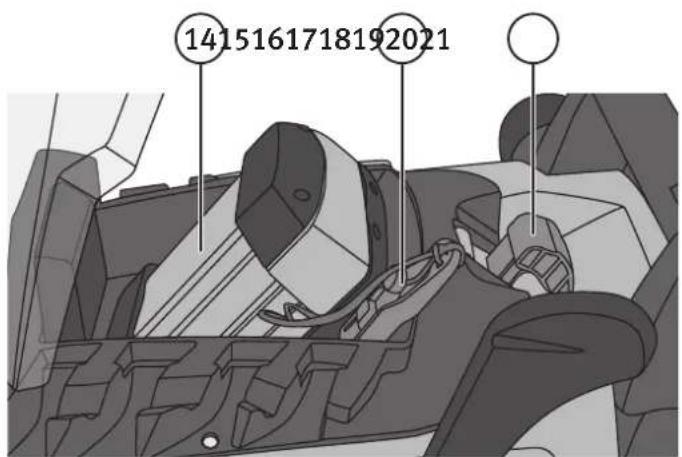
- Battery
- Safety key
- Battery cover and battery removal latch
- Mains lead to plug
- Battery charger
- Battery charger LED
- Battery status test button
- Battery status indicator
Assembly
Assembling the handle
- Fold out the lock levers (9) and turn them anti-clockwise a few turns to loosen them. Spread the upper handle's (8) ends slightly apart so the lock teeth don't catch. Now fold out the upper handle to the extended position. Screw the lock levers clockwise to tighten, and then fold the lock levers (9) back in to their locked positions.
- Loosen the lock knobs (13) by turning them anti-clockwise a few turns. Now, fold out the lower handle to its upright position so that the spacers' lock tabs engage into their cut-outs (see figure). Screw the lock knobs (13) clockwise to tighten them securely.
- Place the cable into the cable clip (5) then clip the cable clip onto the lower handle.
Grass collector
- Snap together the grass collector's upper and lower part making sure that all snap latches are secure. Start from the back and work forward.
- Screw two screws into the underside of the collector, near the mouth.
- Make sure that all the collector's parts are correctly assembled.
Attaching the grass collector
- Attach the collector by opening and holding up the discharge cover (11). Then attach the collector (10) to its catches on the mower and release the discharge cover.
- Remove the collector by lifting up the discharge cover and then lifting the collector up from its catches.
- The mower can even be used without the collector if the discharge cover is completely folded down in the closed position.
natural_image
Technical illustration of a mechanical device with labeled components (no text or symbols present)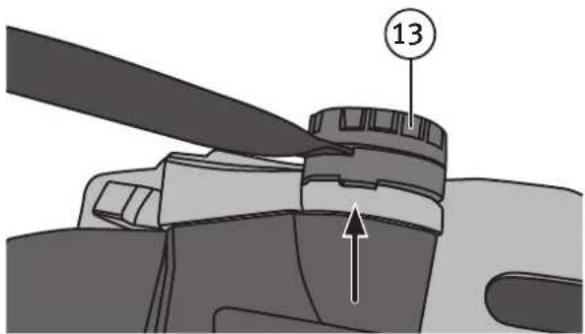
Operating instructions
Battery
The battery sits under the clear dome battery cover (2).
Removing the battery
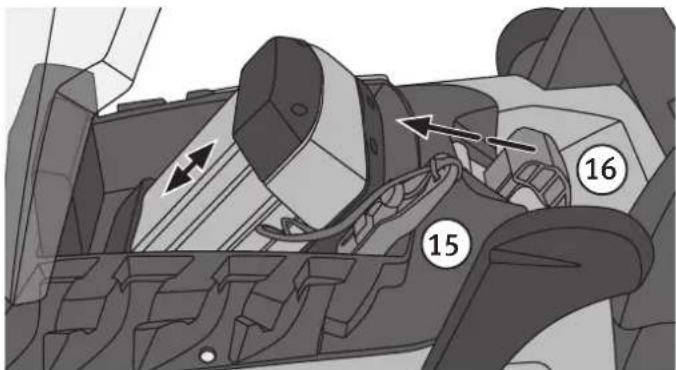
- Press the latch (16) to open the cover.
- Press the safety key's (15) spring tab to release and remove it.
- Press the latch (16) completely forward and pull out the battery.
Inserting the battery
- Press the latch (16) to open the cover.
- Press the safety key's (15) spring tab to release and remove it. Make sure that the safety key does not find it's way into the battery compartment.
- Slide the battery base into the guides and push down. You will first hear one click, when the battery crosses the latch and another click when the latch locks the battery securely in place.
Charging
- Insert the battery securely into the charger.
- Plug the charger into a wall socket. Charging will start immediately.
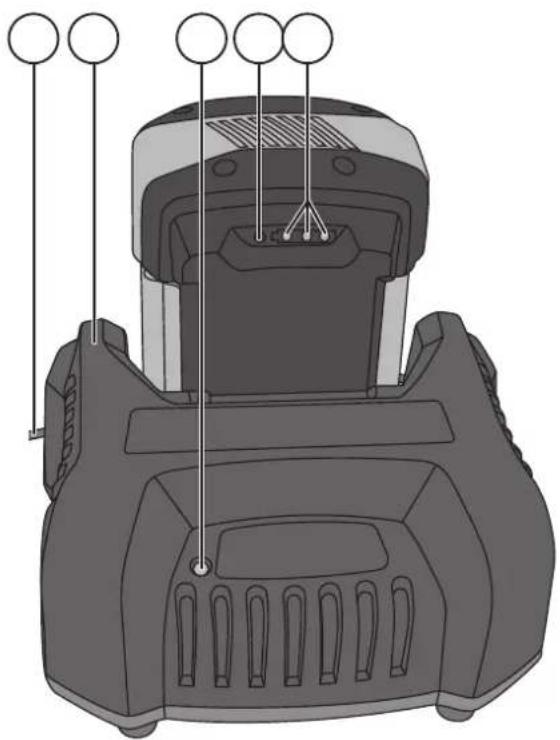
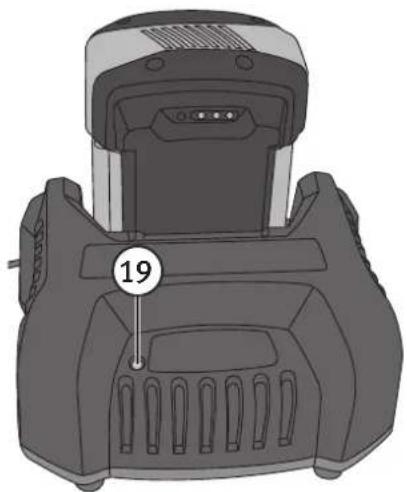
LED charge status indicator (19):
| LED Meaning | |
| Steady red The charger is connected to the mains but the battery is incorrectly inserted into the charger. | |
| Flashing green Charge in progress. | |
| Steady green The battery is fully charged and ready for use. | |
| Flashing red The battery cannot be charged. Refer to the Troubleshooting section. | |
natural_image
Top-down view of a mechanical device with labeled component (no text or symbols beyond the number 19)Checking battery status
- You will find the battery status indicator (21) at the base of the battery. The battery must be removed from the charger to check it.
- Press the test button (20) to check battery status. The battery has 3 green LED status indicators (21).
- 3 LEDs lit mean the battery is ≥ 2/3 charged to its max level.
- 2 of 3 LEDs lit mean the battery is ≥ 1/3 charged to its max level.
- 1 LED lit means the battery is ≤ 1/3 charged to its max level.
- 1 flashing LED means the battery is almost completely discharged.
- If no LEDs are lit, it means the battery is faulty and must be replaced.
If battery life considerably worsens between charges, it indicates that the battery is worn out and needs to be replaced with a new battery.
General information
- Never start the motor without first reading all the steps in the Assembly section.
- Note: Never use the mower without first having studied the instruction manual and its warning symbols as well as any warning decals on the mower itself.
- Note: Never overload the motor for extended periods. When the mower is heavily overloaded (high grass, etc.) the motor becomes sluggish and can be heard struggling. Immediately release the control lever and increase the cutting height to avoid damaging the mower.
- Prolonged heavy use can trip the overload protection. In such cases release the control lever and allow the motor to cool sufficiently. The overload protection can only reset with the control lever in the open released position. Clean the mower from possible obstructions and wait a few minutes before trying to use the mower again. If the overload protection trips again, try raising the cutting height to prevent further overload.
Starting and stopping
• Note: Start the mower only when your hands and feet are a safe distance from the rotating blade.
- Note: The blade will continue to rotate a short while after the motor has been turned off. Always let the motor/blade come to a complete stop before starting the motor again.
Start
- Insert the safety key (15).
- Press and hold the safety button (6) and then clasp the control lever (7) against the handle.
Note: There will be slight delay before the motor actually starts. Once the motor starts you may then begin using the mower.
Stop
- Release the control lever (7) to completely stop the motor and blade. Always let the motor/blade come to a complete stop before starting the motor again.
- Remove the safety key (15) when you have finished mowing.
Setting the cutting height
- Adjust cutting height in relation to grass height. Start with a high cutting height and adjust accordingly for the best results. Note: Always turn off the mower and let the rotating blade come to a complete stop before adjusting the cutting height.
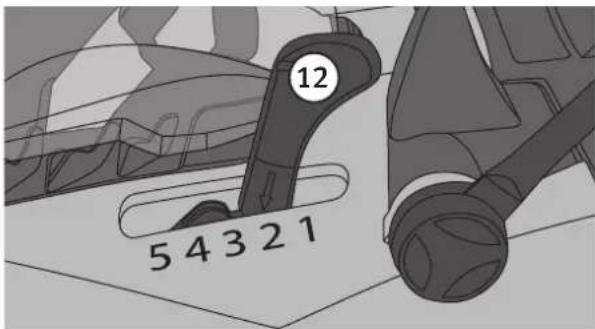
- There are 5 cutting height settings: 1 = 25 ~mm (short grass length) to 5 = 75 ~mm (higher grass length).
- Adjust cutting height by pushing the height lever (12) inwards towards the battery until it releases. Adjust to the desired cutting level. Push the handle outwards to the desired setting and ensure that it locks into position.
- When cutting grass for the first time at the beginning of the season, the mower should be set to a rather high setting in relation to grass height in order to ensure proper healthy growth of your lawn. Thereafter, the cutting height can be adjusted according to desire. Remember that shorter cutting lengths will shorten the battery life's mowing time.
Maintenance
Note: Always disconnect the safety key (15) from the mower before starting maintenance or servicing.
- Clean the mower with a brush or cloth after each use.
- Never spray off the mower with water to clean it. Doing so may damage the mower's electrical components.
- Tighten all nuts and screws to ensure that the mower is in good safe working order.
- Before using make sure to check all electrical equipment. If there is any damage to cables, fittings or anything else the mower must not be used.
• Always use original parts. Non-original parts can present a risk for injury even if they should fit the mower.
• Always change any damaged warning and instructional decals.
Changing the blade
Note: Always make sure the safety key and battery are removed from the mower before starting maintenance or servicing.
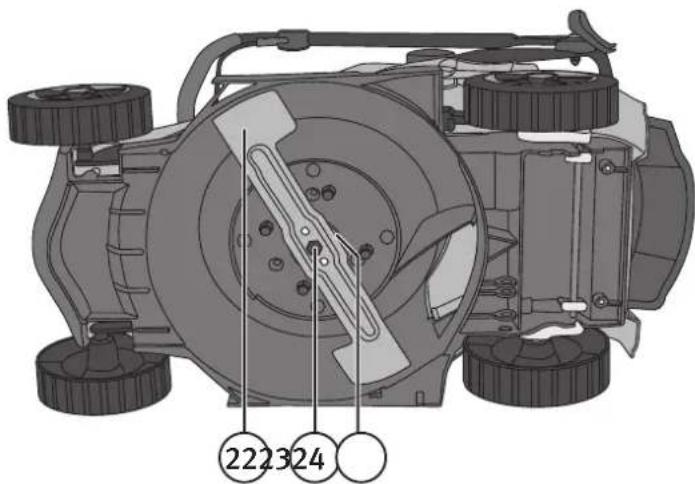
- Turn the mower on its right side to inspect the blade (22). If the blade is dull or damaged it should be replaced.
- Hold the blade (22) using protective gloves and loosen the bolt (23) with an appropriate sized spanner (not included). Always use work gloves when holding the blade as it is sharp.
- Remove the blade (22) from the locating pins (24). Clean if necessary.
- Replace with a new blade and assemble in the reverse order to the procedures described above. Make sure that the blade is facing right side up and that the bolt is securely tightened.
Troubleshooting
The problems described below can often be addressed by the user. If there is any doubt, contact Customer Services.
| Problem Solution | |
| Motor does not start. | Make sure the safety key is correctly inserted.Make sure the battery is correctly inserted.Incorrect starting procedure. First press and hold the safety button and then clasp the control lever against the handle. |
| Motor stops suddenly. | The overload protection has tripped. Let the motor cool down. Increase cutting height.The battery is either too warm or too cold. Let the battery attain normal room temperature. |
| Mower vibrates during use. | Make sure there are no loose parts.The blade is damaged. Replace it.Make sure that the blade or its bolt is not loose. |
| Unsatisfactory cutting results. | The blade is damaged or dull. Replace it.The collector is full.Make sure that the collector is not clogged.The wrong cutting height has been set. Adjust. |
| The battery cannot be charged. | The battery is defective and needs to be replaced.Make sure the battery and charger terminals are clean and free from dirt and debris.Make sure that the charger's plug is correctly connected to the wall socket. |
| The battery goes flat after a short time. | The wrong cutting height has been set. Increase cutting height and push the mower a little slower.Wet grass. Let the grass dry.Thick grass. Increase cutting height and push the mower a little slower.Make sure the battery is not defective. |
Storage
If the mower is to be stored for an extended period, during winter for example, the following steps should be followed:
- Clean the mower thoroughly.
- Inspect the entire mower for possible damage.
- Store the mower in a clean and dry environment.
- Charge the battery.
Responsible disposal
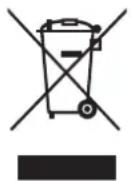
This symbol indicates that this product should not be disposed of with general household waste. This applies throughout the entire EU. In order to prevent any harm to the environment or health hazards caused by incorrect waste disposal, the product must be handed in for recycling so that the material can be disposed of in a responsible manner. When recycling your product, take it to your local collection facility or contact the place of purchase. They will ensure that the product is disposed of in an environmentally sound manner.
Specifications
Type M0R-LR01-370
LwA (sound power level) 75.8 dB(A), uncertainty K=3 dB(A)
LpA (sound pressure level) 88.6 dB(A), uncertainty K=2.13 dB(A)
Guaranteed sound power level 96 dB(A)
Vibration value 0.892 m/s², uncertainty K=1.5 m/s²
Battery capacity 3 Ah
Charging time 3–5 h
Charging current 1 A (3–5 h)
Charging voltage 41.7 VDC
Acceptable charge temperature range 0–45 °C
Operating time 15–30 minutes
Operating voltage 36 V
RPMs 3,800 RPM
Cutting width 37 cm
Cutting height 25–75 mm
Weight 15 kg
Gräsklippare
Art.nr 18-4459-1
31-5298-1
Modell
MOR-LR01-370
MOR-LR01-370
natural_image
Technical diagram of a mechanical device with labeled components (no text or symbols present)Montering
Vik upp handtaget
Laddning
natural_image
Technical illustration of a mechanical device with labeled component (no text or symbols beyond the number 19)natural_image
Technical illustration of a mechanical device with labeled components (no text or symbols present)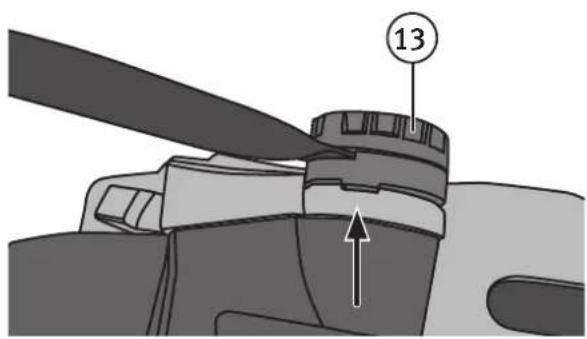
Lading
natural_image
Diagram of a mechanical device with labeled component '19' (no text or symbols beyond label)Ladestrøm 1 A (3–5 timer)
natural_image
Technical diagram of a mechanical device with labeled components (no text or symbols present)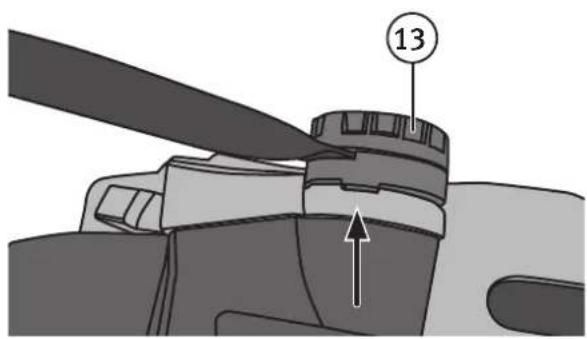
Lataus
natural_image
Diagram of a mechanical device with labeled component '19' (no text or symbols beyond label)natural_image
Technical illustration of a mechanical device with labeled components (no text or symbols present)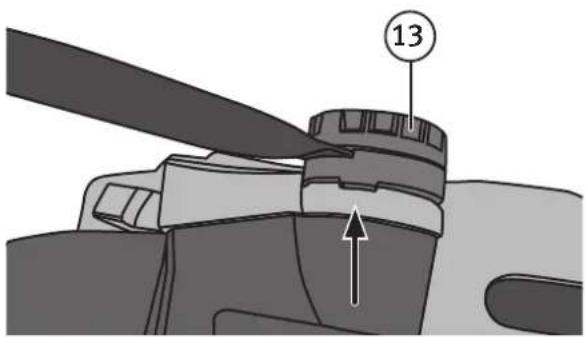
Laden
natural_image
Technical illustration of a mechanical device with labeled component (no text or symbols beyond the number 19)Declaration of Conformity
Klas Balkow President
Insjön, Sweden, 2012-12-05
Sverige
10 - 13 Market Place
Kingston Upon Thames
Surrey
KT1 1JZ
Deutschland


- Viktig information:
- Safety
- Safety symbols
- General safety instructions
- Safety instructions for charging and handling the battery
- Description
- Assembly
- Assembling the handle
- Grass collector
- Attaching the grass collector
- Operating instructions
- Battery
- Removing the battery
- Inserting the battery
- Charging
- Checking battery status
- General information
- Starting and stopping
- Start
- Stop
- Setting the cutting height
- Maintenance
- Changing the blade
- Troubleshooting
- Storage
- Responsible disposal
- Specifications
- Gräsklippare
- Montering
- Vik upp handtaget
- Laddning
- Lading
- Lataus
- Laden
- Declaration of Conformity
- Sverige
- Deutschland
Brand : Cocraft
Model : LM37
Category : Lawn mower