
HS 950-H - Paint gun Cocraft - Free user manual and instructions
Find the device manual for free HS 950-H Cocraft in PDF.


| Product Type | Paint Spray Gun |
| Brand | Cocraft |
| Model | HS 950-H |
| Power Source | Electric (mains powered) |
| Voltage | 220-240V ~50Hz |
| Power Consumption | 600 W |
| Container Capacity | 800 ml |
| Nozzle Size | 2.0 mm |
| Max Flow Rate | 0.5 L/min |
| Spray Pattern | Adjustable (horizontal, vertical, round) |
| Material | Plastic / Metal |
| Weight | 1.2 kg |
| Dimensions (LxWxH) | 200 x 150 x 250 mm |
| Cable Length | 2 m |
| Viscosity Range | 20-80 seconds (DIN cup) |
| Overload Protection | Yes |
| Safety Features | Trigger lock, thermal cut-off |
| Included Accessories | Paint cup, cleaning needle, viscosity cup |
| Cleaning | Disassemble and clean with water or solvent |
| Repairability | Spare parts available (nozzle, needle, seals) |
| Warranty | 2 years |
Frequently Asked Questions - HS 950-H Cocraft
User questions about HS 950-H Cocraft
0 question about this device. Answer the ones you know or ask your own.
Ask a new question about this device
Download the instructions for your Paint gun in PDF format for free! Find your manual HS 950-H - Cocraft and take your electronic device back in hand. On this page are published all the documents necessary for the use of your device. HS 950-H by Cocraft.
USER MANUAL HS 950-H Cocraft
HVLP SPRAY GUN 950 W
HS 950-H
HIGH VOLUME LOW PRESSURE
FÄRGSPRUTA HVLP HVLP MALERSPR∅YTE MAALIRUISKU HVLP HVLP-SPRITZPISTOLE

Important!
Read the entire instruction manual carefully and make sure that you fully understand it before you use the equipment. Keep the manual for future reference.
Viktig information:
natural_image
Blue Cocraft HS 950-H spray gun with attached hose and paint can (no visible text or symbols on main body)Art.no Model
18-3608
41-1011
JS-FB14BD
JS-FB14BD
Ver. 20160513
Original instructions
Bruksanvisning i original
Originalbruksanvisning
Please read the entire instruction manual before using the product and then save it for future reference. We reserve the right for any errors in text or images and any necessary changes made to technical data. In the event of technical problems or other queries, please contact our Customer Services (see address details on the back).
Safety
General safety instructions for power tools
Warning: Read all the instructions.
Failure to adhere to the following instructions may lead to electric shock, fires or serious injuries.
SAVE THESE INSTRUCTIONS.
The term “power tool” in the following text refers to your handheld mains operated or battery operated tool.
1) Work area safety
a) Keep the work area clean and well illuminated. Cluttered and poorly lit areas invite accidents.
b) Do not use power tools in explosive environments, such as in the presence of flammable liquids, gases or dust. Power tools create sparks which may ignite dust or fumes.
c) Keep children and other bystanders away from the area where you are using the power tool. Distractions can cause you to lose concentration and control of the tool.
2) Electrical safety
a) The plug of the power tool must fit correctly into the wall socket. Never modify the plug in any way. Never use an adaptor plug together with earthed power tools. Unmodified plugs and matching outlets will reduce the risk of electric shocks.
b) Avoid physical contact with earthed objects such as pipes, radiators, ovens and refrigerators. There is an increased risk of electric shock if your body is earthed.
c) Do not expose the power tool to rain or other wet conditions. Water entering a power tool will increase the risk of electric shock.
d) Do not abuse the mains lead. Never use the lead for carrying, pulling or unplugging the power tool. Keep the lead away from heat, oil, sharp edges and moving parts. Damaged or tangled leads increase the risk of electric shock.
e) When using power tools outdoors, use an extension lead that is suitable for this purpose. The use of an extension lead designed for outdoor use decreases the risk of electric shocks.
f) If the use of the power tool in a wet environment is unavoidable, a wall socket equipped with a residual current device (RCD) should be used. Use of an RCD significantly reduces the risk of electric shock.
3) Personal safety
a) Pay attention to what you are doing and use common sense when using power tools. Never use power tools if you are tired or under the influence of drugs, alcohol or medication. One moment of inattention while using a power tool may result in a serious injury.
b) Wear protective clothing. Always wear safety glasses. Using protective clothing such as dust masks, non-slip safety shoes, helmets and ear defenders reduces the risk of injury.
c) Avoid accidental starts. Make sure that the power switch is set to OFF before plugging the power tool into a wall socket, fitting the battery or picking up/carrying the power tool. Never carry a power tool with your finger on the trigger and never connect the power tool to a wall socket when the switch is set to ON, since it may result in injury.
d) Remove all service tools/keys before switching on the power tool. A service tool left on a rotating part of the power tool may result in personal injury.
e) Do not overreach. Keep proper footing and balance at all times. This enables better control of the power tool in unexpected situations.
f) Wear suitable clothing. Do not wear loose-fitting clothing or jewellery. Keep hair, clothes and gloves away from moving parts. Loose-fitting clothes, jewellery or long hair could become caught in moving parts.
g) If equipment for the extraction and collection of dust is available, make sure it is connected and used properly. Use of dust collection equipment can reduce dust related hazards.
4) Use and maintenance of the power tool
a) Do not force the power tool. Use the correct power tool for your application. The correct power tool will do the job better and safer if used at the rate for which it was designed.
b) Never use the power tool if the power switch does not switch the tool on and off properly. Any power tool that cannot be controlled by the power switch is dangerous and must be repaired.
c) Unplug the lead from the wall socket or remove the battery before making any adjustments, changing accessories or storing the power tool. These precautions reduce the risk of the power tool starting unexpectedly.
d) Store power tools that are not being used out of children's reach. Do not allow people who are unfamiliar with the tool or these instructions to operate the tool. Power tools are dangerous in the hands of untrained users.
e) Properly maintain your power tools. Check for misalignment, binding of moving parts, broken parts or anything else which might affect the operation of the power tool. If damaged, have the power tool repaired before use. Many accidents are caused by poorly maintained power tools.
f) Keep cutting tools sharp and clean. Properly maintained cutting tools with sharp cutting edges are less likely to bind and are easier to control.
g) Use the power tool, and any accessories in accordance with these instructions, taking into account the working conditions and the work to be performed. Using the power tool for a purpose other than that for which it is intended could result in a dangerous situation.
5) Service
a) Repairs and service should only be performed by qualified tradesmen, and only with original spare parts. This guarantees that the safety of the power tool is maintained.
Safety instructions specific to spray guns
- The spray gun must not be used close to sources of ignition such as open fires, cigarettes, sparks, electrical appliances and hot objects.
- Only use coating materials and solvents with a flashpoint above 21 °C.
- Be aware of potential hazards caused by the coating material. Follow the instructions on the packaging of the coating material. Follow all instructions regarding personal safety equipment.
- Use the spray gun in a well-ventilated area suited for the purpose.
-
Warning: Never use the spray gun with any flammable liquid.
-
If the mains lead is damaged it should only be replaced by the manufacturer or a qualified service technician. This is to avoid hazards.
- Warning: Risk of personal injury! Never point the spray gun at yourself, other persons or animals.
- ALWAYS use suitable safety goggles, gloves, breathing masks, etc. to prevent paint, solvents and poisonous fumes from coming into contact with eyes and skin.
- Always follow the instructions given by the manufacturer of the paint or coating material to be used in the spray gun.
- Do not dismantle the spray gun or try to repair it yourself.
• Make sure that no solvent fumes are sucked into the spray gun. - When using the spray gun outdoors, think about the wind direction. The coating material from the spray gun could land on surfaces where it is not wanted close to the work area.
- When using the spray gun indoors, make sure that the room is well ventilated.
- The spray gun is only intended for normal domestic use and only in the manner described in this instruction manual.
• Never lay the spray gun on its side during use. - Never let children play with the spray gun.
Safety symbol guide

Read the entire instruction manual before use and save it for future reference.

Always use ear protection, safety glasses or a visor and wear a dust mask.
Product description
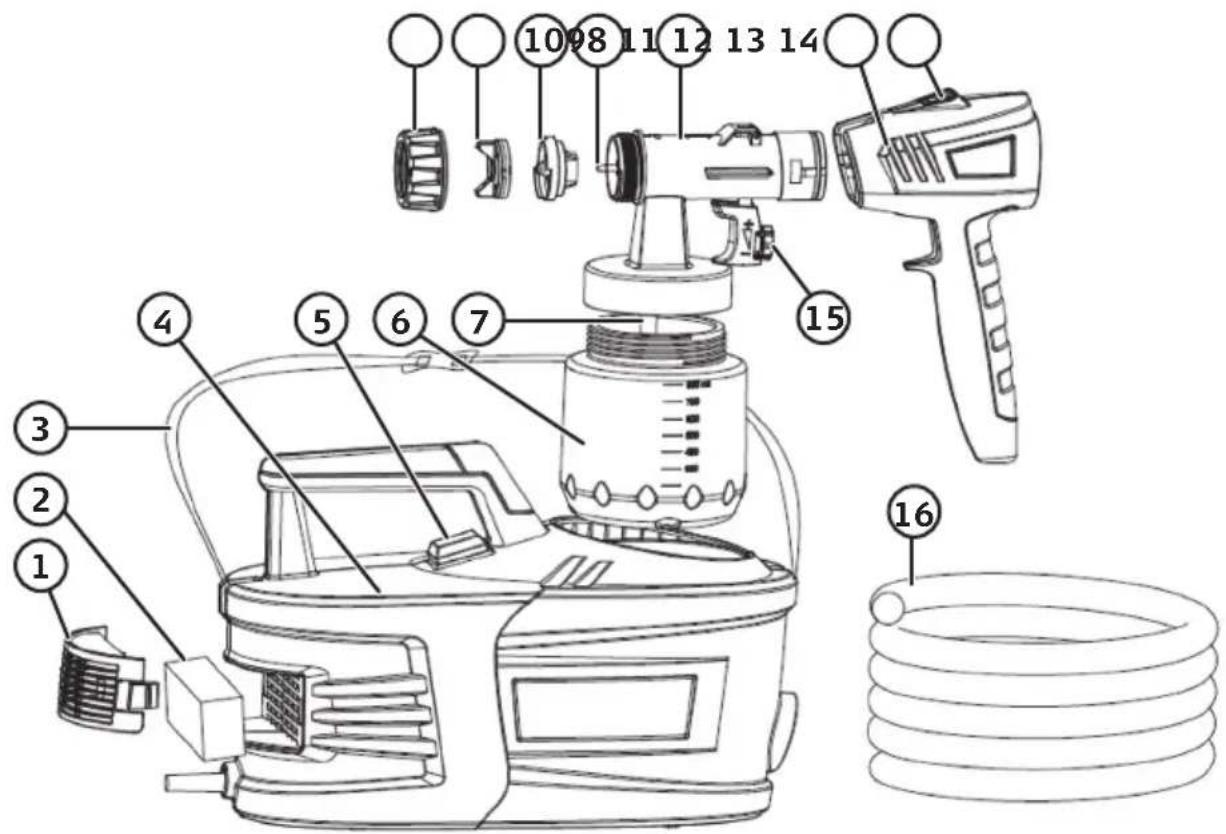
- Air filter cover
- Filter
- Shoulder strap
- Air compressor
- [0/I] Power switch
- Container
- Pickup tube
- Retaining ring, keeps the air cap and paint nozzle in place
- Air cap
- Paint nozzle
- Paint needle
- Spray gun body
- Pistol grip
- [+ -] Trigger and paint flow adjuster
-
Air hose
-
[☐] Quick release button to separate the pistol grip from the spray gun body
Operating instructions Preparations
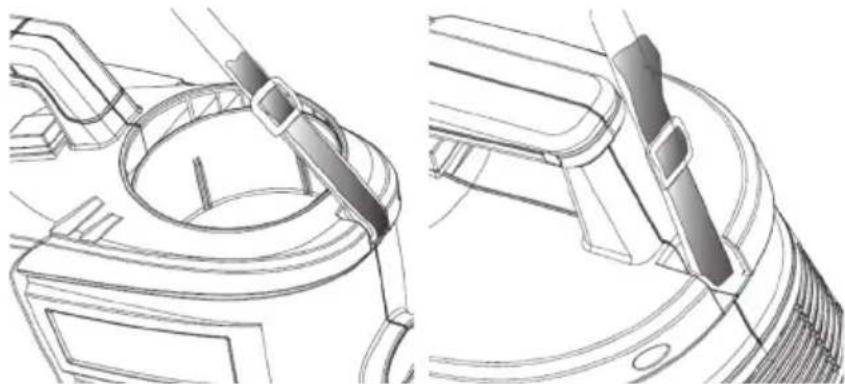
Attaching the shoulder strap
Fasten the shoulder strap to the housing of the air compressor and adjust the length.
natural_image
Technical line drawing of a mechanical assembly with no visible text or symbolsSuitable coating materials
Water- and solvent-based paints, 2-component paints, primers, clear finishes, vehicle finishes, glazes, wood preservatives (sealants, oils, etc), wood stains, insecticides and certain flour paints such as Falu Vapen.
Unsuitable coating materials
Emulsion paints, alkaline paints, calcimine paints (whitewash), materials with a flashpoint below 21 °C.
Preparing the coating material (thinning)
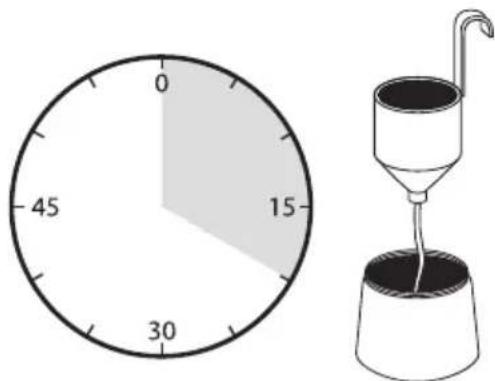
Thoroughly shake the can of coating material before opening it. Coatings such as paints normally need to be diluted/thinned before spraying. Test a small amount of the coating before diluting it all. Follow the manufacturer's advice for thinning the coating you are using. Ask your local paint shop for advice if you are unsure, explain that you are using a HVLP (high volume, low pressure) type spray gun. The thickness of a paint is denoted by its viscosity and is measured by letting a certain amount of paint run through a hole of a certain diameter. The longer it takes for the paint to run through the hole, the higher the viscosity. Viscosity is measured in seconds.
Warning: Only use coating materials and solvents with a flashpoint above 21 °C.
Measuring the viscosity:
- Shake the container of paint before performing a viscosity test.
- Dip the entire viscosity cup into the coating material so that it fills completely.
- Hold up the viscosity cup and measure how long it takes for the paint to run through the hole.
- Dilute the paint if it is too thick and measure it again.
natural_image
Simple line drawing of a clock and a funnel (no text or symbols)Example viscosities of various coating materials
Spray coating Viscosity in DIN-seconds
| Primer containing solvent 25–40 | |
| Varnish containing solvent 15–40 | |
| Water-soluble primer 25–40 | |
| Water-soluble varnish 20–35 | |
| Wood preservative, paint remover, oil Undiluted | |
| Disinfectant, insecticide Undiluted | |
| Vehicle paint/lacquer 20–35 |
Preparation of the workpiece to be coated
- The quality of the finish will depend on how clean and smooth the surface is before it is sprayed. Sand and fill rough or cracked surfaces if required. Remove all dust from the work area before starting to spray, vacuum clean if possible.
- Cover all surfaces and objects that should not be sprayed with masking tape and dust sheets or remove them from the work area.
• Cover all hinges, screw threads, etc.
Spray painting
Operating instructions
Note: Begin by test-spraying on a piece of card to set the correct spray pattern and feed rate before starting to spray the object to be coated.
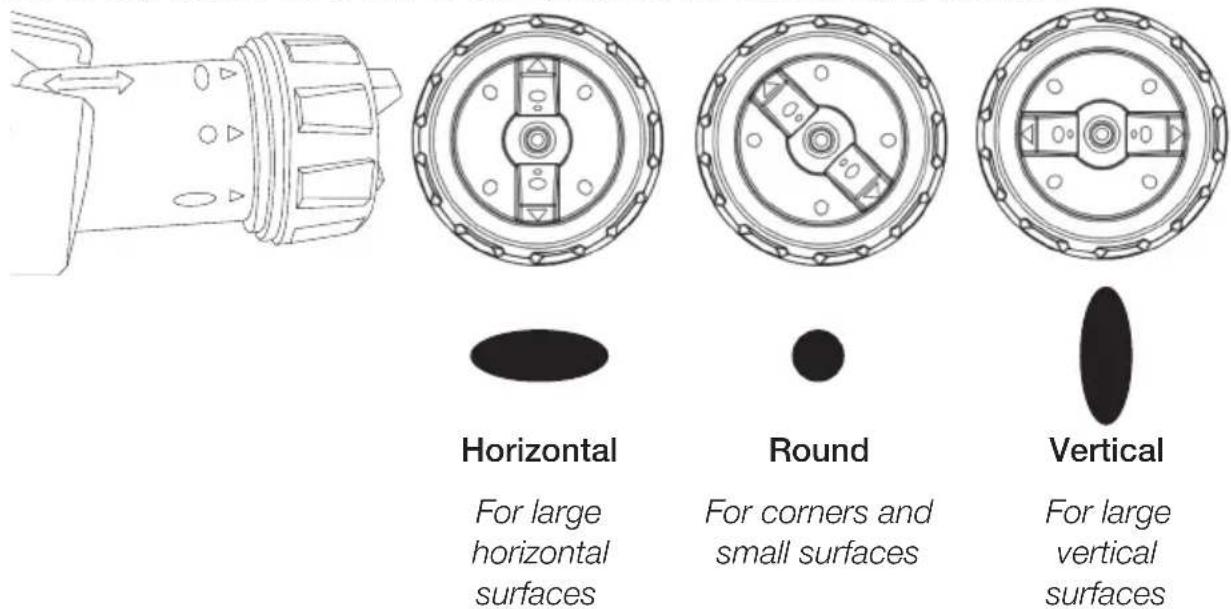
Setting the spray pattern
The air cap can be set to one of three positions for different spray patterns.
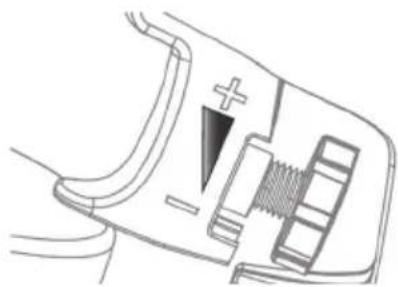
Adjusting the paint volume
Adjust the amount of paint using the screw on the back of the trigger.
natural_image
Technical line drawing of a mechanical component with no visible text or symbols- When working outdoors, pay attention to the wind direction.
- Hold the spray gun perpendicular to the surface to be painted and at a distance of 10–30 cm.
- Begin spraying outside the target area and move your arm in a smooth motion from side to side or up and down.
- Move the spray gun evenly cross-wise or up-and-down, depending on the spray pattern setting.
- Let each pass of the spray jet overlap by 4–5 cm.
- Do not interrupt the spraying action once inside the target area.
• An even movement of the spray gun results in an even surface quality. - Varying the distance or spraying angle will lead to the formation of paint mist, resulting in an uneven coating.
- Finish the spraying motion outside the target area.
- Do not operate the spray gun until the fluid container is completely empty. If the spray gun can no longer feed paint to the nozzle during operation, there will be an interruption in the spraying resulting in an uneven finish.
-
If either the paint nozzle or air cap are soiled, they should be cleaned with the appropriate thinning agent.
-
Fill the container with the ready-mixed coating material.
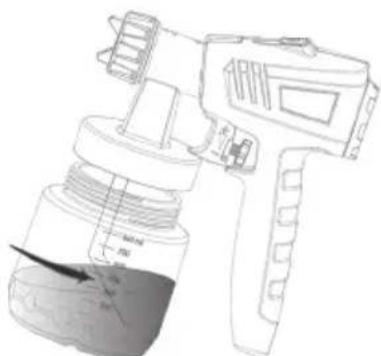
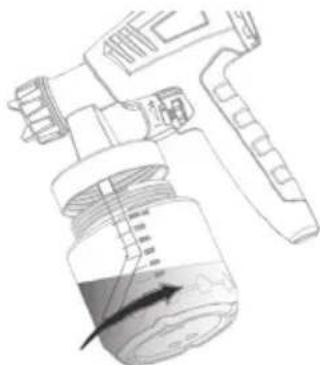
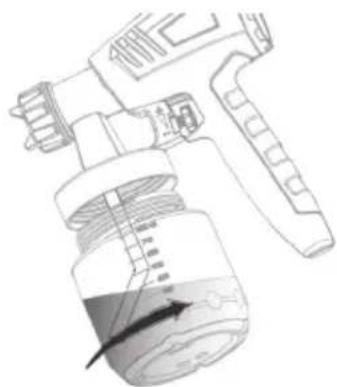
- Attach the container and adjust the pickup tube as directed below:
natural_image
Technical line drawing of a spray gun with nozzle and spray bottle (no text or symbols)If the spray gun needs to be pointed upwards for painting; turn the tube so that it points backwards and then screw the container on.
natural_image
Line drawing of a spray gun with a water droplet inside, showing no text or symbolsIf the spray gun needs to be pointed downwards for painting; turn the tube so that it points forwards and then screw the container on.
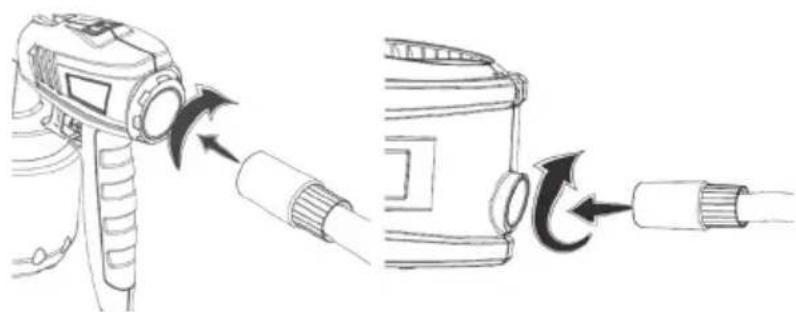
- Connect the air hose to both the air compressor and the spray gun.
natural_image
Diagram showing a device being inserted into a cable, with no text or symbols present.Switching the spray gun on
- Connect the mains lead to a 220–240 V, 50 Hz power socket.
- Turn on the compressor using the power switch (5).
- Pull the trigger (15) until paint comes out.
Switching the spray gun off
- Release the trigger.
- Turn off the compressor using the power switch (5).
- Unplug the mains lead from the wall socket.
Changing the paint nozzle
The spray gun comes with 2 paint nozzles, 1.8 mm and 2.6 mm. The smaller nozzle is suitable for most purposes. The larger nozzle should be used if a high volume of paint needs to be applied.
- Remove the retaining ring (8).
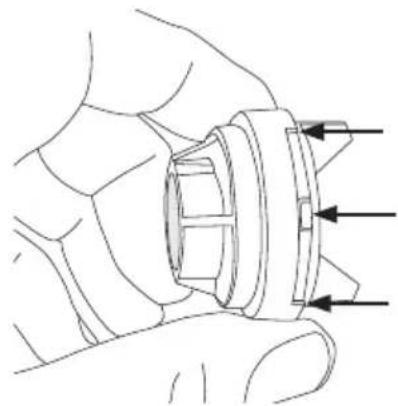
- Remove the air cap and paint nozzle and separate them.
natural_image
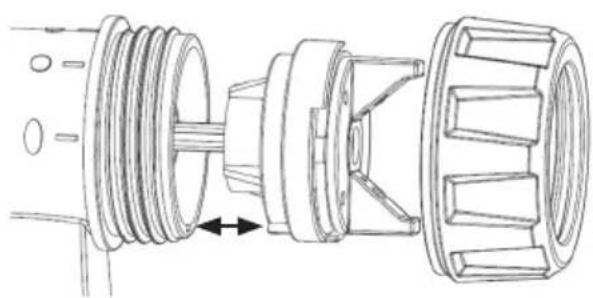
Line drawing of a hand holding a mechanical component with arrows indicating direction (no text or symbols)- Change the paint nozzle and reassemble it with the air cap. Make sure that the lugs on the air cap slot into the notches on the paint nozzle.
natural_image
Technical line drawing of a mechanical assembly with gears and shafts (no text or symbols)- Refit the parts onto the spray gun, making sure that the lugs on the paint nozzle fit into the notches on the spray gun.
- Fasten the nozzles in place using the retaining ring.
Care and maintenance
Note:
For optimum performance it is very important that all the parts of the spray gun are properly cleaned after each use. Use the solvent applicable for the type of coating used and follow the instructions below. Make sure that all the waste paint and solvent is disposed of in an environmentally-friendly manner and is taken to a recycling centre.
Cleaning with water as the solvent
- Switch the air compressor off.
- Disconnect the air hose from the spray gun.
- Pull the trigger so that any paint left in the spray gun runs back into the container.
- Unscrew the container and pour any leftover paint back into its can.
-
Clean as much paint as possible off the container and pickup tube using a soft brush or cloth.
-
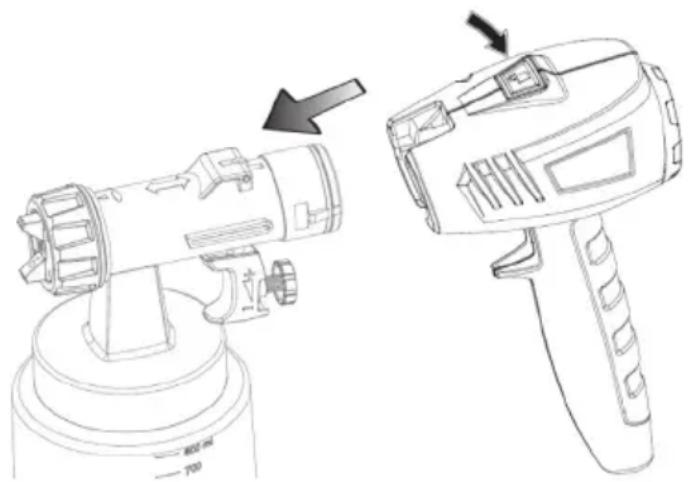
Detach the pistol grip from the body of the spray gun by pressing the release catch (14).
natural_image
Technical line drawing of two different types of spray gun holders, one with a downward arrow indicating motion (no text or symbols present)- Unscrew the air cap and paint nozzle and wipe them clean.
- Soak all the parts in water. Rinse the parts and dry them.
- Another option is to fill the container with water, assemble all the parts and spray water onto a rag or into a suitable container until the water coming out of the spray gun is clean. The spray gun should then be taken apart and dried.
- Reassemble the spray gun when it has been cleaned and dried.
- Unplug the air compressor and clean the exterior wiping it with a damp cloth. Use only mild cleaning agents, never solvents or corrosive chemicals.
Cleaning with another solvent
- Switch the air compressor off.
- Pull the trigger so that any paint left in the spray gun runs back into the container.
- Unscrew the container and pour any leftover paint back into its can.
- Pour solvent into the fluid container and screw it back onto the spray gun.
- Switch the spray gun on and spray the solvent into another container or onto a cloth.
- Repeat the above procedure until the solvent coming out of the nozzle is clean.
-
Unscrew the container and wipe it and the pickup tube clean.
-
Remove and clean the nozzles.
-
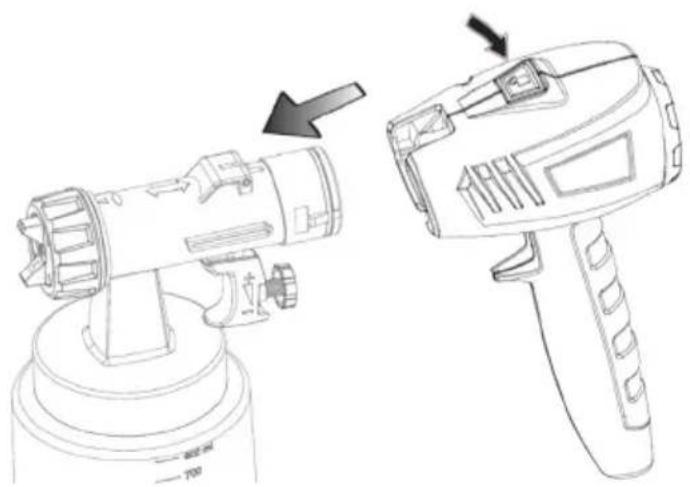
Detach the pistol grip from the body of the spray gun by pressing the release catch (14). Clean all the parts thoroughly using a damp cloth.
natural_image
Technical line drawing of two different types of spray gun holders, one with a handle and arrow indicating motion (no text or symbols)- Reassemble the spray gun when it has been cleaned and dried.
- Unplug the air compressor and clean the exterior wiping it with a damp cloth. Use only mild cleaning agents, never solvents or corrosive chemicals.
Air filter
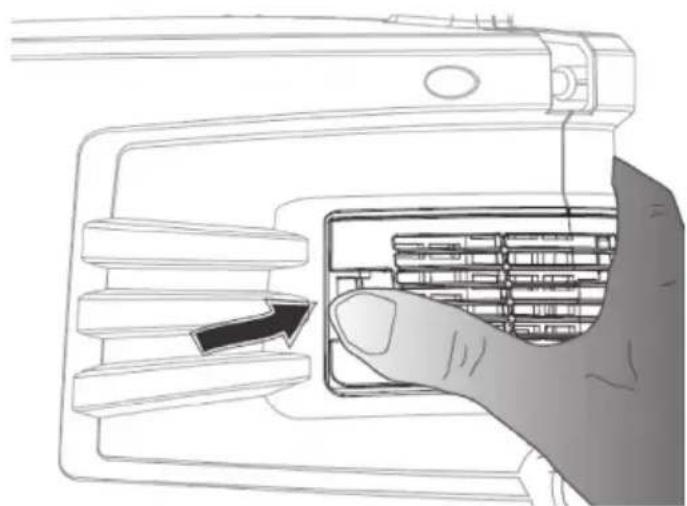
- Remove the air filter cover by pressing in the catch.
- Remove the filter and clean it at regular intervals.
Note: Never use the spray gun without the air filter in place.
If the spray gun is not to be used for an extended period, it should be unplugged and stored in a dry and dust-free location out of reach of children.
natural_image
Hand inserting a card into a device slot (no text or symbols visible)Troubleshooting guide
| Problem Cause | Correction | |
| The spray gun does not start. | 1. The mains lead is not plugged into the wall socket properly.2. The mains lead or plug is damaged.3. The wall socket has no power. | 1. Check the connection.2. Replace the mains lead if necessary.3. Check all the fuses/circuit breakers in the circuit.Contact a qualified electrician if you are at all unsure about how to proceed. |
| No paint comes out of the nozzle. | 1. The nozzle or pickup tube is clogged.2. The pickup tube is loose.3. The container is not screwed on tight.4. The paint is too viscous (too thick). | 1. Clean the parts with solvent or water depending on the type of paint used.2. Unscrew the container and secure the pickup tube.3. Tighten the container.4. Dilute the paint by another 10%. |
| The paint drips from the nozzle. | 1. Too much paint has built up on the paint nozzle and air cap.2. The lock nut is loose. | 1. Clean the parts with solvent or water depending on the type of paint used.2. Tighten the retaining ring. |
| The spray jet pulsates. | 1. The paint container is nearly empty.2. The air filter is clogged.3. The paint is too viscous (too thick). | 1. Refill the container.2. Clean or replace the air filter.3. Dilute the paint by another 10%. |
| Runs in the paint on the surface. | 1. Too much paint leaving spray gun.2. Paint not viscous enough (too thin).3. Spray gun too close or moved too slowly over surface. | 1. Reduce the paint volume using the regulator (7).2. Check the thickness of coating material.3. Refer to the Operating instructions section above. |
| The paint does not cover the surface. | 1. Too little paint leaving the spray gun.2. The paint is too viscous (too thick).3. Spray gun too far away from or moved too quickly over surface. | 1. Increase the paint volume using the regulator (7).2. Check the thickness of coating material.3. Refer to the Operating instructions section above. |
Responsible disposal
This symbol indicates that this product should not be disposed of with general household waste. This applies throughout the entire EU. In order to prevent any harm to the environment or health hazards caused by incorrect waste disposal, the product must be handed in for recycling so that the material can be disposed of in a responsible manner. When recycling your product, take it to your local collection facility or contact the place of purchase. They will ensure that the product is disposed of in an environmentally sound manner.
natural_image
Symbol of a trash bin crossed with no text or numbers, representing waste sorting or disposal (no text present)Specifications
Supply voltage 220–240 V, 50 Hz
Power 950 W
Max viscosity 100 DIN-s
Max flow rate 800 ml/min with 2.6 mm nozzle
Nozzle diam 1.8/2.6 mm
Mains lead 3 m
Paint container 800 ml
Noise level LpA = 72.93 dB(A), K = 3 dB(A)
LwA = 83.93 dB(A), K = 3 dB(A)
Vibration a _h=0.537 m/s^2, K=1.5 m/s^2
Weight 3.0 kg
Protection class Ⅱ□
Färgspruta HVLP
natural_image
Technical line drawing of a mechanical assembly with no visible text or symbolsLämpliga sprutämnen
natural_image
Simple line drawing of a clock and a funnel (no text or symbols)natural_image
Technical line drawing of a mechanical component with no visible text or symbolsnatural_image
Line drawing of a spray gun with a submerged container (no text or symbols)natural_image
Illustration of a spray gun with a water droplet inside, showing no text or symbolsnatural_image
Diagram showing a device being connected to a cable via a rotary switch (no text or symbols present)Slå på färgsprutan
natural_image
Line drawing of a hand holding a mechanical component with arrows indicating direction (no text or symbols)natural_image
Technical line drawing of a mechanical assembly with gears and shafts (no text or symbols)natural_image
Technical line drawing of two spray gun holders, one with a downward arrow indicating motion (no text or symbols)natural_image
Technical line drawing of two different types of spray gun holders, one with a downward arrow indicating motion (no text or symbols present)natural_image
Hand inserting a card into a device slot (no text or symbols visible)Felsökningsschema
natural_image
Symbol of a trash bin crossed with a diagonal line, no text or numbers presentSpecifikationer
Nätanslutning 220–240 V, 50 Hz
Effekt 950 W
Max viskositet 100 DIN-s
natural_image
Technical line drawing of a mechanical assembly with no visible text or symbolsnatural_image
Simple line drawing of a clock and a funnel (no text or symbols)natural_image
Technical line drawing of a mechanical component with no visible text or symbolsnatural_image
Line drawing of a spray gun with a water droplet inside, showing no text or symbolsHvis du må holde malingssprøyten vendt oppover ved påføring av malingen, så drei stigrøret bakover og skru det fast i beholderen.
natural_image
Illustration of a spray gun with a water droplet inside, showing no text or symbolsnatural_image
Diagram showing a device being connected to a cable via a valve mechanism (no text or symbols present)natural_image
Line drawing of a hand holding a mechanical component with arrows indicating direction (no text or symbols)natural_image
Technical line drawing of a mechanical assembly showing internal components and motion arrows (no text or symbols)natural_image
Technical line drawing of two spray gun holders, one with a downward arrow indicating motion (no text or symbols)natural_image
Technical line drawing of two spray gun holders, one with a downward arrow indicating motion (no text or symbols)natural_image
Hand inserting a card into a device slot (no text or symbols visible)Feilsøking
natural_image
Symbol of a trash bin crossed with a diagonal line, no text or numbers presentSpesifikasjoner
Spenning 220–240 V, 50 Hz
Effekt 950 W
Maks viskositet 100 DIN-s
Maks kapasitet 800 ml/min med dysen på 2,6 mm
Munnstykke ∅ 1,8/2,6 mm
Strømkabel 3 m
Malingsbeholder 800 ml
Lyd LpA = 72.93 dB(A), K = 3 dB(A)
$$ \mathrm{LwA} = 8 3. 9 3 \mathrm{dB(A)}, K = 3 \mathrm{dB(A)} $$
natural_image
Technical line drawing of a mechanical assembly with no visible text or symbolsnatural_image
Simple line drawing of a clock and a funnel (no text or symbols)natural_image
Technical line drawing of a mechanical component with no visible text or symbolsnatural_image
Technical line drawing of a spray gun with a handle and spray bottle (no text or symbols)natural_image
Technical line drawing of a spray gun with a water droplet inside (no text or symbols)natural_image
Diagram showing a device being connected to a cylindrical device via tubing, with no visible text or symbols.natural_image
Line drawing of a hand holding a mechanical component with arrows indicating direction (no text or symbols)natural_image
Technical line drawing of a mechanical assembly showing three components with no visible text or symbolsnatural_image
Technical line drawing of two spray gun holders, one with a downward arrow indicating motion (no text or symbols)natural_image
Technical line drawing of two different types of spray gun holders, one with a handle and arrow indicating motion (no text or symbols)natural_image
Hand inserting a card into a device with a finger pointing to the card (no text or symbols visible)Vianetsintä
natural_image
Symbol of a trash bin crossed with a diagonal line, no text or numbers presentTekniset tiedot
natural_image
Technical line drawing of a mechanical assembly with no visible text or symbolsnatural_image
Technical line drawing of a mechanical clamp or bracket component (no text or symbols)natural_image
Line drawing of a spray gun with a pointed tip and liquid level indicator (no text or symbols)natural_image
Diagram showing a device being inserted into a cylindrical component, with arrows indicating the process (no text or symbols present)natural_image
Hand holding a mechanical component with arrows indicating assembly or force direction (no text or symbols present)natural_image
Technical line drawing of a mechanical assembly with gears and shafts (no text or symbols)natural_image
Technical line drawing of two spray gun holders with arrows indicating motion (no text or symbols)natural_image
Technical line drawing of two spray gun holders, one with a downward arrow indicating motion (no text or symbols)natural_image
Hand inserting a card into a device slot (no text or symbols visible)Fehlersuche
natural_image
Symbol of a trash bin crossed with a diagonal line and a horizontal bar below (no text or numbers present)Technische Daten
Declaration of Conformity
Declares that this product complies with the requirements of the following directives and standards
Machinery Directive 2006/42/EC
EN 60745-1:2009+A11
EN 50580:2012+A1
EMC Directive 2014/30/EU
EN 55014-1:2006+A1+A2
EN 55014-2:1997+A1+A2
EN 61000-3-2:2014
EN 61000-3-3:2013
Henrik Alfredsson
Manager Technique & Quality
Insjön, Sweden, 2016-04-25
Sverige
Postal 10 - 13 Market Place
Kingston Upon Thames
Surrey
KT1 1JZ
Deutschland
Kundenservice
- HVLP SPRAY GUN 950 W
- HS 950-H
- HIGH VOLUME LOW PRESSURE
- Important!
- Viktig information:
- Safety
- SAVE THESE INSTRUCTIONS.
- 1) Work area safety
- 2) Electrical safety
- 3) Personal safety
- 4) Use and maintenance of the power tool
- 5) Service
- Safety instructions specific to spray guns
- Safety symbol guide
- Product description
- Operating instructions Preparations
- Attaching the shoulder strap
- Suitable coating materials
- Unsuitable coating materials
- Preparing the coating material (thinning)
- Measuring the viscosity:
- Example viscosities of various coating materials
- Spray coating Viscosity in DIN-seconds
- Preparation of the workpiece to be coated
- Spray painting
- Operating instructions
- Setting the spray pattern
- Adjusting the paint volume
- Switching the spray gun on
- Switching the spray gun off
- Changing the paint nozzle
- Care and maintenance
- Note:
- Cleaning with water as the solvent
- Cleaning with another solvent
- Air filter
- Responsible disposal
- Specifications
- Färgspruta HVLP
- Lämpliga sprutämnen
- Slå på färgsprutan
- Specifikationer
- Spesifikasjoner
- Tekniset tiedot
- Technische Daten
- Declaration of Conformity
- Sverige
- Deutschland
Brand : Cocraft
Model : HS 950-H
Category : Paint gun