HR 710 - Hammer Cocraft - Free user manual and instructions
Find the device manual for free HR 710 Cocraft in PDF.


| Product Type | Rotary Hammer with SDS-plus chuck |
| Model | Cocraft HR 710 |
| Rated Voltage | 220-240 V, 50 Hz |
| Power | 710 W |
| No-Load Speed | 930 rpm |
| Impact Rate | 5000 bpm |
| Impact Force | 2.6 J |
| Chuck Type | Keyless SDS-plus |
| Max Drilling Capacity (Steel) | 13 mm |
| Max Drilling Capacity (Wood) | 40 mm |
| Max Drilling Capacity (Concrete) | 26 mm |
| Weight | 3.3 kg |
| Sound Power Level (LwA) | 96.8 dB(A), K=3 dB(A) |
| Sound Pressure Level (LpA) | 85.8 dB(A), K=3 dB(A) |
| Vibration (Hammer drilling, main handle) | 18.582 m/s², K=1.5 m/s² |
| Vibration (Chiselling, main handle) | 16.069 m/s², K=1.5 m/s² |
| Work Modes | Drilling, Rotary Hammer, Hammer only (chiselling) |
| Depth Stop | Adjustable via side handle lock |
| Side Handle | Adjustable, auxiliary handle included |
| Safety Features | Insulated gripping surfaces, function selector lock, dust cover |
| Maintenance | Clean with damp cloth, keep ventilation openings clear |
| Repairability | Use only original spare parts, service by qualified technicians |
| Disposal | Do not dispose with household waste; recycle at appropriate facility |
Frequently Asked Questions - HR 710 Cocraft
User questions about HR 710 Cocraft
0 question about this device. Answer the ones you know or ask your own.
Ask a new question about this device
Download the instructions for your Hammer in PDF format for free! Find your manual HR 710 - Cocraft and take your electronic device back in hand. On this page are published all the documents necessary for the use of your device. HR 710 by Cocraft.
USER MANUAL HR 710 Cocraft
KEYLESS, SDS-PLUS CHUCK
BORRHAMMARE PORAVASARA
BORHAMMER BOHRHAMMER

Important!
Read the entire instruction manual carefully and make sure that you fully understand it before you use the equipment. Keep the manual for future reference.
Viktig information:
natural_image
Blue Cocraft HR 710 electric drill put tool against a textured gray background (no visible text or symbols on the device body)Art.no Model
18-3552
40-8756
Z1C-HW-2609
Z1C-HW-2609
Ver. 20180703
Original instructions
Bruksanvisning i original
Originalbruksanvisning
Please read the entire instruction manual before using the product and then save it for future reference. We reserve the right for any errors in text or images and any necessary changes made to technical data. If you have any questions regarding technical problems please contact our Customer Services.
Safety

Read the entire instruction manual.

Always use safety glasses or a visor and wear a dust mask.

Always use ear protection.
General safety instructions for power tools
Warning! Read all the instructions.
Failure to adhere to the following instructions may lead to electric shocks, fires and/or serious injury.
SAVE THESE INSTRUCTIONS.
The term “power tools” in the warning text below refers to your handheld mains operated or battery operated tool.
1) Work area
a) Keep the work area clean and well illuminated. Cluttered and poorly lit areas invite accidents.
b) Do not use power tools in explosive environments, e.g. near to flammable liquids, gases or dust. Power tools generate sparks that can easily ignite dust or fumes.
c) Keep children and other bystanders away from the area where you are using the power tool. Distractions can cause you to lose your concentration and control.
2) Electrical safety
a) The power tool's plug must fit correctly into the wall socket. Never modify the plug in any way. Never use an adaptor together with earthed power tools. Unmodified plugs and suitable wall sockets minimize the risk of electric shocks.
b) Avoid physical contact with earthed objects such as pipes, radiators, ovens and refrigerators. There is an increased risk of receiving an electrical shock if your body is earthed.
c) Do not expose the power tool to rain or other wet conditions. If water gets inside it increases the risk of electric shock.
d) Do not abuse the mains lead. Never use the lead to carry the tool or pull the plug from a wall socket. Keep the lead away from heat, oil, sharp edges and moving parts. Damaged or tangled leads increase the risk of electric shock.
e) When using power tools outdoors, use an extension lead that is suitable for this purpose. The use of an extension lead designed for outdoor use decreases the risk of electric shocks.
f) If the use of the power tool in a wet environment is unavoidable, a wall socket equipped with a residual current device (RCD) should be used. Using an RCD significantly reduces the chances of you receiving an electric shock.
3) Personal safety
a) Pay attention to what you are doing and use common sense when using power tools. Never use power tools if you are tired or under the influence of drugs, alcohol or medication. One moment of inattention while using a power tool may result in serious injury.
b) Wear protective clothing. Always wear safety glasses. Using protective clothing such as dust masks, non-slip safety shoes, helmets and ear defenders decreases the risk of injury.
c) Avoid accidental starts. Make sure that the power switch is set to OFF before plugging the power tool into a wall socket, fitting the battery or picking up/carrying the power tool. Carrying a power tool with your finger on the power switch/trigger or connecting the power tool to a wall socket when the power switch/trigger is set to ON is inviting an accident.
d) Remove all service tools/keys before switching on the power tool.
A service tool left on any moving part of the power tool may result in injury.
e) Do not overreach. Make sure you stand steady and well balanced at all times. This ensures better control over the power tool in unexpected situations.
f) Wear suitable clothing. Do not wear loose-fitting clothing or jewellery. Keep hair, clothes and gloves away from moving parts. Loose-fitting clothes, jewellery or long hair could become caught in moving parts.
g) If equipment for dust extraction or collecting is available make sure it is connected and used properly. Using technical aids may decrease dust related hazards.
4) Use and maintenance of the power tool
a) Do not force the power tool. Use a power tool suitable for the work you are about to perform. The proper power tool will perform the task better and safer if used at the correct feed rate.
b) Never use the power tool if the power switch does not switch the tool on and off properly. All power tools that cannot be controlled by the power switch are dangerous and must be repaired.
c) Unplug the lead from the wall socket or remove the battery before making any adjustments, changing accessories or storing the power tool.
These precautions reduce the risk of the power tool starting unexpectedly.
d) Store power tools that are not being used out of children's reach. Do not allow people who are unfamiliar with the tool or its functions to operate the tool.
Power tools can be dangerous if they fall into the hands of inexperienced users.
e) Maintaining power tools. Check for any incorrect settings, parts that catch, broken parts or anything else which may cause the power tool to malfunction. If something is damaged it must be repaired before use. Many accidents are caused by poorly maintained power tools.
f) Keep cutting tools sharp and clean. Properly maintained cutting tools with sharp blades are less likely to jam and are easier to control.
g) Use the power tool, and any accessories in accordance with these instructions, take into consideration the working conditions and the work that is to be performed. Using the power tool for a purpose other than that for which it is intended could result in a dangerous situation.
5) Service
a) Repairs and service should only be performed by qualified tradesmen, and only with original spare parts. This guarantees that the safety of the power tool is maintained.
Specific Safety Regulations for Rotary Hammers
- Always wear hearing protection when hammer drilling. Exposure to excessive noise can cause hearing loss.
- Note: The previous warning only applies to hammer drilling and can be excluded for other types of drilling.
- Always use an auxiliary handle if one is supplied. Loss of control over the power tool can cause personal injury.
- Hold the power tool by its insulated gripping surfaces when performing an operation where the cutting accessory may contact hidden wiring or the power tool's own mains lead. Cutting accessories which contact "live" wires may make exposed metal parts of the power tool "live" and could give the operator an electric shock.
- Never use chisels which are designed for chiselling without rotation in the rotary hammer mode. The chisel could jam and cause you to lose control of the rotary hammer.
- Use gloves when handling chisels and other accessories. Accessories can become hot during use and can cause burns.
Buttons and functions
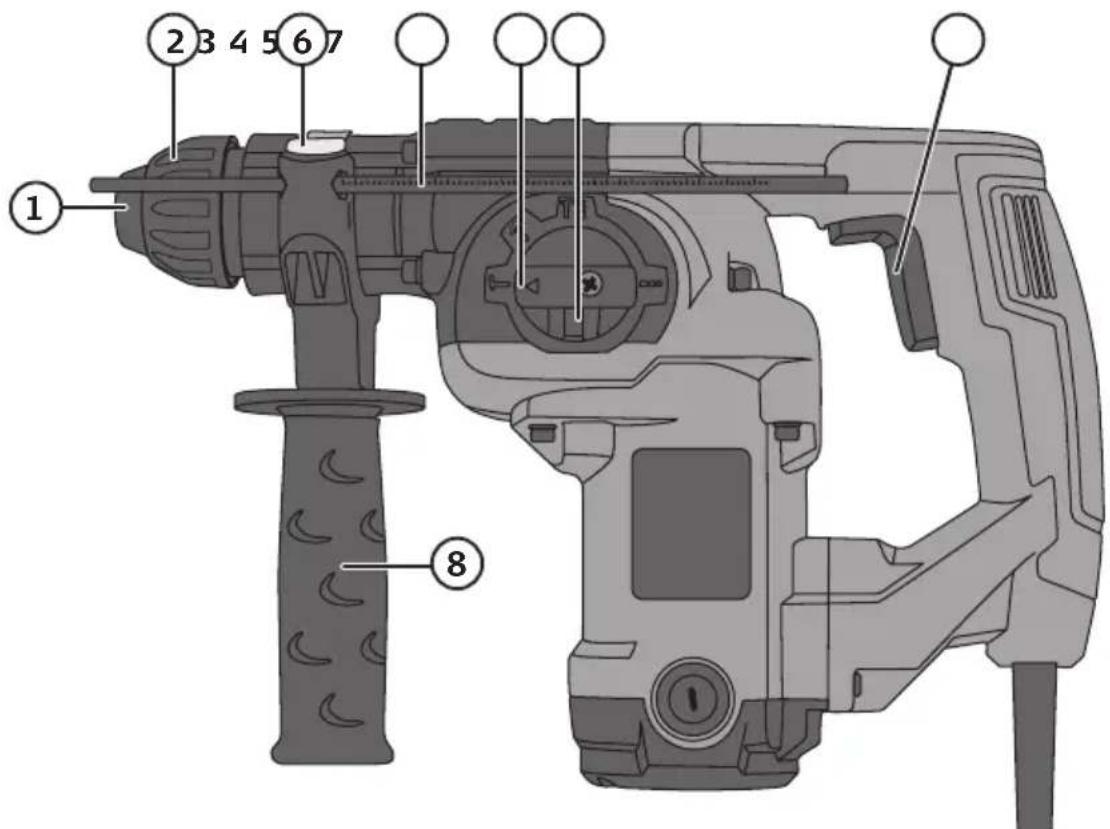
- SDS-plus chuck with dust cover
- Accessory lock
- Depth stop lock
-
Depth stop
-
Function selector
- Function selector lock
- Power trigger
- Side handle
Operating instructions Inserting drill bits/accessories
This rotary hammer drill is equipped with a keyless SDS-plus chuck. Clean the drill bit/accessory and lightly grease its shank before inserting it into the SDS-plus chuck.
- Pull back the locking sleeve.
- Insert a drill bit or other accessory into the SDS-plus chuck. Rotate and push the drill bit/accessory into the chuck as far as it will go.
- Release the locking sleeve so that it moves forward and locks the drill bit/accessory in place.
- Make sure that the drill bit/accessory is securely locked by trying to pull it out. The drill bit/accessory should be able to move but you should not be able to pull it out by hand.
Auxiliary handle with depth stop
- Undo the side handle by twisting it.
- Move the side handle to the desired position.
- Lock the side handle by twisting it.
- Set the depth stop by releasing the lock on the side handle.
Power trigger
- Plug the mains lead into a wall socket after you have inserted a drill bit/accessory into the SDS-plus chuck.
- Start the drill by pulling the power trigger gently.
- Turn the drill off by releasing the power trigger.
Work modes
The rotary hammer drill has three different work modes: The work mode must only be changed when the drill is switched off and the chuck is stationary. The work mode is changed using the function selector.
Drilling with hammer action (for drilling metal, wood, plastic, etc.)
Push in the function selector lock and turn it all the way to the right so the arrow points to the ⏻ symbol.
Rotary hammer (for drilling brick, concrete, masonry)
Push in the function selector lock and turn it so that the arrow points straight up to the T i symbol.
Hammer action without rotation (for chiselling concrete, wood, etc.)
Push in the function selector lock and turn it all the way to the left so the arrow points to the T symbol.
In order to adjust the accessory to the desired position, the function selector should be set to the symbol.
Useful tips
- When using the hammer only mode, you should apply light pressure to the drill. The application of too much pressure can reduce the hammer effect. Try applying different amounts of pressure until you find the most effective one.
- Check the condition of the drill bit/accessory regularly. Replace any worn drill bits/accessories.
- Let the motor run for a few minutes under no load after hard use to let it cool down.
- For hard metals use titanium coated drill bits and for concrete/tiles use tungsten carbide tipped bits.
- Fasten the workpiece down securely if possible. Use clamps or vices when you can, this will leave you with both hands free to manoeuvre the machine with, which increases precision.
- If you are drilling into thin materials it is important that you place a small piece of waste material behind the hole to be drilled, otherwise there is a risk of burring on the back.
- Hold the rotary hammer drill perpendicular to the workpiece before starting to drill (look from several angles). Make sure that you keep the drill straight, do not force the drill out of line when drilling.
- Do not apply so much pressure that the drill reduces speed. Let the drill bit/chisel do the work. Reduce pressure before the drill breaks through the material.
- Let the drill bit continue to rotate once it has broken through the material, this allows the motor to cool down and also clears the drill bit from debris.
Things to consider when drilling into wood and plastic
- For wood and other soft materials there are several types of accessories such as hole saws, flat wood bits, etc. Select the most suitable tool for the job. Test the drill on a piece of waste material first.
- Drills can overheat if you don't pull them up out of the hole often to free them of sawdust.
- Place a small piece of waste material behind the hole to be drilled before starting to drill otherwise there is a risk of burring around the edges of the hole on the back.
Things to consider when drilling into metal
- Mark where the hole is to be drilled using a centre punch.
- The drill bit can overheat if you use too high a speed. Use a cooling fluid suitable for your workpiece material e.g. methylated spirit for aluminium. (Cast iron and brass do not require cooling fluid).
- Use a low rpm for big holes.
- If possible, thin or sharp workpieces should be held in a vice for safety. Make sure that they can't work loose and spin around dangerously when drilled into.
Things to consider when drilling into concrete, tile or brick
- Use Tungsten carbide tipped drill bits.
- Use the rotary hammer drill mode and work carefully, applying constant pressure.
- The material residue comes out of the drilled hole as powder or dust. Wear a face mask.
- Keep the chisels sharp and correctly ground.
Care and maintenance
- Unplug the mains lead before carrying out any maintenance, repairs or service.
- Make sure that the motor's ventilation openings are never clogged.
- Clean the rotary hammer drill using a lightly moistened cloth. Only use mild cleaning agents, never solvents or corrosive chemicals.
- Store the rotary hammer in its storage case and out of the reach of children.
Responsible disposal
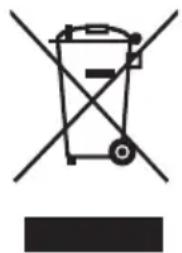
This symbol indicates that this product should not be disposed of with general household waste. This applies throughout the entire EU. In order to prevent any harm to the environment or health hazards caused by incorrect waste disposal, the product must be handed in for recycling so that the material can be disposed of in a responsible manner. When recycling your product, take it to your local collection facility or contact the place of purchase. They will ensure that the product is disposed of in an environmentally sound manner.
natural_image
Symbol of a trash bin crossed out by two crossed lines, with no text or labels present.Specifications
Rated voltage 220–240 V, 50 Hz
Power 710 W
No-load speed 930 rpm
Impact rate 5000 bpm
Impact force 2.6 J
Noise level LwA 96,8 dB(A), K:3 dB(A)
LpA 85,8 dB(A), K:3 dB(A)
Vibration a h, ID 18,582 m/s², K: 1.5 m/s² (drilling with hammer action)
(main handle) a h, CHeq 16,069 m/s², K: 1.5 m/s² (chiselling)
Vibration a h, ID 12,926 m/s², K: 1.5 m/s² (drilling with hammer action)
(aux handle) a h, CHeq 9,649 m/s², K: 1.5 m/s² (chiselling)
Max drill bit size Steel 13 mm
Wood 40 mm
Concrete 26 mm
Chuck SDS-plus
Weight 3.3 kg
Borrhammare
Art.nr 18-3552 Modell Z1C-HW-2609
40-8756 Z1C-HW-2609
natural_image
Symbol of a trash bin crossed out by two crossed lines, with no text or labels present.Specifikationer
Nätanslutning 220–240 V, 50 Hz
Effekt 710 W
Max varvtal obelastad 930 v/min
Slag/min 5000
Slagkraft 2,6 J
Ljud LwA 96,8 dB(A), K: 3 dB(A)
LpA 85,8 dB(A), K: 3 dB(A)
natural_image
Symbol of a trash bin with no text or labels, crossed by diagonal lines and a solid rectangle below (no readable text or symbols)Spesifikasjoner
Spenning 220–240 V, 50 Hz
Effekt 710 W
Maks turtall 930 o/min (ubelastet)
Slag / min. 5 000
Slagkraft 2,6 J
Lyd LwA 96,8 dB(A), K:3 dB(A)
LpA 85,8 dB(A), K:3 dB(A)
natural_image
Symbol of a trash bin crossed with no text or labels, accompanied by a solid black rectangle below (no text or symbols present)Technische Daten
Declaration of Conformity
Declares that this product complies with the requirements of the following directives and standards
Machinery Directive 2006/42/EC
EN 60745-1/A11:2010
EN 60745-2-6:2010
EMC Directive 2014/30/EC
EN 55014-1:2017
EN 55014-2: 2015
EN 61000-3-2: 2014
EN 61000-3-3:2013
Low Voltage Directive 2014/35/EC
Henrik Alfredsson
Manager Technique & Quality
Insjön, Sweden, 2018-07-03
Sverige
Postal 10 - 13 Market Place
Kingston Upon Thames
Surrey
KT1 1JZ
Deutschland
Kundenservice
- Important!
- Viktig information:
- Safety
- General safety instructions for power tools
- SAVE THESE INSTRUCTIONS.
- 1) Work area
- 2) Electrical safety
- 3) Personal safety
- Specific Safety Regulations for Rotary Hammers
- Buttons and functions
- Operating instructions Inserting drill bits/accessories
- Auxiliary handle with depth stop
- Power trigger
- Work modes
- Useful tips
- Things to consider when drilling into wood and plastic
- Things to consider when drilling into metal
- Things to consider when drilling into concrete, tile or brick
- Care and maintenance
- Responsible disposal
- Specifications
- Borrhammare
- Specifikationer
- Spesifikasjoner
- Technische Daten
- Declaration of Conformity
- Sverige
- Deutschland
Brand : Cocraft
Model : HR 710
Category : Hammer