IAN 046701 - Uncategorized FLORABEST - Free user manual and instructions
Find the device manual for free IAN 046701 FLORABEST in PDF.

| Product Type | Grass Trimmer / String Trimmer |
| Brand | Florabest |
| Model | IAN 046701 |
| Power Supply | 230 V AC, 50 Hz, 500 W |
| Cutting Width | 30 cm |
| Cutting Line Diameter | 1.6 mm |
| Line Feed | Automatic bump feed |
| Shaft Type | Telescopic, adjustable length |
| Handle | Adjustable auxiliary handle |
| Weight | 2.5 kg |
| Overall Length | 120 cm (max) |
| Noise Level | 96 dB (A) |
| Vibration Level | 2.5 m/s² |
| Protection Class | II (double insulated) |
| Safety Features | Safety switch, protective guard |
| Maintenance | Clean after use; replace cutting line when worn |
| Spare Parts | Replacement spool and cutting line available |
| Included Items | Trimmer, spool with line, user manual |
Frequently Asked Questions - IAN 046701 FLORABEST
User questions about IAN 046701 FLORABEST
0 question about this device. Answer the ones you know or ask your own.
Ask a new question about this device
Download the instructions for your Uncategorized in PDF format for free! Find your manual IAN 046701 - FLORABEST and take your electronic device back in hand. On this page are published all the documents necessary for the use of your device. IAN 046701 by FLORABEST.
USER MANUAL IAN 046701 FLORABEST
natural_image
Black-and-white photo of a portable kegg grill with cutlery and meat, placed on a wooden deck in a grassy outdoor setting (no text or symbols visible)G8
United Kingdom LANOWAHH ^ Ltd
B
MI DE
AT DI
PT
Unit 6 Blackstone Road, Stokeley Meadows Huntington, PE29 68F - United
Engren: Hapine 24 01481 471731,
Sales Office, 14-01-07-2016
Kumaly to Thursday 2011 to April, Friday, Sam to 4am
• The following table provides the information obtained from the research and development of the research and development of the research and development of the research and development of the research and development of the research and development of the research and development of the research and development of the research and development of the research and development of the research and development of the research and development of the research and development of the research and development of the research and development of the research and development of the research and development of the research and development of the research and development of the research and development of the research and development
Germany Landmann GmbH & Co. Handels
an hennemid 3,5, D 27/11 Ostenzer Schambeck, Dr. U.S.
旧.**9-4791-305-39602176,42**9-4791-305-30
R.O. DE EDUO DE 12/45/2011, FR ADO DE 15:20 DE
E-mail: 013-520@main.sse, InBelec, www.orient.com.cn
⑥ Assembly and operating instructions
③ Instrucciones de montaje y funcionamiento "Barbacoa estérica" 3
Istruzioni per il montaggio ed il funzionamento del "Barbecue a forma sferica" 9
Instalações de montagem e operação 15
Assembly and operating instructions - "Kettle charcoal barbecue" 21
DE AF CH Montage- und Betriebsanleitung "Kugelgrill" 27
natural_image
Diagram showing two chairs on a circular platform with an arrow indicating rotation (no text or symbols)natural_image
Illustration of a barbecue grill with flames and smoke, no text or symbols present
natural_image
Illustration of a grating with four panes and a side menu, showing heat transfer (no text or symbols)Barbacoa indirecta
natural_image
Illustration of a three-step cooking process in a pan, showing heating and cooling steps (no text or symbols)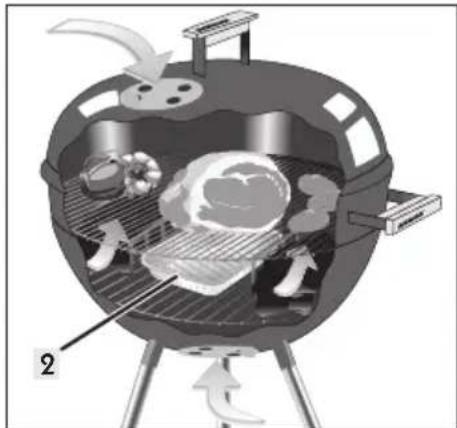
natural_image
Cross-sectional diagram of a grilled grill with visible meat, steam, and airflow (no text or labels)natural_image
Diagram showing two identical chair arrangements on a circular platform with an arrow indicating rotation (no text or symbols)natural_image
Illustration of a barbecue grill with flames and smoke, no text or symbols present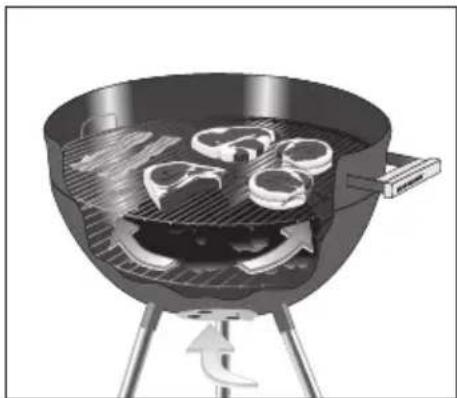
natural_image
Illustration of a grating with four panes and a side menu, showing heat transfer (no text or symbols)
natural_image
Cross-sectional diagram of a grilled grill with visible flames, smoke, and heat transfer (no text or labels)natural_image
Diagram showing two chairs on a circular platform with an arrow indicating rotation (no text or symbols)natural_image
Illustration of a barbecue grill with flames and smoke, no text or symbols present
natural_image
Illustration of a grating with four panes and a side menu, showing heat transfer (no text or symbols)Grelhar com calor indirecto
natural_image
Diagram of a fire extinguisher with labeled parts (1 and 3), showing internal combustion and heating zones (no text or symbols beyond labels)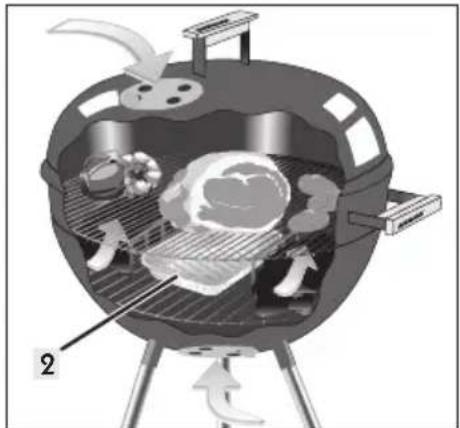
natural_image
Cross-sectional diagram of a grilled grill with visible flames, meat, and steam (no text or labels)Assembly and operating instructions - "Kettle charcoal barbecue"
Introduction
Before operating the high-quality Florabest grill please read these assembly and operating instructions carefully.
You will quickly determine that:
Set up and handling are easy.
Proper use
The grill should only be used for preparing foods that are suitable for grilling. All of these operating instructions must be complied with.
Only for private use!
Safe operation of the grill
Prior to using for the first time, the grill must be heated for approximately 30 minutes.
General safety instructions

WARNING - burn injuries!
→The grill must be placed on a stable and firm substrate during operation, otherwise it can tip over.
→Never move the grill when it is in operation, it can tip over.
→When grilling, wear grill gloves or use grill tongs.
→Allow the grill to cool down completely before cleaning.
Do not use spirit or gasoline to ignite or re-ignite. Use of spirit or gasoline can cause deflagration or uncontrolled heat development. Only use tested ignition aids for grilling such as DIN solid fire starter!
→Never use water to extinguish charcoal.

WARNING - suffocation!
→Do not use in enclosed areas, or in areas covered by a roof.

DANGER for children, people with or physical disabilities, and pets!
→Never leave the hot grill unattended. Keep children, people with mental or physical disabilities, and pets away from the grill.
Assembly preparations
- Please read the assembly instructions carefully all the way through, and follow the safety instructions.
- Allow yourself sufficient time for assembly.
- Establish a level work surface beforehand of approximately two to three square meters.
- Remove the device from the packaging!
- Organize the parts and the required tools so that they are close at hand.
- Please use the list and drawing below to verify that you have all of the parts.
Part list
Designation Qty.
A. Handle 3
B. Vent plate 2
C. Hood 1
D. Hood holder 1
E. Grill element 1
F. Charcoal grate 1
G. Fire bowl 1
H. Stand reinforcement 3
1. Wheel stand 2
J. Ash collection sheet holder 3
K. Wheel 2
L. Wire shelf 1
M. Stand cap (pre-mounted) 1
N. Ash collection sheet 1
0. Stand element 1
P. Charcoal divider 2
Technical data
Assembled dimensions: approx. 57 x 86 x 48 cm
Grill: approx. ∅44 cm
Weight: approx. 5.7 kg
Holding capacity: approx. 1,5 kg
Required tools
| Cross-tip screwdriver | |
| Open-jawed spanner7mm, 10mm and 13mm |
Connecting elements
| [WGSZ] | [7K5Z] | [0C8Z] |  |  |  |  |  |  |  |
| M6x303x | M4x102x | M6x106x | ∅4,22x | ∅6,4x∅126x | ∅6,4x∅183x | M42x | M66x | M82x | ∅8x∅182x |
Assembly

CAUTION!
For your safety the heads of the screws should always point outward, otherwise injuries can occur.
Only firmly tighten all screw connections after assembly is concluded, otherwise undesired material tension can occur.
- Insert an ash collecting sheet holder (J) and a stand reinforcement (H) above each upper end of a stand element (I + 0). Mount the stand elements (I + 0) on the fire bowl (G) in the arrangement shown. Use the M6x30 screws and ∅6.4x∅18 diameter washers.
- Hook the front tab of the wire holder (L) into the lower bore of the stand element (O). Guide the ends of the wire holder (L) through the lower bores in the stand elements (I). Mount the wheels (K) to the ends of the wire shelf (L) using the ∅8x∅18 washers and M8 lock nuts.
- Screw two of the handles (A) onto the fire bowl (G) via the M6x10 screws, ∅6.4x∅12 washers, and M6 nuts. Fasten the hood holder (D) to the handle (A) on the inside of the hood (C) via M6x10 screws, ∅6.4x∅12 washers, and M6 nuts.
-
Fasten the vent plates (B) on the fire bowl (G) and on the hood (C) from the outside with M4x10 screws, ∅4.2 washers, and M4 nuts.
-
Clamp the ash collection sheet (N) into the ash collection sheet holder (J) between the stand elements (I + 0).
- Insert the charcoal grate (F) and the grill element (E) in the fire bowl (G). If needed place the charcoal divider (P) on the charcoal grate (F).
natural_image
Diagram showing two arrangements of chairs on a circular platform with an arrow indicating rotation (no text or symbols)Note the comments on the following pages.

WARNING!
The grill must be placed on a stable and firm substrate during operation, otherwise it can tip over.
Direct grilling
The best known and most frequently used method. Direct grilling refers to the cooking of grilled foods directly over the heat source (charcoal, gas burning, electric heating element) in horizontal position. The effect of heat radiation on the food is the most pronounced with this traditional method, and this method keeps the cooking time to a minimum (fast cooking).
Spherical grills and covered grills have a hood cover in addition, as well as vent sliders in the hood and charcoal bowl. With the hood closed and the vent slider is open the cooking time can be further reduced; and the wood charcoal aroma is even more pronounced.
However with unprotected direct grilling the possibility always exists that drippings or marinade from the food will drip into the heat source and burn there.
When grilling foods with a lot of fat or marinade we recommend using a grill pan made of aluminium, or better yet a grill pan made of enamelled sheet metal.
natural_image
Illustration of a griddle with flames and a side menu, no text or symbols present
natural_image
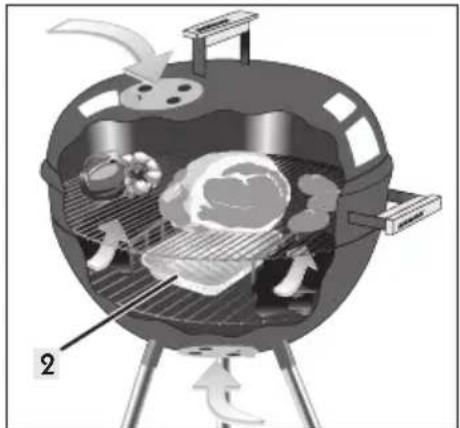
Illustration of a grating with four circular cutouts and a curved arrow indicating heating (no text or symbols)Indirect grilling
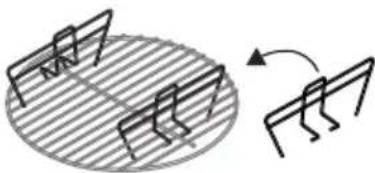
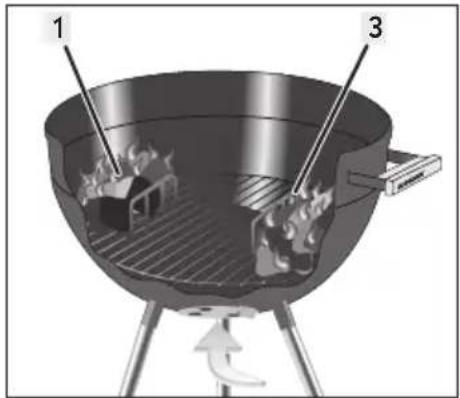
To prepare the fire bowl for indirect grilling the so-called charcoal dividers (P) (usually wire mesh walls) are placed in the provided holders of the container, or on the charcoal grate placed in the fire bowl. Thus the fire bowl is divided into three zones: Zone 1 and 3 are the intermediate spaces between charcoal divider (P) and the side wall of the fuel container.
Zone 2 is the space between the charcoal dividers (P). This space remains free: This is where you can place a drip tray or a plate to collect the drippings. Zones 1 and 3 are filled with fuel and the fuel is ignited in accordance with the lighting instructions. As soon as the optimal coal status is reached you can start with indirect grilling.
The grill element that is placed above the coals is usually designed in such a manner that there is still space for direct grilling above zones 1 and 3, so that both variants can be used at the same time. For slow and gentle indirect grilling, you always require a hood. Use this hood to cover the fire bowl and thus form an enclosed cooking space.
The vent sliders on the floor of fire bowl and on the top of the hood must be opened for indirect grilling, to ensure a supply of oxygen. Thus the cooking space effectively acts as a convection oven. Naturally the cooking time for indirect grilling is significantly longer than it is for direct grilling. However it is not necessary to turn the food, thus frequent opening of the hood is not necessary as the heat is supplied from all sides.

natural_image
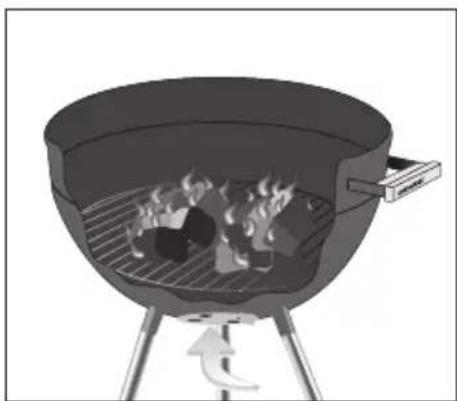
Cross-sectional diagram of a grilled grill with visible meat, steam, and water flow (no text or labels)Igniting the fuel

WARNING - burn injuries!
If igniting with gasoline or spirit, uncontrolled heat development can occur due to deflagration. Only use non-hazardous combustion materials such as solid fire starter. The grill must be stable on a firm substrate for operation.
- Use quality products from DIN, such as DIN charcoal, DIN briquettes, and DIN fire starter.
- Layer a portion of the charcoal or briquettes on the charcoal grate (F). For indirect grilling fill the intermediate space between the charcoal divider (P) and the fire bowl (G) with fuel. The space between the charcoal dividers (P) remains free for indirect grilling.
- Light one or two of the solid fire starters with a match. Place these on the layer of charcoal or briquettes.
- Allow the solid fire starter to burn for 2 to 4 minutes. Then slowly fill the fire bowl (G) with charcoal or briquettes.
- After approximately 15 to 20 minutes white ashes can be seen on the charcoal or briquettes. This indicates that the charcoal or briquettes have reached a state that is ideal for grilling. Distribute the charcoal or briquettes uniformly in the fire bowl (G) with a suitable metal tool.
- Hook in the greased grill element and start grilling.
Cleaning / care

WARNING - burn injuries!
Allow the grill to cool down completely before cleaning. Never use water to cool off a hot grill. This can cause burn injuries and scalding.
Naturally, occasional cleaning is necessary to maintain the attractive appearance of the product. Do not use abrasive agents.
- A wash cloth and water with an off-the-shelf dish washing agent suffice for cleaning.
- If there are stubborn stains on the enamelled parts, use an off-the-shelf cleaning agent for enamel (oven cleaner). Follow the instructions provided by the manufacturer of the cleaning agent you are using.
- Clean the grill element with dish-washing liquid and a rust-free scouring pad.
Environmental instructions & disposal measures
Ensure cleanliness when handling the grill and when disposing of residual materials. Only dispose of residual waste in containers made of metal or non-flammable materials that have been designed for this purpose.
Local regulations apply for disposal.
Guarantee
We guarantee the grill for a period of three years from the date of purchase. The guarantee includes defects in workmanship or defective parts; it covers replacement of these parts. Costs for freight, assembly, replacement of worn parts, etc. are not part of the guarantee. The guarantee is rendered null and void if the grill is handled improperly, or if changes of any kind have been made to the grill.
natural_image
Diagram showing two chairs on a circular platform with an arrow indicating rotation (no text or symbols)natural_image
Illustration of a barbecue grill with flames and smoke, no text or symbols present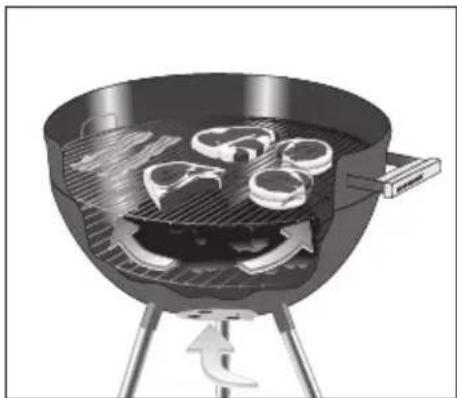
natural_image
Illustration of a grating with four panes and a side menu, showing heat transfer (no text or symbols)Indirektes Grillen