
IAN 70720 - Uncategorized FLORABEST - Free user manual and instructions
Find the device manual for free IAN 70720 FLORABEST in PDF.

| Product Type | Wall-Mounted Hose Box (Hose Reel) |
| Brand | Florabest |
| Model | IAN 70720 |
| Intended Use | Garden hose organization with automatic winding-in function; not for commercial use |
| Dimensions (Hose Reel) | Approx. 480 x 255 x 415 mm |
| Wall Holder Dimensions | Approx. 15 x 9.5 x 26.5 cm |
| Hose Length | 19.5 m (12.5 mm diameter) |
| Hose Attachment Length | 1.5 m (12.5 mm diameter) |
| Included Items | Wall holder, hose reel with hose, side cover, hose attachment, tap attachment, hose connector, screws (4), dowels (4), spray nozzle, hose connector with water stop, operating instructions |
| Mounting Hardware | 4 screws (approx. 4.8 x 55 mm) and 4 dowels (approx. 8 x 38 mm) for brick, concrete, or wood |
| Rotation Range | 180° |
| Safety Features | Automatic stop function; water stop connector; not for potable water |
| Installation Requirements | Must be mounted vertically; avoid electrical cables and water pipes; outdoor use only; not higher than tap to prevent backflow |
| Maintenance | Clean housing with damp cloth; open top door to rinse inside with water; check connections if dripping |
| Winter Storage | Remove from wall and store indoors dry to avoid frost damage |
| Disposal | Packaging recyclable; dispose of product at local recycling facility |
| User Guidance | Never let hose retract freely; guide it carefully; children not allowed to use |
Frequently Asked Questions - IAN 70720 FLORABEST
User questions about IAN 70720 FLORABEST
0 question about this device. Answer the ones you know or ask your own.
Ask a new question about this device
Download the instructions for your Uncategorized in PDF format for free! Find your manual IAN 70720 - FLORABEST and take your electronic device back in hand. On this page are published all the documents necessary for the use of your device. IAN 70720 by FLORABEST.
USER MANUAL IAN 70720 FLORABEST
Wall-Mounted Hose Box
Introduction

These operating instructions form a part of this product. They contain important information on safety, use and disposal.
Make yourself familiar with all the operating instructions and safety advice for the product before installation. Use the product only as described and for the indicated purpose. If you pass the product on to anyone else, please ensure that you also pass on all the documentation with it.
- Proper use
This hose reel is intended for use as a practical organisational aid in the garden and has an automatic winding-in function. Any use other than that described or any modification of the product is not permissible and may result in injury and/or damage to the product. The manufacturer is not liable for damage caused by improper use. The product is not intended for commercial use.
● Description of parts and features
1 Wall holder
2 Hosepipe reel with hosepipe 19.5 m
3 Side cover
4 Hosepipe attachment 1.5 m
5 Tap attachment
6 Hosepipe connector
7 Screws (approx. 4.8 x 55 mm)
8 Dowels (approx. 8 x 38 mm)
9 Spray nozzle
10 Hosepipe connector with water stop function
- Included items
1 x Wall holder
1 x Hosepipe reel with hosepipe 19.5 m
1 x Side cover
1 x Hosepipe attachment 1.5 m
1 x Tap attachment
1 x Hosepipe connector
4x Screws (approx. ∅ 4.8×55 mm)
4x Dowels (approx. ∅ 8×38 mm)
1 x Spray nozzle
1 x Hosepipe connector with water stop function
1 x Operating instruction
- Technical data
Dimensions: approx. 480×255×415 mm
Hosepipe attachment: approx. 12.5 mm x 1.5 m
Hose: approx. 12.5 mm x 19.5 m
Wall holder: approx. 15×9.5×26.5cm

Safety advice
CAUTION! DANGER OF INJURY!

THIS PRODUCT IS NOT A TOY! This product must not be used by children.
■ DANGER TO LIFE AND RISK OF ACCIDENTS FOR INFANTS AND CHILDREN!
Never leave children unsupervised with the packaging materials. Danger of suffocation. Keep out of the reach of children.
CAUTION! DANGER OF ELECTRIC
SHOCK! Make sure that no electrical cables are damaged during installation of the product.
CAUTION! WATER DAMAGE! Make sure that no water pipes are damaged during installation of the product. Observe the operating instructions for your drill.
CAUTION! RISK OF INJURY! Ensure that all parts are undamaged and have been assembled appropriately. Risk of injury exists if assembled incorrectly. Damaged parts can effect safety and function.
- Have the installation done by experienced persons only.
■ Do not open the housing. The springs are
Safety advice/Installation
preset; they may spring back.
■ Never remove any screws from parts of the housing.
CAUTION! RISK OF INJURY! Never let the hose spring back by itself. Guide it carefully back into the housing.
CAUTION! RISK OF INJURY! Never let go of the hose if the automatic stop function is not engaged.
CAUTION! RISK OF INJURY! Never allow the hose to retract freely. This could result in damage to the product.
■ Never block the hose end with your fingers or other objects during use.
■ To avoid frost damage, remove the hose reel from the wall and store it dry during winter.
CAUTION! DANGER OF SLIPPING!
Ensure that the ground near the hose reel is kept as dry as possible.
■ Turn he tap into the off position when the hose reel is not in use.
The hose is not suitable for delivering drinking water.
- Installation
● Fitting the water hosepipe attachment
☐ Guide the short length of hosepipe attachment 4 from outside through the opening into the side compartment of the hose reel. Remove the screw-on cap from the hose reel hose connection and guide it onto the hosepipe attachment 4 (see Fig. A).
☐ Insert the hosepipe attachment 4 firmly into the toothed connection piece and screw the cap back on (see Fig. B).
☐ Close the side compartment with the side cover 3 (see Fig. C).
- Choosing the installation site
The hose reel is intended for outdoor use only and cannot be connected to indoor taps.
☐ Choose a part of the wall surface with approx. 50 cm free to each side so that the hose reel can be turned through 180°.
☐ If you wish to take the hose around a wall corner, mount the hose reel at least 1 m from the corner and use a hose guide (not included).
Note: To prevent backflow do not install the hose reel higher than the tap.
Or: Install a reflux preventer or a pipe interrupter between tap and hose.
- Mounting the wall holder
Important! The holder must be mounted vertically (see Fig. E).
☐ Use the four screws and dowels supplied. They are suitable for mounting on brick, concrete or wooden walls only. For mounting on other materials please use suitable screws and dowels. Enquire in your local DIY shop for some suitable screws and dowels for your particular wall.
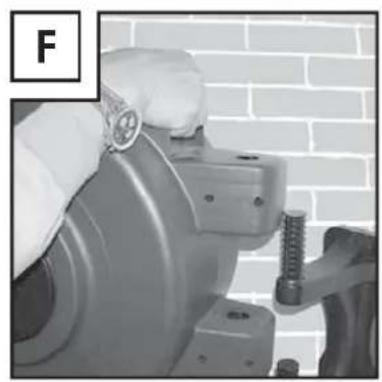
- Mounting the hose reel
□ Push the hose reel 2 on to the wall holder 1 (see Figs. F + G).
☐ Attach the tap attachment 5 to the free end of the hosepipe attachment 4 and screw it on to the water hosepipe connector 6 (see Fig. D).
☐ Push the hosepipe connector with water stop function 10 and the spray nozzle 9 on to the long garden hose.
☐ Check that the hose reel 2 can turn through 180^ (see Fig. H).
Before first use turn the tap on and allow water to run through the garden hose.
☐ Check the device for leaks and tighten any loose connections if necessary.
Installation / Maintenance, cleaning and care / Disposal
- Using the hose reel
☐ Hold the end of the hose firmly when unwinding the hose and pull the hose out of the hose reel 2.
☐ The hose reel 2 has an automatic stop function which ensures that the hose is kept at the desired unwound length. As the hose is unwound a click sounds from the stop function every metre. When the desired length has been unwound, pull out the hose carefully a little further until the next click sounds. The hose is then fixed at the desired unwound length and can be placed on the ground without it springing back into the housing by itself.
☐ If you wish to unwind more of the hose, hold the hose firmly and proceed as described above.
☐ The automatic stop function is cancelled by pulling the hose quickly past the next click and then guiding the hose back carefully by hand into the hose reel [2].
☐ You can regulate the water jet by turning the spray nozzle 9.
Note:
☐ Reduce the pressure if the hose cannot be properly guided into the housing with the tap turned on. Either allow some water to flow out of the hose or turn the water off.
☐ If the hose does not wind back on to the reel return under its own power, hold it slightly above hip-height and guide it carefully back onto the reel.
● Using the spray nozzles
□ Attach the spray nozzle 9 onto the hosepipe connector with water stop function 10.
☐ To adjust the water discharge, turn the green part of the spray nozzle. The spray nozzle can be used to interrupt the discharge of water. The connector with the water-stop function interrupts the water flow when the nozzle is removed from the turned-on tap. Only use these two functions for intermittent interruptions of the flow of water. Never leave the hose unsupervised in such instances.
● Maintenance, cleaning and care
☐ If the hose reel 2 drips, lift the side cover 3 using a screwdriver. Check the connection between the reel and the hose and replace the screw-on cap firmly.
□ Clean the housing using a slightly moist, fluff-free cloth.
☐ To clean the inside of the reel, open the door provided for this purpose on the top of the hose reel 2 (see Fig. I).
□ Spray the inside with a vigorous jet of water and then close the door (see Figs. J, K, L).
- Disposal

The packaging is made entirely of recyclable materials, which you may dispose of at local recycling facilities.
Contact your local refuse disposal authority for more details of how to dispose of your worn-out product.
natural_image
Close-up of a mechanical component with concentric rings and mounting holes (no visible text or symbols)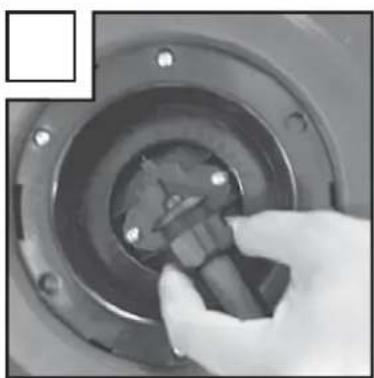
natural_image
Close-up of a hand holding a mechanical component, no visible text or symbols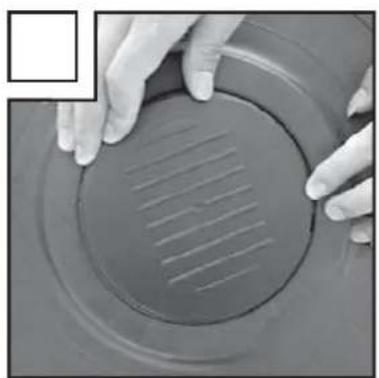
natural_image
Close-up of hands holding a circular object with horizontal lines, possibly a filter or sensor (no text or symbols visible)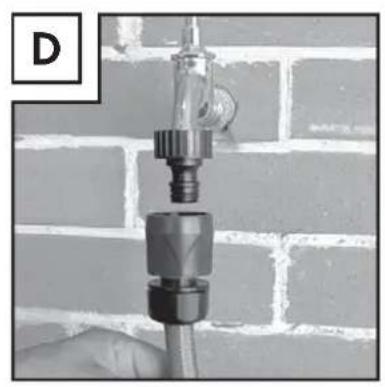
natural_image
Close-up of a mechanical piping device mounted on a brick wall, no visible text or symbols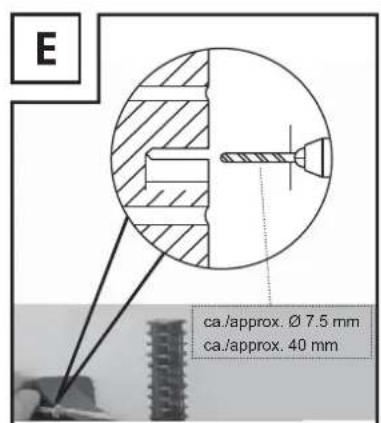
natural_image
Close-up of a hand using a tool to press a mechanical component against a brick wall background (no visible text or symbols)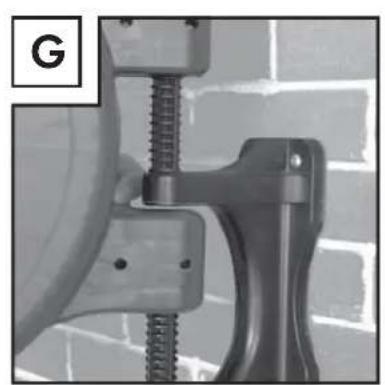
natural_image
Close-up of a dental implant with threaded screw and clamped base, against brick wall background (no text or symbols)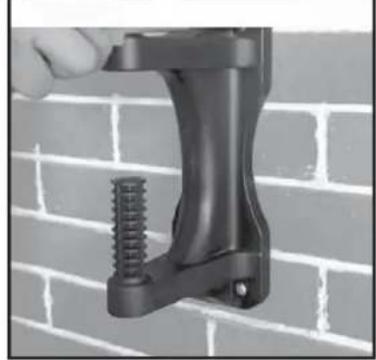
natural_image
Close-up of a hand holding a black mechanical bracket against a brick wall (no text or symbols visible)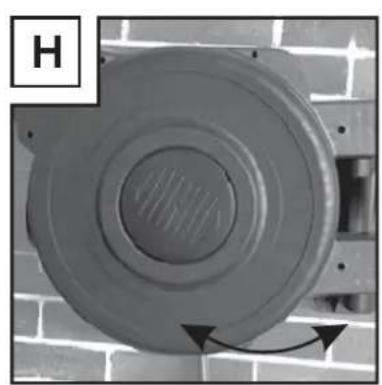
natural_image
Close-up of a circular mechanical component mounted on a brick wall, with directional arrows indicating motion (no text or symbols visible)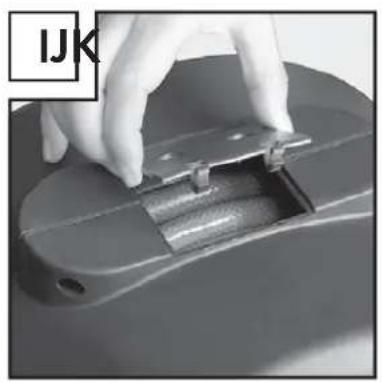
natural_image
Close-up of a hand holding a metal bracket with a circular base, no visible text or symbols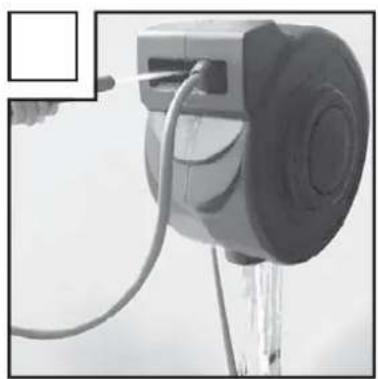
natural_image
Close-up of a mechanical device with hoses and wires, no visible text or symbols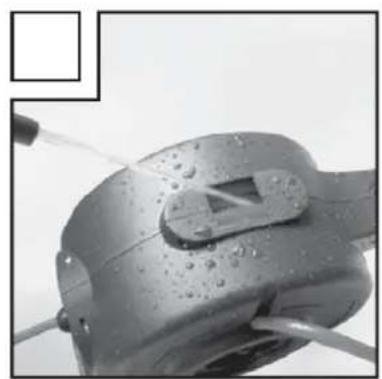
natural_image
Close-up of a metallic mechanical component with water droplets and a triangular handle (no visible text or symbols)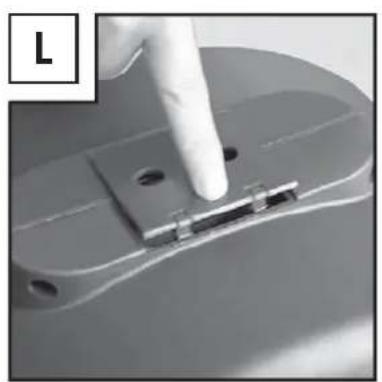
natural_image
Close-up of a gloved hand inserting a small electronic component into a metal plate (no text or symbols visible)- Wall-Mounted Hose Box
- Introduction
- - Proper use
- ● Description of parts and features
- - Included items
- - Technical data
- Safety advice
- CAUTION! DANGER OF INJURY!
- CAUTION! DANGER OF ELECTRIC
- Safety advice/Installation
- - Installation
- - Choosing the installation site
- - Mounting the wall holder
- - Mounting the hose reel
- Installation / Maintenance, cleaning and care / Disposal
- - Using the hose reel
- Note:
- ● Using the spray nozzles
- ● Maintenance, cleaning and care
- - Disposal
Brand : FLORABEST
Model : IAN 70720
Category : Uncategorized