
MWP-13M - Fan MPM - Free user manual and instructions
Find the device manual for free MWP-13M MPM in PDF.


| Product Type | Fan |
| Brand | MPM |
| Model | MWP-13M |
| Power Source | AC mains |
| Voltage | 220-240V, 50/60Hz |
| Speed Settings | 3 speeds |
| Oscillation | Yes, wide angle |
| Tilt Adjustment | Yes, manual tilt |
| Fan Diameter | 13 inches (33 cm) |
| Housing Material | Plastic |
| Weight | 3.5 kg |
| Dimensions (HxWxD) | 48 x 38 x 25 cm |
| Noise Level | Low (approx. 50 dB on high) |
| Power Consumption | 45W |
| Cord Length | 1.5 m |
| Safety Grille | Yes, child-safe grille |
| Stable Base | Yes, non-slip base |
| Maintenance | Clean with damp cloth; do not immerse |
| Package Contents | Fan unit, base, user manual |
| Warranty | 2 years |
Frequently Asked Questions - MWP-13M MPM
User questions about MWP-13M MPM
0 question about this device. Answer the ones you know or ask your own.
Ask a new question about this device
Download the instructions for your Fan in PDF format for free! Find your manual MWP-13M - MPM and take your electronic device back in hand. On this page are published all the documents necessary for the use of your device. MWP-13M by MPM.
USER MANUAL MWP-13M MPM
natural_image
Exterior view of a modern office desk fan with a black stand and a black remote control (no text or symbols visible)WENTYLATOR STOJACY: MWP-13M
Stojanový ventilátor/Standventilator mit Fernbedienung/Standing remote controlled fan/ Напольный вентилятор торшерного типа с пультом/ Stojanový ventilátor
PRZED PIERWSZYM UŻYCIEM ZAPOZNAJ SIĘ Z INSTRUKCJĄ OBSŁUGI
CZ NÁVOD K OBSLUZE....3
Read carefully this manual before using the appliance.
- Close supervision is necessary when using the appliance near children.
Do not hang the power cord over sharp edges and do not allow the power cord to touch hot surfaces.
▶ Always unplug the appliance when it is not in use or before cleaning.
Do not use the appliance if it is damaged, also if the power cord or plug is damaged - return the appliance for repair to an authorized service centre.
To avoid the risk of damage or injury, always use the attachments recommended by the manufacturer.
Do not immerse the appliance, its cord and plug in water or any other liquids, keep it dry at all times.
Do not leave the appliance switched on when unattended.
▶ Always switch off the appliance before unplugging it.
Do not place the appliance in vicinity of heat sources.
Do not use the appliance for the purposes different than it was designed for.
Do not use the appliance outdoors.
Never insert your fingers nor any other items through the guard when the appliance is running.
Before moving the appliance to another location disconnect it from the power source.
Do not cover the front and rear guard!
- Do not place the fan near open windows - raindrops may cause a short circuit and electrical shock! It is advisable not to place fans in rooms with high humidity, such as bathrooms.
This appliance is not intended for use by children under 8 years of age and individuals with reduced physical, sensory or mental capabilities, or lack of experience and knowledge, unless they have been given supervision or instruction concerning use of the appliance in a safe way and if they understand the hazards involved. Cleaning and user maintenance shall not be carried out by children without supervision.
- Store the appliance and its cord out of reach of children under 8 years of age.
Children should be supervised to ensure that they do not play with the appliance.
Do not switch on the appliance without front and rear guard mounted.
The appliance may be switched on only after complete assembly. Partially assembled unit does not provide safe and proper operation.
Do not plug the power cord with wet hands.
This appliance is intended for household use only.
Do not remove the plug from the mains by pulling by the cord.
In order to ensure your children's safety, please keep all packaging (plastic bags, boxes, polystyrene etc.) out of their reach.
WARNING! Do not allow small children to play with the foil as there is a danger of suffocation!
The appliance should be connected into the socket with grounding pin
OVERVIEW
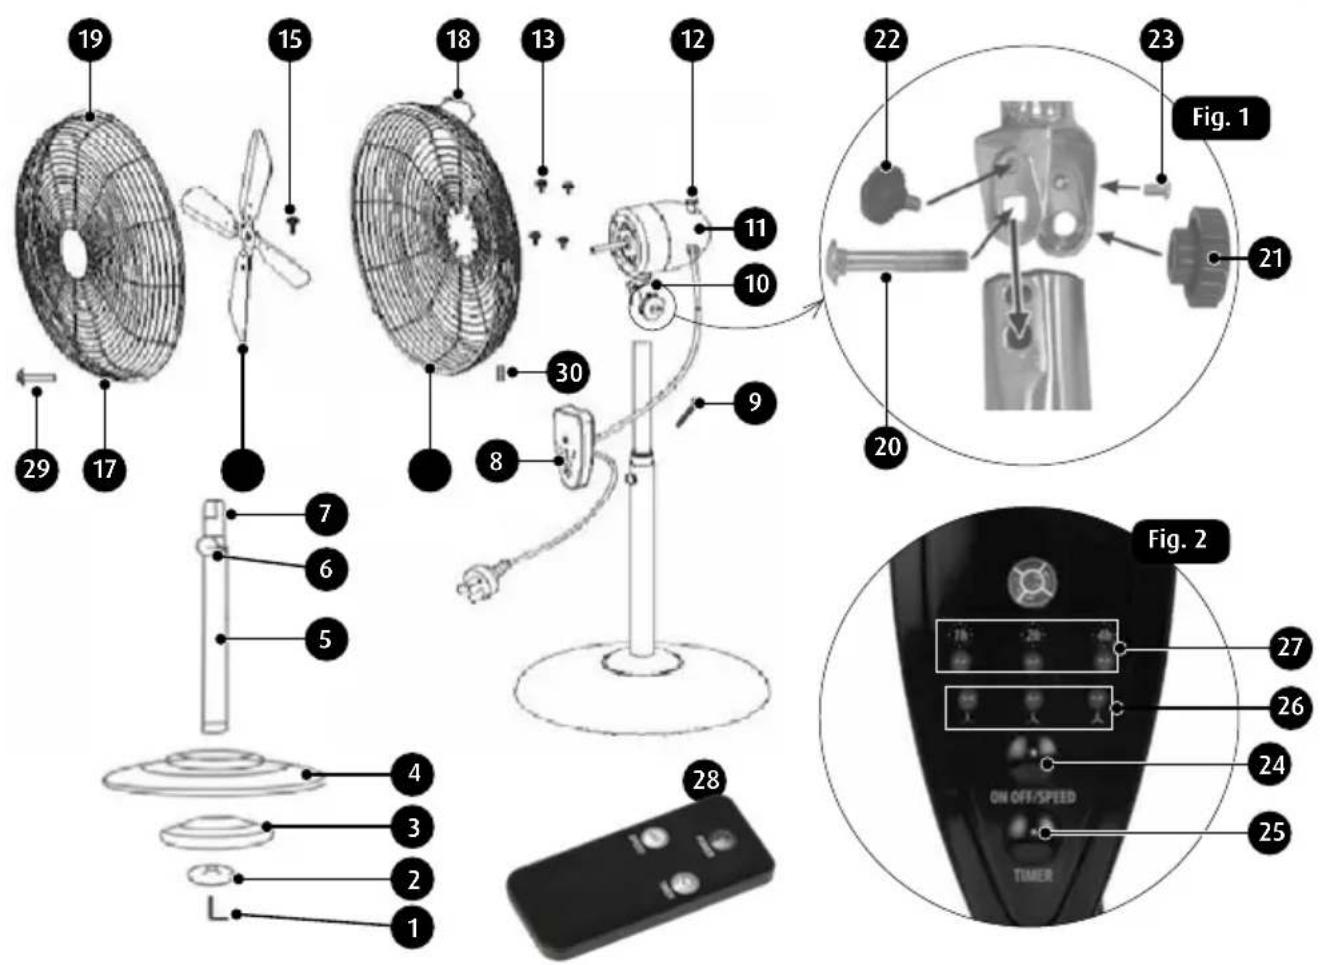
- L-shaped clamping bolt
- Round washer
- Pedestal weight
- Pedestal base
- Pedestal tube
- Height lock knob
- Moving pedestal tube
- Control panel
- Control panel bolt
-
Handle
-
Motor
- Oscillation mode switch
- Bolts, for fastening the rear fan grille to the motor housing (4x)
- Rear fan grille
- Fan propeller bolt
- Fan propeller
- Front fan grille
- Fan handle
-
Hook
-
Lock bolt
- Lock bolt knurled nut
- Fan head tilt lock knurled bolt
- Clamping screw
- ON/OFF/SPEED switch
-
Run timer setting switch, range: 1 to 7 h
-
Fan speed indicator lights
- Timer setting indicator lamps
- Remote controller
- Clamping screw
- Nut
PREPARING YOUR APPLIANCE
CAUTION! The fan must be placed on a stable, flat and dry surface! Do not place the fan near stoves and other sources of heat.
- Remove all packaging parts, including plastic film, filling materials, and cardboard boxes.
- Check that all parts and accessories are in the product packaging.
CAUTION! Assemble the product completely before the first use.
ASSEMBLY
- Slide the pedestal tube (5) in the pedestal base (4).
- Place the pedestal weight (3) and the round washer (2) underneath the pedestal base (4).
- Thread in the L-shaped clamping bolt (1) clockwise to tighten the pedestal tube (5) to the pedestal base (4) and the pedestal weight (2).
- Mount the motor (11) on the moving pedestal tube (7) with the square groove in the motor handle (10) aligned with the bottom hole in the moving pedestal tube (7), as shown in Fig. 1.
- Insert the clamping bolt (20) in the square hole below. The square piece of the bolt must engage the matching hole in the motor handle.
- Set the fan head tilt angle with the knurled bolt (22) and the clamping bolt (23).
- Tighten the knurled nut (21) on the knurled bolt (20).
- Install the rear fan grille (14) on the motor housing with the four bolts (13). The rear fan grille should have the handle (18) on the top, with the handle closer to the motor housing.
- Mount and secure the fan propeller (16) on the motor shaft with the clamping bolt (15), which must engage the threaded hole on the flat of the motor shaft.
- Mount the front fan griller (17) by engaging the hook (19) in the tab of the rear fan grille (14). Make sure that the bolt holes in the front and rear fan grilles are aligned.
- Engage all hooks.
- Secure the front and rear fan grilles together with the bolts (29) and nuts (30).
- Attach the control panel to the moving pedestal tube with the bolt (9). The control panel must be below the fan grille and with the button (25) downward.
USING THE FAN
CAUTION! Make sure that the fan stands on a firm, flat and dry surface before powering on.
- Plug the fan to the mains. Make sure that the mains voltage matches the nameplate ratings.
- Power on the fan with the button (24) (Fig. 2). A beep will sound. Pressing the button (24) repeatedly cycles through low, medium and high fan speed; the next press of the button with
the high fan speed powers off the fan. Each fan speed change is made with a single beep and the selected fan speed indicator light on.
- Operate the button (25) (Fig. 2) to set the run timer. Each press of the button (25) cycles through the following time settings: 1, 2, 3, 4, 5, 6, and 7 h. Each timer setting change is made with a single beep and the selected run time indicator light on. When the run timer counts down to zero, the fan will power off. The fan controls can also be operated with the remote control included with the product.
- To turn on the fan head oscillation, press the oscillation mode switch (12) on the motor housing. The fan head will now oscillate 80^ to the sides.
- Adjust the fan head tilt to adjust the air flow direction by powering the fan off and operating the knurled bolt (22) with the clamping bolt (23).
- Adjust the fan head height by releasing the knob (6), moving the fan head to the desired height and tightening the knob (6) again.
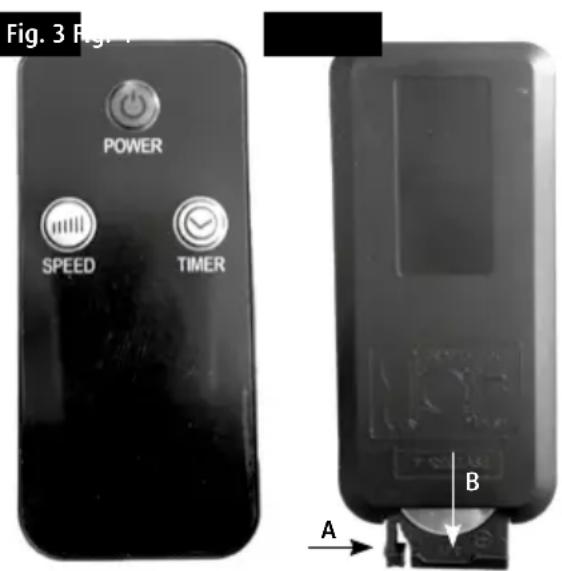
OPERATING THE FAN WITH THE REMOTE CONTROL (FIG. 3)
The remote control requires a CR2025 3-volt battery to work. The battery is accessed by pressing the lock tab (Fig. 4, arrow A) and sliding the battery holder out (Fig. 4, arrow B). Mind the correct polarity when installing the battery.
CAUTION! The CR2025 is not included with MWP-13M.
CAUTION! Do not dispose of spent batteries with household waste. Dispose of spent batteries at designated battery collection points or return them to the seller. Never throw batteries into fire.
- POWER — Turns the fan on and off.
-
SPEED — Selects the fan speed. Pressing the SPEED button repeatedly cycles through low, medium and high fan speed. The current fan speed indicator light goes on on the control panel.
-
TIMER — Sets the run timer. Each press of the TIMER button cycles through the following time settings: 1, 2, 3, 4, 5, 6, and 7 h. The set run time indicator light goes on on the control panel.
CLEANING AND MAINTENANCE
CAUTION! Keep the motor and the control buttons away from water, splashes and dripping liquids!
- Unplug the fan from the mains before cleaning.
- Clean the motor housing, the control button case, the pedestal and the pedestal base with a damp cloth and a little of detergent.
- Clean the fan grilles with a brush from time to time to remove dust from the mesh.
- Remove the fan propeller to wipe the fan blades clean with a damp cloth and a little of detergent. Always make sure that the fan is unplugged from the mains before opening the fan grille!
CAUTION! Never clean with a wire brush or similar tools. Do not clean with sharp tools or abrasive cleaners.
Technical data sheet
| MPM AGD S.A.MODEL: MWP-13M | |||
| Description Symbol Value Unit | |||
| Maximum flow rate of the fan F 46,25 m | ^3/min | ||
| Fan power P 43,57 W | |||
| Operating value SV 1,06 (m | ^3/min)/W | ||
| Power consumption in standby mode P | SB | 0 | W |
| Fan's sound power level L | WA | 65,8 | dB(A) |
| Maximum air speed | C | 1,943 | m/s |
| Seasonal electricity consumption | Q | 13,943 | kWh/a |
| Standards used for measuring the operational values | PN-EN 50564:2011,IEC 60879:1986 (corr.1992)EN 60704-1:2010 + A11: 2012,EN 60704-2-7:1998 | ||
| To get additional information, contact | MPM AGD S.A.ul. Brzozowa 3Milanówek 05-822, Polskatel. (22) 380-52-00BDO: 000027599 | ||
TECHNICAL DATA
Technical parameters are indicated on the product nameplate.
Length of power cord: 1,7 m
Noise level: L_WA = 55 dB

ATTENTION! MPM agd S.A. reserves its right to modify the technical data!
PROPER DISPOSAL OF THE PRODUCT (waste electrical and electronic equipment)
This symbol on the product indicates that the product, after its lifetime, should not be disposed with other household wastes. To avoid harmful influence on the environment and human health due to uncontrolled waste disposal, dispose the waste device to the service point of waste household appliances or report collecting it from home. In order to obtain detailed information about the location and how to dispose the waste electrical and electronic equipment in a safe way, contact your retailer or local Department of Environmental Protection. Do not dispose the device with other municipal waste.
WSKAZÓWKI DOTYCZĄCE BEZPIECZEŃSTWA UŻYTKOWANIA
We wish you satisfaction from using the product and invite you to check a wide range of other MPM appliances
- WENTYLATOR STOJACY: MWP-13M
- PREPARING YOUR APPLIANCE
- CAUTION! The fan must be placed on a stable, flat and dry surface! Do not place the fan near stoves and other sources of heat.
- ASSEMBLY
- USING THE FAN
- CAUTION! Make sure that the fan stands on a firm, flat and dry surface before powering on.
- OPERATING THE FAN WITH THE REMOTE CONTROL (FIG. 3)
- CLEANING AND MAINTENANCE
- CAUTION! Keep the motor and the control buttons away from water, splashes and dripping liquids!
- TECHNICAL DATA
- PROPER DISPOSAL OF THE PRODUCT (waste electrical and electronic equipment)
- WSKAZÓWKI DOTYCZĄCE BEZPIECZEŃSTWA UŻYTKOWANIA
Brand : MPM
Model : MWP-13M
Category : Fan