
RS2 DUO - Dash cam Navitel - Free user manual and instructions
Find the device manual for free RS2 DUO Navitel in PDF.


| Product Type | Dash Cam |
| Brand | Navitel |
| Model | RS2 DUO |
| Dimensions (approx.) | 120 x 60 x 40 mm |
| Weight (approx.) | 150 g |
| Power Supply | 5V, 2A via USB or cigarette lighter adapter |
| Recording Resolution | Front: Full HD 1920x1080p, Rear: HD 1280x720p |
| Field of View | Front: 140°, Rear: 120° |
| Storage Support | microSD card up to 256 GB (Class 10 or higher) |
| Video Format | H.264, MOV |
| G-Sensor | Built-in, automatically locks incident files |
| GPS | Internal GPS module for speed and location data |
| Parking Mode | Available (requires hardwire kit, sold separately) |
| Loop Recording | Automatic loop recording with user-selectable clip length |
| Night Vision | WDR (Wide Dynamic Range) for low light |
| Display | 3.0 inch LCD touchscreen |
| Mounting | Suction cup mount for windshield |
| Maintenance | Clean lens with a soft, dry cloth; avoid harsh chemicals |
| Safety | Do not install in airbag deployment zones; use only provided power adapter |
| Spare Parts Availability | Contact Navitel support for replacement mounts and cables |
| General Information | Language support: English, menu navigation via touch |
Frequently Asked Questions - RS2 DUO Navitel
User questions about RS2 DUO Navitel
0 question about this device. Answer the ones you know or ask your own.
Ask a new question about this device
Download the instructions for your Dash cam in PDF format for free! Find your manual RS2 DUO - Navitel and take your electronic device back in hand. On this page are published all the documents necessary for the use of your device. RS2 DUO by Navitel.
USER MANUAL RS2 DUO Navitel
natural_image
Exterior view of a black Navitel 138° digital camera module (no text or symbols on body)NAVITEL RS2 DUO
Portable Video Recorder
Úvod
Vážený zákazníku!
- Paigaldusport
- Ekraan
- LED-indikaator
- Micro-USB ava
- Alla
- Objektiiv
- Reset
- Juhtnupud
- Lüliti
- Mikrofon
- microSD-kaardi ava
- Mini-USB ava
- Sisekamber
- Infrared light
Spetsifikatsioonid
Thank you for purchasing this NAVITEL® product.
NAVITEL RS2 DUO is a multifunctional high-definition DVR with many functions and features that are described in this User Manual. Please read the manual carefully before using the device and keep it for future reference.
Device layout
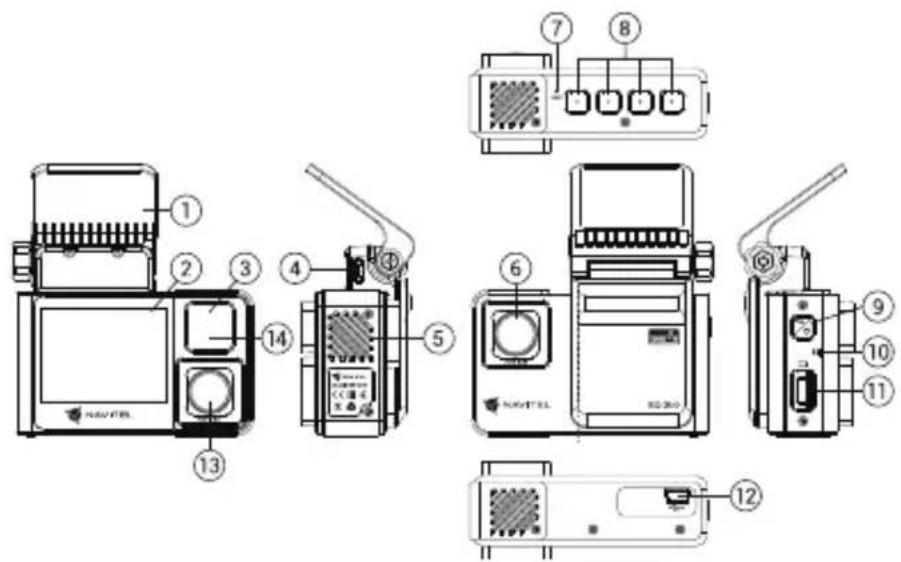
- Mount
- Display
- LED indicator
- Micro-USB port
- Speaker
- Lens
- Reset
- Control buttons
- Power
- Microphone
- microSD slot
- Mini-USB port
- In-cabin camera
- Infrared light
Specifications
| Main camera | Camera sensor SONY | B07 (STARVIS) |
| Video resolution 1920×1080 | ||
| Image resolution 2 MP | ||
| View angle 136° | ||
| Rear camera | Camera sensor SONY | B07 (STARVIS) |
| Video resolution | 1920×1080 | |
| Image resolution 2 MP | ||
| View angle 143° | ||
| Processor NTK96675 | ||
| Display 2", 320×240, IPS | ||
| Recording format MP4 | ||
| Image format JPG | ||
| MicroSD card capacity Max. 256 GB | ||
| USB mini-USB | |
| Battery Li-Pol, 240 mAh | |
| Power 5 V, 2 A | |
| Microphone / speaker Yes | |
| Language | Czech, English, French, German, Hungarian, Italian, Polish, Romanian, Russian, Slovak, Spanish, Ukrainian, Vietnamese |
Note: complete set, appearance, technical characteristics, which do not change the general functionality of the device, can be changed by the manufacturer without prior notice.
Installation
- Put the microSD card into the DVR. Use a high-speed SD card (Class10 or above); capacity should be within 8-256 GB.

- To avoid malfunctions of the DVR and / or SD-card, don't insert and remove SD-card during DVR operation.
-
Before using a microSD card, please format it inside the DVR to avoid data errors. For formatting the SD-card in Menu mode select Format SD-card and confirm it.
-
Secure the device on the windshield with the holder.
- Connect the car charger to the cigarette lighter socket.
- Connect the car charger to the DVR (micro-USB).
- Adjust the camera position.
- Turn the power on; check whether the device is installed correctly. If the device is installed correctly, the indicator will glow blue.
Precautions
- Use only the original charger adapter. Using another adapter may negatively affect the device's battery. Use accessories only approved by manufacturer.
- Permissible ambient temperature in operating mode: 0 to +35 °C. Storage temperature: +5 to +45 °C. Relative humidity: 5% to 90% without condensation (25 °C).
- Put the device away from fire sources to avoid explosion or fire.
- Do not expose the device to physical impacts.
- Avoid contacting the device with sources of electromagnetic radiation.
- Keep the lens clean. Do not use chemicals or detergents to clean the product; always turn off the device before cleaning.
- Strictly follow the laws and regulatory acts of the region where the device is used. This device can not be used for illegal purposes.
- Do not disassemble or repair device by yourself. In case of device failure, contact the service center.
Buttons
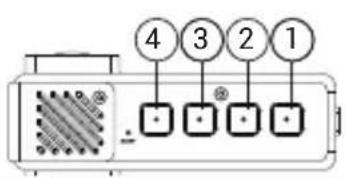
EN
| Button Functions | |
| 1 | Press to enter Menu mode.In Record mode (REC), press to lock a file (protected file cannot be deleted or overwritten).In Playback mode, press to select a file, or pause / resume video. |
| 2 | In Record mode, press to switch between Record, Capture and Playback modes.In Playback mode, press to select a file, or pause / resume video.In Record mode, press Down to turn the microphone on / off. |
| 3 | In Capture mode, press to take a picture.In Menu, press to select the previous menu item.In Playback mode, press to rewind. |
| 4 | In Record mode , press to start recording; press again to stop recording.In Menu, press to select the next menu item.In playback mode, press to fast forward. |
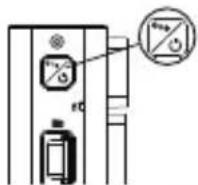
| Power | Press to turn on the display.Press to switch the camera view modes: front only; only back; back over front (picture-in-picture). |
| Reset If the device is not responding, press to reset. | |
Note: The built-in battery is designed only for recording an emergency event in parking mode and turning off the device correctly when the power is turned off; for the full operation of the device in any mode, a constant power connection is required.
Device functions
| Format SD-card | Formatting a microSD card in the DVR is necessary for the correct operation of the device. Before using a microSD card or in case of data error, please format the microSD card. For formatting the SD-card in Menu mode select Format SD-card and confirm it. |
| Record | Connect the device to an external power supply and it will start recording automatically (indicated by the flashing blue light). Press the 4 button to stop recording. Press 4 again to record another video. Each video will be saved automatically. |
| Capture In Record | mode (STBY), press the 2 button to take a photo (it will be saved automatically). |
| Playback | In Record mode (STBY), press the 2 button twice to enter Playback mode; press the 3 and 4 buttons to select a file; press the 2 button to play a file. During playback, press OK to pause/unpause; press the 3 and 4 buttons to fast forward / rewind. |
| Loop recording | This feature allows you to save a video as a set of files given in the duration menu. If the memory card runs out of space, the unprotected files will be overwritten in the order in which they were created. |
| Record audio Record | video with or without sound. |
| Lock file | In Record mode (REC), press 1 to protect the current recording. A key symbol will appear at the bottom of the screen. Protected files cannot be deleted or overwritten. Select Unlock Current / Unlock All to remove protection. |
| Stamp This function | adds date stamp to the record. |
| G-sensor If the vehicle is hit by something, the DVR will automatically lock the current video. | |
| Parking monitor | In shutdown state, if vibration is detected, the device will turn on automatically and start recording. The file will be protected (locked). |
| Battery Blue indicator lights up when the device is plugged into an external power supply. | |
| LCD OFF | The device can automatically shut off the screen to reduce power consumption; time interval can be set in the LCD OFF menu. |
| USB-connection | When connecting the device to a PC using a USB cable, three connection options will appear:1) Mass Storage: play, copy and delete files.2) Record: standard mode.3) PC camera mode. |
Note: Interior camera of device is specially optimized for continuous recording at difficult low-light conditions inside vehicle. We recommend that you keep preset mode "automatic black and white record". Recording will be performed with automatic on/off infrared illuminator in black and white mode. If you turn on mode "automatic switching of color recording to black and white", then when you turn ON/OFF infrared illuminator in transient modes of operation, slight distortion of some colors is possible, which doesn't significantly affect overall perception of recorded image. IR illumination is required for correct function of interior camera and sharp visible recording in cabin in low light conditions.
Bevezetés
Tisztelt Ügyfelünk!
- Montare
- Ecran
- Indicator LED
- Port micro-USB
- Difuzor
- Lentila
- Resetare
- Butoane de control
- Buton Pornire
- Microfon
- Slot card microSD
- Port mini-USB
- Camera internă
- Reflector cu infraroşu
Specificații
- Uchytenie držiaka
- Displej
- LED svetlo
- Port micro-USB
- Reproduktor
- Objektív
- Reset
- Ovládacie tlačidlá
- Vypínač
- Mikrofón
- Slot microSD kartu
- Port mini-USB
- Kamera v kabíne
- Infračervené svetlo
Špecifikácia
| Hlavná kamera | Kamera senzor SONY 307 (STARVIS) |
| Rozlíšenie videoa 1920×1080 | |
| Rozlíšenie obrazu 2 MP | |
| Uhol záberu 136° | |
| Zadná kamera | Kamera senzor SONY 307 (STARVIS) |
| Rozlíšenie videoa 1920×1080 | |
| Rozlíšenie obrazu 2 MP | |
| Uhol záberu 143° | |
| Procesor NTK96675 | |
| Displej 2", 320×240, IPS | |
| Formát videa MP4 | |
| Formát obrazu JPG | |
| MicroSD kapacita Max. 256 GB | |
natural_image
Green globe with orbiting rings, no text or symbols presentNAVITEL
Brand : Navitel
Model : RS2 DUO
Category : Dash cam