
LS 2400 - Hi-Fi System BLAUPUNKT - Free user manual and instructions
Find the device manual for free LS 2400 BLAUPUNKT in PDF.

| Product Type | Hi-Fi System |
| Brand | Blaupunkt |
| Model | LS 2400 |
| Dimensions (approx.) | 200 x 250 x 300 mm (main unit) |
| Weight (approx.) | 5 kg |
| Power Supply | AC 230V, 50/60 Hz |
| Power Consumption | 30 W (max) |
| Output Power (RMS) | 2 x 10 W |
| Supported Media | CD, CD-R/RW, MP3-CD |
| Radio Bands | FM, AM (MW) |
| Preset Stations | 30 (FM) + 10 (AM) |
| Connectivity | USB, AUX input, headphone jack |
| Speaker Type | 2-way bass reflex |
| Speaker Impedance | 4 Ohm |
| Additional Features | Clock, alarm, sleep timer, equalizer |
| Remote Control | Included |
| Display | LCD with white backlight |
| Cleaning Instructions | Wipe with a dry soft cloth. Do not use solvents. |
| Safety | Class II, double insulation |
| Spare Parts / Repairability | Contact authorized service center for spare parts. |
Frequently Asked Questions - LS 2400 BLAUPUNKT
User questions about LS 2400 BLAUPUNKT
0 question about this device. Answer the ones you know or ask your own.
Ask a new question about this device
Download the instructions for your Hi-Fi System in PDF format for free! Find your manual LS 2400 - BLAUPUNKT and take your electronic device back in hand. On this page are published all the documents necessary for the use of your device. LS 2400 by BLAUPUNKT.
USER MANUAL LS 2400 BLAUPUNKT
natural_image
Black rectangular device with two vertical cylindrical towers on a white background (no text or symbols visible)Enjoy it.
Bluetooth-Soundboard
Bluetooth sound board
LS 2400
BLAUPUNKT
Inhalt
natural_image
Two cylindrical objects with textured surfaces, possibly wood or stone (no text or symbols visible)natural_image
Simple line drawing of a rectangular block (no text or symbols)1 kabelloser Subwoofer
natural_image
Two types of electrical plug wires with connectors, no text or symbols visiblenatural_image
Isometric illustration of a modern home TV setup with a monitor, two speakers, and a small box on the floor (no text or symbols)natural_image
Isometric illustration of a modern TV setup with a flat-screen monitor and two rectangular boxes on a shared base (no text or symbols)natural_image
Illustration of a TV mounted on a wall-mounted unit, with a small box nearby (no text or symbols)natural_image
Technical diagram showing mechanical assembly with circular components and a rotating component (no text or symbols)natural_image
Diagram showing two vertical structural components with curved arrows indicating rotation or movement, no text or symbols present.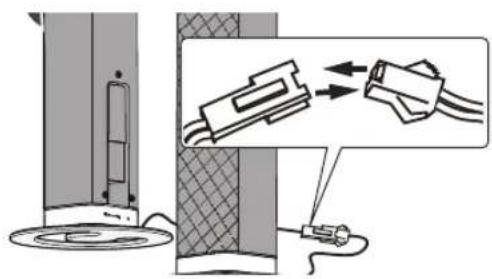
natural_image
Diagram showing a connector assembly with a close-up of its cable being inserted into a socket (no text or symbols present)natural_image
Illustration showing a hand inserting a device into a smartphone into a battery holder (no text or symbols present)Important Safety Instructions 2
Safety 2
Warning 3
What's in the Box 4
Placement and Mounting....5
Placement....5
Stand Mounting (if using option-A)....5
Horizontal Mounting 6
Installing the Rubber Feet (if using option-B)....6
Wall Mounting (if using option-C)....7
Identifying the Parts 8
Main Unit....8
Wireless Subwoofer....9
Remote Control 9
Preparations 10
Prepare the Remote Control....10
Replace the Remote Control Battery 10
Connections....11
Use the AUX Socket.... 11
Use the COAXIALSocket 11
Use the OPTICAL Socket.... 11
Connect to Power 11
Pairing the Wireless Subwoofer with the Main Unit....12
General Operation 12
Standby/ON 12
Select Modes 13
Adjust the Volume....13
Select a Preset Sound Effect 13
AUX / OPTICAL / COAXIAL Operation....13
Bluetooth Operation....14
Pair Bluetooth-enabled Devices.... 14
Listen to Music from Bluetooth Device 14
Troubleshooting....15
Specifications 16
Important Safety Instructions
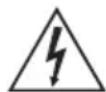
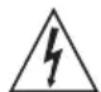
The lightning flash with arrowhead symbol, within an equilateral triangle, is intended to alert the user to the presence of uninsulated "dangerous voltage" within the product's enclosure that may be of sufficient magnitude as to constitute a risk of electric shock to persons.
CAUTION
RISK OF ELECTRIC SHOCK DO NOT OPEN

CAUTION: TO REDUCE THE RISK OF ELECTRIC SHOCK, DO NOT REMOVE COVER (OR BACK) NO USER-SERVICEABLE PARTS INSIDE. REFER SERVICING TO QUALIFIED SERVICE PERSONNEL.

The exclamation point within an equilateral SERVICING TO QUALIFIED SERVICE PERSONNEL. triangle is intended to alert the user to the presence of important operating and maintenance (servicing) instructions in the literature accompanying the appliance.
Safety
1 Read these instructions – All the safety and operating instructions should be read before this product is operated.
2 Keep these instructions – The safety and operating instructions should be retained for future reference.
3 Heed all warnings – All warnings on the appliance and in the operating instructions should be adhered to.
4 Follow all instructions – All operating and usage instructions should be followed.
5 Do not use this apparatus near water – The appliance should not be used near water or moisture – for example, in a wet basement or near a swimming pool and the like.
6 Clean only with a dry cloth.
7 Do not block any ventilation openings. Install in accordance with the manufacturer's instructions.
8 Do not install near any heat sources such as radiators, heaters, stoves, or other apparatus (including amplifiers) that produce heat.
9. Do not defeat the safety purpose of the polarized or grounding plug. A polarized plug has two blades with one wider than the other. A grounding plug has two blades and a third grounding prong. The wide blade or the third prong is provided for your safety. If the provided plug does not fit into your outlet, consult an electrician for replacement of the obsolete outlet.
10 Protect the power cord from being walked on or pinched, particularly at plugs, convenience receptacles and at the point where they exit from the apparatus.
11 Only use attachments/accessories specified by the manufacturer.
12 Use only with the cart, stand, tripod, bracket or table specified by the manufacturer, or sold with the apparatus. When a cart or rack is used, use caution when moving the cart/apparatus combination to avoid injury from tip-over.
13 Unplug the apparatus during lightning storms or when unused for long periods of time.
14 Refer all servicing to qualified personnel. Servicing is required when the apparatus has been damaged in any way, such as power supply cord or plug is damaged, liquid has been spilled or objects have fallen into the apparatus, the unit has been exposed to rain or moisture, does not operate normally, or has been dropped.
15 ☐ This equipment is a Class II or double insulated electrical appliance. It has been designed in such a way that it does not require a safety connection to electrical earth.
Caution:
- Use of controls or adjustments or performance of procedures other than those described herein, may result in hazardous radiation exposure or other unsafe operation.
- To reduce the risk of fire or electric shock, do not expose this apparatus to rain or moisture. The apparatus must not be exposed to dripping or splashing and objects filled with liquids, such as vases, must not be placed on apparatus.
- The mains plug/appliance coupler is used as the disconnect device, the disconnect device must remain readily operable.
- Danger of explosion if battery is incorrectly replaced. Replace only with the same or equivalent type.
Warning
- The battery (batteries or battery pack) must not be exposed to excessive heat such as sunshine, fire or the like.
- Before operating this system, check the voltage of this system to see if it is identical to the voltage of your local power supply.
- Do not place this unit close to strong magnetic fields.
- Do not place this unit on the amplifier or receiver.
- Do not place this unit close to damp areas as the moisture will affect the life of the laser head.
- If any solid object or liquid falls into the system, unplug the system and have it checked by qualified personnel before operating it any further.
- Do not attempt to clean the unit with chemical solvents as this may damage the finish. Use a clean, dry or slightly damp cloth.
- When removing the power plug from the wall outlet, always pull directly on the plug, never yank on the cord.
- No naked flame sources, such as lighted candles, should be placed on the apparatus.
- Changes or modifications to this unit not expressly approved by the party responsible for compliance will void the user's authority to operate the equipment.
- The rating label is pasted on the bottom or back of the equipment.

DO NOT INGEST BATTERY, CHEMICAL BURN HAZARD
The remote control supplied with this product contains a coin/button cell battery. If the coin/button cell battery is swallowed, it can cause severe internal burns in just 2 hours and lead to death. Keep new and used batteries away from children. If the battery compartment does not close securely, stop using the product and keep it away from children. If you think batteries might have been swallowed or placed inside any part of the body, seek immediate medical attention.
WEEE & Statement for product with Battery
WEEE Directive & Product disposal
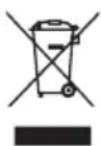
At the end of its serviceable life, this product should not be treated as household or general waste. It should be handed over to the applicable collection point for the recycling of electrical and electronics equipment, or returned to the supplier for disposal.
Internal/Supplied Batteries
This symbol on the battery indicates that the battery is to be collected separately. This battery is designed for separate collection at appropriate collection point.
What's in the Box
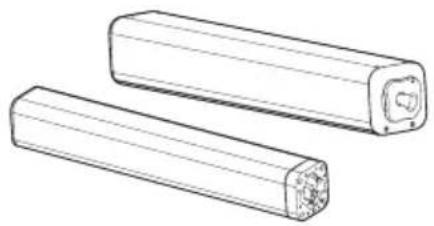
natural_image
Technical line drawing of two cylindrical electronic components with mounting holes (no text or symbols)Main Unit (Left / Right) Remote Control
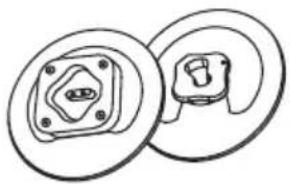
natural_image
Technical line drawing of two mechanical components with circular bases and mounting holes (no text or symbols)Stand (Left / Right)

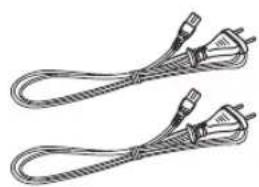
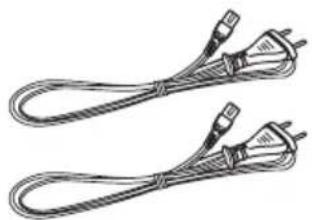
Instruction Manual AC Power Cord x 2
natural_image
Two types of electrical plug wires with terminal connectors (no text or symbols visible)
Wall Bracket
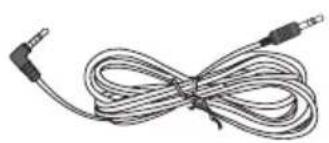
natural_image
Coiled audio jack with two leads (no text or symbols visible)3.5mm to 3.5mm Audio Cable Wireless Subwoofer
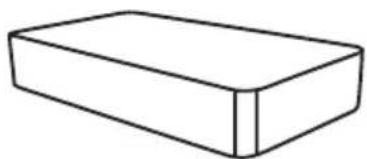
natural_image
Simple line drawing of a rectangular block (no text or symbols)
Rubber Feet
- Design and specifications are subject to change without notice.
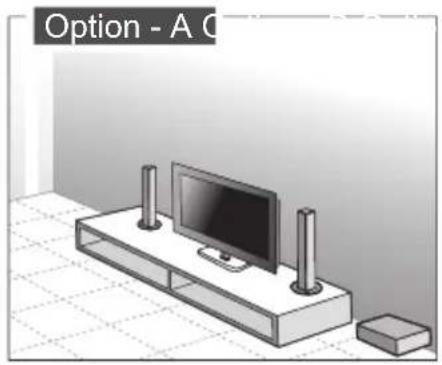
Placement and Mounting
As the unit can be used either a single sound bar or a 2-piece Tube speakers.
Placement
- You are suggested putting the unit with below options:
natural_image
Isometric illustration of a modern TV setup with a monitor, lamp, and box on a grid floor (no text or symbols)
natural_image
Illustration of a modern home TV setup with a mounted monitor and a small box, no text or symbols present.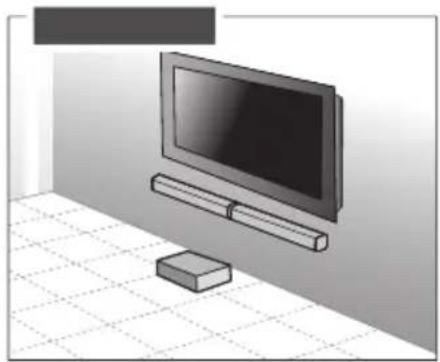
natural_image
Illustration of a modern TV mounted on a wall-mounted unit, placed on a tiled floor (no text or symbols)Stand Mounting (if using option-A)
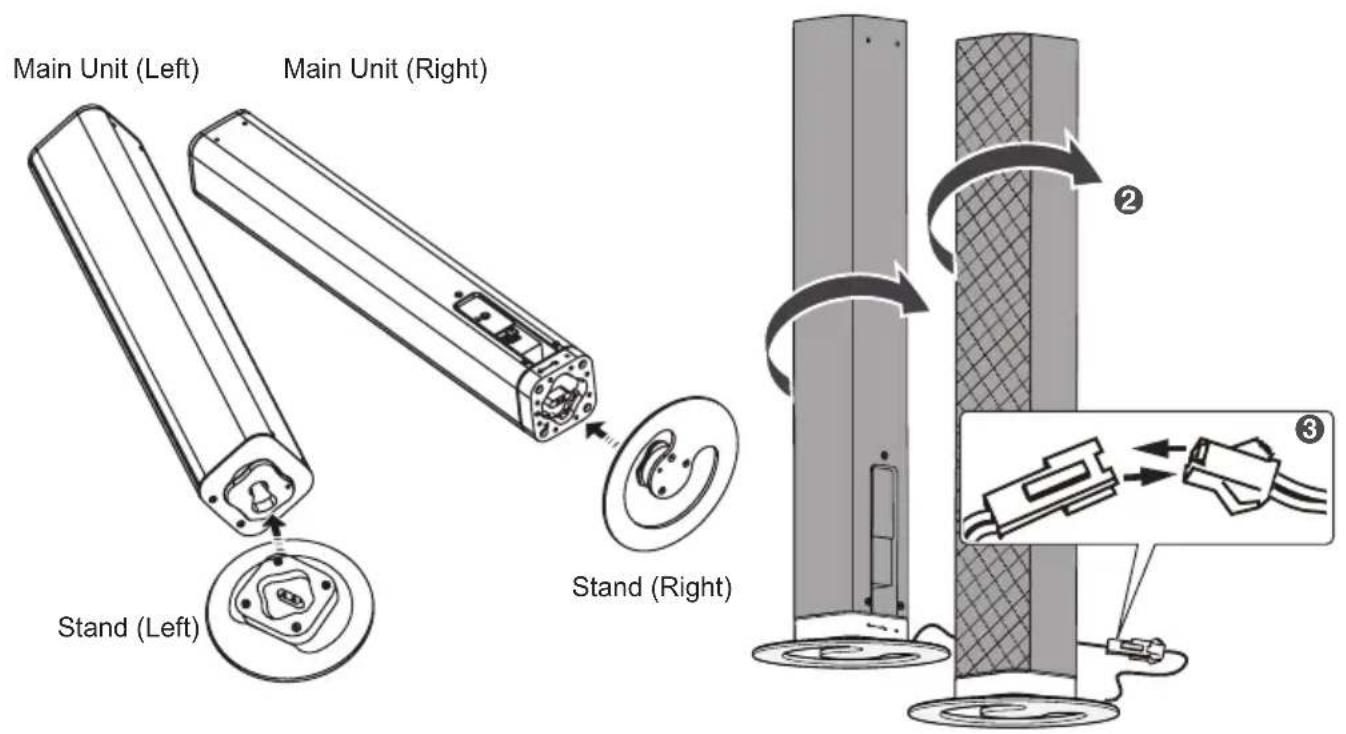
Horizontal Mounting
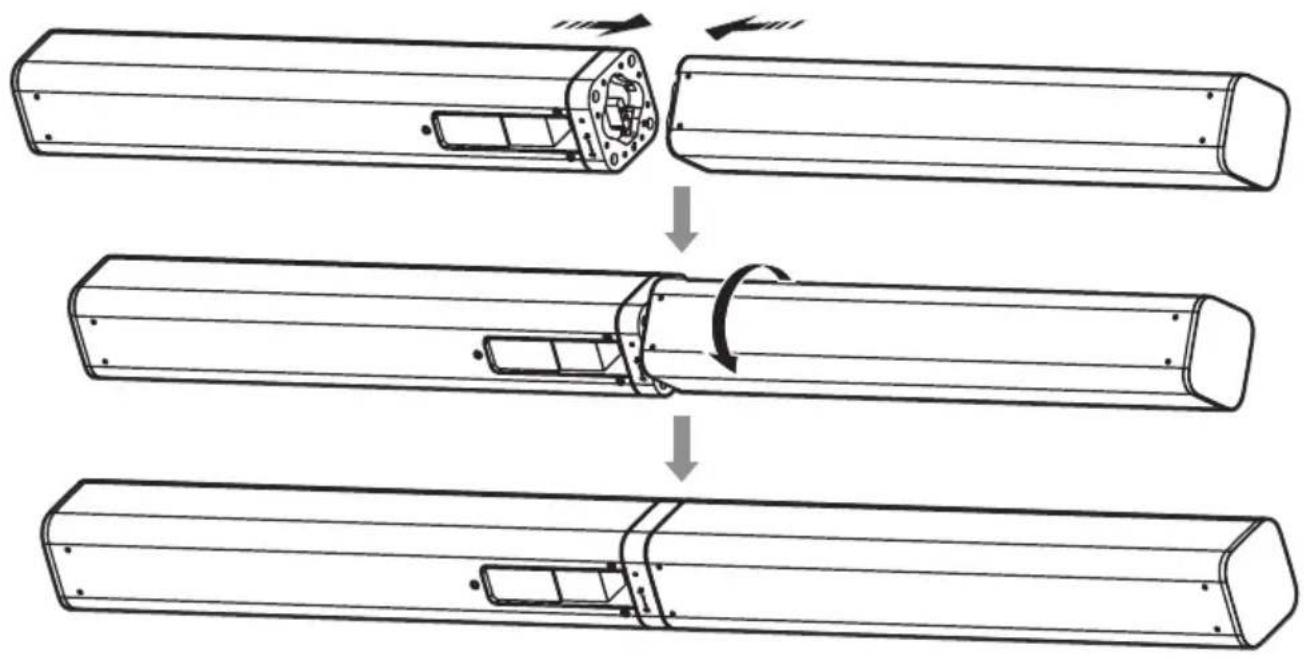
flowchart
graph TD
    A["Initial Component"] --> B{Rotation Arrow}
    B --> C["Step 1: Internal Mechanism"]
    C --> D["Step 2: Rotation Arrow"]
    D --> E["Final Component"]
Installing the Rubber Feet (if using option-B)
You can extend the height of the unit.
natural_image
Technical line drawing of a cylindrical mechanical component with attached parts and a magnified inset showing a cutaway view (no text or symbols)Note:
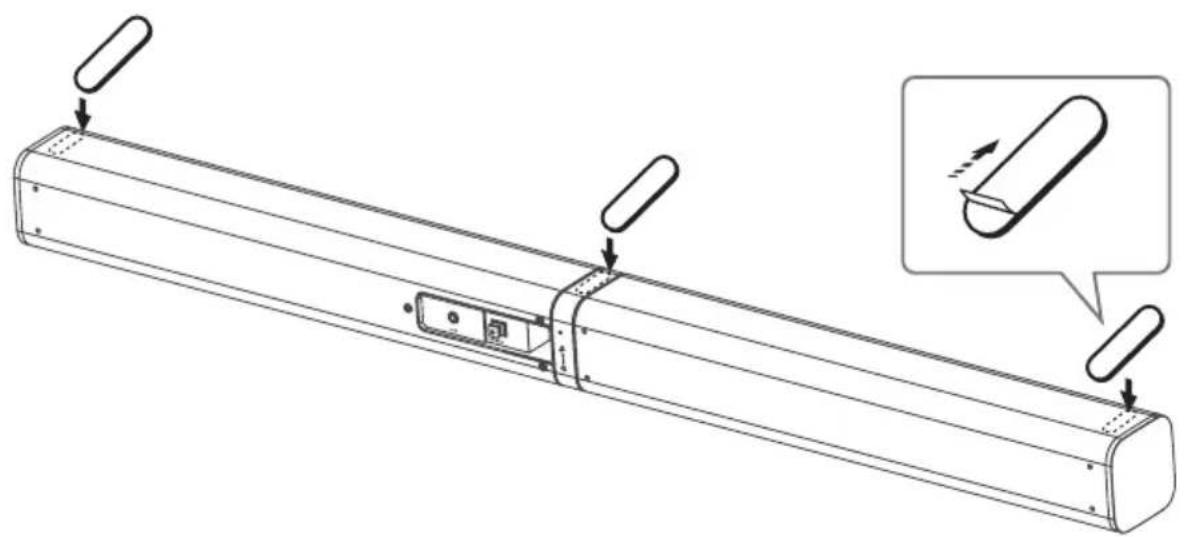
Ensure the surface is clean prior to sticking the rubber foot to the bottom of the unit.
- Turn the unit upside down.
- Remove the backing paper from the rubber foot.
- Stick the rubber foot to the bottom of the unit as shown in the illustration below.
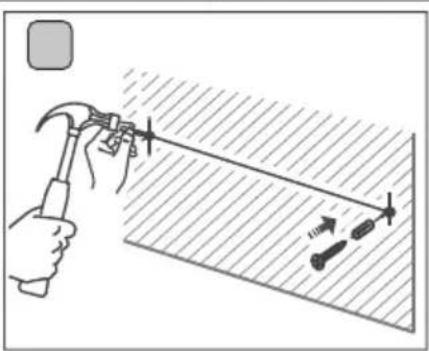
Wall Mounting (if using option-C)
Note:
- Installation must be carried out by qualified personnel only. Incorrect assembly can result in severe personal injury and property damage (if you intend to install this product yourself, you must check for installations such as electrical wiring and plumbing that may be buried inside the wall). It is the installer's responsibility to verify that the wall will safely support the total load of the unit and wall brackets.
• Additional tools (not included) are required for the installation. - Do not overtighten screws.
- Keep this instruction manual for future reference.
- Use an electronic stud finder to check the wall type before drilling and mounting.
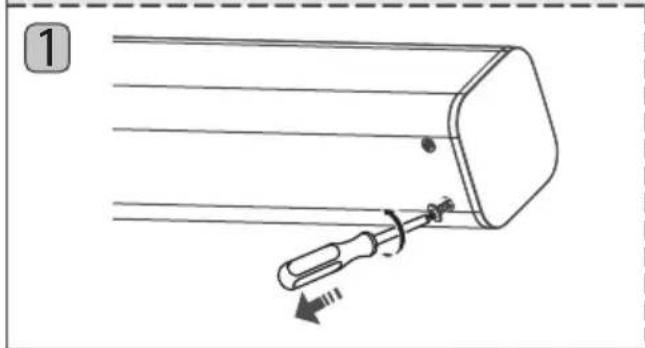
- Remove the screws from the main unit.
- Attach the wall brackets to the main unit with the screws removed from the main unit.
- Drill 2 parallel holes ( 3-8 mm each according to wall type) in the wall. The distance between the holes should be 767 mm.
- Firmly fix 1 dowel into each hole in the wall if necessary.
- Leave a 5 mm gap between the wall and the screw's head. Lift the unit with the attached wall brackets over the heads of the screws and slot into place.

natural_image
Diagram of a mechanical device with a tool inserted, showing motion direction (no text or symbols)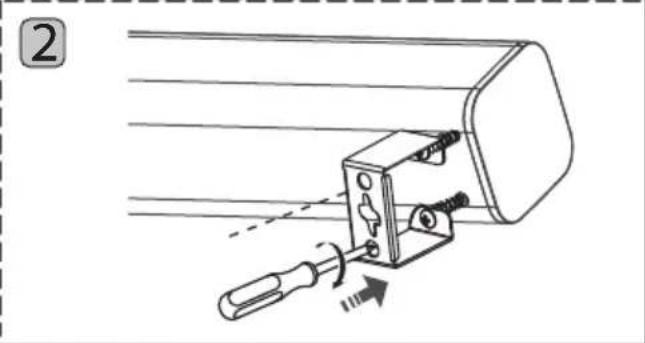
natural_image
Diagram of a mechanical device with a tool and directional arrow, no text or symbols present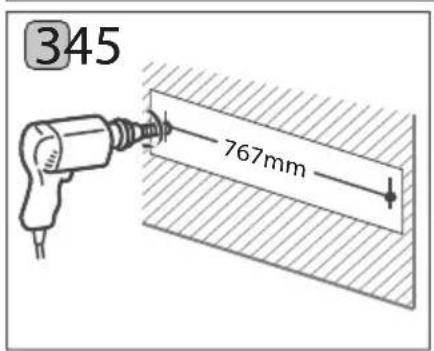
natural_image
Illustration of a hand using a hammer to measure a tool on a flat surface, with no text or symbols present.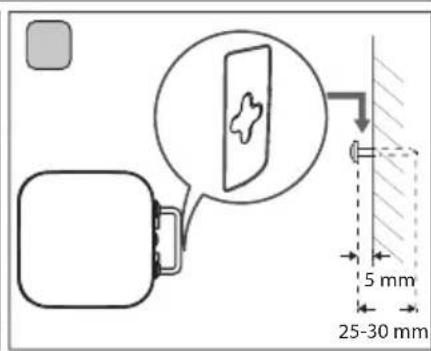
Identifying the Parts
Main Unit
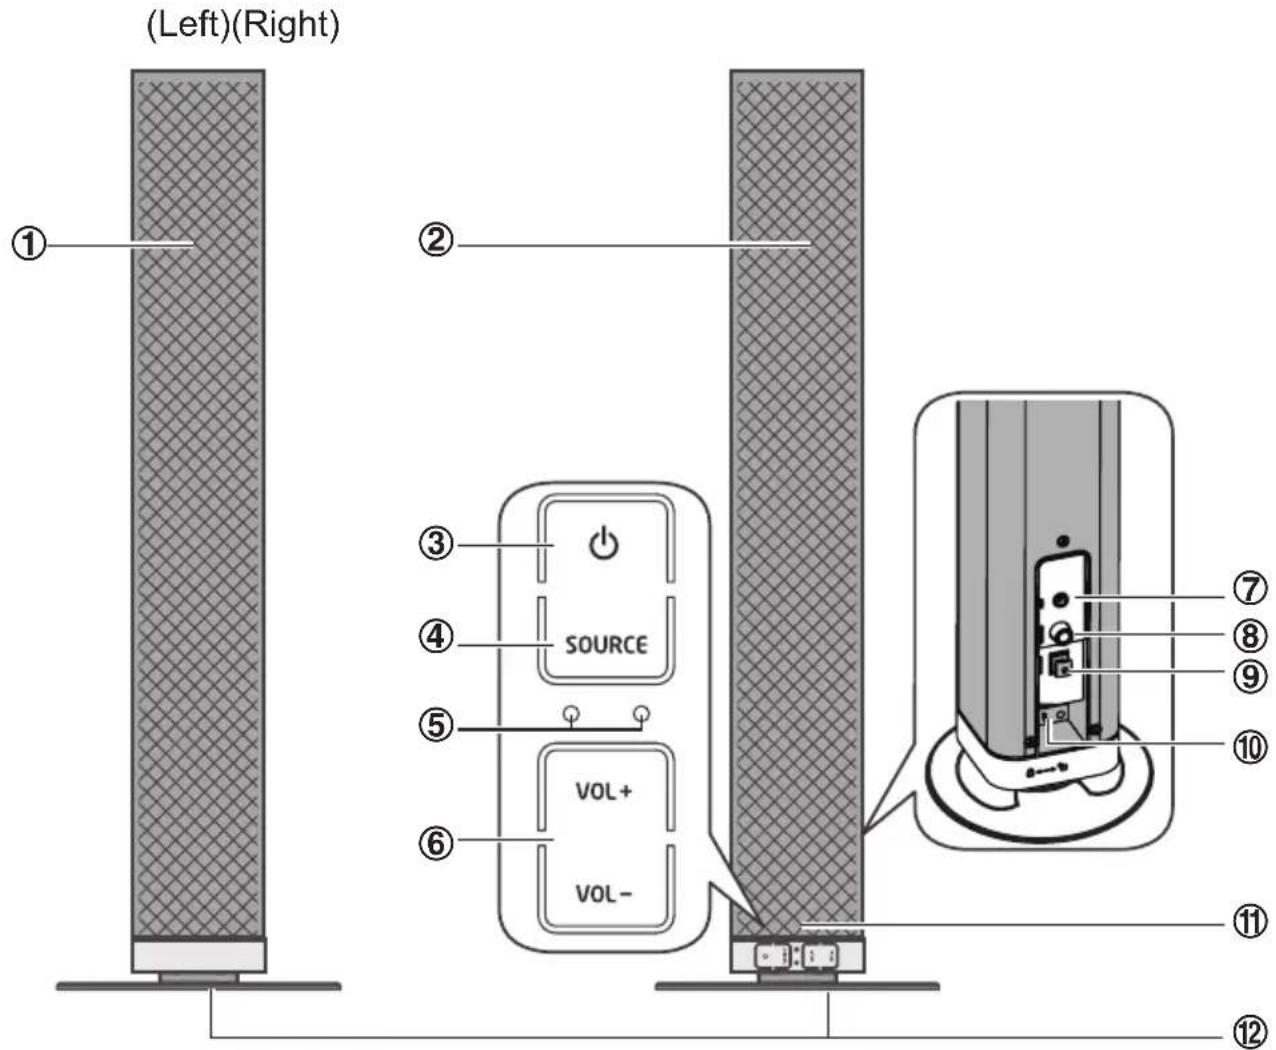
1 Left Speaker
2 Right Speaker
3
Switch the unit between on and Standby mode.
4 SOURCE
Select the play function.
5 LED Indicators
• Red indicator: In STANDBY mode.
• Green indicator lights up: In AUX mode
- Orange indicator: In OPTICAL mode.
• Orange indicator flashes: In COAXIAL mode
- Blue indicator: In Bluetooth mode.
6 VOL+/VOL-
Increase/decrease the volume level.
7 AUX Socket
Connect to an external audio device.
8 OPTICAL Socket
9 COAXIAL Socket
10 AC\~Socket
11 Remote Control Sensor
12 Stand (Left / Right)
Wireless Subwoofer
1 AC\~ Power Cord Connect to power.
2 PAIR button Pair with the main unit.
3 PAIR Indicator Pair indicator lights up when the pairing succeeds
4 Speaker
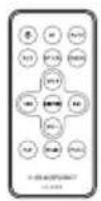
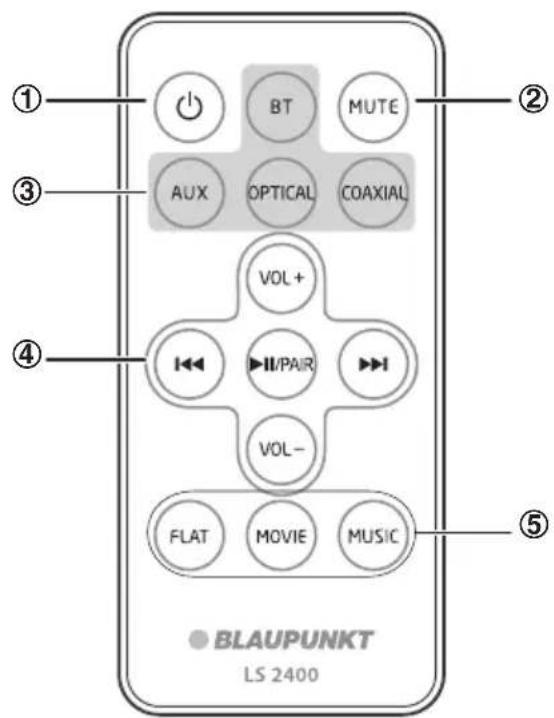
Remote Control
1 ⏻
Switch the unit between ON and STANDBY mode.
2 MUTE
Mute or resume the sound.
3 SOURCE buttons
Select the play function.
4 ◀◀◀/▶▶▶
In Bluetooth mode, skip to previous/next audio file.
▶ II/PAIR
In Bluetooth mode, start or pause playback.
Press and hold to activate the pairing function in Bluetooth mode and disconnect the existing paired Bluetooth device.
VOL+/VOL-
Increase/decrease the volume level.
5 EQ buttons
Select a preset sound effect.
Preparations
Prepare the Remote Control
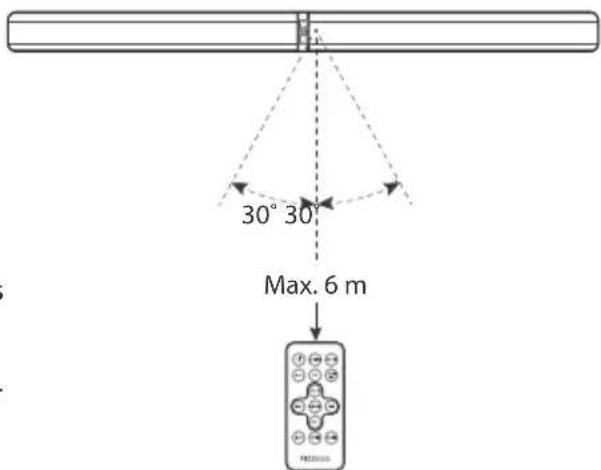
The provided Remote Control allows the unit to be operated from a distance.
• Even if the Remote Control is operated within the effective range (6m), remote control operation may be impossible if there are any obstacles between the unit and the remote control.
- If the Remote Control is operated near other products which generate infrared rays, or if other remote control devices using infra-red rays are used near the unit, it may operate incorrectly. Conversely, the other products may operate incorrectly.
First-time use:
The unit has a pre-installed lithium CR2025 battery. Remove the protective tab to activate the remote control battery.
Replace the Remote Control Battery
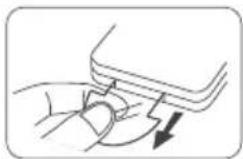
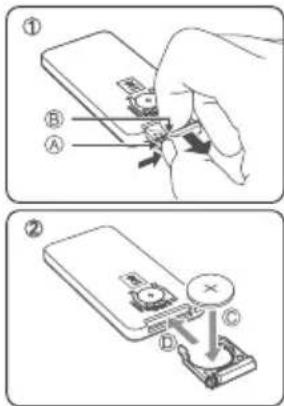
- Pull out the battery tray and remove the old battery.
- Place a new CR2025 battery into the battery tray with correct polarity (+/-) as indicated.
- Insert the battery tray back into the slot.
Precautions Concerning Batteries
- When the Remote Control is not to be used for a long time (more than a
month), remove the battery from the Remote Control to prevent it from leaking. - If the batteries leak, wipe away the leakage inside the battery compartment and replace the batteries with new ones.
- Do not use any batteries other than those specified.
- Do not heat or disassemble batteries.
Never throw them in fire or water. - Do not carry or store batteries with other metallic objects. Doing so could cause batteries to short circuit, leak or explode.
- Never recharge a battery unless it is confirmed to be a rechargeable type.
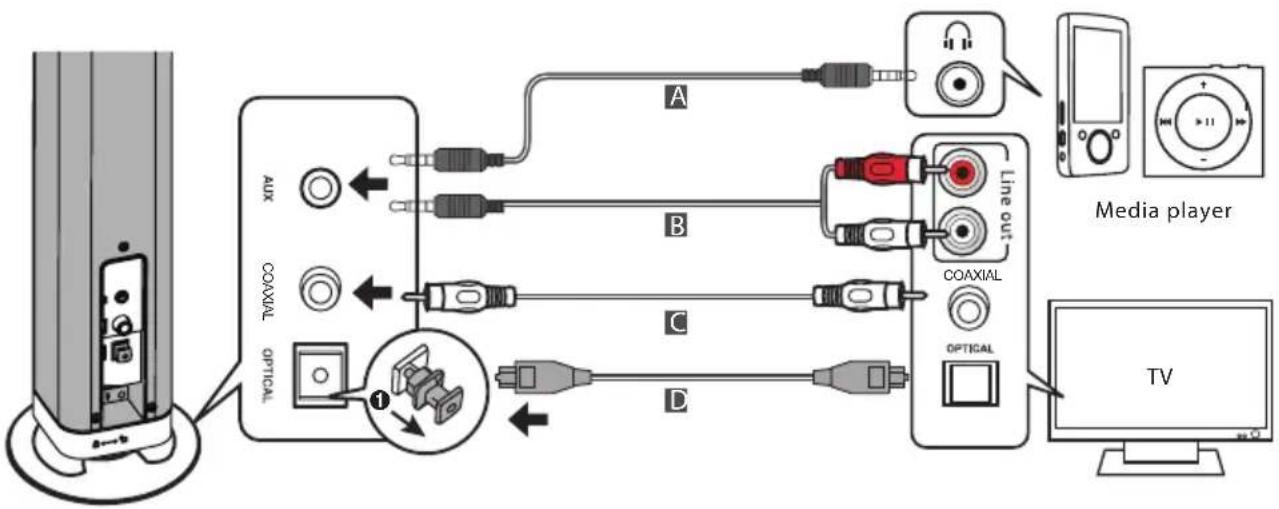
Connections
flowchart
graph TD
    A["TV"] -->|A| B["Line out"]
    A -->|B| C["COAXIAL"]
    A -->|C| D["OPTICAL"]
    A -->|D| E["TV"]
    B --> F["Radio"]
    C --> G["Audio"]
    D --> H["Analog"]
    E --> I["Computer"]
Use the AUX Socket
A. Use a 3.5mm to 3.5mm audio cable (included) to connect the TV's headphone socket to the AUX socket on the unit.
B. Use a RCA to 3.5mm audio cable (not included) to connect the TV's audio output sockets to the AUX socket on the unit.
Use the COAXIALSocket
C. Use a Coaxial cable (not included) to connect the TV's COAXIAL OUT socket to the COAXIAL socket on the unit.
Use the OPTICAL Socket
D. Remove the protective cap of the OPTICAL socket, then connect an Optical cable (not included) to the TV's OPTICAL OUT socket and the OPTICAL socket on the unit.
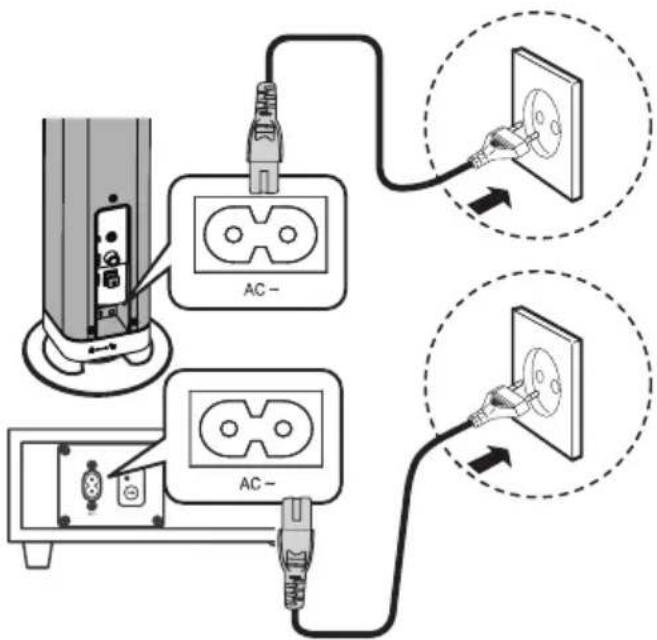
Connect to Power
- Before connecting the AC power cord, ensure you have completed all other connections.
- Risk of product damage! Ensure that the power supply voltage corresponds to the voltage printed on the back or the underside of the unit.
- Connect the mains cable to the AC\~ Socket of the unit and then into a mains socket.
- Connect the mains cable to the AC\~ Socket of the subwoofer and then into a mains socket.
- Ensure all connections are connected before connecting to the mains power socket.
Pairing the Wireless Subwoofer with the Main Unit
- Automatic pairing
The subwoofer and soundbar will automatically pair when both units are plugged into the mains sockets and turned on. No cable is needed for connecting the two units.
- When the subwoofer is pairing with the main unit, the Pair Indicator will flash fast.
- When the subwoofer is paired with the main unit, the Pair Indicator will light up.
NOTE:
- Do not press the Pair button on the rear of the subwoofer, except for manual pairing.
- If the automatic pairing fails, pair the subwoofer with the main unit manually.
- Manual pairing
- Ensure that all the cables are well connected and the main unit is in Standby mode.
- Press and hold the Pair button on the rear of the subwoofer for a few seconds. The subwoofer will enter the pairing mode and the Pair Indicator will blink quickly.
- Press ⏻ the button on the main unit or on the remote control to switch the main unit on.
- After the wireless connection succeeded, the Pair Indicator will light up.
- If the Pair indicator blinks, the wireless connection has failed. Unplug the cable of the subwoofer and then reconnect the main cable after 3 minutes. Repeat step 1 \~ 4.
NOTE:
- If the wireless connection fails again, check if there is conflict or strong interference (for example, interference from an electronic device) around your location. Remove these conflicts or strong interferences and repeat the above procedures.
- The subwoofer should be within 6m of the soundbar in an open area.
- If a TV or an external device is connected, the main unit only AUX model and the subwoofer will switch on automatically when the TV or the external device is switched on.
- If the main unit is not connected with the subwoofer and it is in On mode, the POWER Indicator will flash. Follow step 1 \~ 4 above to pair the subwoofer to the main unit.
General Operation
Standby/ON
When you first connect the main unit to the mains socket, the main unit will be in Standby mode.
- Press the button on the unit or on the remote control to switch the unit ON.
- Press the ⏻ button again on the remote control or on the unit to switch the unit back to STANDBY mode. The POWER indicator will light up red.
- Disconnect the mains plug from the mains socket if you want to switch the unit OFF completely.
- The eco-friendly technology will switch this device to Standby mode automatically when the input volume is too low or muted for 15 minutes. The device can be reactivated by pressing Standby button and turning up the input device volume. Except for Optical & HDMI mode, the eco-friendly control will switch the device to standby mode automatically when there is no input signal for 15 minutes.
Select Modes
Press the SOURCE button repeatedly on the unit or press the HDMI (ARC), AUX, OPTICAL, BT (Bluetooth) buttons on the remote control to select the desired mode.
- In AUX mode: the status indicator lights up Green.
- In OPTICAL mode: the status indicator lights up Orange.
- In COAXIAL mode: the status indicator lights up Orange flashes.
- In Bluetooth mode: the status indicator lights up Blue.
Adjust the Volume
- Press the VOL+ / VOL- buttons on the unit or on the remote control to adjust the volume.
- If you wish to turn the sound off, press the MUTE button on the remote control. Press this button again or press the VOL+ / VOL- buttons on the unit or on the remote control to resume normal listening.
- While adjusting the volume, the status indicator flashes quickly.
- While the volume level reaches its maximum level, if you press the VOL+ button again, the status indicator flashes once. While the volume level reaches its minimum level, if you press the VOL-button again, the status indicator flashes once.
Select a Preset Sound Effect
- While playing, press the FLAT, MOVIE and MUSIC button on the remote control to select desired preset equalizers: MOVIE (recommended for viewing movies), MUSIC (recommended for listening to music), FLAT (EQ mode off).
- While select a preset sound effect, the status indicator flashes quickly.
• While using the OPTICA/AUX/COAXIAL connection, MOVIE EQ will be automatically selected. - While using the BLUETOOTH operation, MUSIC EQ will be automatically selected.
AUX / OPTICAL / COAXIAL Operation
1 Ensure that the unit is connected to the TV or audio device.
2 While in ON mode, press the SOURCE button repeatedly on the unit or press the COAXIAL, AUX, OPTICAL buttons on the remote control to select the desired mode.
3 Operate your audio device directly for playback features.
4 Press the VOL +/- button to adjust the volume to your desired level.
Tip:
- Make sure the audio setting of your source player (e.g. DVD player, game player, TV) is change to "PCM" with the optical and coaxial output.
Bluetooth Operation
You can listen to tracks from a media device if connected to the unit via Bluetooth.
Pair Bluetooth-enabled Devices
The first time you connect your bluetooth device to this player, you need to pair your device to this player.
Note:
- The operational range between this player and a Bluetooth device is approximately 8 meters (without any object between the Bluetooth device and the unit).
- Before you connect a Bluetooth device to this unit, ensure you know the device's capabilities.
- Compatibility with all Bluetooth devices is not guaranteed.
- Any obstacle between this unit and a Bluetooth device can reduce the operational range.
- If the signal strength is weak, your Bluetooth receiver may disconnect, but it will re-enter pairing mode automatically.
1 During ON mode, press the SOURCE button repeatedly on the unit or press the BT (Bluetooth) button on the remote control to select Bluetooth mode. The Blue indicator will flash slowly.
2 The system has entered pairing mode.
- Or press and hold the ▶II/PAIR button on the remote control to be searchable. You will hear "PAIRING" from the unit and the Blue indicator will flash fast.
3 Activate your Bluetooth device and select the search mode. "Blaupunkt LS 2400" will appear on your Bluetooth device list.
4 Select "Blaupunkt LS 2400" in the pairing list. After the "Paired" voice prompt, the system is successfully connected and the Blue indicator will light up solidly.
- To disconnect the Bluetooth function, switch to another function on the unit or disable the function from your Bluetooth device.
Tips:
1 Enter "0000" for the password if necessary.
2 If there is an existing connection, press and hold the ▶II/PAIR button on the remote control to re-activate the pairing mode, the connection will be interrupted. You will hear "Disconnected" from the unit and the Blue indicator will flash slowly.
3 If no other Bluetooth device pairs with this player within two minutes, the player will recover its previous connection.
4 The player will also be disconnected when your device is moved beyond the operational range.
5 If you want to reconnect your device to this player, place it within the operational range.
6 If the device is moved beyond the operational range, when it is brought back, please check if the device is still connected to the player.
7 If the connection is lost, follow the instructions above to pair your device to the player again.
Listen to Music from Bluetooth Device
- If the connected Bluetooth device supports Advanced Audio Distribution Profile (A2DP), you can listen to the music stored on the device through the player.
-
If the device also supports Audio Video Remote Control Profile (AVRCP), you can use the player's remote control to play music stored on the device.
-
Pair your device with the player.
- Play music via your device (if it supports A2DP).
- Use supplied remote control to control play (if it supports AVRCP).
- To pause/resume play, press the ▶ II/PAIR button on the remote control.
- To skip to a track, press the ◀◀◀,▶▶▶I buttons on the remote control.
Troubleshooting
To keep the warranty valid, never try to repair the system yourself. If you encounter problems when using this unit, check the following points before requesting service.
- No power
- Ensure that the AC cord of the apparatus is properly connected.
- Ensure that there is power at the AC outlet.
- Press standby button to turn the unit on.
- Remote control does not work
- Before you press any playback control button, first select the correct source.
- Reduce the distance between the remote control and the unit.
- Insert the battery with its polarities (+/-) aligned as indicated.
- Replace the battery.
- Aim the remote control directly at the sensor on the front of the unit.
• No response from the unit
- Disconnect and reconnect the AC power plug, then turn the unit on again.
- I can't find the Bluetooth name of this unit on my Bluetooth device for Bluetooth pairing
- Ensure the Bluetooth function is activated on your Bluetooth device.
- Ensure you have paired the unit with your Bluetooth device.
Specifications
Soundbar
Power Supply AC 220-240V\~ 50/60Hz
Power consumption of standby mode ....../< 0.5W
Output Power 20W x 2
Power Consumption 30W
Frequency Response 200Hz - 20KHz
Audio input sensitivity (AUX) 700mV
Dimension:
Horizontal installing (L x W x H)....906 x 60 x 60mm
Stand installing (L x W x H)....128 x 128 x 467mm
Speakers Impedance 8Ω x 2
Subwoofer
Power Supply....AC 220-240V\~ 50/60Hz
Output Power 30W
Power Consumption 30W
Frequency Response 40Hz - 200Hz
Impedance.... 4Ω
Dimension (W x H x D) 465 x 255 x 95mm
Remote Control
Distance....6m
Angle 30°

- BLAUPUNKT
- Inhalt
- Important Safety Instructions 2
- What's in the Box 4
- Placement and Mounting....5
- Identifying the Parts 8
- Preparations 10
- Connections....11
- Pairing the Wireless Subwoofer with the Main Unit....12
- General Operation 12
- AUX / OPTICAL / COAXIAL Operation....13
- Bluetooth Operation....14
- Troubleshooting....15
- Specifications 16
- Important Safety Instructions
- CAUTION
- Safety
- Caution:
- Warning
- DO NOT INGEST BATTERY, CHEMICAL BURN HAZARD
- WEEE & Statement for product with Battery
- What's in the Box
- Placement and Mounting
- Placement
- Stand Mounting (if using option-A)
- Horizontal Mounting
- Installing the Rubber Feet (if using option-B)
- Note:
- Wall Mounting (if using option-C)
- Identifying the Parts
- Wireless Subwoofer
- Remote Control
- Preparations
- Prepare the Remote Control
- First-time use:
- Replace the Remote Control Battery
- Precautions Concerning Batteries
- Connections
- Use the AUX Socket
- Use the COAXIALSocket
- Use the OPTICAL Socket
- Connect to Power
- Pairing the Wireless Subwoofer with the Main Unit
- - Automatic pairing
- - Manual pairing
- General Operation
- Standby/ON
- Select Modes
- Adjust the Volume
- Select a Preset Sound Effect
- AUX / OPTICAL / COAXIAL Operation
- Tip:
- Bluetooth Operation
- Pair Bluetooth-enabled Devices
- Tips:
- Listen to Music from Bluetooth Device
- Troubleshooting
- - No power
- - Remote control does not work
- • No response from the unit
- - I can't find the Bluetooth name of this unit on my Bluetooth device for Bluetooth pairing
- Specifications
- Soundbar
- Subwoofer
Brand : BLAUPUNKT
Model : LS 2400
Category : Hi-Fi System