
Washington 100 - Hi-Fi System BLAUPUNKT - Free user manual and instructions
Find the device manual for free Washington 100 BLAUPUNKT in PDF.
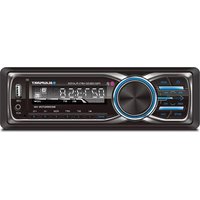


| Product Type | Hi-Fi System |
| Brand | Blaupunkt |
| Model | Washington 100 |
| Color | Black |
| Power Output | 2 x 50W RMS |
| FM Tuner | Yes, with 30 presets |
| CD Player | Yes, compatible with CD, CD-R, CD-RW |
| USB Port | Yes, for MP3 playback |
| AUX Input | Yes, 3.5mm jack |
| Bluetooth | Yes, version 5.0 |
| Dimensions (W x H x D) | 430 x 140 x 300 mm |
| Weight | 8.5 kg |
| Power Supply | AC 230V, 50Hz |
| Power Consumption | 90W (maximum) |
| Standby Power | Less than 1W |
| Speaker Output | 2-way speakers included (8 ohms) |
| Remote Control | Yes, included |
| Warranty | 2 years |
| Maintenance | Clean with a dry cloth; avoid liquids |
| Safety | Do not expose to water or moisture |
Frequently Asked Questions - Washington 100 BLAUPUNKT
User questions about Washington 100 BLAUPUNKT
0 question about this device. Answer the ones you know or ask your own.
Ask a new question about this device
Download the instructions for your Hi-Fi System in PDF format for free! Find your manual Washington 100 - BLAUPUNKT and take your electronic device back in hand. On this page are published all the documents necessary for the use of your device. Washington 100 by BLAUPUNKT.
USER MANUAL Washington 100 BLAUPUNKT
5/6. Track Skip/ Search Forward/ Backward, Browse Radio Station
-
Preset Station 1\~6 for Radio and Play/ pause Function for MP3/WMA
-
Intro Function for MP3/WMA
-
Repeat Function for MP3/WMA
-
Random Playback Funtion for MP3/WMA
-
Go back 10 for Long List and Menus in SD/USB Mode
-
Skip Ahead 10 for Long List and Menus in SD/USB Mode
-
SD Card Slot
-
Aux In Po
-
USB Port
-
LCD Display
-
Volume/ Select Control
-
FO Button
-
Cilk Batten
Please read this instruction manual carefully and familiarize yourself with your new Stereo Reciever before using it for the first time. Please keep this manual for future reference.
FEATURES
The Unit Features FM Stereo with USB & SD/MMC Ports and:
• Electronic PII Tuning Control With 18 Programmable Stations
• MP3/WMA Compatible
- Preamplified Line-out
• From Audio Aux-in
• USB Port and SD/MMC Input
- Last Track Memory ( Radio & SD/ MMC & USB)
KEY FUNCTIONS
- POWER ON/OFF
Press shortly to turn ON. Press for three seconds to turn the unit OFF.
MODE-FUNCTION SELECTOR
Press to cycle through different playblack modes in the following sequence: RADIO/USP/SD/ALIX IN
AUTO SEEK SEARCH TUNNING (AMS)
In radio mode press to seek radio station automatically, press and hold to
automatically save the station
- BAND BUTTON
In radio mode press to cycle through different FM bands. (FM1-FM2-FM3)
- MP3/USD/SP
In Mr. S/USB/ SD, Mike mode press to go to desired truck. In Radio mode press to go to the desired station.
1/▶ BUTTOM
In Radio mode press to go to preset station #1. In USB/ SD/ MMC mode to
press to start music playback
During playback press again to pause playback. Press again to resume play. 8. 2/INT BUTTON
Pressing this key will playback a snippet of each thack. Press again to stop snippet and listen to the full track. While this mode is activated "INT" will be displayed.
In Radio mode press to play preset station #2.
9.3/ RPT BUTTON
Press this key will activate Repeat mode. They current track will be
continually repeated until repeat is deactivated. When this mode is
activated RPT will appear.
In Radio mode press to play preset station #3
0.4/RDM BUTTON
Pressing this key will activate Random playback mode. When this mode
is activated RDM will appear.
In Radio mode press to play preset station #4
1.5/-10 BUTTON
In playback mode, short press to -10, long press to choose a folder.
12.6/+10 BUTTON
In playback mode, short press to +10, long press to choose a folder.
- SD CARD SLOT
Insert the SD/MMC card is the slot. Select SD with the mode selector.
Audio will begin playback aomatically.
- AUX IN PORT
Connect your external device to the AUX Port via an auxiliary cable.
Audio will now be played through the car speakers.
15 USB PORT
Connect your external device via USB (not included) to playback audio
if an AUX port is not available.
- LCD DISPLAY
The LCD Display will show relevant information about the current function
that is being performed.
- VOLUME / SELECT CONTROL
Rotating the volume knob will control the volume. You can also select
funtions by scrolling to them using the volume knob and pressing down.
Pressing down will also give you options to change BASS. TREBLE.
BALANCE, FEDER, LOUD and EO settings
- MUTE BUTTON
Push the mute button to mute all audio.
- FO BUTTON
EO: FLAT/ POP/ CLASS/ ROCK
- CLK BUTTON
Press to change clock setting.
WARNING
Use the specified amperage fuse for each lead. Using a higher amperage fuse may cause serious damage.
SPECIFICATIONS
FM TUNER
Frequency Range
87.5\~107.9 MHz
Sensitivity LE Freque
12 dB μv 10.7 MHz
Frequency Response
40Hz \~15Hz (±3dB)
Stereo Separation
28dB
S/N Ratio
50dB
GENERAL
Power Supply Voltage Max Current Consump
12V DC, Negative Ground
Max Current Consumption Max Output Power
4x10W
(20W RMS)
Note: Specifications and the design are subject to possible modification without notice due to improvement.

-
Power
-
Vol-
-
Mode (switch for FM1-FM2-FM3)
-
Clock Display
-
Mute
-
No.1(Auto Memory Store)
-
Band (switch for FM1-FM2-FM3)
& play/ pause
-
vol+
-
No.2 & Intro (WMA/MP3)
-
AMS
-
P
-
No.3 & Repeat (RFT) 16. No. 10. ReLUO (RMB)
B. Sol /
-
No. 5 & -10 /WMA (MP3) & track Skip
-
Next
-
No. 6 & +10 (WMA/MP3) & track Skip
-
EQ Control
INSTALLATION
Remove the stereo carefully from the box. Keep the box for unit warranty and service.
PRECAUTIONS
- Choose the mounting location carefully so that the unit will not
interfere with the normal driving functions of the driver
- Avoid installing the unit where it can be subjected to high temperatures
from direct sunlight of hot dirt or excessive vibrations
• Use only the supplied mounting hardware for a sale and
secure installation.
MOUNTING ANGLE ADJUSTMENT
Adjust the mounting angle as desired
MOUNTIG EXAMPLE
Dashboard Installation

Note: Keep the release Key in a safe place as you may need it in future to remove the unit form the car.
WIRING DIAGRAMREMOTE CONTROL GUIDE
![graph TD A["Operating Voltage: 12V DC"] --> B["Frequency Range: FM 87.5-107.9MHz"] B --> C["Blue: Power Antenna"] B --> D["Front Left Speaker"] B --> E["Rear Left Speaker"] C --> F["White: White Input Connector"] C --> G["Red: Red Right Audio Out"] D --> H["Black: Ground (B-)"] D --> I["Yellow: Memo…](/content/2026/07/1508093/images/0a01a26edd604f08a5b6997f0aa08eead07c7dab7e245c06ae9f2b6f1a8c375c.jpg)
MAINTENANCE
Fuse Replacement
If the fuse blows, Check the power connection and replace the fuse. If the fuse blows again after the replacement, there may be an internal malfunction. In this case, consult your nearest technician.
NOTE: This equipment has been tested and found to comply with the limits for a Class B digital device, pursuant to Part 15 of the FCC Rules. These limit are designed to provide reasonable protection harmful interference in a residential installation. The equipment generates, uses and can radiate radio frequency energy and, if not installed and used in accordance with the instructions, maybe cause harmful interference to radio communications. However, there is not guarantee that interference will not occur in a particular installation. If this equipment does cause harmful interference to radio or television reception, which can be determined by turning the equipment off and on, the user is encourage to try to correct the interference by one or more of the following
measures:
-Reorient or relocate the receiving antenna.
-Increase the distance between the equipment and receiver
-Connect the equipment into an outlet on a circuit different from that to which the receiver is connected.
-Consult the dealer or
- 2017年1月1日


Brand : BLAUPUNKT
Model : Washington 100
Category : Hi-Fi System